系列电子书:传送门
协程构建器
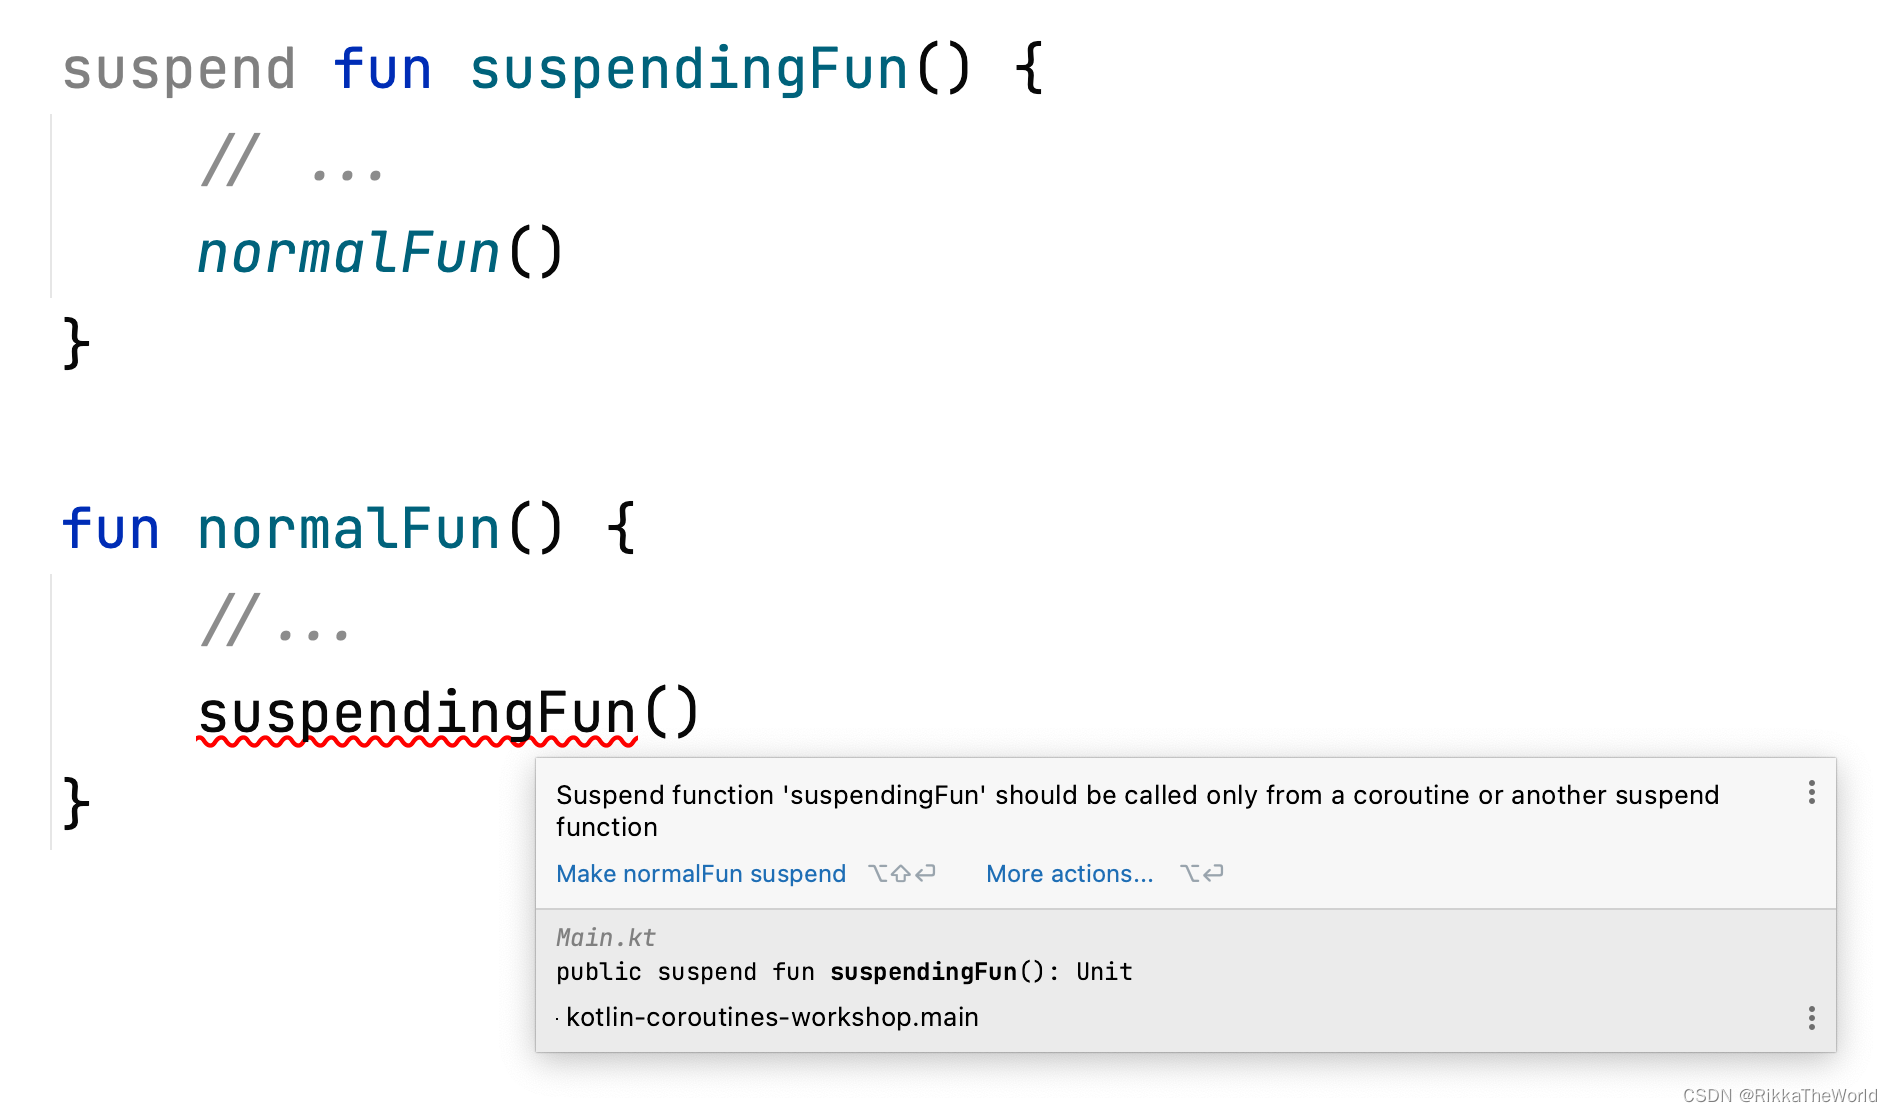
挂起函数需要相互传递 continuation。它们调用普通函数没有任何问题,但是普通函数不能调用挂起函数。
每个挂起函数都需要由另一个挂起函数调用,而另一个挂起函数又由另一个挂起函数调用,以此类推。但这一切都要从某个地方开始。这个地方就是协程构建器,它是连接正常世界和挂起世界的桥梁。
我们将探讨 kotlinx.continues 库提供的三个基本协程构建器:
launchrunBlockingasync
每种方法都有其用例,让我们来逐一了解。
launch
launch 工作的方式在概念上类似于启动一个新线程(thread 函数)。我们只需启动一个协程,它就会独立运行,就像向空中发射的烟花。下面就是我们如何使用 launch 来启动一个协程:
fun main() {
    GlobalScope.launch {
        delay(1000L)
        println("World!")
    }
    GlobalScope.launch {
        delay(1000L)
        println("World!")
    }
    GlobalScope.launch {
        delay(1000L)
        println("World!")
    }
    println("Hello,")
    Thread.sleep(2000L)
}
// Hello,
// (1 sec)
// World!
// World!
// World!
launch 函数是 CoroutineScope 接口上的一个扩展函数。它是一个被称为结构化并发机制的重要部分,其目的是在父协程和子协程之间建立关系。在本章的后面,我们将学习结构化并发,但现在我们将通过在 GlobalScope 对象上调用 launch (之后是 async)来避免这个概念。这并不是一个标准的实现,因为我们在实际项目中很少使用 GlobalScrope。
你可能已经注意到的另一件事情:在 main 函数的末尾,我们需要调用 Thread.sleep ,如果不这样做,该函数将会在启动协程后立即结束,因此它们将没有机会完成它们的工作。这是因为 delay 不会阻塞线程:它只是挂起一个协程。你们还记得挂起是如何工作的么? delay 只是设置一个计时器,并挂起一个协程,在一段时间后恢复。如果线程没有被阻塞,那么没有什么事情是繁忙的,那就没有什么事情阻止程序完成(稍后我们将看到,如果我们使用结构化并发,就没有要调用 Thread.sleep)。
在某种程度上, launch 的工作原理类似 daemon 线程,但是它要廉价的多。维护一个阻塞的线程总是很昂贵的,而维护一个挂起的协程几乎是无成本的(正如前面介绍底层运作的章节中解释的那样)。它们都独立的启动了一些任务,并且需要一些东西来防止程序在它们完成之前结束(在下面例子中,是 Thread.sleep(2000L)):
fun main() {
    thread(isDaemon = true) {
        Thread.sleep(1000L)
        println("World!")
    }
    thread(isDaemon = true) {
        Thread.sleep(1000L)
        println("World!")
    }
    thread(isDaemon = true) {
        Thread.sleep(1000L)
        println("World!")
    }
    println("Hello,")
    Thread.sleep(2000L)
}
runBlocking
一般规则下协程不应该阻塞线程,而应该挂起它们,但另一方面,在某些情况下阻塞却是必要的。与 main 函数一样,我们需要阻塞线程,否则程序将过早的结束。对于这种情况,我们可以使用 runBlocking。
runBlocking 是一个特殊的协程构建器。当它的协程被挂起时(类似于挂起 main),它会阻塞它已经启动的线程。这意味着 runBlocking 内部的 delay(1000L) 将表现的像 Thread.sleep(1000L) 一样。
fun main() {
    runBlocking {
        delay(1000L)
        println("World!")
    }
    runBlocking {
        delay(1000L)
        println("World!")
    }
    runBlocking {
        delay(1000L)
        println("World!")
    }
    println("Hello,")
}
// (1 sec)
// World!
// (1 sec)
// World!
// (1 sec)
// World!
// Hello,
fun main() {
    Thread.sleep(1000L)
    println("World!")
    Thread.sleep(1000L)
    println("World!")
    Thread.sleep(1000L)
    println("World!")
    println("Hello,")
}
// (1 sec)
// World!
// (1 sec)
// World!
// (1 sec)
// World!
// Hello,
实际上有几个使用 runBlocking 的特定场景,第一个是 main 函数,我们需要阻塞线程,否则程序将结束。另一个常见用例是单元测试,由于同样的原因,我们需要阻塞线程。
fun main() = runBlocking {
    // ...
}

class MyTests {
    @Test
    fun `a test`() = runBlocking {
    }
}
在我们的例子中,我们可以使用 runBlocking 将 Thread.sleep(200) 替换为 delay(2000)。稍后我们将看到,一旦引入结构化并发,它将会变得更加有用。
fun main() = runBlocking {
    GlobalScope.launch {
        delay(1000L)
        println("World!")
    }
    GlobalScope.launch {
        delay(1000L)
        println("World!")
    }
    GlobalScope.launch {
        delay(1000L)
        println("World!")
    }
    println("Hello,")
    delay(2000L) // still needed
}
// Hello,
// (1 sec)
// World!
// World!
// World!
runBlocking 曾经是一个重要的构建器,但是在现代编程中很少使用它。在单元测试中,我们经常使用它的接班人 runTest,它使协程在虚拟时间内运行(这是一个非常有用的测试特性,我们将在协程测试一章中描述)。对于main函数,我们经常将其挂起(用 suspend 修饰),挂起 main 函数很方便,但现在之后我们将会使用 runBlocking 来运行它。
async
asynce 协程构建器类似于 launch,但它的设计目的是去产生一个值。这个值需要由 lambda 表达式来返回。 async 函数返回一个 Deferred<T> 类型的对象,其中 T 是生成值的类型。 Deferred 有一个挂起方法 await,当它准备好时会返回这个值。在下面的例子中,生成的值是42,它的类型是 Int,因此 async 返回 Deferred<Int> 类型, await 函数返回42的 Int 值。
fun main() = runBlocking {
    val resultDeferred: Deferred<Int> = GlobalScope.async {
        delay(1000L)
        42
    }
    // do other stuff...
    val result: Int = resultDeferred.await() // (1 sec)
    println(result) // 42
    // or just
    println(resultDeferred.await()) // 42
}
就像 launch 构建器一样,async 在被调用时,立马启动协程。因此,它是一种一次启动多个任务,然后等待所有结果的方法。返回的 Deferred 会将生成后的值将存储在自身内部,因此值一旦准备好了,它将立即从 await 返回。但是,如果在值产生之前调用 await,则该函数会被挂起,直到值准备好。
fun main() = runBlocking {
    val res1 = GlobalScope.async {
        delay(1000L)
        "Text 1"
    }
    val res2 = GlobalScope.async {
        delay(3000L)
        "Text 2"
    }
    val res3 = GlobalScope.async {
        delay(2000L)
        "Text 3"
    }
    println(res1.await())
    println(res2.await())
    println(res3.await())
}
// (1 sec)
// Text 1
// (2 sec)
// Text 2
// Text 3
async 构建器的工作方式与 launch 非常相似,但它对返回值有额外的支持。如果所有 launch 函数都用 async 来替代,代码仍然可以正常工作。但是请不要这样做! async 使用来生成值的,所以如果我们不需要值,我们仍应该使用 launch。
fun main() = runBlocking {
    // 不要这么做
    GlobalScope.async {
        delay(1000L)
        println("World!")
    }
    println("Hello,")
    delay(2000L)
}
// Hello,
// (1 sec)
// World!
async 构建器通常用于并行两个任务,例如从两个不同的地方获取数据,并将它们组合在一起。
scope.launch {
    val news = async {
        newsRepo.getNews()
            .sortedByDescending { it.date }
    }
    val newsSummary = newsRepo.getNewsSummary()
    view.showNews(
        newsSummary,
        news.await()
    )
}
结构化并发
如果一个协程在 GlobalScope 上启动,程序不会等待它。如上所述,协程不会阻塞任何线程,也不会阻止程序结束,这就是为什么在下面这个例子中,如果我们想要看到 runBlocking 打印出 “World!”,需要在末尾调用额外的 delay 函数。
fun main() = runBlocking {
    GlobalScope.launch {
        delay(1000L)
        println("World!")
    }
    GlobalScope.launch {
        delay(2000L)
        println("World!")
    }
    println("Hello,")
    // delay(3000L)
}
// Hello,
我们为什么需要在开始的地方使用 GlobalScope?这是因为 launch 和 async 都是 CoroutineScope 上的扩展函数。但是,如果你查看这些函数和 runBlocking 的定义,你将看到 block 参数是一个函数类型,其接收类型都是 CoroutineScope。
fun <T> runBlocking(
    context: CoroutineContext = EmptyCoroutineContext,
    block: suspend CoroutineScope.() -> T
): T

fun CoroutineScope.launch(
    context: CoroutineContext = EmptyCoroutineContext,
    start: CoroutineStart = CoroutineStart.DEFAULT,
    block: suspend CoroutineScope.() -> Unit
): Job

fun <T> CoroutineScope.async(
    context: CoroutineContext = EmptyCoroutineContext,
    start: CoroutineStart = CoroutineStart.DEFAULT,
    block: suspend CoroutineScope.() -> T
): Deferred<T>
这意味着我们可以摆脱 GlobalScope,作为替代,可以用 runBlocking 提供的接收器来调用 launch,使用 this.launch 或者简化的 launch。因此, launch 将成为 runBlocking 的子协程。正如父子关系那样,父协程的责任是等待所有的子协程,因此 runBlocking 将会挂起,直到所有的子协程完成:
fun main() = runBlocking {
    this.launch { // 和 launch 一样
        delay(1000L)
        println("World!")
    }
    launch { 和 this.launch 一样
        delay(2000L)
        println("World!")
    }
    println("Hello,")
}
// Hello,
// (1 sec)
// World!
// (1 sec)
// World!
父协程为其子协程务提供一个作用域,它们都在该作用域中被调用。这构成了一种被称为结构化并发的关系。下面是父子关系的最重要影响:
- 子协程从父协程继承上下文(但它们也可以重写它,这将在协程上下文一章中解释)
- 父协程挂起,直到所有子协程都完成(这将在任务和子任务等待章节中解释)
- 当父协程被取消时,其所有子协程也会被取消(这将在取消章节中解释)
- 当子协程发生错误时,它也会销毁父协程(这将在异常章节中解释)
注意,与其他协程构建器不同,runBlocking 不是 CoroutineScope 上的扩展函数。这意味着它不能作为子协程:它只能用作根协程(层次结构中所有子协程的父协程)。这意味着 runBlocking 将不同于其他协程的情况。正如我们之前提到的,这与其它构建器非常不同。
更多示例
挂起函数需要从其他挂起函数调用。这一切都需要从一个协程构建器开始。除了 runBlocking,构建器需要在 CoroutineScope 上启动,在我们的简单示例中, runBlocking 提供了作用域,但在更大的应用程序中,作用域是由我们(我会在构建协程作用域章节中阐述)或者我们所使用的的框架(比如 Ktor 或 Android KTX 或 Android)来提供。一旦第一个构建器在一个作用域上启动,其他构建器就可以在第一个构建器的作用域上启动,依次类推,这就是我们应用程序的本质结构。
下面是一些在现实项目中如何使用协程的例子。前两个是后端和 Android 的经典用法。 MainPresenter 是Android 的典型用法。 UserController 则是后端的典型用法。
class NetworkUserRepository(
    private val api: UserApi,
) : UserRepository {
    suspend fun getUser(): User = api.getUser().toDomainUser()
}

class NetworkNewsRepository(
    private val api: NewsApi,
    private val settings: SettingsRepository,
) : NewsRepository {
    suspend fun getNews(): List<News> = api.getNews()
        .map { it.toDomainNews() }

    suspend fun getNewsSummary(): List<News> {
        val type = settings.getNewsSummaryType()
        return api.getNewsSummary(type)
    }
}

class MainPresenter(
    private val view: MainView,
    private val userRepo: UserRepository,
    private val newsRepo: NewsRepository
) : BasePresenter {

    fun onCreate() {
        scope.launch {
            val user = userRepo.getUser()
            view.showUserData(user)
        }
        scope.launch {
            val news = async {
                newsRepo.getNews()
                    .sortedByDescending { it.date }
                }
            val newsSummary = async {
                newsRepo.getNewsSummary()
            }
            view.showNews(newsSummary.await(), news.await())
        }
    }
}

@Controller
class UserController(
    private val tokenService: TokenService,
    private val userService: UserService,
) {
    @GetMapping("/me")
    suspend fun findUser(
        @PathVariable userId: String,
        @RequestHeader("Authorization") authorization: String
    ): UserJson {
        val userId = tokenService.readUserId(authorization)
        val user = userService.findUserById(userId)
        return user.toJson()
    }
}
但是有一个问题:挂起函数该怎么办呢? 我们可以挂起,但是我们没有任何作用域。将作用域作为参数传递并不是一个好的解决方案(我们将在作用域函数一章中看到)。我们应该使用 coroutineScope 函数,它是一个挂起函数,为构建起创建一个协程。
使用 coroutineScope
假设在某个存储函数中,你需要异步加载两个资源,如用户数据和文章列表。在本例中,你希望只返回那些用户应该可以看到的文章。为了调用 async,我们需要一个作用域,但是我们不想把它传递给一个函数。要在挂起函数之外创建作用域,我们可以使用 coroutineScope 函数:
suspend fun getArticlesForUser(
    userToken: String?,
): List<ArticleJson> = coroutineScope {
    val articles = async { articleRepository.getArticles() }
    val user = userService.getUser(userToken)
    articles.await()
        .filter { canSeeOnList(user, it) }
        .map { toArticleJson(it) }
}
coroutineScope 只是一个挂起函数,它为 lambda 表达式创建一个作用域。该函数返回 lambda 表达式,这个 lambda 可以返回任何内容(如 let、run、use、runBlocking)。在上面的例子中,lambda 表达式返回 List<ArticleJson>,所以 getArticlesForUser 也返回该类型。
coroutineScope 是在挂起函数内部需要作用域时使用的标准函数。这真的很重要,它的设计方法非常适合这个用例,但是要分析它,我们首先要学习一些关于上下文、取消和异常处理的知识,这就是为什么该函数将在后面的专门章节(协程作用域函数)中详细解释。
我们还可以开始将挂起的 main 函数与 coroutineScope 一起使用,这是 runBlocking 的主流替换方案:
suspend fun main(): Unit = coroutineScope {
    launch {
        delay(1000L)
        println("World!")
    }
    println("Hello,")
}
// Hello,
// (1 sec)
// World!
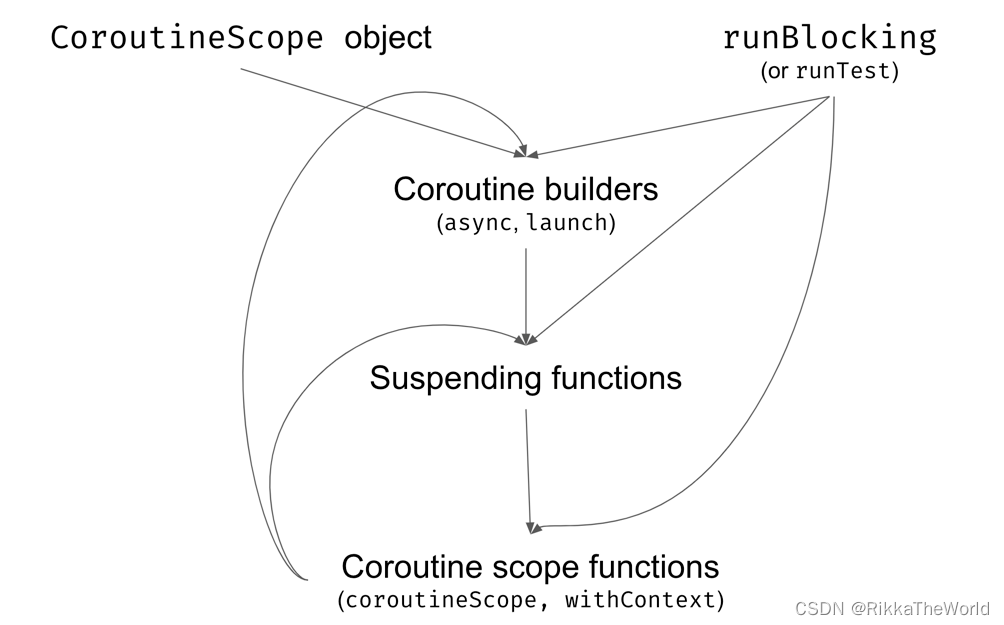
这张图显示了 kotlinx.couroutines 库使用的不同元素。我们通常从作用域或者 runBlocking 开始。在这些函数中,我们可以调用其他构建器或挂起函数。我们不能在挂起函数上运行构建器,所以我们使用协程作用域函数(例如 coroutineScope)
总结
这些知识对于使用大多数 Kotlin 协程来说已经足够了。在大多数情况下,我们只是使用挂起函数来调用其它挂起函数或普通函数。如果我们需要引入并发,我们可以使用 coroutineScope 包装函数,并在其作用域上使用构建器。我们将在后面的部分中学习如何构建这样的一个作用域,但对于大多数项目来说,它只需要定义一次,之后就很少涉及了。
虽然我们已经学会了基本知识,但是还有很多东西要学习。在下一章中,我们将深入探讨协程。我们将学习使用不同的上下文,如何处理取消、异常,如何测试协程,等等。还有很多很棒的功能等着我们去发现。

