原文链接:https://blog.csdn.net/ly59782/article/details/120823052
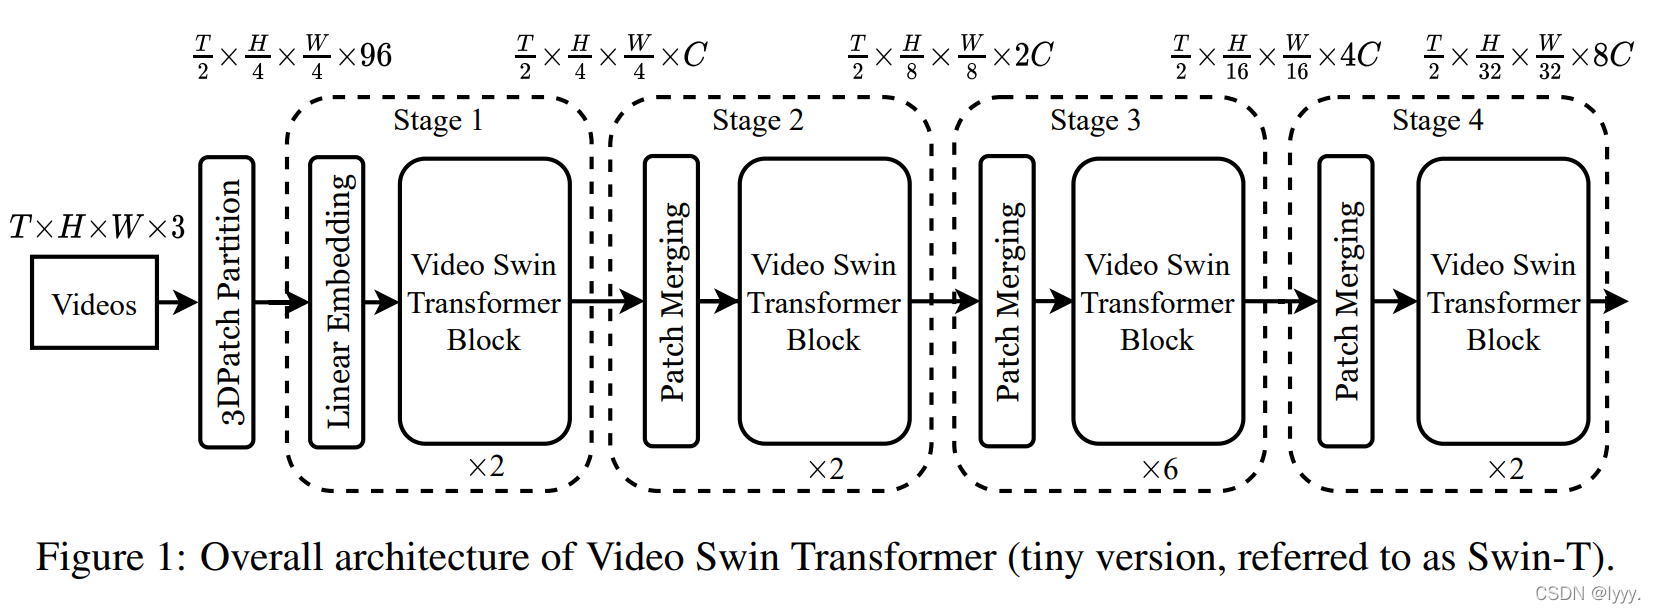
Swin-Transformer和Video Swin-Transformer大同小异,感觉最大的区别就是2D的改到了3D,其实操作都是一样的,就是多了一个维度,所以主要还是基于2d讲解的,然后类比一下3d就好啦,讲的是tiny版本的。
源码git传送门:https://github.com/SwinTransformer/Video-Swin-Transformer
目录
类定义
首先看类定义,主要的函数如下
-
class
SwinTransformer3D(nn.Module):
-
""" Swin Transformer backbone.
-
A PyTorch impl of : `Swin Transformer: Hierarchical Vision Transformer using Shifted Windows` -
-
"""
-
-
def
__init__(
self,
-
pretrained=None,
-
pretrained2d=True,
-
# 原swin-transformer是4(然后tuple到4x4),而这里是4x4x4,多了一个时间维度
-
patch_size=(4,4,4),
-
in_chans=3,
-
embed_dim=96,
-
depths=[2, 2, 6, 2],
-
num_heads=[3, 6, 12, 24],
-
window_size=(2,7,7),
-
mlp_ratio=4.,
-
qkv_bias=True,
-
qk_scale=None,
-
drop_rate=0.,
-
attn_drop_rate=0.,
-
drop_path_rate=0.2,
-
norm_layer=nn.LayerNorm,
-
patch_norm=False,
-
frozen_stages=-1,
-
use_checkpoint=False):
-
super().__init__()
-
-
self.pretrained = pretrained
-
self.pretrained2d = pretrained2d
-
self.num_layers =
len(depths)
-
self.embed_dim = embed_dim
-
self.patch_norm = patch_norm
-
self.frozen_stages = frozen_stages
-
self.window_size = window_size
-
self.patch_size = patch_size
-
"""
-
# 预处理图片序列到patch_embed,对应流程图中的Linear Embedding,
-
# 具体做法是用3d卷积,形状变化为BCDHW -> B,C,D,Wh,Ww 即(B,96,T/4,H/4,W/4),
-
# 要注意的是,其实在stage 1之前,即预处理完成后,已经是流程图上的T/4 × H/4 × W/4 × 96
-
"""
-
# split image into non-overlapping patches
-
self.patch_embed = PatchEmbed3D(
-
patch_size=patch_size, in_chans=in_chans, embed_dim=embed_dim,
-
norm_layer=norm_layer
if self.patch_norm
else
None)
-
"""
-
# ViT在输入会给embedding进行位置编码.实验证明位置编码效果不好
-
# 所以Swin-T把它作为一个可选项(self.ape),Swin-T是在计算Attention的时候做了一个相对位置编码
-
# 这里video-Swin-T 直接去掉了位置编码
-
# ViT会单独加上一个可学习参数,作为分类的token.
-
# 而Swin-T则是直接做平均,输出分类,有点类似CNN最后的全局平均池化层
-
"""
-
# 经过一层dropout,至此预处理结束
-
self.pos_drop = nn.Dropout(p=drop_rate)
-
"""
-
# 流程图中每个stage,即代码中的BasicLayer,由若干个block组成,
-
# 而block的数目由depths列表中的元素决定,这里是[2,2,6,2].
-
# 每个block就是W-MSA(window-multihead self attention)或者SW-MSA(shift window multihead self attention),
-
# 一般有偶数个block,两种SA交替出现,比如6个block,0,2,4是W-MSA,1,3,5是SW-MSA.
-
# 前三个stage的最后会用PatchMerging进行下采样(代码中是前三个stage每个stage最后,流程图上画的是后三个,每个stage最前面做,其实是一样的)
-
# 操作为将临近2*2范围内的patch(即4个为一组)按通道cat起来,经过一个layernorm和linear层, 实现维度下采样、特征加倍的效果,具体见PatchMerging类注释
-
"""
-
# stochastic depth
-
# 随机深度,用这个来让每个stage中的block数目随机变化,达到随机深度的效果
-
# torch.linspace()生成0到0.2的12个数构成的等差数列,如下
-
# [0, 0.01818182, 0.03636364, 0.05454545, 0.07272727 0.09090909,
-
# 0.10909091, 0.12727273, 0.14545455, 0.16363636, 0.18181818, 0.2]
-
dpr = [x.item()
for x
in torch.linspace(
0, drop_path_rate,
sum(depths))]
# stochastic depth decay rule
-
-
# build layers
-
self.layers = nn.ModuleList()
-
for i_layer
in
range(self.num_layers):
# 流程图中的4个stage,对应代码中4个layers
-
layer = BasicLayer(
-
dim=
int(embed_dim *
2**i_layer),
#96 x 2^n,对应流程图上的C,2C,4C,8C
-
depth=depths[i_layer],
#[2,2,6,2]
-
num_heads=num_heads[i_layer],
#[3, 6, 12, 24],
-
window_size=window_size,
# (8,7,7)
-
mlp_ratio=mlp_ratio,
# 4
-
qkv_bias=qkv_bias,
# True
-
qk_scale=qk_scale,
# None
-
drop=drop_rate,
# 0
-
attn_drop=attn_drop_rate,
# 0
-
drop_path=dpr[
sum(depths[:i_layer]):
sum(depths[:i_layer +
1])],
# 依据上面算的dpr
-
norm_layer=norm_layer,
# nn.LayerNorm
-
downsample=PatchMerging
if i_layer<self.num_layers-
1
else
None,
# 前三个stage后要用PatchMerging下采样,
-
use_checkpoint=use_checkpoint)
-
self.layers.append(layer)
-
-
self.num_features =
int(embed_dim *
2**(self.num_layers-
1))
# 96*8
-
-
# add a norm layer for each output
-
self.norm = norm_layer(self.num_features)
-
-
self._freeze_stages()
预处理
预处理图片序列到patch_embed,对应流程图中的Linear Embedding,具体做法是用3d卷积,从BCDHW->B,C,D,Wh,Ww 即(B,96,T/4,H/4,W/4),以后都假设HW为224X224,T为32,那么形状为(B,96,8,56,56),最后经过一层dropout,至此预处理结束 。要注意的是,其实在stage 1之前,即预处理完成后,已经是流程图上的T/4 × H/4 × W/4 × 96。主要函数实现:
-
class
PatchEmbed3D(nn.Module):
-
""" Video to Patch Embedding.
-
-
Args:
-
patch_size (int): Patch token size. Default: (2,4,4).
-
in_chans (int): Number of input video channels. Default: 3.
-
embed_dim (int): Number of linear projection output channels. Default: 96.
-
norm_layer (nn.Module, optional): Normalization layer. Default: None
-
"""
-
def
__init__(
self, patch_size=(2,4,4), in_chans=3, embed_dim=96, norm_layer=None):
-
super().__init__()
-
self.patch_size = patch_size
-
-
self.in_chans = in_chans
-
self.embed_dim = embed_dim
-
-
self.proj = nn.Conv3d(in_chans, embed_dim, kernel_size=patch_size, stride=patch_size)
-
if norm_layer
is
not
None:
-
self.norm = norm_layer(embed_dim)
-
else:
-
self.norm =
None
-
-
def
forward(
self, x):
-
"""Forward function."""
-
# padding
-
_, _, D, H, W = x.size()
#BCDHW
-
#DHW正好对应patch_size[0],patch_size[1],patch_size[2],防止除不开先pad
-
if W % self.patch_size[
2] !=
0:
-
x = F.pad(x, (
0, self.patch_size[
2] - W % self.patch_size[
2]))
-
if H % self.patch_size[
1] !=
0:
-
x = F.pad(x, (
0,
0,
0, self.patch_size[
1] - H % self.patch_size[
1]))
-
if D % self.patch_size[
0] !=
0:
-
x = F.pad(x, (
0,
0,
0,
0,
0, self.patch_size[
0] - D % self.patch_size[
0]))
-
-
x = self.proj(x)
# B C D Wh Ww, 其中D Wh Ww表示经过3d卷积后特征的大小
-
if self.norm
is
not
None:
#默认会使用nn.LayerNorm,所以下面程序必运行
-
D, Wh, Ww = x.size(
2), x.size(
3), x.size(
4)
-
x = x.flatten(
2).transpose(
1,
2)
#B, C, D, Wh, Ww -> B, C, D*Wh*Ww ->B,D*Wh*Ww, C
-
#因为要层归一化,所以要拉成上面的形状,把C放在最后
-
x = self.norm(x)
-
x = x.transpose(
1,
2).view(-
1, self.embed_dim, D, Wh, Ww)
#又拉回 B, C, D, Wh, Ww
-
-
return x
ViT在输入会给embedding进行位置编码。实验证明位置编码效果不好所以Swin-T把它作为一个可选项(self.ape),Swin-T是在计算Attention的时候做了一个相对位置编码(见下文中block部分的W-MSA)。这里video-Swin-T 直接去掉了位置编码
stage
流程图中每个stage,对应代码中的BasicLayer,由若干个block组成,而block的数目由depths列表中的元素决定,这里是[2,2,6,2]. 每个block就是W-MSA(window-multihead self attention)或者SW-MSA(shift window multihead self attention),一般有偶数个block,两种SA交替出现,比如6个block,0,2,4是W-MSA,1,3,5是SW-MSA. 前三个stage的最后会用PatchMerging进行下采样.(代码中是前三个stage每个stage最后,流程图上画的是后三个,每个stage最前面做,其实是一样的). 操作为将临近2*2范围内的patch(即4个为一组)按通道cat起来,经过一个layernorm和linear层, 实现维度下采样、特征加倍的效果,具体见PatchMerging类注释
-
class
BasicLayer(nn.Module):
-
""" A basic Swin Transformer layer for one stage.
-
"""
-
-
def
__init__(
self,
-
dim, # 以第一层为例 为96
-
depth, #以第一层为例 为2
-
num_heads, #以第一层为例 为3
-
window_size=(1,7,7), # (8,7,7)
-
mlp_ratio=4.,
-
qkv_bias=False, #true
-
qk_scale=None,
-
drop=0.,
-
attn_drop=0.,
-
drop_path=0.,#以第一层为例 为[0, 0.01818182]
-
norm_layer=nn.LayerNorm,
-
downsample=None, #PatchMerging
-
use_checkpoint=False):
-
super().__init__()
-
self.window_size = window_size
# (8,7,7)
-
self.shift_size =
tuple(i //
2
for i
in window_size)
#(4,3,3)
-
self.depth = depth
# 2
-
self.use_checkpoint = use_checkpoint
-
-
# build blocks
-
self.blocks = nn.ModuleList([
-
SwinTransformerBlock3D(
-
dim=dim,
#96
-
num_heads=num_heads,
# 3
-
window_size=window_size,
-
# 第一个block的shiftsize=(0,0,0),也就是W-MSA不进行shift,第2个shiftsize=(4,3,3)
-
shift_size=(
0,
0,
0)
if (i %
2 ==
0)
else self.shift_size,
-
mlp_ratio=mlp_ratio,
-
qkv_bias=qkv_bias,
# true
-
qk_scale=qk_scale,
# None
-
drop=drop,
-
attn_drop=attn_drop,
-
drop_path=drop_path[i]
if
isinstance(drop_path,
list)
else drop_path,
-
norm_layer=norm_layer,
-
use_checkpoint=use_checkpoint,
-
)
-
for i
in
range(depth)])
# depth = 2
-
-
self.downsample = downsample
-
if self.downsample
is
not
None:
-
self.downsample = downsample(dim=dim, norm_layer=norm_layer)
-
-
def
forward(
self, x):
-
""" Forward function.
-
"""
-
# calculate attention mask for SW-MSA
-
B, C, D, H, W = x.shape
-
window_size, shift_size = get_window_size((D,H,W), self.window_size, self.shift_size)
-
x = rearrange(x,
'b c d h w -> b d h w c')
-
Dp =
int(np.ceil(D / window_size[
0])) * window_size[
0]
# 1*8
-
Hp =
int(np.ceil(H / window_size[
1])) * window_size[
1]
# 56/7 *7
-
Wp =
int(np.ceil(W / window_size[
2])) * window_size[
2]
# 56/7 *7
-
# 计算一个attention_mask用于SW-MSA,怎么shitfed以及mask如何推导见后文
-
attn_mask = compute_mask(Dp, Hp, Wp, window_size, shift_size, x.device)
# (8,7,7) (0,3,3)
-
-
# 以第一个stage为例,里面有2个block,第一个block进行W-MSA,第二个block进行SW-MSA
-
# 如何W-MSA SW-MSA 见下述
-
for blk
in self.blocks:
-
x = blk(x, attn_mask)
-
#改变形状,把C放到最后一维度(因为PatchMerging里有layernom和全连接层)
-
x = x.view(B, D, H, W, -
1)
-
-
# 用PatchMerging 进行patch的拼接和全连接层 实现下采样
-
if self.downsample
is
not
None:
-
x = self.downsample(x)
-
x = rearrange(x,
'b d h w c -> b c d h w')
-
return x
-
class
PatchMerging(nn.Module):
-
""" Patch Merging Layer
-
"""
-
def
__init__(
self, dim, norm_layer=nn.LayerNorm):
-
super().__init__()
-
self.dim = dim
-
#用全连接层把C由4C->2C,因为是4个cat一起所以是4C
-
self.reduction = nn.Linear(
4 * dim,
2 * dim, bias=
False)
-
self.norm = norm_layer(
4 * dim)
-
-
def
forward(
self, x):
-
""" Forward function.
-
"""
-
B, D, H, W, C = x.shape
-
-
# padding
-
pad_input = (H %
2 ==
1)
or (W %
2 ==
1)
-
if pad_input:
-
x = F.pad(x, (
0,
0,
0, W %
2,
0, H %
2))
-
-
x0 = x[:, :,
0::
2,
0::
2, :]
# B D H/2 W/2 C
-
x1 = x[:, :,
1::
2,
0::
2, :]
# B D H/2 W/2 C
-
x2 = x[:, :,
0::
2,
1::
2, :]
# B D H/2 W/2 C
-
x3 = x[:, :,
1::
2,
1::
2, :]
# B D H/2 W/2 C
-
# 每2X2个patch cat到一起
-
x = torch.cat([x0, x1, x2, x3], -
1)
# B D H/2 W/2 4*C
-
-
x = self.norm(x)
# 层归一化
-
x = self.reduction(x)
# 全连接层 降维
-
-
return x
block
首先梳每个block的理整体脉络,和普通的transformer的encoder一样,只不过把MSA变成W-MSA或者SW-MSA
-
class
SwinTransformerBlock3D(nn.Module):
-
""" Swin Transformer Block.
-
"""
-
-
def
__init__(
self, dim, num_heads, window_size=(2,7,7), shift_size=(0,0,0),
-
mlp_ratio=4., qkv_bias=True, qk_scale=None, drop=0., attn_drop=0., drop_path=0.,
-
act_layer=nn.GELU, norm_layer=nn.LayerNorm, use_checkpoint=False):
-
super().__init__()
-
self.dim = dim
-
self.num_heads = num_heads
-
self.window_size = window_size
-
self.shift_size = shift_size
-
self.mlp_ratio = mlp_ratio
-
self.use_checkpoint=use_checkpoint
-
-
assert
0 <= self.shift_size[
0] < self.window_size[
0],
"shift_size must in 0-window_size"
-
assert
0 <= self.shift_size[
1] < self.window_size[
1],
"shift_size must in 0-window_size"
-
assert
0 <= self.shift_size[
2] < self.window_size[
2],
"shift_size must in 0-window_size"
-
-
self.norm1 = norm_layer(dim)
-
self.attn = WindowAttention3D(
-
dim, window_size=self.window_size, num_heads=num_heads,
-
qkv_bias=qkv_bias, qk_scale=qk_scale, attn_drop=attn_drop, proj_drop=drop)
-
-
self.drop_path = DropPath(drop_path)
if drop_path >
0.
else nn.Identity()
-
self.norm2 = norm_layer(dim)
-
mlp_hidden_dim =
int(dim * mlp_ratio)
-
self.mlp = Mlp(in_features=dim, hidden_features=mlp_hidden_dim, act_layer=act_layer, drop=drop)
-
-
def
forward_part1(
self, x, mask_matrix):
-
B, D, H, W, C = x.shape
-
# 1 先计算出当前block的window_size, 和shift_size
-
window_size, shift_size = get_window_size((D, H, W), self.window_size, self.shift_size)
-
-
# 2 经过一个layer_norm
-
x = self.norm1(x)
-
-
# pad一下特征图避免除不开
-
# pad feature maps to multiples of window size
-
pad_l = pad_t = pad_d0 =
0
-
pad_d1 = (window_size[
0] - D % window_size[
0]) % window_size[
0]
-
pad_b = (window_size[
1] - H % window_size[
1]) % window_size[
1]
-
pad_r = (window_size[
2] - W % window_size[
2]) % window_size[
2]
-
x = F.pad(x, (
0,
0, pad_l, pad_r, pad_t, pad_b, pad_d0, pad_d1))
-
_, Dp, Hp, Wp, _ = x.shape
-
-
# 3 判断是否需要对特征图进行shift
-
# cyclic shift
-
if
any(i >
0
for i
in shift_size):
-
shifted_x = torch.roll(x, shifts=(-shift_size[
0], -shift_size[
1], -shift_size[
2]), dims=(
1,
2,
3))
-
attn_mask = mask_matrix
-
else:
-
shifted_x = x
-
attn_mask =
None
-
-
# 4 将特征图切成一个个的窗口(都是reshape操作)
-
# partition windows
-
x_windows = window_partition(shifted_x, window_size)
# B*nW, Wd*Wh*Ww, C
-
-
# 5 通过attn_mask是否为None判断进行W-MSA还是SW-MSA
-
# W-MSA/SW-MSA
-
attn_windows = self.attn(x_windows, mask=attn_mask)
# B*nW, Wd*Wh*Ww, C
-
-
# 6 把窗口在合并回来,看成4的逆操作,同样都是reshape操作
-
# merge windows
-
attn_windows = attn_windows.view(-
1, *(window_size+(C,)))
#(B*num_windows, window_size, window_size, C)
-
shifted_x = window_reverse(attn_windows, window_size, B, Dp, Hp, Wp)
# B D' H' W' C
-
-
# 7 如果之前shitf过,也要还原回去
-
# reverse cyclic shift
-
if
any(i >
0
for i
in shift_size):
-
x = torch.roll(shifted_x, shifts=(shift_size[
0], shift_size[
1], shift_size[
2]), dims=(
1,
2,
3))
-
else:
-
x = shifted_x
-
-
# 去掉pad
-
if pad_d1 >
0
or pad_r >
0
or pad_b >
0:
-
x = x[:, :D, :H, :W, :].contiguous()
-
return x
-
-
def
forward_part2(
self, x):
-
# 经过FFN
-
return self.drop_path(self.mlp(self.norm2(x)))
-
-
def
forward(
self, x, mask_matrix):
-
""" Forward function.
-
-
Args:
-
x: Input feature, tensor size (B, D, H, W, C).
-
mask_matrix: Attention mask for cyclic shift.
-
"""
-
# tranformer的常规操作,包含MSA、残差连接、dropout、FFN,只不过MSA变成W-MSA或者SW-MSA
-
shortcut = x
-
if self.use_checkpoint:
-
x = checkpoint.checkpoint(self.forward_part1, x, mask_matrix)
-
else:
-
x = self.forward_part1(x, mask_matrix)
-
x = shortcut + self.drop_path(x)
-
-
if self.use_checkpoint:
-
x = x + checkpoint.checkpoint(self.forward_part2, x)
-
else:
-
x = x + self.forward_part2(x)
-
-
return x
W-MSA
先来看没有Shift的基于Window的注意力机制是如何做的,传统的Transformer都是基于全局来计算注意力的,因此计算复杂度十分高。而Swin Transformer则将注意力的计算限制在每个窗口内,进而减少了计算量,主要区别是在原始计算Attention的公式中的Q,K时加入了相对位置编码
-
class
WindowAttention3D(nn.Module):
-
""" Window based multi-head self attention (W-MSA) module with relative position
-
"""
-
-
def
__init__(
self, dim, window_size, num_heads, qkv_bias=False, qk_scale=None, attn_drop=0., proj_drop=0.):
-
-
super().__init__()
-
self.dim = dim
-
self.window_size = window_size
# Wd, Wh, Ww
-
self.num_heads = num_heads
-
head_dim = dim // num_heads
# 每个注意力头对应的通道数
-
self.scale = qk_scale
or head_dim ** -
0.5
-
-
# define a parameter table of relative position bias
-
# 设置一个形状为(2*Wd-1*2*(Wh-1) * 2*(Ww-1), nH)的可学习变量 ,用于后续的位置编码
-
self.relative_position_bias_table = nn.Parameter(
-
torch.zeros((
2 * window_size[
0] -
1) * (
2 * window_size[
1] -
1) * (
2 * window_size[
2] -
1), num_heads))
# 2*Wd-1 * 2*Wh-1 * 2*Ww-1, nH
-
-
# 获取窗口内每对token的相对位置索引
-
# get pair-wise relative position index for each token inside the window
-
coords_d = torch.arange(self.window_size[
0])
-
coords_h = torch.arange(self.window_size[
1])
-
coords_w = torch.arange(self.window_size[
2])
-
coords = torch.stack(torch.meshgrid(coords_d, coords_h, coords_w))
# 3, Wd, Wh, Ww
-
coords_flatten = torch.flatten(coords,
1)
# 3, Wd*Wh*Ww
-
#利用广播机制 ,分别在第二维 ,第一维 ,插入一个维度 ,进行广播相减 ,得到 3, Wd*Wh*Ww, Wd*Wh*Ww的张量
-
relative_coords = coords_flatten[:, :,
None] - coords_flatten[:,
None, :]
# 3, Wd*Wh*Ww, Wd*Wh*Ww
-
relative_coords = relative_coords.permute(
1,
2,
0).contiguous()
# Wd*Wh*Ww, Wd*Wh*Ww, 3
-
#因为采取的是相减 ,所以得到的索引是从负数开始的 ,所以加上偏移量 ,让其从0开始
-
relative_coords[:, :,
0] += self.window_size[
0] -
1
# shift to start from 0
-
relative_coords[:, :,
1] += self.window_size[
1] -
1
-
relative_coords[:, :,
2] += self.window_size[
2] -
1
-
# 后续我们需要将其展开成一维偏移量 而对于(1 ,2)和(2 ,1)这两个坐标 在二维上是不同的,
-
# 但是通过将x,y坐标相加转换为一维偏移的时候,他的偏移量是相等的,所以对其做乘法以进行区分
-
relative_coords[:, :,
0] *= (
2 * self.window_size[
1] -
1) * (
2 * self.window_size[
2] -
1)
-
relative_coords[:, :,
1] *= (
2 * self.window_size[
2] -
1)
-
#在最后一维上进行求和 ,展开成一个一维坐标 ,并注册为一个不参与网络学习的常量
-
relative_position_index = relative_coords.
sum(-
1)
# Wd*Wh*Ww, Wd*Wh*Ww
-
self.register_buffer(
"relative_position_index", relative_position_index)
-
-
self.qkv = nn.Linear(dim, dim *
3, bias=qkv_bias)
-
self.attn_drop = nn.Dropout(attn_drop)
-
self.proj = nn.Linear(dim, dim)
-
self.proj_drop = nn.Dropout(proj_drop)
-
-
# 截断正态分布初始化
-
trunc_normal_(self.relative_position_bias_table, std=
.02)
-
self.softmax = nn.Softmax(dim=-
1)
-
-
def
forward(
self, x, mask=None):
-
""" Forward function.
-
Args:
-
x: input features with shape of (num_windows*B, N, C)
-
mask: (0/-inf) mask with shape of (num_windows, N, N) or None
-
"""
-
# numWindows*B, N, C ,其中N=window_size_d * window_size_h * window_size_w
-
B_, N, C = x.shape
-
# 然后经过self.qkv这个全连接层后进行reshape到(3, numWindows*B, num_heads,N, c//num_heads)
-
# 3表示3个向量,刚好分配给q,k,v,
-
qkv = self.qkv(x).reshape(B_, N,
3, self.num_heads, C // self.num_heads).permute(
2,
0,
3,
1,
4)
-
q, k, v = qkv[
0], qkv[
1], qkv[
2]
# B_, nH, N, C
-
-
# 根据公式,对q乘以一个scale缩放系数,
-
# 然后与k(为了满足矩阵乘要求,需要将最后两个维度调换)进行相乘.
-
# 得(numWindows*B, num_heads, N, N)的attn张量
-
q = q * self.scale
# selfattention公式里的根号下dk
-
attn = q @ k.transpose(-
2, -
1)
-
-
# 之前我们针对位置编码设置了个形状为(2*Wd-1*2*(Wh-1) * 2*(Ww-1), numHeads)的可学习变量.
-
# 我们用计算得到的相对编码位置索引self.relative_position_index选取,
-
# 得到形状为(nH, Wd*Wh*Ww, Wd*Wh*Ww)的编码,加到attn张量上
-
relative_position_bias = self.relative_position_bias_table[self.relative_position_index[:N, :N].reshape(-
1)].reshape(
-
N, N, -
1)
# Wd*Wh*Ww,Wd*Wh*Ww,nH
-
relative_position_bias = relative_position_bias.permute(
2,
0,
1).contiguous()
# nH, Wd*Wh*Ww, Wd*Wh*Ww
-
attn = attn + relative_position_bias.unsqueeze(
0)
# B_, nH, N, N
-
-
# 剩下就是跟transformer一样的softmax,dropout,与V矩阵乘,再经过一层全连接层和dropout
-
if mask
is
not
None:
-
# mask.shape = nW, N, N, 其中N = Wd*Wh*Ww
-
nW = mask.shape[
0]
-
# 将mask加到attention的计算结果再进行softmax,
-
# 由于mask的值设置为-100,softmax后就会忽略掉对应的值,从而达到mask的效果
-
attn = attn.view(B_ // nW, nW, self.num_heads, N, N) + mask.unsqueeze(
1).unsqueeze(
0)
-
attn = attn.view(-
1, self.num_heads, N, N)
-
attn = self.softmax(attn)
-
else:
-
attn = self.softmax(attn)
-
-
attn = self.attn_drop(attn)
-
-
x = (attn @ v).transpose(
1,
2).reshape(B_, N, C)
-
x = self.proj(x)
-
x = self.proj_drop(x)
-
return x
-
SW-MSA
SW-MSA,这里比较复杂,是swinTransformer精髓之处
首先理解下如何shitfed的
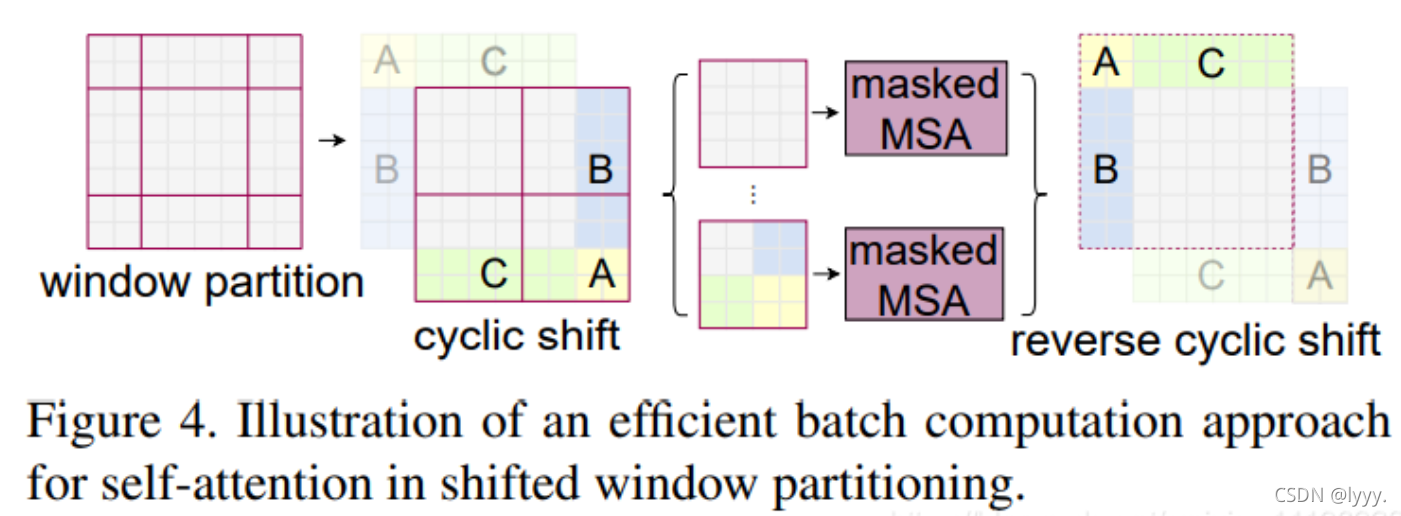
为什么cyclic shift? 图一可以看出,partition后Windows的数量变多了,从4个变成了9个大小不一致的窗,我们希望每个window是单独做attention的,for循环做显然不好。其实在代码里,是通过对特征图移位实现的,把切成边角料的小块又拼在一起,把A拼接到右下角,C向下平移,B向右平移,最后组合成4个大小一致的window。但这又引入一个问题, 例如右下角的窗口由好几个小窗组成,上面说到了我们希望每个window是单独做attention的,所以引入mask,保证A窗不与C窗进行attention。
代码里对特征图移位是通过torch.roll来实现的,下面是示意图
为什么mask?
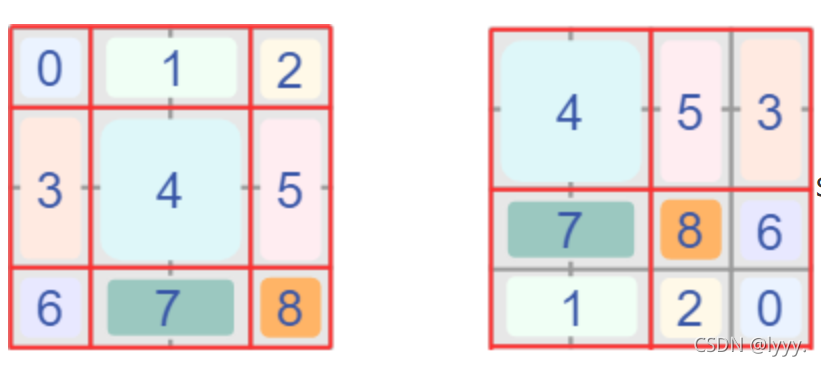
我们给window编号(下左图),然后按上面讲的shitf,得到右图
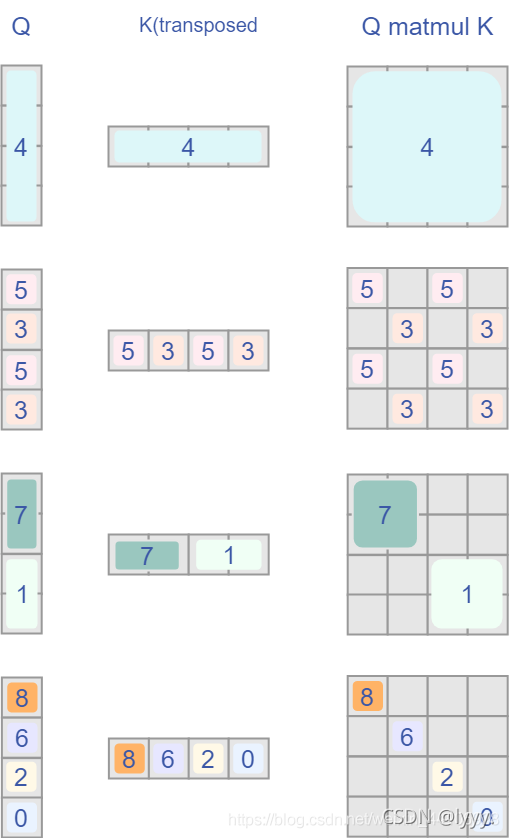
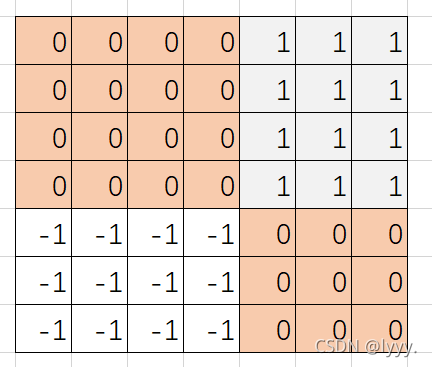
我们有提到过,希望每个窗口内的内容单独做注意力机制,也就是说希望在计算Attention的时候,让具有相同index QK进行计算,而忽略不同index QK计算结果。如下图,只取有颜色的部分而忽略灰色部分,这就用到mask,让灰色部分的值为-100,softmax后忽略掉对应的值,有色部分为0
如何计算得到mask的?
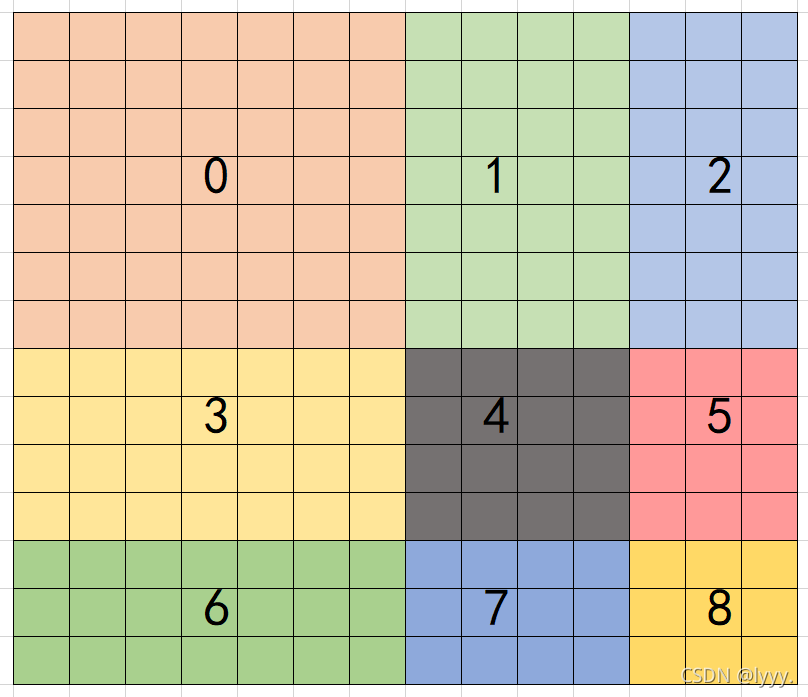
首先上代码,slice表示切片操作,我们以二维为例讲解,先不考虑d维度。所以h和w都是在(0,-7),(-7,-3),(-3,None)切片循环的,然后给不同切片的位置填上标号
-
def
compute_mask(
D, H, W, window_size, shift_size, device):
-
img_mask = torch.zeros((
1, D, H, W,
1), device=device)
# 1 Dp Hp Wp 1
-
cnt =
0
-
# 切片操作,假设不看d维度,见详解图
-
for d
in
slice(-window_size[
0]),
slice(-window_size[
0], -shift_size[
0]),
slice(-shift_size[
0],
None):
-
for h
in
slice(-window_size[
1]),
slice(-window_size[
1], -shift_size[
1]),
slice(-shift_size[
1],
None):
-
for w
in
slice(-window_size[
2]),
slice(-window_size[
2], -shift_size[
2]),
slice(-shift_size[
2],
None):
-
img_mask[:, d, h, w, :] = cnt
-
cnt +=
1
-
mask_windows = window_partition(img_mask, window_size)
# nW, ws[0]*ws[1]*ws[2], 1
-
mask_windows = mask_windows.squeeze(-
1)
# nW, ws[0]*ws[1]*ws[2]
-
# nW, 1, ws[0]*ws[1]*ws[2] - nW, ws[0]*ws[1]*ws[2],1会触发广播机制,将维度不匹配维度中维度为1的复制然后匹配上
-
attn_mask = mask_windows.unsqueeze(
1) - mask_windows.unsqueeze(
2)
-
attn_mask = attn_mask.masked_fill(attn_mask !=
0,
float(-
100.0)).masked_fill(attn_mask ==
0,
float(
0.0))
-
return attn_mask
-
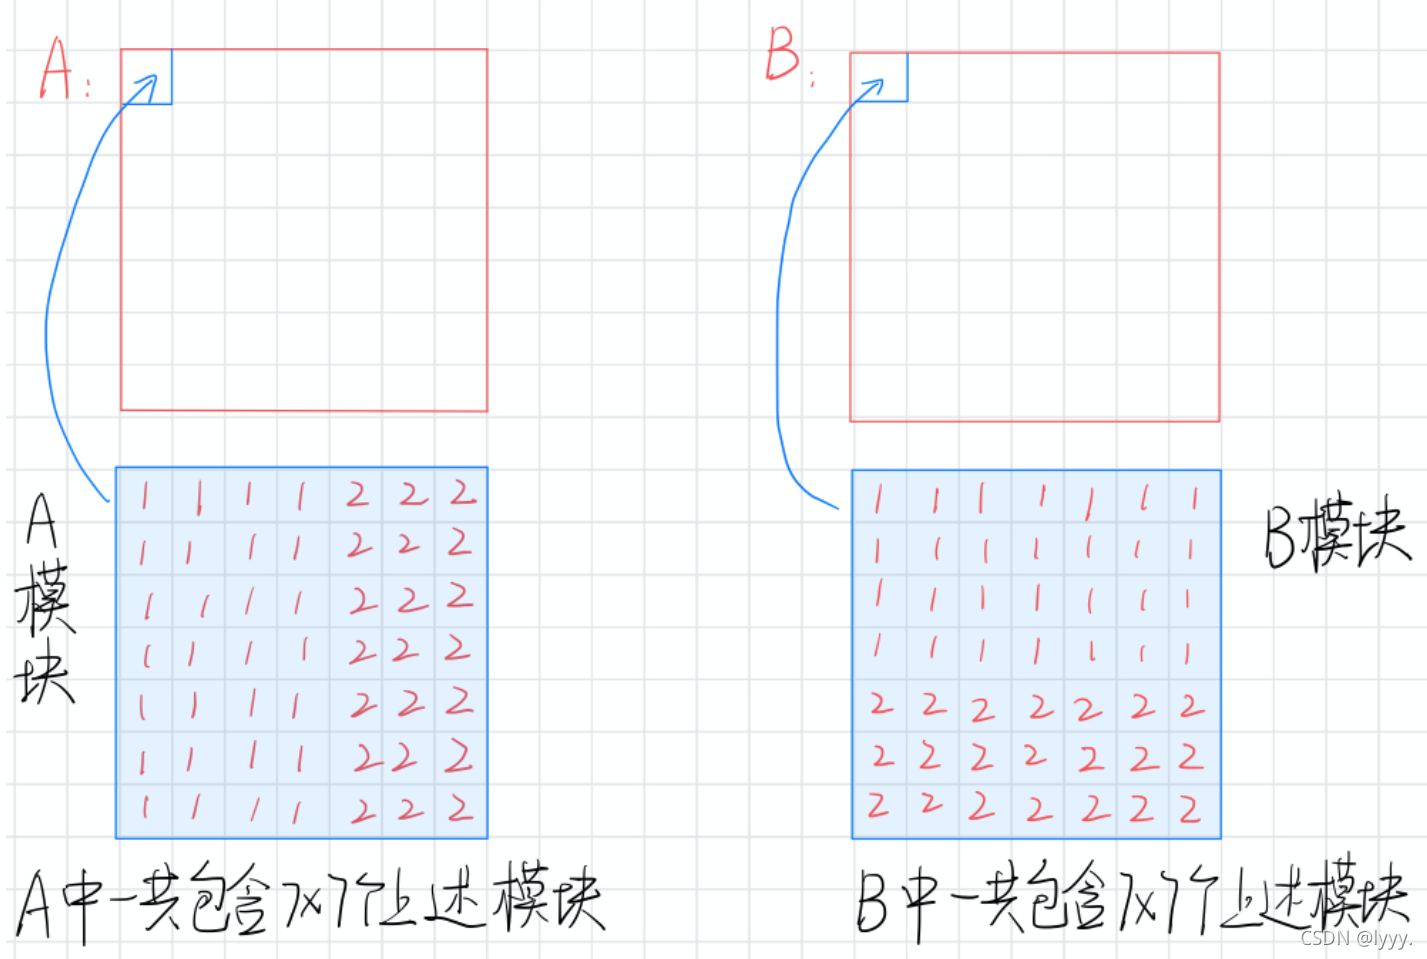
按照上述填写编号的代码,假设窗口大小M=7,图片H=2M,W=2M,shiftwindow_size=M//2=3,我们的到如下图的mask,1表示那一部分区域里面值全填1。我们看这个图和上面讲的shitf后的窗口其实是一样的,有4个window,其中3个window是由不同小窗口组成的,我们要进行mask,
按照代码接下来进行window_partition,使形状变为(B*num_windows, window_size*window_size, C),即(nW,M^2,1),window_partition函数内全是reshape操作,这里不展开。
然后squeeze去掉最后一个维度,然后做了一个减法 mask_windows.unsqueeze(1) - mask_windows.unsqueeze(2),也就是(nW,1,M^2)-(nW,M^2,1),此时会触发广播机制,将维度不匹配维度中维度为1的复制然后匹配上,以第二个window为例,
首先M^2的向量画出来就是
(nW,1,M^2)会把原来1行M^2列的向量复制M^2行,得到下图A
(nW,M^2,1)会把原来M^2行1列的向量复制M^2列,得到下图B
然后A-B,每一个小块就变成了下图,然后把非0的地方填充-100,在后续代码中会忽略这些位置的值来实现mask
最后自己可以在脑海中想象下加上D维度之后3维的操作,其实是一样的。
SW-MSA前向传播中不同的代码地方为
-
-
if mask
is
not
None:
-
# mask.shape = nW, N, N, 其中N = Wd*Wh*Ww
-
nW = mask.shape[
0]
-
# 将mask加到attention的计算结果再进行softmax,
-
# 由于mask的值设置为-100,softmax后就会忽略掉对应的值,从而达到mask的效果
-
attn = attn.view(B_ // nW, nW, self.num_heads, N, N) + mask.unsqueeze(
1).unsqueeze(
0)
-
attn = attn.view(-
1, self.num_heads, N, N)
-
attn = self.softmax(attn)
-
else:
-
attn = self.softmax(attn)
就是比W-MSA在attn结果上多加了一个mask的值,使不想要的位置的值无限小,softmax后就会被忽略,从而达到mask的效果。
参考文献:

