文章目录
一、准备工作
本节通过向已加入应用通道的排序组织OrderOrg增加排序节点来扩展Fabric测试网络。
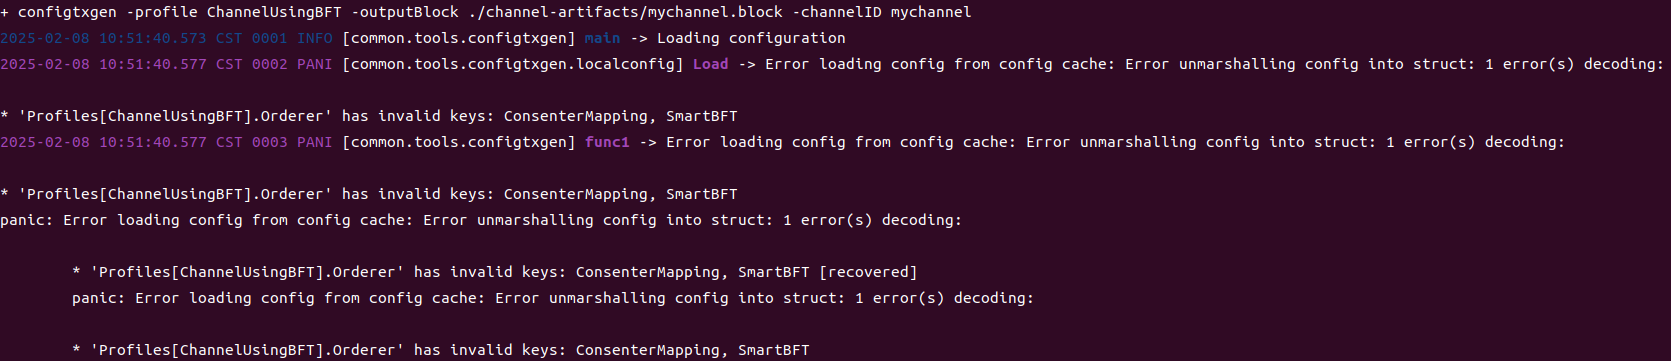
后续将要使用BFT共识,如果仍然使用v2.x的二进制文件和镜像,会报如下错误:
因此需要先更新二进制文件和镜像:
cd ~/hyfa/fabric-samples/
wget https://github.com/hyperledger/fabric/releases/download/v3.0.0/hyperledger-fabric-linux-amd64-3.0.0.tar.gz
tar -zxvf hyperledger-fabric-linux-amd64-3.0.0.tar.gz
chmod +x ./bin/*
docker pull hyperledger/fabric-peer:3.0.0 && docker tag hyperledger/fabric-peer:3.0.0 hyperledger/fabric-peer
docker pull hyperledger/fabric-orderer:3.0.0 && docker tag hyperledger/fabric-orderer:3.0.0 hyperledger/fabric-orderer
docker pull hyperledger/fabric-ccenv:3.0.0 && docker tag hyperledger/fabric-ccenv:3.0.0 hyperledger/fabric-ccenv
docker pull hyperledger/fabric-baseos:3.0.0 && docker tag hyperledger/fabric-baseos:3.0.0 hyperledger/fabric-baseos
启动测试网络并创建通道:
cd ./test-network
./network.sh down
./network.sh up createChannel -bft
这里部署的测试网络的排序服务包括4个排序节点。
二、手动为通道加入排序节点
2.1. 生成加密材料与启动容器
2.1.1. 为新增排序节点生成加密材料
拷贝排序组织OrderOrg的MSP配置文件crypto-config-orderer.yaml并重命名:
cp ./organizations/cryptogen/crypto-config-orderer.yaml ./organizations/cryptogen/add-orderer.yaml
修改add-orderer.yaml将排序组织OrderOrg的节点数量增加到5个:
gedit ./organizations/cryptogen/add-orderer.yaml
内容如下:
OrdererOrgs:
  - Name: Orderer
    Domain: example.com
    EnableNodeOUs: true

    Specs:
      - Hostname: orderer
        SANS:
          - localhost
      - Hostname: orderer2
        SANS:
          - localhost
      - Hostname: orderer3
        SANS:
          - localhost
      - Hostname: orderer4
        SANS:
          - localhost
      - Hostname: orderer5
        SANS:
          - localhost
查看排序组织OrderOrg的MSP:
tree ./organizations/ordererOrganizations/example.com/orderers
使用cryptogen工具更新MSP:
cryptogen extend --config=./organizations/cryptogen/add-orderer.yaml --input ./organizations/
更新后再一次查看排序组织OrderOrg的MSP:
tree ./organizations/ordererOrganizations/example.com/orderers
2.1.2. 启动新增的排序节点
编写排序组织OrderOrg的新增排序节点的节点配置文件:
gedit ./compose/compose-addorderer.yaml
内容如下:
version: '3.7'

volumes:
  orderer5.example.com:

networks:
  test:
    name: fabric_test

services:

  orderer5.example.com:
    container_name: orderer5.example.com
    image: hyperledger/fabric-orderer:latest
    labels:
      service: hyperledger-fabric
    environment:
      - FABRIC_LOGGING_SPEC=INFO
      - ORDERER_GENERAL_LISTENADDRESS=0.0.0.0
      - ORDERER_GENERAL_LISTENPORT=7060
      - ORDERER_GENERAL_LOCALMSPID=OrdererMSP
      - ORDERER_GENERAL_LOCALMSPDIR=/var/hyperledger/orderer/msp
      # enabled TLS
      - ORDERER_GENERAL_TLS_ENABLED=true
      - ORDERER_GENERAL_TLS_PRIVATEKEY=/var/hyperledger/orderer/tls/server.key
      - ORDERER_GENERAL_TLS_CERTIFICATE=/var/hyperledger/orderer/tls/server.crt
      - ORDERER_GENERAL_TLS_ROOTCAS=[/var/hyperledger/orderer/tls/ca.crt]
      - ORDERER_GENERAL_CLUSTER_CLIENTCERTIFICATE=/var/hyperledger/orderer/tls/server.crt
      - ORDERER_GENERAL_CLUSTER_CLIENTPRIVATEKEY=/var/hyperledger/orderer/tls/server.key
      - ORDERER_GENERAL_CLUSTER_ROOTCAS=[/var/hyperledger/orderer/tls/ca.crt]
      - ORDERER_GENERAL_BOOTSTRAPMETHOD=none
      - ORDERER_CHANNELPARTICIPATION_ENABLED=true
      - ORDERER_ADMIN_TLS_ENABLED=true
      - ORDERER_ADMIN_TLS_CERTIFICATE=/var/hyperledger/orderer/tls/server.crt
      - ORDERER_ADMIN_TLS_PRIVATEKEY=/var/hyperledger/orderer/tls/server.key
      - ORDERER_ADMIN_TLS_ROOTCAS=[/var/hyperledger/orderer/tls/ca.crt]
      - ORDERER_ADMIN_TLS_CLIENTROOTCAS=[/var/hyperledger/orderer/tls/ca.crt]
      - ORDERER_ADMIN_LISTENADDRESS=0.0.0.0:7063
      - ORDERER_OPERATIONS_LISTENADDRESS=orderer5.example.com:9453
      - ORDERER_METRICS_PROVIDER=prometheus
    working_dir: /root
    command: orderer
    volumes:
      - ../organizations/ordererOrganizations/example.com/orderers/orderer5.example.com/msp:/var/hyperledger/orderer/msp
      - ../organizations/ordererOrganizations/example.com/orderers/orderer5.example.com/tls/:/var/hyperledger/orderer/tls
      - orderer5.example.com:/var/hyperledger/production/orderer
    ports:
      - 7060:7060
      - 7063:7063
      - 9453:9453
    networks:
      - test
将新增的排序节点启动:
export DOCKER_SOCK="${DOCKER_HOST:-/var/run/docker.sock}"
docker-compose -f compose/compose-addorderer.yaml up -d
启动排序节点时,查看容器日志,如果出现如下错误:
failed to start operations subsystem: listen tcp xx.xx.xx.xx:9453: bind: cannot assign requested address
检查配置文件的环境变量ORDERER_OPERATIONS_LISTENADDRESS是否有误。
2.2. 加入排序节点
2.2.1. 获取最新的配置区块
将二进制文件和配置文件的目录加入环境变量:
export PATH=$PATH:${PWD}/../bin/
export FABRIC_CFG_PATH=${PWD}/../config/
使用setOrgEnv.sh脚本设置环境变量作为Org1操作peer CLI来获取通道配置:
export $(./setOrgEnv.sh Org1 | xargs)
再将测试网络的排序服务的TLS CA证书的路径设置为环境变量:
export ORDERER_CA=${PWD}/organizations/ordererOrganizations/example.com/orderers/orderer.example.com/msp/tlscacerts/tlsca.example.com-cert.pem
获取最新的配置区块:
peer channel fetch config channel-artifacts/config_block.pb -o localhost:7050 --ordererTLSHostnameOverride orderer.example.com -c mychannel --tls --cafile "$ORDERER_CA"
2.2.2. 将新增的排序节点加入到通道中
设置环境变量,指定新增的排序节点的加密材料:
export ORDERER_ADMIN_TLS_SIGN_CERT=${PWD}/organizations/ordererOrganizations/example.com/orderers/orderer5.example.com/tls/server.crt
export ORDERER_ADMIN_TLS_PRIVATE_KEY=${PWD}/organizations/ordererOrganizations/example.com/orderers/orderer5.example.com/tls/server.key
使用最新的配置区块将新增的排序节点加入到通道中:
osnadmin channel join --channelID mychannel --config-block ./channel-artifacts/config_block.pb -o localhost:7063 --ca-file "$ORDERER_CA" --client-cert "$ORDERER_ADMIN_TLS_SIGN_CERT" --client-key "$ORDERER_ADMIN_TLS_PRIVATE_KEY"
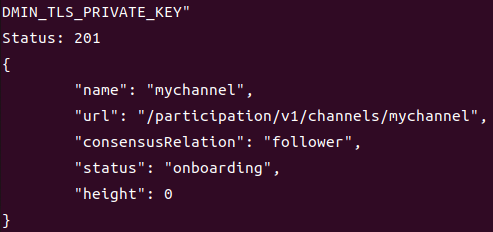
命令的输出如下图所示,注意此时的status为onboarding,height为0,暂时与其它排序节点不同。
2.3. 通道配置更新
2.3.1. 将通道配置转换为JSON格式并修剪
进入存储通道配置区块的channel-artifacts文件夹:
cd channel-artifacts
使用configtxlator工具将此通道配置区块解码为JSON格式,去掉所有与想要进行的更改无关的标头、元数据、创建者签名等:
configtxlator proto_decode --input config_block.pb --type common.Block --output config_block.json
jq ".data.data[0].payload.data.config" config_block.json > original_config.json
2.3.2. 修改通道配置
复制一份通道配置文件并命名为modified_config.json:
cp original_config.json modified_config.json
修改modified_config.json:
gedit modified_config.json
需要修改的地方有4处:
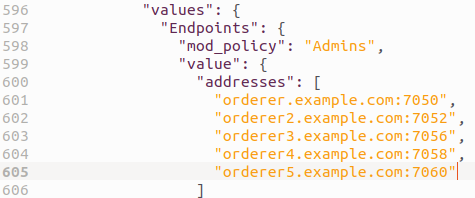
- 将新的排序节点的端点信息加入配置中
目标字段:channel_group → groups → Orderer → groups → OrdererOrg → values → Endpoints → value → addresses
新增内容:"orderer5.example.com:7060"
- 将新排序节点的身份信息加入配置中
目标字段:channel_group → groups → Orderer → policies → BlockValidation → policy → value → identities
新增内容:
{
    "principal": {
          "id_bytes": "LS0tLS1CRUdJTiBDRVJUSUZJQ0FURS0tLS0tCk1JSUNJRENDQWNhZ0F3SUJBZ0lSQUxaUnIzMXkyZTBWM1ZQbVUwdThlU0l3Q2dZSUtvWkl6ajBFQXdJd2FURUwKTUFrR0ExVUVCaE1DVlZNeEV6QVJCZ05WQkFnVENrTmhiR2xtYjNKdWFXRXhGakFVQmdOVkJBY1REVk5oYmlCRwpjbUZ1WTJselkyOHhGREFTQmdOVkJBb1RDMlY0WVcxd2JHVXVZMjl0TVJjd0ZRWURWUVFERXc1allTNWxlR0Z0CmNHeGxMbU52YlRBZUZ3MHlOVEF5TVRFd01qVTNNREJhRncwek5UQXlNRGt3TWpVM01EQmFNR3N4Q3pBSkJnTlYKQkFZVEFsVlRNUk13RVFZRFZRUUlFd3BEWVd4cFptOXlibWxoTVJZd0ZBWURWUVFIRXcxVFlXNGdSbkpoYm1OcApjMk52TVJBd0RnWURWUVFMRXdkdmNtUmxjbVZ5TVIwd0d3WURWUVFERXhSdmNtUmxjbVZ5TlM1bGVHRnRjR3hsCkxtTnZiVEJaTUJNR0J5cUdTTTQ5QWdFR0NDcUdTTTQ5QXdFSEEwSUFCSTM2WTViMWVHZmxqakMxQks2N2ZJODAKa05aSkY0RkZMMG92RHBVTG1razFHRVFIRjdZaWZBVjZJV1k4YzEyVHpNRFJTZFdDSGdyT3NZelVTa3VSS3AragpUVEJMTUE0R0ExVWREd0VCL3dRRUF3SUhnREFNQmdOVkhSTUJBZjhFQWpBQU1Dc0dBMVVkSXdRa01DS0FJSjBUCnJnbS9qSENvOVlURm11a1UyaTZDZHZ3b29WSHhsWG5Ed2ZEUDk5T29NQW9HQ0NxR1NNNDlCQU1DQTBnQU1FVUMKSVFEMnFqNHhBVDZxZ2xkbDNlM2NZU2U0dW9CUDhXSk1MN1Uwb2s2ck9nMyt0d0lnSEFRN1ZlNjBuLy9HRG0wUApxdlBqOS9BRUc4L3Q2WktYMDFjVEZJV1hjNm89Ci0tLS0tRU5EIENFUlRJRklDQVRFLS0tLS0K",
          "mspid": "OrdererMSP"
    },
    "principal_classification": "IDENTITY"
}
注:"id_bytes"是排序节点的证书orderer5.example.com-cert.pem,但是必须经过Base64编码,不能直接使用原文件的路径。需要在终端中通过下述命令转换:
base64 -w 0 ~/hyfa/fabric-samples/test-network/organizations/ordererOrganizations/example.com/orderers/orderer5.example.com/msp/signcerts/orderer5.example.com-cert.pem
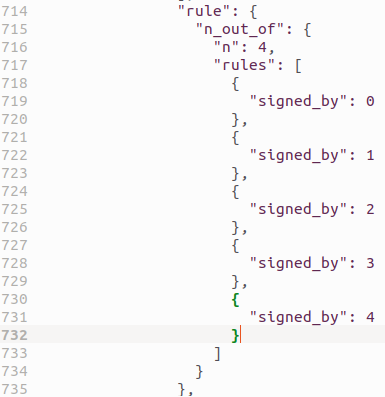
- 修改排序的策略
目标字段:channel_group → groups → Orderer → policies → BlockValidation → policy → value → rule
修改内容:n=4
n的值基于以下公式
f = int((num_of_nodes - 1) / 3)
n = ceil((num_of_nodes + f + 1) / 2)
新增内容:
{
    "signed_by": 4
}
- 添加集合映射(concenter mapping)
目标字段:channel_group → groups → Orderer → values → Orderers → value → consenter_mapping
新增内容:
{
    "client_tls_cert": "LS0tLS1CRUdJTiBDRVJUSUZJQ0FURS0tLS0tCk1JSUNRekNDQWVtZ0F3SUJBZ0lRSDFadTM1ak5Gelp4TkVFQ3d6ZnE0akFLQmdncWhrak9QUVFEQWpCc01Rc3cKQ1FZRFZRUUdFd0pWVXpFVE1CRUdBMVVFQ0JNS1EyRnNhV1p2Y201cFlURVdNQlFHQTFVRUJ4TU5VMkZ1SUVaeQpZVzVqYVhOamJ6RVVNQklHQTFVRUNoTUxaWGhoYlhCc1pTNWpiMjB4R2pBWUJnTlZCQU1URVhSc2MyTmhMbVY0CllXMXdiR1V1WTI5dE1CNFhEVEkxTURJeE1UQXlOVFl3TUZvWERUTTFNREl3T1RBeU5UWXdNRm93YkRFTE1Ba0cKQTFVRUJoTUNWVk14RXpBUkJnTlZCQWdUQ2tOaGJHbG1iM0p1YVdFeEZqQVVCZ05WQkFjVERWTmhiaUJHY21GdQpZMmx6WTI4eEZEQVNCZ05WQkFvVEMyVjRZVzF3YkdVdVkyOXRNUm93R0FZRFZRUURFeEYwYkhOallTNWxlR0Z0CmNHeGxMbU52YlRCWk1CTUdCeXFHU000OUFnRUdDQ3FHU000OUF3RUhBMElBQkI5VnVjTXF1YkdGYlBGTFdnK2oKNklUU3dVaEJMSEluVU9kTkhnNU1TeVJ6aXFrU2xQTElVWllTT21ObE1aRlBWdDdqSVVKSzVhM01uUGtqYVNkOAo0WVdqYlRCck1BNEdBMVVkRHdFQi93UUVBd0lCcGpBZEJnTlZIU1VFRmpBVUJnZ3JCZ0VGQlFjREFnWUlLd1lCCkJRVUhBd0V3RHdZRFZSMFRBUUgvQkFVd0F3RUIvekFwQmdOVkhRNEVJZ1FnajR0YlBnZjgydHJKcnpmb1prZnIKVnJGMmVYZ01STXJEcVBpQnB5MVR6dTh3Q2dZSUtvWkl6ajBFQXdJRFNBQXdSUUlnYWdrRFBEa3E3SEVrclBzYwplbXlBWEY0cjNmWjllYngvZDQvNFNTN3o5aXNDSVFDN3hZRE1xUjZyQ3ZqYVlnb2tTUUtuNmtBY1lkQlNFMEs2CjRQb1VDdHY3OGc9PQotLS0tLUVORCBDRVJUSUZJQ0FURS0tLS0tCg==",
    "host": "orderer5.example.com",
    "id": 5,
    "identity": "LS0tLS1CRUdJTiBDRVJUSUZJQ0FURS0tLS0tCk1JSUNJRENDQWNhZ0F3SUJBZ0lSQUxaUnIzMXkyZTBWM1ZQbVUwdThlU0l3Q2dZSUtvWkl6ajBFQXdJd2FURUwKTUFrR0ExVUVCaE1DVlZNeEV6QVJCZ05WQkFnVENrTmhiR2xtYjNKdWFXRXhGakFVQmdOVkJBY1REVk5oYmlCRwpjbUZ1WTJselkyOHhGREFTQmdOVkJBb1RDMlY0WVcxd2JHVXVZMjl0TVJjd0ZRWURWUVFERXc1allTNWxlR0Z0CmNHeGxMbU52YlRBZUZ3MHlOVEF5TVRFd01qVTNNREJhRncwek5UQXlNRGt3TWpVM01EQmFNR3N4Q3pBSkJnTlYKQkFZVEFsVlRNUk13RVFZRFZRUUlFd3BEWVd4cFptOXlibWxoTVJZd0ZBWURWUVFIRXcxVFlXNGdSbkpoYm1OcApjMk52TVJBd0RnWURWUVFMRXdkdmNtUmxjbVZ5TVIwd0d3WURWUVFERXhSdmNtUmxjbVZ5TlM1bGVHRnRjR3hsCkxtTnZiVEJaTUJNR0J5cUdTTTQ5QWdFR0NDcUdTTTQ5QXdFSEEwSUFCSTM2WTViMWVHZmxqakMxQks2N2ZJODAKa05aSkY0RkZMMG92RHBVTG1razFHRVFIRjdZaWZBVjZJV1k4YzEyVHpNRFJTZFdDSGdyT3NZelVTa3VSS3AragpUVEJMTUE0R0ExVWREd0VCL3dRRUF3SUhnREFNQmdOVkhSTUJBZjhFQWpBQU1Dc0dBMVVkSXdRa01DS0FJSjBUCnJnbS9qSENvOVlURm11a1UyaTZDZHZ3b29WSHhsWG5Ed2ZEUDk5T29NQW9HQ0NxR1NNNDlCQU1DQTBnQU1FVUMKSVFEMnFqNHhBVDZxZ2xkbDNlM2NZU2U0dW9CUDhXSk1MN1Uwb2s2ck9nMyt0d0lnSEFRN1ZlNjBuLy9HRG0wUApxdlBqOS9BRUc4L3Q2WktYMDFjVEZJV1hjNm89Ci0tLS0tRU5EIENFUlRJRklDQVRFLS0tLS0K",
    "msp_id": "OrdererMSP",
    "port": 7060,
    "server_tls_cert": "LS0tLS1CRUdJTiBDRVJUSUZJQ0FURS0tLS0tCk1JSUNRekNDQWVtZ0F3SUJBZ0lRSDFadTM1ak5Gelp4TkVFQ3d6ZnE0akFLQmdncWhrak9QUVFEQWpCc01Rc3cKQ1FZRFZRUUdFd0pWVXpFVE1CRUdBMVVFQ0JNS1EyRnNhV1p2Y201cFlURVdNQlFHQTFVRUJ4TU5VMkZ1SUVaeQpZVzVqYVhOamJ6RVVNQklHQTFVRUNoTUxaWGhoYlhCc1pTNWpiMjB4R2pBWUJnTlZCQU1URVhSc2MyTmhMbVY0CllXMXdiR1V1WTI5dE1CNFhEVEkxTURJeE1UQXlOVFl3TUZvWERUTTFNREl3T1RBeU5UWXdNRm93YkRFTE1Ba0cKQTFVRUJoTUNWVk14RXpBUkJnTlZCQWdUQ2tOaGJHbG1iM0p1YVdFeEZqQVVCZ05WQkFjVERWTmhiaUJHY21GdQpZMmx6WTI4eEZEQVNCZ05WQkFvVEMyVjRZVzF3YkdVdVkyOXRNUm93R0FZRFZRUURFeEYwYkhOallTNWxlR0Z0CmNHeGxMbU52YlRCWk1CTUdCeXFHU000OUFnRUdDQ3FHU000OUF3RUhBMElBQkI5VnVjTXF1YkdGYlBGTFdnK2oKNklUU3dVaEJMSEluVU9kTkhnNU1TeVJ6aXFrU2xQTElVWllTT21ObE1aRlBWdDdqSVVKSzVhM01uUGtqYVNkOAo0WVdqYlRCck1BNEdBMVVkRHdFQi93UUVBd0lCcGpBZEJnTlZIU1VFRmpBVUJnZ3JCZ0VGQlFjREFnWUlLd1lCCkJRVUhBd0V3RHdZRFZSMFRBUUgvQkFVd0F3RUIvekFwQmdOVkhRNEVJZ1FnajR0YlBnZjgydHJKcnpmb1prZnIKVnJGMmVYZ01STXJEcVBpQnB5MVR6dTh3Q2dZSUtvWkl6ajBFQXdJRFNBQXdSUUlnYWdrRFBEa3E3SEVrclBzYwplbXlBWEY0cjNmWjllYngvZDQvNFNTN3o5aXNDSVFDN3hZRE1xUjZyQ3ZqYVlnb2tTUUtuNmtBY1lkQlNFMEs2CjRQb1VDdHY3OGc9PQotLS0tLUVORCBDRVJUSUZJQ0FURS0tLS0tCg=="
}
注1:"identity"是排序节点的证书,同"id_bytes"。
注2:"client_tls_cert"和"server_tls_cert"使用同一个证书分别作为客户端和服务端的TLS证书,同样必须经过Base64编码。可以在终端中通过下述命令转换:
base64 -w 0 ~/hyfa/fabric-samples/test-network/organizations/ordererOrganizations/example.com/orderers/orderer5.example.com/msp/tlscacerts/tlsca.example.com-cert.pem
测试网络在
scripts/文件夹中提供了一个Python脚本add_new_orderer_to_config.py来快速完成以上修改工作,用法如下:
python3 ../scripts/add_new_orderer_to_config.py original_config.json modified_config.json \ -a orderer5.example.com:7060 \ -i ../organizations/ordererOrganizations/example.com/orderers/orderer5.example.com/msp/signcerts/orderer5.example.com-cert.pem \ -s ../organizations/ordererOrganizations/example.com/orderers/orderer5.example.com/msp/tlscacerts/tlsca.example.com-cert.pem \ -c ../organizations/ordererOrganizations/example.com/orderers/orderer5.example.com/msp/tlscacerts/tlsca.example.com-cert.pem
将原始和修改后的通道配置转换回protobuf格式,计算它们之间的差异,输出一个名为config_update.pb的新protobuf二进制文件。
configtxlator proto_encode --input original_config.json --type common.Config --output original_config.pb
configtxlator proto_encode --input modified_config.json --type common.Config --output modified_config.pb
configtxlator compute_update --channel_id mychannel --original original_config.pb --updated modified_config.pb --output config_update.pb
将config_update.pb解码为可编辑的JSON格式:
configtxlator proto_decode --input config_update.pb --type common.ConfigUpdate --output config_update.json
将config_update.json封装在一个信封消息中:
echo '{"payload":{"header":{"channel_header":{"channel_id":"mychannel", "type":2}},"data":{"config_update":'$(cat config_update.json)'}}}' | jq . >config_update_in_envelope.json
最后转换为protobuf格式:
configtxlator proto_encode --input config_update_in_envelope.json --type common.Envelope --output envelope.pb
2.3.3. 签名并提交配置更新
返回test-network目录:
cd ..
涉及排序节点的配置更新需要排序组织和一个Peer组织的签名。
当前已经作为Org1操作peer CLI,因此可以直接更新签名:
peer channel signconfigtx -f channel-artifacts/envelope.pb
作为排序组织OrdererOrg操作peer CLI:
export CORE_PEER_TLS_ENABLED=true
export CORE_PEER_LOCALMSPID=OrdererMSP
export CORE_PEER_TLS_ROOTCERT_FILE=${PWD}/organizations/ordererOrganizations/example.com/orderers/orderer.example.com/tls/ca.crt
export CORE_PEER_MSPCONFIGPATH=${PWD}/organizations/ordererOrganizations/example.com/users/[email protected]/msp
export CORE_PEER_ADDRESS=localhost:7050
使用peer channel update命令提交更新:
peer channel update -o localhost:7050 --ordererTLSHostnameOverride orderer.example.com -c mychannel -f channel-artifacts/envelope.pb --tls --cafile "$ORDERER_CA"
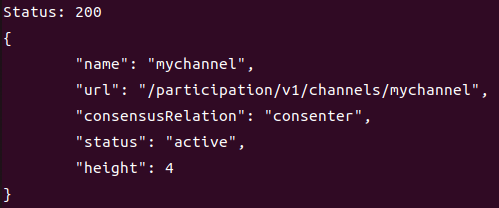
使用osnadmin channel list命令确认更新:
osnadmin channel list --channelID mychannel -o localhost:7063 --ca-file "$ORDERER_CA" --client-cert "$ORDERER_ADMIN_TLS_SIGN_CERT" --client-key "$ORDERER_ADMIN_TLS_PRIVATE_KEY"
命令的输出如下图所示,注意此时的status为active,height为4,与其它排序节点一致。
三、手动从通道中移除排序节点
从通道中移除排序节点的流程与为通道加入排序节点类似,需要一份包含通道当前配置的文件(使用peer channel fetch命令获取并处理,其实内容跟已有的modified_config.json一致)和通道配置变更后的文件(如果要移除的排序节点为刚才新加入的orderer5.example.com,则内容跟已有的original_config.json一致)。
作为Org1操作peer CLI:
export $(./setOrgEnv.sh Org1 | xargs)
获取最新的配置区块:
peer channel fetch config channel-artifacts/config_block.pb -o localhost:7050 --ordererTLSHostnameOverride orderer.example.com -c mychannel --tls --cafile "$ORDERER_CA"
进入存储通道配置区块的channel-artifacts文件夹:
cd channel-artifacts
复制original_config.json并命名为modified_config.json作为新的通道配置变更后的文件:
cp original_config.json modified_config.json
使用configtxlator工具将最新的通道配置区块解码为JSON格式,去掉所有与想要进行的更改无关的标头、元数据、创建者签名等:
configtxlator proto_decode --input config_block.pb --type common.Block --output config_block.json
jq .data.data[0].payload.data.config config_block.json > original_config.json
将原始和修改后的通道配置转换回protobuf格式,计算它们之间的差异,输出一个名为config_update.pb的新protobuf二进制文件。
configtxlator proto_encode --input original_config.json --type common.Config --output original_config.pb
configtxlator proto_encode --input modified_config.json --type common.Config --output modified_config.pb
configtxlator compute_update --channel_id mychannel --original original_config.pb --updated modified_config.pb --output config_update.pb
将config_update.pb解码为可编辑的JSON格式:
configtxlator proto_decode --input config_update.pb --type common.ConfigUpdate --output config_update.json
将config_update.json封装在一个信封消息中:
echo '{"payload":{"header":{"channel_header":{"channel_id":"mychannel", "type":2}},"data":{"config_update":'$(cat config_update.json)'}}}' | jq . >config_update_in_envelope.json
最后转换为protobuf格式:
configtxlator proto_encode --input config_update_in_envelope.json --type common.Envelope --output envelope.pb
返回test-network目录:
cd ..
涉及排序节点的配置更新需要排序组织和一个Peer组织的签名。
当前已经作为Org1操作peer CLI,因此可以直接更新签名:
peer channel signconfigtx -f channel-artifacts/envelope.pb
作为排序组织OrdererOrg操作peer CLI:
export CORE_PEER_TLS_ENABLED=true
export CORE_PEER_LOCALMSPID=OrdererMSP
export CORE_PEER_TLS_ROOTCERT_FILE=${PWD}/organizations/ordererOrganizations/example.com/orderers/orderer.example.com/tls/ca.crt
export CORE_PEER_MSPCONFIGPATH=${PWD}/organizations/ordererOrganizations/example.com/users/[email protected]/msp
export CORE_PEER_ADDRESS=localhost:7050
使用peer channel update命令提交更新:
peer channel update -o localhost:7050 --ordererTLSHostnameOverride orderer.example.com -c mychannel -f channel-artifacts/envelope.pb --tls --cafile "$ORDERER_CA"
使用osnadmin channel remove将排序节点从通道中移除:
osnadmin channel remove --channelID mychannel -o localhost:7063 --ca-file "$ORDERER_CA" --client-cert "$ORDERER_ADMIN_TLS_SIGN_CERT" --client-key "$ORDERER_ADMIN_TLS_PRIVATE_KEY"
如果成功,会返回状态204。
查看orderer5.example.com的日志结果如下:
docker logs --tail 10 orderer5.example.com
