系列文章目录
HarmonyOS Next 系列之省市区弹窗选择器实现(一)
HarmonyOS Next 系列之验证码输入组件实现(二)
HarmonyOS Next 系列之底部标签栏TabBar实现(三)
HarmonyOS Next 系列之HTTP请求封装和Token持久化存储(四)
HarmonyOS Next 系列之从手机选择图片或拍照上传功能实现(五)
HarmonyOS Next 系列之可移动悬浮按钮实现(六)
HarmonyOS Next 系列之沉浸式状态实现的多种方式(七)
HarmonyOS Next系列之Echarts图表组件(折线图、柱状图、饼图等)实现(八)
HarmonyOS Next系列之地图组件(Map Kit)使用(九)
文章目录
前言
HarmonyOS Next(基于API12)自带地图Map Kit使用——本文将讲述如何通过手动生成签名证书、申请地图权限、地图展示和地图常用功能示例讲解。
一、地图组件正确渲染步骤总结
1、手动新建私钥和证书请求文件
2、AppGallery 网站上创建项目和应用、申请调试/生产证书、Profile文件,并开通地图服务
3、项目代码中修改包名、配置client_id
4、手动修改签名配置
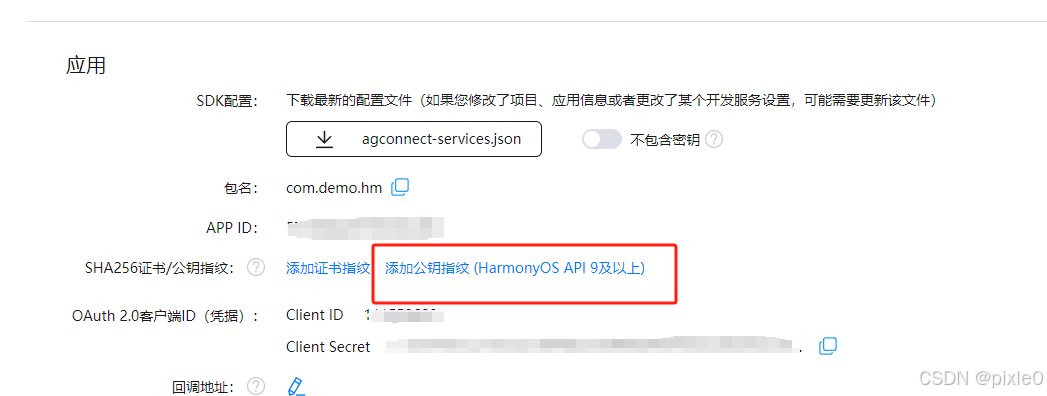
5、AppGallery 添加证书指纹、公钥指纹
6、引入组件渲染
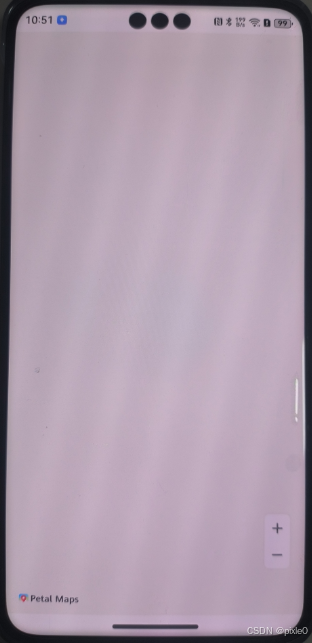
以上缺少任何步骤地图都无法正常显示,很多人没去手动创建签名证书或者未去AppGallery 申请地图服务,直接引用map组件导致渲染出来空白
空白示例:
二、详细步骤
1、手动新建私钥和证书请求文件
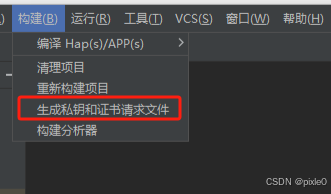
(1)开发工具—构建—生成私钥和证书请求文件
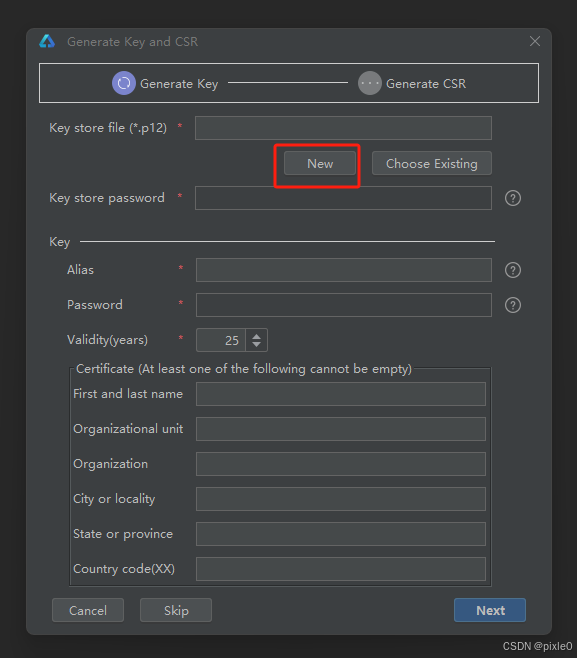
(2)点击New
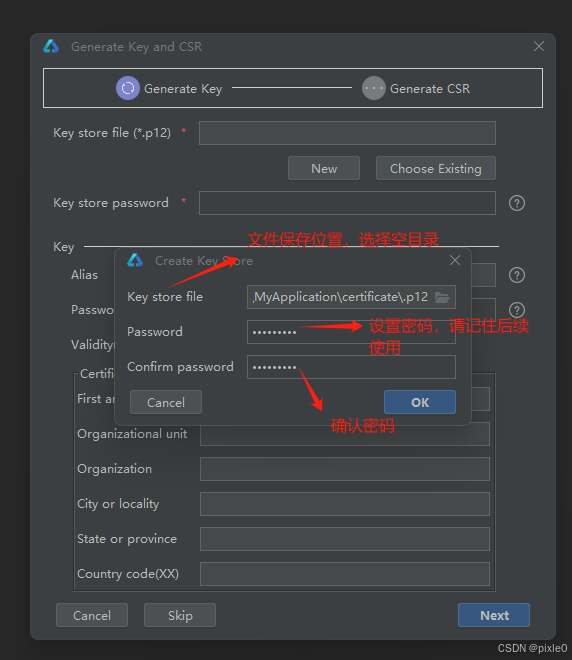
(3)选择文件保存目录,设置密码后点击OK
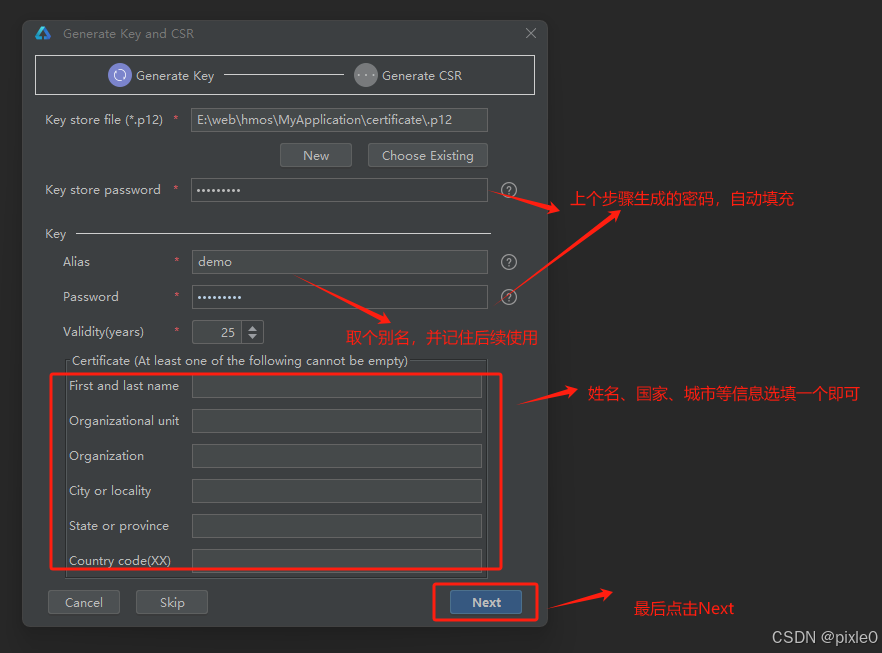
(4)如下图设置alias、个人信息后点击Next
(5)弹出如下确认框,选择csr file文件保存目录后点击Finish
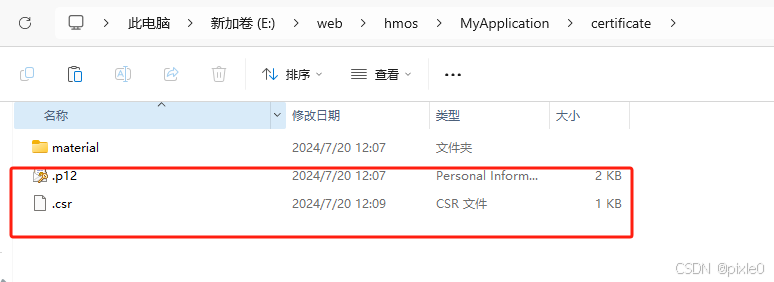
此时在第三小步选择的目录下生成了证书请求文件(.csr格式)和证书文件(.p12格式),记住位置后续需要使用
2、AppGallery 网站上创建项目和应用、申请调试证书或生产证书和Profile文件,并开通地图服务
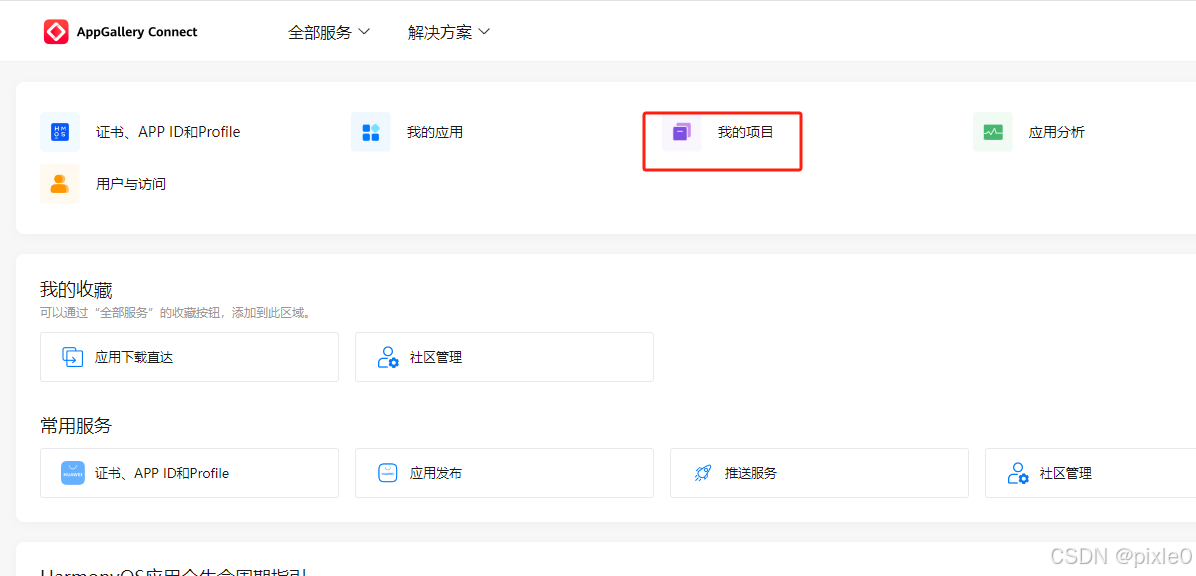
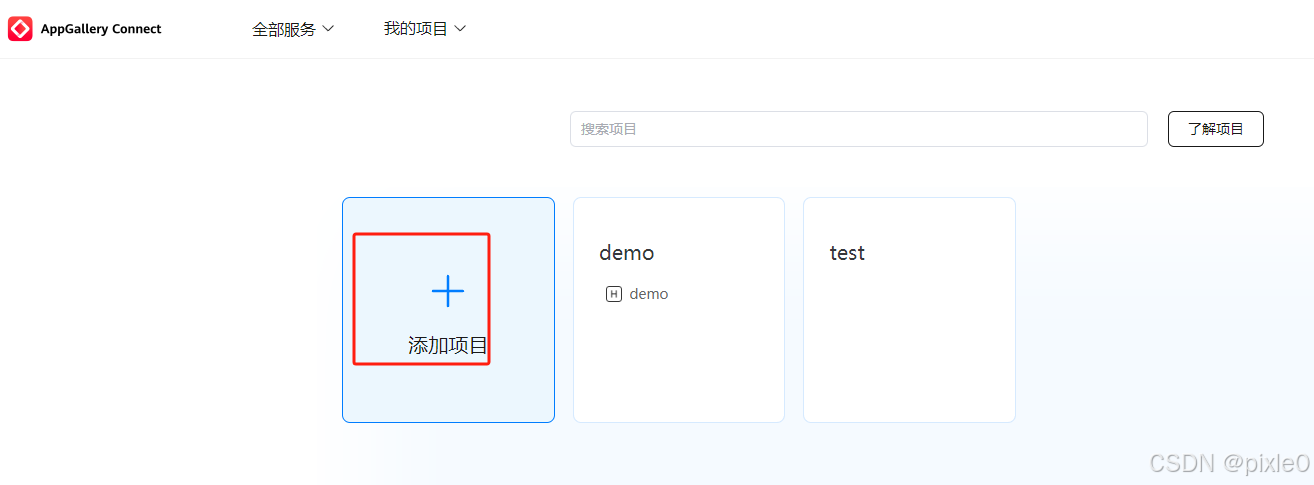
(1)AppGallery 网站,我的项目-添加项目
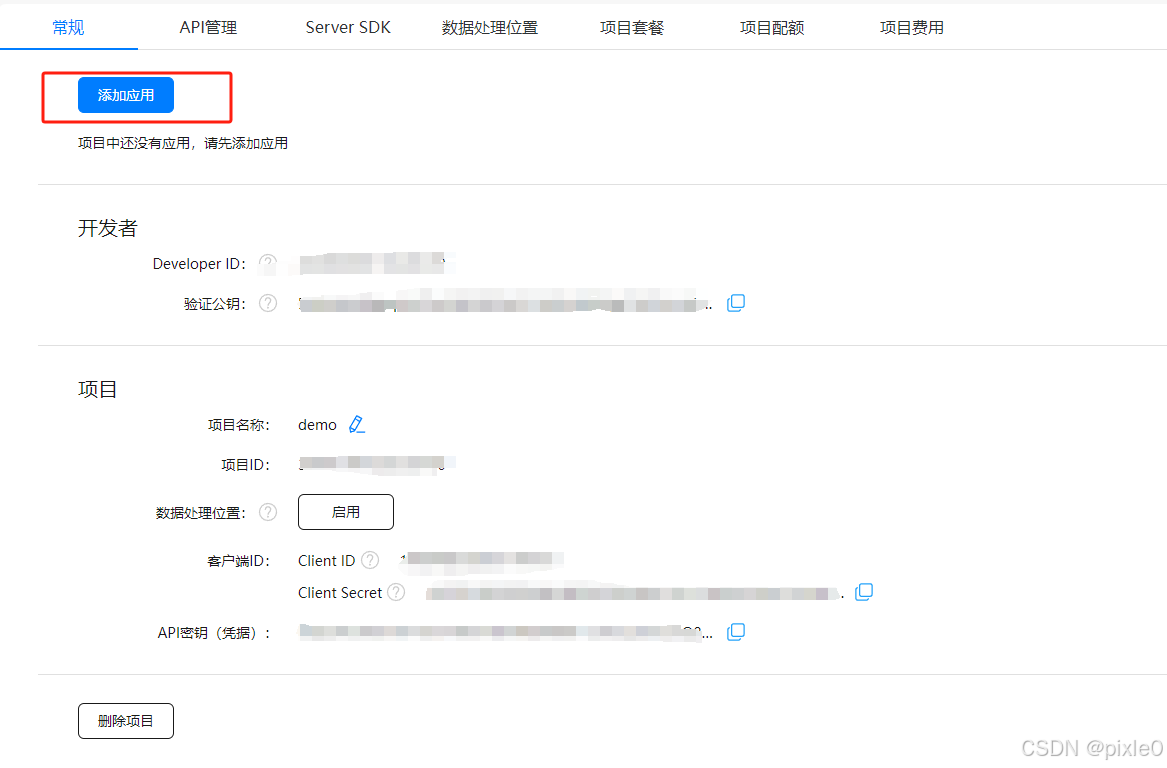
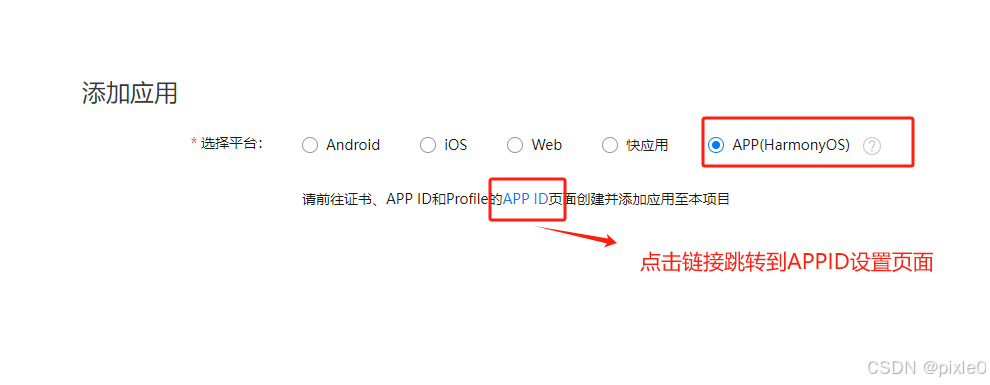
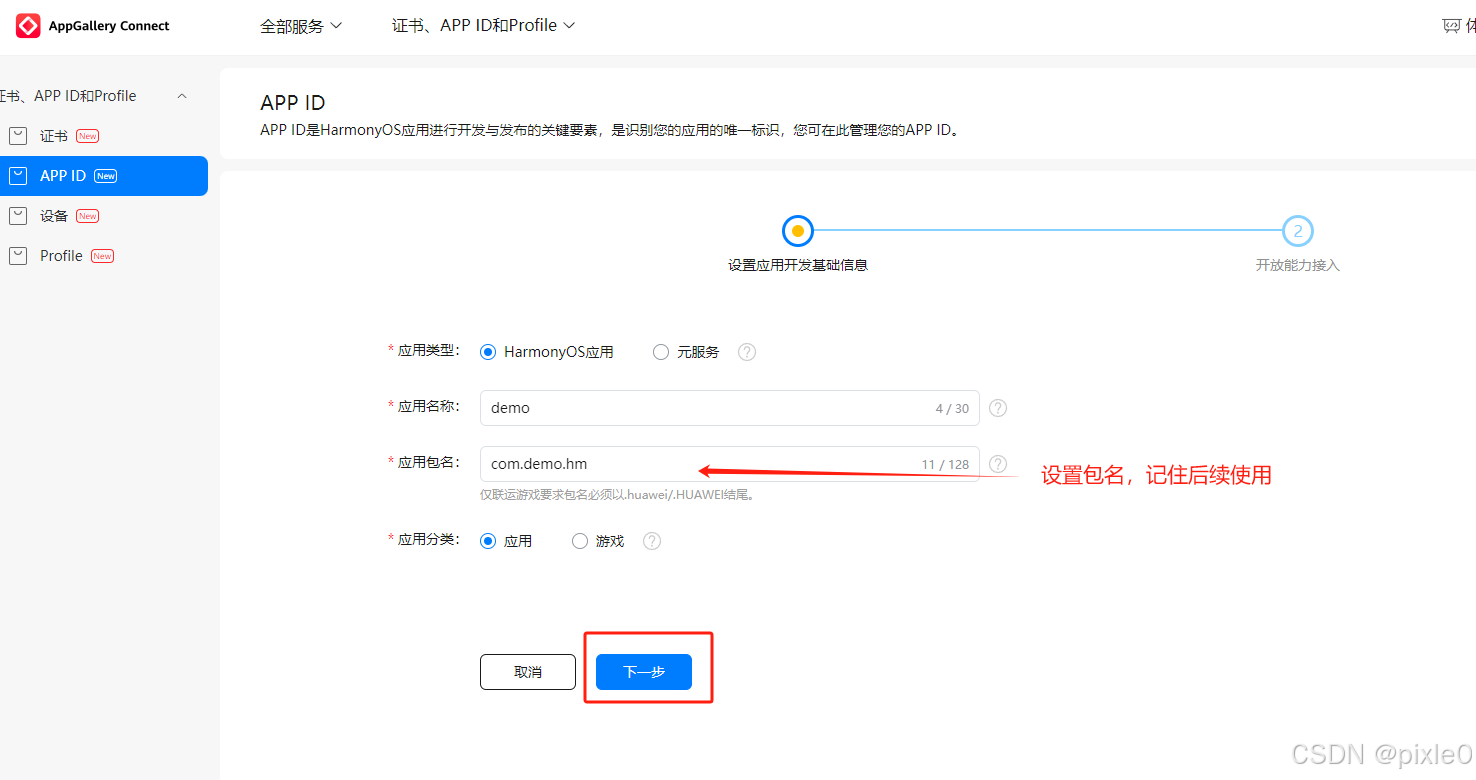
(2)在项目里面添加应用,设置应用包名和名称
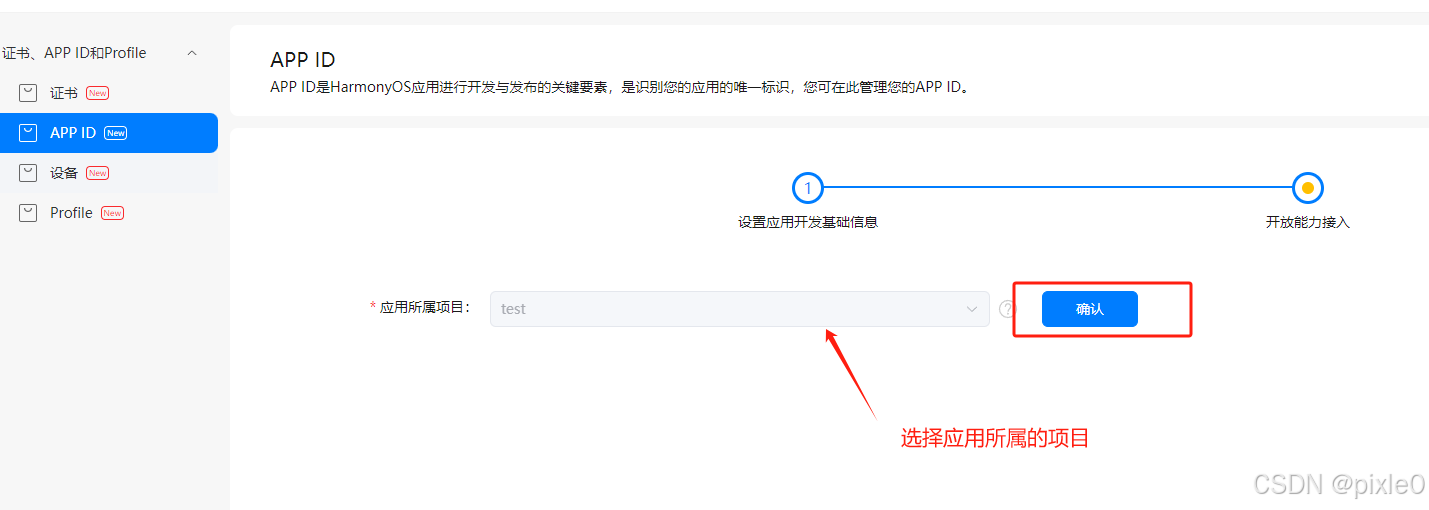
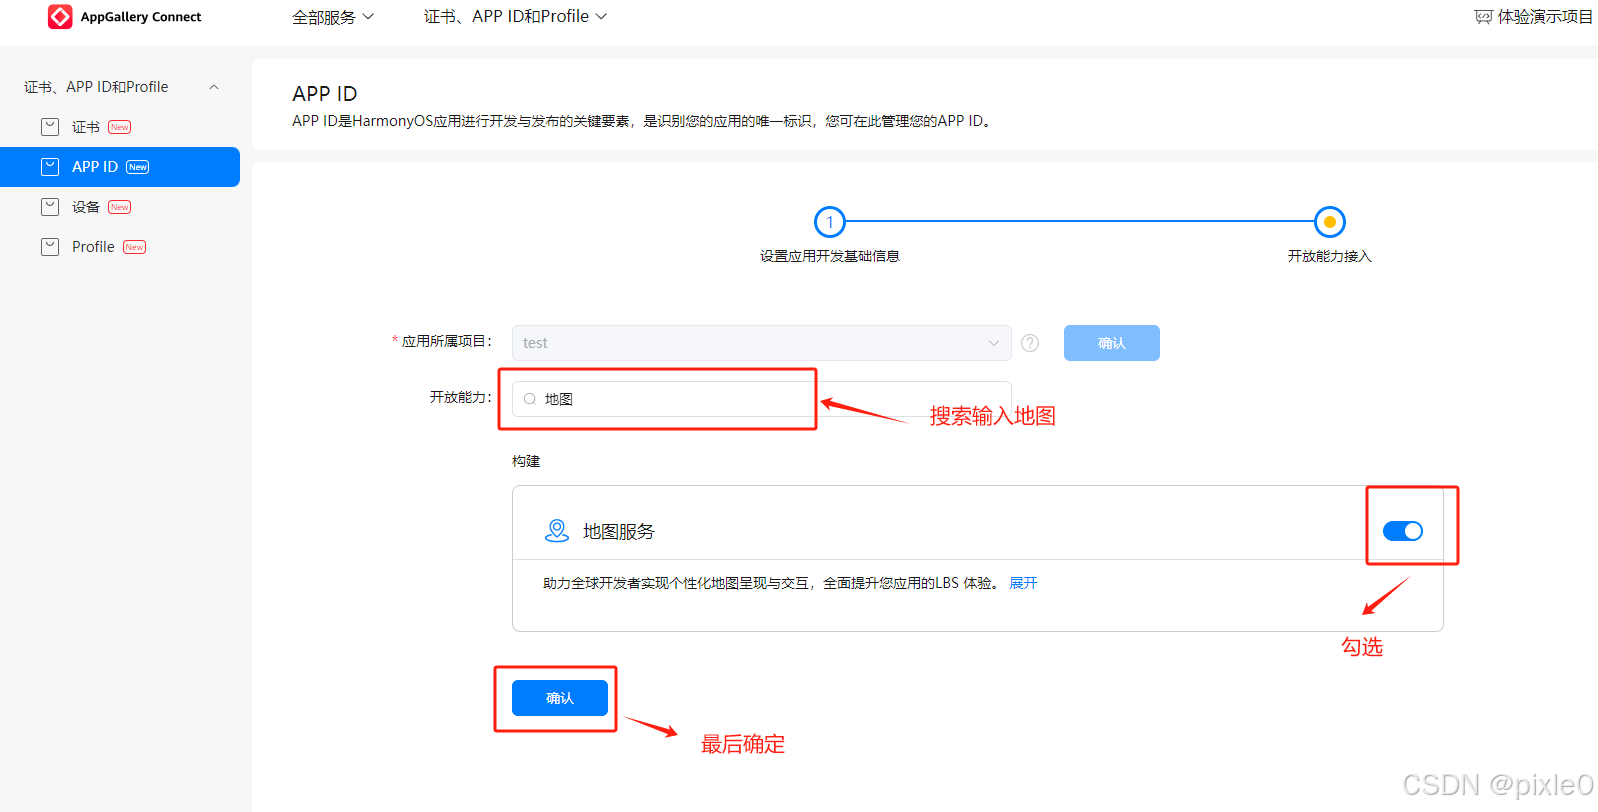
(3)开通地图服务
如下图,成功开通
3 、项目代码中修改包名和配置client_id
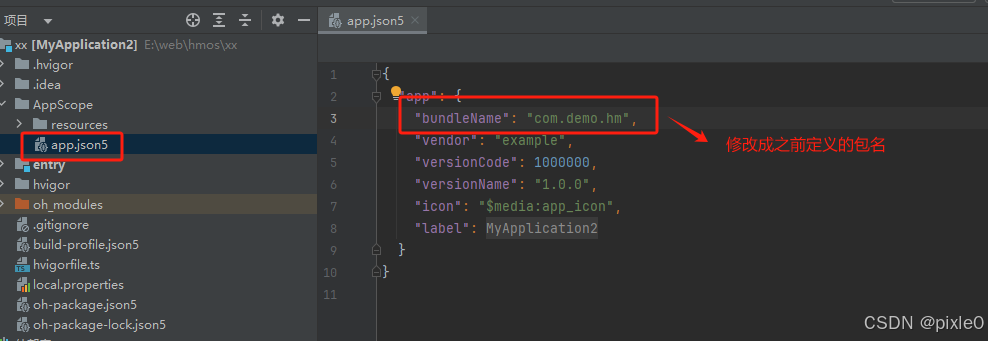
(1)包名修改
AppScope/app.json5
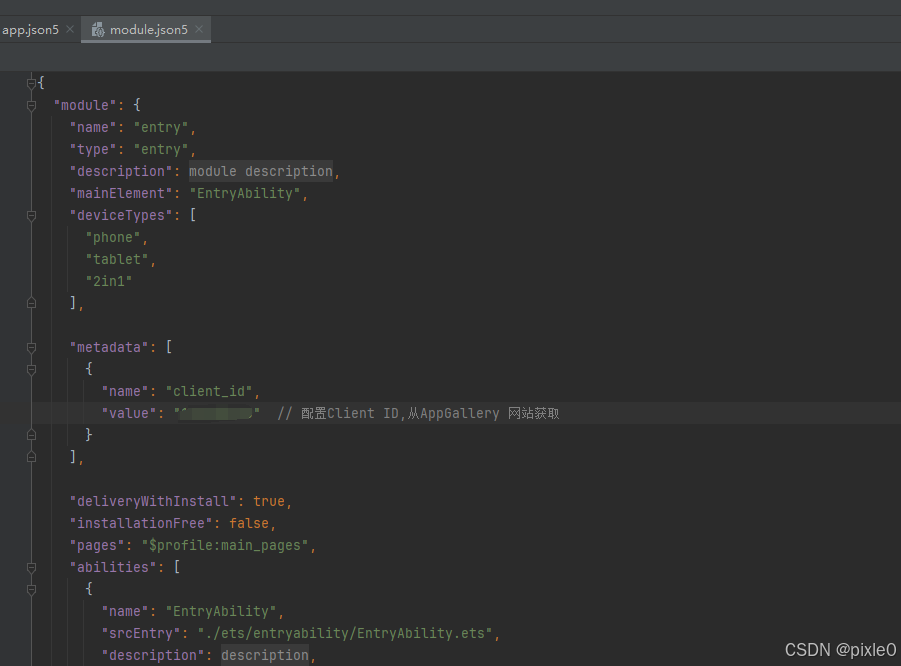
(2)配置client_id
entry/src/main/module.json5,module下
添加:
 "metadata": [
      {
        "name": "client_id",
        "value": "111xxxxxxx"  // 配置Client ID,从AppGallery 网站获取
      }
    ]
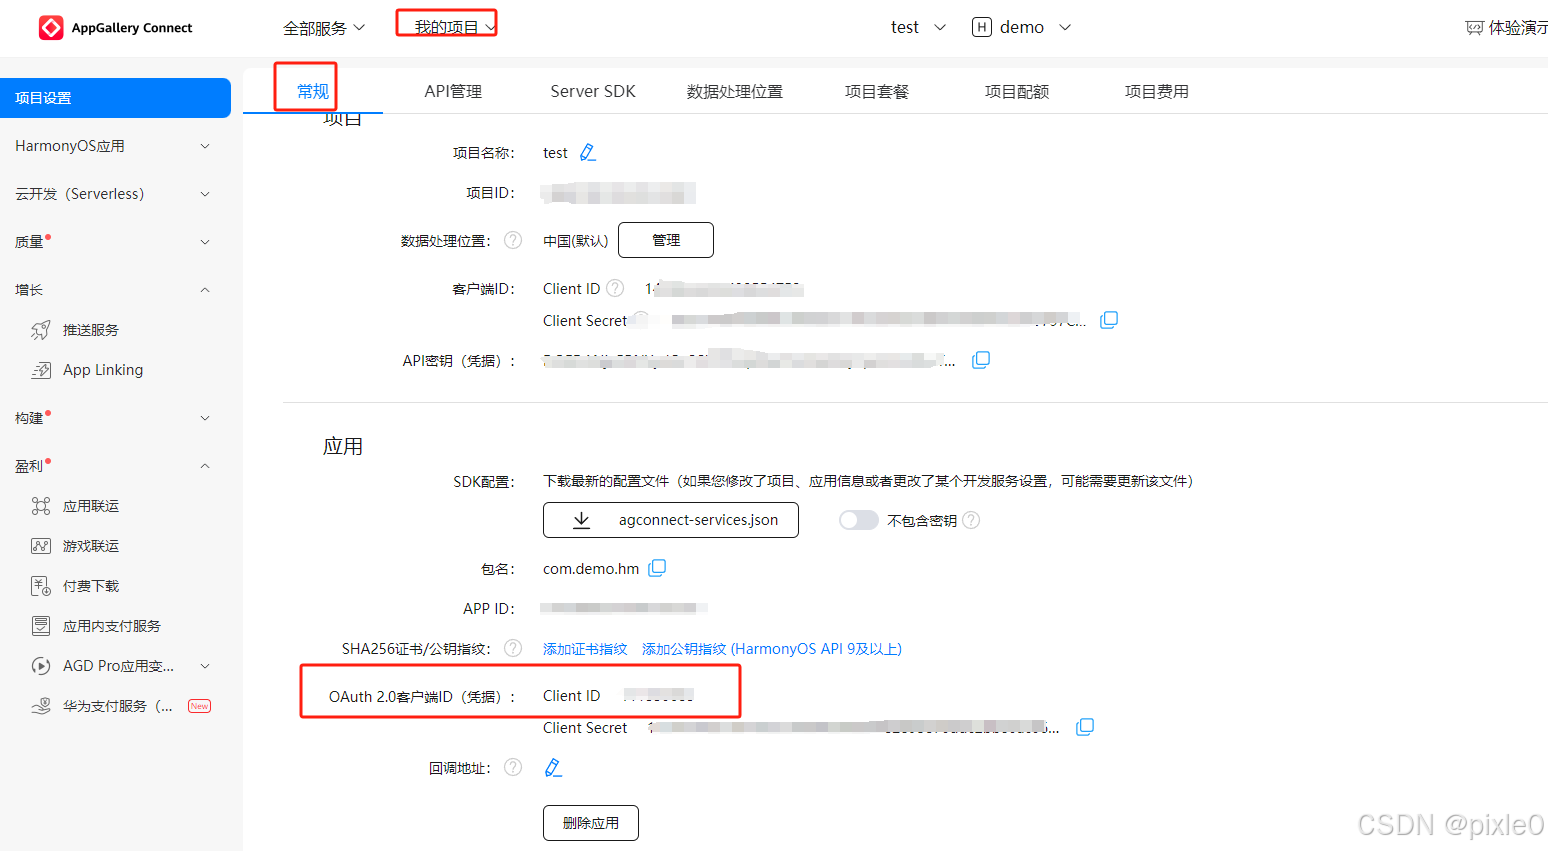
其中 Client ID从AppGallery 我的项目里面获取
4、手动修改签名配置
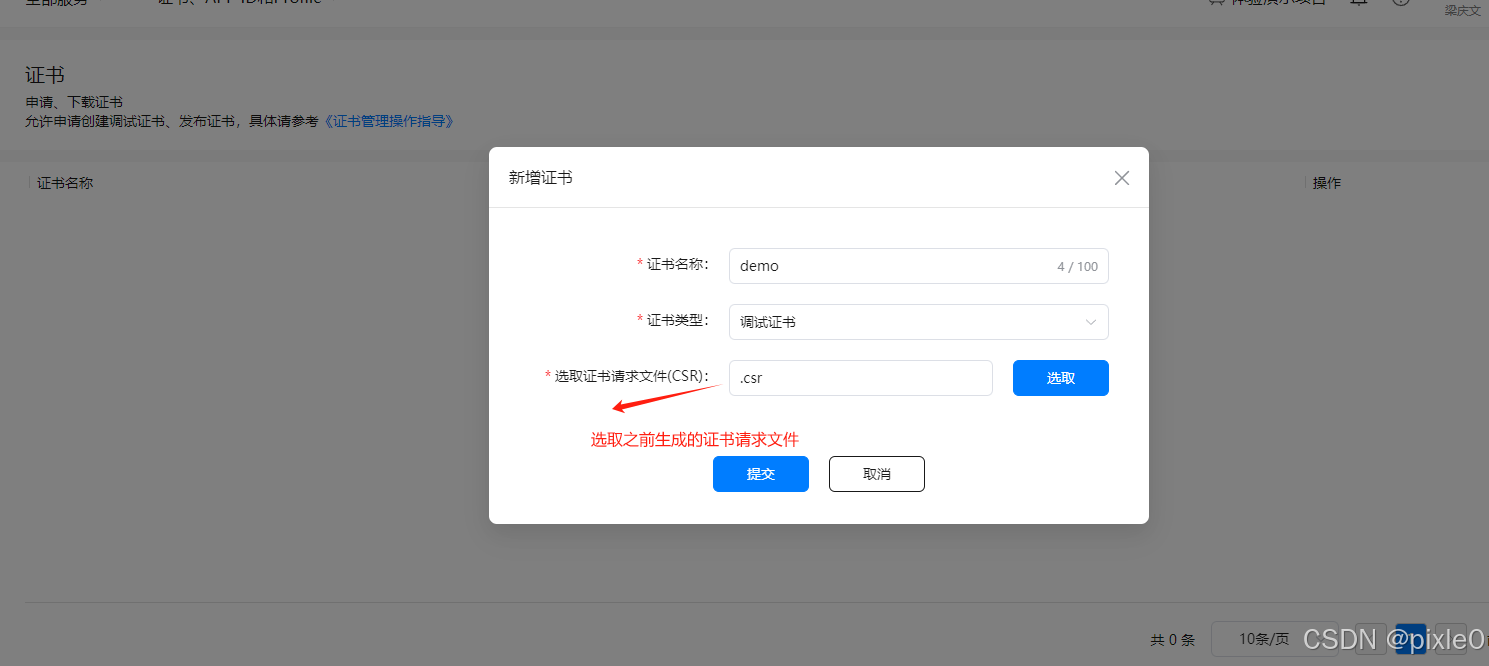
(1)从AppGallery 新建并下载调试证书或发布证书(调试下载调试证书,上线下载开发证书)
成功后下载,文件格式为(.cer)
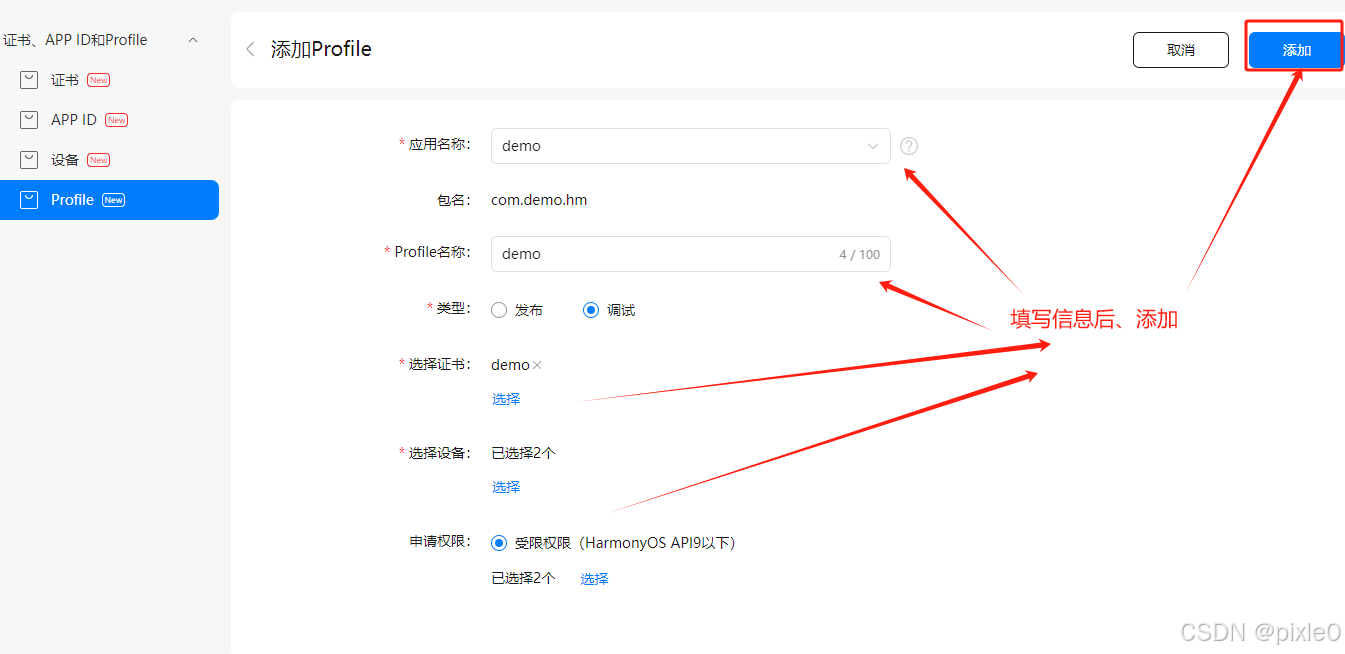
(2)从AppGallery 新建并下载Profile文件
成功后下载,文件格式为(.p7b)
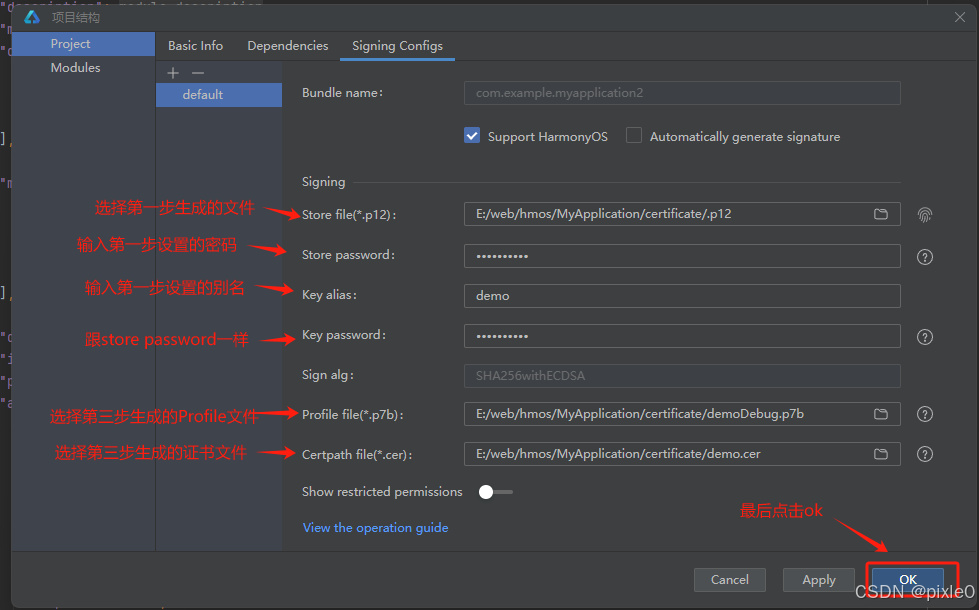
(3)修改签名配置
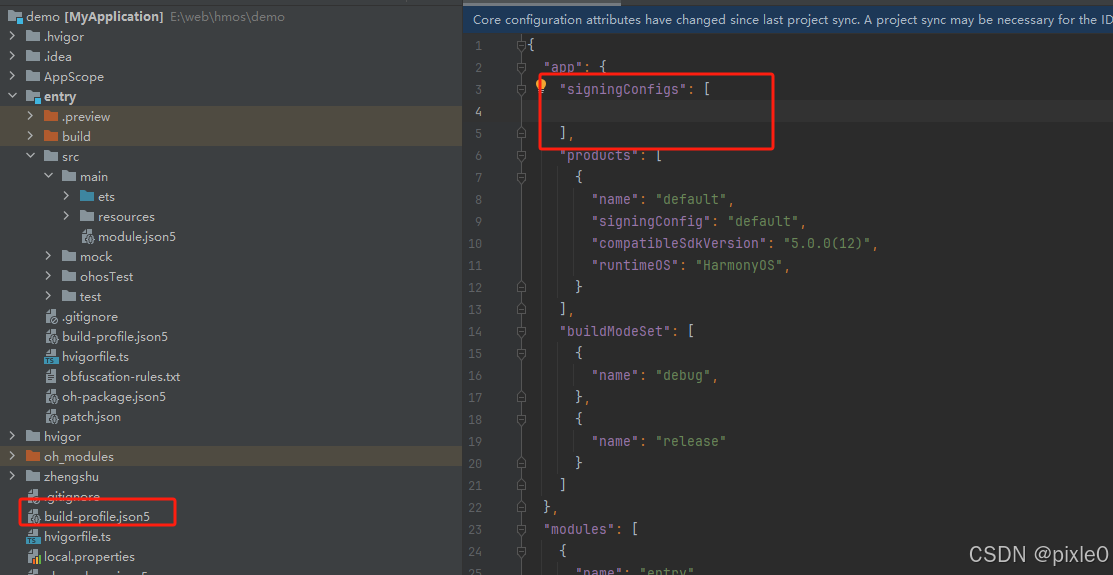
删除原来的签名配置:
项目根目录/build-profile.json5 打开删除app下signingConfigs字段内容
开发工具—文件—项目结构—Signing Configs ,只勾选SupportHarmonyOS,进行手动签名
点击ok后build-profile.json5签名配置已更新
5、AppGallery 添加证书指纹、添加公钥指纹
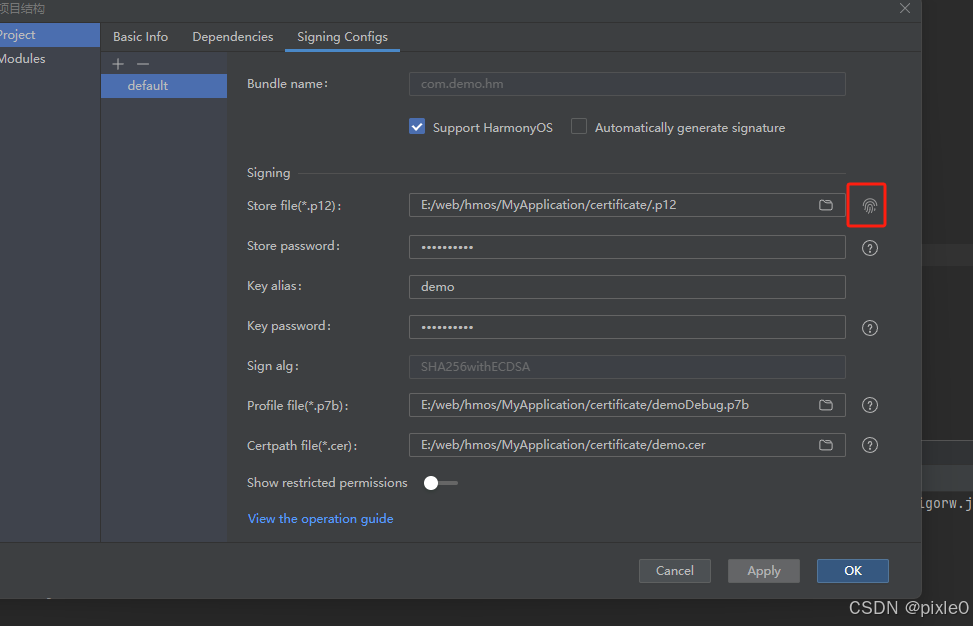
开发工具—文件—项目结构—Signing Configs
点击右边指纹图标
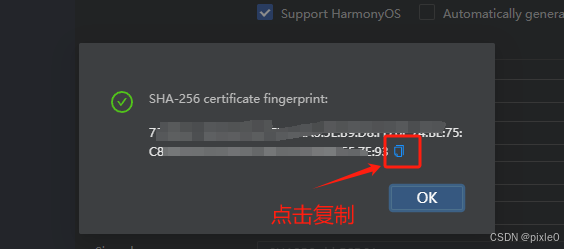
复制证书指纹
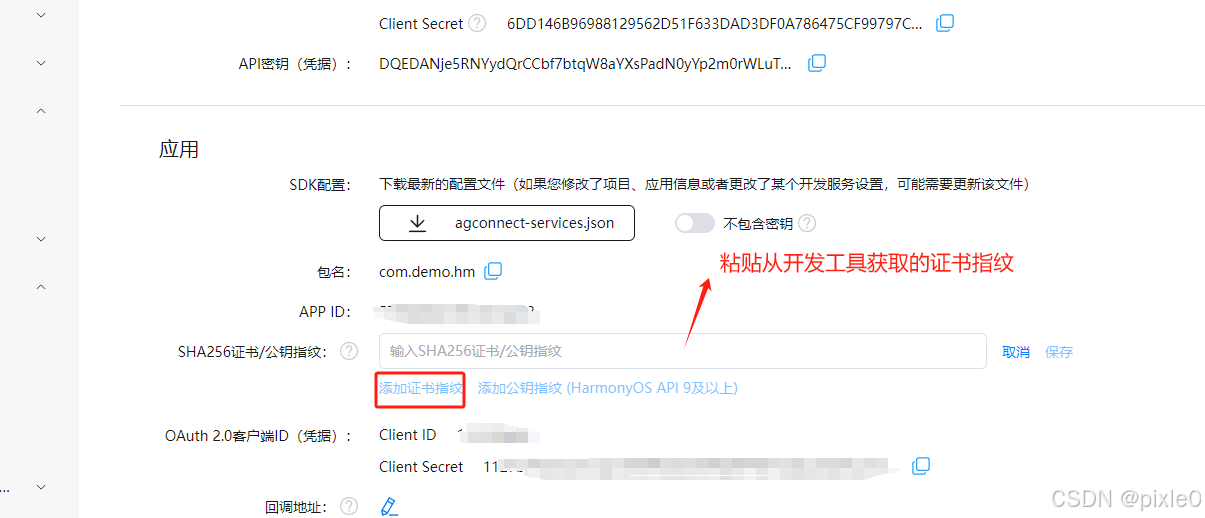
在AppGallery—我的项目下添加证书指纹
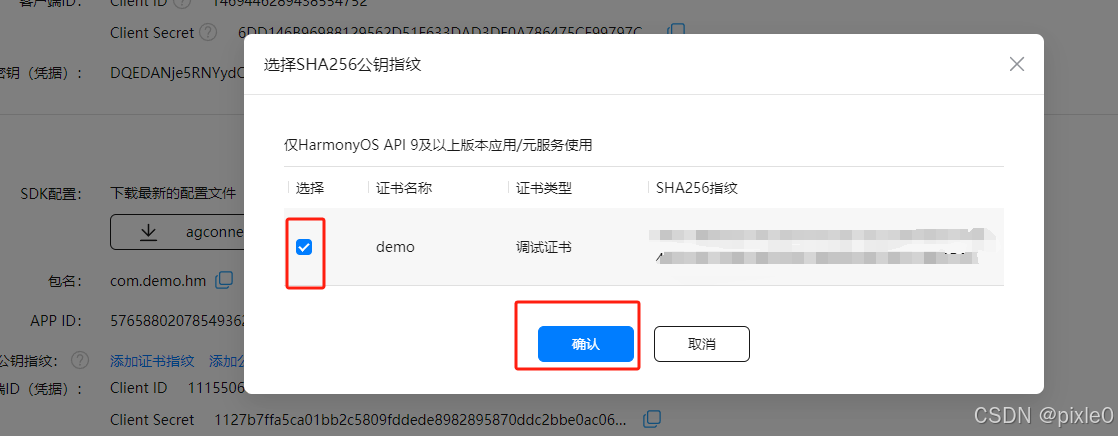
添加公钥指纹
至此所有设置已完成(设置完可能有几分钟的延迟生效),之后就可以愉快开发了
6、引入组件渲染
核心提炼:
组件:
MapComponent({ mapOptions,mapCallback })
其中mapOptions地图初始化配置参数,mapCallback 地图初始化完成回调,回调函数返回mapController(地图控制器),后续其他功能将通过调用mapController API实现
import { MapComponent, mapCommon, map } from '@kit.MapKit';
import { AsyncCallback } from '@kit.BasicServicesKit';
@Entry
@Component
struct Index{
  private mapOption?: mapCommon.MapOptions; //地图配置
  private callback?: AsyncCallback<map.MapComponentController>; //初始化完成回调
  private mapController?: map.MapComponentController; //地图控制器

  aboutToAppear(): void {
    // 地图初始化参数,设置地图中心点坐标及层级
    this.mapOption = {
      position: {
        target: {
          latitude: 39.9, //纬度
          longitude: 116.4  //经度
        },
        zoom: 10, //缩放层级
        //compassControlsEnabled:true,//是否显示指南针
        //zoomControlsEnabled:true,//是否展示缩放按钮
        //myLocationControlsEnabled:fasle,//是否展示我的位置按钮
        //scaleControlsEnabled:false,//是否展示比例尺
      }
    };

    // 地图初始化的回调
    this.callback = async (err, mapController) => {
      if (!err) {
        // 获取地图的控制器类,用来操作地图
        this.mapController = mapController;
      }
    };
  }

  build() {
    Stack() {
        // 调用MapComponent组件初始化地图
        MapComponent({ mapOptions: this.mapOption, mapCallback: this.callback }).width('100%').height('100%');
    }.height('100%')
  }
}
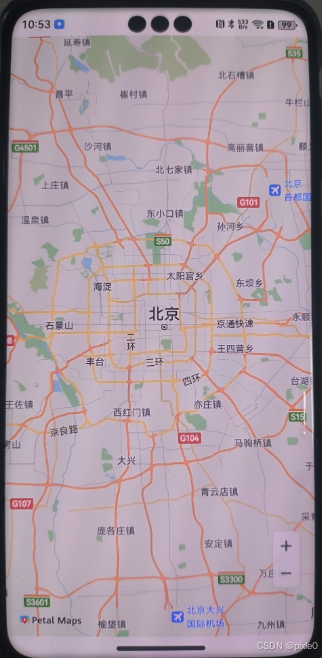
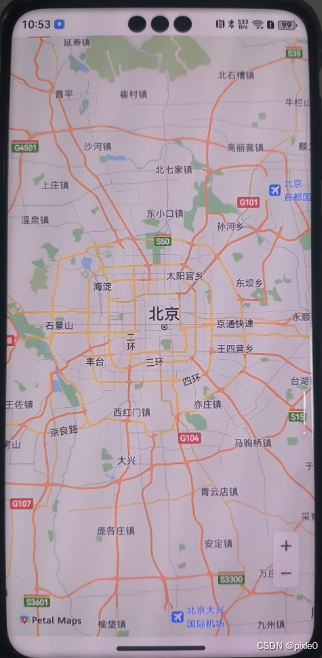
运行效果:
更多的mapOption属性请 查看官网文档
三、地图组件常用功能
1.开启我的位置
我的位置按钮位于地图右下角默认未开启
关键代码:
// 启用我的位置图层
this.mapController.setMyLocationEnabled(true);
// 启用我的位置按钮
this.mapController.setMyLocationControlsEnabled(true)
开启我的位置功能需要用到定位权限如下:
ohos.permission.APPROXIMATELY_LOCATION和ohos.permission.LOCATION
使用前需要先申请权限,申请成功后再调用上述代码,地图初始化后定位功能才能生效
entry/src/module.json5添加权限
requestPermissions: [
      {
        "name": "ohos.permission.INTERNET",
      },
      {
        "name": "ohos.permission.APPROXIMATELY_LOCATION",
        "reason": "$string:reason",
        "usedScene": {
          "abilities": [
            "EntryAbility"
          ],
          "when": "inuse"
        }
      },{
        "name": "ohos.permission.LOCATION",
        "reason": "$string:reason",
        "usedScene": {
          "abilities": [
            "EntryAbility"
          ],
          "when": "inuse"
        }
      }]
Index.ets
import { MapComponent, mapCommon, map } from '@kit.MapKit';
import { AsyncCallback } from '@kit.BasicServicesKit';
import abilityAccessCtrl, { Permissions } from '@ohos.abilityAccessCtrl';
@Entry
@Component
struct Index {
  private mapOption?: mapCommon.MapOptions; //地图配置
  private callback?: AsyncCallback<map.MapComponentController>; //初始化完成回调
  private mapController?: map.MapComponentController; //地图控制器

  aboutToAppear(): void {
    // 地图初始化参数,设置地图中心点坐标及层级
    this.mapOption = {
      position: {
        target: {
          latitude: 39.9, //纬度
          longitude: 116.4 //经度
        },
        zoom: 10 //缩放级别
      }
    };

    // 地图初始化的回调
    this.callback = async (err, mapController) => {
      if (!err) {
        // 获取地图的控制器类,用来操作地图
        this.mapController = mapController;
        //申请权限
        let list:Array<Permissions>=['ohos.permission.APPROXIMATELY_LOCATION','ohos.permission.LOCATION']
        try {
          await this.applyPermission(getContext(this), list)
         //以下2句启用需在权限申请完后调用,否则首次定位功能不生效
          // 启用我的位置图层
          this.mapController.setMyLocationEnabled(true);
          // 启用我的位置按钮
          this.mapController.setMyLocationControlsEnabled(true)
        }
        catch (e){

        }
      }
    };
  }
  //申请权限
  applyPermission(context: Context,
    permissions: Array<Permissions>): Promise<boolean> {
    let atManager = abilityAccessCtrl.createAtManager();
    return new Promise((resolve: (res: boolean) => void, reject: (e: ESObject) => void) => {
      atManager.requestPermissionsFromUser(context, permissions).then((data) => {
        let grantStatus: Array<number> = data.authResults;
        resolve(grantStatus.every(item => item === 0))
      }).catch((err: ESObject) => {
        reject(err)
      })

    })
  }


  build() {
    Stack() {
      // 调用MapComponent组件初始化地图
      MapComponent({ mapOptions: this.mapOption, mapCallback: this.callback }).width('100%').height('100%');
    }.height('100%')
  }
}
说明:地图初始化回调函数内进行定位权限申请,申请成功后启用我的位置图层和启用我的位置按钮,权限申请只会首次弹窗提示,允许后再次运行不会弹窗
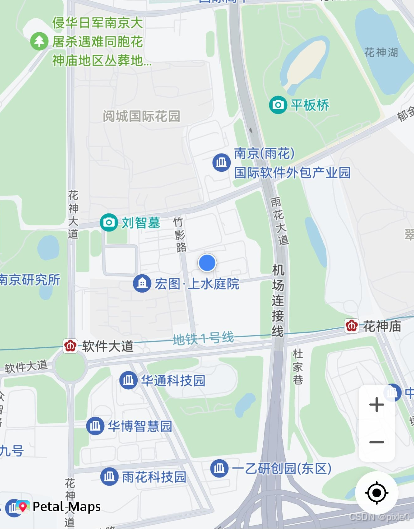
运行效果:
2.移动地图位置
api:
// 以非动画方式移动地图相机
mapController.moveCamera(cameraUpdate);
// 以动画方式移动地图相机
mapController.animateCamera(cameraUpdate, 1000);
示例:
 // 创建CameraUpdate对象
        let cameraPosition: mapCommon.CameraPosition = {
          target: {//地图中心点经纬度
            latitude: 32.0,
            longitude: 118.0
          },
          zoom: 15,//缩放等级
        };
        let cameraUpdate = map.newCameraPosition(cameraPosition);
        // 以非动画方式移动地图相机
        this.mapController?.moveCamera(cameraUpdate);
        // 以动画方式移动地图相机
        this.mapController?.animateCamera(cameraUpdate, 1000);
3.地图标点
api:
mapController.addMarker(markerOptions);
示例:
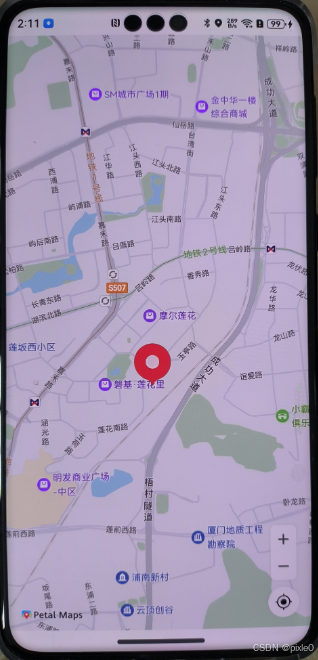
默认图标
        let markerOptions: mapCommon.MarkerOptions = {
            position: {//标点经纬度
              latitude: 24.2646,
              longitude: 118.0404
            },
           // rotation: 0,//标记旋转角度
          //  alpha: 1,//标记透明度
           // clickable: true,//是否可点击
           // draggable: true, //是否可拖拽
           // icon:'xxxxx'//自定义图标,不设显示默认图标
          };
        // 创建Marker
        this.marker = await this.mapController.addMarker(markerOptions);
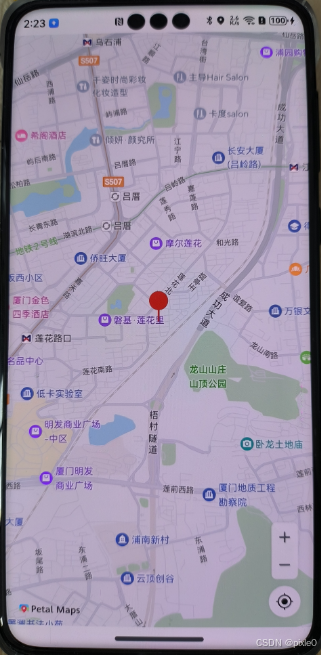
加载本地自定义图标:
     let markerOptions: mapCommon.MarkerOptions = {
          position: {//标点经纬度
            latitude: 24.4846,
            longitude: 118.1304
          },
          icon:$r('app.media.remark')//自定义图标,不设显示默认图标
        }
      // 创建Marker
        this.marker = await this.mapController.addMarker(markerOptions);
本地图标存放在resources/rawfile或者resources/base/media
加载网络图标:
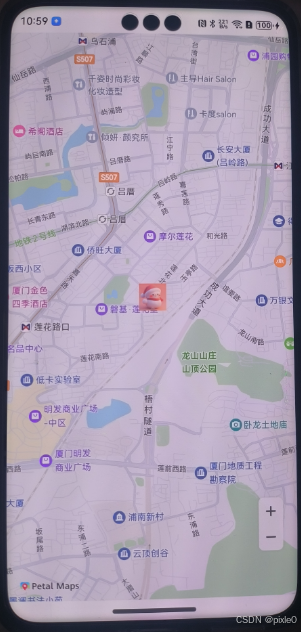
icon属性不支持直接引用在线图片url,但支持base64或者PixleMap类型,所以想要显示网络图片需要把图片转为base64或者PixelMap。
从官方文档看markerOptions属性未找到icon尺寸设置,像默认图标和本地图标和base64图标无法设置大小,想设置图标大小只能从PixelMap入手
代码示例:
import { MapComponent, mapCommon, map } from '@kit.MapKit';
import { AsyncCallback, BusinessError } from '@kit.BasicServicesKit';
import http from '@ohos.net.http';
import { image } from '@kit.ImageKit';


@Entry
@Component
struct Index {
  @State markerIcon: PixelMap | null = null//标点图标
  private mapOption?: mapCommon.MapOptions; //地图配置
  private callback?: AsyncCallback<map.MapComponentController>; //初始化完成回调
  private mapController?: map.MapComponentController; //地图控制器

  /**
   * //在线图片转PixelMap
   * @param imageUrl:在线图片链接
   * @param opt:图像解码设置选项
   * @returns Promise<PixelMap>
   */
  imageToPixelMap(imageUrl: string, opt: image.DecodingOptions): Promise<PixelMap> {
    let httpRequest = http.createHttp()
    return new Promise((resolve: (pixleMap: PixelMap) => void, reject: (err: BusinessError) => void) => {
      httpRequest.request(imageUrl,
        (err, data) => {
          if (!err) {
            let arrayBuffer: ArrayBuffer = data.result as ArrayBuffer
            let imageSource: image.ImageSource = image.createImageSource(arrayBuffer);
            imageSource.createPixelMap(opt).then((pixelMap: image.PixelMap) => {
              resolve(pixelMap)
            }).catch((error: BusinessError) => {
              reject(error)
            })
          } else {
            reject(err)
          }
        })

    })

  }

  async aboutToAppear() {
    // 地图初始化参数,设置地图中心点坐标及层级
    this.mapOption = {
      position: {
        target: {
          latitude: 24.4846,
          longitude: 118.1304
        },
        zoom: 15, //缩放层级
      }
    };

    // 地图初始化的回调
    this.callback = async (err, mapController) => {
      if (!err) {
        // 获取地图的控制器类,用来操作地图
        this.mapController = mapController;

        let markerOptions: mapCommon.MarkerOptions = {
          position: {
            //标点经纬度
            latitude: 24.4846,
            longitude: 118.1304
          },
          icon: this.markerIcon ?? ''
        }
        // 创建Marker
        await this.mapController?.addMarker(markerOptions);

      }
    };

    //设置图片120x120尺寸,单位px
    let opt: image.DecodingOptions = { desiredSize: { height: 120, width: 120 } }
    this.markerIcon = await this.imageToPixelMap('https://img2.baidu.com/it/u=2105446738,2493267053&fm=253&fmt=auto&app=138&f=JPEG?w=800&h=800', opt)

  }

  build() {
    Stack() {
      //防止异步问题
      if(this.markerIcon ){
        MapComponent({ mapOptions: this.mapOption, mapCallback: this.callback }).width('100%').height('100%');
      }
    }.height('100%')
  }
}
运行效果:
更多markerOptions属性请查看官网文档
4.信息窗口
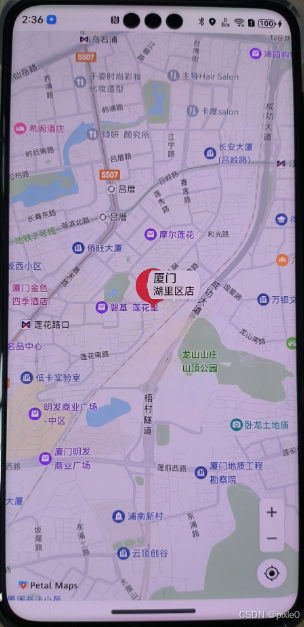
默认信息窗口
      //标点
        let markerOptions: mapCommon.MarkerOptions = {
          position: {//标点经纬度
            latitude: 24.4846,
            longitude: 118.1304
          },
        };

        // 创建Marker
        this.marker = await this.mapController.addMarker(markerOptions);
        // 设置信息窗的标题
        this.marker.setTitle('厦门');
        // 设置信息窗的子标题
        this.marker.setSnippet('湖里区店');
        // 设置信息窗可点击
        this.marker.setClickable(true);
        // 设置信息窗的锚点位置
        this.marker.setInfoWindowAnchor(1,1);
        // 设置信息窗可见
        this.marker.setInfoWindowVisible(true);
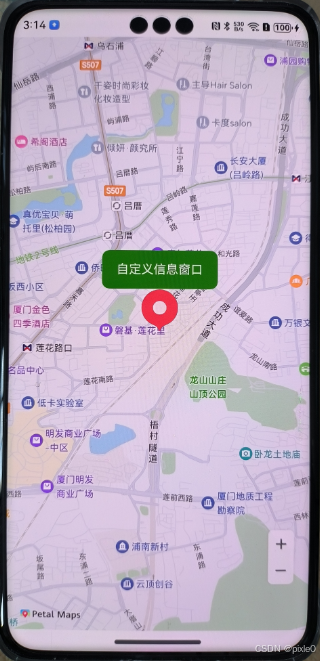
自定义信息窗口
api提炼:
//MapComponent组件第三个参数传入自定义信息窗Builder
MapComponent({ mapOptions,mapCallback,customInfoWindow })
// 设置信息窗可见
marker.setInfoWindowVisible(true);
//监听标记点击事件
mapController.on(“markerClick”, (marker) => {
})
点击标点显示自定义信息窗示例:
import { MapComponent, mapCommon, map } from '@kit.MapKit';
import { AsyncCallback } from '@kit.BasicServicesKit';

@Entry
@Component
struct Index {
  private mapOption?: mapCommon.MapOptions; //地图配置
  private callback?: AsyncCallback<map.MapComponentController>; //初始化完成回调
  private mapController?: map.MapComponentController; //地图控制器
  private marker?: map.Marker

  aboutToAppear(): void {
    // 地图初始化参数,设置地图中心点坐标及层级
    this.mapOption = {
      position: {
        target: {
          latitude: 24.4846,
          longitude: 118.1304
        },
        zoom: 15 //缩放级别
      }
    };

    // 地图初始化的回调
    this.callback = async (err, mapController) => {
      if (!err) {
        // 获取地图的控制器类,用来操作地图
        this.mapController = mapController;
        //标点
        let markerOptions: mapCommon.MarkerOptions = {
          position: {
            //标点经纬度
            latitude: 24.4846,
            longitude: 118.1304
          },
          clickable: true,
          title: '自定义标题'//窗口标题必须设置,不然窗口不显示
        };

        // 创建Marker
        this.marker = await this.mapController.addMarker(markerOptions);
         //标点点击监听,点击标点显示信息窗口
        this.mapController.on("markerClick", (marker) => {
          // 设置信息窗的锚点位置
          this.marker?.setInfoWindowAnchor(2, 2);
          // 设置信息窗可见
          this.marker?.setInfoWindowVisible(true);
        });

      }
    };
  }


  // 自定义信息窗BuilderParam
  @BuilderParam customInfoWindow: ($$: map.MarkerDelegate) => void = this.customInfoWindowBuilder;

  // 自定义信息窗Builder
  @Builder
  customInfoWindowBuilder($$: map.MarkerDelegate) {
    Column() {
      Text('自定义信息窗口').fontColor(Color.White)
    }
    .width(150)
    .height(50)
    .backgroundColor(Color.Green)
    .borderRadius(10)
    .justifyContent(FlexAlign.Center)
  }

  build() {
    Stack({ alignContent: Alignment.BottomStart }) {
      // 调用MapComponent组件初始化地图
      MapComponent({
        mapOptions: this.mapOption, mapCallback: this.callback,
        customInfoWindow: this.customInfoWindow
      }).width('100%').height('100%');

    }.height('100%')
  }
}
运行效果:
ps:markerOptions的title属性必须设置,不然窗口无法正常显示
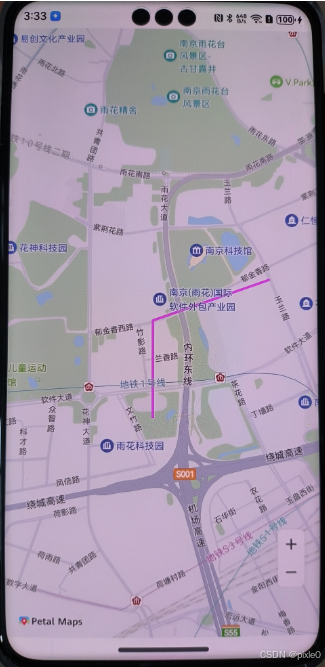
5.画路线
api提炼:
mapController.addPolyline(polylineOption);
示例:
import { MapComponent, mapCommon, map } from '@kit.MapKit';
import { AsyncCallback } from '@kit.BasicServicesKit';

@Entry
@Component
struct Index {
  private mapOption?: mapCommon.MapOptions; //地图配置
  private callback?: AsyncCallback<map.MapComponentController>; //初始化完成回调
  private mapController?: map.MapComponentController; //地图控制器
  private marker?: map.Marker

  aboutToAppear(): void {
    // 地图初始化参数,设置地图中心点坐标及层级
    this.mapOption = {
      position: {
        target: {
          latitude: 31.98,
          longitude: 118.78
        },
        zoom: 15 //缩放级别
      }
    };

    // 地图初始化的回调
    this.callback = async (err, mapController) => {
      if (!err) {
        // 获取地图的控制器类,用来操作地图
        this.mapController = mapController;

        // polyline初始化参数
        let polylineOption: mapCommon.MapPolylineOptions = {
          points: [{longitude:118.78,latitude:31.975}, {longitude:118.78,latitude:31.982}, {longitude:118.79,latitude:31.985}],//所有点经纬度
          clickable: true,
          jointType: mapCommon.JointType.BEVEL,//拐点样式
          width: 10,//线宽
          color:0xffff00ff,//线颜色
        }
        // 创建polyline
         await this.mapController.addPolyline(polylineOption);

      }
    };
  }


  build() {
    Stack({ alignContent: Alignment.BottomStart }) {
      // 调用MapComponent组件初始化地图
      MapComponent({ mapOptions: this.mapOption, mapCallback: this.callback,  }).width('100%').height('100%');
    }.height('100%')
  }
}
运行效果:
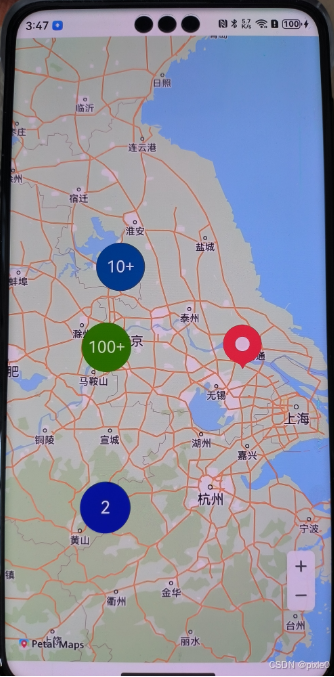
6.标点聚合
api提炼:
mapController.addClusterOverlay(mapCommon.ClusterOverlayParams)
mapCommon.ClusterOverlayParams = { distance: Number, clusterItems: array },其中distance 表示2点之间距离多少vp开始聚合,clusterItems:带聚合点坐标
示例:
import { MapComponent, mapCommon, map } from '@kit.MapKit';
import { AsyncCallback } from '@kit.BasicServicesKit';

@Entry
@Component
struct Index {
  private mapOption?: mapCommon.MapOptions;
  private mapController?: map.MapComponentController;
  private callback?: AsyncCallback<map.MapComponentController>;

  aboutToAppear(): void {
    this.mapOption = {
      position: {
        target: {
          latitude: 31.98,
          longitude: 118.7
        },
        zoom: 7
      }
    }

    this.callback = async (err, mapController) => {
      if (!err) {
        this.mapController = mapController;
        // 生成待聚合点
        let clusterItem1: mapCommon.ClusterItem = {
          position: {
            latitude: 31.98,
            longitude: 118.7
          }
        };
        let clusterItem2: mapCommon.ClusterItem = {
          position: {
            latitude: 32.99,
            longitude: 118.9
          }
        };
        let clusterItem3: mapCommon.ClusterItem = {
          position: {
            latitude: 31.5,
            longitude: 118.7
          }
        };
        let clusterItem4: mapCommon.ClusterItem = {
          position: {
            latitude: 30,
            longitude: 118.7
          }
        };
        let clusterItem5: mapCommon.ClusterItem = {
          position: {
            latitude: 29.98,
            longitude: 117.7
          }
        };
        let clusterItem6: mapCommon.ClusterItem = {
          position: {
            latitude: 31.98,
            longitude: 120.7
          }
        };
        let clusterItem7: mapCommon.ClusterItem = {
          position: {
            latitude: 25.98,
            longitude: 119.7
          }
        };
        let clusterItem8: mapCommon.ClusterItem = {
          position: {
            latitude: 30.98,
            longitude: 110.7
          }
        };
        let clusterItem9: mapCommon.ClusterItem = {
          position: {
            latitude: 30.98,
            longitude: 115.7
          }
        };
        let clusterItem10: mapCommon.ClusterItem = {
          position: {
            latitude: 28.98,
            longitude: 122.7
          }
        };
        let array: Array<mapCommon.ClusterItem> = [
          clusterItem1,
          clusterItem2,
          clusterItem3,
          clusterItem4,
          clusterItem5,
          clusterItem6,
          clusterItem7,
          clusterItem8,
          clusterItem9,
          clusterItem10
        ]
        //模拟更多点
        for(let index = 0; index < 100; index++){
          array.push(clusterItem1)
        }
        //模拟更多点
        for(let index = 0; index < 10; index++){
          array.push(clusterItem2)
        }
        // 生成聚合图层的入参 聚合distance设置为100vp
        let clusterOverlayParams: mapCommon.ClusterOverlayParams = { distance: 100, clusterItems: array };
        // 调用addClusterOverlay生成聚合图层
        await this.mapController.addClusterOverlay(clusterOverlayParams);

      }
    }
  }

  build() {
    Stack() {
      Column() {
        MapComponent({ mapOptions: this.mapOption, mapCallback: this.callback })
          .width('100%')
          .height('100%');
      }.width('100%')
    }.height('100%')
  }
}
运行效果:
总结
以上就是地图组件加载和最常用的功能示例讲解,官方地图组件还有很多其他功能诸如画圆形区域、点注释、覆盖物、动态轨迹等,更多使用请查看官方文档
