(一) Netty的概念
1.1 Netty是一个NIO客户端服务器框架,可以快速轻松地开发网络应用程序,例如协议服务器和客户端。它极大地简化和简化了网络编程,例如TCP和UDP套接字服务器。比如阿里的RPC框架Dubbo和其概念。
Netty是一个NIO客户端服务器框架,可以快速轻松地开发网络应用程序,例如 协议服务器和客户端。它极大地简化和简化了网络编程,例如TCP和UDP套接字服务器。比如阿里的RPC框架Dubbo和其消息中间件RocketMQ底层都使用了Netty作为底层通信
(二)Java NIO和Netty的实现方式
废话不多说直接开始,首先在解析源码的时候你需要具备Java怎么实现NIO的知识这里百度一下就行了。因为Netty是基于Java的NIO实现的;因为Java的NIO使用起来比较困难有很多细节问题,Netty直接将其封装好给我们使用,这样能提高我们的开发效率。这里我们直接开始先看一下Java NIO是怎么实现客户端和服务端的交互的。
客户端源代码
public class NioSocketClient {
    public static void main(String[] args) throws Exception{
        while(true) {
            //创建一个SocketChannel对象,配置成非阻塞模式
            SocketChannel socketChannel = SocketChannel.open();
            socketChannel.configureBlocking(false);

            //创建一个选择器,并把SocketChannel注册selector对象
            Selector selector = Selector.open();
            socketChannel.register(selector, SelectionKey.OP_CONNECT);
            //客户端绑定一个9999的端口
            socketChannel.bind(new InetSocketAddress(8889));
            //发起建立连接的请求,这里会立即返回,当连接建立完成后,SocketChannel就会被选取出来
            socketChannel.connect(new InetSocketAddress("localhost", 8888));
            //遍历,不段的从Selector中选取出已经就绪的Channel,在这个例子中,Selector只监控了一个SocketChannel
            while (true) {
                selector.select();
                Set<SelectionKey> selectionKeySet = selector.selectedKeys();

                for (SelectionKey selectionKey : selectionKeySet) {
                    if (!selectionKey.isValid()) {
                        continue;
                    }
                    //连接建立完成后的操作:直接发送请求数据
                    if (selectionKey.isConnectable()) {
                        if (socketChannel.finishConnect()) {
                            //在发送数据之前注册read事件
                            socketChannel.register(selector, SelectionKey.OP_READ);
                            doWriteRequest(((SocketChannel) selectionKey.channel()));
                        }
                    }
                    //如果当前已经可以读数据了,说明服务端已经响应完了,读取数据
                    if (selectionKey.isReadable()) {
                        doRead(selectionKey);
                    }
                }
                //最后同样要清除所有的Key
                selectionKeySet.removeAll(selectionKeySet);
            }
        }
    }

    //发送请求
    private static void doWriteRequest(SocketChannel socketChannel) throws Exception{
        //创建ByteBuffer对象,会放入数据
        ByteBuffer byteBuffer = ByteBuffer.allocate("客户端发来的数据!".getBytes().length);
        byteBuffer.put("客户端发来的数据!".getBytes());
        byteBuffer.flip();
        //写数据
        socketChannel.write(byteBuffer);
        if(!byteBuffer.hasRemaining()) {
            System.err.println("Send request success...");
        }
    }

    //读取服务端的响应
    private static void doRead(SelectionKey selectionKey) throws Exception{
        SocketChannel socketChannel = ((SocketChannel) selectionKey.channel());
        ByteBuffer byteBuffer = ByteBuffer.allocate(1024);
        int len = socketChannel.read(byteBuffer);
        System.out.println("Recv:" + new String(byteBuffer.array(), 0 ,len));
        socketChannel.close();
    }
}
客户端的大致流程就是先创建一个SocketChannel对象,一个Selector选择器。开启非阻塞模式,绑定客户端程序的端口和远程服务器的端口。之后把该Channel通道感兴趣的事件注册到选择器Selector上,通过调用select方法。等有事件促发了从select方法这里返回并获取一个事件集合自己去遍历判断相应的事件来执行业务逻辑
服务端代码
public class NioSocketServer {
    public static void main(String[] args) throws Exception {


        //创建一个ServerSocketChannel对象,绑定端口并配置成非阻塞模式。
        ServerSocketChannel serverSocketChannel = ServerSocketChannel.open();
        serverSocketChannel.bind(new InetSocketAddress(8888), 1024);
        //下面这句必需要,否则ServerSocketChannel会使用阻塞的模式,那就不是NIO了
        serverSocketChannel.configureBlocking(false);

        //把ServerSocketChannel交给Selector监听
        Selector selector = Selector.open();
        serverSocketChannel.register(selector, SelectionKey.OP_ACCEPT);

        //循环,不断的从Selector中获取准备就绪的Channel,最开始的时候Selector只监听了一个ServerSocketChannel
        //但是后续有客户端连接时,会把客户端对应的Channel也交给Selector对象
        while (true) {
            //这一步会阻塞,当有Channel准备就绪时后会返回。
            selector.select();
            //获取所有的准备就绪的Channel,SelectionKey中包含中Channel信息
            Set<SelectionKey> selectionKeySet = selector.selectedKeys();
            //遍历,每个Channel都可处理
            for (SelectionKey selectionKey : selectionKeySet) {
                //如果Channel已经无效了,则跳过(如Channel已经关闭了)
                if (!selectionKey.isValid()) {
                    continue;
                }
                //判断Channel具体的就绪事件,如果是有客户端连接,则建立连接
                if (selectionKey.isAcceptable()) {
                    acceptConnection(selectionKey, selector);
                }
                //如果有客户端可以读取请求了,则读取请求然后返回数据
                if (selectionKey.isReadable()) {
                    System.out.println(readFromSelectionKey(selectionKey));
                }
            }
            //处理完成后把返回的Set清空,如果不清空下次还会再返回这些Key,导致重复处理
            selectionKeySet.clear();
        }


    }

    //客户端建立连接的方法
    private static void acceptConnection(SelectionKey selectionKey, Selector selector) throws Exception {
        //SelectionKey中包含选取出来的Channel的信息,我们可以从中获取,对于建立连接来说,只会有ServerSocketChannel可能触发,
        //因此这里可以把它转成ServerSocketChannel对象
        ServerSocketChannel ssc = ((ServerSocketChannel) selectionKey.channel());
        //获取客户端对应的SocketChannel,也需要配置成非阻塞模式
        SocketChannel socketChannel = ssc.accept();
        socketChannel.configureBlocking(false);
        //把客户端的Channel交给Selector监控,之后如果有数据可以读取时,会被select出来
        socketChannel.register(selector, SelectionKey.OP_READ);
    }

    //从客户端读取数据的庐江
    private static String readFromSelectionKey(SelectionKey selectionKey)  {
        //从SelectionKey中包含选取出来的Channel的信息把Channel获取出来
        SocketChannel socketChannel = ((SocketChannel) selectionKey.channel());
        //读取数据到ByteBuffer中
        ByteBuffer byteBuffer = ByteBuffer.allocate(1024);
        int len = 0;
        try {
            len = socketChannel.read(byteBuffer);
        } catch (IOException e) {
            e.printStackTrace();
        }
        //如果读到-1,说明数据已经传输完成了,可以并闭
        if (len < 0) {
            //客户端关闭连接需要把注册的channel取消掉不然会一直触发
            try {
                socketChannel.close();
            } catch (IOException e) {
                e.printStackTrace();
            }
            selectionKey.cancel();
            return "";
        } else if (len == 0) { //什么都没读到
            return "";
        }
        byteBuffer.flip();
        doWrite(selectionKey, "服务端发来的数据");
        return new String(byteBuffer.array(), 0, len);
    }

    private static void doWrite(SelectionKey selectionKey, String responseMessage)   {
        SocketChannel socketChannel = ((SocketChannel) selectionKey.channel());
        //创建一个缓存器
        ByteBuffer byteBuffer = ByteBuffer.allocate(responseMessage.getBytes().length);
        byteBuffer.put(responseMessage.getBytes());
        byteBuffer.flip();
        try {
            socketChannel.write(byteBuffer);
        } catch (IOException e) {
            e.printStackTrace();
        }
    }
}
流程和客户端的类似两个程序一起运行让我们看下结果
接下来我们来看Netty是如何实现客户端和服务端的程序的。再次之前建议仔细阅读上面Java NIO的实现过程
Netty客户端
public class EchoClient {
    public static void main(String[] args) throws InterruptedException {
        //指定 EventLoopGroup 以 处理客户端事件;需要适 用于 NIO 的实现
        NioEventLoopGroup nioEventLoopGroup = new NioEventLoopGroup();
        Bootstrap b = new Bootstrap();
        b.group(nioEventLoopGroup)
                .channel(NioSocketChannel.class)
                .remoteAddress(new InetSocketAddress(8007))
                .handler(new ChannelInitializer<SocketChannel>() {
                             @Override
                             protected void initChannel(SocketChannel ch) throws Exception {
                                 ch.pipeline().addLast(new EchoClientHandler());
                             }
                         }
                );
        try {
            ChannelFuture f = b.connect().sync();
            f.channel().closeFuture().sync();

        } catch (InterruptedException e) {
            e.printStackTrace();
        } finally {
            nioEventLoopGroup.shutdownGracefully().sync();
        }
    }
}
class EchoClientHandler extends SimpleChannelInboundHandler<ByteBuf> {
    @Override
    protected void channelRead0(ChannelHandlerContext ctx, ByteBuf msg) throws Exception {
        System.out.println("Recv:"+msg.toString(CharsetUtil.UTF_8));
    }
    @Override
    public void channelActive(ChannelHandlerContext ctx) throws Exception {
        ctx.writeAndFlush(Unpooled.copiedBuffer("客户端发来的信息!",CharsetUtil.UTF_8));
    }
}
代码是不是看起来简洁一点也舒服一点,越简洁说明框架内部逻辑越复杂。Netty的功能强大功能非常多
接下来看服务端的代码
public final class EchoServer {
    public static void main(String[] args) throws Exception {
        //配置一个bossGroup.
        EventLoopGroup bossGroup = new NioEventLoopGroup(1);
        //配置一个workerGroup
        EventLoopGroup workerGroup = new NioEventLoopGroup(4);
        try {
            //创建一个server启动类
            ServerBootstrap b = new ServerBootstrap();
            b.group(bossGroup, workerGroup)
                    .channel(NioServerSocketChannel.class)
                    .handler(new LoggingHandler(LogLevel.INFO))
                    .childHandler(new ChannelInitializer<SocketChannel>() {
                        @Override
                        public void initChannel(SocketChannel ch) throws Exception {
                            ChannelPipeline p = ch.pipeline();
                            p.addLast(new EchoServerHandler());
                        }
                    });
            ChannelFuture f = b.bind(8007).sync();
            f.channel().closeFuture().sync();
        } finally {
            bossGroup.shutdownGracefully();
            workerGroup.shutdownGracefully();
        }
    }
}
public class EchoServerHandler extends SimpleChannelInboundHandler<ByteBuf> {
    @Override
    protected void channelRead0(ChannelHandlerContext ctx, ByteBuf msg) throws Exception {
        System.out.println(msg.toString(CharsetUtil.UTF_8));
        ctx.writeAndFlush(Unpooled.copiedBuffer("服务端发来的信息!",CharsetUtil.UTF_8));
    }
}
运行后和JavaNIO结果一样,看完两个事例后我们现在开始一行一行的来分析netty的每行代码都干了撒。先从Netty的Server端开始
(三) EventLoopGroup创建的流程分析
EventLoopGroup bossGroup = new NioEventLoopGroup(1);
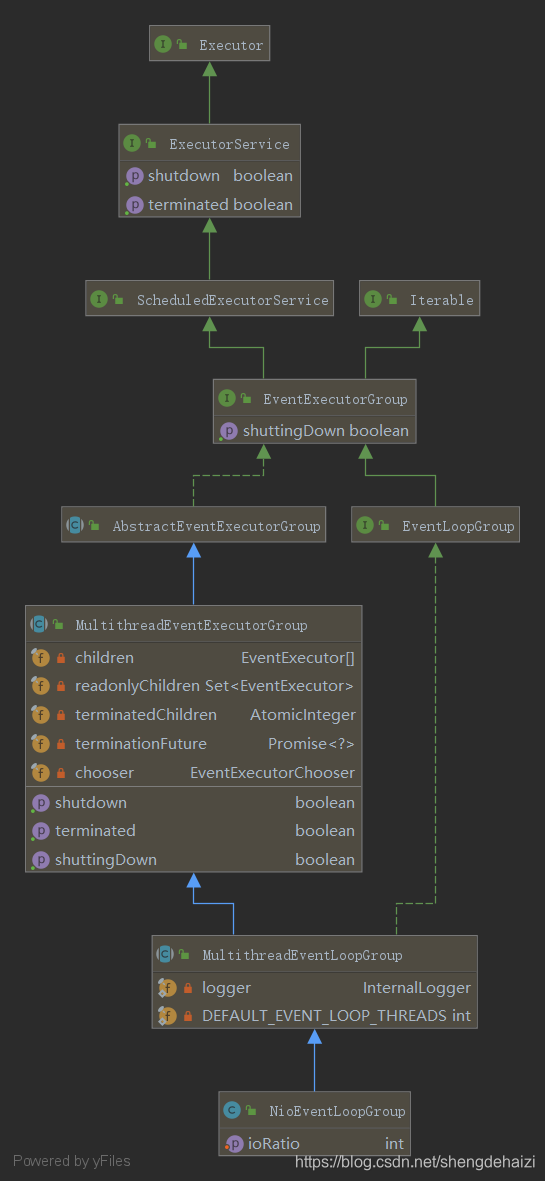
创建了一个对象我们首先来观察一下该类的体系结构
在进入源码观察
/*
 * Copyright 2012 The Netty Project
 *
 * The Netty Project licenses this file to you under the Apache License,
 * version 2.0 (the "License"); you may not use this file except in compliance
 * with the License. You may obtain a copy of the License at:
 *
 *   http://www.apache.org/licenses/LICENSE-2.0
 *
 * Unless required by applicable law or agreed to in writing, software
 * distributed under the License is distributed on an "AS IS" BASIS, WITHOUT
 * WARRANTIES OR CONDITIONS OF ANY KIND, either express or implied. See the
 * License for the specific language governing permissions and limitations
 * under the License.
 */
package io.netty.channel.nio;

import io.netty.channel.Channel;
import io.netty.channel.EventLoop;
import io.netty.channel.DefaultSelectStrategyFactory;
import io.netty.channel.EventLoopTaskQueueFactory;
import io.netty.channel.MultithreadEventLoopGroup;
import io.netty.channel.SelectStrategyFactory;
import io.netty.util.concurrent.EventExecutor;
import io.netty.util.concurrent.EventExecutorChooserFactory;
import io.netty.util.concurrent.RejectedExecutionHandler;
import io.netty.util.concurrent.RejectedExecutionHandlers;

import java.nio.channels.Selector;
import java.nio.channels.spi.SelectorProvider;
import java.util.concurrent.Executor;
import java.util.concurrent.ThreadFactory;

/**
 * {@link MultithreadEventLoopGroup} implementations which is used for NIO {@link Selector} based {@link Channel}s.
 */
public class NioEventLoopGroup extends MultithreadEventLoopGroup {

    /**
     * Create a new instance using the default number of threads, the default {@link ThreadFactory} and
     * the {@link SelectorProvider} which is returned by {@link SelectorProvider#provider()}.
     */
    public NioEventLoopGroup() {
        this(0);
    }

    /**
     * Create a new instance using the specified number of threads, {@link ThreadFactory} and the
     * {@link SelectorProvider} which is returned by {@link SelectorProvider#provider()}.
     */
    public NioEventLoopGroup(int nThreads) {
        this(nThreads, (Executor) null);
    }

    /**
     * Create a new instance using the default number of threads, the given {@link ThreadFactory} and the
     * {@link SelectorProvider} which is returned by {@link SelectorProvider#provider()}.
     */
    public NioEventLoopGroup(ThreadFactory threadFactory) {
        this(0, threadFactory, SelectorProvider.provider());
    }

    /**
     * Create a new instance using the specified number of threads, the given {@link ThreadFactory} and the
     * {@link SelectorProvider} which is returned by {@link SelectorProvider#provider()}.
     */
    public NioEventLoopGroup(int nThreads, ThreadFactory threadFactory) {
        this(nThreads, threadFactory, SelectorProvider.provider());
    }

    public NioEventLoopGroup(int nThreads, Executor executor) {
        this(nThreads, executor, SelectorProvider.provider());
    }

    /**
     * Create a new instance using the specified number of threads, the given {@link ThreadFactory} and the given
     * {@link SelectorProvider}.
     */
    public NioEventLoopGroup(
            int nThreads, ThreadFactory threadFactory, final SelectorProvider selectorProvider) {
        this(nThreads, threadFactory, selectorProvider, DefaultSelectStrategyFactory.INSTANCE);
    }

    public NioEventLoopGroup(int nThreads, ThreadFactory threadFactory,
        final SelectorProvider selectorProvider, final SelectStrategyFactory selectStrategyFactory) {
        super(nThreads, threadFactory, selectorProvider, selectStrategyFactory, RejectedExecutionHandlers.reject());
    }

    public NioEventLoopGroup(
            int nThreads, Executor executor, final SelectorProvider selectorProvider) {
        this(nThreads, executor, selectorProvider, DefaultSelectStrategyFactory.INSTANCE);
    }

    public NioEventLoopGroup(int nThreads, Executor executor, final SelectorProvider selectorProvider,
                             final SelectStrategyFactory selectStrategyFactory) {
        super(nThreads, executor, selectorProvider, selectStrategyFactory, RejectedExecutionHandlers.reject());
    }

    public NioEventLoopGroup(int nThreads, Executor executor, EventExecutorChooserFactory chooserFactory,
                             final SelectorProvider selectorProvider,
                             final SelectStrategyFactory selectStrategyFactory) {
        super(nThreads, executor, chooserFactory, selectorProvider, selectStrategyFactory,
                RejectedExecutionHandlers.reject());
    }

    public NioEventLoopGroup(int nThreads, Executor executor, EventExecutorChooserFactory chooserFactory,
                             final SelectorProvider selectorProvider,
                             final SelectStrategyFactory selectStrategyFactory,
                             final RejectedExecutionHandler rejectedExecutionHandler) {
        super(nThreads, executor, chooserFactory, selectorProvider, selectStrategyFactory, rejectedExecutionHandler);
    }

    public NioEventLoopGroup(int nThreads, Executor executor, EventExecutorChooserFactory chooserFactory,
                             final SelectorProvider selectorProvider,
                             final SelectStrategyFactory selectStrategyFactory,
                             final RejectedExecutionHandler rejectedExecutionHandler,
                             final EventLoopTaskQueueFactory taskQueueFactory) {
        super(nThreads, executor, chooserFactory, selectorProvider, selectStrategyFactory,
                rejectedExecutionHandler, taskQueueFactory);
    }

    /**
     * Sets the percentage of the desired amount of time spent for I/O in the child event loops.  The default value is
     * {@code 50}, which means the event loop will try to spend the same amount of time for I/O as for non-I/O tasks.
     */
    public void setIoRatio(int ioRatio) {
        for (EventExecutor e: this) {
            ((NioEventLoop) e).setIoRatio(ioRatio);
        }
    }

    /**
     * Replaces the current {@link Selector}s of the child event loops with newly created {@link Selector}s to work
     * around the  infamous epoll 100% CPU bug.
     */
    public void rebuildSelectors() {
        for (EventExecutor e: this) {
            ((NioEventLoop) e).rebuildSelector();
        }
    }

    @Override
    protected EventLoop newChild(Executor executor, Object... args) throws Exception {
        EventLoopTaskQueueFactory queueFactory = args.length == 4 ? (EventLoopTaskQueueFactory) args[3] : null;
        return new NioEventLoop(this, executor, (SelectorProvider) args[0],
            ((SelectStrategyFactory) args[1]).newSelectStrategy(), (RejectedExecutionHandler) args[2], queueFactory);
    }
}
可以看见NioEventLoopGroup没有属性,这里我们只需要关注其构造函数和newChild()方法后面会用到。我们来看创建该对象的时候做了什么
         //配置一个bossGroup
        EventLoopGroup bossGroup = new NioEventLoopGroup(1);
                                 |你传入的线程数量和默认设置了一个null的线程执行器
                                 v
                     this(nThreads, (Executor) null);
                                 |继续调用构造参数并添加了一个SelectorProvider来获取选择器的
                                 v
           this(nThreads, executor, SelectorProvider.provider());
                                 |又多加了一个DefaultSelectStrategyFactory.INSTANCE对象点进去看什么都没有就一个DefaultSelectStrategyFactory对象。这里具体提供什么服务的选择策略后面在看
                                 v
            this(nThreads, executor, selectorProvider, DefaultSelectStrategyFactory.INSTANCE);
                                 |这里又调用了父类MultithreadEventLoopGroup的构造器增加了一个拒绝策略类
                                 v
 super(nThreads, executor, selectorProvider, selectStrategyFactory, RejectedExecutionHandlers.reject());
                                 |这里我把具体方法贴出来可以看出通过可变参数组合了selectorProvider, selectStrategyFactory, RejectedExecutionHandlers.reject()这三个参数简化一下不然参数太长了不好看。并且可以看出如果你传入的线程数量为0则提供一个默认的数量点进去看可以看出是可利用cpu数量的两倍
                                 V
 protected MultithreadEventLoopGroup(int nThreads, Executor executor, Object... args) {
 super(nThreads == 0 ? DEFAULT_EVENT_LOOP_THREADS : nThreads, executor, args);
  }
                                 |又多加了一个默认的事件执行器的选择策略类后面详细分析
                                 V
 this(nThreads, executor, DefaultEventExecutorChooserFactory.INSTANCE, args);
                                |最后到了MultithreadEventExecutorGroup抽象类的构造器
                                V
  MultithreadEventExecutorGroup(int nThreads, Executor executor, EventExecutorChooserFactory chooserFactory, Object... args)
  最后我们来分析这个代码做了什么
   protected MultithreadEventExecutorGroup(int nThreads, Executor executor, EventExecutorChooserFactory chooserFactory, Object... args) {
       //判断一下万一你给线程数设置一个负数呢,应该没有这种操作但还是判断一下。根据墨菲定律只要有概率发生的事件往往会发生
        if (nThreads <= 0) {
            throw new IllegalArgumentException(String.format("nThreads: %d (expected: > 0)", nThreads));
        } else {
        //根据前面的逻辑可以得出这里我们的excutor是空的。我们没有传入我们自己定义的excetor
            if (executor == null) {
               //具体分析下ThreadPerTaskExecutor对象干嘛的
               //public final class ThreadPerTaskExecutor implements Executor {
             // private final ThreadFactory threadFactory;
            //  public ThreadPerTaskExecutor(ThreadFactory threadFactory) {
           //     this.threadFactory = ObjectUtil.checkNotNull(threadFactory, "threadFactory");
          //    }
         //  @Override
       //   public void execute(Runnable command) {
      //       threadFactory.newThread(command).start();
                //可以看出封装了一个专门启动线程的工厂模式的类。你只需要传入runnable就行了
                executor = new ThreadPerTaskExecutor(this.newDefaultThreadFactory());
            }
           //上面创建了一个执行器来启动线程的,这里就可以根据我们传入的线程数来创建一个数组
           //这个children是MultithreadEventExecutorGroup的属性看类名多个线程事件执行器组
           //这个children属性是一个数组private final EventExecutor[] children;
            this.children = new EventExecutor[nThreads];
           //看这里弄了一个for循环循环次数为传入的线程参数nThreads根据前面的操作,先给我们创建了
           //一个线程启动类工厂又给我们创建了一个数组。下面代码应该是用来循环给每个EventExecutor
           //关联我们的excutor
            int j;
            for(int i = 0; i < nThreads; ++i) {
                boolean success = false;
                boolean var18 = false;

                try {
                    var18 = true;
                    //循环遍历传入我们的Excutor和可变参数里面包含的值
                    //这个newChild方法是我们最开始的NioEventLoopGroup对象的方法
                    //在进入newChild方法之前我们总结一下NioEventLoopGroup可以看作一个线程池
                    //而children[0]可以看成一个线程那么netty是如何具体的封装一个线程呢这就是我们接下来要分析的这里我们单独把这行代码具体研究一下请往下翻
                    this.children[i] = this.newChild((Executor)executor, args);
                    success = true;
                    var18 = false;
                } catch (Exception var19) {
                    throw new IllegalStateException("failed to create a child event loop", var19);
                } finally {
                    if (var18) {
                        if (!success) {
                            int j;
                            for(j = 0; j < i; ++j) {
                                this.children[j].shutdownGracefully();
                            }

                            for(j = 0; j < i; ++j) {
                                EventExecutor e = this.children[j];

                                try {
                                    while(!e.isTerminated()) {
                                        e.awaitTermination(2147483647L, TimeUnit.SECONDS);
                                    }
                                } catch (InterruptedException var20) {
                                    Thread.currentThread().interrupt();
                                    break;
                                }
                            }
                        }

                    }
                }

                if (!success) {
                    for(j = 0; j < i; ++j) {
                        this.children[j].shutdownGracefully();
                    }

                    for(j = 0; j < i; ++j) {
                        EventExecutor e = this.children[j];

                        try {
                            while(!e.isTerminated()) {
                                e.awaitTermination(2147483647L, TimeUnit.SECONDS);
                            }
                        } catch (InterruptedException var22) {
                            Thread.currentThread().interrupt();
                            break;
                        }
                    }
                }
            }

            this.chooser = chooserFactory.newChooser(this.children);
            FutureListener<Object> terminationListener = new FutureListener<Object>() {
                public void operationComplete(Future<Object> future) throws Exception {
                    if (MultithreadEventExecutorGroup.this.terminatedChildren.incrementAndGet() == MultithreadEventExecutorGroup.this.children.length) {
                        MultithreadEventExecutorGroup.this.terminationFuture.setSuccess((Object)null);
                    }

                }
            };
            EventExecutor[] var24 = this.children;
            j = var24.length;

            for(int var26 = 0; var26 < j; ++var26) {
                EventExecutor e = var24[var26];
                e.terminationFuture().addListener(terminationListener);
            }

            Set<EventExecutor> childrenSet = new LinkedHashSet(this.children.length);
            Collections.addAll(childrenSet, this.children);
            this.readonlyChildren = Collections.unmodifiableSet(childrenSet);
        }
    }
this.children[i] = this.newChild((Executor)executor, args);详解
this指向的是我们开始创建的NioEventLoopGroup
    @Override
    protected EventLoop newChild(Executor executor, Object... args) throws Exception {
         //这里的args是3因此queueFactory是null
        EventLoopTaskQueueFactory queueFactory = args.length == 4 ? (EventLoopTaskQueueFactory) args[3] : null;
        //new了一个NioEvenLoop对象作为NioEventLoopGroup线程池中的一个线程,传入的参数有group
        //说明可以通过nioeventloop获取到自己所在的group,一个excutor执行器来开启一个线程,SelectorProvider用来获取selector每个线程都可以创建自己的selector,选择策略,和拒绝策略。
        //这个和java线程池一样NioEventLoopGroup作为线程池如果有处理不了的任务可以拒绝。比如线程数和等待队列都满了,queueFactory为null估计会提供一个默认的。记住这行代码是放在一个循环里面的会根据你传入的nthreads来运行多次
        return new NioEventLoop(this, executor, (SelectorProvider) args[0],
            ((SelectStrategyFactory) args[1]).newSelectStrategy(), (RejectedExecutionHandler) args[2], queueFactory);
    }
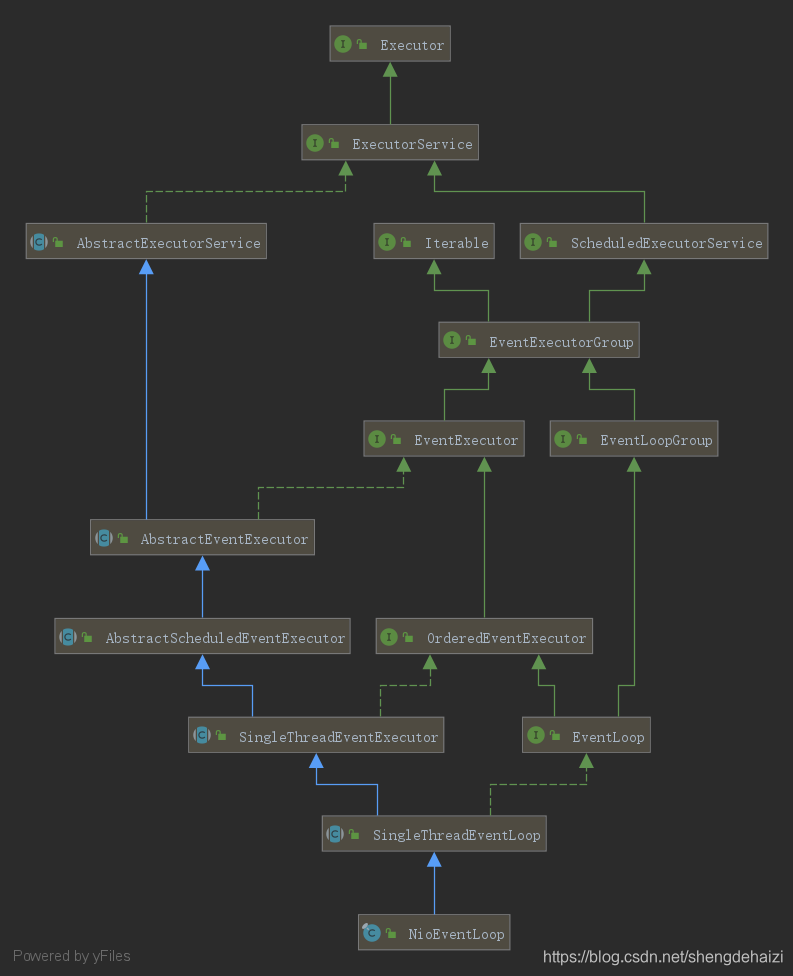
在进入NioEventLoop详细代码之前我们先来看下该类的继承结构
看见Single关键字没,虽然我们给NioEventLoop传入了excutor对象只要调用它的execute()方法就可以创建一个线程但是我们做了约束,每次调用只会创建一个线程。具体是如何弄得后面再说。
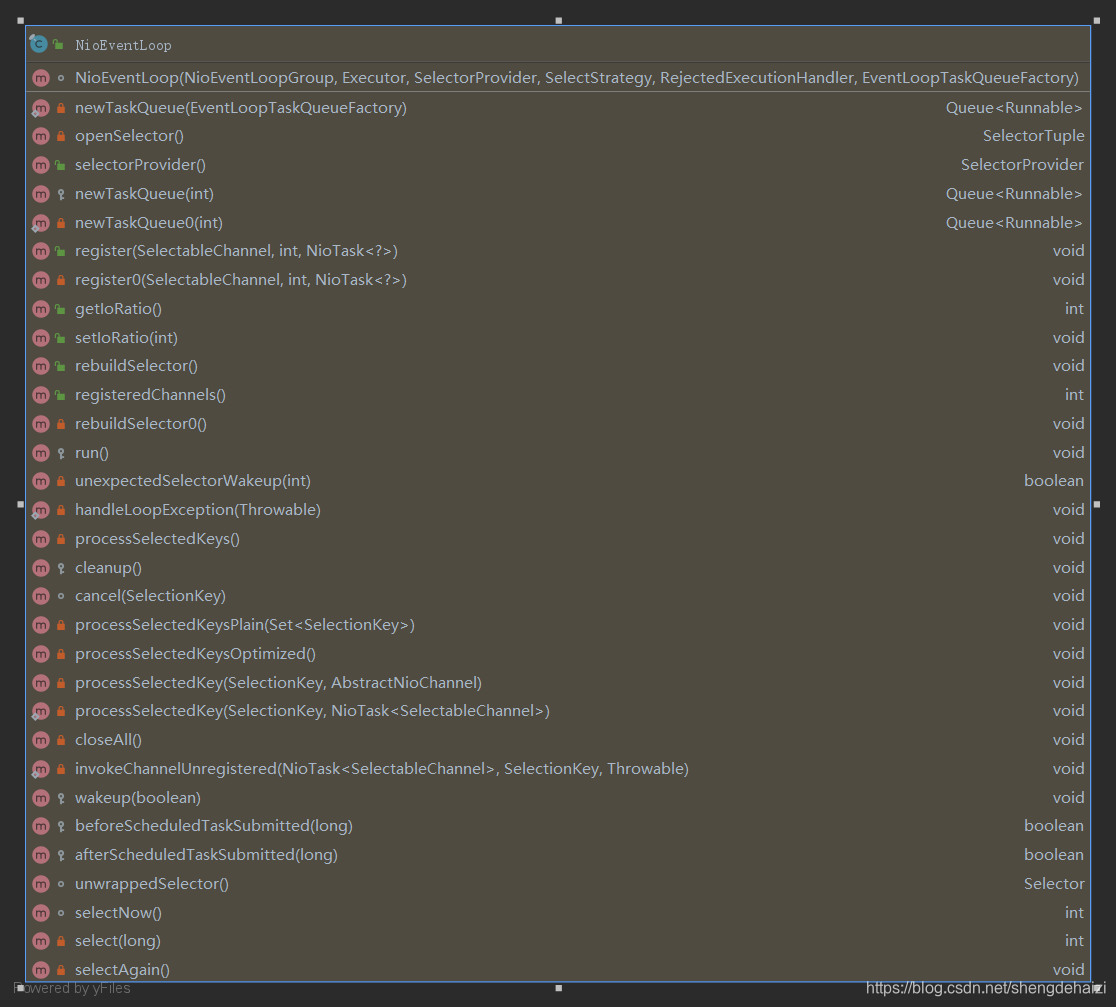
我们再来看看NioEventLoop有哪些方法
这里我们注意一下rebuildSelector0() run() select() 这些方法先混个眼熟
//这里开始分析创建NioEventLoop发生了什么
    NioEventLoop(NioEventLoopGroup parent, Executor executor, SelectorProvider selectorProvider,
                 SelectStrategy strategy, RejectedExecutionHandler rejectedExecutionHandler,
                 EventLoopTaskQueueFactory queueFactory) {
                 //先跳过
        super(parent, executor, false, newTaskQueue(queueFactory), newTaskQueue(queueFactory),
                rejectedExecutionHandler);
                //赋值一系列属性,比如通过selector该线程就可以通过selector来感知相应的channel注册的感兴趣的事件详细的后面分析
        this.provider = ObjectUtil.checkNotNull(selectorProvider, "selectorProvider");
        this.selectStrategy = ObjectUtil.checkNotNull(strategy, "selectStrategy");
        final SelectorTuple selectorTuple = openSelector();
        this.selector = selectorTuple.selector;
        this.unwrappedSelector = selectorTuple.unwrappedSelector;
    }
  //再来看
  super(parent, executor, false, newTaskQueue(queueFactory), newTaskQueue(queueFactory),
                rejectedExecutionHandler);
//  首先观察newTaskQueue()该方法用来创建一个队列
  private static Queue<Runnable> newTaskQueue(
            EventLoopTaskQueueFactory queueFactory) {
            //queueFactory为null因此默认给我们提供一个队列
        if (queueFactory == null) {
        //DEFAULT_MAX_PENDING_TASKS= Integer.MAX_VALUE
            return newTaskQueue0(DEFAULT_MAX_PENDING_TASKS);
        }
        return queueFactory.newTaskQueue(DEFAULT_MAX_PENDING_TASKS);
    }

//  newTaskQueue0(DEFAULT_MAX_PENDING_TASKS);创建一个任务队列size=0不是容量为0
 private static Queue<Runnable> newTaskQueue0(int maxPendingTasks) {
        // This event loop never calls takeTask()
        return maxPendingTasks == Integer.MAX_VALUE ? PlatformDependent.<Runnable>newMpscQueue()
                : PlatformDependent.<Runnable>newMpscQueue(maxPendingTasks);
    }
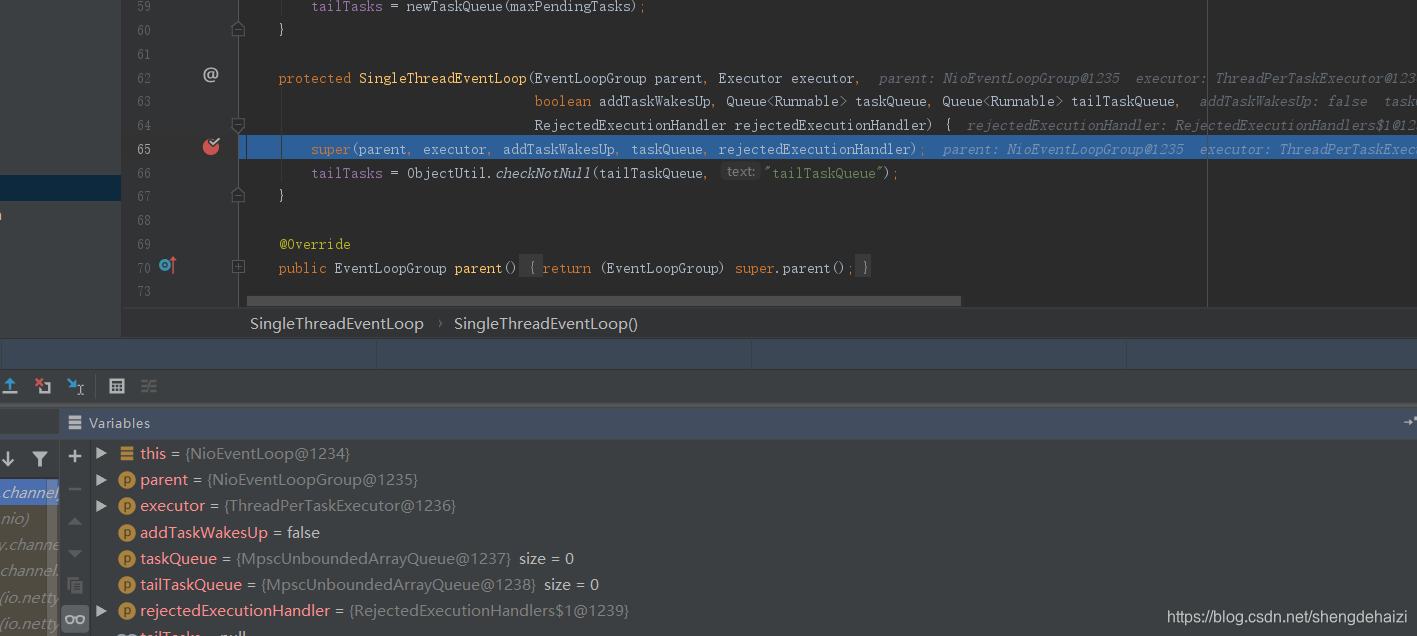
直接通过debug来观察创建的queue对象是什么如图
//  接上上面分析super(parent, executor, false, newTaskQueue(queueFactory), newTaskQueue(queueFactory),
//                rejectedExecutionHandler);
   protected SingleThreadEventLoop(EventLoopGroup parent, Executor executor,
                                    boolean addTaskWakesUp, Queue<Runnable> taskQueue, Queue<Runnable> tailTaskQueue,
                                    RejectedExecutionHandler rejectedExecutionHandler) {
        super(parent, executor, addTaskWakesUp, taskQueue, rejectedExecutionHandler);
        //尾部任务队列赋值对象为长度为0的 size = 0 MpscUnboundedArrayQueue
        //MpscUnboundedArrayQueue的描述为一个MPSC数组队列,它从<i> initialCapacity=1024 </ i>开始,并以初始大小的链接块无限期地增长。 *仅当当前块已满且元素未在调整大小时复制时,队列才会增长,而是将到新块的链接存储在旧块中,以供使用者遵循
        tailTasks = ObjectUtil.checkNotNull(tailTaskQueue, "tailTaskQueue");
    }
//super(parent, executor, addTaskWakesUp, taskQueue, rejectedExecutionHandler);
    protected SingleThreadEventExecutor(EventExecutorGroup parent, Executor executor,
                                        boolean addTaskWakesUp, Queue<Runnable> taskQueue,
                               RejectedExecutionHandler rejectedHandler) {
        //parent=EventExecutorGroup
        super(parent);
        this.addTaskWakesUp = addTaskWakesUp;
        //最大待处理任务
        this.maxPendingTasks = DEFAULT_MAX_PENDING_EXECUTOR_TASKS;
        //执行器可以用来启动一个线程
        this.executor = ThreadExecutorMap.apply(executor, this);
        //任务队列
        this.taskQueue = ObjectUtil.checkNotNull(taskQueue, "taskQueue");
        this.rejectedExecutionHandler = ObjectUtil.checkNotNull(rejectedHandler, "rejectedHandler");
    }
好了我们可以回到children[i]=newChild(executor,args)
  for (int i = 0; i < nThreads; i ++) {
            boolean success = false;
            try {
                 //这里我们创建了n个NioEventGoop
                children[i] = newChild(executor, args);
                success = true;
            } catch (Exception e) {
                // 如果创建失败发生异常即抛出
                throw new IllegalStateException("failed to create a child event loop", e);
            } finally {
            //这里也是异常后进行相应处理的逻辑没怎么看懂
                if (!success) {
                    for (int j = 0; j < i; j ++) {
                        children[j].shutdownGracefully();
                    }

                    for (int j = 0; j < i; j ++) {
                        EventExecutor e = children[j];
                        try {
                            while (!e.isTerminated()) {
                                e.awaitTermination(Integer.MAX_VALUE, TimeUnit.SECONDS);
                            }
                        } catch (InterruptedException interrupted) {
                            // Let the caller handle the interruption.
                            Thread.currentThread().interrupt();
                            break;
                        }
                    }
                }
            }
        }
        //我们还是着重分析一下正常启动的逻辑
        //给grop线程池设置一个选择策略,比如一个任务提交过来我要怎么挑选一个线程来执行呢
        //这里我们吧线程数组chidren闯入了进去
         chooser = chooserFactory.newChooser(children);
         // @Override
  //  public EventExecutorChooser newChooser(EventExecutor[] executors) {
    //如果executors.length是二的次幂则通过生成一个随机整数%executors.length-1来取一个线程。有点hashmap内味道了
    //这样可以完成依赖随机生成的整数来取一个线程执行很合理
    //    if (isPowerOfTwo(executors.length)) {
           // return new PowerOfTwoEventExecutorChooser(executors);
    //    } else {
    //不是二的次幂就return executors[Math.abs(idx.getAndIncrement() % executors.length)];直接和数组长度取模
      //      return new GenericEventExecutorChooser(executors);
   //     }
  //  }
//
//    在调用bossGroup.shutdownGracefully();即线程池关闭的时候每个线程收到通知调用operationComplete()
        final FutureListener<Object> terminationListener = new FutureListener<Object>() {
            @Override
            public void operationComplete(Future<Object> future) throws Exception {
                if (terminatedChildren.incrementAndGet() == children.length) {
                    terminationFuture.setSuccess(null);
                }
            }
        };
//给每个线程都设置一下
        for (EventExecutor e: children) {
            e.terminationFuture().addListener(terminationListener);
        }
//创建一个set来存放children。只用来read
        Set<EventExecutor> childrenSet = new LinkedHashSet<EventExecutor>(children.length);
        Collections.addAll(childrenSet, children);
        readonlyChildren = Collections.unmodifiableSet(childrenSet);
EventLoopGroup的创建过程就分析完了,你是不是能总结一下核心的几个东西呢。


