两年没接触小程序,都忘记uniapp
前言
工具:HBuilder X 3.99版本 微信开发者工具 1.06
语言:vue2 + uView
一、创建项目
先使用HBuilder X工具创建一个空白uni-app项目 uviewTest
二、安装和配置
HBuilder X找到工具-》插件安装-》插件市场
uview链接
配置成功后项目有一个uni_modules文件夹下uview-ui文件夹
引入js 在main.js中引入
引入css 在uni.scss文件最后引入
@import "@/uni_modules/uview-ui/theme.scss";
@import "@/uni_modules/uview-ui/index.scss";
css的引用二
在uni.scss中@import “@/uni_modules/uview-ui/theme.scss”;
在App.vue中@import “@/uni_modules/uview-ui/index.scss”;
配置page.json easycom 代码在下面
easycom的作用主要是:
传统vue组件,需要安装、引用、注册,三个步骤后才能使用组件。easycom将其精简为一步。 只要组件安装在项目的components目录下,并符合components/组件名称/组件名称.vue目录结构。就可以不用引用、注册,直接在页面中使用。
三、使用步骤
1、配置page.json文件
{
	"pages": [ //pages数组中第一项表示应用启动页,参考:https://uniapp.dcloud.io/collocation/pages
		{
			"path": "pages/index/index",
			"style": {
				"navigationBarTitleText": "uni-app-uview"
			}
		},
		{
			"path": "pages/main/main",
			"style": {
				"navigationBarTitleText": "首页"
			}
		},
		{
			"path": "pages/mine/mine",
			"style": {
				"navigationBarTitleText": "我的"
			}
		}
	],
	"globalStyle": {
		"navigationBarTextStyle": "black",
		"navigationBarTitleText": "uni-app",
		"navigationBarBackgroundColor": "#F8F8F8",
		"backgroundColor": "#F8F8F8"
	},
	"tabBar": {
		"custom":true,
		"list":[
			{
				"pagePath": "pages/main/main"
			},
			{
				"pagePath": "pages/mine/mine"
			}
		]
	},
	"uniIdRouter": {},
	"easycom":{
		"autoscan":true,
		"custom":{
			"^u-(.*)": "@/uni_modules/uview-ui/components/u-$1/u-$1.vue",
			"^my-(.*)": "@/components/my-$1/my-$1.vue" // 匹配components目录内的vue文件
		}
	}

}
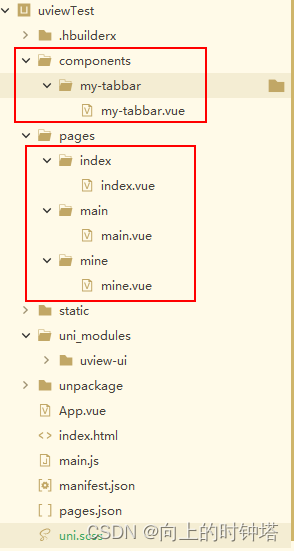
2、创建文件
3、相关代码
//my-tabbar文件
<template>
	<view>
		<u-tabbar
			:value="currentTab"
			:fixed="true"
			:border="false"
			activeColor="#d81e06"
			:placeholder="false"
			 @change="changeTabIndex"
		>
			<u-tabbar-item
			v-for="item in switchTabs"
			:key="item.name"
			:text="item.text" :icon="item.iconName" ></u-tabbar-item>
		</u-tabbar>
	</view>
</template>

<script>
	export default {
		data(){
			return{
				switchTabs:[
					{
						"pagePath":"/pages/main/main",
						"iconName":"home",
						"text":"首页",
						"name":"home"
					},
					{
						"pagePath":"/pages/mine/mine",
						"iconName":"account",
						"text":"我的",
						"name":"mine"
					}
				]
			}
		},
		props:['currentTab'],
		methods:{
			changeTabIndex(e){
				let pagePath = this.switchTabs[e].pagePath
				uni.switchTab({
					url:pagePath
				})
			}
		}
	}
</script>
//App.vue文件
<template>
	<view class="content">
	</view>
</template>

<script>
	export default {
		data() {
			return {
				title: 'Hello'
			}
		},
		components:{},
		onLoad() {
			uni.switchTab({
				url:'/pages/main/main'
			})
		},
		methods: {

		}
	}
</script>
//main.vue文件
<template>
	<view class="content">
		首页
		<my-tabbar :currentTab='0'/>
	</view>
</template>

<script>
	export default {
		data() {
			return {
			}
		},
		onLoad() {
		},
		methods: {
		}
	}
</script>
//mine.vue 文件
<template>
	<view class="content">
		我的
		<my-tabbar :currentTab='1'/>
	</view>
</template>

<script>
	export default {
		data(){
			return{
			}
		},
		onLaunch() {
		},
		methods:{
		}
	}
</script>
四 、运行
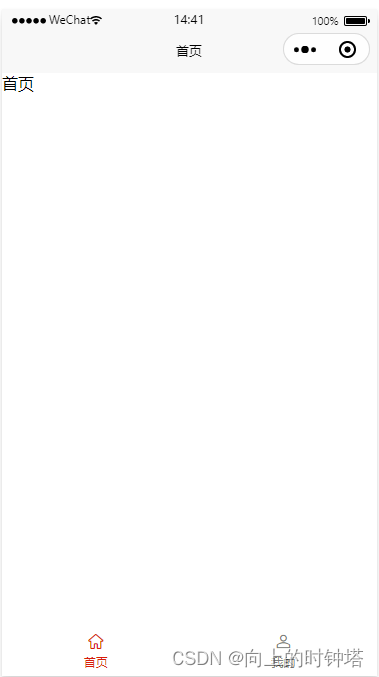
HBuilder X 运行-》运行到小程序模拟器
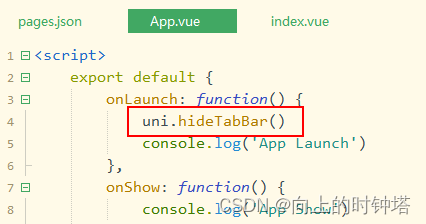
如果要在内置浏览器执行,要记得在App.vue加uni.hideTabBar()


