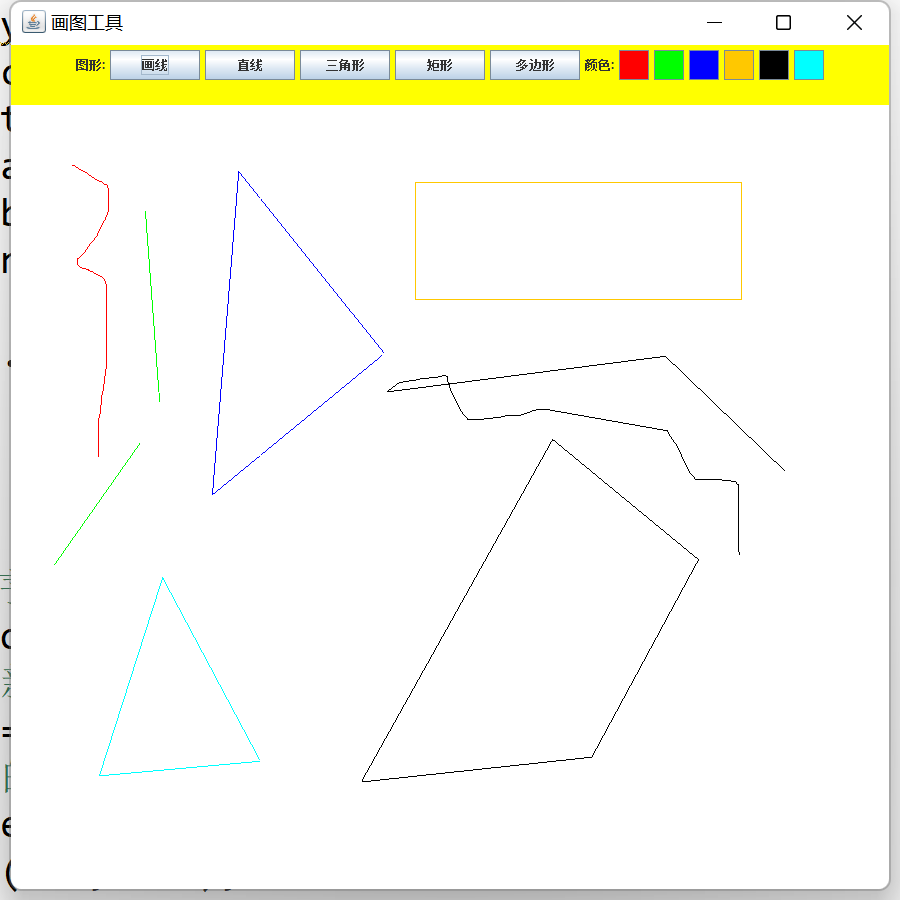
用java实现简单绘图的过程中可以让初学者更好的学习java这门语言,更好的理解包括变量类型,类与对象,接口等概念。在学习了简单的Swing程序设计之后,初学者可以运用窗体框架JFrame,布局管理器,常用面板,Swing常用组件等实现绘图所需要的画布。接下来我们就一起来设计一下绘图工具。
首先,我们定义一个程序显示的类,然后再主函数中定义一个这个类的对象。当然也可以直接在主函数中进行程序显示的代码操作,之所以要定义一个程序显示的类是为了程序的封装方便以及调用方便。
public class DrawUI {
    //     1.声明显示程序的类
        public void showUI() {
}
}
这个类无返回值,所以用void声明,其次,所有定义的新的类和主函数都要包含在public class DrawUI 里面。这里我没有写之前的路径和包名。接下来要做的就是丰富这个新定义好的 showUI()类。
JFrame jf = new JFrame();
            //对新创建的窗体设置参数
            jf.setTitle("画图工具");
            jf.setSize(900, 900);
            jf.setDefaultCloseOperation(3);
            jf.setLocationRelativeTo(null);
            //设置边框布局
            jf.setLayout(new BorderLayout());
那么首先要做的就是利用Swing组件新建一个窗体框架JFrame,对这个JFrame进行参数设置,调用布局管理器,这里布局可以设置流式布局和边框布局,网格布局。本文以边框布局为例,创建面板对象,根据边框布局的特点创建了中间的面板用来作为画板以及北边得面板作为菜单栏。
//面板对象:JPanel
            JPanel northPanel = new JPanel();
            northPanel.setBackground(Color.YELLOW);
            northPanel.setPreferredSize(new Dimension(0, 60));
            jf.add(northPanel,BorderLayout.NORTH);
            JPanel centerPanel = new JPanel();
            centerPanel.setBackground(Color.WHITE);
            centerPanel.setPreferredSize(new Dimension(0, 0));
            jf.add(centerPanel,BorderLayout.CENTER);
            //功能
接下来我们先新建一个class类,用来放我们的监听器接口,注意要调用监听器,需要重写监听器中所有的方法。如图所示调用了接下来可能用到的三个监听器。
public class DrawMouse implements MouseListener, ActionListener, MouseMotionListener {

    public void actionPerformed(ActionEvent e) {
    }
    public void mouseClicked(MouseEvent e) {
    }
    public void mousePressed(MouseEvent e) {

    }
    public void mouseReleased(MouseEvent e) {
    }
    public void mouseEntered(MouseEvent e) {
    }
    public void mouseExited(MouseEvent e) {
    }

    public void mouseDragged(MouseEvent e) {
    }
    public void mouseMoved(MouseEvent e) {
    }
}
继续在drawUI中设置各种按钮,并把这些按钮加入监听器。
JLabel user = new JLabel("图形:");
            northPanel.add(user);

            DrawMouse mouse = new DrawMouse();
            String[] shape= {"画线","直线","三角形","矩形","多边形"};
            for(int i=0;i<shape.length;i++) {
                JButton jbu = new JButton(shape[i]);
                jbu.setPreferredSize(new Dimension(90, 30));
                northPanel.add(jbu);
                jbu.addActionListener(mouse);
            }

            JLabel user1 = new JLabel("颜色:");
            northPanel.add(user1);

            Color[] color = {Color.RED,Color.GREEN,Color.BLUE,Color.ORANGE,Color.BLACK,Color.CYAN};
            for(int i=0;i<color.length;i++) {
                JButton but = new JButton();
                //设置背景色
                but.setBackground(color[i]);
                but.setPreferredSize(new Dimension(30, 30));
                northPanel.add(but);
                //添加监听器
                but.addActionListener(mouse);
            }
            jf.setVisible(true);
定义画笔,将drawmouse中的画笔的值引用传递给drawUI.
Graphics g = centerPanel.getGraphics();
            centerPanel.addMouseListener(mouse);
            centerPanel.addMouseMotionListener(mouse);
            //引用传递
            mouse.gr=g;
接下来就需要根据需要丰富drawmouse中的方法。如下是笔者设计的具体方法。
public void actionPerformed(ActionEvent e) {

        if ("".equals(e.getActionCommand())) {
            // 获取当前事件源对象
            JButton jbu = (JButton) e.getSource();
            // 获取按钮背景色,设置给画笔
            color = jbu.getBackground();
            gr.setColor(color);
        } else {
            // 获取按钮上的内容
            name = e.getActionCommand();
        }
        System.out.println("按钮!name = " + name);
    }

    public void mouseClicked(MouseEvent e) {
        x3 = e.getX();
        y3 = e.getY();

        if ("三角形".equals(name)) {
            gr.drawLine(x1, y1, x3, y3);
            gr.drawLine(x2, y2, x3, y3);
            flag = 1;
            System.out.println("x3 = " + x3 + "   y3 = " + y3);
        }
        // 判断是否双击:e.getClickCount() == 2
        if ("多边形".equals(name)) {
            if (e.getClickCount() == 1) {
                x3 = e.getX();
                y3 = e.getY();
                gr.drawLine(x2, y2, x3, y3);
                x2 = x3;
                y2 = y3;
            }
            if (e.getClickCount() == 2) {
                gr.drawLine(x1, y1, x3, y3);
                flag = 1;
            }
        }
    }

    public void mousePressed(MouseEvent e) {
        System.out.println("按下");
        // 获取当前的坐标值
        // 局部变量:1.在方法(作用域)里面定义的变量 2.方法的参数
        if (flag == 1) {
            x1 = e.getX();
            y1 = e.getY();
        }
        System.out.println("x1 = " + x1 + "   y1 = " + y1);
    }

    public void mouseReleased(MouseEvent e) {

        if (flag == 1) {
            x2 = e.getX();
            y2 = e.getY();
        }

        // 任意三角形
        if ("多边形".equals(name) && flag == 1) {
            gr.drawLine(x1, y1, x2, y2);
            flag++;
        }
    }
    public void mouseEntered(MouseEvent e) {
    }

    public void mouseExited(MouseEvent e) {
    }

    public void mouseDragged(MouseEvent e) {
        if ("画线".equals(name)) {
            x2 = e.getX();
            y2 = e.getY();
            gr.drawLine(x1,y1,x2,y2);
            x1=x2;
            y1=y2;
        }
        if ("直线".equals(name)) {
            gr.setColor(Color.WHITE);
            gr.drawLine(x1,y1,x2,y2);
            x2 = e.getX();
            y2 = e.getY();
            gr.setColor(color);
            gr.drawLine(x1,y1,x2,y2);

        }
        if ("三角形".equals(name)) {
            gr.setColor(Color.WHITE);
            gr.drawLine(x1,y1,x2,y2);
            x2 = e.getX();
            y2 = e.getY();
            gr.setColor(color);
            gr.drawLine(x1,y1,x2,y2);
            flag++;
        }
        if ("矩形".equals(name)) {
            gr.setColor(Color.WHITE);
            gr.drawLine(x1,y1,x1,y2);
            gr.drawLine(x1,y1,x2,y1);
            gr.drawLine(x2,y2,x1,y2);
            gr.drawLine(x2,y2 ,x2,y1);
            x2 = e.getX();
            y2 = e.getY();
            gr.setColor(color);
            // 矩形,椭圆,等腰/等边三角形
            gr.drawLine(x1,y1,x1,y2);
            gr.drawLine(x1,y1,x2,y1);
            gr.drawLine(x2,y2,x1,y2);
            gr.drawLine(x2,y2 ,x2,y1);
        }
    }
    public void mouseMoved(MouseEvent e) {
    }
public static void main(String[] args) {
DrawUI ui = new DrawUI();
ui.showUI();
}在主函数中运行showUI()即可。java包可以根据系统提示进行导入。最终程序效果如下所示:
