【线程】Java多线程代码案例(2)
一、定时器的实现
1.1Java标准库定时器
import java.util.Timer;
import java.util.TimerTask;

public class ThreadDemo5 {
    public static void main(String[] args) throws InterruptedException {
        Timer timer =new Timer();

        timer.schedule(new TimerTask() {
            @Override
            public void run() {
                System.out.println("1000");
            }
        },1000);

        System.out.println("hello main");
    }
}
1.2 定时器的实现
首先考虑,定时器中都需要都需要实现哪些元素呢?
- 需要有一个线程,负责掐时间
- 还需要有一个队列,能够保存所有添加进来的任务,这个队列要带有阻塞功能
因为这个任务,要先执行时间小的,再执行时间大的。此处我们可以实现一个优先级队列。那么时间小的任务就始终排在第一位,我们只需要关注队首元素是否到时间,如果队首没有到时间,那么后续其他元素,也一定没有到时间。
首先定义任务类,包含要执行的任务和时间
class MyTimerTask implements Comparable<MyTimerTask>{
    //执行时间
    private long time;
    //持有一个Runnable
    private Runnable runnable;

    public MyTimerTask(Runnable runnable,long delay){
        this.time=System.currentTimeMillis()+delay;
        this.runnable=runnable;
    }

    //实际要执行的任务
    public void run(){
        runnable.run();
    }

    public long getTime() {
        return time;
    }

    @Override
    //因为要加入优先级队列,必须能比较
    public int compareTo(MyTimerTask o) {
        return (int)(this.time-o.time);
    }
}
定义计时器
class MyTimer{
	//持有一个线程负责计时
	private Thread t=null;
	//优先级队列
	private PriorityQueue<MyTimerTask> queue =new PriorityQueue<>();
	//前面实现阻塞队列的逻辑,加锁
	private Object locker =new Object();
	//添加任务
	public void schedule(Runnable runnable,long delay){}
	//构造方法
	//注意执行任务并不需要我们写一个方法在main()函数中调用
	//这个是到时间自动执行的
	public MyTimer(){
		t=new Thread(()->{
			while(true){
				//到时间执行任务的逻辑
			}
		});
	}
}
那接下来我们就来分别实现这里的schedule方法和构造函数中执行任务的逻辑:
schedule():
public void schedule(Runnable runnable,long delay){
	//入队列和出队列都需要打包成“原子性”的操作,加锁实现
	synchronized(locker){
		//新建任务
		MyTimerTask task=new MyTimerTask(runnable,delay);
		//加入队列
		queue.offer(task);
		//参考前面阻塞队列的实现,当队列为空时wait(),加入元素后notify()
		locker.notify();
	}
}
构造方法:
public MyTimer(){
	t=new Thread(()->{
		while(true){
			try{
				synchronized(locker){
				while(queue.isEmpty()){
					//阻塞直到加入新的任务后被notify()唤醒
					locker.wait();
				}
				//查看队首元素
				//peek不会将元素弹出
				MyTimerTask task=queue.peek;
				if(System.currentTimeMillis() >= task.getTime()){
					queue.poll();
					task.run();
				}else{
					//阻塞,释放锁(允许继续添加任务)
					//设置最大阻塞时间,阻塞到这个时间到了
					locker.wait(task.getTime()-System.currentTimeMillis());
				}
			}catch (InterruptedException e) {
               break;
            }
		}
	});
	//启动线程
	t.start();
}
写到这里,就大功告成了,我们在main()函数中试验看一下运行结果:
public class ThreadDemo5{
    public static void main(String[] args) {
        MyTimer timer=new MyTimer();
        timer.schedule(new Runnable() {
            @Override
            public void run() {
                System.out.println(3000);
            }
        },3000);
        timer.schedule(new Runnable() {
            @Override
            public void run() {
                System.out.println(2000);
            }
        },2000);
        timer.schedule(new Runnable() {
            @Override
            public void run() {
                System.out.println(1000);
            }
        },1000);

        Thread.sleep(4000);
        timer.cancel();
    }
}
这里我们再加一个方法,我们希望任务执行完成后,能够主动结束这个线程:
public void cancel(){
	t.interrupt();
}
这里需要考虑线程被提前唤醒抛出的异常,因此在构造方法中将捕获异常的操作改为break;
计时器完整代码:
import java.util.PriorityQueue;

class MyTimerTask implements Comparable<MyTimerTask>{
    //执行时间
    private long time;
    //持有一个Runnable
    private Runnable runnable;

    public MyTimerTask(Runnable runnable,long delay){
        this.time=System.currentTimeMillis()+delay;
        this.runnable=runnable;
    }

    //实际要执行的任务
    public void run(){
        runnable.run();
    }

    public long getTime() {
        return time;
    }

    @Override
    public int compareTo(MyTimerTask o) {
        return (int)(this.time-o.time);
    }
}

class MyTimer{
    //持有一个线程负责计时
    private Thread t=null;
    //任务队列——>优先级队列
    private PriorityQueue<MyTimerTask> queue =new PriorityQueue<>();
    //锁对象
    private Object locker=new Object();

    public void schedule(Runnable runnable,long delay){
        synchronized (locker) {
            //新建任务
            MyTimerTask task = new MyTimerTask(runnable, delay);
            //加入队列
            queue.offer(task);
            locker.notify();
        }
    }
    public void cancel(){
        t.interrupt();
    }
    public MyTimer(){
        t = new Thread(() -> {
            while (true) {
                try {
                    synchronized (locker) {
                        while (queue.isEmpty()) {
                            //阻塞
                            locker.wait();
                        }
                        //查看队首元素
                        MyTimerTask task = queue.peek();
                        if (System.currentTimeMillis() >= task.getTime()) {
                            queue.poll();
                            task.run();
                        } else {
                            //阻塞
                            locker.wait(task.getTime()-System.currentTimeMillis());
                        }
                    }
                } catch (InterruptedException e) {
                    break;
                }
            }
        });
        t.start();
    }
}
public class ThreadDemo5{
    public static void main(String[] args) throws InterruptedException {
        MyTimer timer=new MyTimer();
        timer.schedule(new Runnable() {
            @Override
            public void run() {
                System.out.println(3000);
            }
        },3000);
        timer.schedule(new Runnable() {
            @Override
            public void run() {
                System.out.println(2000);
            }
        },2000);
        timer.schedule(new Runnable() {
            @Override
            public void run() {
                System.out.println(1000);
            }
        },1000);

        Thread.sleep(4000);
        timer.cancel();
    }
}
二、线程池的实现
2.1 线程池
最初我们提到线程这个概念,其实是一个“轻量级进程”。他的优势在于无需频繁地向系统申请/释放内存,提高了效率。但是随着线程的增多,频繁地创建/销毁线程也是一个很大的开销。解决方案有两种:
- 轻量级线程(协程),Java 21中引入了虚拟线程,就是这个东西。协程主要在Go语言中有较好的运用。
- 其次就是引入线程池的概念,无需频繁创建/销毁线程,而是一次性的创建好许多线程,每次直接取用,用完了放回线程池中。
为什么从线程池里取线程,会比从系统中申请更高效。
本质上在于去线程池里取线程,是一个用户态的操作,而向系统申请线程是一个内核态的操作。
还是以去银行取钱为例,向系统申请线程,就相当于找工作人员,在柜台取钱(工作人员收到请求后可能不会立即给你取钱),相对低效;而从线程池中取用线程,则相当于从ATM机里面取钱(从ATM机里面取钱是可以立即取到的),相对高效。
2.2 Java标准库中的线程池
这里我们可以细看一下这里的参数:
- corePoolSize(核心线程数)
一个线程池里,最少要有多少个线程,相当于正式工,不会被销毁。 - maximumPoolSize(最大线程数)
一个线程池里,最多要有多少个线程,相当于临时工,一段时间不干活就被销毁。 - keepAliveTime
临时工允许的空闲时间,超过这个时间,就被销毁。 - unit
keepAliveTime的时间单位 - BlockingQueue workQueue
传递任务的阻塞队列 - threadFactory
创建线程的工厂,参与具体的创建线程的工作。
这里涉及到工厂模式,试想这样的代码能否运行:
class Point{
	//笛卡尔坐标系
	public point(double x,double y){...}
	//极坐标系
	public point(double r,double a){...}
}
像这样的代码是无法运行的。因为他们具有相同的方法名和参数列表,无法完成重载。那如果确实想完成这样的操作,该怎么做呢?
class Point{
	public static Point makePointByXY(double x, double y){
		Point p=new Point();
		p.setX(x);
		p.setY(y);
		return p;
	}
	public static Point makePointByRA(double r,double a){
		Point p=new Point();
		p.setR(r);
		p.setA(a);
		return p;
	}
}
Point p=Point.makePointByXY(x,y);
Point p=Point.makePointByRA(r,a);
总的来说,通过静态方法封装new操作,在方法内部设定不同的属性完成对象的初始化,构造对象的过程,就是工厂模式。
- RejectedExecutionHandler handler
拒绝策略。如果这里的阻塞队列满了,此时要添加任务,就需要有一个应对策略。
| 策略 | 含义 | 备注 |
|---|---|---|
| AbortPolicy() | 超过负荷,抛出异常 | 所有任务都不做了 |
| CallerRunsPolicy() | 调用者负责处理多出来的任务 | 所有任务都要做,新加的任务由添加任务的线程做 |
| DiscardOldestPolicy() | 丢弃队列中最老的任务 | 不做最老的任务 |
| DiscardPolicy() | 丢弃新来的任务 | 不做最新的任务 |
由于ThreadPoolExecutor本身用起来比较复杂,因此标准库还提供了一个版本,把ThreadPoolExecutor给封装了一下。Executors 工厂类,通过这个类来创建不同的线程池对象(内部把ThreadPoolExecutor创建好了并且设置了不同的参数)
大致有这么几种方法:
| 方法 | 用途 |
|---|---|
| newScheduleThreadExecutor() | 创建定时器线程,延时执行任务 |
| newSingleThreadExecutor() | 只包含单个线程的线程池 |
| newCachedThreadExecutor() | 线程数目能够动态扩容 |
| newFixedThreadExecutor() | 线程数目固定 |
import java.util.concurrent.ExecutorService;
import java.util.concurrent.Executors;

public class ThreadDemo6 {
    public static void main(String[] args) {
        ExecutorService service=Executors.newFixedThreadPool(4);
        service.submit(new Runnable() {
            @Override
            public void run() {
                System.out.println("hello");
            }
        });
    }
}
那么,对于一个多线程任务,创建多少个线程合适呢?
- 如果任务都是CPU密集型的(大部分时间在CPU上执行),此时线程数不应超过逻辑核心数;
- 如果任务都是IO密集型的(大部分时间在等待IO),此时线程数可以远远超过逻辑核心数;
- 由于实际的任务都是两种任务混合型的,一般通过实验的方式来得到最合适的线程数。
2.3 线程池的实现
我们可以实现一个简单的线程池(固定线程数目的线程池),要完成以下任务:
- 提供构造方法,指定创建多少个线程;
- 在构造方法中,创建线程;
- 有一个阻塞队列,能够执行要执行的任务;
- 提供submit()方法,添加新的任务
import java.util.ArrayList;
import java.util.List;
import java.util.concurrent.ArrayBlockingQueue;
import java.util.concurrent.BlockingQueue;

class MyThreadPoolExecutor{
    private List<Thread> threadList=new ArrayList<>();

    //阻塞队列
    private BlockingQueue<Runnable> queue=new ArrayBlockingQueue<>(10);

    public MyThreadPoolExecutor(int n){
        for(int i=0;i<n;i++){
            Thread t=new Thread(()-> {
                while (true) {
                    try {
                        //take操作也带有阻塞
                        Runnable runnable = queue.take();
                        runnable.run();
                    } catch (InterruptedException e) {
                        throw new RuntimeException(e);
                    }
                }
            });
            t.start();
            threadList.add(t);
        }
    }

    public void submit(Runnable runnable) throws InterruptedException {
        //put操作带有阻塞功能
        queue.put(runnable);
    }
}
public class ThreadDemo6 {
    public static void main(String[] args) throws InterruptedException {
       MyThreadPoolExecutor executor=new MyThreadPoolExecutor(4);
       for(int i=0;i<1000;i++){
           int n=i;
           executor.submit(new Runnable() {
               @Override
               public void run() {
                   System.out.println("执行任务:"+n+",当前线程:"+
                           Thread.currentThread().getName());
               }
           });
       }
    }
}
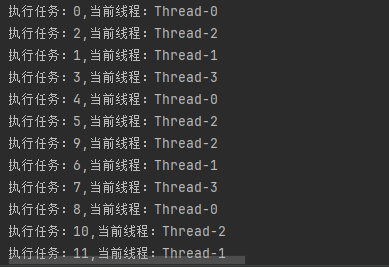
运行结果:


