阿里云image-syncer源码分析
欢迎关注“云原生手记”微信公众号
背景
大家在公司中都会使用到容器镜像私有仓库,一般都用harbor,也有会用registry搭建一个简陋的私库。然后,有一天,领导告诉你,公司建了一个统一的镜像仓库,需要做镜像迁移,或者公司业务要上公有云了,需要把公司原私有仓库中的镜像全部迁移到公有云镜像仓库(阿里云,腾讯云或者移动云)上去。那么,运维人员就会开始写脚本,逻辑大概是这样的:先从原仓库pull下镜像,然后重新tag,最后push到目标仓库。这种逻辑在一般原镜像仓库不大的情况下是没有问题的,但是在镜像仓库已经到了几百G或者几T的情况下,就会出现效率和可靠性问题。
- 效率问题: 简单粗暴的docker pull和docker push,都是由docker daemon来执行,而docker daemon的并发性能并不是很好,导致同步镜像慢。此外,机器带宽会限制同步速度。
- 可靠性:docker pull会把镜像数据保存在本地,所以会落盘。那么本地存储会不会被撑爆也是个问题。
对于上面的这些问题,阿里云推出了image-syncer小工具:
一个简单、易用的批量镜像迁移/同步工具,支持几乎所有目前主流的基于 docker registry V2 搭建的镜像存储服务,比如 ACR、Docker
Hub、Quay、自建 Harbor 等,目前已经初步经过了 TB 级别的生产环境镜像迁移验证,并开源于 https://github.com/AliyunContainerService/image-syncer
感兴趣的小伙伴可以把源码克隆下来,自己研究,并进行二次开发(我就已经开始二次开发啦)。另外,这个工程只能在linux环境下运行,windows下启动不了。
源码分析
编译及运行
执行下面步骤,你就能获得image-syncer的可执行文件:
git clone https://github.com/AliyunContainerService/image-syncer.git
cd $GOPATH/github.com/AliyunContainerService/image-syncer
make
./image-syncer --help
然后你就可以用这个可执行文件愉快的玩耍啦!
工程启动
首先看下项目的目录结构:
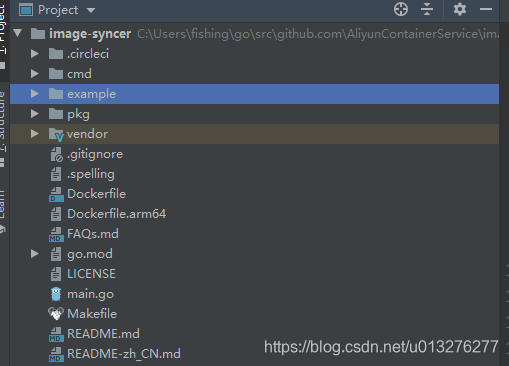
明显这是个以Cobra为基础的项目。那么先找到main函数,就在根目录下:
import (
	"github.com/AliyunContainerService/image-syncer/cmd"
)

func main() {
	cmd.Execute() // 执行了运行
}
继续看命令定义,主要分为三块:
1、init函数
启动程序就会先执行该函数,主要用于接收执行参数,例如配置文件,日志路径、并发线程数和重试次数等
func init() {
	RootCmd.PersistentFlags().StringVar(&configFile, "config", "", "config file path. This flag is deprecated and will be removed in the future. Please use --auth and --images instead.")
	RootCmd.PersistentFlags().StringVar(&authFile, "auth", "", "auth file path. This flag need to be pair used with --images.")
	RootCmd.PersistentFlags().StringVar(&imageFile, "images", "", "images file path. This flag need to be pair used with --auth")
	RootCmd.PersistentFlags().StringVar(&logPath, "log", "", "log file path (default in os.Stderr)")
	RootCmd.PersistentFlags().StringVar(&defaultRegistry, "registry", os.Getenv("DEFAULT_REGISTRY"),
		"default destinate registry url when destinate registry is not given in the config file, can also be set with DEFAULT_REGISTRY environment value")
	RootCmd.PersistentFlags().StringVar(&defaultNamespace, "namespace", os.Getenv("DEFAULT_NAMESPACE"),
		"default destinate namespace when destinate namespace is not given in the config file, can also be set with DEFAULT_NAMESPACE environment value")
	RootCmd.PersistentFlags().IntVarP(&procNum, "proc", "p", 1, "numbers of working goroutines")
	RootCmd.PersistentFlags().IntVarP(&retries, "retries", "r", 0, "times to retry failed task")
}
2、Execute函数
该函数就是main函数中调用的函数:
func Execute() {
	if err := RootCmd.Execute(); err != nil {
		fmt.Println(err)
		os.Exit(-1)
	}
}
其实调用的是RootCmd的Execute函数。
3、RootCmd
这里就来到的启动的主逻辑了,其中的RunE函数就是Execute函数执行的主体。可以看到RunE函数的逻辑是先去创建一个SyncClient,然后将其运行起来。
// RootCmd describes "image-syncer" command
var RootCmd = &cobra.Command{
	Use:     "image-syncer",
	Aliases: []string{"image-syncer"},
	Short:   "A docker registry image synchronization tool",
	Long: `A Fast and Flexible docker registry image synchronization tool implement by Go.
	Complete documentation is available at https://github.com/AliyunContainerService/image-syncer`,
	// !!!!重点在这
	RunE: func(cmd *cobra.Command, args []string) error {
		// work starts here
		client, err := client.NewSyncClient(configFile, authFile, imageFile, logPath, procNum, retries, defaultRegistry, defaultNamespace)
		if err != nil {
			return fmt.Errorf("init sync client error: %v", err)
		}
		client.Run()
		return nil
	},
}
那么到这里,启动部分就看完了。主要就是执行SyncClient的Run方法,那么下面我们就围绕Run方法展开
整体逻辑
这边主要介绍大致的逻辑,对于如何进行manifest和blob文件的获取和推送的过程请自己翻阅源码。
新建SyncClient
具体逻辑见下方代码注释,后面会有业务逻辑图:
func NewSyncClient(configFile, authFile, imageFile, logFile string, routineNum, retries int, defaultDestRegistry string, defaultDestNamespace string) (*Client, error) {
	logger := NewFileLogger(logFile) // 日志设置

	// 根据传入参数初始化config对象
	config, err := NewSyncConfig(configFile, authFile, imageFile, defaultDestRegistry, defaultDestNamespace)
	if err != nil {
		return nil, fmt.Errorf("generate confg error: %v", err)
	}
    // 构建client
	return &Client{
		taskList:                   list.New(),// 任务列表
		urlPairList:                list.New(),// 要同步的镜像对(原仓库镜像《-》目标仓库镜像)
		failedTaskList:             list.New(), // 失败任务队列
		failedTaskGenerateList:     list.New(), // 失败任务生成列表
		config:                     config, // 配置对象
		routineNum:                 routineNum, // 几个协程跑同步任务
		retries:                    retries, // 重试次数
		logger:                     logger,
		taskListChan:               make(chan int, 1), // 缓存未1的通道
		urlPairListChan:            make(chan int, 1), // 缓存未1的通道
		failedTaskListChan:         make(chan int, 1), // 缓存未1的通道
		failedTaskGenerateListChan: make(chan int, 1), // 缓存未1的通道
	}, nil
}
syncClient的Run方法
Run方法:
这边只截取主要逻辑的部分,解释见注释
func (c *Client) Run() {
	fmt.Println("Start to generate sync tasks, please wait ...")
    ...
    // 遍历配置文件中的镜像列表,封装URLPair放入urlPairList
	for source, dest := range c.config.GetImageList() {
		c.urlPairList.PushBack(&URLPair{
			source:      source,
			destination: dest,
		})
	}

	// 生成同步任务
	openRoutinesGenTaskAndWaitForFinish()

	fmt.Println("Start to handle sync tasks, please wait ...")

	// 执行同步任务
	openRoutinesHandleTaskAndWaitForFinish()

    // 从failedTaskGenerateList队列中获取失败的同步任务,并开始重试同步
	for times := 0; times < c.retries; times++ {
		if c.failedTaskGenerateList.Len() != 0 {
			c.urlPairList.PushBackList(c.failedTaskGenerateList)// 取出的失败任务放入urlPairList
			c.failedTaskGenerateList.Init()
			// retry to generate task
			fmt.Println("Start to retry to generate sync tasks, please wait ...")
			openRoutinesGenTaskAndWaitForFinish() // 执行同步任务
		}

		if c.failedTaskList.Len() != 0 {
			c.taskList.PushBackList(c.failedTaskList) // 失败任务放入任务队列
			c.failedTaskList.Init()
		}

		if c.taskList.Len() != 0 {
			// retry to handle task
			fmt.Println("Start to retry sync tasks, please wait ...")
			openRoutinesHandleTaskAndWaitForFinish() // 任务队列不为空,就去执行任务
		}
	}
    // 同步结果打印
	fmt.Printf("Finished, %v sync tasks failed, %v tasks generate failed\n", c.failedTaskList.Len(), c.failedTaskGenerateList.Len())
	c.logger.Infof("Finished, %v sync tasks failed, %v tasks generate failed", c.failedTaskList.Len(), c.failedTaskGenerateList.Len())
}
一致没给大家看配置文件长什么样,这边提供了好几种配置文件(auth.json,auth.yaml,config.json,config.yaml,images.json,images.yaml),运行时自己指定即可。我这边使用了config.yaml文件,因为这个文件的信息最全,不然你得使用auth文件加images文件一起使用,让大家看下我的config.yaml文件:
auth:
  registry.nanjun:
    username: admin
    password: zhounanjun
    insecure: true
  registry.nanjun1:
    username: admin
    password: zhounanjun
    insecure: true
images:
  registry.nanjun/test/hello:latest: registry.nanjun1/test/busybox:v1.5
在syncClient中的config对象就是基于这个文件的生成的,c.config.GetImageList()的镜像列表就是配置文件中的images下的内容,此外,auth下配置了各个仓库的认证信息,insecure表示跳过私有仓库的https认证。
下面介绍Run方法中的定义的两个函数类型openRoutinesGenTaskAndWaitForFinish和openRoutinesHandleTaskAndWaitForFinish,分别用来并发生成同步任务和并发执行同步任务。
openRoutinesGenTaskAndWaitForFinish:
开启协程生成任务并等待结束
openRoutinesGenTaskAndWaitForFinish := func() {
		wg := sync2.WaitGroup{} // golang的waitgroup
		for i := 0; i < c.routineNum; i++ { // 用户设置几个协程,就用几个协程并发生成任务
			wg.Add(1)
			go func() {
				defer wg.Done()
				for {
					urlPair, empty := c.GetAURLPair() // 从urlPairList获取同步镜像对
					// no more task to generate
					if empty {
						break
					}
					moreURLPairs, err := c.GenerateSyncTask(urlPair.source, urlPair.destination) //根据镜像对的原镜像地址和目标镜像地址生成任务,并把任务放入taskList
					if err != nil {
						c.logger.Errorf("Generate sync task %s to %s error: %v", urlPair.source, urlPair.destination, err)
						// put to failedTaskGenerateList
						c.PutAFailedURLPair(urlPair)
					}
					if moreURLPairs != nil { // 会存在返回镜像对的情况,如果有多个镜像tag的情况
						c.PutURLPairs(moreURLPairs)// 将urlPairs放入urlPairList,以便后面的协程可以获取到
					}
				}
			}()
		}
		wg.Wait() // 等待所有协程生成任务结束
	}
openRoutinesHandleTaskAndWaitForFinish:
开启协程处理任务并等待结束
openRoutinesHandleTaskAndWaitForFinish := func() {
		wg := sync2.WaitGroup{}
		for i := 0; i < c.routineNum; i++ {
			wg.Add(1)
			go func() {
				defer wg.Done()
				for {
					task, empty := c.GetATask() // 从taskList中获取task
					// no more tasks need to handle
					if empty {
						break
					}
					if err := task.Run(); err != nil {// 执行task的run方法
						// put to failedTaskList
						c.PutAFailedTask(task)
					}
				}
			}()
		}

		wg.Wait()
	}
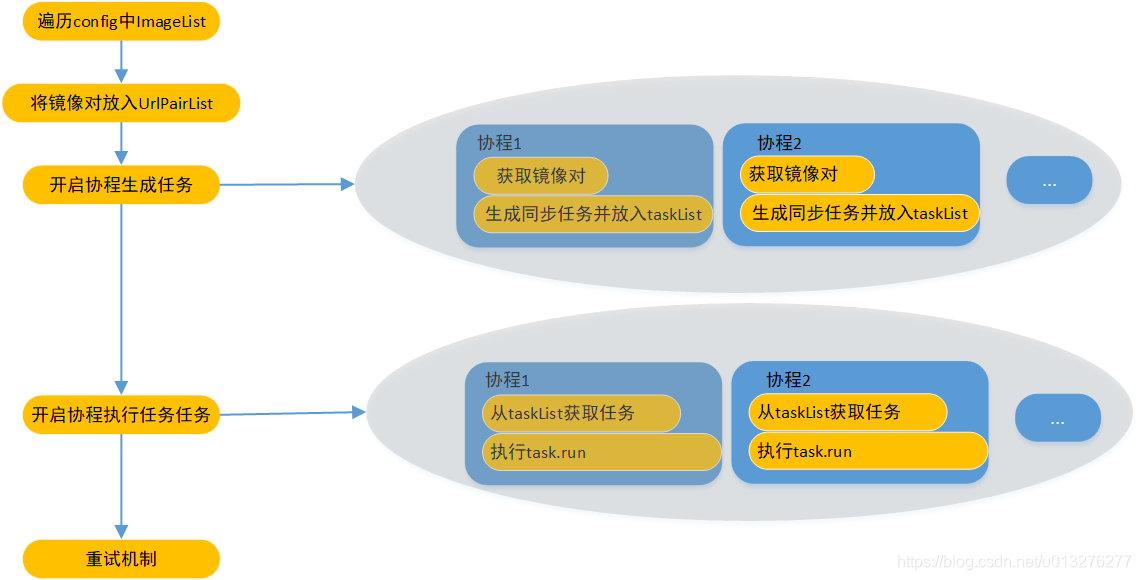
整个syncClient运行逻辑图如下:
镜像同步逻辑
知道syncClient的主要运行逻辑,但是对于镜像同步的还没有讲到,这部分在task.run方法中,
func (t *Task) Run() error {
	// 获取原镜像的manifest文件内容
	manifestByte, manifestType, err := t.source.GetManifest()
	if err != nil {
		return t.Errorf("Failed to get manifest from %s/%s:%s error: %v", t.source.GetRegistry(), t.source.GetRepository(), t.source.GetTag(), err)
	}
	t.Infof("Get manifest from %s/%s:%s", t.source.GetRegistry(), t.source.GetRepository(), t.source.GetTag())
    // 根据manifetst文件获取bolbIds数组
	blobInfos, err := t.source.GetBlobInfos(manifestByte, manifestType)
	if err != nil {
		return t.Errorf("Get blob info from %s/%s:%s error: %v", t.source.GetRegistry(), t.source.GetRepository(), t.source.GetTag(), err)
	}

	// 获取blob文件,并推送至目标仓库
	for _, b := range blobInfos {
	    // 检查目标仓库是否存在该blob文件
		blobExist, err := t.destination.CheckBlobExist(b)
		if err != nil {
			return t.Errorf("Check blob %s(%v) to %s/%s:%s exist error: %v", b.Digest, b.Size, t.destination.GetRegistry(), t.destination.GetRepository(), t.destination.GetTag(), err)
		}

		if !blobExist {
			// 不存在,就从原仓库获取blob文件
			blob, size, err := t.source.GetABlob(b)
			if err != nil {
				return t.Errorf("Get blob %s(%v) from %s/%s:%s failed: %v", b.Digest, size, t.source.GetRegistry(), t.source.GetRepository(), t.source.GetTag(), err)
			}
			t.Infof("Get a blob %s(%v) from %s/%s:%s success", b.Digest, size, t.source.GetRegistry(), t.source.GetRepository(), t.source.GetTag())

			b.Size = size
			// 将blob文件推送至目标仓库
			if err := t.destination.PutABlob(blob, b); err != nil {
				return t.Errorf("Put blob %s(%v) to %s/%s:%s failed: %v", b.Digest, b.Size, t.destination.GetRegistry(), t.destination.GetRepository(), t.destination.GetTag(), err)
			}
			t.Infof("Put blob %s(%v) to %s/%s:%s success", b.Digest, b.Size, t.destination.GetRegistry(), t.destination.GetRepository(), t.destination.GetTag())
		} else {
			// 目标仓库存在该blob文件,那就不推送了
			t.Infof("Blob %s(%v) has been pushed to %s, will not be pulled", b.Digest, b.Size, t.destination.GetRegistry()+"/"+t.destination.GetRepository())
		}
	}

	// 将manifest文件推送至目标仓库
	if err := t.destination.PushManifest(manifestByte); err != nil {
		return t.Errorf("Put manifest to %s/%s:%s error: %v", t.destination.GetRegistry(), t.destination.GetRepository(), t.destination.GetTag(), err)
	}
	t.Infof("Put manifest to %s/%s:%s", t.destination.GetRegistry(), t.destination.GetRepository(), t.destination.GetTag())

	t.Infof("Synchronization successfully from %s/%s:%s to %s/%s:%s", t.source.GetRegistry(), t.source.GetRepository(), t.source.GetTag(), t.destination.GetRegistry(), t.destination.GetRepository(), t.destination.GetTag())
	return nil
}
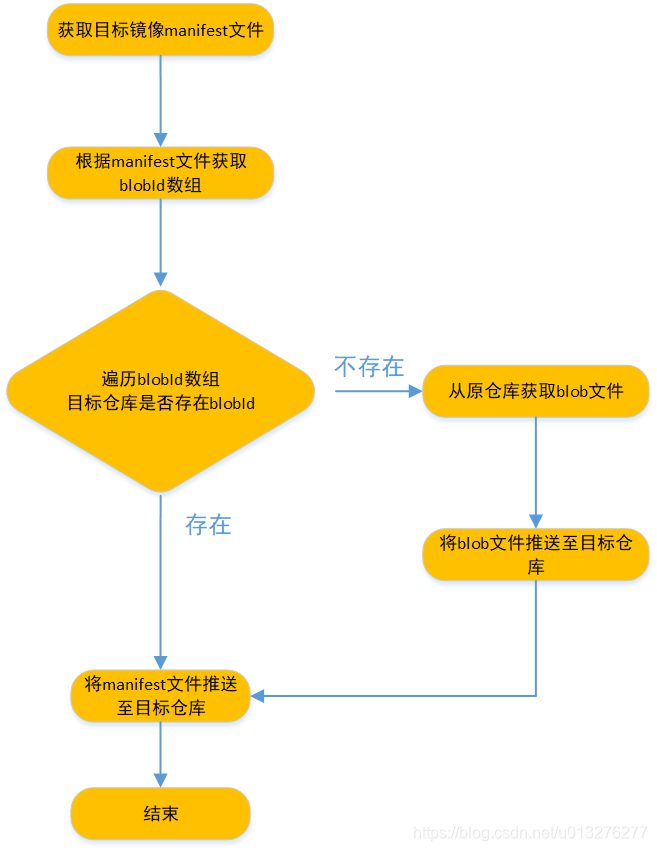
逻辑图如下, 这边再获取完manifest文件后,获取了bolb文件id,然后先去目标仓库检查是否存在blob文件,不存在再去原仓库获取并推送至目标仓库。这种方式避免了盲目获取所有的blob文件。此外,整个过程都在内存中进行,数据不落盘,减少了像docker pull 这种操作带来的落盘时间损耗。
总结及我的优化方向
阿里的image-syncer工具确实在镜像迁移效率这方面做到了极致,也考虑到了用户私有云迁至公有云的过程中可能遇到的磁盘空间限制和带宽限制等问题。但是,在功能上,我觉得还应该有新增的点(可能在之后的实践中我会去做):
- 在同步规则方面比如,镜像是列在配置文件里面的,那有多少个镜像就得列出多少行,有点麻烦,我觉得可以做成以命名空间为维度去同步;
- 有必要支持同步到多个目标仓库。刚制作的镜像直接同步到多个目标仓库;
- 是否有必要支持镜像仓库级别的同步。在私有仓库迁移时特别有用。