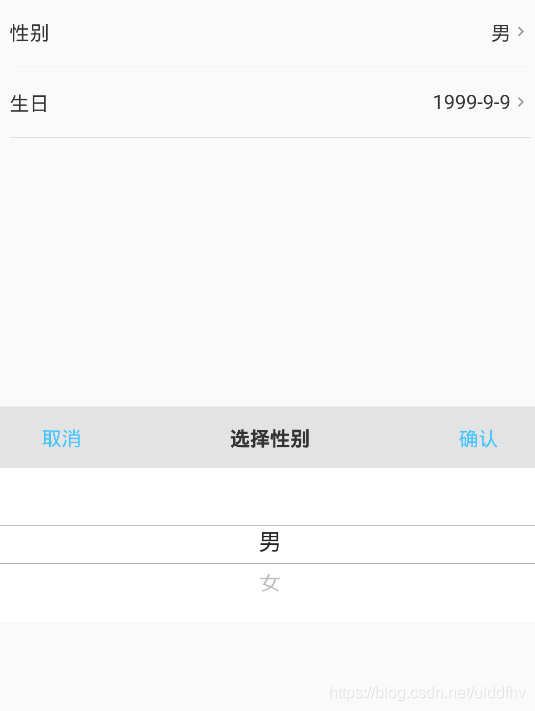
在使用showbottomsheet的时候,因为bottomsheet中有个dropdownbutton,需要选择之后更新dropdownbutton,按照正常的方式来使用没用效果.我先上一段正常使用的代码 一个选择性别的滚轮,我这里使用的是CupertinoPicker来实现的
先上效果图
1.model类
import 'package:scoped_model/scoped_model.dart';

class ScopedModelCupertinoPicker extends Model{

    int  _index=0;

    //获取当前被选中的index
    int get currentIndex=>_index;

     //设置被选中的index并更新
    void changeValue(int currentIndex){
        _index=currentIndex;
        notifyListeners();
    }

    //重置被选中的index为0
    void setIndexValueZero(){
        _index=0;
        notifyListeners();
    }

}
2.实现.
import 'package:flutter/cupertino.dart';
import 'package:flutter/material.dart';
import 'package:xxxxx/yyyyyy/scopedmodel_cupertinopicker.dart';     //改成你自己的目录
import 'package:scoped_model/scoped_model.dart';

class BBBBBB extends StatelessWidget {
  ScopedModelCupertinoPicker mScopedModelCupertinoPicker=ScopedModelCupertinoPicker();

  @override
  Widget build(BuildContext context) {
    return ScopedModel<ScopedModelCupertinoPicker>(
      model: mScopedModelCupertinoPicker,
      child: Scaffold(
        appBar: AppBar(
          brightness: Brightness.light,
          backgroundColor: Colors.white,
          leading: IconButton(icon: Icon(Icons.chevron_left), onPressed: (){Navigator.of(context).pop();}),
          title: Text('用户资料',style: TextStyle(fontSize: 15),),
          centerTitle: true,
        ),
        body:MyBody() ,
      ),
    );
  }
}


class MyBody extends StatefulWidget {
  @override
  _MyBodyState createState() => _MyBodyState();
}

class _MyBodyState extends State<MyBody> {
  ScopedModelCupertinoPicker mScopedModelCupertinoPicker;
  @override
  void initState() {
    super.initState();
    mScopedModelCupertinoPicker=ScopedModel.of<ScopedModelCupertinoPicker>(context);
  }

  @override
  Widget build(BuildContext context) {
    return Container(
      padding: EdgeInsets.only(left: 10,right: 10),
      child: Column(
        children: <Widget>[
          Container(
            height: 45,
            child: Row(
              mainAxisAlignment: MainAxisAlignment.spaceBetween,
              children: <Widget>[
                Text('性别',style: TextStyle(color: Color(0xff333333),fontSize: 13),),
                GestureDetector(
                  onTap:_showBottomSheetSex,
                  child:  Row(
                    children: <Widget>[
                      Text('${mTypeList[mScopedModelCupertinoPicker.currentIndex]}',style: TextStyle(fontSize: 13,color: Color(0xff333333)),),
                      Icon(Icons.keyboard_arrow_right,size: 13,color: Color(0xff999999),),
                    ],
                  ),
                )
              ],
            ),
          ),
          Divider(height: 1,),
        ],
      ),
    );
  }


  List<String>  mTypeList=['男','女'];
  ///展示性别选择底部滚轮弹窗
  void _showBottomSheetSex() {
    bool  changed=false;        //标记是直接点击确定还是调整过选项之后点击的
    Scaffold.of(context).showBottomSheet((BuildContext context) {
      return Container(
        height:200,
        child: Column(
          children: <Widget>[
            Container(
              height: 40,
              color: Colors.grey.withOpacity(0.25),
              child: Row(
                mainAxisAlignment: MainAxisAlignment.spaceBetween,
                crossAxisAlignment: CrossAxisAlignment.center,
                children: <Widget>[
                  FlatButton(onPressed: (){Navigator.of(context).pop();}, child: Text('取消',style: TextStyle(color: Color(0xff44c5fe),fontSize: 13,),)),
                  Text('选择性别',style: TextStyle(color: Color(0xff333333),fontSize: 13,fontWeight: FontWeight.bold),),
                  FlatButton(onPressed: (){
                    setState(() {
                      if(changed==false){
                        mScopedModelCupertinoPicker.setIndexValueZero();
                      }
                      debugPrint('${mTypeList[mScopedModelCupertinoPicker.currentIndex]}');
                      Navigator.of(context).pop();
                    });
                  }, child: Text('确认',style: TextStyle(color: Color(0xff44c5fe),fontSize: 13,),)),
                ],
              ),
            ),
            Container(
              width: double.infinity,
              color: Colors.grey.withOpacity(0.1),
              height: 100,
              child: CupertinoPicker(
                useMagnifier: true,
                backgroundColor: Colors.white, //选择器背景色
                itemExtent: 25, //item的高度
                onSelectedItemChanged: (index) {
                  changed=true;
                  mScopedModelCupertinoPicker.changeValue(index);
                  print("index = $index}");
                },
                children: <Widget>[ //所有的选择项
                  Text('${mTypeList[0]}'),
                  Text('${mTypeList[1]}'),
                ],
              ),
            )
          ],
        ),
      );
    },
    );
  }
}
以上代码可以看出我使用的
Scaffold.of(context).showBottomSheet((BuildContext context) {})来实现的 。
但是在我另一个需求里面 弹出框里面有一个Dropdownbutton的时候 dropdownbutton切换选择项之后需要更新状态 这种方法却不凑效了 ,网上查资料 使用另一种方法实现了
class CarAdd extends StatefulWidget {
  @override
  _CarAddState createState() => _CarAddState();
}

class _CarAddState extends State<CarAdd> {
    MyScopedModel mScopedModel= new MyScopedModel();
  final _bottomSheetKey = GlobalKey<ScaffoldState>();
  String dropdown1Value = 'A';
  TextEditingController mController1 = TextEditingController();
  TextEditingController mController2 = TextEditingController();

  @override
  void initState() {
    super.initState();
    HHHHHH b1 = HHHHHH("AAAAAAA", "蓝",'1234', false, false);
    HHHHHH b2 = HHHHHH("BBBBBBB", "绿",'5678', true, false);
    mScopedModel..add(b1)..add(b2);
  }

  @override
  Widget build(BuildContext context) {
    return ScopedModel<BindCarScopedModel>(
      model: mScopedModel,
      child: Scaffold(
        key: _bottomSheetKey,
        appBar: AppBar(
          brightness: Brightness.light,
          backgroundColor: Colors.white,
          leading: GestureDetector(
            child: Icon(Icons.chevron_left),
            onTap: () {
              Navigator.of(context).pop();
            },
          ),
          title: Text(
            '标题',
            style: TextStyle(fontSize: 15, color: Color(0xff333333)),
          ),
          centerTitle: true,
          elevation: 1,
        ),
        body: SafeArea(
          child: CustomScrollView(
            shrinkWrap: true,     //必须添加  否则  就需要在slivers里面添加占位的sliverToBoxAdapter占位置  不然就会报错(我这里未指定listview的Item高度)
            slivers: <Widget>[
              SliverToBoxAdapter(        //绑定车辆按钮
                child: Container(
                  width: double.infinity,
                  height: 45,
                  margin: EdgeInsets.only(left: 10,right: 10,top: 50),
                  child: RaisedButton(
                    onPressed: _showBottomSheet,
                    color: Color(0xff44c5fe),
                    shape: StadiumBorder(
                        side: BorderSide(
                          style: BorderStyle.none,
                          color: Color(0xff44c5fe),
                        )),
                    child: Text(
                      '绑定',
                      style: TextStyle(color: Colors.white),
                    ),
                  ),
                ),
              )
            ],
          ),
        ),
      ),
    );
  }


  _showBottomSheet() {          //底部弹框
    _bottomSheetKey.currentState.showBottomSheet((BuildContext context) {
     //注意  这里return StatefulBuilder  然后调用state方法更新状态
      return StatefulBuilder(
        builder: (context, state) {
          return Container(
            width: double.infinity,
            color: Colors.grey.withOpacity(0.1),
            height: 300,
            child: Column(
              mainAxisAlignment: MainAxisAlignment.center,
              children: <Widget>[
                Container(
                  padding: EdgeInsets.only(left: 10, right: 10),
                  child: Row(
                    mainAxisAlignment: MainAxisAlignment.spaceBetween,
                    children: <Widget>[
                      SizedBox(
                        width: 1,
                      ),
                      Text('添加'),
                      GestureDetector(
                        onTap: () {
                          Navigator.of(context).pop();
                        },
                        child: Icon(Icons.clear),
                      )
                    ],
                  ),
                ),
                Container(
                  padding: EdgeInsets.only(left: 10, right: 10),
                  child: Row(
                    mainAxisAlignment: MainAxisAlignment.spaceBetween,
                    crossAxisAlignment: CrossAxisAlignment.baseline,
                    textBaseline: TextBaseline.ideographic,
                    children: <Widget>[
                      Text(
                        '号码',
                        style: TextStyle(fontSize: 13),
                      ),
                      SizedBox(
                        width: 10,
                      ),
                      DropdownButtonHideUnderline(
                        child: DropdownButton<String>(
                          value: dropdown1Value,
                          iconEnabledColor: Color(0xff44c5fe),
                          onChanged: (String newValue) {
                            //注意  这里使用setState无效
                            state(() => dropdown1Value = newValue);
                          },
                          items: <String>[
                            'A',
                            'B',
                            'C',
                          ].map<DropdownMenuItem<String>>((String value) {
                            return DropdownMenuItem<String>(
                              value: value,
                              child: Text(
                                value,
                                style: TextStyle(fontSize: 13),
                              ),
                            );
                          }).toList(),
                        ),
                      ),
                      Expanded(
                        child: TextFormField(
                          controller: mController1,
                          inputFormatters: [
                            LengthLimitingTextInputFormatter(6)
                          ],
                          decoration: InputDecoration(
                            contentPadding: EdgeInsets.all(2),
                          ),
                        ),
                      ),
                    ],
                  ),
                ),
                Container(
                  width: double.infinity,
                  height: 80,
                  padding: EdgeInsets.only(left: 10, right: 10),
                  child: TextFormField(
                    style: TextStyle(fontSize: 13),
                    controller: mController2,
                    inputFormatters: [LengthLimitingTextInputFormatter(4)],
                    decoration: InputDecoration(
                        contentPadding: EdgeInsets.all(2),
                        hintText: '请输入后四位',
                        hintStyle:
                        TextStyle(fontSize: 13, color: Color(0xff999999))),
                  ),
                ),
                Container(
                  width: double.infinity,
                  height: 45,
                  padding: EdgeInsets.only(left: 20, right: 20),
                  child: RaisedButton(
                    onPressed: () {
                      debugPrint(
                          '${dropdown1Value}:${mController1.text},,,,${mController2.text}');
                    },
                    shape: StadiumBorder(side: BorderSide.none),
                    color: Color(0xff44c5fe),
                    child: Text(
                      '确 定',
                      style: TextStyle(color: Colors.white, fontSize: 15),
                    ),
                  ),
                ),
              ],
            ),
          );
        },
      );
    });
  }

}
这个我删减了部分代码,大家主要看showbottomsheet方法 及bottomsheetkey的使用就行了 效果图先不贴了 ,对比上面的发现使用的
 _bottomSheetKey.currentState.showBottomSheet((BuildContext context) {
      return StatefulBuilder(
        builder: (context, state) {
            return Container();
        }
        ))
来实现的。如果使用第一种方法会报错
总结:第二种是更新Bottomsheet本身的状态用的 。
第一种方法更新的是bottomsheet所依赖的widget的。
