lstm bi-lstm
Asking well defined questions is crucial when it comes to programmers, because most of the questions have been answered, but in the plethora of information that are on Google, it can be hard to find the exact answer one is looking for sometimes.
对于程序员,提出明确的问题至关重要,因为大多数问题都已得到回答,但是在Google上的大量信息中,有时很难找到确切的答案。
The data set we’ll be analyzing in this blog post is a collection of questions taken from StackOverflow (largest question/answer site for programmers) separated into three categories based on quality of the post/question.
我们将在此博客文章中分析的数据集是从StackOverflow(程序员最大的问题/答案网站)中提取的问题的集合,根据问题/问题的质量分为三类。
Link to the data set, where you can download it and see a brief description.
链接到数据集,您可以在此处下载并查看简要说明。
介绍 (Introduction)
I’ll be using Google Colab for this tutorial, taking advantage of it’s GPU computing power, and also because it’s a platform that everyone should be familiar by now.
我将在本教程中使用Google Colab,以利用它的GPU计算能力,也因为它是一个现在每个人都应该熟悉的平台。
Also, I’ll try to limit myself to using as few libraries as I can, to help you get familiar with Tensorflow 2 + Keras primarily(no scikit-learn or other machine learning libraries).
此外,我将尝试限制自己使用尽可能少的库,以帮助您首先熟悉Tensorflow 2 + Keras(没有scikit-learn或其他机器学习库)。
As a start, I’ll need to import the data. I’ve had the data set uploaded on G Drive, and with the code below, I’m granting access to Colab to pull all the data from my G Drive.
首先,我需要导入数据。 我已经将数据集上传到G云端硬盘,并且使用下面的代码,我已授予访问Colab的权限,以从我的G云端硬盘提取所有数据。
from google.colab import drivedrive.mount(‘/content/gdrive’)After we run that we’ll be given a link, where we will have to go and allow Colab to access Drive, and after we’ve done that, we will get a unique code that will be used as a password to enter in Colab cell.
运行之后,我们将为您提供一个链接,我们必须在其中链接并允许Colab访问云端硬盘,完成之后,我们将获得一个唯一的代码,该代码将用作密码输入Colab细胞。
We can also manually upload files on Colab, as shown below. We would save ourselves some time, skipping the mounting of the Drive part.
我们还可以在Colab上手动上传文件,如下所示。 我们将节省一些时间,而无需安装驱动器部件。
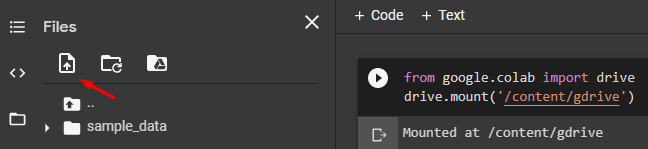
Once we’ve successfully finished all the steps from above, we’ll see a new folder in our files manager called gdrive. We will find our data there, copy it’s path(right click on file and press “Copy Path”) and use that to load it.
成功完成上述所有步骤后,我们将在文件管理器中看到一个名为gdrive的新文件夹。 我们将在那里找到我们的数据,复制它的路径(右键单击文件并按“复制路径”),然后使用它来加载它。
data_path=‘/content/gdrive/MyDrive/StackOverflowQuestions/data.csv’data = pd.read_csv(data_path)data.head()We’re calling the .head() function, just to get an idea how the data looks like, which we can see below.
我们正在调用.head()函数,只是为了了解数据的外观,如下所示。

As these are bunch of questions from Stack Overflow, it wouldn’t be crazy to guess that the text data is probably not so clean. We’ll print one question, just to see how it looks like, using data.Body[3]. Output:
由于这些都是来自Stack Overflow的问题,因此猜测文本数据可能不是那么干净不会太疯狂。 我们将使用data.Body [3]打印一个问题,以查看其外观。 输出:
<p>I am attempting to overlay a title over an image — with the image darkened with a lower opacity. However, the opacity effect is changing the overlaying text as well — making it dim. Any fix to this? Here is what is looks like:</p>\n\n<p><a href=”https://i.stack.imgur.com/1HzD7.png" rel=”noreferrer”><img src=”https://i.stack.imgur.com/1HzD7.png" alt=”enter image description here”></a></p>\n\n<p>....As we can see, a lot of things going on in that body of text. We’ll define a function to clean it up a little:
正如我们所看到的,该正文中发生了很多事情。 我们将定义一个函数来对其进行一些清理:
import re
def cleant(raw_t):  cleanr = re.compile('<.*?>')  cleantext = re.sub(cleanr, '', raw_t)  cleantext = re.sub(r'([a-zA-Z0-9+._-]+@[a-zA-Z0-9._-]+\.[a-zA-Z0-   9_-]+)', '', cleantext)  #regex to remove to emails(above)  cleantext = re.sub(r'(http|ftp|https)://([\w_-]+(?:(?:\.[\w_-]+)+))([\w.,@?^=%&:/~+#-]*[\w@?^=%&/~+#-])?', '', cleantext)  return cleantextdata.Body = data['Body'].apply(lambda x: cleant(x))
We can define X and Y now. Keep in mind though, that our y / categorical values are represented with strings, as we’ve seen above. We need to turn them into numerical values, so we will manually label encode them.
我们现在可以定义X和Y。 但是请记住,如上所述,我们的y /分类值是用字符串表示的。 我们需要将它们转换为数值,因此我们将对其进行手动标签编码。
X = data.Bodyy = data.Y.map({‘LQ_CLOSE’:0,’LQ_EDIT’:1,’HQ’:2})Split the data into train and test, with 70:30 ration, and print the shapes(always print and double-check the shapes, a lot of errors arise from mismatched shapes of data)
将数据分成70:30的比例进行训练和测试,然后打印形状(总是打印并再次检查形状,由于数据形状不匹配会产生很多错误)
train_size = int(len(X) * 0.7)X_train, y_train = X[0:train_size], y[0:train_size]X_test, y_test = X[train_size:], y[train_size:]print(“X_train shape:”,X_train.shape) #(42000,)print(“X_test shape:”,X_test.shape) #(18000,print(“y_train shape:”, y_train.shape)#(42000,)print(“y_test shape:”, y_test.shape) #(18000,)Now we start playing with Tensorflow. We use Tokenizer to map the words from our data into their numeric representations. After that we need to fit it to text.
现在我们开始玩Tensorflow。 我们使用Tokenizer将数据中的单词映射到其数字表示形式中。 之后,我们需要使其适合文本。
from tensorflow.keras.preprocessing.text import Tokenizerfrom tensorflow.keras.preprocessing.sequence import pad_sequencesvocab_size = 30000 #Size of our vocabularyembedding_dim = 16 max_length = 150 #length of every input that we will feed our DNNtokenizer = Tokenizer(vocab_size, oov_token=”<OOV>”)tokenizer.fit_on_texts(X_train)word_index = tokenizer.word_indexprint(len(word_index)) #How many unique words there are in X_trainNow we need to create sequences of data, and after that we will need to pad those sequences to a fixed length, just like we do with Convolutional Neural Networks
现在我们需要创建数据序列,然后我们需要将这些序列填充到固定长度,就像我们使用卷积神经网络一样
sequences = tokenizer.texts_to_sequences(X_train)padded = pad_sequences(sequences,maxlen=max_length,
padding=’post’, truncating=’post’)test_sequences = tokenizer.texts_to_sequences(X_test)test_padded = pad_sequences(test_sequences, maxlen=max_length, padding=’post’, truncating=’post’)print(padded.shape)       #(42000, 150)print(test_padded.shape)  #(18000, 150)
模型架构 (Model Architecture)

Time to build, compile and fit our model. We’ll keep the model simple, I’ll let you experiment with it further if you want.
是时候构建,编译和拟合我们的模型了。 我们将使模型保持简单,如果需要,让您进一步进行试验。
model = tf.keras.Sequential([tf.keras.layers.Embedding(vocab_size, embedding_dim, input_length=(max_length)),tf.keras.layers.Bidirectional(tf.keras.layers.LSTM(50, return_sequences=True)),tf.keras.layers.Bidirectional(tf.keras.layers.LSTM(50)),tf.keras.layers.Dropout(0.3),tf.keras.layers.Dense(units=vocab_size/100, activation=’relu’),tf.keras.layers.Dense(3, activation=’softmax’)])model.summary()
Model: "sequential"
_________________________________________________________________
Layer (type)                 Output Shape              Param #
=================================================================
embedding (Embedding)        (None, 150, 16)           480000
_________________________________________________________________
bidirectional (Bidirectional (None, 150, 100)          26800
_________________________________________________________________
bidirectional_1 (Bidirection (None, 100)               60400
_________________________________________________________________
dropout (Dropout)            (None, 100)               0
_________________________________________________________________
dense (Dense)                (None, 300)               30300
_________________________________________________________________
dense_1 (Dense)              (None, 3)                 903
=================================================================
Total params: 598,403
Trainable params: 598,403
This is where I usually have the most fun, as there are so many things we can tweak. I didn’t want to make my model too complex, there were no regularizers included, no fancy weight initializers, and only one Dropout layer, but you’re more than welcome to add those in order to optimize the performance. The optimizer I’ve decided to use is Adam.
这是我通常最开心的地方,因为我们可以调整很多东西。 我不想让我的模型变得过于复杂,不包括正则化器,没有花哨的权重初始化器,只有一个Dropout层,但是我们非常乐意添加它们以优化性能。 我决定使用的优化器是Adam。
model.compile(loss=’sparse_categorical_crossentropy’,optimizer=tf.keras.optimizers.Adam(lr=0.001),metrics=[‘accuracy’])history = model.fit(padded, y_train, epochs=10)
...
Epoch 7/10
1313/1313 [==============================] - 38s 29ms/step - loss: 0.1300 - accuracy: 0.9613
Epoch 8/10
1313/1313 [==============================] - 38s 29ms/step - loss: 0.1095 - accuracy: 0.9668
Epoch 9/10
1313/1313 [==============================] - 38s 29ms/step - loss: 0.0918 - accuracy: 0.9722
Epoch 10/10
1313/1313 [==============================] - 38s 29ms/step - loss: 0.0763 - accuracy: 0.9768
About 97% on train data! Not too shabby. What about our test data, that should be our main focus!
火车数据约占97%! 不是太寒酸。 那我们的测试数据呢,那应该是我们的主要重点!
scores = model.evaluate(test_padded, y_test, verbose=0)print(“Accuracy: %.2f%%” % (scores[1]*100))#Accuracy: 81.67%Considerably lower than the train data, although still good. We will also plot the history of training:
尽管仍然不错,但比火车数据要低很多。 我们还将绘制培训的历史记录:
plt.style.use(‘ggplot’)fig, (ax1, ax2) = plt.subplots(nrows=1,ncols=2, figsize=(10, 4), sharex=True)ax1.plot(history.history[‘accuracy’], label=’Train’)ax1.set_xlabel(‘Epochs’)ax1.set_ylabel(‘Accuracy %’)ax1.set_title(‘Accuracy per Epoch’)ax1.legend()ax2.plot(history.history[‘loss’], label=’train’)ax2.set_ylabel(“Loss”)ax2.set_title(“Loss per epoch”)ax2.legend()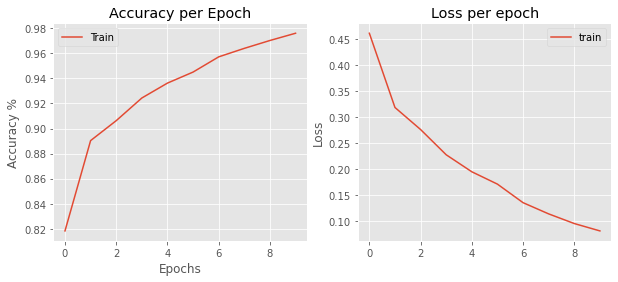
Steady trend, which is good. If I were to leave it for 100+ epochs, the model would’ve overfitted badly most likely, since it’s already overfitting after 10 epochs.
趋势稳定,这是好的。 如果我将其保留100个以上的时间,则该模型极有可能过度拟合,因为在10个时间段后它已经过度拟合。
预测我们自己的数据 (Predict our own data)
I always find it tricky predicting new data, or my own data, with Tensorflow models. There is always a lot of hassle with dimension matching, reverse engineering of what I did to my train/test data, and so on. So here, I decided to show you how you can do that too.
使用Tensorflow模型来预测新数据或我自己的数据总是很棘手。 尺寸匹配,对火车/测试数据所做的反向工程总是有很多麻烦。 所以在这里,我决定向您展示如何做到这一点。
We will define a function that will transform our text in a same way that our train/test data was transformed:
我们将定义一个函数,该函数将以与转换训练/测试数据相同的方式来转换文本:
def get_encode(x): x = cleant(x) x = tokenizer.texts_to_sequences(x) x = tf.keras.preprocessing.sequence.pad_sequences(x, maxlen=max_length, padding=’post’) return xI’ve found a random question on Stack Overflow, that I decided to convert into html text, to make it similar to the question format that was in our data
我在Stack Overflow上发现了一个随机问题,决定转换为html文本,使其类似于我们数据中的问题格式
text=[‘<p>I want to write a bash script which takes different arguments. It should be used like normal linux console programs:</p><p>my_bash_script -p 2 -l 5 -t 20 So the value 2 should be saved in a variable called pages and the parameter l should be saved in a variable called length and the value 20 should be saved in a variable time.</p><p>What is the best way to do this?</p>’]text_sequences = tokenizer.texts_to_sequences(text)text_padded = pad_sequences(text_sequences, maxlen=max_length)text_padded.shape #(1, 150)y_pred = model.predict(text_padded) y_pred = y_pred.round() #[1, 0, 0]As you can see, it’s pretty straightforward. Make sure your text is in brackets [], create sequences with tokenizer, and then pad them to a dimension our model can take. Function model.predict returns an array of 3 values(because our output layer is a Dense of 3 outputs, for 3 classes), and the 3 values represent the softmax probability of that class being the one. We then call the .round() function, which takes the value with highest probability, and rounds it off to 1.
如您所见,这非常简单。 确保您的文本在方括号[]中,使用令牌生成器创建序列,然后将其填充到模型可以采用的尺寸。 函数model.predict返回3个值的数组(因为我们的输出层是3个类的3个输出的Dense),而这3个值表示该类为1的softmax概率。 然后,我们调用.round()函数,该函数以最高的概率获取值并将其四舍五入为1。
Thanks for reading my first blog, if you’d like to see more let me know!
感谢您阅读我的第一个博客,如果您想了解更多,请告诉我!
lstm bi-lstm