1.定位服务
现在的移动设备很多都提供定位服务,IOS设备提供3种不同定位途径:
(1)WiFi定位,通过查询一个WiFi路由器的地理位置的信息,比较省电;IPhone,IPod touch和IPad都可以采用。
(2)蜂窝式移动电话基站定位,通过移动运营商基站定位,只有Iphone,3G版本的IPod touch和Ipad可以采用
(3)GPS卫星定位,通过3~4颗GPS卫星定位,最为准确,但是耗电量大,不能遮挡,IPhone,IPod touch和IPad都可以采用
IOS不像Android系统在定位服务编程时可以指定采用哪种途径进行定位。IOS的API把底层这些细节屏蔽掉了,开发人员和用户并不知道现在设备采用哪种方式进行定位,IOS系统会根据设备的情况和周围的环境,采用一套最佳的解决方案。这个方案是这样的:如果能够接收GPS信息,那么设备优先采用GPS定位,否者采用WiFi或者蜂窝基站定位,在WiFi和蜂窝基站之间优先选择使用WiFi,如果无法连接WiFi才使用蜂窝基站定位。
1.1 定位服务编程
定位在IOS6之后,API没有太大的变化,它主要使用CoreLocation框架,定位时主要使用CLLocationManamger , CLLocationManagerDelegate和CLLocation. CLLocationManager是定位服务管理类,它能够使我们获得设备的位置信息和高度信息,也可以监控设备进入某个区域,他还可以帮组获得设备的运行方向等。CLLocationManagerDelegate是CLLocationManager类委托协议。CLLocation封装了位置和高度信息。
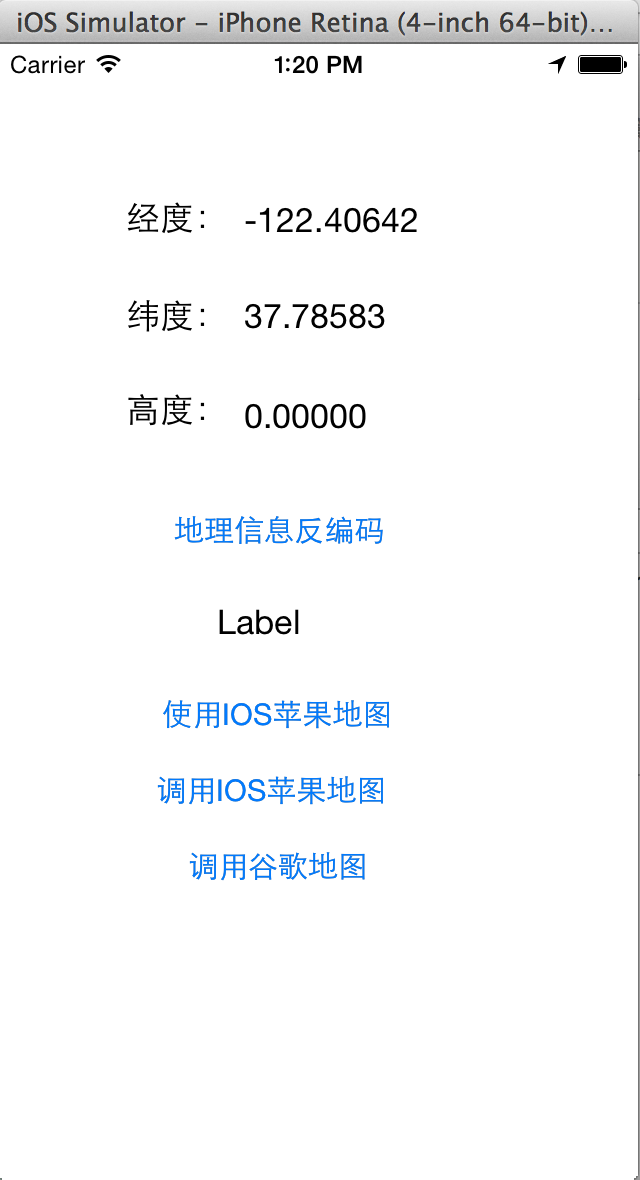
下面通过一个实例介绍一下使用定位服务编程,在应用启动时,进入画面会或得位置信息,并显示在对应的文本框中,如果设备位置发生变化,也会重新或得位置信息,并更新对应的文本框。
首先需要添加CorLocation.framework框架。在ViewController.h中代码如下:
 1 #import <UIKit/UIKit.h>
 2 #import <CoreLocation/CoreLocation.h>
 3 #import <CoreLocation/CLLocationManagerDelegate.h>
 4 #import <AddressBook/AddressBook.h>
 5
 6 @interface HBViewController : UIViewController<CLLocationManagerDelegate>
 7 //经度
 8 @property (weak, nonatomic) IBOutlet UILabel *lbLng;
 9 //纬度
10 @property (weak, nonatomic) IBOutlet UILabel *lbLat;
11 //高度
12 @property (weak, nonatomic) IBOutlet UILabel *lbAlt;
13 //城市地址
14 @property (weak, nonatomic) IBOutlet UILabel *lbAddress;
15
16 @property (nonatomic,strong)CLLocationManager *locationManager;
17 @property (nonatomic,strong)CLLocation *currLocation;
18
19 - (IBAction)goToNextPage:(id)sender;
20
21 - (IBAction)reverseGeocode:(id)sender;
22 @end
在h文件中,首先引入<CorLocation/CorLocation.h>和<CoreLocation/CLLocationManagerDelegate.h>头文件,然后再定义ViewController时,需要声明实现CLLocationManagerDelegate协议
ViewController.m的viewDidLoad代码如下:
 1 - (void)viewDidLoad
 2 {
 3     [super viewDidLoad];
 4     // Do any additional setup after loading the view, typically from a nib.
 5
 6     //定位服务管理对象初始化
 7     _locationManager = [[CLLocationManager alloc]init];
 8     _locationManager.delegate = self;
 9     //(desired 期望)(Accuracy准确度)
10     _locationManager.desiredAccuracy = kCLLocationAccuracyBest;
11     _locationManager.distanceFilter = 100.0f;
12 }
在viewDidLoad方法中主要对CLLoacationManager的成员变量_locationManager进行初始化。并且给_locationManager设置了desiredAccuracy属性,desiredAccuracy属性是一个非常重要的属性,他的取值有6个常量:
(1)KCLLocationAccuracyNearestTenMeters 精度10米
(2)KCLLocationAccuracyHundredMeters 精度100米
(3)KCLLocationAccuracyKilometer 精度1000米
(4)KCLLocationAccuracyThreeKilometers 精度3000米
(5)KCLLocationAccuracyBest 设备使用电池供电时候,最高的精度
(6)kCLLocationAccuratyBestForNavigation 导航情况下最高精度,一般要有外接电源时才能使用
精度越高请求的位置信息的频率就高,这就意味着设备越耗电
最后设置的distanceFilter属性,distanceFilter属性时距离过滤器,它定义了设备移动更新位置的最小距离,他的单位是米
初始化CLLocationManager完成之后,需要使用startUpdatingLocation方法开始定位服务,他是在ViewController.m的viewWillAppear:方法中,代码如下:
1 -(void)viewWillAppear:(BOOL)animated
2 {
3     [super viewWillAppear:animated];
4
5     //开始定位
6     [_locationManager startUpdatingLocation];
7 }
在离开页面时,关闭定位服务:
1 -(void)viewWillDisappear:(BOOL)animated
2 {
3     [super viewWillDisappear:animated];
4
5     //停止定位
6     [_locationManager stopUpdatingLocation];
7 }
viewWillDisappear:在视图消失时调用,能够保证及时地关闭定位服务,这是负责人的做法。在IOS6之后,请求有所变化,地位服务应用退到后台后可以延迟更新位置信息,其中allowDeferredLocationUpdatesUntilTraveld:timeout方法可以设置延迟更新,从而使得应用在后台不再更新位置信息,关闭延迟更新使用disallowDeferredLocationUpdates方法实现。此外,在IOS6之后新增pausesLocationUpdatesAutomatically属性,他能设定自动暂停位置更新,定位服务的开启和暂停管理权交给系统,这样会更加合理和简单。
一旦定位服务开启,并设置好了CLLocationManager委托属性delegate后,当用户设备移动到达过滤距离时,就会回调委托方法,与定位服务有关的方法有两个。代码如下:
 1 #pragma mark Core Loacation委托方法实现位置的更新
 2 -(void)locationManager:(CLLocationManager *)manager didUpdateLocations:(NSArray *)locations
 3 {
 4     self.currLocation = [locations lastObject];
 5     _lbLat.text = [NSString stringWithFormat:@"%3.5f",self.currLocation.coordinate.latitude];
 6     _lbLng.text = [NSString stringWithFormat:@"%3.5f",self.currLocation.coordinate.longitude];
 7     _lbAlt.text = [NSString stringWithFormat:@"%3.5f",self.currLocation.altitude];
 8 }
 9
10 -(void)locationManager:(CLLocationManager *)manager didFailWithError:(NSError *)error
11 {
12     NSLog(@"error:%@",error);
13 }
其中latitude为纬度信息,longitude为经度信息
1.2 地理信息反编码
我们可以通过精度纬度来获取到给定点的地理坐标,返回这个地点的相关文字描述信息,这些文字描述信息被封装在CLPlaceMark类中,我们把这个类叫做“地标”类,地标类有很多属性,下面是主要的几个文字描述相关属性:
(1)addressDictionary,地址信息的字典,包含一些键值对,其中的键是在AddressBook.framework中定义好的;
(2)IOScountryCode,IOS国家代号
(3)country,国家信息
(4)postalCode邮政编码
(5)administrativeArea 行政区域信息
(6)subAdministrativeArea 行政区域附加信息
(7)locality 指定城市信息
(8)subLocality 指定城市信息附加信息
(9)thoroughfare 指定街道级别信息
(10)subThoroughfare指定街道级别的附加信息
地理信息反编码使用CLGeocoder类实现,这个类能够实现在地理坐标与地理文字描述信息之间的转换。CLGeocoder类中进行地理信息反编码的方法是:
-(void)reverseGeocoderLocation:(CLLocation *)location completionHandler:(CLGeocodeCompletionHandler)completionHandler
其中,参数location时要定位的地理位置对象,completionHandler参数指定了一个代码块CLGeocoderCompletionHandler对象,用于地理信息反编码之后的回调。在试图控制器中添加按钮,设计其点击时间,代码如下:
 1 - (IBAction)reverseGeocode:(id)sender {
 2
 3     CLGeocoder *geocoder = [[CLGeocoder alloc]init];
 4
 5     [geocoder reverseGeocodeLocation:self.currLocation completionHandler:^(NSArray *placemarks, NSError *error) {
 6
 7         if([placemarks count]>0)
 8         {
 9             CLPlacemark *placemark = placemarks[0];
10             NSDictionary *addressDictionary = placemark.addressDictionary;
11
12             NSString *address = [addressDictionary objectForKey:(NSString *)kABPersonAddressStreetKey];
13             address=address==nil?@"":address;
14
15             NSString *state=[addressDictionary objectForKey:(NSString *)kABPersonAddressStateKey];
16             state=state==nil?@"":state;
17
18             NSString *city = [addressDictionary objectForKey:(NSString *)kABPersonAddressCityKey];
19             city=city==nil?@"":city;
20
21             NSString *addressName=[addressDictionary objectForKey:@"Name"];
22
23             //_lbAddress.text=[NSString stringWithFormat:@"%@%@%@",state,city,address];
24             _lbAddress.text=[NSString stringWithFormat:@"%@",addressName];
25         }
26     }];
27 }
注:需要在头文件中引入代码#import <AddressBook/AddressBook.h>
1.3 地理信息编码查询
地理信息编码查询与反编码刚好相反,他给定地理信息的文件描述,查询出来相关的地理坐标,这种查询结果也是一个集合。地理信息编码查询也是采用CLGeocoder类,其中有关地理信息编码的方法有:
(1)geocodeAddressDictionary:completionHandler: 通过指定一个地址信息字典对象参数进行查询。
(2)geocodeAddressString:completionHandler: 通过指定一个地址字符串参数进行查询。
(3)geocodeAddressString:inRegion: completionHandler 通过指定地址字符串和查询的范围作为参数进行查询,其中inRegion部分时指定查询范围,他是CLRegion类型。在UIViewController中按钮的代码如下:
 1 -(IBAction)geocodeQuery:(id)sender
 2 {
 3     if(_lbAddress.text == nil || [_lbAddress.text length] == 0)
 4     {
 5         return;
 6     }
 7
 8     CLGeocoder *geocoder = [[CLGeocoder alloc]init];
 9     [geocoder geocodeAddressString:_lbAddress.text completionHandler:^(NSArray *placemarks, NSError *error) {
10         NSLog(@"查询记录数:%i",[placemarks count]);
11
12         if([placemarks count]>0)
13         {
14             CLPlacemark *placemark = [placemarks objectAtIndex:0];
15             CLLocationCoordinate2D coordinate = placemark.location.coordinate;
16             float latitude=coordinate.latitude;
17             float longitude= coordinate.longitude;
18             NSString *strCoordinate = [NSString stringWithFormat:@"经度:%3.5f\n 纬度:%3.5f",latitude,longitude];
19
20             NSDictionary *addressDictionary = placemark.addressDictionary;
21
22             NSString *address = [addressDictionary objectForKey:(NSString *)kABPersonAddressStreetKey];
23             address = address ==nil?@"":address;
24
25             NSString *state = [addressDictionary objectForKey:(NSString *)kABPersonAddressStateKey];
26             state = state==nil?@"":state;
27
28             NSString *city = [addressDictionary objectForKey:(NSString *)kABPersonAddressCityKey];
29             city = city ==nil?@"":city;
30
31             [_lbAddress resignFirstResponder];
32         }
33     }];
34 }
运行显示效果如下:
