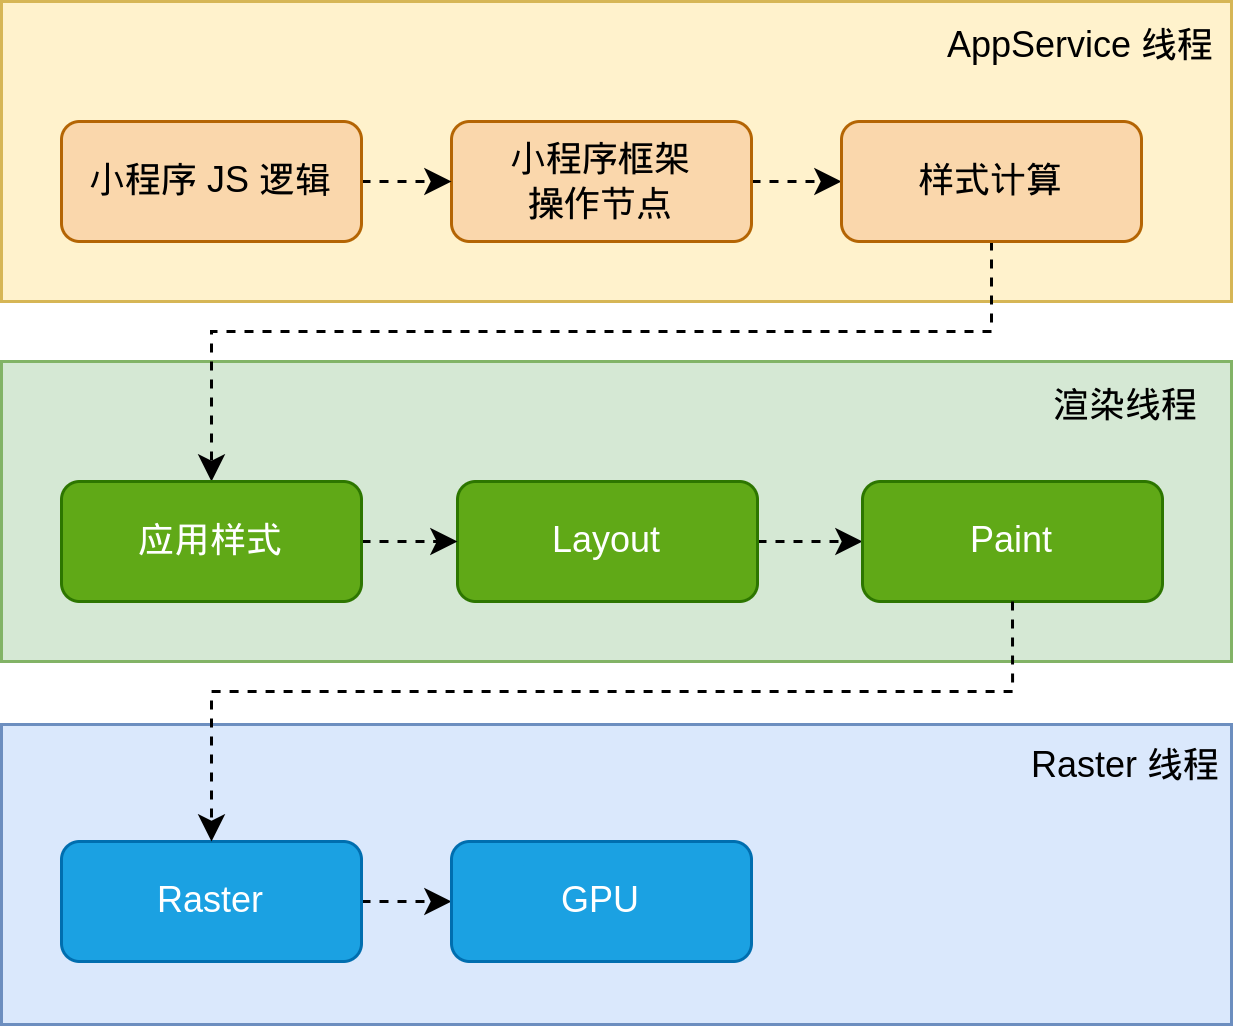
微信小程序 最新推出的Skyline渲染以及打包ios、andorid查看各个技术平台很少有详细介绍与项目案例,下面是一个简单的壁纸项目开发实战案例,涵盖了从项目创建到功能实现的整个过程。
项目概述
我们开发的是一个小程序手机、平板、pc端壁纸项目。用户可以点赞、收藏、下载壁纸。虽然项目很简单,但项目中我们会涉及多语言、主题外观、适配ios andorid、手势系统、自定义tabbar、自定义appbar、复杂组件开发测试、自定义路由、 元素共享动画、以及一些算法如:发布订阅、线性插值、矩形插值等高阶内容。
项目初始化
首先你需要拥有微信小程序AppID,以及下载微信开发者工具,再打开微信开发者工具创建一个不使用微信云以及官方JS-基础模版的小程序,这里我们就不再细聊,我们默认用户拥有一定开发基础。
编译项目后能正常运行。接下来需要配置Skline,打开app.json配置文件,添加如下配置。
 "renderer": "skyline",
  "componentFramework": "glass-easel",
  "rendererOptions": {
    "skyline": {
      "defaultDisplayBlock": true,
      "defaultContentBox": true
    }
},再点击微信开发者工具右侧详情-本地设置勾选开启Skyline渲染调试,以及将JS编译成ES5。当然如果你还需要真机调试,需要在真机下点击小程序胶囊-开发调试-Siwtch Render 选择Skline。
创建项目配置skyline
获取微信小程序基本布局信息以及系统基本信息
打开 app.js文件先删除部分内容只留下基本的框架 留下如下代码
App({
  onLaunch() {
    this.globalData = {
      appName: '多时壁纸', // app名称
      windowInfo: null, // 设备布局与APP基础信息
    }
  }
})
获取基本信息
    // 获取窗口信息
    const windowInfo = wx.getWindowInfo()
    // 获取设备基础信息
    windowInfo.deviceInfo = wx.getDeviceInfo()
    // 获取菜单按钮(右上角胶囊按钮)的布局位置信息。坐标信息以屏幕左上角为原点。
    windowInfo.clientRect = wx.getMenuButtonBoundingClientRect()
    // APP基础信息
    windowInfo.appBase = wx.getAppBaseInfo()
    // 计算appbar高度
    windowInfo.appbarHeight = windowInfo.clientRect.bottom + windowInfo.clientRect.top - windowInfo.statusBarHeight
    // 计算胶囊边距
    windowInfo.padding = windowInfo.windowWidth - windowInfo.clientRect.right
    // 计算头部导行高度
    windowInfo.headerHeight = windowInfo.appbarHeight - windowInfo.statusBarHeight
    // 设备宽高比例
    windowInfo.ratio = windowInfo.screenWidth / windowInfo.screenHeight
    // 加入全局数据
    this.globalData.windowInfo = windowInfo
获取设备信息
自定义tabbar
我们还是先删除掉没用的页面以及内容和utils文件夹子下utils.js里面的全部内容。删除pages文件夹下的全部文件夹,以及删除app.json下pages下的配置。再再pages文件夹下创建四个文件夹分别是:index、classify、seeker、mine。 注意我们在这四个文件下创建的是组件components而不是页面page,app.jaon中pages[]和普通的配置一样。
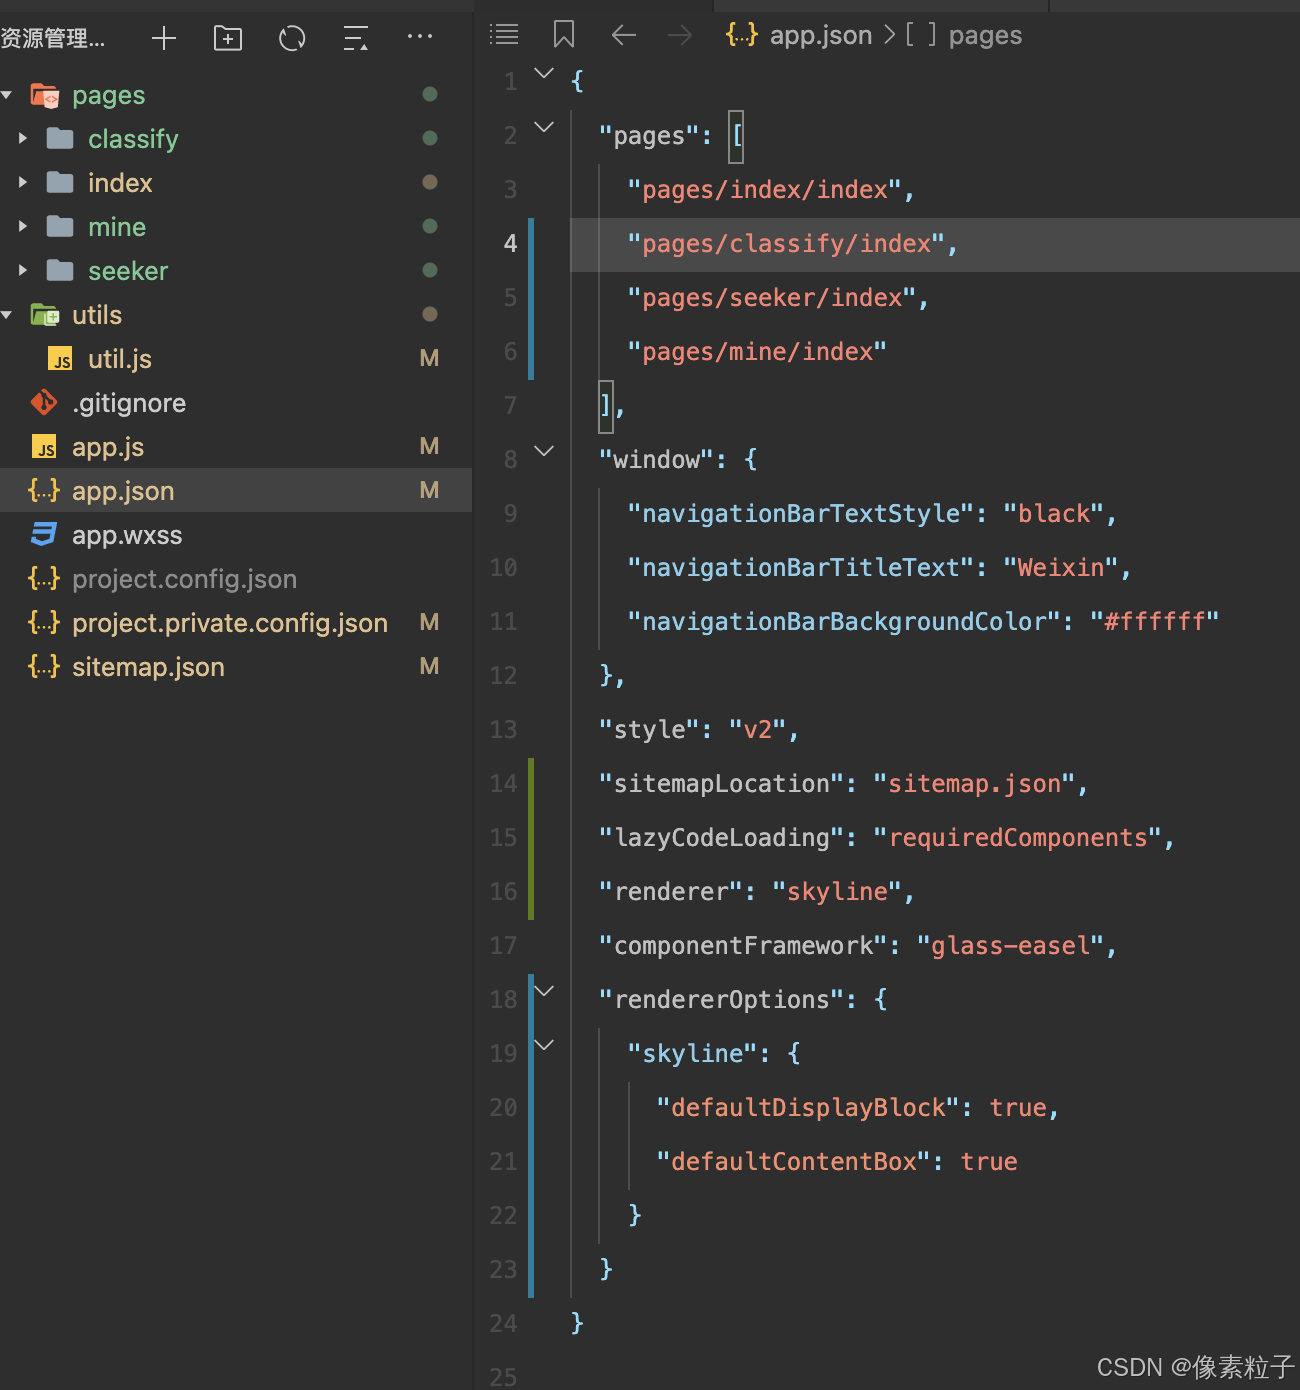
现在文件目录应该是这个样子的,而四个页面index.js内容是如下代码:
const app = getApp()
Component({
  behaviors: [],
  properties: {},
  observers: {},
  data: {},
  lifetimes: {
    created: function () {},
    attached: function () {
    },
    ready: function () {},
    detached: function () {}
  },
  pageLifetimes: {
    show: function () {},
    hide: function () {}
  },
  methods: {}
})
pages文件夹下index.json配置如下,四个都一样哈。
{
  "navigationStyle": "custom",
  "navigationBarTextStyle": "black",
  "disableScroll": true,
  "componentFramework": "glass-easel",
  "renderer": "skyline",
  "component": true,
  "usingComponents": {}
}
好了现在对应的tabbap四个页面都创建完成,自己为每个页面添加个背景色,一会切换测试看得清楚些。
在根目录下创建存放静态资源的status文件夹, 图片请下载原码。再在根目录下创建一个custom-tab-bar文件夹以及在文件下创建index组件。这就是我们需要自定义的tabbar布局组件。当然你还是需要配置一下app.json 下的 tabBar。
 "tabBar": {
    "custom": true,
    "list": [
      {
        "pagePath": "pages/index/index"
      },
      {
        "pagePath": "pages/classify/index"
      },
      {
        "pagePath": "pages/seeker/index"
      },
      {
        "pagePath": "pages/mine/index"
      }
    ]
  }
开始编写自定义tabbar:
const { runOnJS, shared, timing, Easing, spring, sequence } = wx.worklet
const app = getApp()
const wininfo = app.globalData.windowInfo // 基础信息
Component({
  options: {
    addGlobalClass: true // 使用全局样式
  },
  lifetimes: {
    attached: function () {
      // wx.worklet.shared用于跨线程共享数据和驱动动画数据
      // Y抽偏移距离
      this._offsetY = shared(100)
      // 主题颜色
      this._backgroundColor1 = shared(app.globalData.theme === 'light' ? '#f4e2d8a6' : 'rgba(0,0,0,0.3)')
      this._backgroundColor2 = shared(app.globalData.theme === 'light' ? '#f4e2d82d' : 'rgba(0,0,0,0.3)')
      // 获取组件节点更新属性
      this.applyAnimatedStyle('#tabbar', () => {
        'worklet'
        return {
          transform: `translateY(${this._offsetY.value}px)`,
          background: `linear-gradient(145deg, ${this._backgroundColor1.value}, ${this._backgroundColor2.value})`
        }
      })
    },
  },

  ready() {
    this._offsetY.value = spring(0)
  },

  data: {
    index: 0,
    list: [
      '../static/index',
      '../static/classify',
      '../static/seeker',
      '../static/mine'
    ]
  },

  methods: {
    // 显示隐藏
    onShowHide(bool = true, defaultNumber = 0, hideNumber = 100) {
      if (bool) this._offsetY.value = spring(defaultNumber)
      else this._offsetY.value = spring(hideNumber)
    },

    // 切换背景颜色
    switchBackgroundColor(theme = app.globalData.theme) {
      if (theme === 'light') {
        this._backgroundColor1.value = '#f4e2d8a6'
        this._backgroundColor2.value = '#f4e2d8a6'
      } else {
        this._backgroundColor1.value = 'rgba(0,0,0,0.3)'
        this._backgroundColor2.value = 'rgba(0,0,0,0.3)'
      }
    },

    // 根据下标获取相应的页面
    currentIndexGetPage(index) {
      switch (index) {
        case 0:
          return '/pages/index/index'
        case 1:
          return '/pages/classify/index'
        case 2:
          return '/pages/seeker/index'
        case 3:
          return '/pages/mine/index'
        default:
          return '/pages/index/index'
      }
    },

    // 切换页面
    switchTab(e) {
      // 重复中一个同一个tabbar处理
      if (this.data.index === e.currentTarget.dataset.index) {
        // 当不是探索直接返回
        if (e.currentTarget.dataset.index !== 2) return
        // 当在探索时发布下载事件
        const eventChannel = this.getOpenerEventChannel()
        if (!eventChannel) return
        eventChannel.emit('download', { index: e.currentTarget.dataset.index })
      }
      // 当前点击下标
      const index = +e.currentTarget.dataset.index
      // 根据下标选择路由路径
      let url = this.currentIndexGetPage(index)
      // 跳转到 tabBar 页面,并关闭其他所有非 tabBar 页面
      wx.switchTab({
        url: `${url}?index=${index}`, // 路由路径
        routeType: 'wx://cupertino-modal', // 路由类型
        success: () => {
          this.setData({ index }, () => {
            // 短时间的振动
            wx.vibrateShort({ type: 'medium' })
            // tabbar在探索Y抽移动负40像素
            if (index === 2) this._offsetY.value = spring(-40)
            // 默认移动0
            else this._offsetY.value = spring(0)
          })
        }
      })
    }
  }
})
<view id="tabbar">
<view wx:for="{{list}}" wx:for-index="i" wx:key="*this" bind:tap="switchTab" data-index="{{i}}">
<image src="{{item}}{{index == i? 1: 0}}.svg"/>
</view>
</view>#tabbar {
width: 600rpx;
height: 100rpx;
position: absolute;
left: 75rpx;
border-radius: 30rpx;
pointer-events: auto;
bottom: calc(env(safe-area-inset-bottom) + 8px);
backdrop-filter: blur(10rpx);
display: flex;
align-items: center;
}
#tabbar>view {
display: flex;
align-items: center;
justify-content: center;
flex: 1;
height: 100%;
}
#tabbar>view>image {
width: 50rpx;
height: 50rpx;
}自定义tabbat