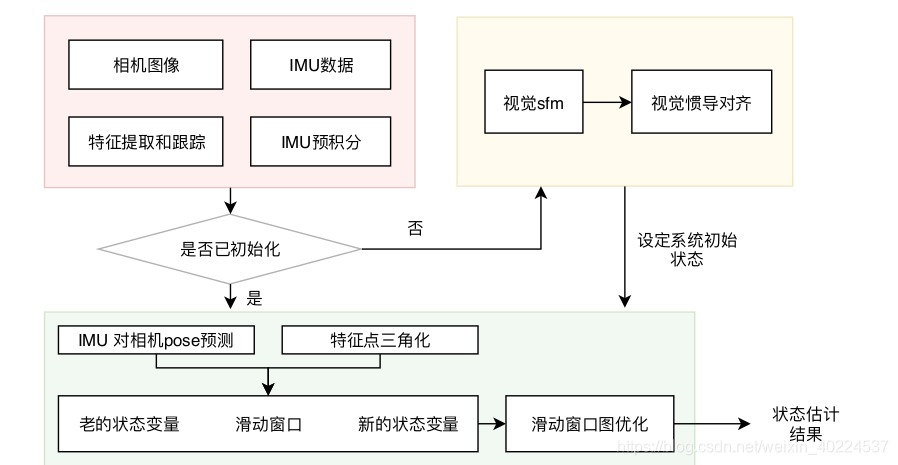
vins_mono代码总框架如下图:
前端的数据处理,包括两个部分,一个是图像的特征提取和匹配,再一个就是对IMU数据进行预积分。
对于VINS-Course\CMakeLists.txt:
生成两个库文件:camera_model,MyVio;
生成两个可执行文件:run_euroc,testCurveFitting;
我们重点看一下run_euroc的文件内容;
// 跑euroc数据集
// 将带有特征点和imu仿真数据喂给系统
主函数框架
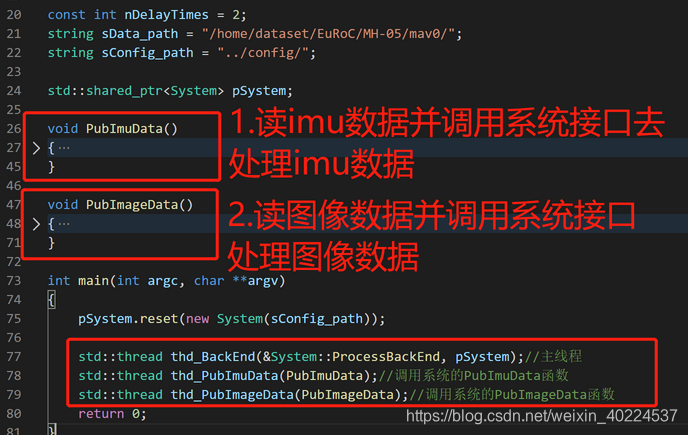
定义了三个线程,一个系统变量

int main(int argc, char **argv)
{
	if(argc != 3)
	{
		cerr << "./run_euroc PATH_TO_FOLDER/MH-05/mav0 PATH_TO_CONFIG/config \n"
			<< "For example: ./run_euroc /home/stevencui/dataset/EuRoC/MH-05/mav0/ ../config/"<< endl;
		return -1;
	}
	sData_path = argv[1];
	sConfig_path = argv[2];

	pSystem.reset(new System(sConfig_path));

	std::thread thd_BackEnd(&System::ProcessBackEnd, pSystem); // 最重要!!

	// sleep(5);
	std::thread thd_PubImuData(PubImuData); // 获取IMU数据的线程

	std::thread thd_PubImageData(PubImageData); //获取图像数据的线程

#ifdef __linux__
	std::thread thd_Draw(&System::Draw, pSystem); // 画图的线程
#elif __APPLE__
	DrawIMGandGLinMainThrd();
#endif

	thd_PubImuData.join();
	thd_PubImageData.join();

	// thd_BackEnd.join();
	// thd_Draw.join();

	cout << "main end... see you ..." << endl;
	return 0;
}
相关变量
- 图像数据变量:
- prev_img: 上一次发布数据时对应的图像帧
- cur_img: 光流跟踪的前一帧图像,而不是“当前帧”
- forw_img: 光流跟踪的后一帧图像,真正意义上的“当前帧”
- 特征点数据变量:
- prev_pts: 上一次发布的,且能够被当前帧(forw)跟踪到的特征点
- cur_pts: 在光流跟踪的前一帧图像中,能够被当前帧(forw)跟踪到的特征点
- forw_pts: 光流跟踪的后一帧图像,即当前帧中的特征点(除了跟踪到的特征点,可能还包含新检测的特征点)
1. pSystem变量
pSystem.reset(new System(sConfig_path));主函数中定义了一个变量pSystem,并调用System的构造函数System(std::string sConfig_files)从配置文件…/config/euroc_config.yaml中读取相机参数,imu参数,imu相机外参等数据;读取参数生成一个相机模型m_camera;设置估计器的参数。
class System
{
public:
    System(std::string sConfig_files);
    ~System();
    void PubImageData(double dStampSec, cv::Mat &img);
    void PubImuData(double dStampSec, const Eigen::Vector3d &vGyr,         const Eigen::Vector3d &vAcc);
    // thread: visual-inertial odometry
    void ProcessBackEnd();
    void Draw();
    ...
}System::System(string sConfig_file_)
:bStart_backend(true)
{
string sConfig_file = sConfig_file_ + "euroc_config.yaml";
cout << "1 System() sConfig_file: " << sConfig_file << endl;
// 从yaml文件中读取相机和imu之类的参数等
readParameters(sConfig_file);
// 从euroc_config.yaml文件中读取参数生成一个相机模型m_camera
trackerData[0].readIntrinsicParameter(sConfig_file);
// 设置相机与imu外参
estimator.setParameter();
ofs_pose.open("./pose_output.txt",fstream::app | fstream::out);
if(!ofs_pose.is_open())
{
cerr << "ofs_pose is not open" << endl;
}
// thread thd_RunBackend(&System::process,this);
// thd_RunBackend.detach();
cout << "2 System() end" << endl;
}设置相机与imu外参的setParameter()函数:
void Estimator::setParameter()
{
    for (int i = 0; i < NUM_OF_CAM; i++)
    {
        tic[i] = TIC[i]; // 相机到IMU的平移量
        ric[i] = RIC[i];
    }
    cout << "1 Estimator::setParameter FOCAL_LENGTH: " << FOCAL_LENGTH << endl;
    f_manager.setRic(ric);
    project_sqrt_info_ = FOCAL_LENGTH / 1.5 * Matrix2d::Identity();
    td = TD;
}
2.thd_PubImuData线程
读取imu数据文件中的IMU数据,并把数据打包成(时间dStampNSec,角速度vGyr,加速度vAcc)的形式调用系统函数PubImuData进行处理:
void PubImuData()
{
    // 获取IMU数据
    string sImu_data_file = sConfig_path + "MH_05_imu0.txt";
    cout << "1 PubImuData start sImu_data_filea: " << sImu_data_file << endl;
    ifstream fsImu;
    fsImu.open(sImu_data_file.c_str());
    if (!fsImu.is_open())
    {
        cerr << "Failed to open imu file! " << sImu_data_file << endl;
        return;
    }
    std::string sImu_line;
    double dStampNSec = 0.0; // 时间戳
    Vector3d vAcc;
    Vector3d vGyr;
    while (std::getline(fsImu, sImu_line) && !sImu_line.empty()) // 按行read imu data
    {
        std::istringstream ssImuData(sImu_line);
        // IMU数据打包
        ssImuData >> dStampNSec >> vGyr.x() >> vGyr.y() >> vGyr.z() >> vAcc.x() >> vAcc.y() >> vAcc.z();
        // cout << "Imu t: " << fixed << dStampNSec << " gyr: " << vGyr.transpose() << " acc: " << vAcc.transpose() << endl;
        pSystem->PubImuData(dStampNSec / 1e9, vGyr, vAcc); // System
        usleep(5000*nDelayTimes);
    }
    fsImu.close();
}
【补充】
系统的PubImuData函数
pSystem->PubImuData(dStampNSec / 1e9, vGyr, vAcc); // System 对从文件读取出来的IMU数据进行检测,检测imu数据是否乱序,装进去imu_buf中,并唤醒条件变量去获取数据
void PubImuData(double dStampSec, const Eigen::Vector3d &vGyr,
                const Eigen::Vector3d &vAcc);
详细代码如下:
void System::PubImuData(double dStampSec, const Eigen::Vector3d &vGyr,     const Eigen::Vector3d &vAcc)
{
    // 将IMU数据读入,并放进自定义的类IMU_MSG中(IMU预处理)
    shared_ptr<IMU_MSG> imu_msg(new IMU_MSG()); // imu数据指针
    imu_msg->header = dStampSec; // 分别赋值 时间戳
    imu_msg->linear_acceleration = vAcc; // 加速度
    imu_msg->angular_velocity = vGyr; // 角速度
    if (dStampSec <= last_imu_t) //last_imu_t是上一次的imu数据时间
    {
        // 检测imu数据是否乱序
        cerr << "imu message in disorder!" << endl;
        return;
    }
    last_imu_t = dStampSec;

    m_buf.lock();
    imu_buf.push(imu_msg); //!把imu数据放入队列中,最后根据时间戳找对应的imu数据
    m_buf.unlock();
    con.notify_one(); // 唤醒
}
为方便理解,自定义的类IMU_MSG的结构体如下:
//imu for vio
struct IMU_MSG
{
    double header;
    Eigen::Vector3d linear_acceleration;
    Eigen::Vector3d angular_velocity;
};
3.thd_PubImageData线程
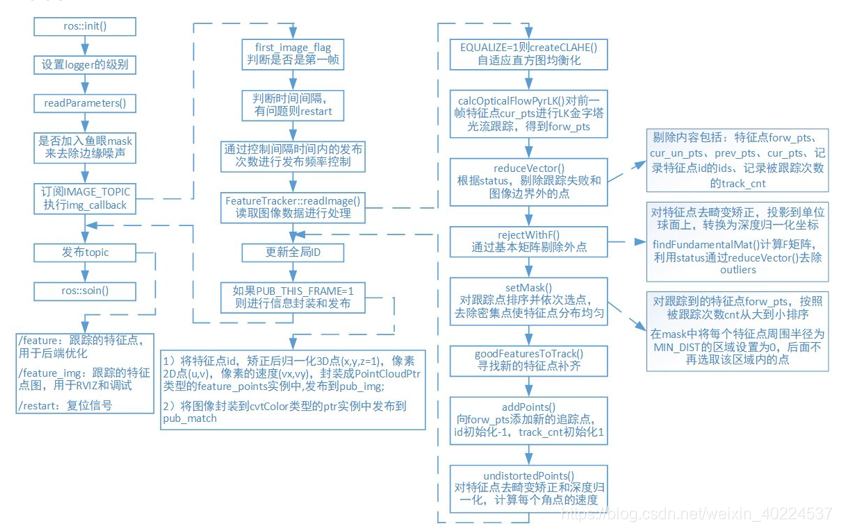
流程图:
先从MH_05_cam0.txt文件读取数据,打包成(时间dStampNSec,图像sImgFileName)。再调用系统的PubImageData函数进行图像数据的处理。
void PubImageData()
{
    // 获取图像数据
    string sImage_file = sConfig_path + "MH_05_cam0.txt";
    cout << "1 PubImageData start sImage_file: " << sImage_file << endl;
    ifstream fsImage;
    fsImage.open(sImage_file.c_str());
    if (!fsImage.is_open())
    {
        cerr << "Failed to open image file! " << sImage_file << endl;
        return;
    }
    std::string sImage_line;
    double dStampNSec;
    string sImgFileName;

    while (std::getline(fsImage, sImage_line) && !sImage_line.empty())
    {
        std::istringstream ssImuData(sImage_line);
        // 打包图像数据
        ssImuData >> dStampNSec >> sImgFileName;
        string imagePath = sData_path + "cam0/data/" + sImgFileName;
        Mat img = imread(imagePath.c_str(), 0);
        if (img.empty())
        {
            cerr << "image is empty! path: " << imagePath << endl;
            return;
        }
        // system
        pSystem->PubImageData(dStampNSec / 1e9, img);
        // cv::imshow("SOURCE IMAGE", img);
        // cv::waitKey(0);
        usleep(50000*nDelayTimes);
    }
    fsImage.close();
}
调用系统的PubImageData函数进行图像数据的处理:
pSystem->PubImageData(dStampNSec / 1e9, img);系统的PubImageData函数
void PubImageData(double dStampSec, cv::Mat &img);1. 预处理
1.1 跳过前两帧图像数据:
void System::PubImageData(double dStampSec, Mat &img) // 时间戳&图像
{   // 预处理
    // init_feature的初始值设置的是0
    if (!init_feature)  //第一帧图像数据不包含光流信息
    {
        cout << "1 PubImageData skip the first detected feature, which doesn't contain optical flow speed" << endl;
        init_feature = 1;
        return; // 跳过第一帧
    }
    // first_image_flag的初始值设置的是true
    if (first_image_flag)// 第二帧图像
    {
        cout << "2 PubImageData first_image_flag" << endl;
        first_image_flag = false;
        first_image_time = dStampSec;
        last_image_time = dStampSec;
        return; // 跳过第二帧
    }
1.2 检测相机的数据流是否乱序,若乱序则重置:
// detect unstable camera stream
// dStampSec:当前帧的时间戳
// last_image_time:上一帧的时间戳
if (dStampSec - last_image_time > 1.0 || dStampSec < last_image_time)
{
    cerr << "3 PubImageData image discontinue! reset the feature tracker!" << endl;
    first_image_flag = true;
    last_image_time = 0; // 从初始时刻开始,重置
    pub_count = 1;
    return;
}
1.3 控制发布的频率在FREQ (config文件中已设置)
发布频率控制(不是每来一张图像都要发布,但是都要传入readImage()进行处理),保证每秒钟处理的图像不超过FREQ,此处为每秒10帧
last_image_time = dStampSec;
// frequency control
if (round(1.0 * pub_count / (dStampSec - first_image_time)) <= FREQ)
{
   // 控制频率在FREQ
   PUB_THIS_FRAME = true; // 发布flag
   // reset the frequency control
   // 时间间隔内的发布频率十分接近设定频率时,更新时间间隔起始时刻,并将数据发布次数置0
   if (abs(1.0 * pub_count / (dStampSec - first_image_time) - FREQ) < 0.01 * FREQ)
   {
       first_image_time = dStampSec;
       pub_count = 0;
   }
}
else
{
    PUB_THIS_FRAME = false; // 不发布flag
}
1.4 readImage()
在feature_tracker.cpp中。
这个函数最为重要,主要是进行特征点的处理(提取,LK光流法跟踪),并保存
tackerData是FeatureTracker类的实例,是System类的私有成员。
TicToc t_r;
// cout << "3 PubImageData t : " << dStampSec << endl;
trackerData[0].readImage(img, dStampSec); // 最重要!!!获取图像,进行特征点的处理(提取,跟踪),并保存prev_img是前前帧已经处理好的图像,cur_img是上一帧图像,forw_img是当前处理的图像数据。对应的图像上提取的光流坐标分别是prev_pts ,cur_pts和forw_pts。
(1) 直方图均衡化,明暗亮度的调整
判断EQUALIZE的值,决定是否对图像进行直方图均衡化处理:createCLAHE()
void FeatureTracker::readImage(const cv::Mat &_img, double _cur_time)
{
    cv::Mat img;
    TicToc t_r;
    cur_time = _cur_time;
    if (EQUALIZE)
    {
        // 直方图的均衡,明暗亮度的调整
        cv::Ptr<cv::CLAHE> clahe = cv::createCLAHE(3.0, cv::Size(8, 8));
        TicToc t_c;
        clahe->apply(_img, img);
        //ROS_DEBUG("CLAHE costs: %fms", t_c.toc());
    }
    else
        img = _img;
(2)LK光流跟踪,并更新信息
调用opencv的calcOpticalFlowPyrLK函数进行光流跟踪,根据前一帧cur_img的特征点cur_pts(像素坐标),在当前帧forw_img进行跟踪,把追踪到的特征点的像素坐标放在forw_pts中,若成功跟踪,则跟踪状态status设置为1,否则为0。之后根据状态信息去除更新失败的点以及在边缘处的点,更新状态信息。
if (cur_pts.size() > 0)
{
    TicToc t_o;
    vector<uchar> status;
    vector<float> err;
    // LK光流跟踪
    cv::calcOpticalFlowPyrLK(cur_img, forw_img, cur_pts, forw_pts, status, err, cv::Size(21, 21), 3); // LK光流跟踪
    //根据状态信息更新失败的点以及在边缘处的点
    for (int i = 0; i < int(forw_pts.size()); i++)
        if (status[i] && !inBorder(forw_pts[i]))
            status[i] = 0;
    //根据跟踪的状态进行去除失败的信息
    reduceVector(prev_pts, status);
    reduceVector(cur_pts, status); // 二维坐标
    reduceVector(forw_pts, status);
    reduceVector(ids, status);
    reduceVector(cur_un_pts, status);
    reduceVector(track_cnt, status);
    //ROS_DEBUG("temporal optical flow costs: %fms", t_o.toc());
}其中,判断跟踪的特征点是否在图像边界内inBorder(forw_pts[i]):
bool inBorder(const cv::Point2f &pt)
{
    // cvRound对一个float型的数进行四舍五入
    const int BORDER_SIZE = 1;
    int img_x = cvRound(pt.x); // 像素点在图像上的x坐标
    int img_y = cvRound(pt.y);

    // COL:图像的宽,ROW:图像的高
    return BORDER_SIZE <= img_x && img_x < COL - BORDER_SIZE && / BORDER_SIZE <= img_y && img_y < ROW - BORDER_SIZE;
}
跟踪到的角点次数+1:
for (auto &n : track_cnt)
    n++;
(3)判断是否需要发布该帧图像:
否(PUB_THIS_FRAME=0):当前帧 forw 的数据赋给上一帧 cur,然后结束整个readImage的流程。
// 不发布该图像:当前帧 forw 的数据赋给上一帧 cur,结束
prev_img = cur_img;
prev_pts = cur_pts;
prev_un_pts = cur_un_pts;
cur_img = forw_img;
cur_pts = forw_pts;
① 需要发布该图像帧
是(PUB_THIS_FRAME=1):开始提取角点信息。
提取角点信息:
- 调用
rejectWithF()对prev_pts和forw_pts做RANSAC剔除outlier,函数里面主要是调用了cv::findFundamentalMat()函数,然后将所有剩下的特征点的track_cnt加1,track_cnt数值越大,说明被追踪得越久。
rejectWithF();值得注意的是,rejectWithF函数在处理第三帧图像数据时,并不进行外点检测(此时没有角点信息),但在之后,随着跟踪的进行,光流信息会出现很多外点,执行rejectWithF函数,使用基于Fundamental矩阵的外点检测去剔除outlier可以增强系统的鲁棒性。
rejectWithF()代码如下:
// 利用F矩阵剔除外点void FeatureTracker::rejectWithF()
{
    if (forw_pts.size() >= 8)
    {
            TicToc t_f;
            vector<cv::Point2f> un_cur_pts(cur_pts.size()), un_forw_pts(forw_pts.size());
            for (unsigned int i = 0; i < cur_pts.size(); i++)
            {
                Eigen::Vector3d tmp_p;
                //根据不同的相机模型将二维坐标转换到三维坐标
                m_camera->liftProjective(Eigen::Vector2d(cur_pts[i].x, cur_pts[i].y), tmp_p); // 上一帧
                //转换成像素坐标
                tmp_p.x() = FOCAL_LENGTH * tmp_p.x() / tmp_p.z() + COL / 2.0;
                tmp_p.y() = FOCAL_LENGTH * tmp_p.y() / tmp_p.z() + ROW / 2.0;
                un_cur_pts[i] = cv::Point2f(tmp_p.x(), tmp_p.y());

                m_camera->liftProjective(Eigen::Vector2d(forw_pts[i].x, forw_pts[i].y), tmp_p); // 当前帧
                tmp_p.x() = FOCAL_LENGTH * tmp_p.x() / tmp_p.z() + COL / 2.0;
                tmp_p.y() = FOCAL_LENGTH * tmp_p.y() / tmp_p.z() + ROW / 2.0;
                un_forw_pts[i] = cv::Point2f(tmp_p.x(), tmp_p.y());
            }
            vector<uchar> status;
            // 基于Fundamental矩阵的外点检测 p2^T*F*p1=0
            cv::findFundamentalMat(un_cur_pts, un_forw_pts, cv::FM_RANSAC, F_THRESHOLD, 0.99, status);
            int size_a = cur_pts.size();
            // 剔除outlier
            reduceVector(prev_pts, status);
            reduceVector(cur_pts, status);
            reduceVector(forw_pts, status);
            reduceVector(cur_un_pts, status);
            reduceVector(ids, status);
            reduceVector(track_cnt, status);
            //ROS_DEBUG("FM ransac: %d -> %lu: %f", size_a, forw_pts.size(), 1.0 * forw_pts.size() / size_a);
            //ROS_DEBUG("FM ransac costs: %fms", t_f.toc());
     }
}
【补充】
像素坐标的求解
- 对跟踪点进行排序并去除密集点
setMask();调用setMask()函数,通过设置一个mask,使跟踪的特征点在整幅图像中能够均匀分布,防止特征点扎堆。具体操作为:先对跟踪到的当前帧的特征点 forw_pts 按照跟踪次数降序排列(认为特征点被跟踪到的次数越多越好),然后遍历这个降序排列,对于遍历的每一个特征点,在 mask中将该点周围半径为 MIN_DIST=30 的区域设置为 0,在后续的遍历过程中,不再选择该区域内的点。
相关代码如下:
void FeatureTracker::setMask()
{
    if(FISHEYE)
        mask = fisheye_mask.clone();
    else
        mask = cv::Mat(ROW, COL, CV_8UC1, cv::Scalar(255));
    // prefer to keep features that are tracked for long time
    vector<pair<int, pair<cv::Point2f, int>>> cnt_pts_id;
    for (unsigned int i = 0; i < forw_pts.size(); i++)
        cnt_pts_id.push_back(make_pair(track_cnt[i], make_pair(forw_pts[i], ids[i])));
    // 对跟踪到的当前帧的特征点 `forw_pts` 按照跟踪次数降序排列
    sort(cnt_pts_id.begin(), cnt_pts_id.end(), [](const pair<int, pair<cv::Point2f, int>> &a, const pair<int, pair<cv::Point2f, int>> &b)
    {
        return a.first > b.first;
    });
    forw_pts.clear();
    ids.clear();
    track_cnt.clear();

    // 遍历降序排列中的每一个特征点
    // 在 mask中将该点周围半径为 `MIN_DIST=30` 的区域设置为 0,
    // 在后续的遍历过程中,不再选择该区域内的点。
    for (auto &it : cnt_pts_id)
    {
        if (mask.at<uchar>(it.second.first) == 255)
        {
            // 当前特征点位置对应的mask值为255,则保留当前特征点,将对应的特征点位置pts,id,被追踪次数cnt分别存入
            forw_pts.push_back(it.second.first);
            ids.push_back(it.second.second);
            track_cnt.push_back(it.first);
            cv::circle(mask, it.second.first, MIN_DIST, 0, -1);
        }
    }
}
其实就是为了避免角点扎堆的现象,极大值抑制。即在原来有角点信息的地方,设置一个半径,在这个半径内,不再提取新的角点信息,这样会使得特征点分布得更加均匀,同时尽可能地保留被跟踪次数更多的特征点。
【补充】
OpenCV - C++ - cv::circle
- 检测新的特征点
由于光流跟踪到的特征点会减少、setMask()的过程中也删除了一些特征点,所以需要再检测一些新的特征点。但应该注意的是,只有需要发布数据时,才会检测新的特征点,否则只跟踪,不检测新的特征点)。
具体操作为:调用cv::goodFeaturesToTrack()在当前帧forw_img图像的mask中不为0的区域检测新的特征点(使其最终得到的特征点一共MAX_CNT个),将特征点数量补充至指定数量,此时新检测得到的特征点存在n_pts中。
相关代码如下:
TicToc t_t;
// 跟踪的特征点数量标准为MAX_CNT
int n_max_cnt = MAX_CNT - static_cast<int>(forw_pts.size());
if (n_max_cnt > 0)
{
    if(mask.empty())
        cout << "mask is empty " << endl;
    if (mask.type() != CV_8UC1)
        cout << "mask type wrong " << endl;
    if (mask.size() != forw_img.size())
        cout << "wrong size " << endl;

        cv::goodFeaturesToTrack(forw_img, n_pts, MAX_CNT - forw_pts.size(), 0.01, MIN_DIST, mask); // 没mask的像素再去重新提取特征点
    }
else
n_pts.clear();- 调用
FeatureTracker::addPoints(),将新检测到的特征点到forw_pts中去,id初始化为-1,track_cnt初始化为1。
TicToc t_a;
addPoints();
void FeatureTracker::addPoints()
{
for (auto &p : n_pts)
{
forw_pts.push_back(p);
ids.push_back(-1);
track_cnt.push_back(1);
}
}②若不需要发布该图像帧
则:
- 当前帧 forw 的数据赋给上一帧 cur
prev_img = cur_img;
prev_pts = cur_pts;
prev_un_pts = cur_un_pts;
cur_img = forw_img;
cur_pts = forw_pts;- 调用
undistortedPoints()函数根据不同的相机模型进行去畸变矫正和深度归一化,计算速度。
undistortedPoints(); // ?坐标——>归一化平面的2d图像坐标
prev_time = cur_time;
具体代码如下:
void FeatureTracker::undistortedPoints()
{
    cur_un_pts.clear();
    cur_un_pts_map.clear();
    //cv::undistortPoints(cur_pts, un_pts, K, cv::Mat());
    for (unsigned int i = 0; i < cur_pts.size(); i++)
    {
        Eigen::Vector2d a(cur_pts[i].x, cur_pts[i].y);
        Eigen::Vector3d b;
        // liftProjective()将图像特征点的坐标a映射到空间坐标b,里面涉及处理畸变的过程。最后得到俩组特征点的位置
        m_camera->liftProjective(a, b);
        cur_un_pts.push_back(cv::Point2f(b.x() / b.z(), b.y() / b.z()));// 归一化坐标
        cur_un_pts_map.insert(make_pair(ids[i], cv::Point2f(b.x() / b.z(), b.y() / b.z())));
        //printf("cur pts id %d %f %f", ids[i], cur_un_pts[i].x, cur_un_pts[i].y);
    }
    // caculate points velocity
    if (!prev_un_pts_map.empty())
    {
        double dt = cur_time - prev_time;
        pts_velocity.clear();
        for (unsigned int i = 0; i < cur_un_pts.size(); i++)
        {
            if (ids[i] != -1)
            {
                std::map<int, cv::Point2f>::iterator it;
                it = prev_un_pts_map.find(ids[i]);
                if (it != prev_un_pts_map.end())
                {
                    double v_x = (cur_un_pts[i].x - it->second.x) / dt;
                    double v_y = (cur_un_pts[i].y - it->second.y) / dt;
                    pts_velocity.push_back(cv::Point2f(v_x, v_y));
                }
                else
                    pts_velocity.push_back(cv::Point2f(0, 0));
            }
            else
            {
                pts_velocity.push_back(cv::Point2f(0, 0));
            }
        }
    }
    else
    {
        for (unsigned int i = 0; i < cur_pts.size(); i++)
        {
            pts_velocity.push_back(cv::Point2f(0, 0));
        }
    }
    prev_un_pts_map = cur_un_pts_map;
}
至此,trackerData[0].readImage(img, dStampSec);的流程结束。回到System::PubImageData(double dStampSec, Mat &img):
1.5 更新全局ID,将新提取的特征点赋予全局id
for (unsigned int i = 0;; i++)
{      bool completed = false;
       // 这里,成功跟踪才会使completed=true
       completed |= trackerData[0].updateID(i);
       if (!completed)
           break;
}
【补充】
- |=运算符的使用
实际上,|是按位或操作,就是只要有一个1就是1,两个都是0才是0。 a|=b 等价于a=a|b; 即求 a,b 按位与,再把a|b的值赋给a。
1.6 将readImage()求解出的值封装,并发布
封装的值都包括:特征点id,矫正后归一化平面的3D点(x,y,z=1),像素2D点(u,v),像素的速度(vx,vy),封装成sensor_msgs::PointCloudPtr类型的feature_points实例中,将预处理的结果保存在feature_buf中。
if (PUB_THIS_FRAME)
{
    pub_count++;
    shared_ptr<IMG_MSG> feature_points(new IMG_MSG());
    feature_points->header = dStampSec;
    vector<set<int>> hash_ids(NUM_OF_CAM);
    for (int i = 0; i < NUM_OF_CAM; i++)
    {
        auto &un_pts = trackerData[i].cur_un_pts; // 归一化坐标
        auto &cur_pts = trackerData[i].cur_pts; //保存,当前帧的特征点二维图像坐标
        auto &ids = trackerData[i].ids;
        auto &pts_velocity = trackerData[i].pts_velocity; // 速度
        for (unsigned int j = 0; j < ids.size(); j++)
        {
            if (trackerData[i].track_cnt[j] > 1)
            {
                int p_id = ids[j];
                hash_ids[i].insert(p_id);
                double x = un_pts[j].x; //归一化坐标
                double y = un_pts[j].y;
                double z = 1;
                feature_points->points.push_back(Vector3d(x, y, z)); // 归一化坐标
                feature_points->id_of_point.push_back(p_id * NUM_OF_CAM + i);
                feature_points->u_of_point.push_back(cur_pts[j].x); //像素坐标
                feature_points->v_of_point.push_back(cur_pts[j].y);
                feature_points->velocity_x_of_point.push_back(pts_velocity[j].x);
                feature_points->velocity_y_of_point.push_back(pts_velocity[j].y);
            }
        }
        // skip the first image; since no optical speed on frist image
        if (!init_pub)
        {
            cout << "4 PubImage init_pub skip the first image!" << endl;
            init_pub = 1;
        }
        else
        {
            m_buf.lock();
            feature_buf.push(feature_points); // 预处理的结果
            // cout << "5 PubImage t : " << fixed << feature_points->header
            //     << " feature_buf size: " << feature_buf.size() << endl;
            m_buf.unlock();
            con.notify_one();
        }
     }
 }
至此,获取图像数据的线程全部解析完成!
4. thd_BackEnd线程
最重要!前面的两个线程主要是获取IMU数据、获取图像数据以及进行特征提取和LK光流的跟踪。thd_BackEnd线程包括IMU预积分Estimator::processIMU和图像数据的进一步操作,其中包括初始化的一系列操作Estimator::processImage。初始化完成后将进入后端进行滑动窗口的优化,进而得到优化后的状态估计结果。
这部分的内容在我另一篇博客——指路
//imu for vio
struct IMU_MSG
{
    double header;
    Eigen::Vector3d linear_acceleration;
    Eigen::Vector3d angular_velocity;
};
//image for vio
struct IMG_MSG
{
double header;
vector<Vector3d> points;
vector<int> id_of_point;
vector<float> u_of_point;
vector<float> v_of_point;
vector<float> velocity_x_of_point;
vector<float> velocity_y_of_point;
};

