一、什么是深度图
目前深度图像的获取方法有激光雷达深度成像法、计算机立体视觉成像、坐标测量机法、莫尔条纹法、结构光法等等,针对深度图像的研究重点主要集中在以下几个方面,深度图像的分割技术 ,深度图像的边缘检测技术 ,基于不同视点的多幅深度图像的配准技术,基于深度数据的三维重建技术,基于三维深度图像的三维目标识别技术,深度图像的多分辨率建模和几何压缩技术等等,在PCL 中深度图像与点云最主要的区别在于 其近邻的检索方式的不同,并且可以互相转换。
深度图像(Depth Images)也被称为距离影像(Range Image),是指将从图像采集器到场景中各点的距离值作为像素值的图像,它直接反应了景物可见表面的几何形状,利用它可以很方便的解决3D目标描述中的许多问题,深度图像经过点云变换可以计算为点云数据,有规则及有必要信息的点云数据可以反算为深度图像数据。
二、点云转深度图 PointCloud->Range Image
本节演示了如何从点云和一个给定的传感器位姿创建一个深度图像。以下代码创建了一个矩形点云的示例,它浮动在观察者的前面。具体注释非常详细。
#include <pcl/range_image/range_image.h> // 深度图头文件
int main () {
  pcl::PointCloud<pcl::PointXYZ> pointCloud; // 点云

  // 创造矩形点云数据,0.01分辨率
  for (float y=-0.5f; y<=0.5f; y+=0.01f) {
    for (float z=-0.5f; z<=0.5f; z+=0.01f) {
      pcl::PointXYZ point;
      point.x = 2.0f - y;
      point.y = y;
      point.z = z;
      pointCloud.push_back(point);
    }
  }
  pointCloud.width = pointCloud.size();
  pointCloud.height = 1;

  // 利用以上创造的矩形体点云,创造一个1度角分辨率的深度图像
  float angularResolution = (float) (  1.0f * (M_PI/180.0f));  //  1角度转弧度
  float maxAngleWidth     = (float) (360.0f * (M_PI/180.0f));  // 360角度转弧度
  float maxAngleHeight    = (float) (180.0f * (M_PI/180.0f));  // 180角度转弧度
  Eigen::Affine3f sensorPose = (Eigen::Affine3f)Eigen::Translation3f(0.0f, 0.0f, 0.0f); // 传感器位姿roll = pitch = yaw = 0(6DOF视角位姿)
  // 深度图所使用的坐标系
  pcl::RangeImage::CoordinateFrame coordinate_frame = pcl::RangeImage::CAMERA_FRAME;
  float noiseLevel=0.00;
  float minRange = 0.0f;
  int borderSize = 1;

  pcl::RangeImage rangeImage; // 深度图对象
  // 从以上的点云和设置的参数来创建深度图
  // ================================下面函数参数解释如下======================================
  // [in] 点云、角分辨率1°、
  // [in]maxAngleWidth = 360和maxAngleHeight = 180表示我们正在模拟的深度传感器具有完整的360度周围视图。(注:深度图像将仅裁剪为自动观察到某些内容的区域)。也可以通过减少值来节省一些计算。例如,对于180度视图朝前的激光扫描仪,可以观察到传感器后面没有点,maxAngleWidth = 180就足够了。
  // [in]sensorPose将虚拟深度传感器的6DOF位置定义为roll = pitch = yaw = 0的原点。
  // [in]coordinate_frame = CAMERA_FRAME告诉系统x面向右,y向下,z轴向前。另一种选择是LASER_FRAME,x面向前方,y位于左侧,z位于上方。
  // [in]对于noiseLevel = 0,沿Z轴剖分创建深度图像。然而,想平均落在同一个单元格中的点数,可以使用更高的值。比如0.05表示所有与最近点的最大距离为5cm的点用于计算深度。
  // [in]minRange 如果minRange大于0,所有靠近虚拟深度传感器的点将被忽略。
  // [in]borderSize,当裁剪图像时,如果borderSize大于0将在图像四周留下未观察到的点的边界。
  // [return]rangeImage 深度图
  //=========================================================================================
  rangeImage.createFromPointCloud(pointCloud, angularResolution, maxAngleWidth, maxAngleHeight,
                                  sensorPose, coordinate_frame, noiseLevel, minRange, borderSize);
  std::cout << rangeImage << "\n";
}
以上代码执行结果如下:
header:
seq: 0 stamp: 0 frame_id:
points[]: 1360
width: 40
height: 34
sensor_origin_: 0 0 0
sensor_orientation_: 0 0 0 1
is_dense: 0
angular resolution: 1deg/pixel in x and 1deg/pixel in y.
深度图像是从PointCloud类派生出来的,它的点类有成员x,y,z和range。有三种可能形式,被观测点有一个大于零的实际深度range。未观测到的点有x=y=z=NAN和range=-INFINITY。远距离点有x=y=z=NAN和range=INFINITY。
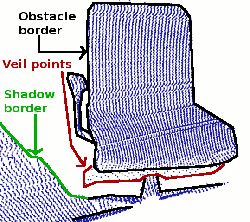
三、利用深度图提取点云边缘
本节演示了如何从深度图像中提取边界(即从前景到背景的分割)。我们感兴趣的是三种不同的点集:
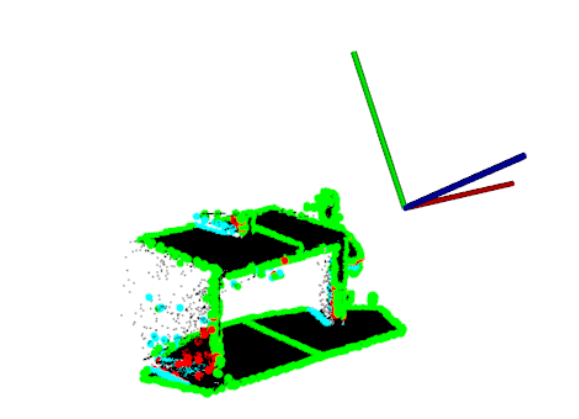
物体边界点,即仍然属于物体,但是位于物体最外面的可见点(图中黑色点);
阴影边界点,即背景中被物体投影所遮挡的边界点(图中绿色点);
遮挡点,即障碍物边界与阴影边界之间的插值点,也称纱点,是激光雷达获取的三维距离数据中的典型现象。
以下代码表述了如何利用深度图将这些边缘点分割出来。详细注释请看代码内容。
 /* \代码作者:Bastian Steder */

 #include <iostream>

 #include <pcl/range_image/range_image.h>  				// 深度图头文件
 #include <pcl/io/pcd_io.h>								// IO头文件
 #include <pcl/visualization/range_image_visualizer.h>	// 深度图可视化头文件
 #include <pcl/visualization/pcl_visualizer.h>			// 点云可视化头文件
 #include <pcl/features/range_image_border_extractor.h>	// 深度图边界提取头文件
 #include <pcl/console/parse.h> 						// 控制台语句分析头文件
 #include <pcl/common/file_io.h> 						// 获取无拓展名文件

 typedef pcl::PointXYZ PointType;						// 点云类型

 // --------------------
 // -----参数-----
 // --------------------
 float angular_resolution = 0.5f;	// 角度分辨率
  //coordinate_frame = CAMERA_FRAME告诉系统x面向右,y向下,z轴向前
 pcl::RangeImage::CoordinateFrame coordinate_frame = pcl::RangeImage::CAMERA_FRAME;
 bool setUnseenToMaxRange = false;	//不设置所有不能观察到的点都为远距离的点


 // --------------
 // -----帮助提示-----
 // --------------
 void
 printUsage (const char* progName)
 {
   std::cout << "\n\nUsage: "<<progName<<" [options] <scene.pcd>\n\n"
             << "Options:\n"
             << "-------------------------------------------\n"
             << "-r <float>   angular resolution in degrees (default "<<angular_resolution<<")\n"
             << "-c <int>     coordinate frame (default "<< (int)coordinate_frame<<")\n"
             << "-m           Treat all unseen points to max range\n"
             << "-h           this help\n"
             << "\n\n";
 }

 // --------------
 // -----主程序-----
 // --------------
 int
 main (int argc, char** argv)
 {
   // --------------------------------------
   // -----解析命令行参数-------------------
   // --------------------------------------
   if (pcl::console::find_argument (argc, argv, "-h") >= 0)
   {
     printUsage (argv[0]);
     return 0;
   }
   if (pcl::console::find_argument (argc, argv, "-m") >= 0)
   {
     setUnseenToMaxRange = true;//设置所有不能观察到的点都为远距离的点
     std::cout << "Setting unseen values in range image to maximum range readings.\n";
   }
   int tmp_coordinate_frame;
   if (pcl::console::parse (argc, argv, "-c", tmp_coordinate_frame) >= 0)
   {
     coordinate_frame = pcl::RangeImage::CoordinateFrame (tmp_coordinate_frame);
     std::cout << "Using coordinate frame "<< (int)coordinate_frame<<".\n";
   }
   if (pcl::console::parse (argc, argv, "-r", angular_resolution) >= 0)
     std::cout << "Setting angular resolution to "<<angular_resolution<<"deg.\n";
   angular_resolution = pcl::deg2rad (angular_resolution);

   // ------------------------------------------------------------------
   // -----读取pcd文件或创建示例点云(如果没有给出)-----------------------
   // ------------------------------------------------------------------
   pcl::PointCloud<PointType>::Ptr point_cloud_ptr (new pcl::PointCloud<PointType>);
   pcl::PointCloud<PointType>& point_cloud = *point_cloud_ptr;
   pcl::PointCloud<pcl::PointWithViewpoint> far_ranges;
   Eigen::Affine3f scene_sensor_pose (Eigen::Affine3f::Identity ());
   std::vector<int> pcd_filename_indices = pcl::console::parse_file_extension_argument (argc, argv, "pcd");
   if (!pcd_filename_indices.empty ())
   {
     std::string filename = argv[pcd_filename_indices[0]];
     if (pcl::io::loadPCDFile (filename, point_cloud) == -1)
    {
       std::cout << "Was not able to open file \""<<filename<<"\".\n";
       printUsage (argv[0]);
       return 0;
     }
     // 配置平移和旋转矩阵来设定传感器位姿
     scene_sensor_pose = Eigen::Affine3f (Eigen::Translation3f (point_cloud.sensor_origin_[0],
                                                                point_cloud.sensor_origin_[1],
                                                                point_cloud.sensor_origin_[2])) *
                         Eigen::Affine3f (point_cloud.sensor_orientation_);

     std::string far_ranges_filename = pcl::getFilenameWithoutExtension (filename)+"_far_ranges.pcd";
     if (pcl::io::loadPCDFile(far_ranges_filename.c_str(), far_ranges) == -1)
       std::cout << "Far ranges file \""<<far_ranges_filename<<"\" does not exists.\n";
   }
   else
   {
   // 如果pcd文件不存在则创建点云数据
     std::cout << "\nNo *.pcd file given => Generating example point cloud.\n\n";
     for (float x=-0.5f; x<=0.5f; x+=0.01f)
    {
       for (float y=-0.5f; y<=0.5f; y+=0.01f)
       {
        PointType point;  point.x = x;  point.y = y;  point.z = 2.0f - y;
        point_cloud.push_back (point);
      }
    }
    point_cloud.width = point_cloud.size ();  point_cloud.height = 1;
  }

  // -----------------------------------------------
  // -----利用点云创建深度图像,方法见上一节-----
  // -----------------------------------------------
  float noise_level = 0.0;
  float min_range = 0.0f;
  int border_size = 1;
  pcl::RangeImage::Ptr range_image_ptr (new pcl::RangeImage);
  pcl::RangeImage& range_image = *range_image_ptr;
  range_image.createFromPointCloud (point_cloud, angular_resolution, pcl::deg2rad (360.0f), pcl::deg2rad (180.0f),
                                   scene_sensor_pose, coordinate_frame, noise_level, min_range, border_size);
  range_image.integrateFarRanges (far_ranges);
  if (setUnseenToMaxRange)
    range_image.setUnseenToMaxRange ();  //设置所有不能观察到的点都为远距离的点

  // --------------------------------------------
  // ---------使用3D点云查看器来查看源点云----------
  // --------------------------------------------
  pcl::visualization::PCLVisualizer viewer ("3D Viewer"); 	// 窗口名
  viewer.setBackgroundColor (1, 1, 1);						// 背景色
 viewer.addCoordinateSystem (1.0f, "global");				// 添加全局坐标系
  pcl::visualization::PointCloudColorHandlerCustom<PointType> point_cloud_color_handler (point_cloud_ptr, 0, 0, 0); // 设置点云颜色
  viewer.addPointCloud (point_cloud_ptr, point_cloud_color_handler, "original point cloud");
  //PointCloudColorHandlerCustom<pcl::PointWithRange> range_image_color_handler (range_image_ptr, 150, 150, 150);
  //viewer.addPointCloud (range_image_ptr, range_image_color_handler, "range image");
  //viewer.setPointCloudRenderingProperties (PCL_VISUALIZER_POINT_SIZE, 2, "range image");

  // -------------------------
  // -----使用深度图提取边界点-----
  // -------------------------
  pcl::RangeImageBorderExtractor border_extractor (&range_image); 	// 实例化深度图边界点提取器
  pcl::PointCloud<pcl::BorderDescription> border_descriptions;		// 实例化边界描述子
  border_extractor.compute (border_descriptions);					// 开始利用深度图计算边界,并返回给边界描述子。

  // ----------------------------------
  // -----使用3D查看器显示点云的物体边界点,阴影边界点,插值点-----
  // ----------------------------------
  pcl::PointCloud<pcl::PointWithRange>::Ptr border_points_ptr(new pcl::PointCloud<pcl::PointWithRange>),
                                            veil_points_ptr(new pcl::PointCloud<pcl::PointWithRange>),
                                            shadow_points_ptr(new pcl::PointCloud<pcl::PointWithRange>);
  pcl::PointCloud<pcl::PointWithRange>& border_points = *border_points_ptr,
                                      & veil_points = * veil_points_ptr,
                                      & shadow_points = *shadow_points_ptr;
  for (int y=0; y< (int)range_image.height; ++y)
  {
    for (int x=0; x< (int)range_image.width; ++x)
    {
    // 判断深度图中的点并提取出的这些点的类型,按类型分别装入不同点云容器中
      if (border_descriptions[y*range_image.width + x].traits[pcl::BORDER_TRAIT__OBSTACLE_BORDER])
        border_points.push_back (range_image[y*range_image.width + x]);
      if (border_descriptions[y*range_image.width + x].traits[pcl::BORDER_TRAIT__VEIL_POINT])
        veil_points.push_back (range_image[y*range_image.width + x]);
      if (border_descriptions[y*range_image.width + x].traits[pcl::BORDER_TRAIT__SHADOW_BORDER])
        shadow_points.push_back (range_image[y*range_image.width + x]);
    }
  }
  // 为不同类型的点着色,并渲染点的尺寸,并在显示器中显示出来
  pcl::visualization::PointCloudColorHandlerCustom<pcl::PointWithRange> border_points_color_handler (border_points_ptr, 0, 255, 0);
  viewer.addPointCloud<pcl::PointWithRange> (border_points_ptr, border_points_color_handler, "border points");
  viewer.setPointCloudRenderingProperties (pcl::visualization::PCL_VISUALIZER_POINT_SIZE, 7, "border points");
  pcl::visualization::PointCloudColorHandlerCustom<pcl::PointWithRange> veil_points_color_handler (veil_points_ptr, 255, 0, 0);
  viewer.addPointCloud<pcl::PointWithRange> (veil_points_ptr, veil_points_color_handler, "veil points");
  viewer.setPointCloudRenderingProperties (pcl::visualization::PCL_VISUALIZER_POINT_SIZE, 7, "veil points");
  pcl::visualization::PointCloudColorHandlerCustom<pcl::PointWithRange> shadow_points_color_handler (shadow_points_ptr, 0, 255, 255);
  viewer.addPointCloud<pcl::PointWithRange> (shadow_points_ptr, shadow_points_color_handler, "shadow points");
  viewer.setPointCloudRenderingProperties (pcl::visualization::PCL_VISUALIZER_POINT_SIZE, 7, "shadow points");

  //-------------------------------------------
  // ------------显示深度图像------------------
  // ------------------------------------------
  pcl::visualization::RangeImageVisualizer* range_image_borders_widget = NULL;
  range_image_borders_widget =
    pcl::visualization::RangeImageVisualizer::getRangeImageBordersWidget (range_image, -std::numeric_limits<float>::infinity (), std::numeric_limits<float>::infinity (), false,
                                                                          border_descriptions, "Range image with borders");
 // -------------------------------------


  //--------------------
  // ----开始循环显示-----
  //--------------------
  while (!viewer.wasStopped ())
 {
    range_image_borders_widget->spinOnce ();
    viewer.spinOnce ();
    pcl_sleep(0.01);
  }
}
代码效果如下:
【博主简介】
斯坦福的兔子,男,天津大学机械工程工学硕士。毕业至今从事光学三维成像及点云处理相关工作。因工作中使用的三维处理库为公司内部库,不具有普遍适用性,遂自学开源PCL库及其相关数学知识以备使用。谨此将自学过程与君共享。
博主才疏学浅,尚不具有指导能力,如有问题还请各位在评论处留言供大家共同讨论。
若前辈们有工作机会介绍欢迎私信。

