Locust介绍
LoadRunner 是非常有名的商业性能测试工具,功能非常强大。使用也比较复杂,目前大多介绍性能测试的书籍都以该工具为基础,甚至有些书整本都在介绍 LoadRunner 的使用。
Jmeter 同样是非常有名的开源性能测试工具,功能也很完善,在本书中介绍了它作为接口测试工具的使用。但实际上,它是一个标准的性能测试工具。关于Jmeter相关的资料也非常丰富,它的官方文档也很完善。
Locust 同样是性能测试工具,虽然官方这样来描述它 “An open source load testing tool.” 。但其它和前面两个工具有着较大的不同。相比前面两个工具,功能上要差上不少,但它也并非优点全无。
-
Locust 完全基本 Python 编程语言,采用 Pure Python 描述测试脚本,并且 HTTP 请求完全基于 Requests 库。除了 HTTP/HTTPS 协议,Locust 也可以测试其它协议的系统,只需要采用Python调用对应的库进行请求描述即可。
-
LoadRunner 和 Jmeter 这类采用进程和线程的测试工具,都很难在单机上模拟出较高的并发压力。Locust 的并发机制摒弃了进程和线程,采用协程(gevent)的机制。协程避免了系统级资源调度,由此可以大幅提高单机的并发能力。
-
Locust安装
这里想简单介绍 Locust 都基于了哪些库。打开 Locust 安装目录下的 setup.py 文件。查看安装要求:
install_requires=["gevent>=1.1.2", "flask>=0.10.1", "requests>=2.9.1", "msgpack-python>=0.4.2", "six>=1.10.0", "pyzmq==15.2.0"]
gevent 是在 Python 中实现协程的一个第三方库(微线程(Coroutine))。使用gevent可以获得极高的并发性能。
flask 是 Python 的一个 Web 开发框架。
requests 用来做 HTTP 接口测试。
msgpack-python 是一种快速、紧凑的二进制序列化格式,适用于类似JSON的数据。
six 提供了一些简单的工具用来封装 Python2 和 Python3 之间的差异性。
pyzmq 支持运行 Locust 分布在多个进程或多台机器上。
当我们在安装 Locust 时,它会检测我们当前的 Python 环境是否已经安装了这些库,如果没有安装,它会先把这些库一一装上。并且对这些库版本有要求,有些是必须等于某版本,有些是大于某版本。我们也可以事先把这些库全部按要求装好,再安装Locust时就会快上许多。
CMD命令行输入:pip install locust 安装,安装后locust --version查看当前Locust版本
报错就升级pip(pip install --upgrade pip)
安装后运行locust文件发现提示是'locust' 不是内部或外部命令,也不是可运行的程序或批处理文件。
折腾半天,解决方式如下:
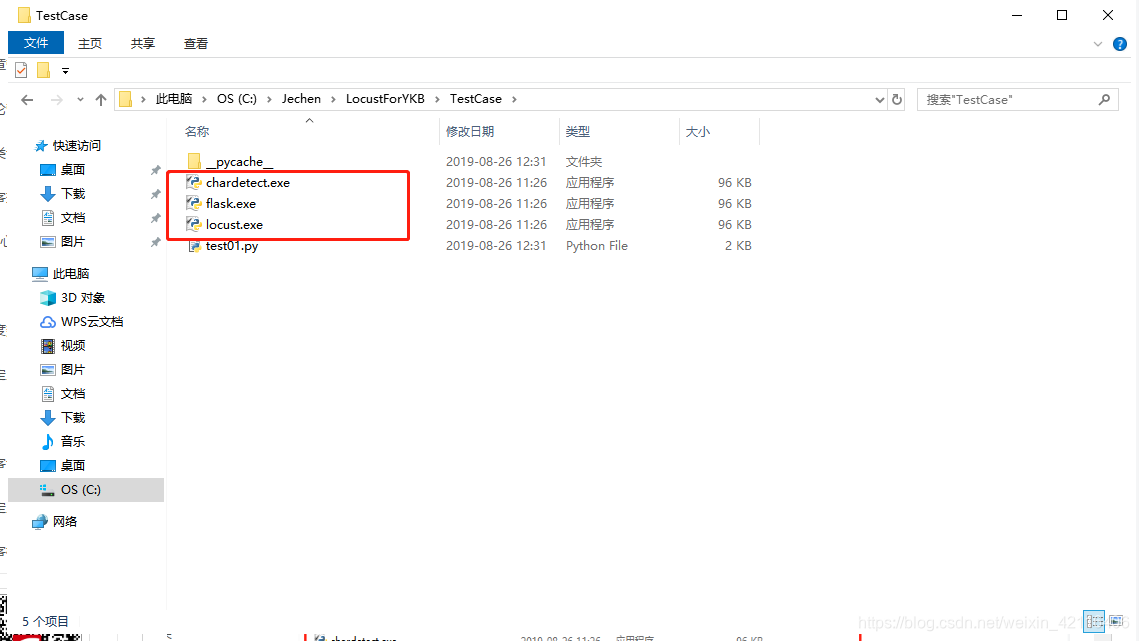
找到scripts文件夹,将其加入path环境变量,或者将scripts里的几个文件拷贝到你运行的工程项目中,如下图:

以下是我的工程路径>>>>>>>>>>>>>>>
环境准备就绪,接下来试试水,来个简单的接口压测。
-
一个简单的单接口压测
简单举个栗子,比如我们现在需要压力测试访问百度首页
#! encoding:utf-8

from locust import HttpLocust, TaskSet, task,events
from gevent._semaphore import Semaphore
import queue,pymysql,requests,threading


'''''''''
创建集合点,当locust实例产生完成是触发
'''

all_locusts_spawned = Semaphore()
all_locusts_spawned.acquire()

# 创建等待方法
def on_hatch_complete(**kwargs):
    all_locusts_spawned.release()

# 当用户加载完成是触发
events.hatch_complete += on_hatch_complete


# token全局队列
q = queue.Queue(maxsize=10)

# token生产函数
def product():
    count = 1
    db = pymysql.connect(host='localhost',user='root',port=3306,password='123456',database='user',cursorclass=pymysql.cursors.SSCursor)
    cursor = db.cursor()
    sql = 'SELECT ID,BindUserOpenID,authorizer_appid,Openid,CustomerID,AppID FROM getusertoken'
    cursor.execute(sql)
    result = cursor.fetchall()
    db.close()
    for k in result:
        # print(k[0]) # UserID
        # print(k[1]) # BusinessPlatformOpenID
        # print(k[2]) # WeChatAppletAppID
        # print(k[3]) # OpenID
        # print(k[4]) # CustomerID
        # print(k[5]) # AppID
        url = 'http://192.0.0.0/huiyuan/api/Login'
        header = {"Content-Type": "application/json"}
        body = {
            "AppID":"APP0000026a737f6f294b15f",
            "CustomerID":"aae70115-9d86-eab1-8551-496b438186c6",
            "WeChatAppletAppID":"wxfeaee751f84c1d6e",
            "PlatformAppID": True,
            "OpenID":k[3],
            "UserID":k[0],
            "BusinessPlatformOpenID":k[1]
        }
        res = requests.post(url=url,json=body,headers=header,verify=False)
        res.close()
        q.put(res.text)
        count+=1
        print('生成第{}个token:{}'.format(count,str(res.text)))


# 定义线程生成token
p = threading.Thread(target=product)

# 开始线程任务
p.start()


class UserBehavior(TaskSet):

    def setup(self):
        print('用户准备.....')

    def on_start(self):
        print('用户登录!')

    def teardown(self):
        print('用户退出登录!')

    @task
    def do_something(self):
        # 压力测试路径
        url = "/"

        # 集合点,限制在所有用户准备完成前处于等待状态
        all_locusts_spawned.wait()

        # 获取全局队列里的token给do_something使用
        token = q.get()
        print(token)

        # 开始请求
        res = self.client.get(url)
        try:
            assert res.status_code == 200
            print('断言成功!')
        except Exception as err:
            print('断言失败!',err)

class WebsiteUser(HttpLocust):

    task_set = UserBehavior
    min_wait = 3000   # 用户行为间隔的最小的等待时间,毫秒
    max_wait = 5000   # 用户行为间隔的最大的等待时间,毫秒 如果在此未声明则默认为1秒
    stop_timeout = 10

if __name__ == "__main__":

    # 运行程序入口
    import os
    os.system("locust -f locust单接口.py -H http://www.baidu.com")
    # os.system("locust -f locust单接口.py -c 5 -r 1 --no-web -H http://www.baidu.com")
以上代码就是一个简单的压测脚本,访问百度首页的压力测试。那么,如果需要某个用户登录后接口才能进行有效请求该如何呢?
-
如何处理压测前需要完成行为动作
#! encoding:utf-8

from locust import HttpLocust, TaskSet, task,events
from gevent._semaphore import Semaphore
import urllib3, warnings,queue

# 定义用户压测前的一些行为
def login(self):
    print('用户登录!')

def logout(self):
    print('用户退出登录!')


class UserBehavior(TaskSet):
    # 压测前登录,on_start()是固定的,这个是定义一个压测任务前用户首先要做的一个操作
    def on_start(self):
        login(self)

     # 压测完后退出,on_stop()也是固定的,这个是定义一个任务结束后该做什么操作
    def on_stop(self):
        logout(self)

     # 接下来开始压测需要压测的接口
    @task
    def do_something(self):
        url = "/"
        res = self.client.get(url)

        try:
            assert res.status_code == 200
            print('断言成功!')
        except Exception as err:
            print('断言失败!')

class WebsiteUser(HttpLocust):
    task_set = UserBehavior
    min_wait = 3000   # 用户行为间隔的最小的等待时间,毫秒
    max_wait = 5000   # 用户行为间隔的最大的等待时间,毫秒 如果在此未声明则默认为1秒
    stop_timeout = 20

if __name__ == "__main__":
    # 运行程序入口
    import os
    os.system("locust -f locust单接口.py -H http://www.baidu.com")
在测试过程中很多场景需要很多不同的用户来访问接口,给接口施加压力,那么如何达到这个目的,生成多个不同的用户呢,接下来了解下参数化。
-
参数化
参数化需要引入一个Python的三方模块 random
#! encoding:utf-8

from locust import HttpLocust, TaskSet, task,events
from gevent._semaphore import Semaphore
import urllib3, warnings,queue

# 定义用户压测前的一些行为
def login(self):
	print('用户登录!')
	url = '/login'

	# 参数化username和password
	#生成以username为开头以1到100之间为结尾的随机数字为用户名
	user = str("username") + str(random.randint(1,100))
	#生成以password为开头以1到100之间为结尾的随机数字为密码
	pwd = str("password") + str(random.randint(1,100))
	# 登录请求参数
	body = {"username":user,"password":pwd}
	print(body)
	# 请求接口生成用户
	respones = self.client.post(url,body)

def logout(self):
    print('用户退出登录!')

class UserBehavior(TaskSet):
    # 压测前登录,on_start()是固定的,这个是定义一个压测任务前用户首先要做的一个操作
    def on_start(self):
        login(self)
     # 压测完后退出,on_stop()也是固定的,这个是定义一个任务结束后该做什么操作
    def on_stop(self):
        logout(self)
     # 接下来开始压测需要压测的接口
    @task
    def do_something(self):
        url = "/"
        res = self.client.get(url)
        try:
            assert res.status_code == 200
            print('断言成功!')
        except Exception as err:
            print('断言失败!')
class WebsiteUser(HttpLocust):
    task_set = UserBehavior
    min_wait = 3000   # 用户行为间隔的最小的等待时间,毫秒
    max_wait = 5000   # 用户行为间隔的最大的等待时间,毫秒 如果在此未声明则默认为1秒
    stop_timeout = 20  # 压测多久单位:秒

if __name__ == "__main__":
    # 运行程序入口
    import os
    os.system("locust -f locust单接口.py -H http://www.baidu.com")
生成了那么多用户,如果是生成一个就开始请求接口,这并不能在某个时间对接口同时产生压力。那么接下来就会用到集合点。
-
集合点
#! encoding:utf-8

from locust import HttpLocust, TaskSet, task,events
from gevent._semaphore import Semaphore
import urllib3, warnings,queue
# 实例化
all_locusts_spawned = Semaphore()
all_locusts_spawned.acquire()
# 创建等待方法
def on_hatch_complete(**kwargs):
    all_locusts_spawned.release()
# 当用户加载完成是触发
events.hatch_complete += on_hatch_complete

# 定义用户压测前的一些行为
def login(self):
	print('用户登录!')
	url = '/login'

	# 参数化username和password
	#生成以username为开头以1到100之间为结尾的随机数字为用户名
	user = str("username") + str(random.randint(1,100))
	#生成以password为开头以1到100之间为结尾的随机数字为密码
	pwd = str("password") + str(random.randint(1,100))
	# 登录请求参数
	body = {"username":user,"password":pwd}
	print(body)
	# 请求接口生成用户
	respones = self.client.post(url,body)

def logout(self):
    print('用户退出登录!')

class UserBehavior(TaskSet):
    # 压测前登录,on_start()是固定的,这个是定义一个压测任务前用户首先要做的一个操作
    def on_start(self):
        login(self)
     # 压测完后退出,on_stop()也是固定的,这个是定义一个任务结束后该做什么操作
    def on_stop(self):
        logout(self)
     # 接下来开始压测需要压测的接口
    @task
    def do_something(self):
        url = "/"
       # 集合点,限制在所有用户准备完成前处于等待状态
        all_locusts_spawned.wait()
      # 等待用户加载完成,实现并发请求
        res = self.client.get(url)
        try:
            assert res.status_code == 200
            print('断言成功!')
        except Exception as err:
            print('断言失败!')
class WebsiteUser(HttpLocust):
    task_set = UserBehavior
    min_wait = 3000   # 用户行为间隔的最小的等待时间,毫秒
    max_wait = 5000   # 用户行为间隔的最大的等待时间,毫秒 如果在此未声明则默认为1秒
    stop_timeout = 20  # 压测多久单位:秒

if __name__ == "__main__":
    # 运行程序入口
    import os
    os.system("locust -f locust单接口.py -H http://www.baidu.com")
以上是一个完整的单接口的压测,单这远远不够,现实中,用户的行为多种多样,那么,复杂的场景我们如何模拟接下来了解下复杂场景如何设计。
-
复杂场景压测
我们假设一个购物系统,压力测试需要并发10个人,其中有2个人正在浏览商品;1个人正在下单;3个人正在支付订单,4个人不喜欢这个商品离开了。
看下示例代码如何设计的:
#! encoding:utf-8

from locust import HttpLocust, TaskSet, task,events,seq_task
from gevent._semaphore import Semaphore
import urllib3, warnings,queue
from TestMethod import table

'''''''''
创建集合点,当locust实例产生完成是触发
'''
all_locusts_spawned = Semaphore()
all_locusts_spawned.acquire()

def on_hatch_complete(**kwargs):
    all_locusts_spawned.release()

events.hatch_complete += on_hatch_complete

def login(self):
    print('用户登录!')

def logout(self):
    print('用户退出登录!')

'''''''''
比如一个请求就是一个人

场景1:
一个购物系统,压力测试需要并发10个人,其中有2个人正在浏览商品;1个人正在下单;3个人正在支付订单,4个人不喜欢这个商品离开了
'''

class UserBehavior(TaskSet):

    # 压测前登录
    def on_start(self):
        login(self)

     # 压测完后退出
    def on_stop(self):
        logout(self)

    @task
    class stay(TaskSet):
        @seq_task(2) # @seq_task(2) 指定它的任务按顺序执行,括号中的数值为顺序值,数值越大,执行顺序越靠后
        @task(2)   # @task 为任务装饰器,2为运行次数的比例
        def BrowseGoods(self):

            all_locusts_spawned.wait()  # 集合点等待并发
            print('浏览商品')
        @seq_task(1)
        @task(3)
        def PayOrder(self):
            all_locusts_spawned.wait()
            print('支付订单')

        @seq_task(3)
        @task(1)
        def CreateOrder(self):
            all_locusts_spawned.wait()
            print('创建订单')

    @task
    class Out(TaskSet):
        @task(4)
        def leave(self):
            all_locusts_spawned.wait()
            print('退出浏览该商品')

class WebsiteUser(HttpLocust):
    task_set = UserBehavior
    min_wait = 2000   # 用户行为间隔的最小的等待时间,毫秒
    max_wait = 3000   # 用户行为间隔的最大的等待时间,毫秒 如果在此未声明则默认为1秒
    stop_timeout = 30

if __name__ == "__main__":

    # 运行程序入口
    import os
    #os.system("locust -f locust多场景.py -H http://www.baidu.com")
    os.system("locust -f locust多场景.py -c 20 -r 10  --no-web -H http://www.baidu.com")
有时候用户是数据资源有限,比如请求某接口需要用token或者cookie或者session,那么这些东西使用过一次以后我想循环使用该怎么办,那么就需要用到queue.Queue() 序列化模块,以下给出示例代码。
#! encoding:utf-8

from locust import HttpLocust, TaskSet, task,events
from gevent._semaphore import Semaphore
import queue


all_locusts_spawned = Semaphore()
all_locusts_spawned.acquire()

def complete(**kwargs):
    all_locusts_spawned.release()

events.hatch_complete += complete

global k
class UserBehavior(TaskSet):
    @task
    def SnapUp(self):
        # 获取参数值
        a = k.get()

        # 集合点
        all_locusts_spawned.wait()
        # 打印参数值
        print(a)

        # 当我打印以后就没有了,所以用put方法把使用过的参数值放回队列中继续循环使用
        k.put(a)

class WebsiteUser(HttpLocust):
    task_set = UserBehavior
    min_wait = 0
    max_wait = 0

    # 首先序列化队列
    q = queue.Queue(maxsize=10)

    for i in range(5):

        # 放入队列
        q.put(i)

        # 作为公共参数
        globals()['k']=q

if __name__ == "__main__":
    import os
    os.system("locust -f locust数据循环.py -H http://www.baidu.com")
运行展示:

-
性能测试页面参数解析
-
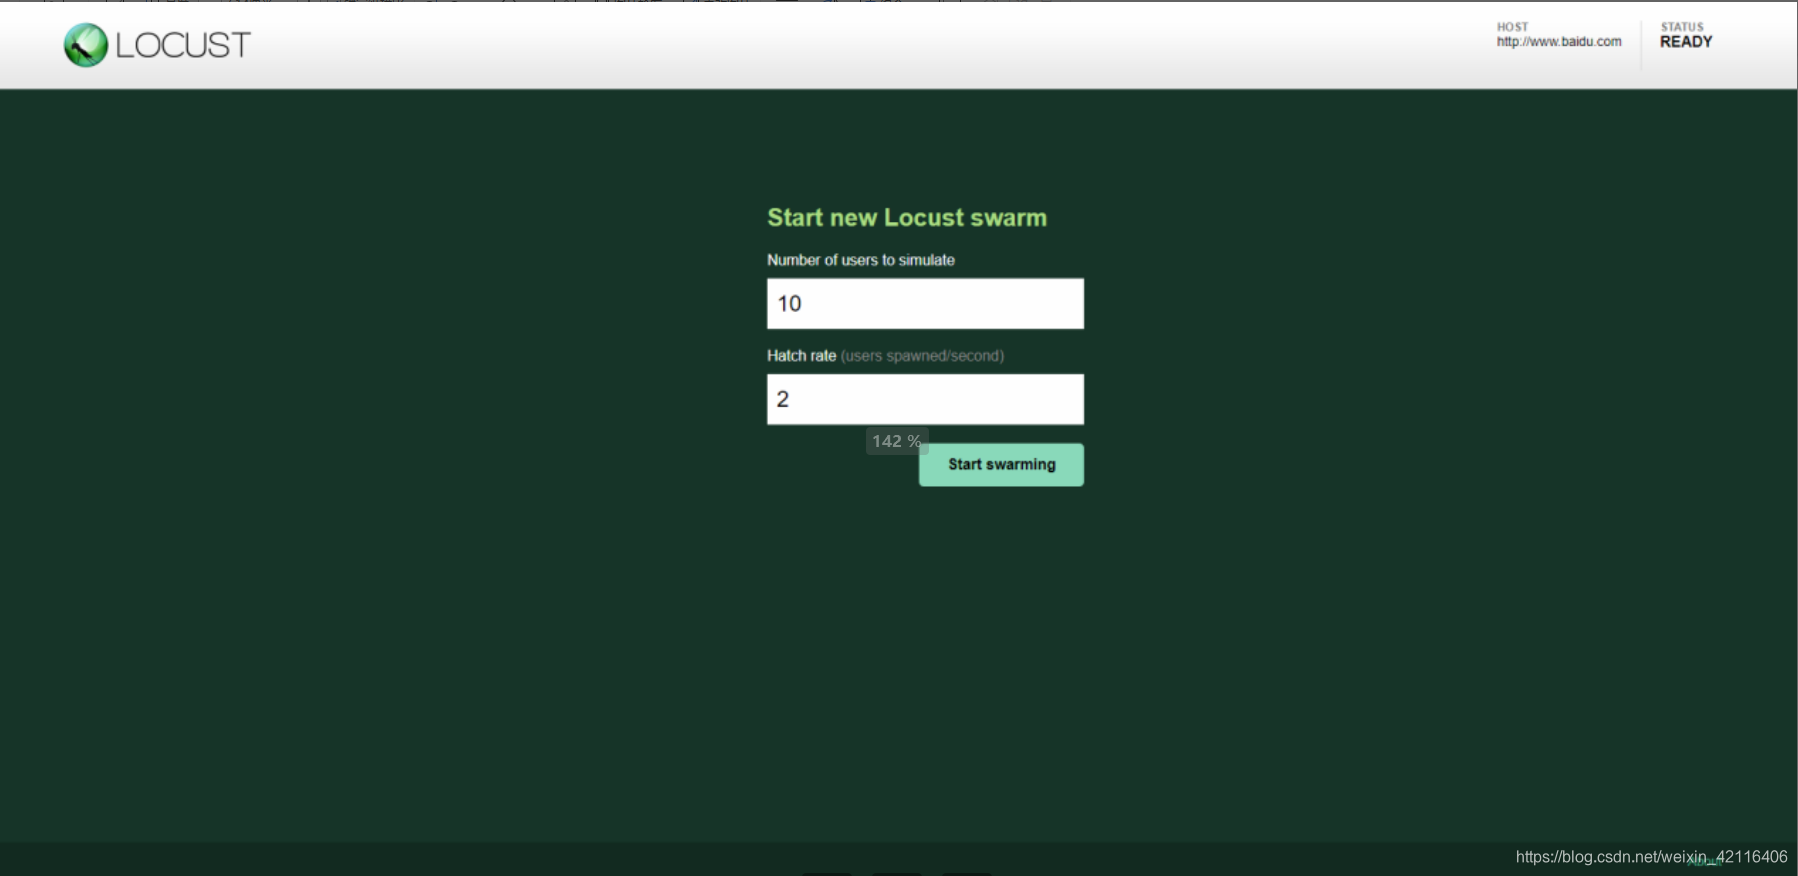
Number of users to simulate 设置模拟用户数。
-
Hatch rate(users spawned/second) 每秒产生(启动)的虚拟用户数。
-
点击 “Start swarming” 按钮,开始运行性能测试。
-
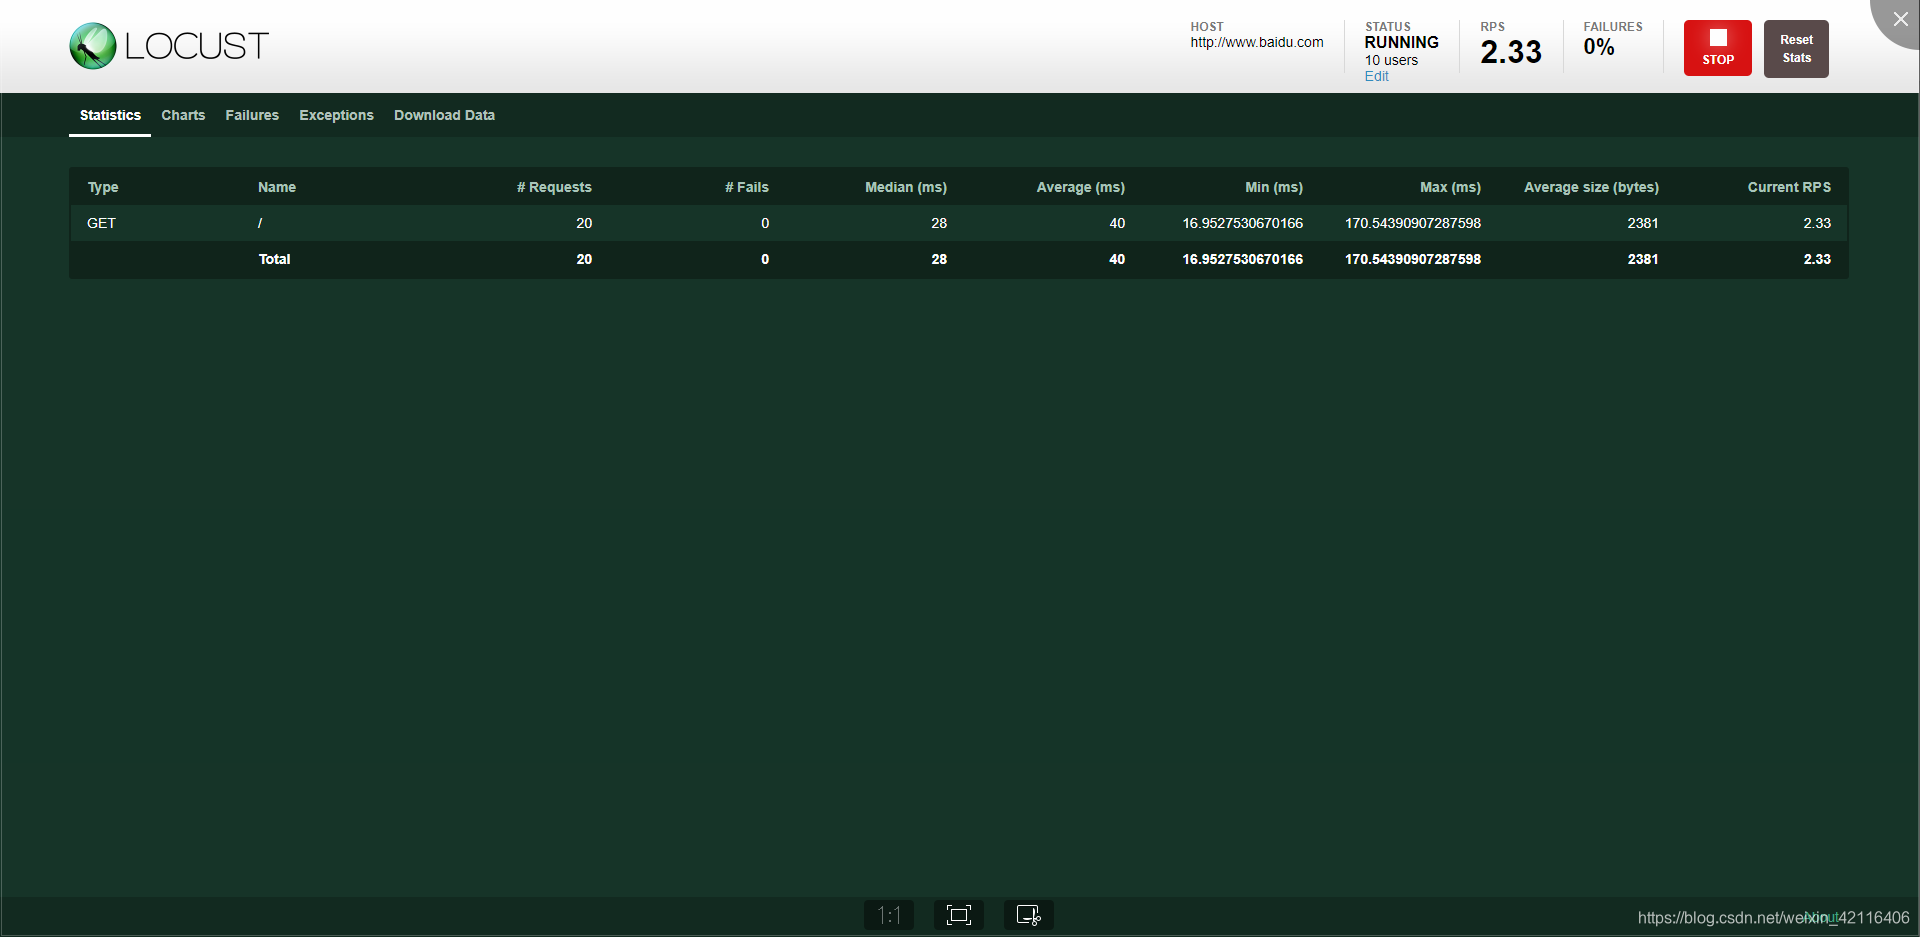
Type: 请求的类型,例如GET/POST。
-
Name:请求的路径。这里为百度首页,即:百度一下,你就知道
-
request:当前请求的数量。
-
fails:当前请求失败的数量。
-
Median:中间值,单位毫秒,一半的服务器响应时间低于该值,而另一半高于该值。
-
Average:平均值,单位毫秒,所有请求的平均响应时间。
-
Min:请求的最小服务器响应时间,单位毫秒。
-
Max:请求的最大服务器响应时间,单位毫秒。
-
Content Size:单个请求的大小,单位字节。
-
reqs/sec:是每秒钟请求的个数。
-
无界面启动参数介绍
启动参数:
--no-web 表示不使用Web界面运行测试。
-c 设置虚拟用户数。
-r 设置每秒启动虚拟用户数。
-t 设置设置运行时间。
例如:
Locust -f locust单接口.py -c 1 -r 1 --no-web -H 百度一下,你就知道
-
分布式压测
当单台机器不够模拟足够多的用户时,Locust支持运行在多台机器中进行压力测试。就是分布式。。。
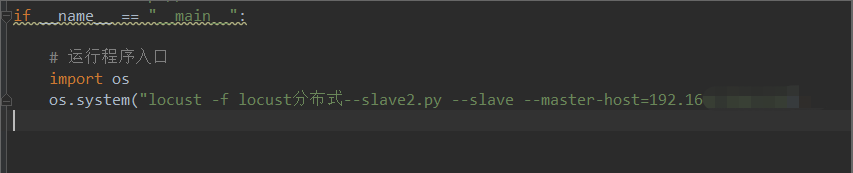
为了实现这个,应该在 master 模式中使用参数--master标记来启用一个 Locust 实例。这个实例将会运行启动测试的 Locust 交互网站并查看实时统计数据。master 节点的机器自身不会模拟任何用户。相反,必须使用 --slave 标记启动一台到多台 Locust slave 机器节点,与标记 --master-host 一起使用(指出master机器的IP/hostname)。
如下图:
主机入口:

从机入口:

常用的做法是在一台独立的机器中运行master,在slave机器中每个处理器内核运行一个slave实例。
需要注意的是:master 和每一台 slave 机器,在运行分布式测试时都必须要有 locust 的测试文件,运行时要先运行从机的locust文件,再运行主机的locust文件
接下来打开master的IP+端口8089会出现如下所示:
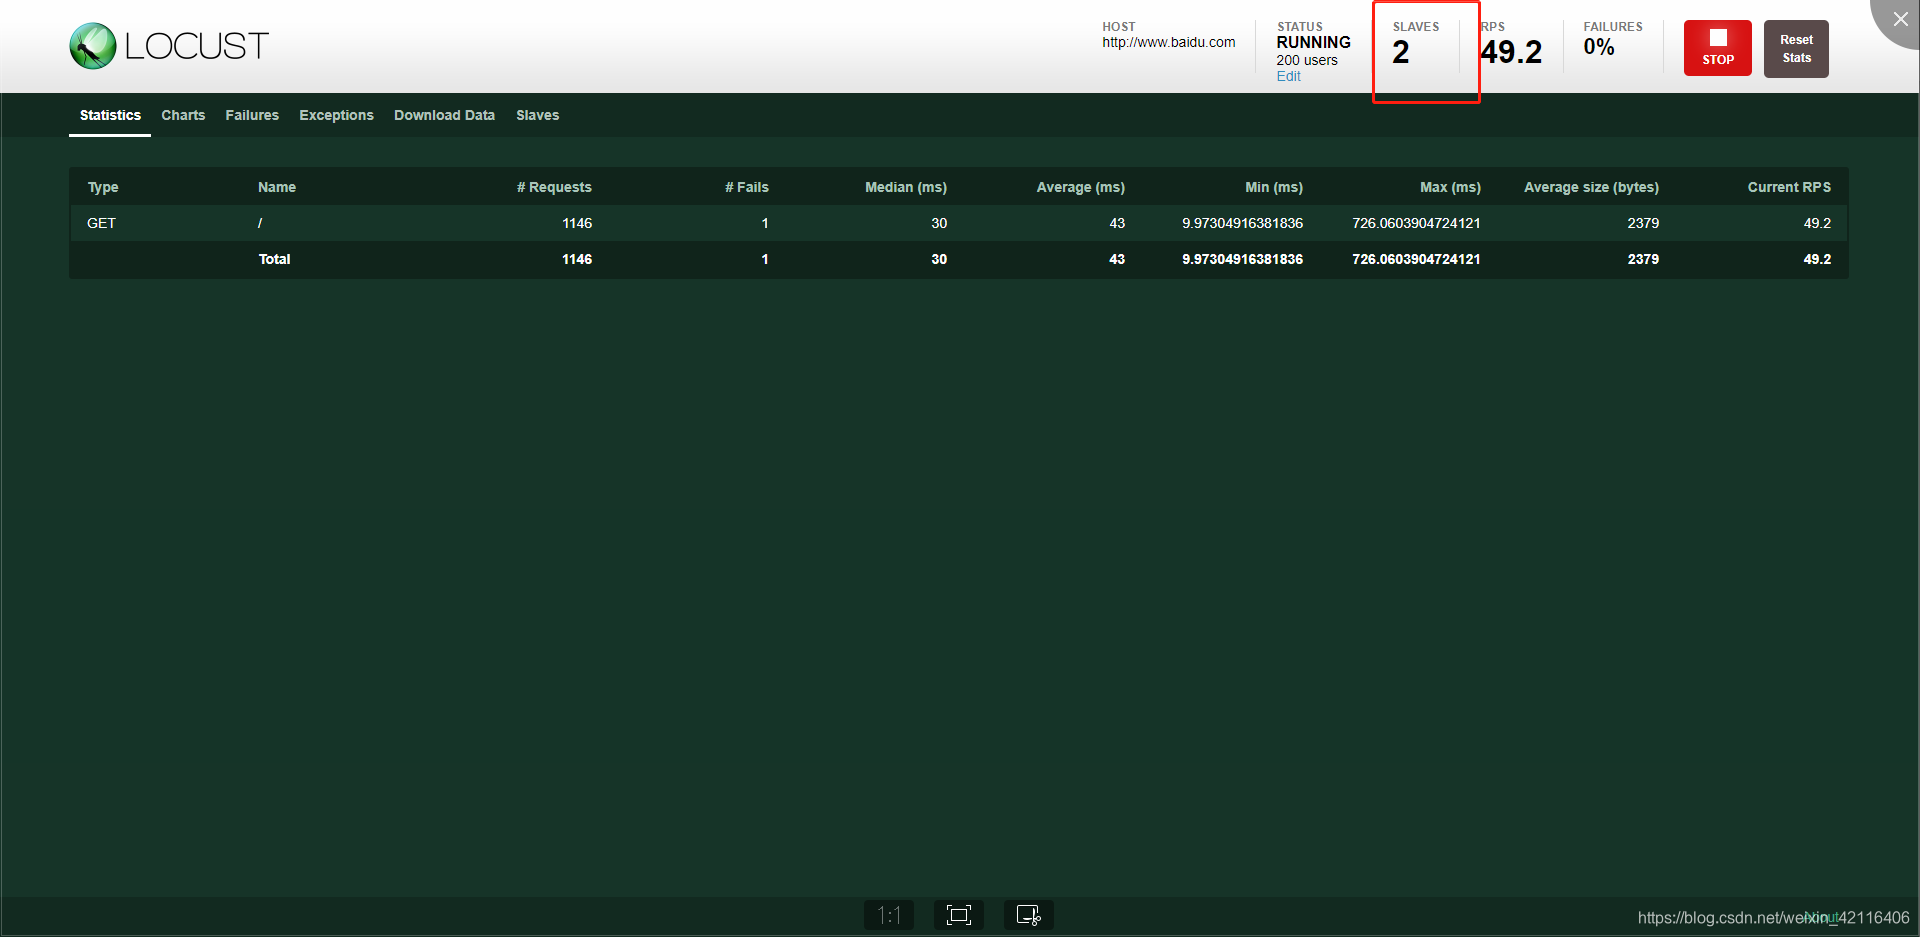
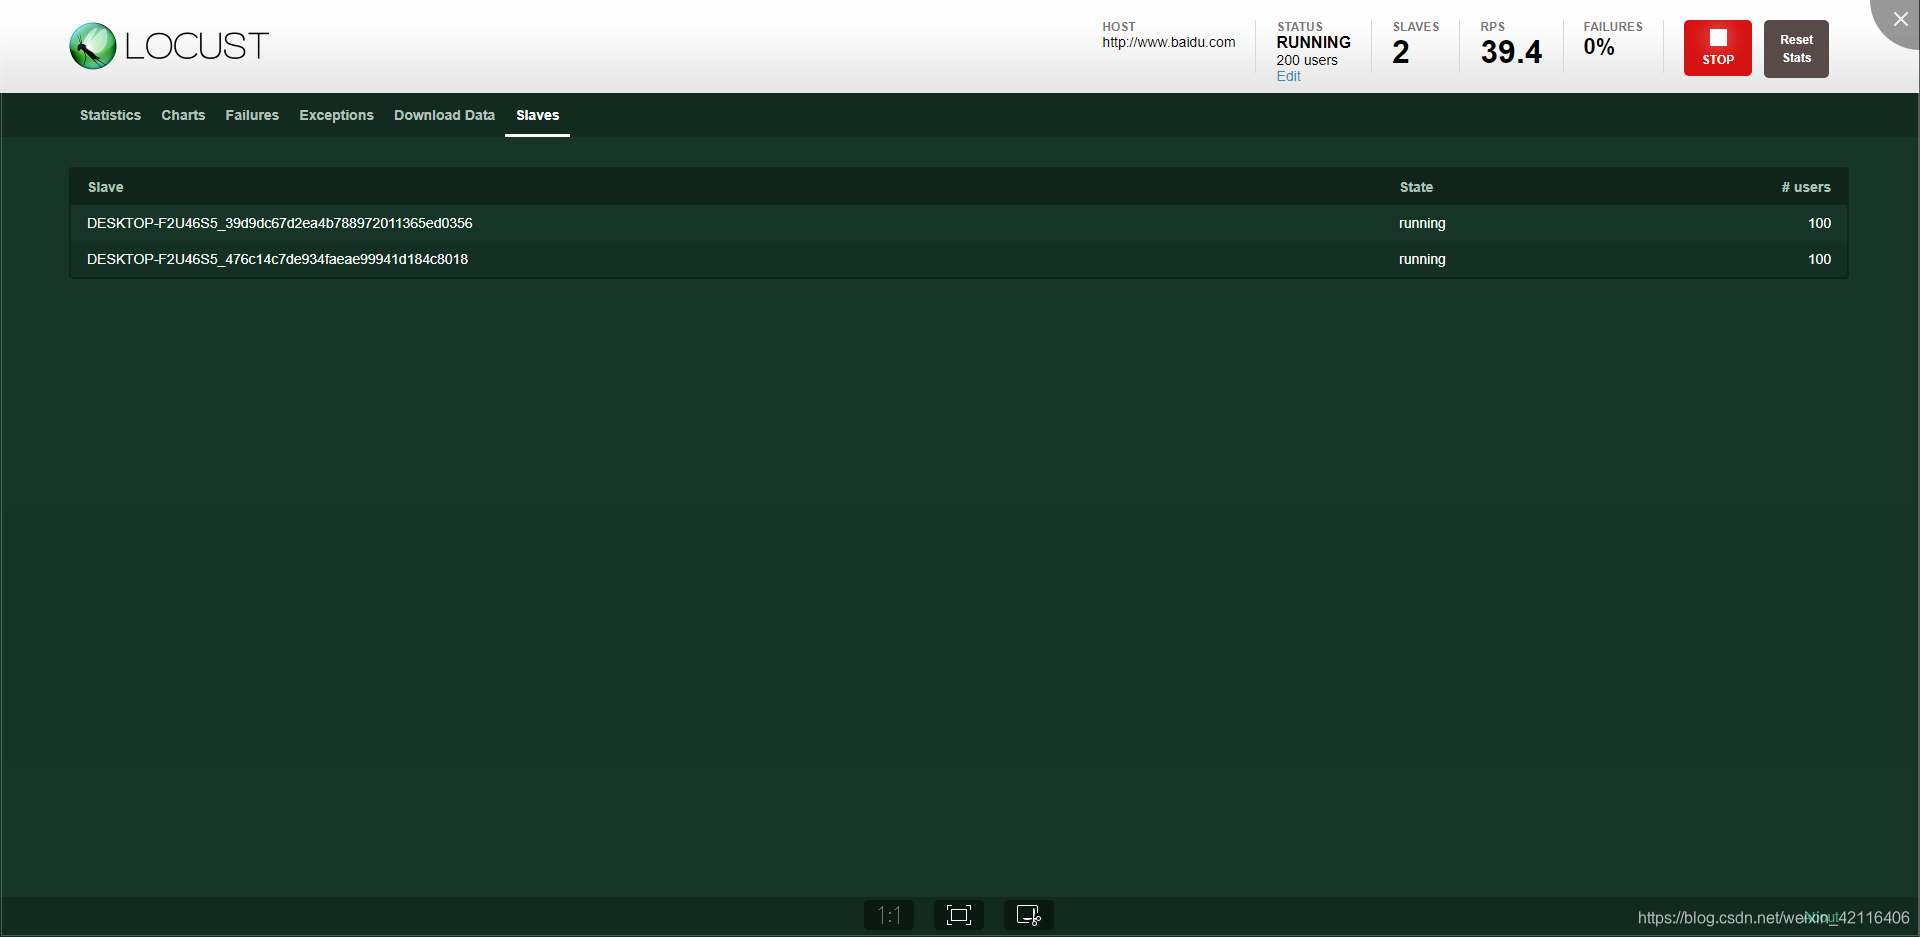
到此,分布式完成。
有问题请麻烦我~