系列文章目录
- 【扩散模型(一)】中介绍了 Stable Diffusion 可以被理解为重建分支(reconstruction branch)和条件分支(condition branch)
- 【扩散模型(二)】IP-Adapter 从条件分支的视角,快速理解相关的可控生成研究
- 【可控图像生成系列论文(一)】 简要介绍了 MimicBrush 的整体流程和方法;
- 【可控图像生成系列论文(二)】 就MimicBrush 的具体模型结构、训练数据和纹理迁移进行了更详细的介绍。
- 【可控图像生成系列论文(三)】介绍了一篇相对早期(2018年)的可控字体艺术化工作。
- 【可控图像生成系列论文(四)】介绍了 IP-Adapter 具体是如何训练的?
- 【可控图像生成系列论文(五)】ControlNet 和 IP-Adapter 之间的区别有哪些?
- 【扩散模型(三)】IP-Adapter 源码详解1-训练输入篇 介绍了训练代码中的 image prompt 的输入部分,即 img projection 模块。
- 本文则详细介绍 IP-Adapter 训练代码的核心部分,即插入 Unet 中的、针对 Image prompt 的 cross-attention 模块。
文章目录
整体结构图+代码中的变量名
IP-Adapter 源码:https://github.com/tencent-ailab/IP-Adapter
本文就基于 SD1.5 的 IP-Adapter 训练代码 tutorial_train.py 为例,进行代码和结构图的解释。
一、IP-Adapter 做了什么?
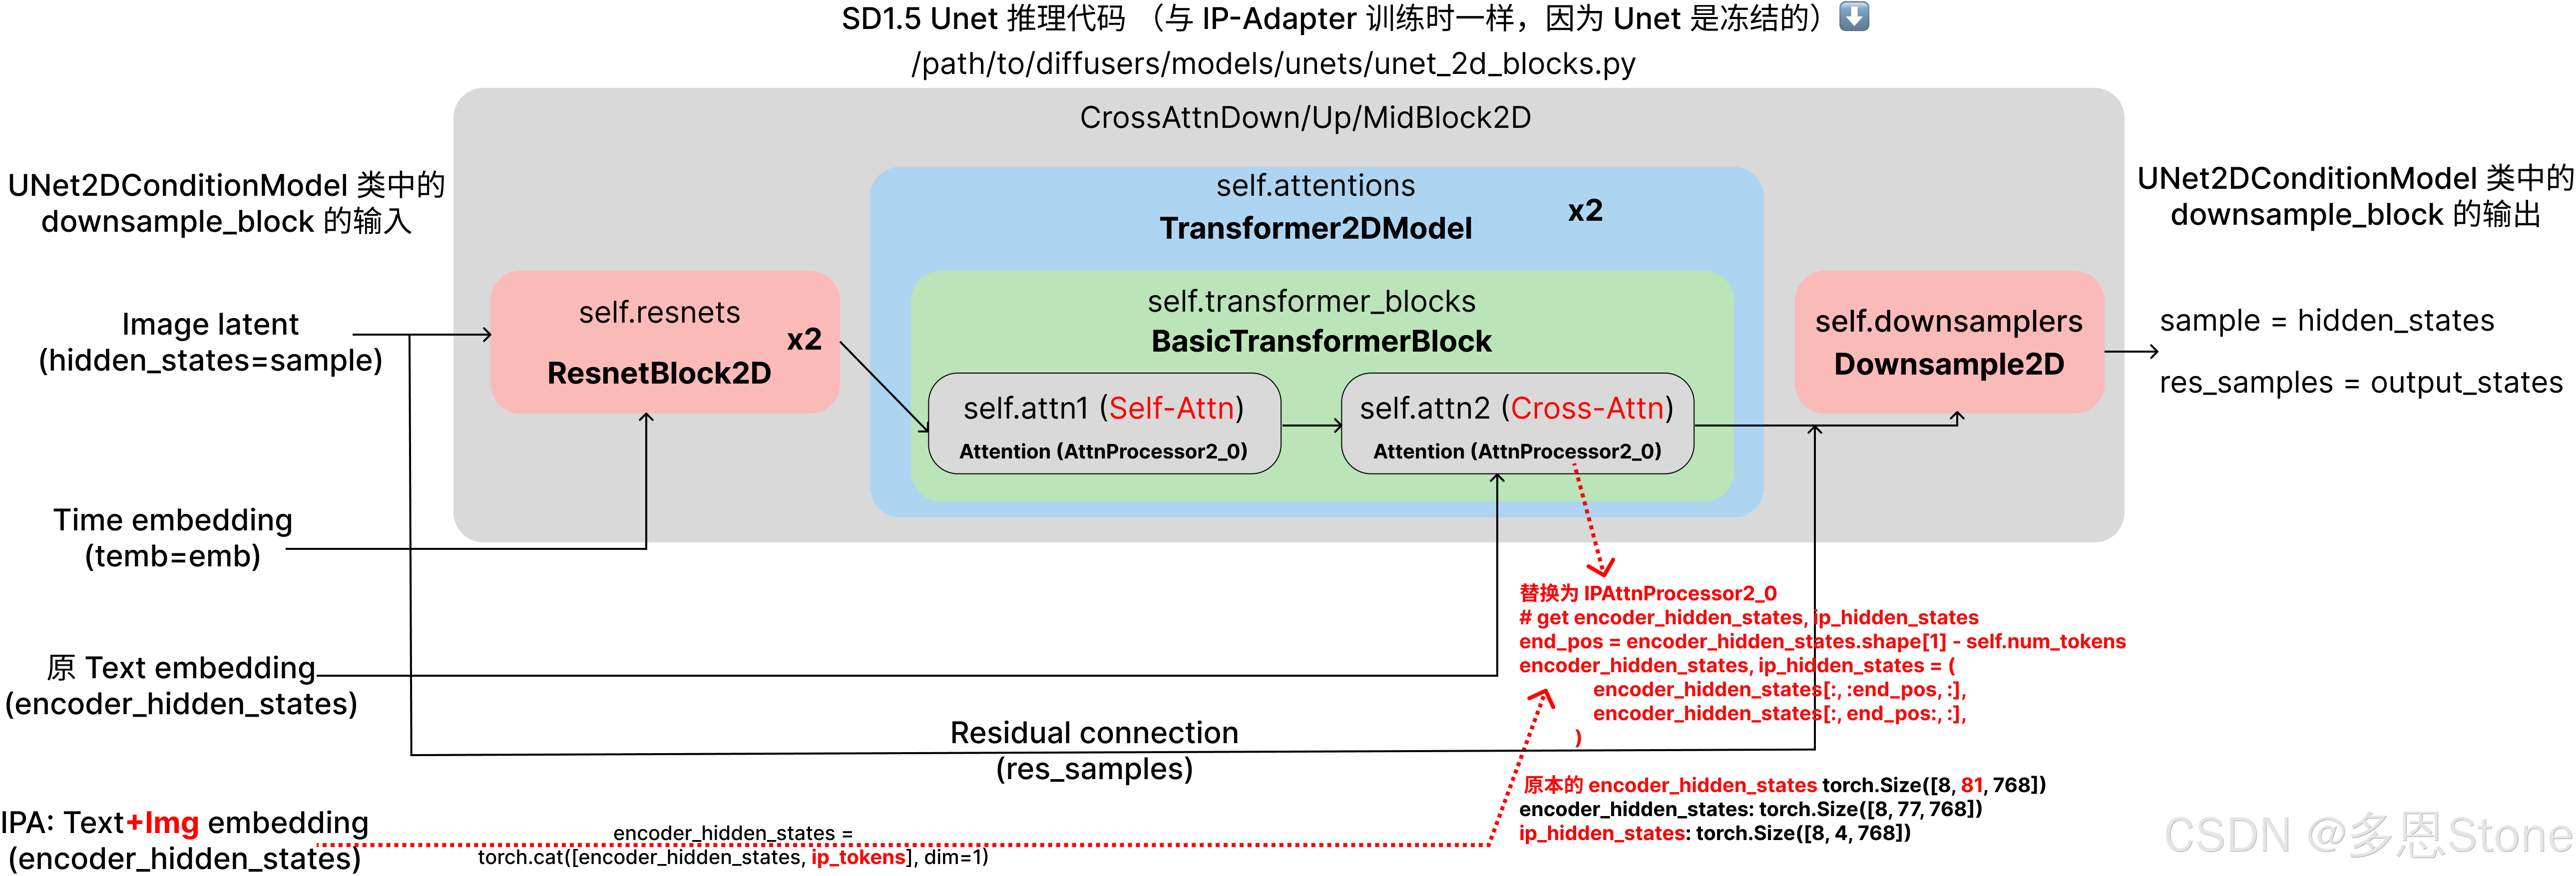
如上篇 所说,本质就是插入了一条针对图像提示词的输入条件分支:
- 蓝色的(无需训练的) Image Encoder
- 红色的(需训练的)Linear + LN(LayerNorm)
- 红色的(需训练的)、针对图像(Image Prompt)的 Cross Attention。
- 其中 1、2 在上篇介绍,本篇则介绍 3 的部分。
- 又由于在 IP-Adapter 的训练过程中, Unet 本身是冻结的,所以 IP-Adapter 训练过程中排除掉“针对图像(Image Prompt)的 Cross Attention”之外、和 SD1.5 的推理过程是完全一致的。
- 也就是上图所示,关键点是在于 Unet 中 Cross-Attention 的 processor (AttnProcessor2_0) 被换成了 IPAttnProcessor2_0。
二、SD1.5 的 Unet 架构
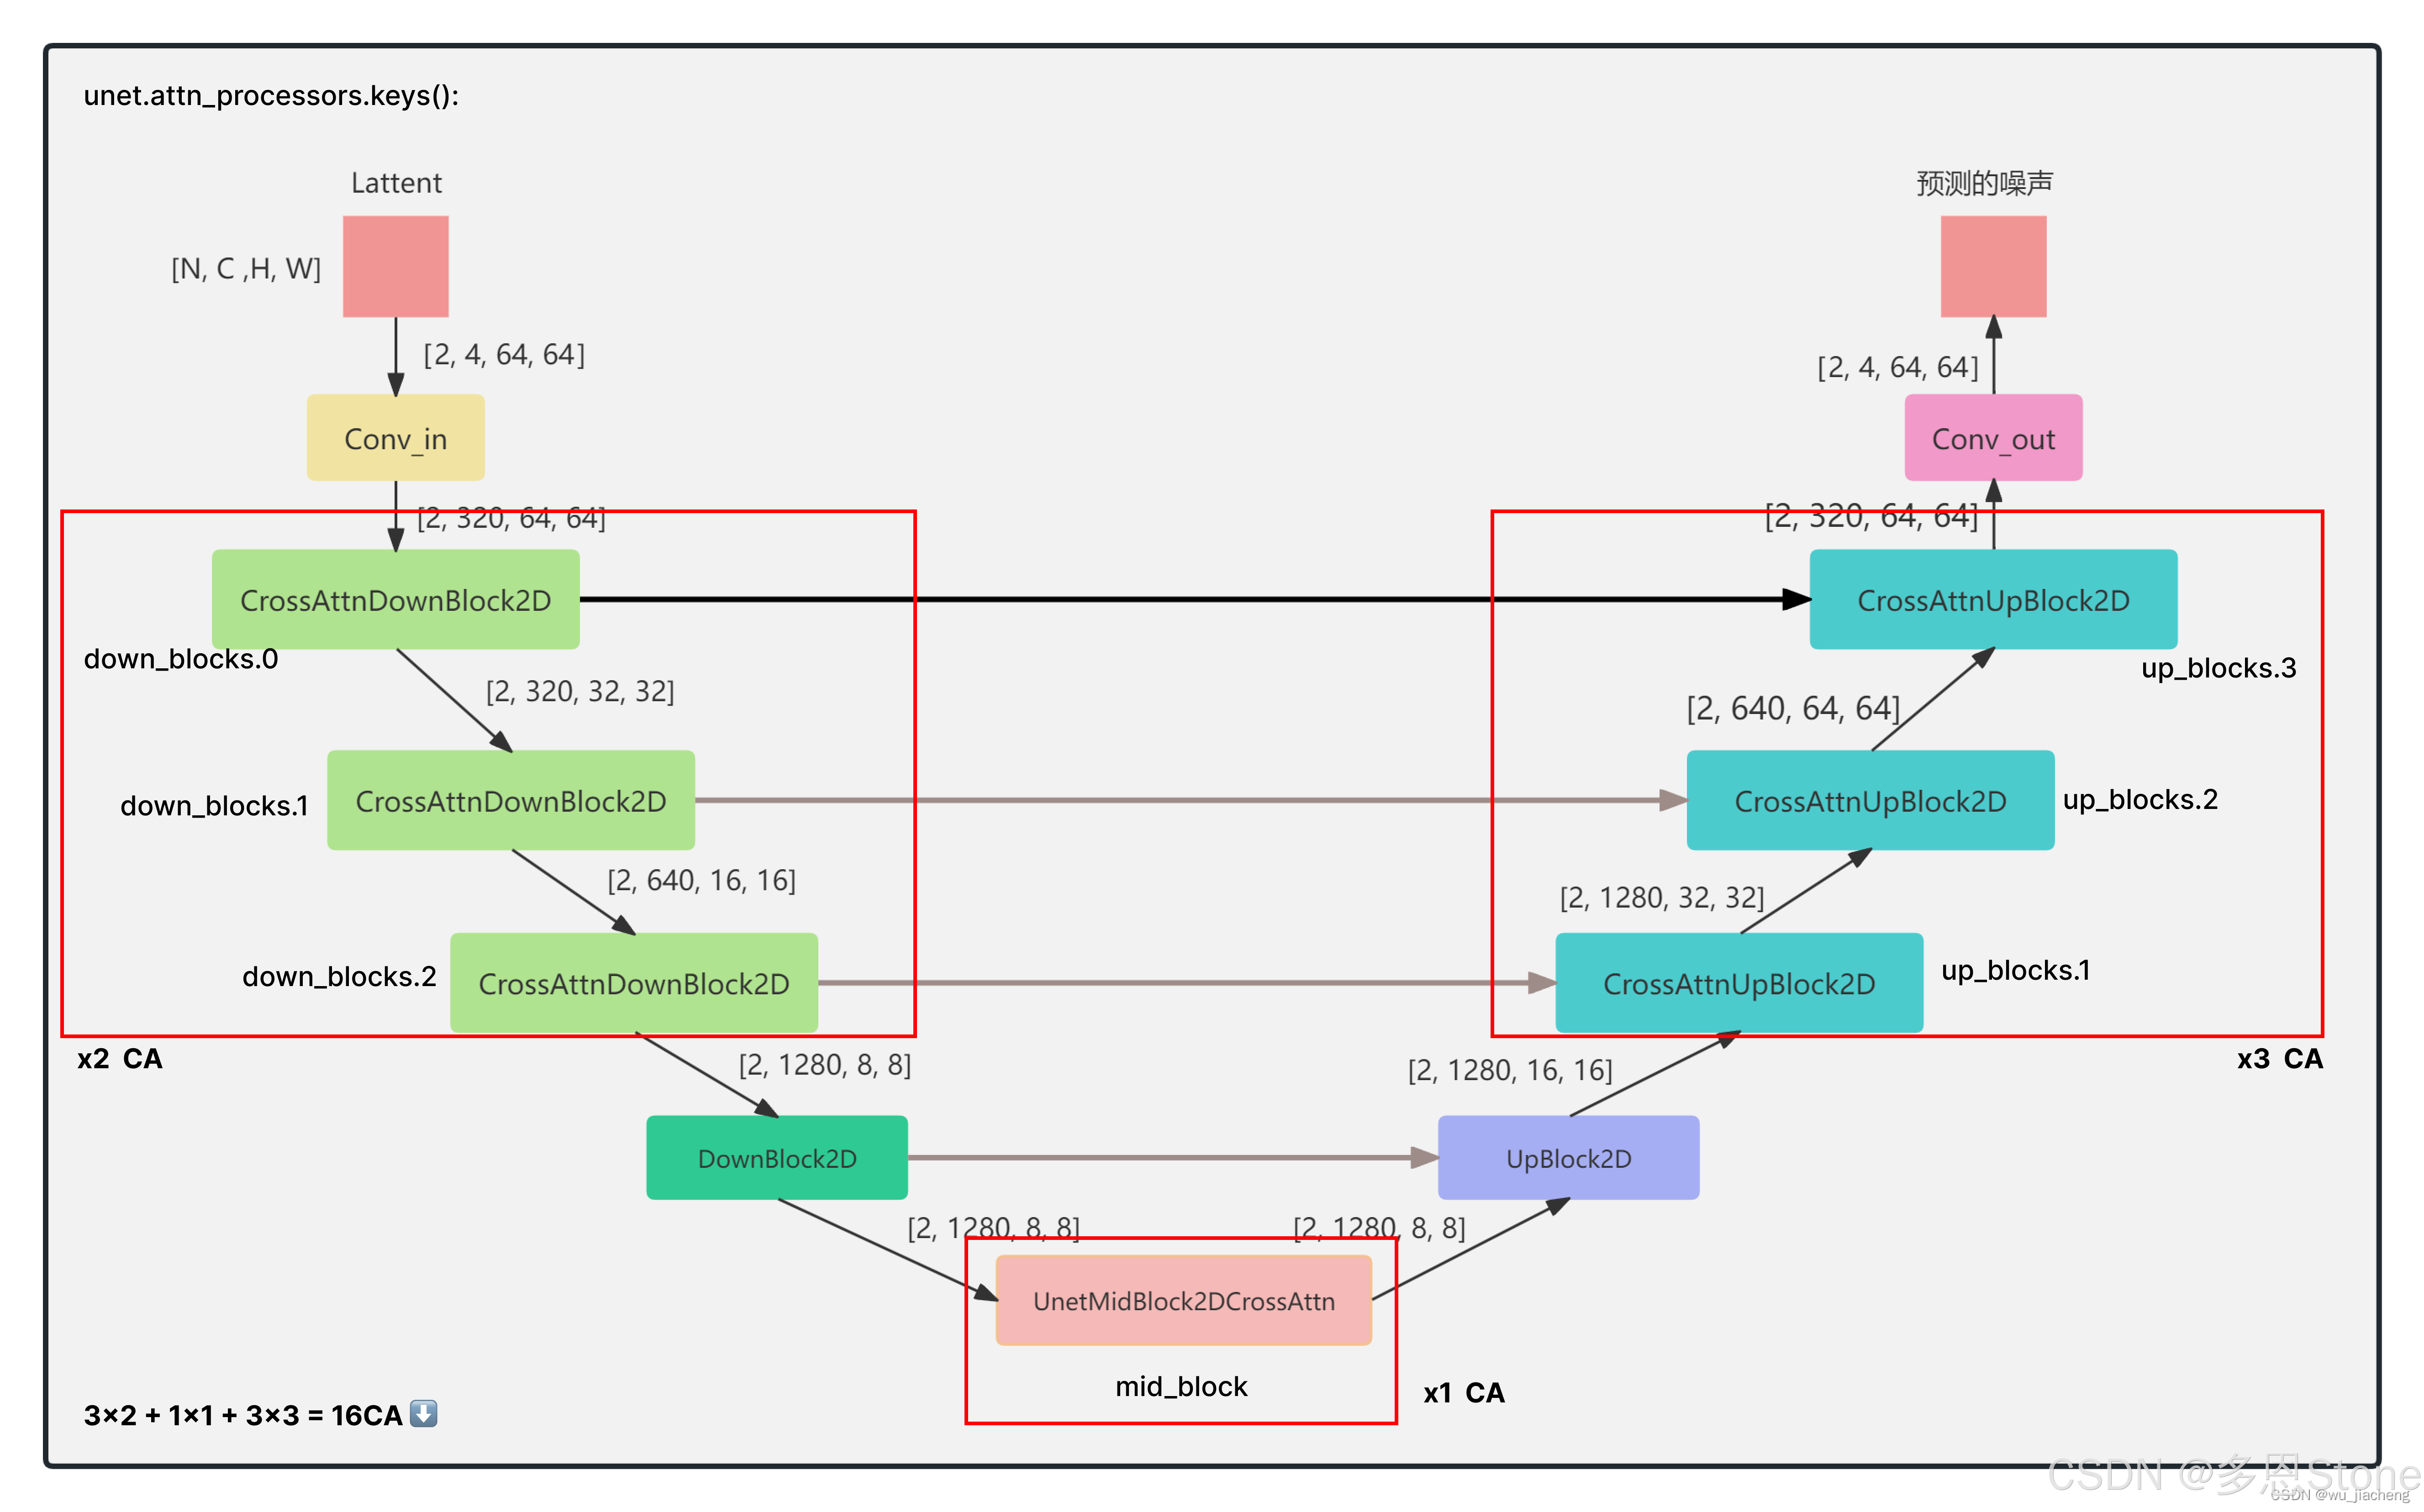
SD1.5 架构细节强烈推荐这篇博客:Stable Diffusion1.5网络结构-超详细原创-CSDN博客,细节不展开,直接上结论:
- SD1.5 中一共有 16 个 Cross-Attention(CA),其中:
- down_block 中每个有2个 CA,一共有 3 个down_block (2x3=6)
- mid_blobk 只有1个 CA (1x1=1)
- up_block 中每个有3个 CA,一共 3 个 up_block(3x3=9)
我们可以通过对开源项目里给出的预训练权重 ip-adapter_sd15.bin 进行查看其中的权重内容。
ckpt_bin_dict = torch.load('path/to/ip-adapter_sd15.bin', map_location="cpu")

for k, v in ckpt_bin_dict.items():
    print(f"Key: {k}, Value type: {type(v)}")
可以得到的以下输出,这些就是训练好的、针对 Image prompt 的 CA 模块,一共 16 个(16 对 to_k_ip 和 to_v_ip)。
<class 'dict'>
Dictionary content:
Key: proj.weight, Shape of value: torch.Size([3072, 1024])
Key: proj.bias, Shape of value: torch.Size([3072])
Key: norm.weight, Shape of value: torch.Size([768])
Key: norm.bias, Shape of value: torch.Size([768])
Dictionary content:
Key: 1.to_k_ip.weight, Shape of value: torch.Size([320, 768])
Key: 1.to_v_ip.weight, Shape of value: torch.Size([320, 768])
Key: 3.to_k_ip.weight, Shape of value: torch.Size([320, 768])
Key: 3.to_v_ip.weight, Shape of value: torch.Size([320, 768])
Key: 5.to_k_ip.weight, Shape of value: torch.Size([640, 768])
Key: 5.to_v_ip.weight, Shape of value: torch.Size([640, 768])
Key: 7.to_k_ip.weight, Shape of value: torch.Size([640, 768])
Key: 7.to_v_ip.weight, Shape of value: torch.Size([640, 768])
Key: 9.to_k_ip.weight, Shape of value: torch.Size([1280, 768])
Key: 9.to_v_ip.weight, Shape of value: torch.Size([1280, 768])
Key: 11.to_k_ip.weight, Shape of value: torch.Size([1280, 768])
Key: 11.to_v_ip.weight, Shape of value: torch.Size([1280, 768])
Key: 13.to_k_ip.weight, Shape of value: torch.Size([1280, 768])
Key: 13.to_v_ip.weight, Shape of value: torch.Size([1280, 768])
Key: 15.to_k_ip.weight, Shape of value: torch.Size([1280, 768])
Key: 15.to_v_ip.weight, Shape of value: torch.Size([1280, 768])
Key: 17.to_k_ip.weight, Shape of value: torch.Size([1280, 768])
Key: 17.to_v_ip.weight, Shape of value: torch.Size([1280, 768])
Key: 19.to_k_ip.weight, Shape of value: torch.Size([640, 768])
Key: 19.to_v_ip.weight, Shape of value: torch.Size([640, 768])
Key: 21.to_k_ip.weight, Shape of value: torch.Size([640, 768])
Key: 21.to_v_ip.weight, Shape of value: torch.Size([640, 768])
Key: 23.to_k_ip.weight, Shape of value: torch.Size([640, 768])
Key: 23.to_v_ip.weight, Shape of value: torch.Size([640, 768])
Key: 25.to_k_ip.weight, Shape of value: torch.Size([320, 768])
Key: 25.to_v_ip.weight, Shape of value: torch.Size([320, 768])
Key: 27.to_k_ip.weight, Shape of value: torch.Size([320, 768])
Key: 27.to_v_ip.weight, Shape of value: torch.Size([320, 768])
Key: 29.to_k_ip.weight, Shape of value: torch.Size([320, 768])
Key: 29.to_v_ip.weight, Shape of value: torch.Size([320, 768])
Key: 31.to_k_ip.weight, Shape of value: torch.Size([1280, 768])
Key: 31.to_v_ip.weight, Shape of value: torch.Size([1280, 768])
三、IPAttnProcessor2_0 与 AttnProcessor2_0 的不同
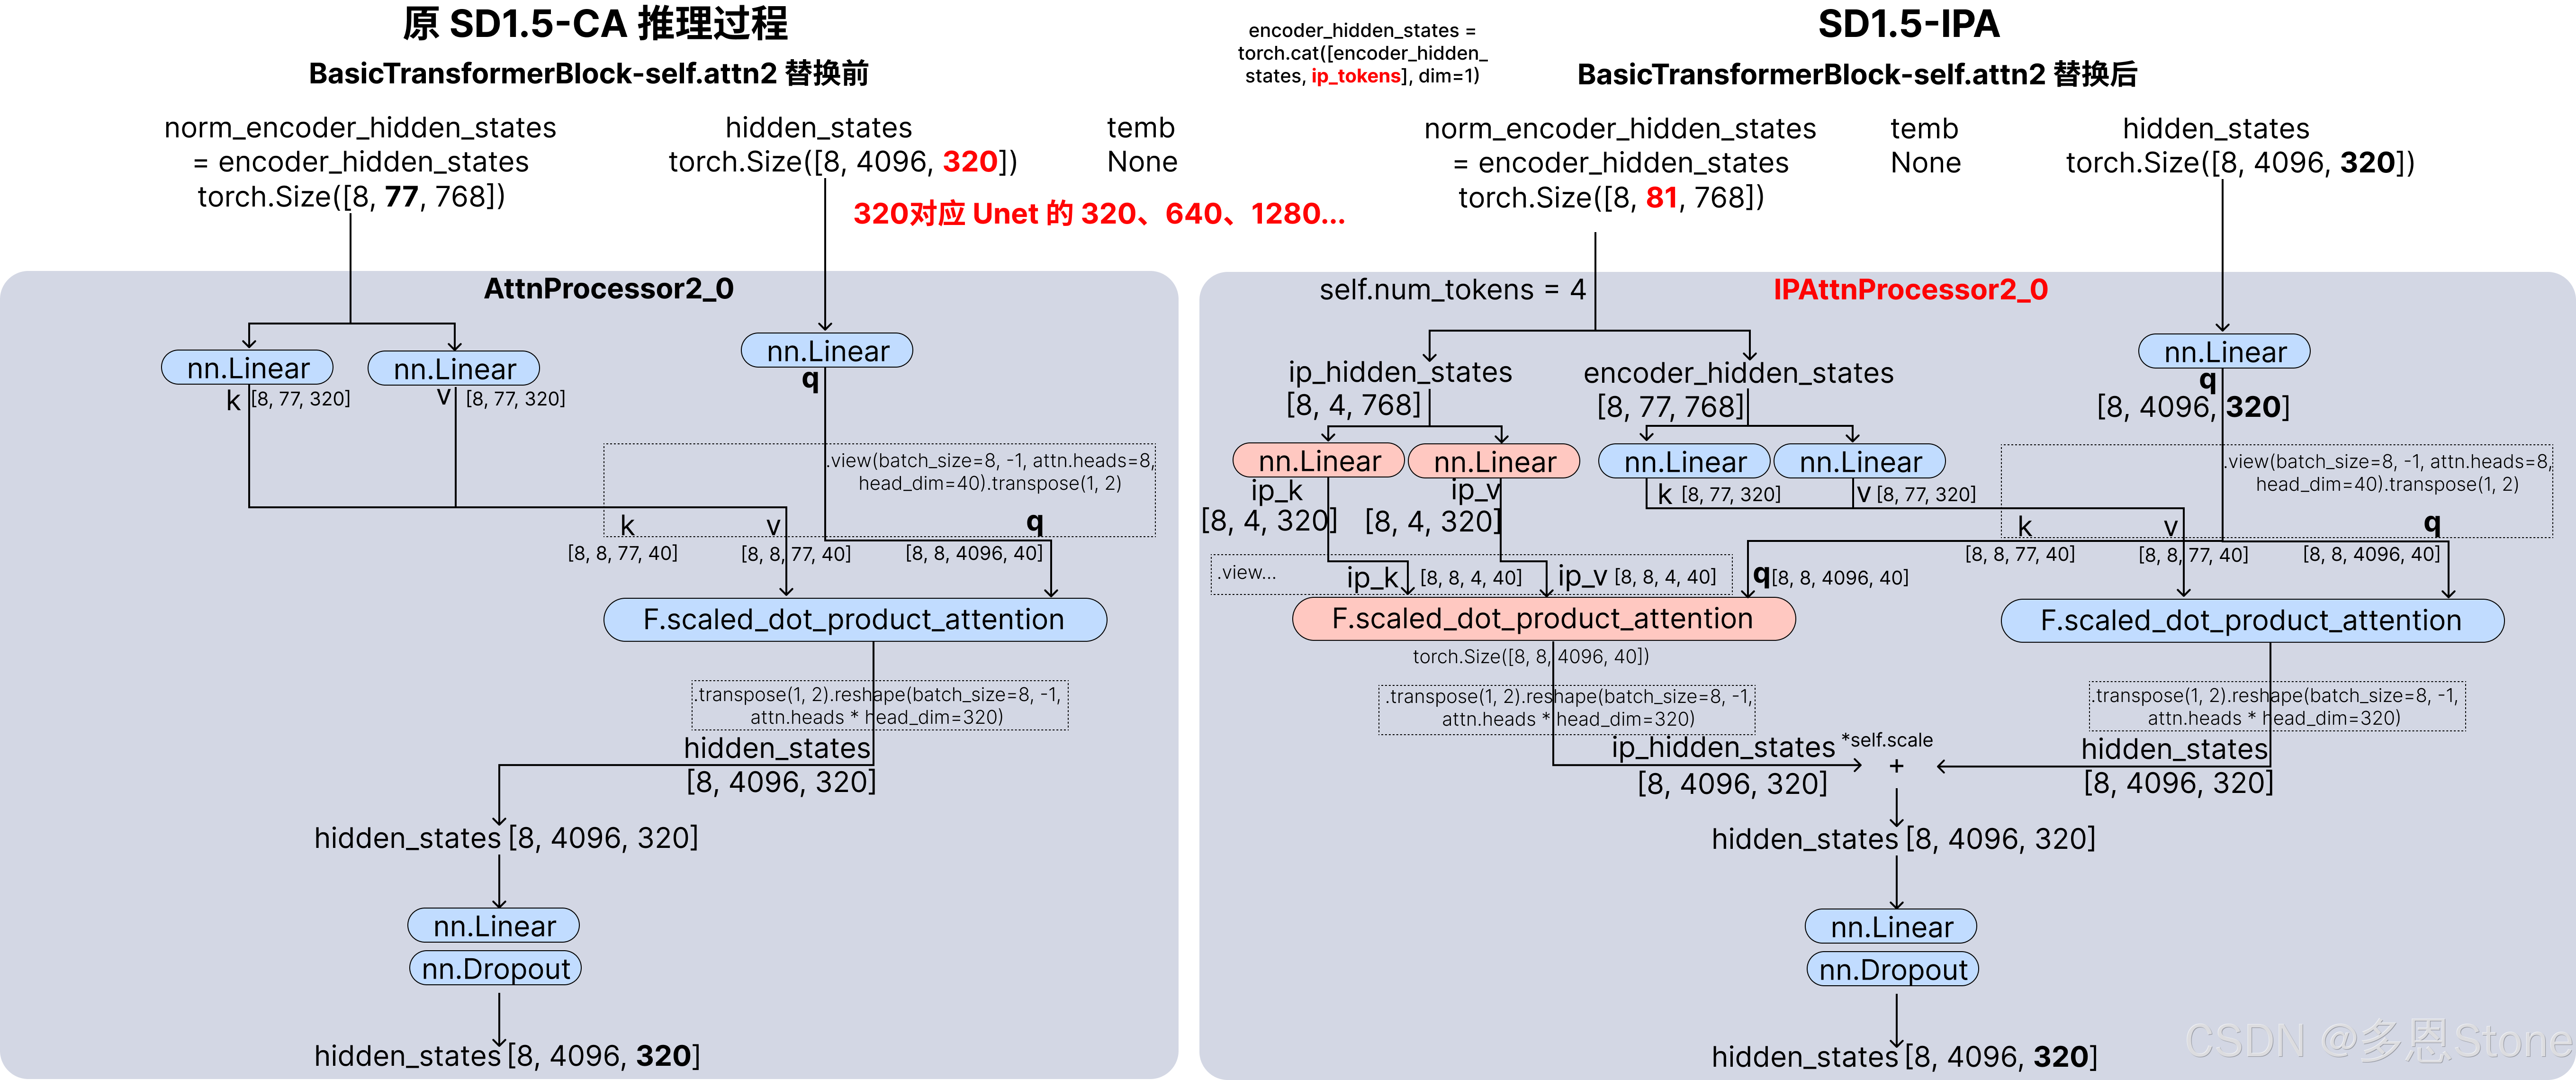
通过对比 /path/to/IP-Adapter/ip_adapter/attention_processor.py 中两个类的不同,可以知道本质就是在原来 CA 的基础上,为 image prompt 增加了一个 k 和 v,同时并且共享原有的 q。
与原文《IP-Adapter: Text Compatible Image Prompt Adapter for Text-to-Image Diffusion Models》中的公式(5)完全一致。
其中 IPAttnProcessor2_0 关键代码有两个部分
- 拆出 img prompt (ip_hidden_states)和原来 txt prompt(encoder_hidden_states)
 # get encoder_hidden_states, ip_hidden_states
 end_pos = encoder_hidden_states.shape[1] - self.num_tokens
 encoder_hidden_states, ip_hidden_states = (
     encoder_hidden_states[:, :end_pos, :],
     encoder_hidden_states[:, end_pos:, :],
 )
 if attn.norm_cross:
     encoder_hidden_states = attn.norm_encoder_hidden_states(encoder_hidden_states)
- 针对 img prompt (ip_hidden_states) 增加 k (to_k_ip)和 v (to_v_ip),与前文打印出来的权重文件一致。
 # for ip-adapter
 ip_key = self.to_k_ip(ip_hidden_states)
 ip_value = self.to_v_ip(ip_hidden_states)

 ip_key = ip_key.view(batch_size, -1, attn.heads, head_dim).transpose(1, 2)
 ip_value = ip_value.view(batch_size, -1, attn.heads, head_dim).transpose(1, 2)

 # the output of sdp = (batch, num_heads, seq_len, head_dim)
 # TODO: add support for attn.scale when we move to Torch 2.1
 ip_hidden_states = F.scaled_dot_product_attention(
     query, ip_key, ip_value, attn_mask=None, dropout_p=0.0, is_causal=False
 )
 with torch.no_grad():
     self.attn_map = query @ ip_key.transpose(-2, -1).softmax(dim=-1)
     #print(self.attn_map.shape)

 ip_hidden_states = ip_hidden_states.transpose(1, 2).reshape(batch_size, -1, attn.heads * head_dim)
 ip_hidden_states = ip_hidden_states.to(query.dtype)
- 最后再按照一个比例 self.scale 来控制 img prompt (ip_hidden_states)的影响
hidden_states = hidden_states + self.scale * ip_hidden_states
总结
以上就是本篇全部内容,本文通过结构图和相关代码片段介绍了 IP-Adapter 训练代码的核心部分,下篇则介绍其推理代码。


