一、实验目的:
1. 掌握无损图像数据的读写方法;
2. 掌握图像无损压缩编码压缩技术的基本原理;
3. 编码实现霍夫曼编码,算术编码,词典编码(编程语言不限);
4. 编程计算图像的熵、编码后的实际压缩比。
二、实验环境:
Windows 11专业版,Python 3.11.5,Pycharm 2023.
实验要求:
1. 编程语言不限制:Maltab/Python/C/C++等;
2. 基本要求:设计一个基于无损编码的图像压缩系统,系统输入为一副图像X(bmp)(建议分辨率不大于50*50),系统可以允许用户选择霍夫曼编码,算术编码,词典编码来对图像进行编解码;系统输出为二进制码流文件B与解码后的图像文件Y。
2.1 编码器的输入为任意bmp文件。
2.2 解码器的输入为二进制码流文件,输出为bmp文件。
2.3 程序代码要清晰,必须要有注释。实验报告给出算法流程图或者伪代码,输入和输出,并有必要的截图;
2.4 BB系统提交源代码,exe程序,实验报告,输入的图像文件,必要的库文件。
三、实验过程及内容:
1. 设计并实现编解码算法
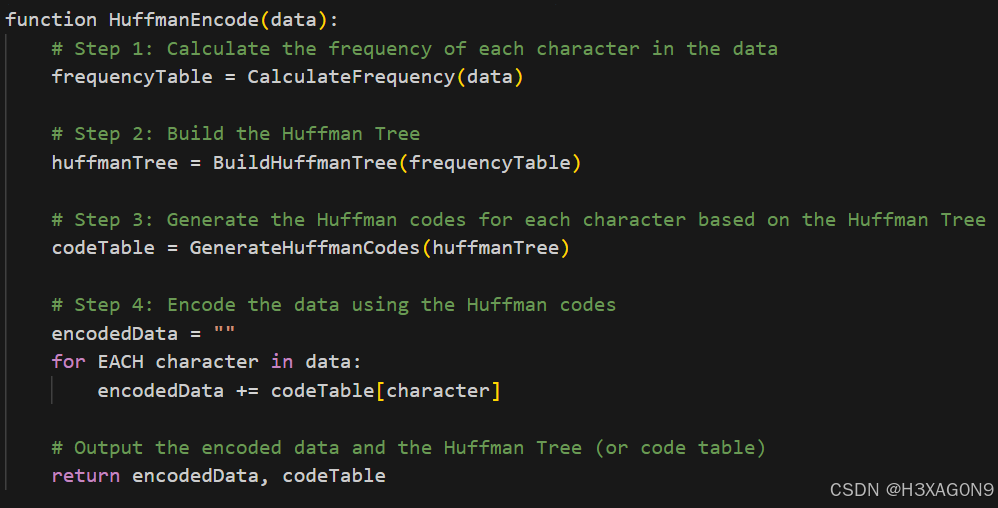
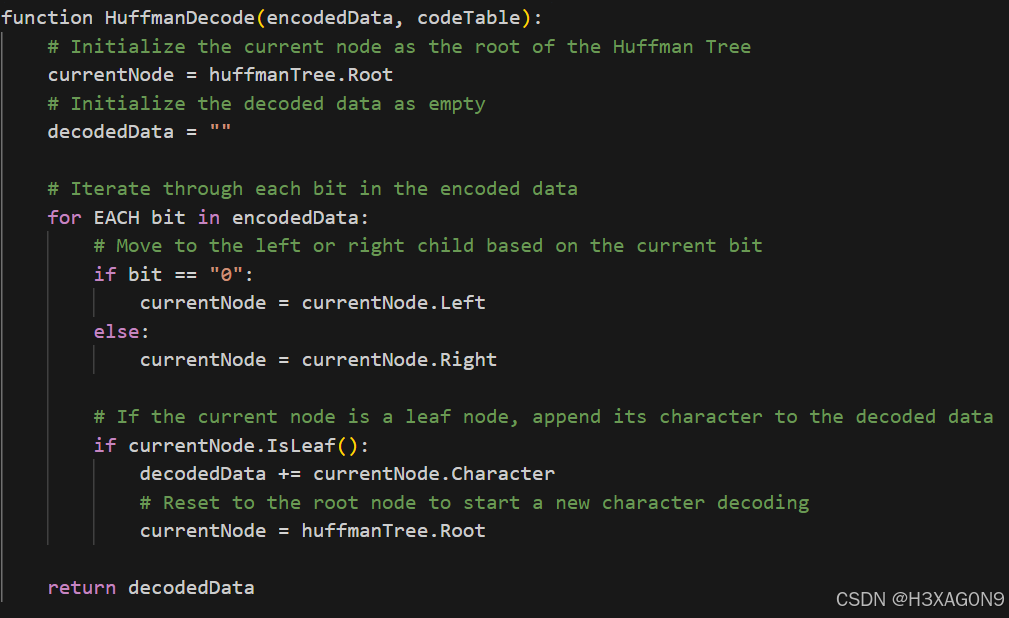
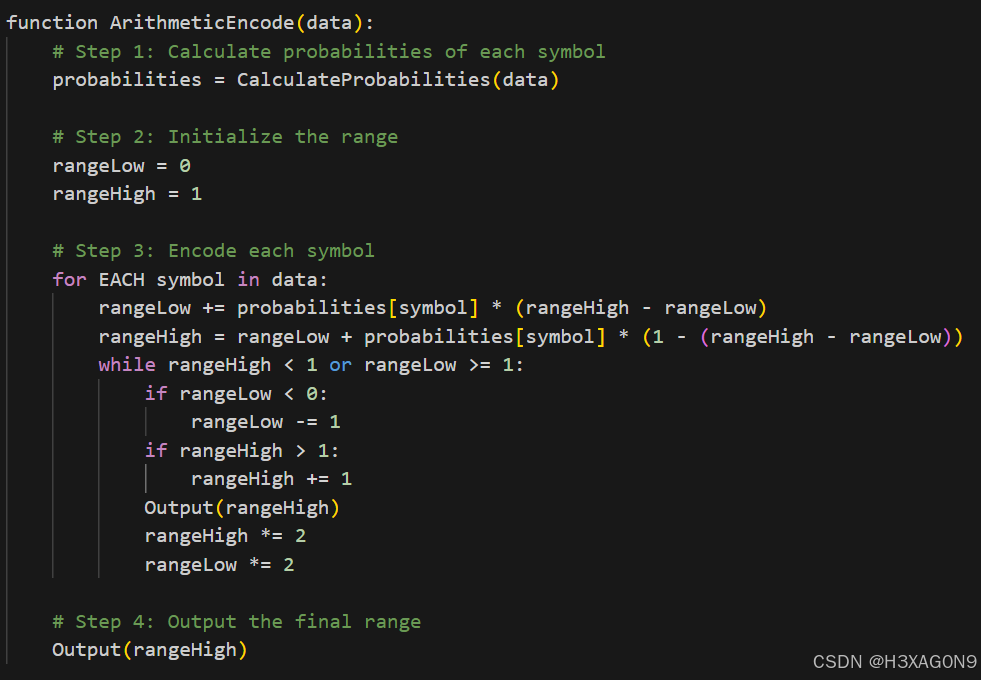
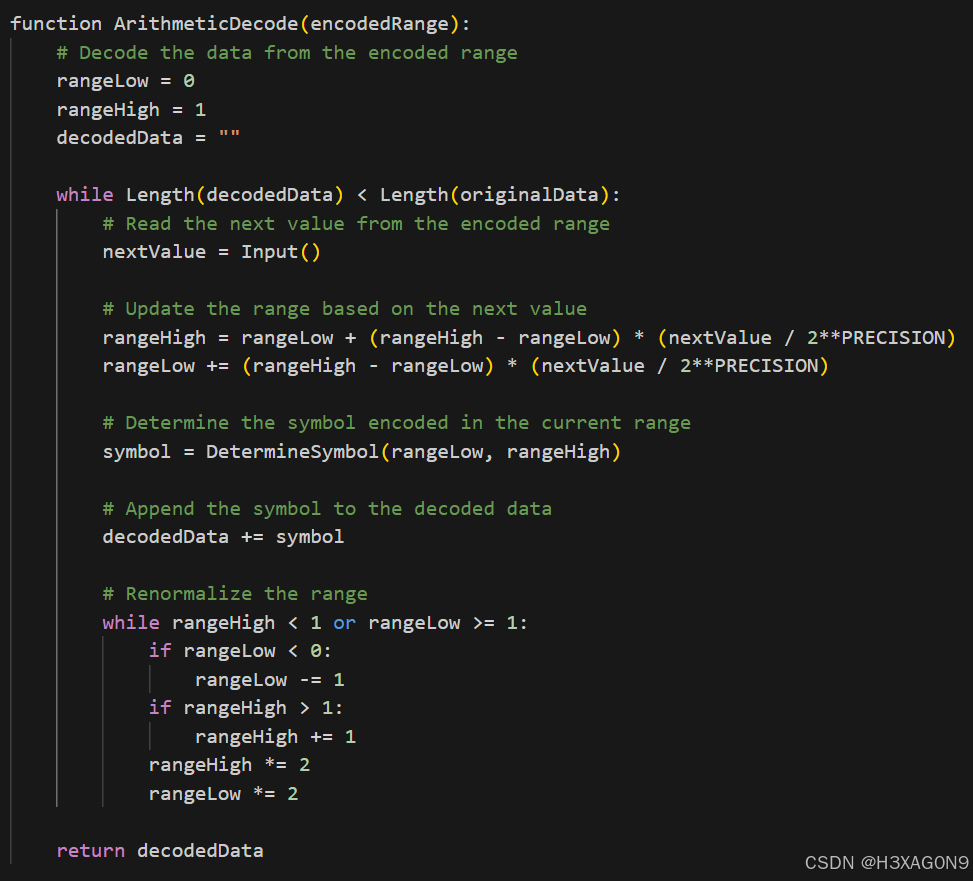
首先分别设计霍夫曼编码、算术编码、词典编码的编解码算法。具体算法思路由于篇幅问题不在报告里详细展开,下面直接给出三种编码方式的伪代码。
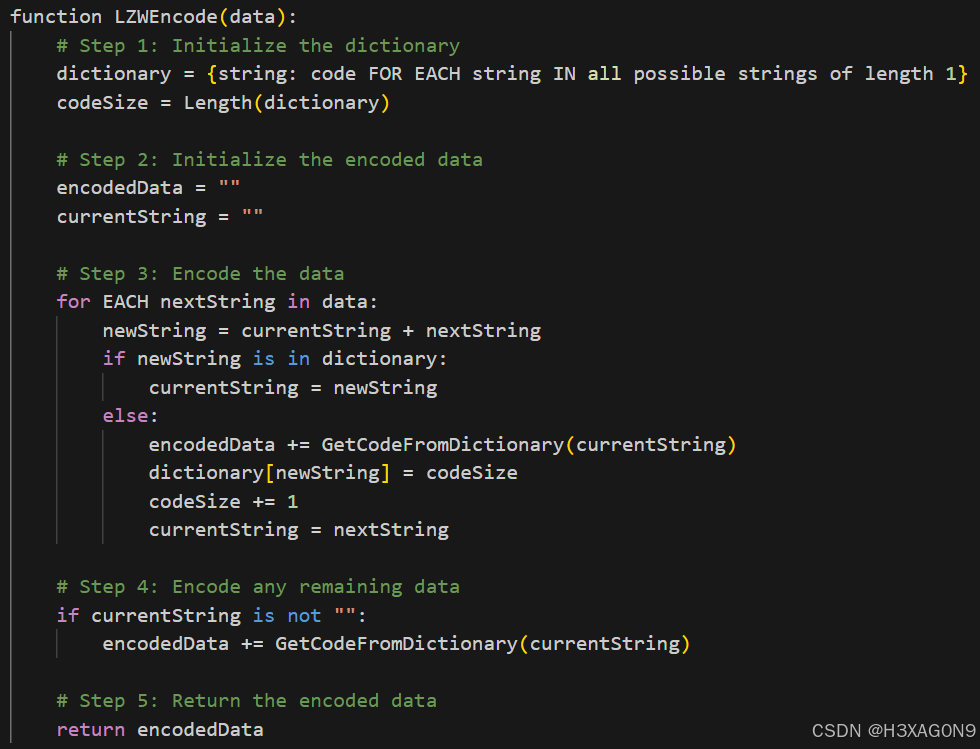
霍夫曼编码
编码过程伪代码如下所示:
图 1- 1 霍夫曼编码伪代码
霍夫曼解码伪代码如下所示:
图 1- 2 霍夫曼解码伪代码
Python实现代码:
import math
import struct
from queue import PriorityQueue

import cv2
import matplotlib.pyplot as plt
import numpy as np


class HuffmanNode(object):
    '''
    哈夫曼树的节点类
    '''

    def __init__(self, value, key=None, symbol='', left_child=None, right_child=None):
        '''
        初始化哈夫曼树的节点
        :param value: 节点的值,i.e. 元素出现的频率
        :param key: 节点代表的元素,非叶子节点为None
        :param symbol: 节点的哈夫曼编码,初始化必须为空字符串
        :param left_child: 左子节点
        :param right_child: 右子节点
        '''
        self.left_child = left_child
        self.right_child = right_child
        self.value = value
        self.key = key
        assert symbol == ''
        self.symbol = symbol

    def __eq__(self, other):
        '''
        用于比较两个HuffmanNode的大小,等于号,根据value的值比较
        :param other:
        :return:
        '''
        return self.value == other.value

    def __gt__(self, other):
        '''
        用于比较两个HuffmanNode的大小,大于号,根据value的值比较
        :param other:
        :return:
        '''
        return self.value > other.value

    def __lt__(self, other):
        '''
        用于比较两个HuffmanNode的大小,小于号,根据value的值比较
        :param other:
        :return:
        '''
        return self.value < other.value


def createTree(hist_dict: dict) -> HuffmanNode:
    '''
    构造哈夫曼树
    可以写一个HuffmanTree的类
    :param hist_dict: 图像的直方图,dict = {pixel_value: count}
    :return: HuffmanNode, 哈夫曼树的根节点
    '''
    # 借助优先级队列实现直方图频率的排序,取出和插入元素很方便
    q = PriorityQueue()

    # 根据传入的像素值和频率字典构造哈夫曼节点并放入队列中
    for k, v in hist_dict.items():
        # 这里放入的都是之后哈夫曼树的叶子节点,key都是各自的元素
        q.put(HuffmanNode(value=v, key=k))

    # 判断条件,直到队列中只剩下一个根节点
    while q.qsize() > 1:
        # 取出两个最小的哈夫曼节点,队列中这两个节点就不在了
        l_freq, r_freq = q.get(), q.get()
        # 增加他们的父节点,父节点值为这两个哈夫曼节点的和,但是没有key值;左子节点是较小的,右子节点是较大的
        node = HuffmanNode(value=l_freq.value + r_freq.value, left_child=l_freq, right_child=r_freq)
        # 把构造的父节点放在队列中,继续排序和取放、构造其他的节点
        q.put(node)

    # 队列中只剩下根节点了,返回根节点
    return q.get()


def walkTree_VLR(root_node: HuffmanNode, symbol=''):
    '''
    前序遍历一个哈夫曼树,同时得到每个元素(叶子节点)的编码,保存到全局的Huffman_encode_dict
    :param root_node: 哈夫曼树的根节点
    :param symbol: 用于对哈夫曼树上的节点进行编码,递归的时候用到,为'0'或'1'
    :return: None
    '''
    # 为了不增加变量复制的成本,直接使用一个dict类型的全局变量保存每个元素对应的哈夫曼编码
    global Huffman_encode_dict

    # 判断节点是不是HuffmanNode,因为叶子节点的子节点是None
    if isinstance(root_node, HuffmanNode):
        # 编码操作,改变每个子树的根节点的哈夫曼编码,根据遍历过程是逐渐增加编码长度到完整的
        root_node.symbol += symbol
        # 判断是否走到了叶子节点,叶子节点的key!=None
        if root_node.key != None:
            # 记录叶子节点的编码到全局的dict中
            Huffman_encode_dict[root_node.key] = root_node.symbol

        # 访问左子树,左子树在此根节点基础上赋值'0'
        walkTree_VLR(root_node.left_child, symbol=root_node.symbol + '0')
        # 访问右子树,右子树在此根节点基础上赋值'1'
        walkTree_VLR(root_node.right_child, symbol=root_node.symbol + '1')

    return


def encodeImage(src_img: np.ndarray, encode_dict: dict):
    '''
    用已知的编码字典对图像进行编码
    :param src_img: 原始图像数据,必须是一个向量
    :param encode_dict: 编码字典,dict={element:code}
    :return: 图像编码后的字符串,字符串中只包含'0'和'1'
    '''
    img_encode = ""
    assert len(src_img.shape) == 1, '`src_img` must be a vector'
    for pixel in src_img:
        img_encode += encode_dict[pixel]
    return img_encode


def writeBinImage(img_encode: str, huffman_file: str):
    '''
    把编码后的二进制图像数据写入到文件中
    :param img_encode: 图像编码字符串,只包含'0'和'1'
    :param huffman_file: 要写入的图像编码数据文件的路径
    :return:
    '''
    # 文件要以二进制打开
    with open(huffman_file, 'wb') as f:
        # 每8个bit组成一个byte
        for i in range(0, len(img_encode), 8):
            # 把这一个字节的数据根据二进制翻译为十进制的数字
            img_encode_dec = int(img_encode[i:i + 8], 2)
            # 把这一个字节的十进制数据打包为一个unsigned char,大端(可省略)
            img_encode_bin = struct.pack('>B', img_encode_dec)
            # 写入这一个字节数据
            f.write(img_encode_bin)


def readBinImage(huffman_file: str, img_encode_len: int):
    '''
    从二进制的编码文件读取数据,得到原来的编码信息,为只包含'0'和'1'的字符串
    :param huffman_file: 保存的编码文件
    :param img_encode_len: 原始编码的长度,必须要给出,否则最后一个字节对不上
    :return: str,只包含'0'和'1'的编码字符串
    '''
    code_bin_str = ""
    with open(huffman_file, 'rb') as f:
        # 从文件读取二进制数据
        content = f.read()
        # 从二进制数据解包到十进制数据,所有数据组成的是tuple
        code_dec_tuple = struct.unpack('>' + 'B' * len(content), content)
        for code_dec in code_dec_tuple:
            # 通过bin把解压的十进制数据翻译为二进制的字符串,并填充为8位,否则会丢失高位的0
            # 0 -> bin() -> '0b0' -> [2:] -> '0' -> zfill(8) -> '00000000'
            code_bin_str += bin(code_dec)[2:].zfill(8)
        # 由于原始的编码最后可能不足8位,保存到一个字节的时候会在高位自动填充0,读取的时候需要去掉填充的0,否则读取出的编码会比原来的编码长
        # 计算读取的编码字符串与原始编码字符串长度的差,差出现在读取的编码字符串的最后一个字节,去掉高位的相应数量的0就可以
        len_diff = len(code_bin_str) - img_encode_len
        # 在读取的编码字符串最后8位去掉高位的多余的0
        code_bin_str = code_bin_str[:-8] + code_bin_str[-(8 - len_diff):]
    return code_bin_str


def decodeHuffman(img_encode: str, huffman_tree_root: HuffmanNode):
    '''
    根据哈夫曼树对编码数据进行解码
    :param img_encode: 哈夫曼编码数据,只包含'0'和'1'的字符串
    :param huffman_tree_root: 对应的哈夫曼树,根节点
    :return: 原始图像数据展开的向量
    '''
    img_src_val_list = []

    # 从根节点开始访问
    root_node = huffman_tree_root
    # 每次访问都要使用一位编码
    for code in img_encode:
        # 如果编码是'0',说明应该走到左子树
        if code == '0':
            root_node = root_node.left_child
        # 如果编码是'1',说明应该走到右子树
        elif code == '1':
            root_node = root_node.right_child
        # 只有叶子节点的key才不是None,判断当前走到的节点是不是叶子节点
        if root_node.key != None:
            # 如果是叶子节点,则记录这个节点的key,也就是哪个原始数据的元素
            img_src_val_list.append(root_node.key)
            # 访问到叶子节点之后,下一次应该从整个数的根节点开始访问了
            root_node = huffman_tree_root
    return np.asarray(img_src_val_list)


def decodeHuffmanByDict(img_encode: str, encode_dict: dict):
    '''
    另外一种解码策略是先遍历一遍哈夫曼树得到所有叶子节点编码对应的元素,可以保存在字典中,再对字符串的子串逐个与字典的键进行比对,就得到相应的元素是什么。
    用C语言也可以这么做。
    这里不再对哈夫曼树重新遍历了,因为之前已经遍历过,所以直接使用之前记录的编码字典就可以。
    :param img_encode: 哈夫曼编码数据,只包含'0'和'1'的字符串
    :param encode_dict: 编码字典dict={element:code}
    :return: 原始图像数据展开的向量
    '''
    img_src_val_list = []
    decode_dict = {}
        # 构造一个key-value互换的字典,i.e. dict={code:element},后边方便使用
    for k, v in encode_dict.items():
        decode_dict[v] = k
    # s用来记录当前字符串的访问位置,相当于一个指针
    s = 0
    # 只要没有访问到最后
    while len(img_encode) > s + 1:
        # 遍历字典中每一个键code
        for k in decode_dict.keys():
            # 如果当前的code字符串与编码字符串前k个字符相同,k表示code字符串的长度,那么就可以确定这k个编码对应的元素是什么
            if k == img_encode[s:s + len(k)]:
                img_src_val_list.append(decode_dict[k])
                # 指针移动k个单位
                s += len(k)
                # 如果已经找到了相应的编码了,就可以找下一个了
                break
    return np.asarray(img_src_val_list)


def put(path):
    # 即使原图像是灰度图,也需要加入GRAYSCALE标志
    src_img = cv2.imread(path, cv2.IMREAD_GRAYSCALE)
    # 记录原始图像的尺寸,后续还原图像要用到
    src_img_w, src_img_h = src_img.shape[:2]
    # 把图像展开成一个行向量
    src_img_ravel = src_img.ravel()

    # {pixel_value:count},保存原始图像每个像素对应出现的次数,也就是直方图
    hist_dict = {}

    # 得到原始图像的直方图,出现次数为0的元素(像素值)没有加入
    for p in src_img_ravel:
        if p not in hist_dict:
            hist_dict[p] = 1
        else:
            hist_dict[p] += 1

    # 构造哈夫曼树
    huffman_root_node = createTree(hist_dict)
    # 遍历哈夫曼树,并得到每个元素的编码,保存到Huffman_encode_dict,这是全局变量
    walkTree_VLR(huffman_root_node)
    global Huffman_encode_dict
    print('哈夫曼编码字典:', Huffman_encode_dict)
    # 根据编码字典编码原始图像得到二进制编码数据字符串
    img_encode = encodeImage(src_img_ravel, Huffman_encode_dict)
    # 把二进制编码数据字符串写入到文件中,后缀为bin
    writeBinImage(img_encode, 'huffman_bin_img_file.bin')

    # 读取编码的文件,得到二进制编码数据字符串
    img_read_code = readBinImage('huffman_bin_img_file.bin', len(img_encode))
    # 解码二进制编码数据字符串,得到原始图像展开的向量
    # 这是根据哈夫曼树进行解码的方式
    img_src_val_array = decodeHuffman(img_read_code, huffman_root_node)
    # 这是根据编码字典进行解码的方式,更慢一些
    # img_src_val_array = decodeHuffmanByDict(img_read_code, Huffman_encode_dict)

    # 确保解码的数据与原始数据大小一致
    assert len(img_src_val_array) == src_img_w * src_img_h
    # 恢复原始二维图像
    img_decode = np.reshape(img_src_val_array, [src_img_w, src_img_h])

    # 计算平均编码长度和编码效率
    total_code_len = 0
    total_code_num = sum(hist_dict.values())
    avg_code_len = 0
    I_entropy = 0
    for key in hist_dict.keys():
        count = hist_dict[key]
        code_len = len(Huffman_encode_dict[key])
        prob = count / total_code_num
        avg_code_len += prob * code_len
        I_entropy += -(prob * math.log2(prob))
    S_eff = I_entropy / avg_code_len
    print("平均编码长度为:{:.3f}".format(avg_code_len))
    print("编码效率为:{:.6f}".format(S_eff))

    # 压缩率
    ori_size = src_img_w * src_img_h * 8 / (1024 * 8)
    comp_size = len(img_encode) / (1024 * 8)
    comp_rate = 1 - comp_size / ori_size
    print('原图灰度图大小', ori_size, 'KB  压缩后大小', comp_size, 'KB  压缩率', comp_rate, '%')

    plt.rcParams['font.sans-serif'] = ['SimHei']
    plt.subplot(121), plt.imshow(src_img, plt.cm.gray), plt.title('原图灰度图像'), plt.axis('off')
    plt.subplot(122), plt.imshow(img_decode, plt.cm.gray), plt.title('解压后'), plt.axis('off')
    # plt.savefig('1.1new.jpg')
    plt.show()


if __name__ == '__main__':
    # 哈夫曼编码字典{pixel_value:code},在函数中作为全局变量用到了
    Huffman_encode_dict = {}

    # 图像处理函数,要传入路径
    put(r'orl_grey.bmp')
算术编码
编码过程伪代码如下所示:
图 1- 3 算术编码伪代码
算术编码解码伪代码如下所示:
图 1- 4 算术编码解码伪代码
Python代码:
#!/usr/bin/env python
# -*- coding: utf-8 -*-
# author:mgboy time:2021/6/29
# 算术编码

import cv2
import math
import os
from fnmatch import fnmatch
from datetime import datetime
import matplotlib.pyplot as plt
plt.rcParams['font.sans-serif'] = ['SimHei']
plt.rcParams['axes.unicode_minus'] = False

# 以二进制的方式读取文件,结果为字节
def fileload(filename):
    file_pth = os.path.dirname(__file__) + '/' + filename
    file_in = os.open(file_pth, os.O_BINARY | os.O_RDONLY)
    file_size = os.stat(file_in)[6]
    data = os.read(file_in, file_size)
    os.close(file_in)
    return data


# 计算文件中不同字节的频数和累积频数
def cal_pr(data):
    pro_dic = {}
    data_set = set(data)
    for i in data_set:
        pro_dic[i] = data.count(i)  # 统计频数
    sym_pro = []  # 频数列表
    accum_pro = []  # 累积频数列表
    keys = []  # 字节名列表
    accum_p = 0
    data_size = len(data)
    for k in sorted(pro_dic, key=pro_dic.__getitem__, reverse=True):
        sym_pro.append(pro_dic[k])
        keys.append(k)
    for i in sym_pro:
        accum_pro.append(accum_p)
        accum_p += i
    accum_pro.append(data_size)
    tmp = 0
    for k in sorted(pro_dic, key=pro_dic.__getitem__, reverse=True):
        pro_dic[k] = [pro_dic[k], accum_pro[tmp]]
        tmp += 1
    return pro_dic, keys, accum_pro


# 编码
def encode(data, pro_dic, data_size):
    C_up = 0
    A_up = A_down = C_down = 1
    for i in range(len(data)):
        C_up = C_up * data_size + A_up * pro_dic[data[i]][1]
        C_down = C_down * data_size
        A_up *= pro_dic[data[i]][0]
        A_down *= data_size
    L = math.ceil(len(data) * math.log2(data_size) - math.log2(A_up))  # 计算编码长度
    bin_C = dec2bin(C_up, C_down, L)
    amcode = bin_C[0:L]  # 生成编码
    return C_up, C_down, amcode


# 译码
def decode(C_up, C_down, pro_dic, keys, accum_pro, byte_num, data_size):
    byte_list = []
    for i in range(byte_num):
        k = binarysearch(accum_pro, C_up * data_size / C_down)  # 二分法搜索编码所在频数区间
        if k == len(accum_pro) - 1:
            k -= 1
        key = keys[k]
        byte_list.append(key)
        C_up = (C_up * data_size - C_down * pro_dic[key][1]) * data_size
        C_down = C_down * data_size * pro_dic[key][0]
    return byte_list  # 返回译码字节列表


# 二分法搜索
def binarysearch(pro_list, target):
    low = 0
    high = len(pro_list) - 1
    if pro_list[0] <= target <= pro_list[-1]:
        while high >= low:
            middle = int((high + low) / 2)
            if (pro_list[middle] < target) & (pro_list[middle + 1] < target):
                low = middle + 1
            elif (pro_list[middle] > target) & (pro_list[middle - 1] > target):
                high = middle - 1
            elif (pro_list[middle] < target) & (pro_list[middle + 1] > target):
                return middle
            elif (pro_list[middle] > target) & (pro_list[middle - 1] < target):
                return middle - 1
            elif (pro_list[middle] < target) & (pro_list[middle + 1] == target):
                return middle + 1
            elif (pro_list[middle] > target) & (pro_list[middle - 1] == target):
                return middle - 1
            elif pro_list[middle] == target:
                return middle
        return middle
    else:
        return False


# 整数二进制转十进制
def int_bin2dec(bins):
    dec = 0
    for i in range(len(bins)):
        dec += int(bins[i]) * 2 ** (len(bins) - i - 1)
    return dec


# 小数十进制转二进制
def dec2bin(x_up, x_down, L):
    bins = ""
    while ((x_up != x_down) & (len(bins) < L)):
        x_up *= 2
        if x_up > x_down:
            bins += "1"
            x_up -= x_down
        elif x_up < x_down:
            bins += "0"
        else:
            bins += "1"
    return bins


# 保存文件
def filesave(data_after, filename):
    file_pth = os.path.dirname(__file__) + '/' + filename
    # 保存译码文件
    if fnmatch(filename, "*_am.*"):
        file_open = os.open(file_pth, os.O_WRONLY | os.O_CREAT | os.O_BINARY)
        os.write(file_open, data_after)
        os.close(file_open)
    # 保存编码文件
    else:
        byte_list = []
        byte_num = math.ceil(len(data_after) / 8)
        for i in range(byte_num):
            byte_list.append(int_bin2dec(data_after[8 * i:8 * (i + 1)]))
        file_open = os.open(file_pth, os.O_WRONLY | os.O_CREAT | os.O_BINARY)
        os.write(file_open, bytes(byte_list))
        os.close(file_open)
        return byte_num  # 返回字节数


# 计算编码效率
def code_efficiency(pro_dic, data_size, bit_num):
    entropy = 0
    # 计算熵
    for k in pro_dic.keys():
        entropy += (pro_dic[k][0] / data_size) * (math.log2(data_size) - math.log2(pro_dic[k][0]))
    # 计算平均码长
    ave_length = bit_num / data_size
    code_efficiency = entropy / ave_length
    # print("The code efficiency is %.3f%%" % (code_efficiency * 100))


# 主函数
def amcode():
    filename = ["orl_grey"]
    filetype = [".bmp"]
    for i in range(len(filename)):
        print(60 * "-")
        print("加载文件:", filename[i] + filetype[i])
        t_begin = datetime.now()
        # 读取源文件
        data = fileload(filename[i] + filetype[i])
        data_size = len(data)
        print("计算字节的概率..")
        # 统计字节频数
        pro_dic, keys, accum_pro = cal_pr(data)
        amcode_ls = ""
        C_upls = []
        C_downls = []
        byte_num = 32  # 每次编码的字节数
        integra = math.ceil(data_size / byte_num)  # 迭代次数
        print("\n编码开始.")
        # 编码
        for k in range(integra):
            C_up, C_down, amcode = encode(data[byte_num * k: byte_num * (k + 1)], pro_dic, data_size)
            amcode_ls += amcode
            C_upls.append(C_up)
            C_downls.append(C_down)
        # 保存编码文件,返回编码总字节数
        codebyte_num = filesave(amcode_ls, filename[i] + '.am')
        t_end = datetime.now()
        print("编码完成.")
        print("保存编码文件为: " + filename[i] + '.am')
        print("压缩比(原图大小除以压缩后大小)  %.3f%%" % ((data_size / codebyte_num) * 100))  # 压缩比,原图大小除以压缩后大小
        code_efficiency(pro_dic, data_size, len(amcode_ls))  # 编码效率
        print()

        decodebyte_ls = []
        print("解码开始.")
        # 译码
        for k in range(integra):
            if (k == integra - 1) & (data_size % byte_num != 0):
                decodebyte_ls += decode(C_upls[k], C_downls[k], pro_dic, keys, accum_pro, data_size % byte_num,
                                        data_size)
            else:
                decodebyte_ls += decode(C_upls[k], C_downls[k], pro_dic, keys, accum_pro, byte_num, data_size)
        # 保存译码文件
        filesave(bytes(decodebyte_ls), filename[i] + '_am' + filetype[i])
        print("解码完成.")
        print("保存解压文件: " + filename[i] + '_am' + filetype[i])
        # 计算误码率
        errornum = 0
        for j in range(data_size):
            if data[j] != decodebyte_ls[j]:
                errornum += 1
        print("误码率: %.3f%%" % (errornum / data_size * 100))  # 误码率
        org_img = cv2.imread(filename[i] + filetype[i], 1)
        dep_img = cv2.imread(filename[i] + '_am' + filetype[i], 1)
        plt.figure()

        plt.suptitle('算术编码')
        plt.subplot(1, 2, 1)
        plt.title('原图')
        plt.imshow(cv2.cvtColor(org_img, cv2.COLOR_BGR2RGB))

        plt.subplot(1, 2, 2)
        plt.title('解压后')
        plt.imshow(cv2.cvtColor(dep_img, cv2.COLOR_BGR2RGB))
        plt.show()

if __name__ == "__main__":
    amcode()
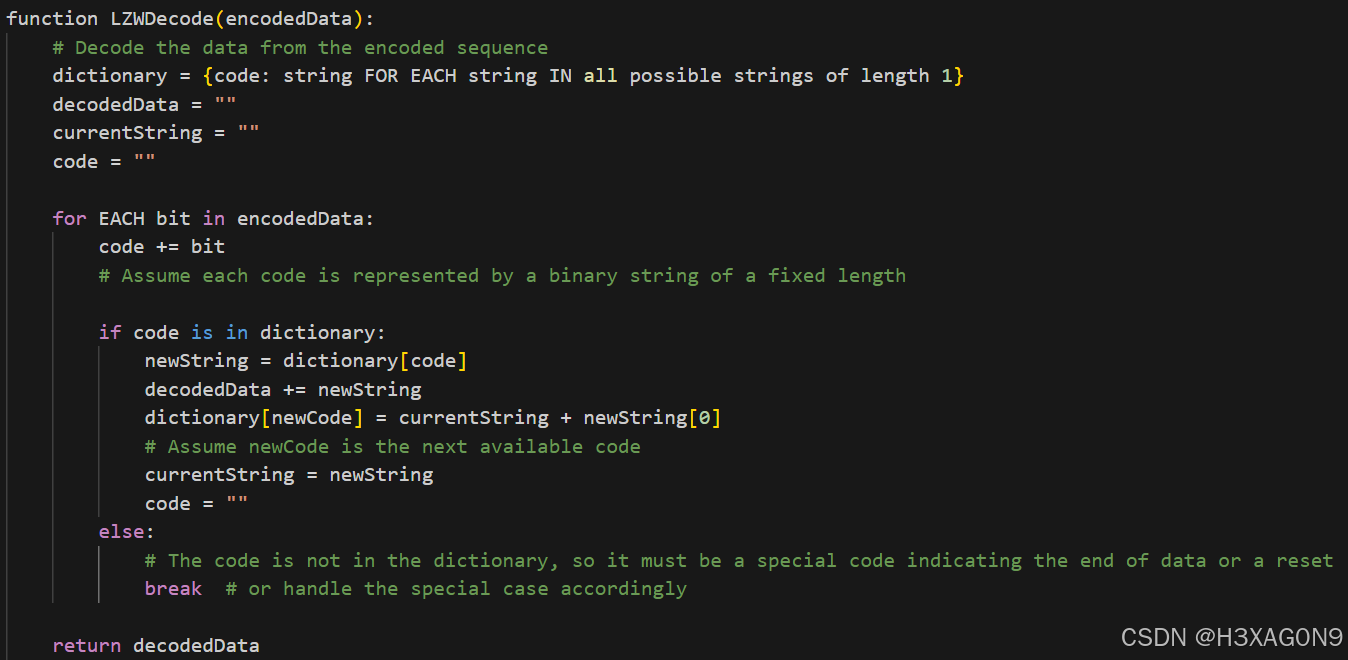
词典编码(LZW)
LZW编码过程伪代码如下所示:
图 1- 5 LZW编码伪代码
LZW解码过程伪代码如下所示:
图 1- 6 LZW解码伪代码
Python代码实现方式1:
import math

import numpy as np
import cv2
import os
from fnmatch import fnmatch
from datetime import datetime
import matplotlib.pyplot as plt

from arithmetic_coding import int_bin2dec


class LZWCoding:
    def __init__(self):
        self.max_table_size = 4096  # 通常,LZW 使用 12 位字典大小

    def compress(self, image):
        """使用 LZW 压缩算法压缩图像."""

        # 初始化字典
        dictionary = {bytes([i]): i for i in range(256)}
        dict_size = 256
        string = b""
        compressed_data = []

        # 读取图像数据并压缩
        for pixel in image.flatten():
            symbol = bytes([pixel])
            string_plus_symbol = string + symbol
            if string_plus_symbol in dictionary:
                string = string_plus_symbol
            else:
                compressed_data.append(dictionary[string])
                if dict_size < self.max_table_size:
                    dictionary[string_plus_symbol] = dict_size
                    dict_size += 1
                string = symbol

        if string:
            compressed_data.append(dictionary[string])

        # 打印解码过程中的字典和输出数据
        print("Compression Dictionary:")
        for k, v in dictionary.items():
            print(f"{k}: {v}")

        print("Compressed Data:")
        print(compressed_data)

        # 将压缩数据转换为二进制流
        bitstream = self.to_bitstream(compressed_data)
        return bitstream

    def decompress(self, bitstream, shape):
        """解压缩比特流以重建图像."""

        # 初始化字典
        dictionary = {i: bytes([i]) for i in range(256)}
        dict_size = 256

        # 读取压缩数据
        compressed_data = self.from_bitstream(bitstream)
        string = bytes([compressed_data.pop(0)])
        decompressed_data = [string]

        for code in compressed_data:
            if code in dictionary:
                entry = dictionary[code]
            elif code == dict_size:
                entry = string + string[0:1]
            else:
                raise ValueError("Invalid LZW code")
            decompressed_data.append(entry)

            if dict_size < self.max_table_size:
                dictionary[dict_size] = string + entry[0:1]
            dict_size += 1

            string = entry

        # 将解压后的数据转换回图像
        decompressed_data = b''.join(decompressed_data)
        image = np.frombuffer(decompressed_data, dtype=np.uint8).reshape(shape)
        return image

    def to_bitstream(self, data):
        """将整数列表转换为比特流"""
        bitstream = bytearray()
        for number in data:
            bitstream.extend(number.to_bytes(2, byteorder='big'))
        return bytes(bitstream)

    def from_bitstream(self, bitstream):
        """将比特流转换回整数列表"""
        data = []
        for i in range(0, len(bitstream), 2):
            number = int.from_bytes(bitstream[i:i + 2], byteorder='big')
            data.append(number)
        return data


def filesave(data_after, filename):
    file_pth = os.path.dirname(__file__) + '/' + filename
    # 保存译码文件
    if fnmatch(filename, "*_dc.*"):
        file_open = os.open(file_pth, os.O_WRONLY | os.O_CREAT | os.O_BINARY)
        os.write(file_open, data_after)
        os.close(file_open)
    # 保存编码文件
    else:
        byte_list = []
        byte_num = math.ceil(len(data_after) / 8)
        for i in range(byte_num):
            byte_list.append(int_bin2dec(data_after[8 * i:8 * (i + 1)]))
        file_open = os.open(file_pth, os.O_WRONLY | os.O_CREAT | os.O_BINARY)
        os.write(file_open, data_after)
        os.close(file_open)
        return byte_num  # 返回字节数


# 步骤1: 读取灰度图像
image_path = 'orl_grey.bmp'  # 替换为你的灰度图像路径
image = cv2.imread(image_path, cv2.IMREAD_GRAYSCALE)  # 读取灰度图像

# 确保图像不是None
if image is None:
    print("Error: Image not found or the path is incorrect.")
else:
    # 步骤2: 压缩图像
    lzw_coder = LZWCoding()
    compressed_data = lzw_coder.compress(image.flatten())
    filesave(compressed_data, 'orl.dc')

    # 步骤3: 解压图像
    # 需要提供原始图像的形状信息
    original_shape = image.shape
    decompressed_image = lzw_coder.decompress(compressed_data, original_shape)

    # 步骤4: 保存或显示结果
    # 将解压后的NumPy数组转换回图像
    decompressed_image = decompressed_image.reshape(original_shape)
    plt.subplot(121)  # 设置第二个子图
    plt.title('原图像')
    plt.imshow(image, cmap='gray')  # 绘制解码输出图像,便于对比
    plt.subplot(122)  # 设置第二个子图
    plt.title('解码重构图像')
    plt.imshow(decompressed_image, cmap='gray')  # 绘制解码输出图像,便于对比
    plt.show()

    # 如果你想保存为bmp图像,需要将数据类型转换为uint8
    decompressed_image_uint8 = decompressed_image.astype(np.uint8)
    cv2.imwrite('orl_dc.bmp', decompressed_image_uint8)
Python实现代码2:
import math
import os
from fnmatch import fnmatch

import cv2
import matplotlib.pyplot as plt  # 导入第三方库
import matplotlib.image as image  # 导入第三方库
import numpy as np  # 导入第三方库

from arithmetic_coding import int_bin2dec

plt.rcParams["font.sans-serif"] = "SimHei"  # 修改字体的样式可以解决标题中文显示乱码的问题
plt.rcParams["axes.unicode_minus"] = False  # 该项可以解决绘图中的坐标轴负数无法显示的问题
img = image.imread('orl1_1.bmp')  # 读取图片


##编码函数的定义
def Encode(img):
    plt.subplot(121)  # 设置子图
    plt.title('原始图像')
    shape = img.shape
    plt.imshow(img, cmap='gray')  # 显示原始图像,便于对比
    img1 = img.flatten()  # 图像序列化
    dict1 = dict(zip(np.array(range(256), dtype='str'), range(256)))  # 构建初始化字符串表
    dict1['LZW_CLEAR'] = len(dict1)  # 构建初始化字符串表
    dict1['LZW_EOI'] = len(dict1)  # 构建初始化字符串表
    result = []  # 定义编码结果存放位置
    R = ''  # 初始化R
    result.append(dict1['LZW_CLEAR'])  # 读取开始字符
    for S in img1:  # 依次读入每个待编码数据
        if R == '':  # 第一次读
            temp = str(S)
        else:
            temp = R + '-' + str(S)  # 构成RS
        if temp in dict1.keys():
            R = temp  # RS在字典中,就令R=RS
        else:
            dict1[temp] = len(dict1)  # RS不在字典中,更新字典
            result.append(dict1[R])  # RS不在字典中,输出R索引
            R = str(S)  # RS不在字典中,就令R=S
    result.append(dict1[R])  # 将最后一个R输出
    result.append(dict1['LZW_EOI'])  # 输出结束符
    return result, shape  # 返回输出结果,编码完成


##解码函数的定义
def Decode(code_stream, shape):
    img = ""  # 解码结果放在img字符串中
    S = code_stream.pop(0)  # 读取开始字符
    values = [str(x) + '-' for x in range(S)]  # 构建初始化字典的索引
    dict1 = dict(zip(range(S), values))  # 构建初始化字典
    dict1[len(dict1)] = 'LZW_CLEAR'  # 构建初始化字典
    dict1[len(dict1)] = 'LZW_EOI'  # 构建初始化字典
    R = ''  # 临时变量R
    for i in range(len(code_stream)):  # 循环读入码流
        S = code_stream.pop(0)  # 取第一个码字
        if S in dict1.keys():  # 如果S在字典中
            if R == '':
                img += (dict1[S])  # 数据为第一个码字
                R = S  # R=S
            else:
                head = dict1[S].split('-')
                temp = dict1[R] + head[0] + '-'  # 构建RS
                dict1[len(dict1)] = temp  # 更新字典
                img += (dict1[S])  # 输出S
                R = S  # R=S
        else:  # 如果S不在字典中
            head = dict1[R].split('-')
            temp = dict1[R] + head[0] + '-'  # 构建RS
            dict1[len(dict1)] = temp  # 更新字典
            img += (temp)  # 输出RS
            R = S  # R=S
    img = img.rstrip('-LZW_EOI')  # 去掉输出的-LZW_EOI
    img = np.array(img.split('-'), dtype=int)  # 输出结果类型转换
    img = img.reshape(shape)  # 输出结果变为原始图像形状
    img_uint8 = img.astype(np.uint8)
    cv2.imwrite('sb.bmp', img_uint8)
    plt.subplot(122)  # 设置第二个子图
    plt.title('解码重构图像')
    plt.imshow(img, cmap='gray')  # 绘制解码输出图像,便于对比

def filesave(data_after, filename):
    file_pth = os.path.dirname(__file__) + '/' + filename
    # 保存译码文件
    if fnmatch(filename, "*_dc.*"):
        file_open = os.open(file_pth, os.O_WRONLY | os.O_CREAT | os.O_BINARY)
        os.write(file_open, data_after)
        os.close(file_open)
    # 保存编码文件
    else:
        byte_list = []
        byte_num = math.ceil(len(data_after) / 8)
        for i in range(byte_num):
            byte_list.append(int_bin2dec(data_after[8 * i:8 * (i + 1)]))
        file_open = os.open(file_pth, os.O_WRONLY | os.O_CREAT | os.O_BINARY)
        os.write(file_open, data_after)
        os.close(file_open)
        return byte_num  # 返回字节数

##调用函数
code, shape = Encode(img)  # 对输入图像编码
array=np.array(code)
byte_stream = array.tobytes()  # 转换为字节流
filesave(byte_stream,'sb')
Decode(code, shape)  # 通过编码结果进行解码
plt.show()
接着将三种算法用Python代码分别进行实现,代码作为附件提交。
代码中首先需要读取图片,可使用os库加载图片文件或使用cv2库的imread读取。接着用numpy库将图片文件转为矩阵格式。
此外需要编写的辅助函数还有:在完成编码后将列表转为比特流的函数、将比特流转回列表的函数、保存二进制文件和解码后文件的函数。
代码完成后用46*56的orl人脸图片素材进行测试。
2. 测试结果分析
霍夫曼编码:
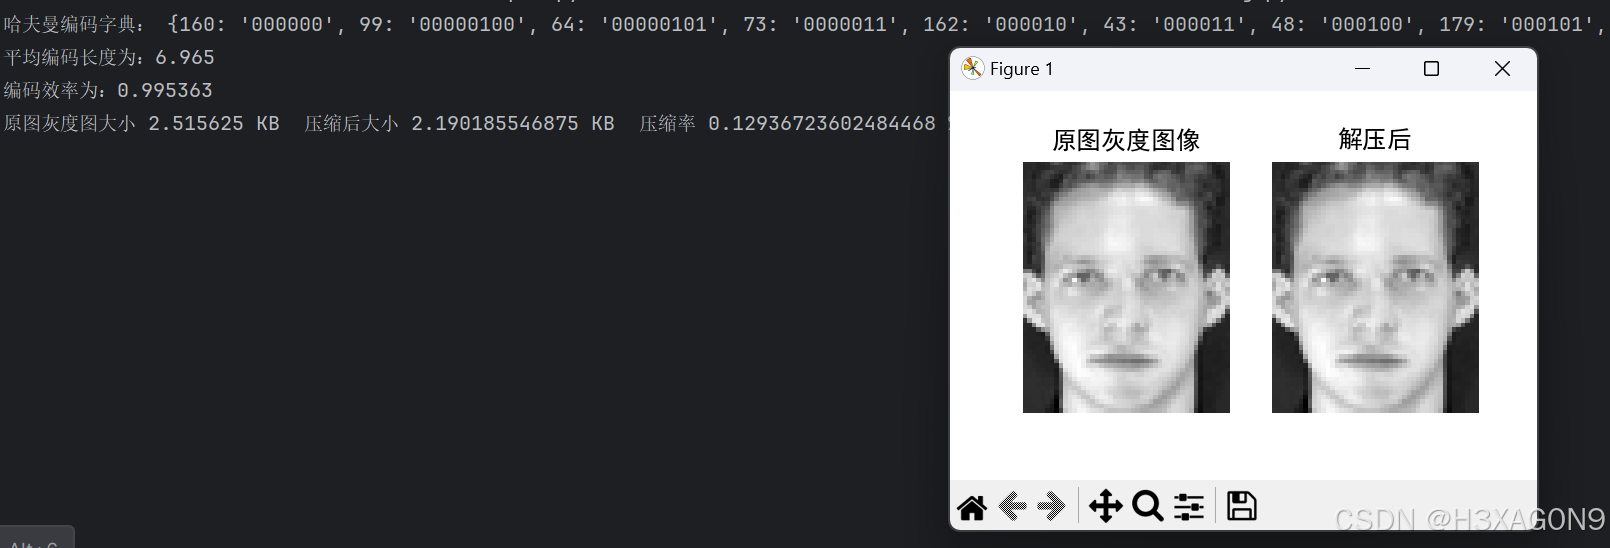
霍夫曼编码在orl素材下的测试结果如下所示:
图 2- 1 霍夫曼编码46*56测试结果
可以看到,霍夫曼在较小尺寸的图片上有较好的压缩效果,测试orl库中的其他素材情况同样符合预期,压缩效果较为稳定,没有出现膨胀。
接着我试着将其应用在较大尺寸的图片上,使用855*852的纯色背景肖像图片进行测试。测试结果如下所示。
图 2- 2 霍夫曼编码855*852测试结果
可以看到在较大尺寸的图片中霍夫曼编码依然可以正常应用并有理想的性能。观察哈夫曼编码得到的字典,看到背景色被编码为‘0’,这是因为背景色所占比例最大,这样可以最大程度压缩图片。
算术编码:
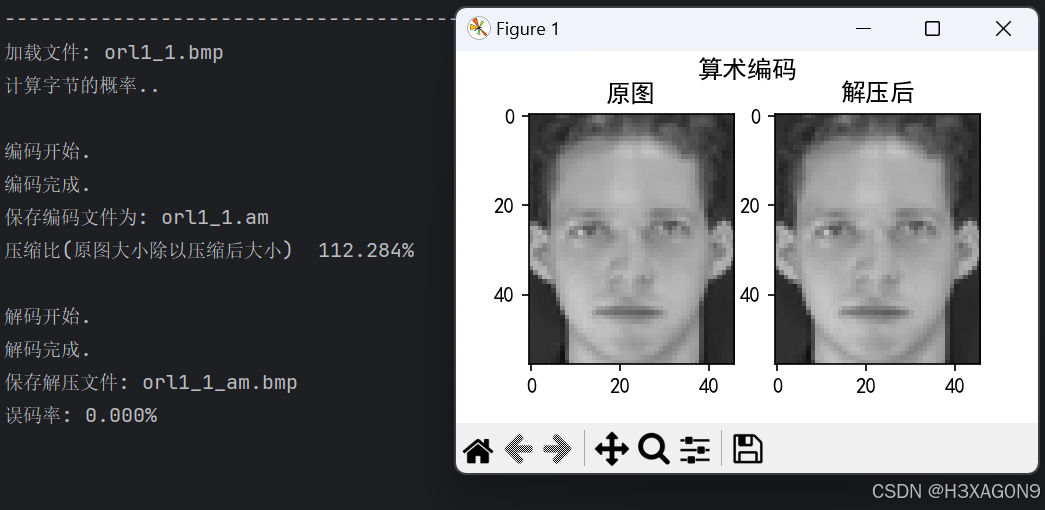
用46*56图片测试算术编码结果如下图所示:
图 2- 3 算术编码46*56测试结果
测试多张图片得出,算术编码在小尺寸图片上也有稳定的压缩效果,但压缩比较霍夫曼编码更低。
接着用较大尺寸的图片测试,大小在713KB左右的bmp图片,绝大多数都可以无损压缩,但在特定一张素材上测试时出现较严重的误码情况,如下图所示。
图 2- 4 算术编码在较大尺寸图片出现误码情况
在理论知识学习中已经得知,算术编码会由于浮点数精度的不足而出现误差因而不适合大尺寸图片的压缩。解压后发现图片被解码为和背景色相同的纯色图片。
分析出现该结果的原因,在其他没有纯色背景的图片下算数编码仍可以进行无损压缩,而在纯色背景的图片下出现误码,说明有大片的同色的图片更容易带来误码。结合浮点数精度分析,在每次算数编码中出现大量同色时,其他颜色就容易由于精度而忽略。因此,理论上通过减少每次编码的字节数,可以降低误差出现的概率。前面测试对编码分块的步长为1024字节,即1KB。下面每次将步长缩短为1/2进行测试。步长512B、256B、128B、64B的效果如下图所示。
图 2- 5 步长为512B
图 2- 6 步长为256B
图 2- 7 步长为128B
图 2- 8 步长为64B
从图中可以看到,随着步长以指数级缩短,算术编码的误码率如预期般逐渐降低,解码后的效果也越来越接近原图,到128B和64B时,已经可以基本复原图像,且运行时间也明显减少,这是因为当k>1时,(k·n)a>k·na。步长为32B时,算术编码恢复无损压缩,即误码率为0,如下图所示。
图 2- 9 步长为32B
LZW编码:
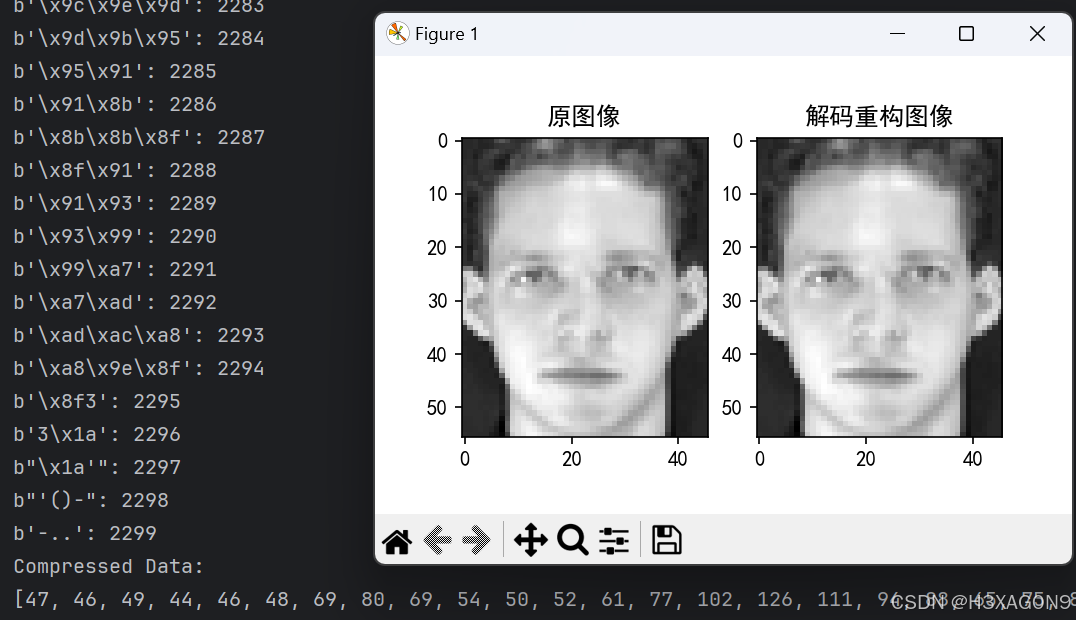
设置字典最大为4096(12位),使用LZW编码对46*56图片进行编解码结果如下图所示:
图 2- 10 LZW应用46*56图片编解码
尽管数据在压缩中没有发生误码,但压缩后的文件大小反而略有增大。推测这是由于所用的图片素材尺寸较小且较混乱,压缩后词典太大且无法充分重复利用词典,所以将其应用在尺寸较大以及像素分布较规则的图片上应该会有较好的效果。使用713KB左右大小的图片测试结果如下图所示。
图 2- 11 LZW应用2MB图片编解码
算法成功对图片进行了无损压缩和解码,可将713K的BMP图片压缩为300~400KB,且编解码效率较高。
我编写了两种实现LZW的代码,它们的区别主要在于词典的对象类型。第一种直接使用字节流作为对象,第二种使用字符串类型作为对象。且分别使用面向过程和面向对象的思路来实现。二者的结果都符合预期而略有不同,对于二者的性能差异还没有深入进行探究,在后面的学习中我可能会就此继续进行研究。
3. 集成系统
最后,将已经测试过的算法进行封装,应用到完整的程序框架中,即完成了一个可选择的编解码系统。
四、实验结果与分析:
实验成功实现了基于无损编码的图像压缩系统,并通过霍夫曼编码、算术编码和词典编码对图像进行了有效的压缩。实验结果表明,不同的编码方法适用于不同类型的数据,且压缩效果与数据的熵密切相关。
五、心得体会:
通过本次实验,我深刻体会到了无损数据压缩技术的重要性和实用性。在实现霍夫曼编码、算术编码和LZW编码的过程中,我不仅加深了对这些算法原理的理解,而且通过编程实践提高了解决实际问题的能力。实验中,我学会了如何读取和写入图像数据,如何根据不同的数据特性选择合适的压缩算法,并计算了图像的熵以及实际压缩比,这些经验对于我理解数据压缩领域的知识非常宝贵。此外,我也认识到了在算法实现过程中细节处理的重要性,如编码的起始和结束、边界条件的处理等,这些都直接影响到算法的准确性和效率。尽管在实验过程中遇到了一些挑战,但通过不断调试和优化,我提高了分析问题和解决问题的能力。最后,实验报告的撰写也锻炼了我的科技写作技巧,使我能够更加清晰和专业地表达我的实验过程和结果。
实验让我对无损压缩技术有了更全面的认识,从理论到实践,从编码到解码,每一步的实现都让我对数据压缩的深层原理和潜在应用有了更深的理解。我意识到无损压缩技术在图像处理、数据存储和传输等多个领域的广泛应用,并对其在未来技术发展中的潜力感到兴奋。这次实验经历不仅提升了我的技术能力,也激发了我进一步探索数据压缩及其他相关领域的兴趣。
思考题:
- 选择一个图像文件,针对该图像文件,讨论在上述三个无损编码中,哪一个无损压缩比最高,哪一个最低,并分析原因。
我选择如下图片,大小为713KB,格式为BMP,使用三种无损编码进行压缩,比较其压缩比。
压缩后大小:
霍夫曼编码:358KB
算术编码(步长选择32B):422KB
LZW编码:336KB
压缩率:LZW编码>霍夫曼编码>算术编码
分析:
首先分析本张图片与压缩相关的特点:有较多连续的纯色色块(背景),熵较低,元素总个数较少(256)。
对于熵较低的文件,不利于算术编码的压缩,容易出现误码,需要不断降低步长至实现无损压缩。同时,相同元素多有利于霍夫曼编码,熵低有利于字典编码,因此可以理解其效果最差。
LZW编码略优于霍夫曼编码,这是由于连续重复元素的出现(尤其是背景)会大幅提高词典编码的性能,在元素越多时效果越明显,霍夫曼更适用于小尺寸文件的压缩。
