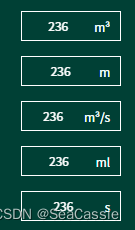
Vue3-elementPlus二次开发系列文章目录
第一章 关于el-input的二次开发
前言
在使用elementPlus的过程中,产生了一系列需求不明确的要求,故需要对elementPlus开发的二次封装,从而达到使项目使用起来更加方便。
一、el-input的带单位的二次封装
二、实现思路
1.引用数据源
代码如下(示例):
<el_input v-model="value1" style="width: 100px; height: 30px; margin-top: 15px; border: 1px solid #fff;"><template #title>m³</template></el_input>
封装后的数据用v-model的形式去绑定数据源
2.组件封装
代码如下(示例):
<template>
  <div class="main">
    <el-input v-model="fromData" style="flex: 1;"></el-input>
    <slot name="title"></slot>
  </div>
</template>

<script setup>
import { ref, defineProps, defineEmits, watch } from 'vue';

const props = defineProps({
  modelValue: {
    type: String
  }
});

const emit = defineEmits(['update:modelValue']);
const fromData = ref(props.modelValue);

// 监听 fromData 变化,并在变化时触发事件更新父组件的数据
watch(fromData, (newValue) => {
  emit('update:modelValue', newValue);
});
</script>
<style lang="scss" scoped>
.main{
  width: 100%;
  height: 100%;
  // background-color: red;
  display: flex;
  align-items: center;
  padding-right: 10px;
  font-size: 12px;
}
.el-input{
  height: 100%;
}
:deep(.el-input__wrapper) {
  background-color: transparent;
  box-shadow: none;
  padding: 0
}
:deep(.el-input__inner) {
  color: #fff;
  font-size: 12px;
  text-align: center;
}
</style>
emit(‘update:modelValue’, newValue); 将数据双向绑定上
单位用插槽方式实现
总结
提示:这里对文章进行总结:
例如:以上是关于el-input的二次数据绑定的方法
