iOS真机测试
Appium XCUITest Driver Real Device Setup
Installing dependencies
//安装依赖项
From Appium 1.15.0, Appium communicates with a real device via appium-ios-device. You no longer install extra dependencies.
//从1.15.0版本开始,Appium通过Appium iOS设备与真机通信,不需要安装额外的依赖项
XCUITest driver installs a helper application called WebDriverAgent-Runner onto the device, and handles the application under test via it. While this is simple in theory, the hoops of code signing and provisioning applications for development and testing can make this a bit of a headache.
//XCUITest 驱动将作为助手为WebDriverAgent-Runner安装到设备上,并通过它来处理被测试的应用程序,理论上很简单,代码签名和为开发和测试提供应用程序的可能会让你有点头疼
The device should be available to Xcode. Please make sure the device under test can connect to Xcode without issues. You could confirm it with Devices and Simulators Xcode dialog.
//该设备应该可以应用于Xcode,请确保被测设备可以连接到Xcode没问题,你可以用设备和模拟器Xcode对话来确认
The documentation on appium-xcuitest-driver is also helpful to resolve dependencies.//Appium-Xcuitest-driver上的文档也有助于解决依赖关系
Basic (automatic) configuration
//基本(自动)配置
The easiest way to get up-and-running with Appium’s XCUITest support on iOS real devices is to use the automatic configuration strategy. There are two ways to do this:
//最简单的方式获取up-end-running具有Appium’s XCUITest支持在iOS真机上使用自动配置策略,两种方式如下:
- Use the
xcodeOrgIdandxcodeSigningIddesired capabilities:
 {
      "xcodeOrgId": "<Team ID>",
      "xcodeSigningId": "iPhone Developer"
    }
- Create a .xcconfig file somewhere on your file system and add the following to it:
DEVELOPMENT_TEAM = <Team ID>
    CODE_SIGN_IDENTITY = iPhone Developer
In either case, the Team ID is a unique 10-character string generated by Apple that is assigned to your team. You can find your Team ID using your developer account. Sign in to developer.apple.com/account, and click Membership in the sidebar. Your Team ID appears in the Membership Information section under the team name. You can also find your team ID listed under the “Organizational Unit” field in your iPhone Developer certificate in your keychain.
Note that these are mutually exclusive strategies; use either the xcodeConfigFile capability or the combination of xcodeOrgIdand xcodeSigningId.
Once this configuration is done, it should just be a matter of starting your test specifying a real device in your udid desired capability.
If this has not worked it will usually manifest itself in the Appium server logs as some error followed by info XCUITest xcodebuild exited with code '65' and signal 'null'. This usually means that the necessary code signing is not set up correctly. Go on to the Basic (manual) configuration to fix.
If the WebDriverAgentRunner is successfully installed on the device, but in the Appium logs there is an error message something like:
2017-01-24 09:02:18.358 xcodebuild[30385:339674] Error Domain=com.apple.platform.
iphoneos Code=-12 "Unable to launch com.apple.test.WebDriverAgentRunner-Runner" U
serInfo={NSLocalizedDescription=Unable to launch com.apple.test.WebDriverAgentRunner-Runner, NSUnderlyingError=0x7fa839cadc60 {Error Domain=DTXMessage Code=1 "(n
ull)" UserInfo={DTXExceptionKey=The operation couldn’t be completed. Unable to la
unch com.apple.test.WebDriverAgentRunner-Runner because it has an invalid code sig
nature, inadequate entitlements or its profile has not been explicitly trusted by
the user. : Failed to launch process with bundle identifier 'com.apple.test.WebDriverAgentRunner-Runner'}}}

2017-01-24 09:02:18.358 xcodebuild[30385:339674] Error Domain=IDETestOperationsOb
serverErrorDomain Code=5 `"Early unexpected exit, operation never finished bootstr
apping - no restart will be attempted"` UserInfo={NSLocalizedDescription=Early une
xpected exit, operation never finished bootstrapping - no restart will be attempted}

Testing failed:
    Test target WebDriverAgentRunner encountered an error (Early unexpected exit,
    operation never finished bootstrapping - no restart will be attempted)
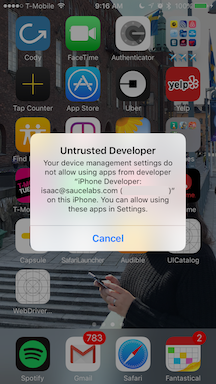
The problem is that the developer is not trusted on the device. If you manually try to run the WebDriverAgentRunner app on the device, you will see a popup message:
//问题是在设备上开发人员不受信任如果您手动尝试在设备上运行WebDriverAgentRunner应用程序,您将看到一条弹出消息:
You can go to Settings => General => Device Management on the device to trust the developer and allow the WebDriverAgentRunner app to be run (see Apple documentation for more information). //设置开发人员信任
Basic (manual) configuration
//基本(手动)设置
There are many cases in which the basic automatic configuration is not enough. This usually has to do with code signing and the configuration of the project to be able to be run on the real device under test. Often this happens when the development account being used is a “Free” one, in which case it is not possible to create a wildcard provisioning profile, and will often not create one for the default application bundle.
在很多情况下,基本的自动配置是不够的。这通常与代码签名和项目的配置有关,以便能够在被测试的真实设备上运行。当使用的开发帐户是“免费”帐户时,通常会发生这种情况,在这种情况下,不可能创建通配符配置文件,并且通常不会为默认应用程序包创建通配符配置文件
This will manifest as something like an error that Xcode failed to create provisioning profile:
//这将表现为Xcode未能创建配置文件的错误
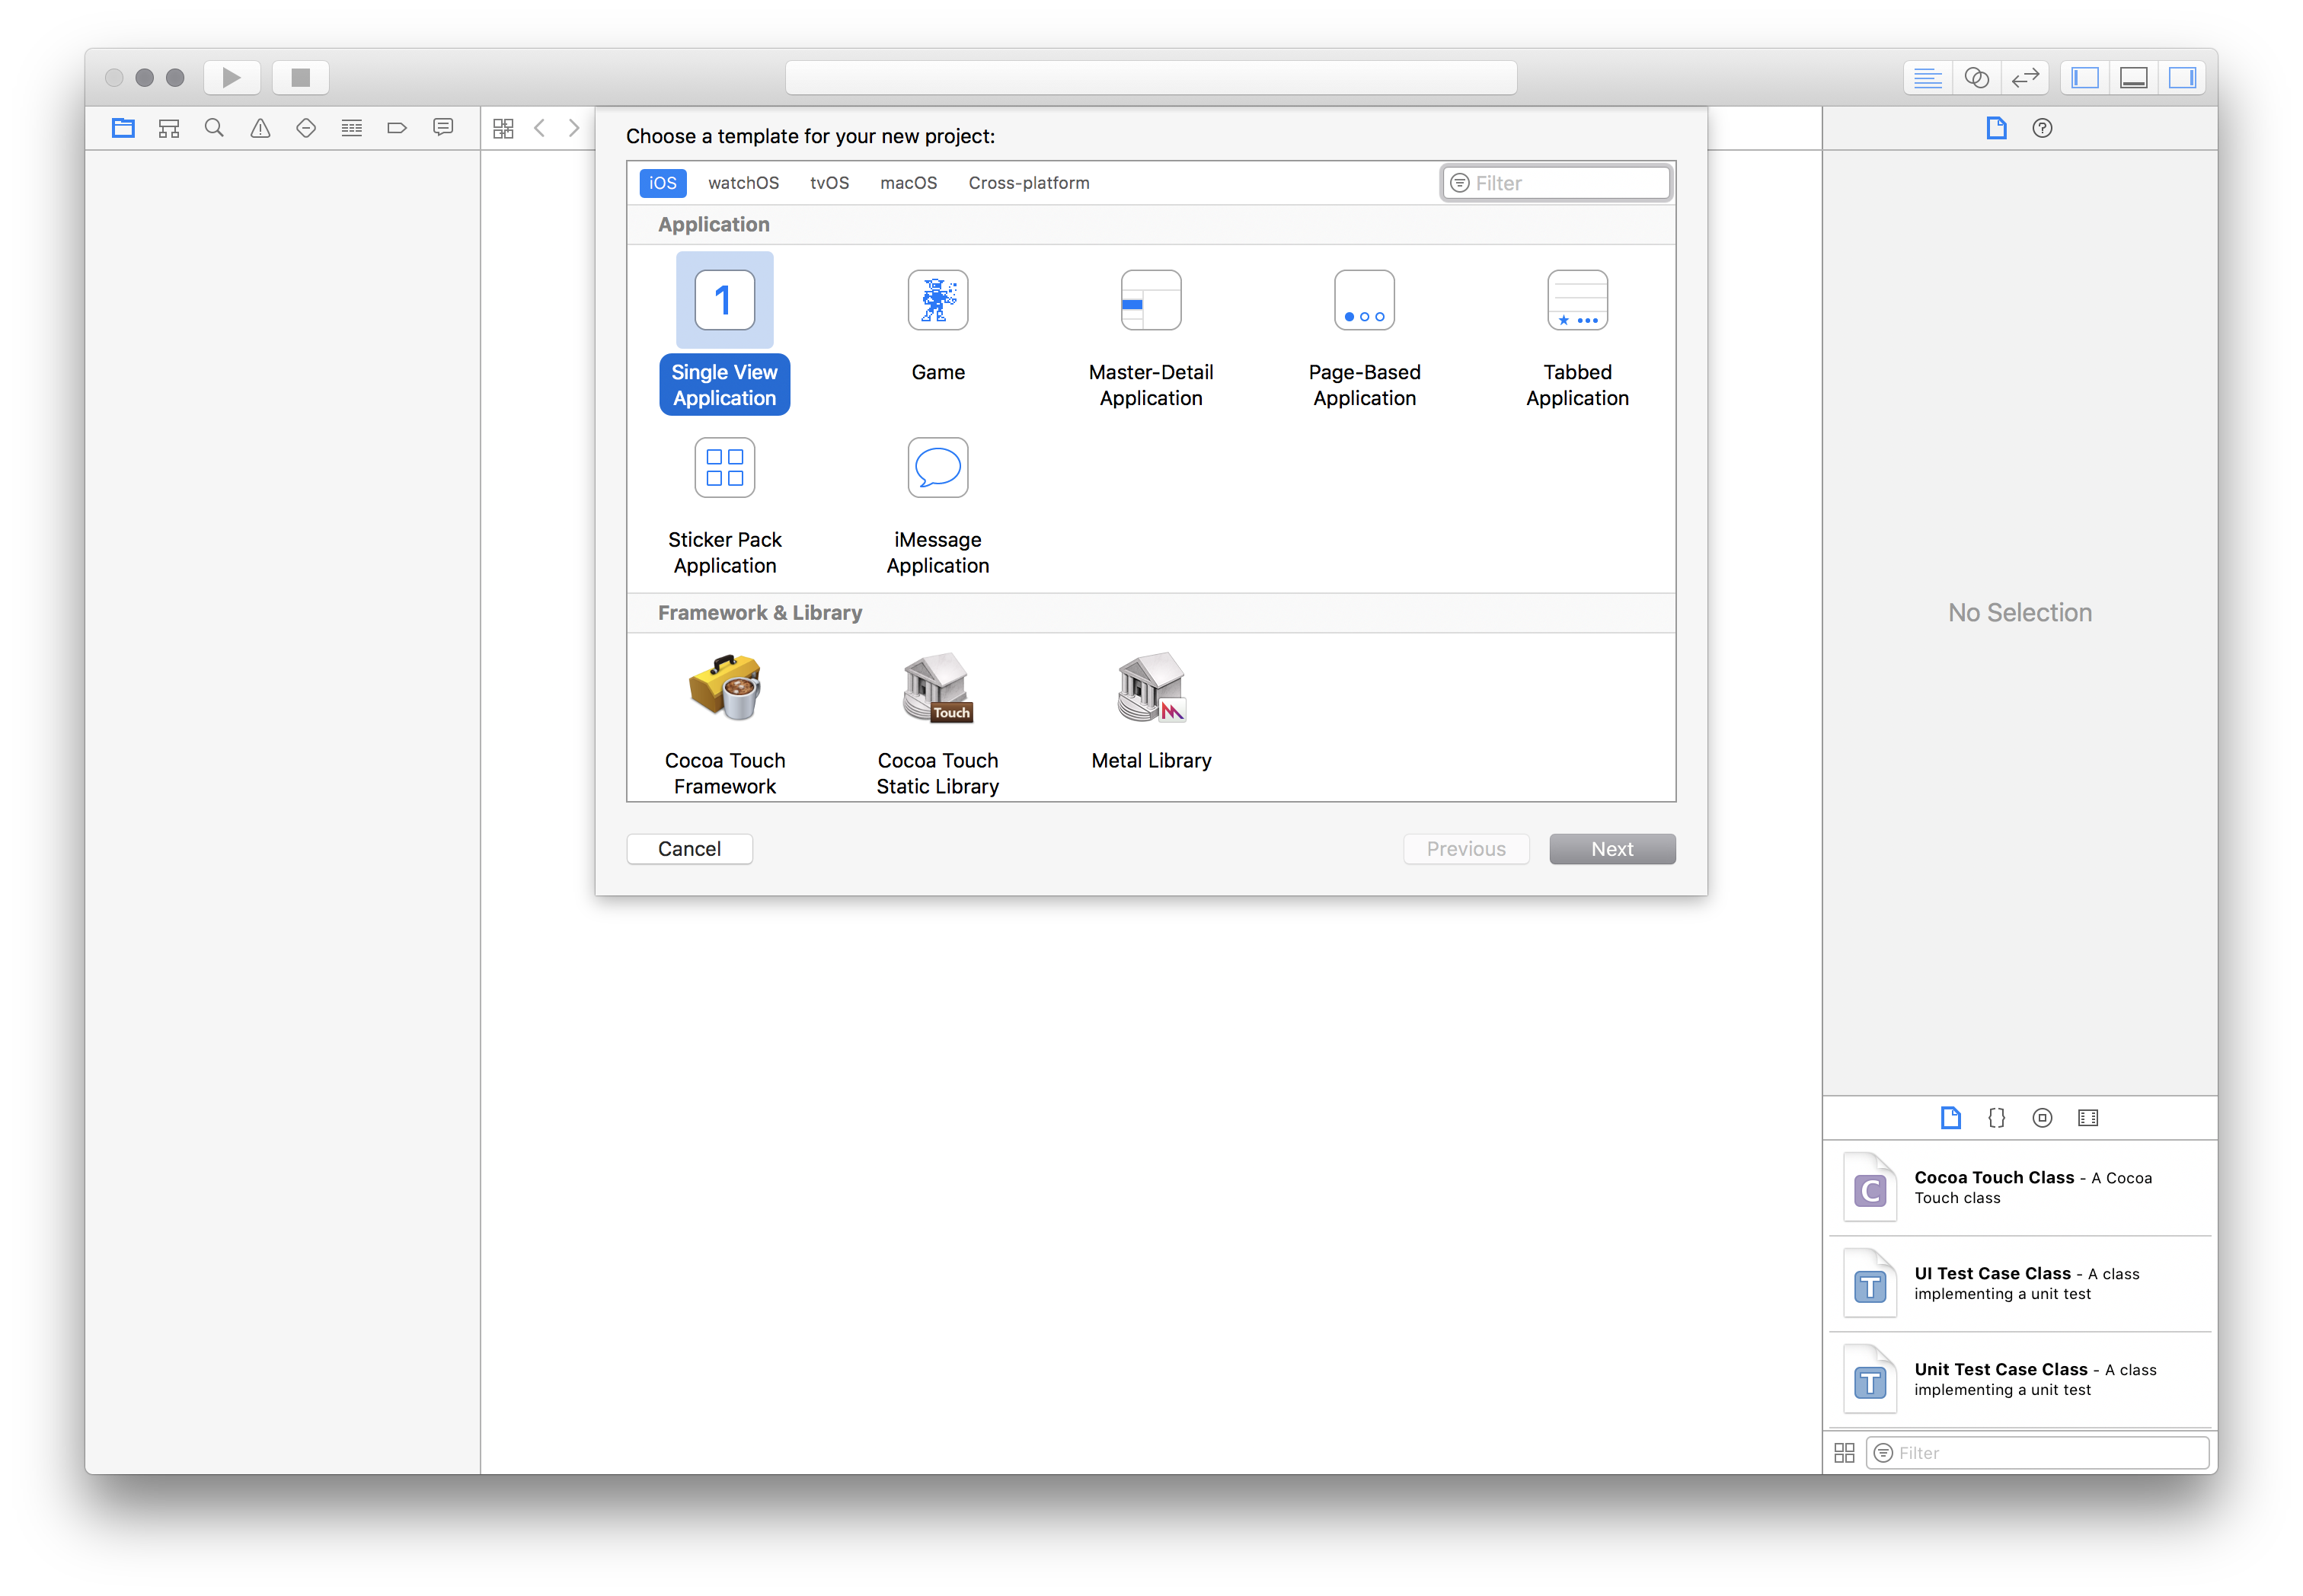
The easiest way around this is to create a provisioning profile by opening Xcode and creating a new project: //最简单的方法是通过打开Xcode并创建一个新项目来创建配置文件:
The type does not matter, other than it being “iOS”. “Single View Application” is the easiest: //类型不重要,除了“iOS”“单视图应用程序”是最简单的:
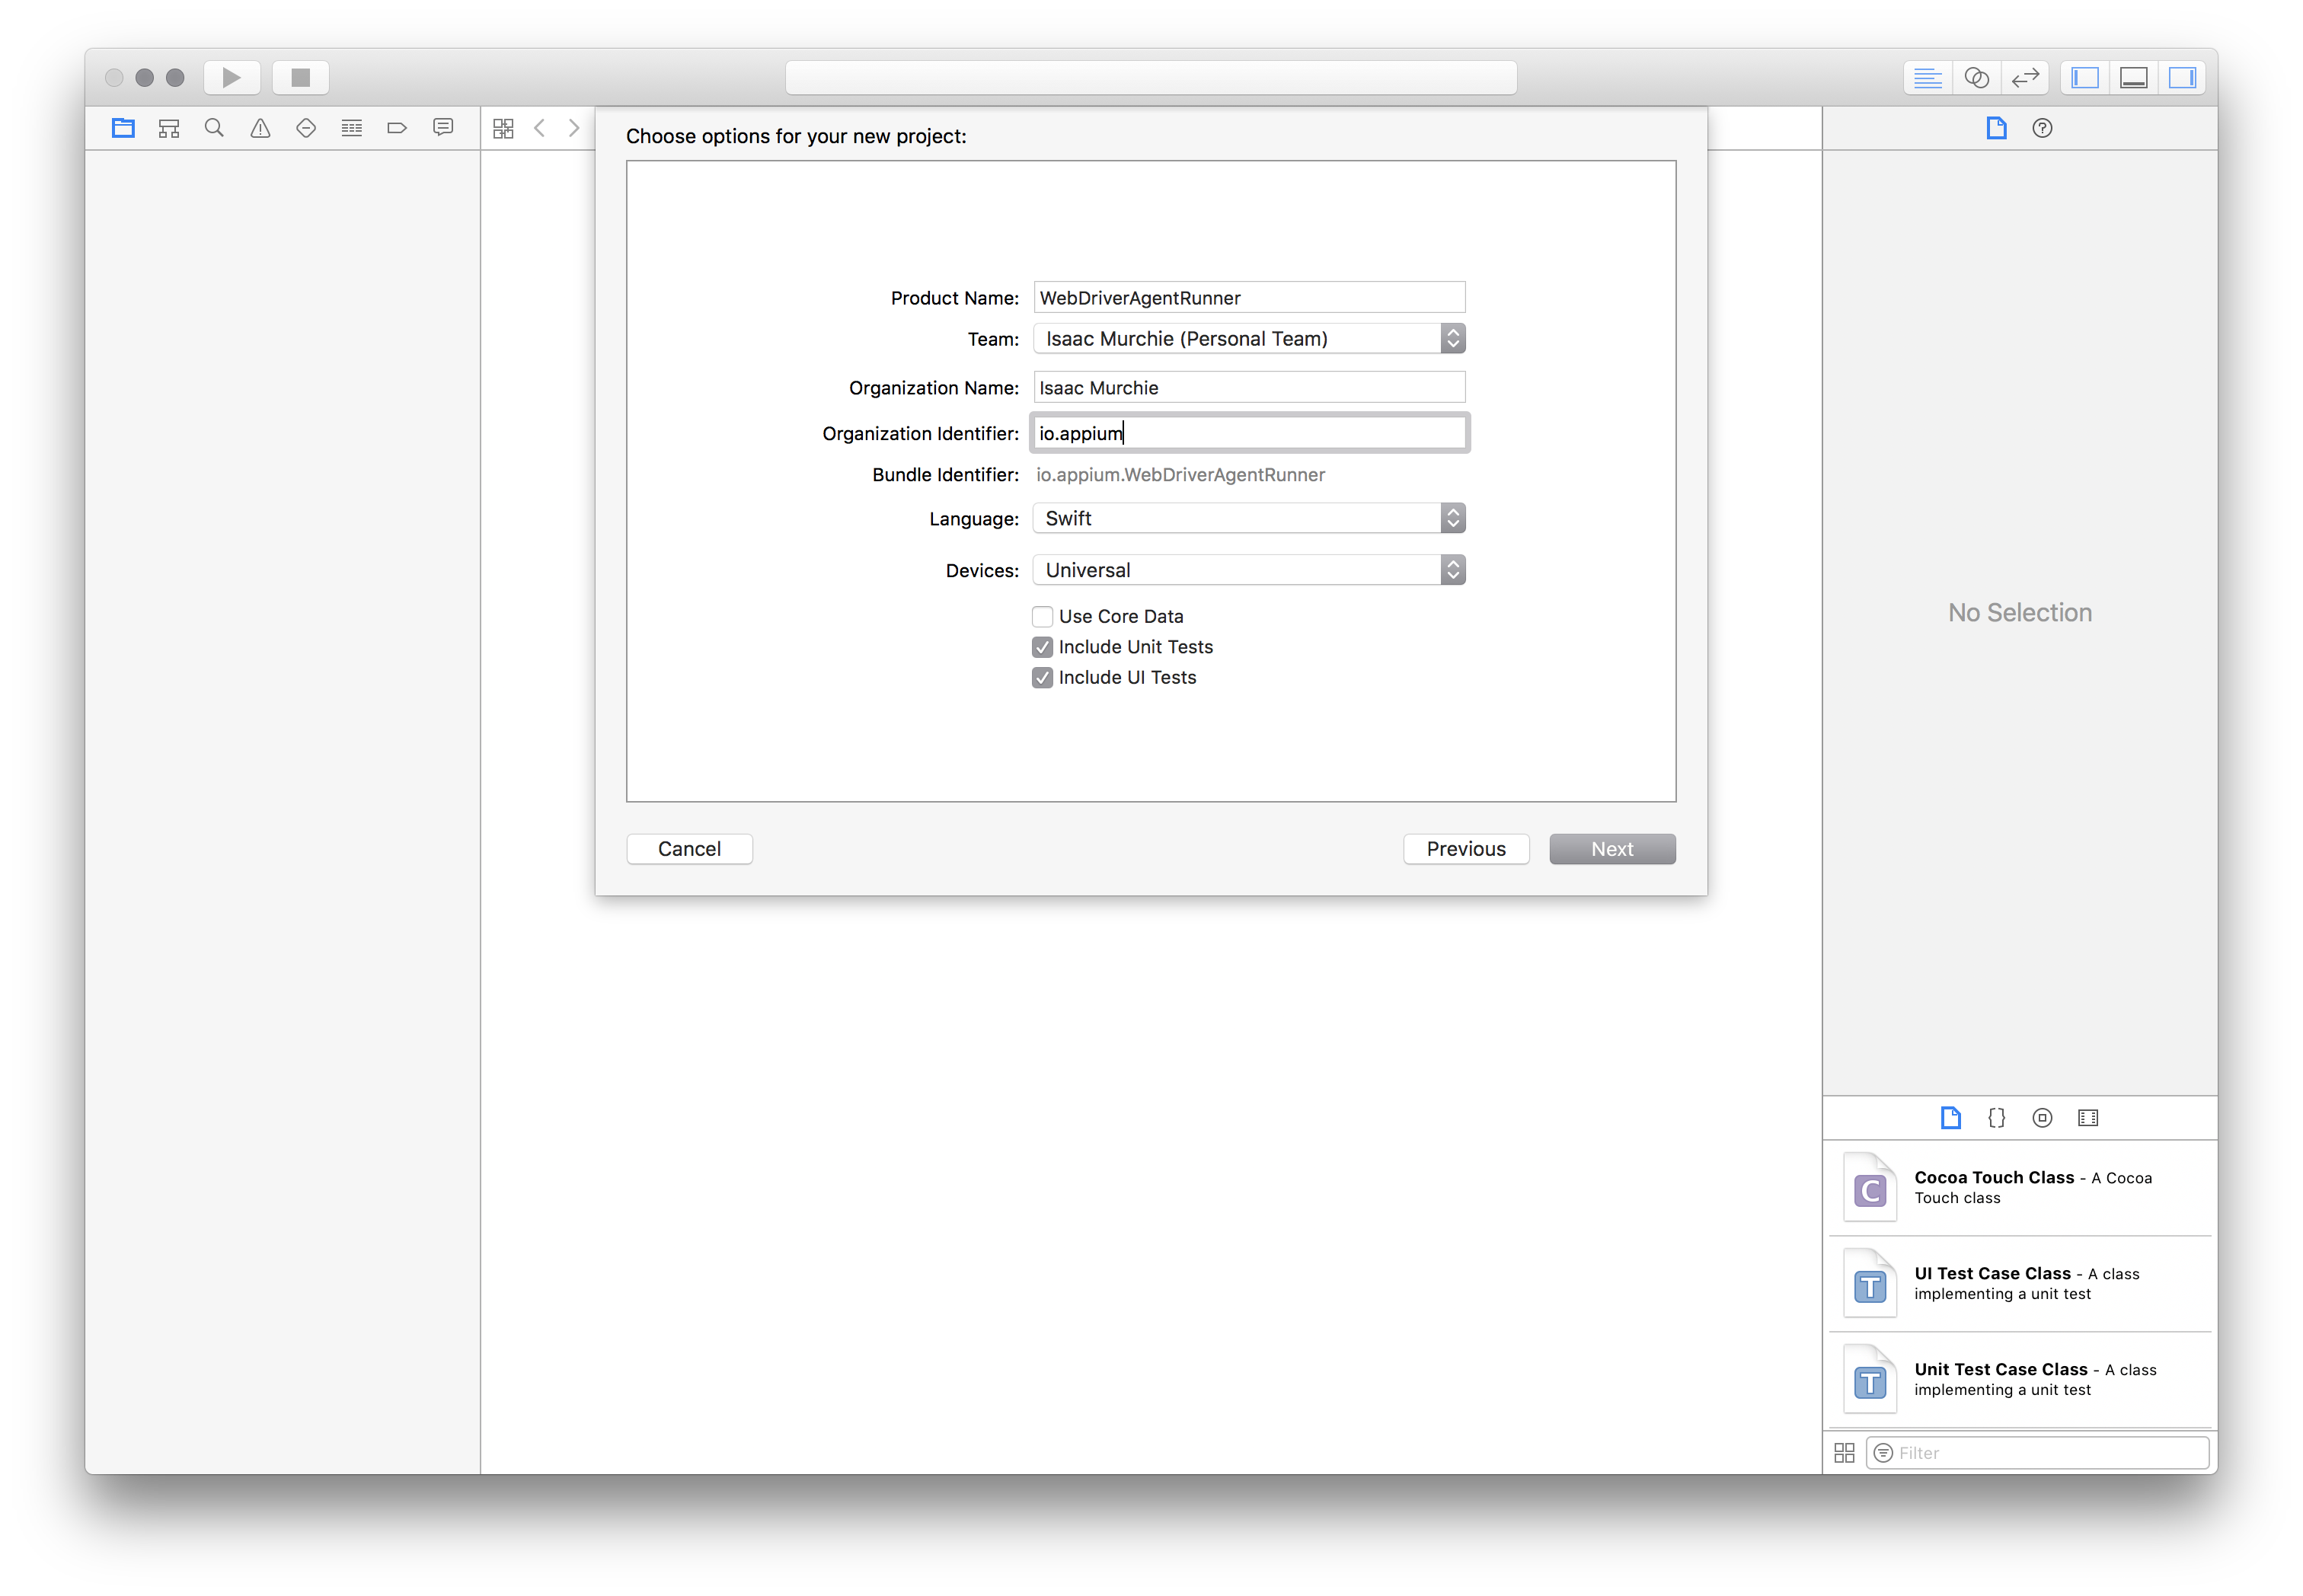
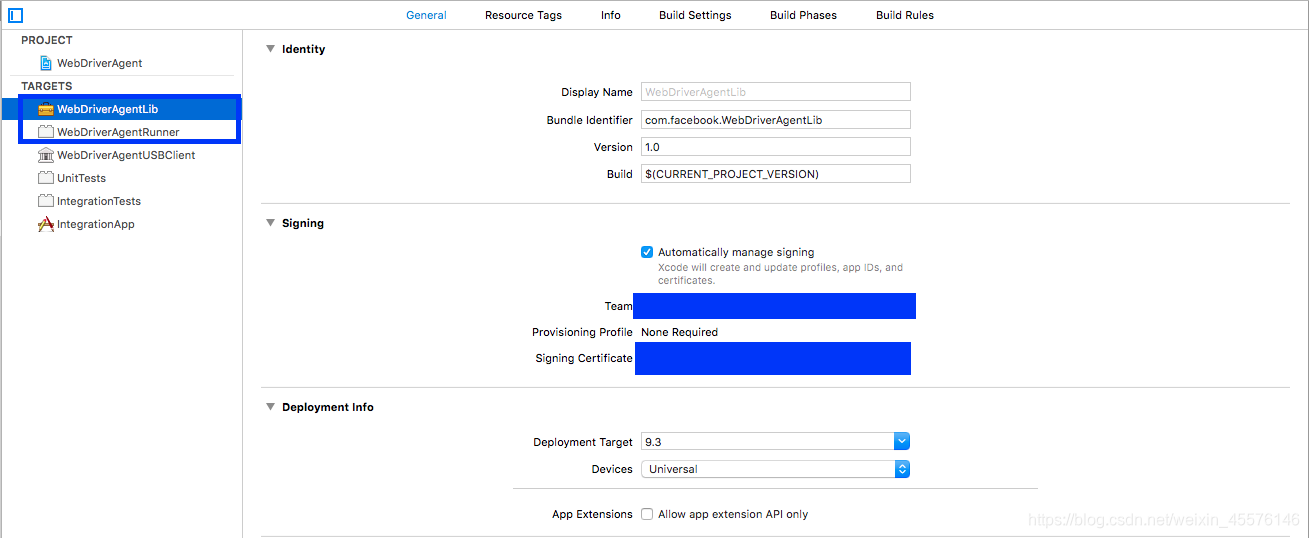
The important part is to use a unique “Product Name” and “Organization Name”. Also, at this point, specify your “Team”.
//注意’组’
You can confirm that the provisioning profile was created by looking at the “Project” tab: //查看“Project”选项卡来设置配置文件
Or by going into your account preferences and seeing the provisioning profile://进入账户首选项来查看配置文件
At this point you have a valid provisioning profile. Make note of the bundle id you associated with it, and add that in the updatedWDABundleId desired capability for your tests. Then follow the initial instructions for automatic configuration.
//有效配置文件,关联的bundle id并添加到updatedWDABundleId中,跟着说明进行自动配置


Full manual configuration
//全手动配置
Alternatively, the provisioning profile can be manually associated with the project (keep in mind that this will have to be done each time the WebDriverAgent is updated, which includes every time a new version of Appium is installed, and is not recommended):
//或许,可以手动将配置文件与项目关联(每次更新都必须执行,不建议)
- Find out where your Appium installation is:
$ which appium
    /path/where/installed/bin/appium
- Given this installation location,
/path/where/installed/bin/appium,WebDriverAgentproject will be found in/path/where/installed/lib/node_modules/appium/node_modules/appium-webdriveragent. Open a terminal and go to the location, then run the next script. //给定安装位置,使用终端转到此处,运行脚本
mkdir -p Resources/WebDriverAgent.bundle
- (Only for Appium versions below 1.20) Run the next script on the same terminal.
./Scripts/bootstrap.sh -d
- Open
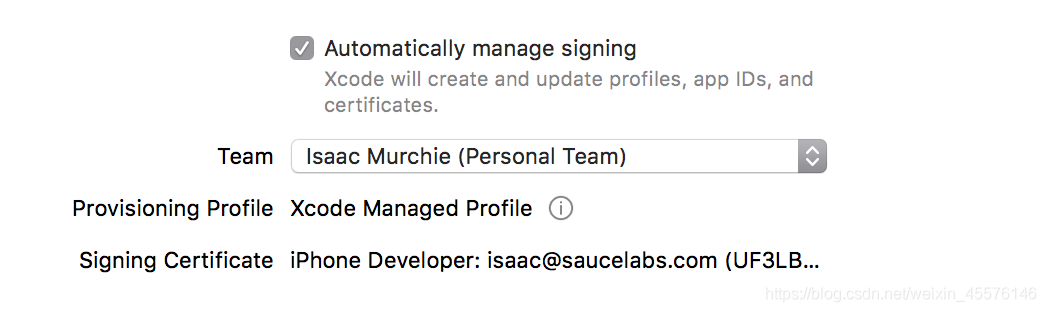
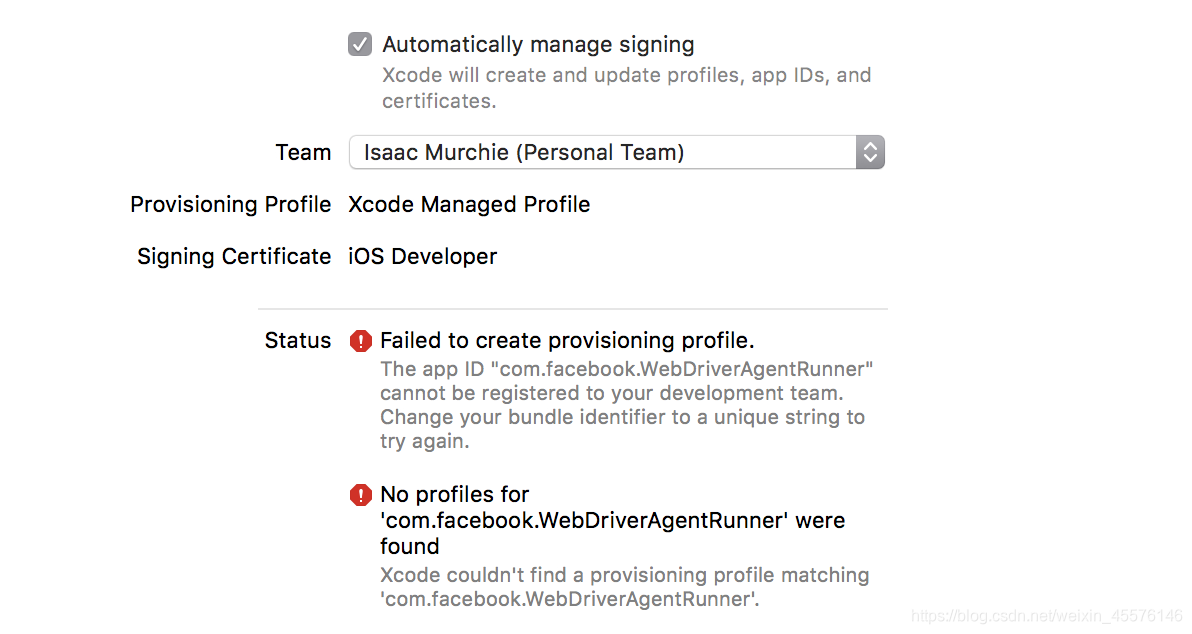
WebDriverAgent.xcodeprojin Xcode. For both theWebDriverAgentLibandWebDriverAgentRunnertargets, select “Automatically manage signing” in the “General” tab, and then select yourDevelopment Team. This should also auto selectSigning Ceritificate. The outcome should look as shown below: - Xcode may fail to create a provisioning profile for the
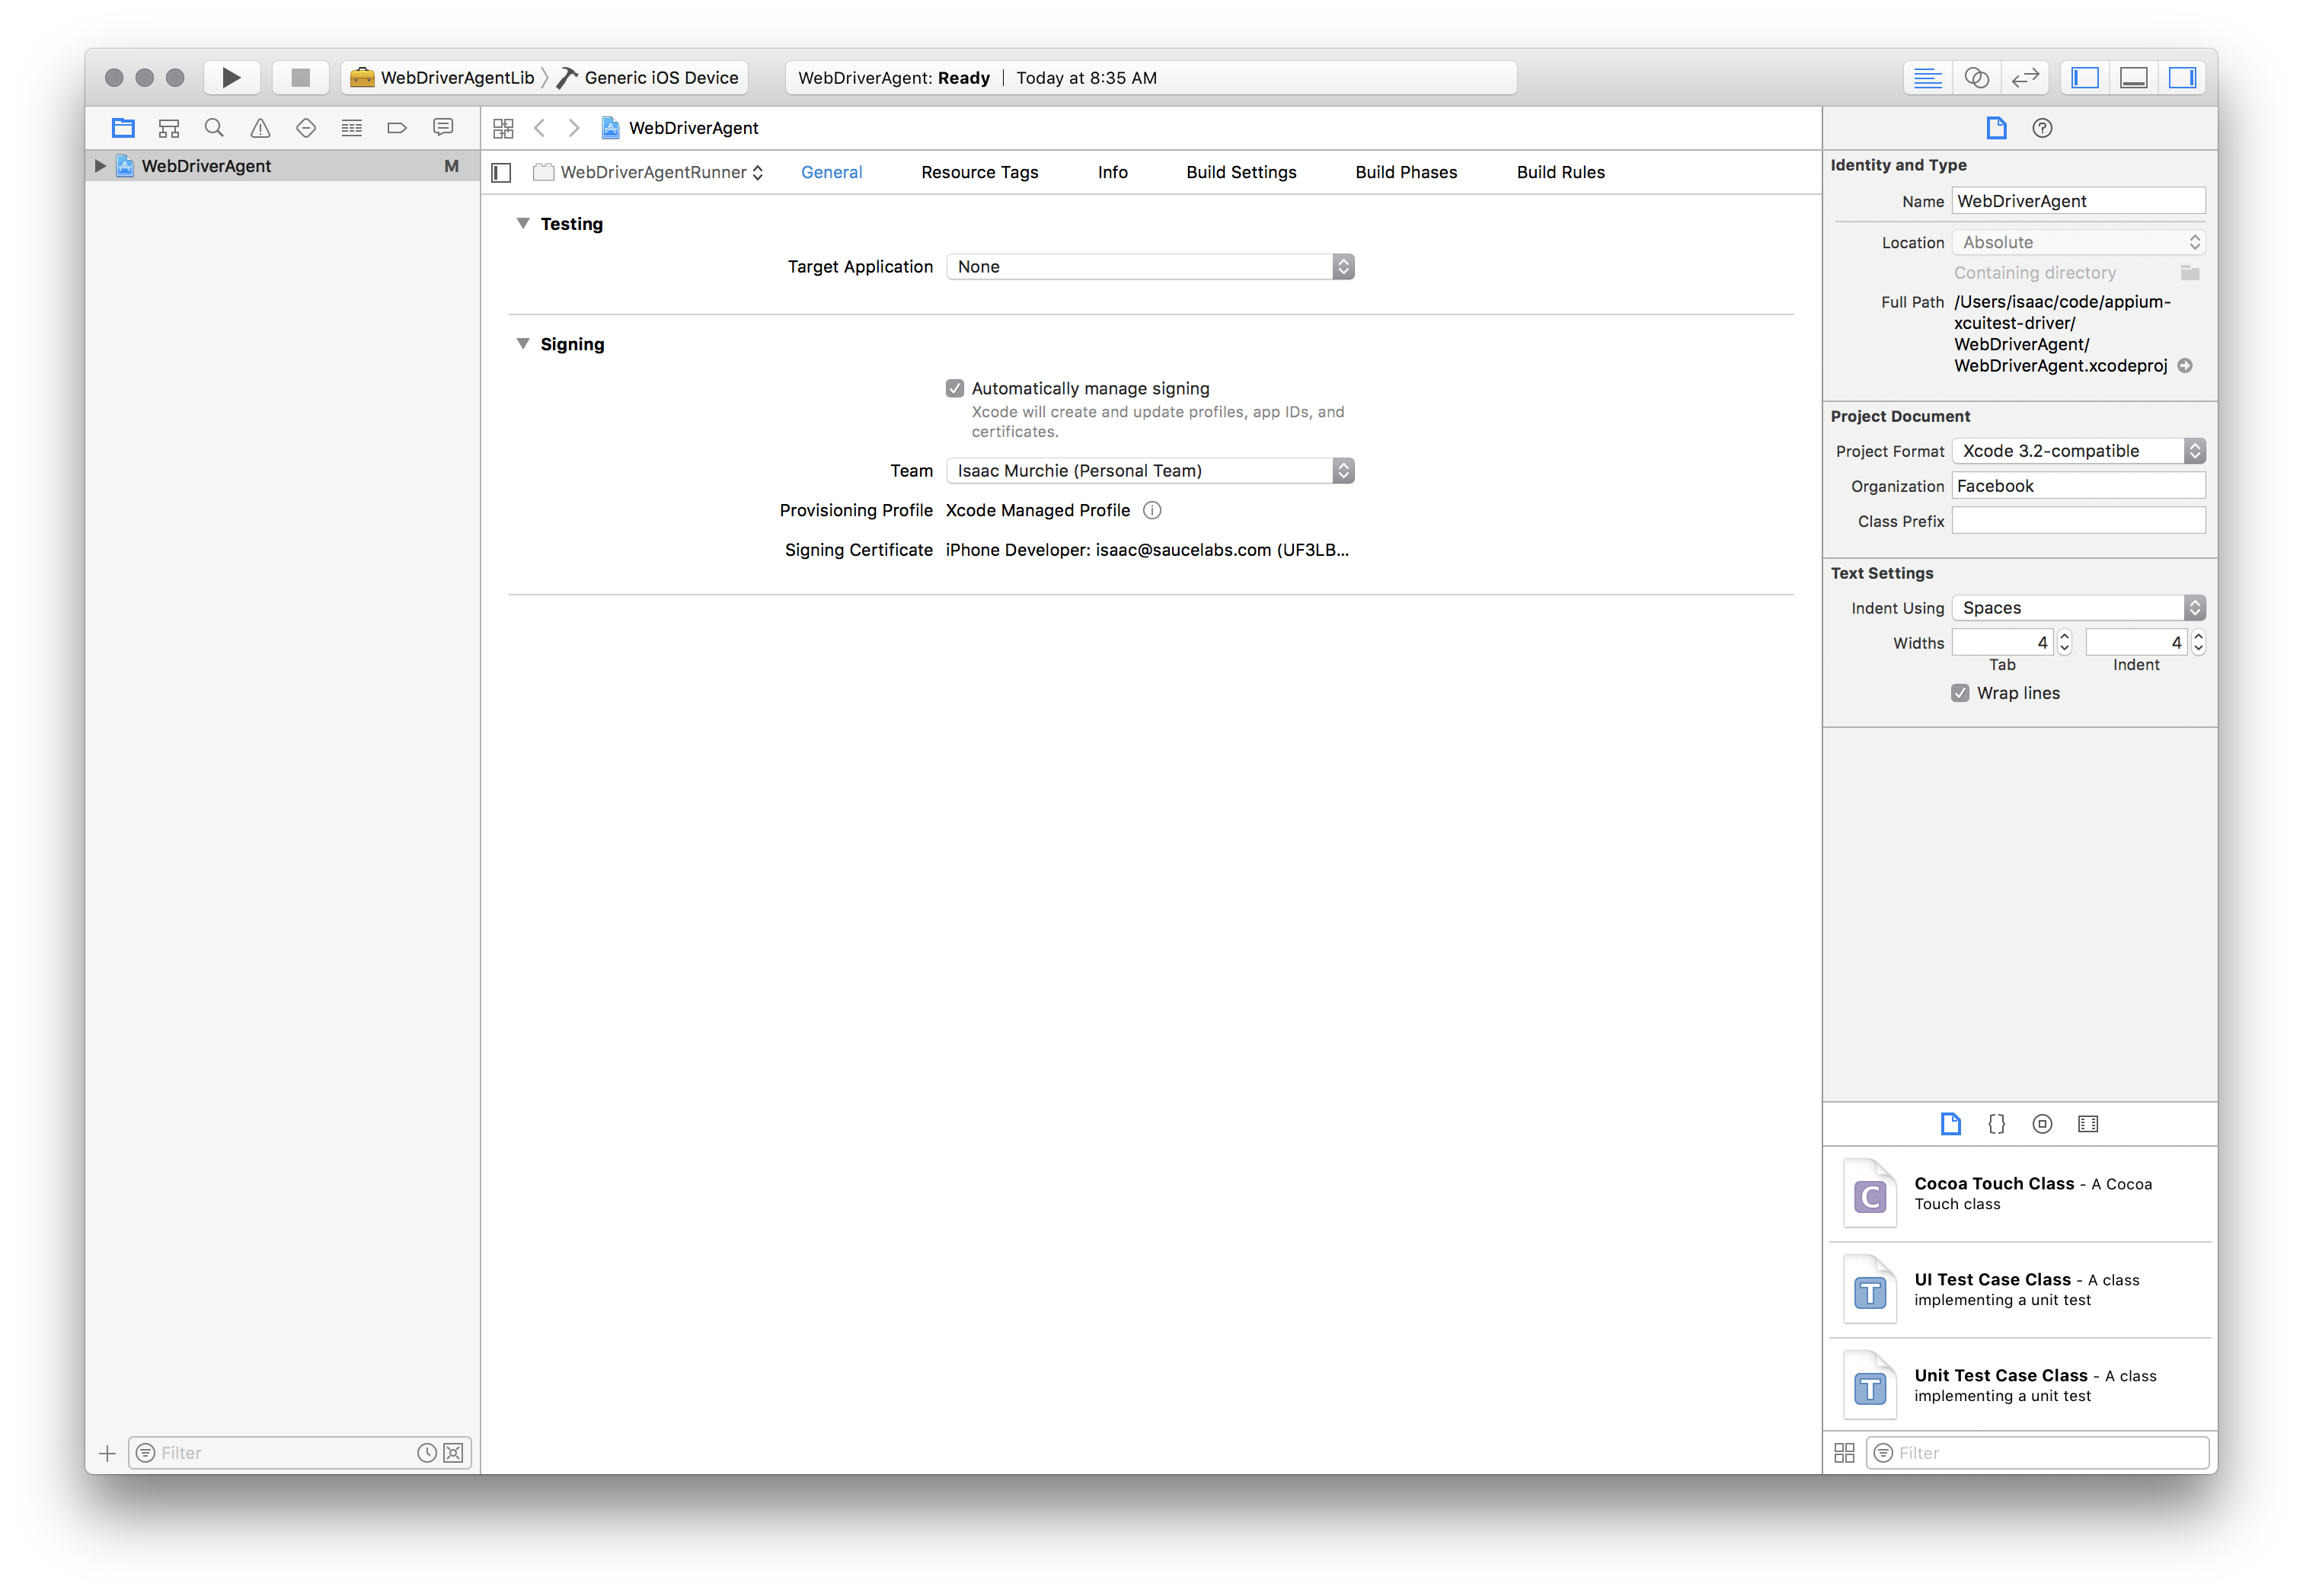
WebDriverAgentRunnertarget: //Xcode无法为WebDriverAgentRunner目标创配置文件 - This necessitates manually changing the bundle id for the target by going into the “Build Settings” tab, and changing the “Product Bundle Identifier” from
com.facebook.WebDriverAgentRunnerto something that Xcode will accept: - Going back to the “General” tab for the WebDriverAgentRunner target, you should now see that it has created a provisioning profile and all is well:
- Finally, you can verify that everything works. Build the project: //检查所有项目

 xcodebuild -project WebDriverAgent.xcodeproj -scheme WebDriverAgentRunner -de
 stination 'id=<udid>' test
If this was successful, the output should end with something like:
 Test Suite 'All tests' started at 2017-01-23 15:49:12.585
    Test Suite 'WebDriverAgentRunner.xctest' started at 2017-01-23 15:49:12.586
    Test Suite 'UITestingUITests' started at 2017-01-23 15:49:12.587
    Test Case '-[UITestingUITests testRunner]' started.
        t =     0.00s     Start Test at 2017-01-23 15:49:12.588
        t =     0.00s     Set Up
- To completely verify, you can try accessing the WebDriverAgent server status (note: you must be on the same network as the device, and know its IP address, from Settings => Wi-Fi => Current Network): //要完全验证,您可以尝试访问WebDriverAgent服务器状态(注意:您必须与设备位于同一网络上,并通过设置=>Wi-Fi=>当前网络了解其IP地址):
export DEVICE_URL='http://<device IP>:8100'
    export JSON_HEADER='-H "Content-Type: application/json;charset=UTF-8, accept: application/json"'
    curl -X GET $JSON_HEADER $DEVICE_URL/status
You ought to get back output something like this:
  {
      "value" : {
        "state" : "success",
        "os" : {
          "name" : "iOS",
          "version" : "10.2"
        },
        "ios" : {
          "simulatorVersion" : "10.2",
          "ip" : "192.168.0.7"
        },
        "build" : {
          "time" : "Jan 23 2017 14:59:57"
        }
      },
      "sessionId" : "8951A6DD-F3AD-410E-A5DB-D042F42F68A7",
      "status" : 0
    }
Configuring the app under test
// 配置测试中的应用程序
Not only does WebDriverAgent need to be configured to run on your device, but your app must also be able to run on your device. The central requirements are the same: to have a build of your app (an .ipa file) signed with a development provisioning profile. A good overview of the process can be found here and here.
In a little more detail, to get started on a real device, you will need the following:
- An Apple Developer ID and a valid Developer Account with a configured development certificate and provisioning profile. (Please make sure the provisioning profile has iOS Distribution type)
- A valid iOS Development Certificate and Provisioning Profile are necessary to test on a real device. Your app will also need to be signed. You can find information about this in the Apple documentation.
- An iPad or iPhone. Make sure this has been set up for development in Xcode.
- A signed
.appor.ipafile of your app, or the source code to build one. - A Mac with Xcode and the Xcode Command Line Developer Tools.
Appium handles installing the application to the device, using ideviceinstaller (which is installed as part of libimobiledevice), but it is sometimes easier to pre-install your app using Xcode to ensure there are no problems (see again the Apple documentation for this).
Troubleshooting ideas
1.Make sure UDID is correct by checking it in Xcode Organizer or iTunes. It is a long string (20+ chars).
2.Make sure that you can run your tests against the Simulator.
3.Make sure the following settings are enabled on your device:
- Settings -> Developer -> Enable UI Automation
- Settings -> Safari -> Advanced -> Web Inspector and Remote Automation
- Please read Automating mobile web apps for more details about WebView
4.Consider generating a provisioning profile with .xctrunner identifier if you do not want to generate a wildcard one for manual configuration. The .xctrunner config support has been added since Xcode 11. A reference
5.Make sure the device under test is not a jaibroken one
com.apple.mobile.installation_proxyservice to manage Apps on the device does not work
6.Make sure the provisioning profile has iOS Distribution certificate
- An active Xcode/xcodebuild connection/session is necessary to interact with WebDriverAgentRunner because of Apple’s security design. The certificate affects the limitation (issue)