介绍
- python:编程语言
- pytest:第三方单元测试库
- requests:http接口测试第三方库
- allure:生成测试报告
- Jenkins:持续集成
一、全面认识requests模块以及常用的方法和底层原理
Requests模块适用于发送http请求以及接受http响应的python第三方库
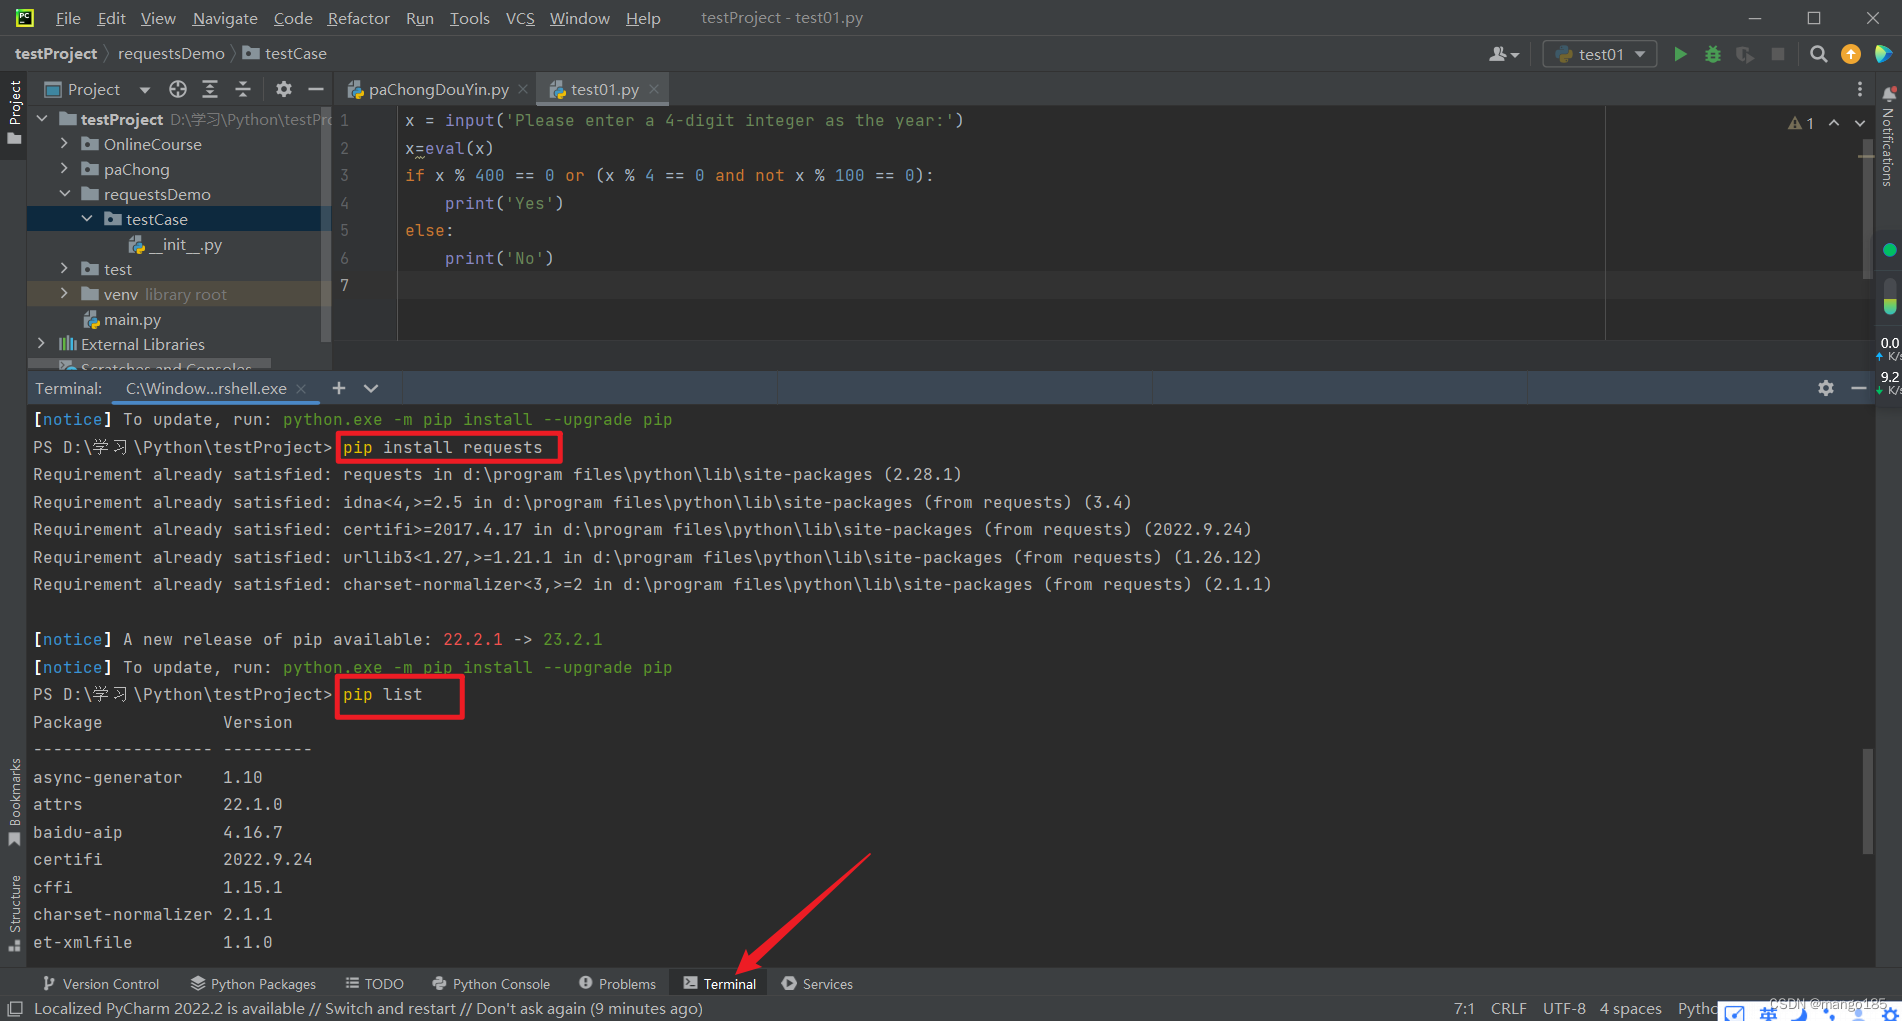
安装requests
// 安装
pip install requests

// 查看
pip list
详解requests
常用方法
import requests

requests.get()
requests.post()
requests.put()
requests.delete()
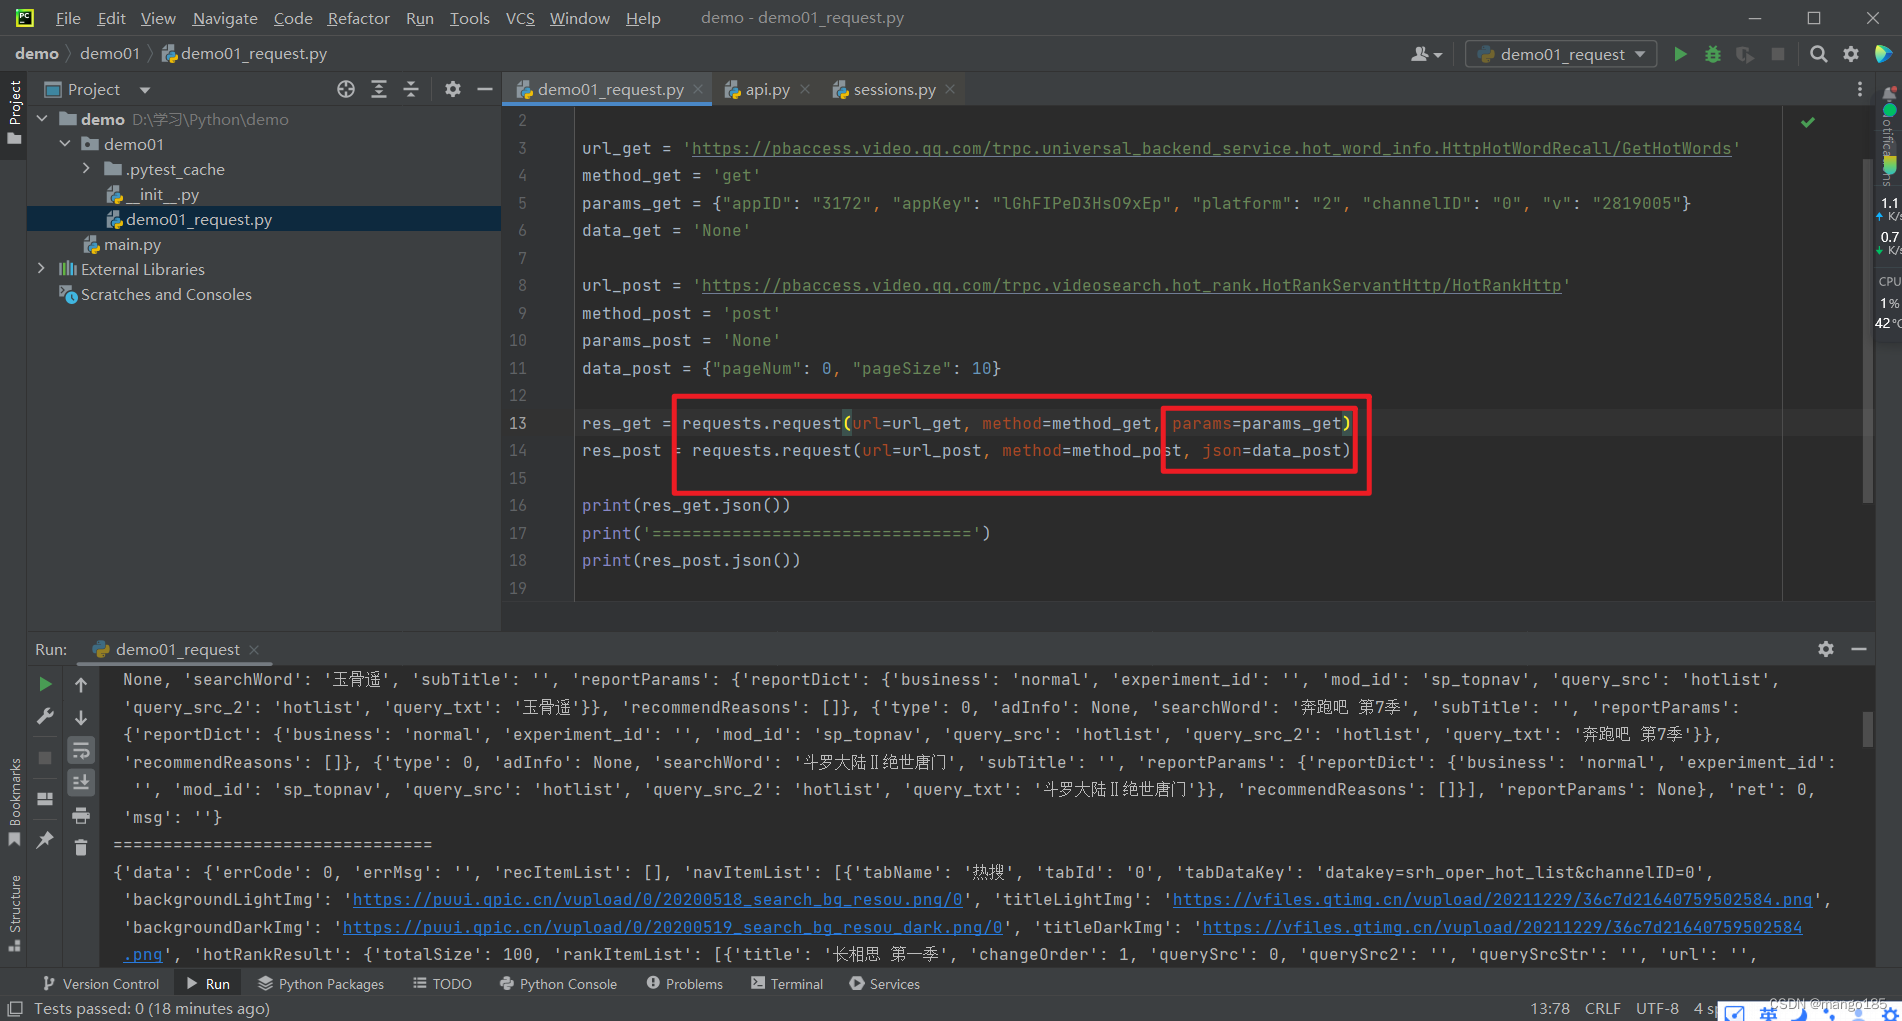
requests.request()
requests.session()
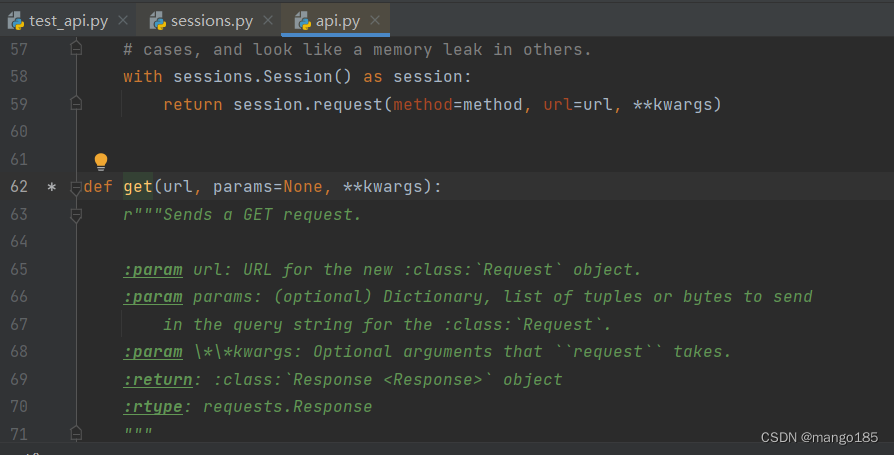
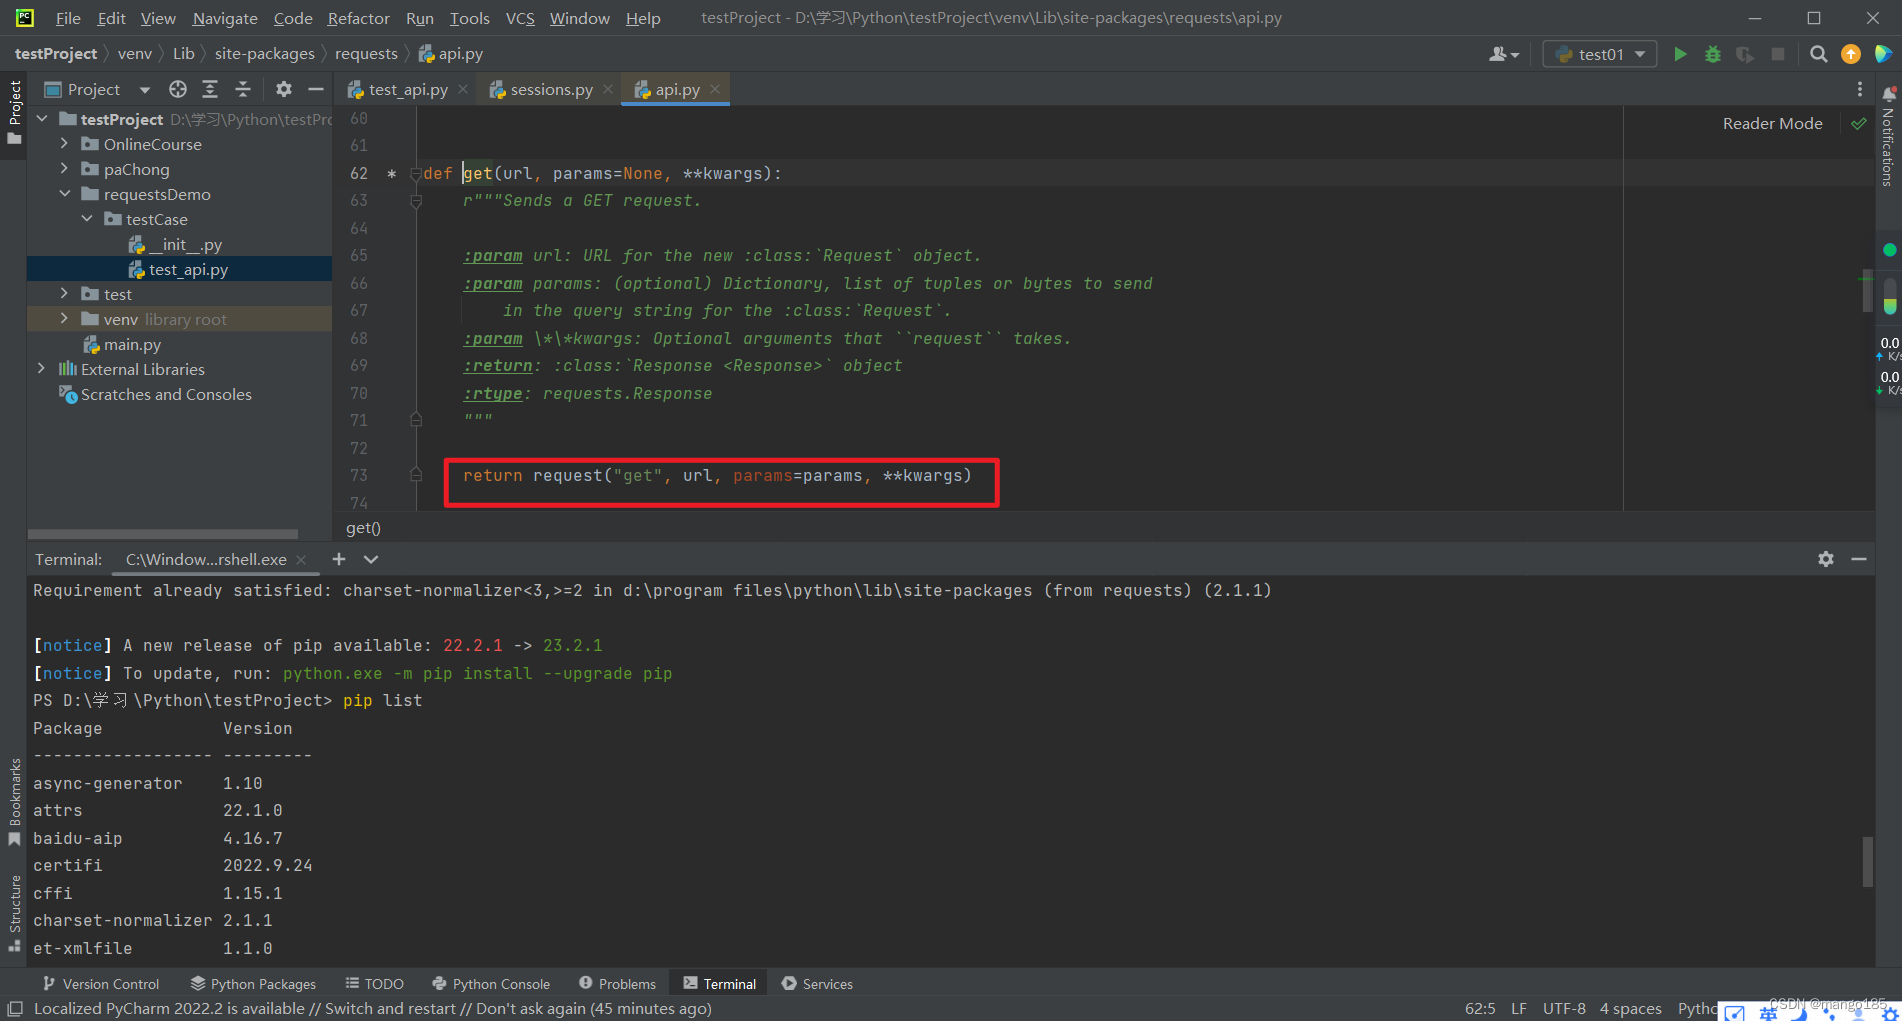
CTRL + 鼠标左键查看具体方法
解析requests底层原理
def get(url, params=None, **kwargs):
def post(url, data=None, json=None, **kwargs):
def put(url, data=None, **kwargs):
def delete(url, **kwargs):
def request(method, url, **kwargs):  前面四个方法统一调用的方法
def session(): 会话,web项目从登录到退出就是一个会话
def request(method, url, **kwargs):
    """Constructs and sends a :class:`Request <Request>`.

    :param method: method for the new :class:`Request` object: ``GET``, ``OPTIONS``, ``HEAD``, ``POST``, ``PUT``, ``PATCH``, or ``DELETE``.
    :param url: URL for the new :class:`Request` object.
    :param params: (optional) Dictionary, list of tuples or bytes to send
        in the query string for the :class:`Request`.
    :param data: (optional) Dictionary, list of tuples, bytes, or file-like
        object to send in the body of the :class:`Request`.
    :param json: (optional) A JSON serializable Python object to send in the body of the :class:`Request`.
    :param headers: (optional) Dictionary of HTTP Headers to send with the :class:`Request`.
    :param cookies: (optional) Dict or CookieJar object to send with the :class:`Request`.
    :param files: (optional) Dictionary of ``'name': file-like-objects`` (or ``{'name': file-tuple}``) for multipart encoding upload.
        ``file-tuple`` can be a 2-tuple ``('filename', fileobj)``, 3-tuple ``('filename', fileobj, 'content_type')``
        or a 4-tuple ``('filename', fileobj, 'content_type', custom_headers)``, where ``'content-type'`` is a string
        defining the content type of the given file and ``custom_headers`` a dict-like object containing additional headers
        to add for the file.
    :param auth: (optional) Auth tuple to enable Basic/Digest/Custom HTTP Auth.
    :param timeout: (optional) How many seconds to wait for the server to send data
        before giving up, as a float, or a :ref:`(connect timeout, read
        timeout) <timeouts>` tuple.
    :type timeout: float or tuple
    :param allow_redirects: (optional) Boolean. Enable/disable GET/OPTIONS/POST/PUT/PATCH/DELETE/HEAD redirection. Defaults to ``True``.
    :type allow_redirects: bool
    :param proxies: (optional) Dictionary mapping protocol to the URL of the proxy.
    :param verify: (optional) Either a boolean, in which case it controls whether we verify
            the server's TLS certificate, or a string, in which case it must be a path
            to a CA bundle to use. Defaults to ``True``.
    :param stream: (optional) if ``False``, the response content will be immediately downloaded.
    :param cert: (optional) if String, path to ssl client cert file (.pem). If Tuple, ('cert', 'key') pair.
    :return: :class:`Response <Response>` object
    :rtype: requests.Response

    Usage::

      >>> import requests
      >>> req = requests.request('GET', 'https://httpbin.org/get')
      >>> req
      <Response [200]>
    """

    # By using the 'with' statement we are sure the session is closed, thus we
    # avoid leaving sockets open which can trigger a ResourceWarning in some
    # cases, and look like a memory leak in others.
    with sessions.Session() as session:
        return session.request(method=method, url=url, **kwargs)
request方法底层调用的是session对象的request方法
    def request(
        self,
        method,  请求方式
        url,  请求路径
        params=None,  get请求传参
        data=None,  post或put请求传参
        json=None,  post请求传参
        headers=None,  kwargs参数的部分,请求头
        cookies=None,  kwargs参数的部分, cookie信息
        files=None,  kwargs参数的部分,文件上传
        auth=None,  kwargs参数的部分, 鉴权
        timeout=None,  kwargs参数的部分, 超时处理
        allow_redirects=True,  kwargs参数的部分, 是否允许重定向
        proxies=None,  kwargs参数的部分,  代理
        hooks=None,  kwargs参数的部分,  钩子
        stream=None,  kwargs参数的部分,  文件下载
        verify=None,  kwargs参数的部分,  证书验证
        cert=None,  kwargs参数的部分, CA证书
    ):
response对象
res.text  返回文本格式
res.content  返回bytes类型数据
res.json()  返回json数据
res.status_code  返回状态码
res.reason  返回状态信息
res.cookies  返回cookie信息
res.encoding  返回编码格式
res.headers  返回响应头
res.request.???  返回请求的信息和数据
二、测试框架:unittest和pytest
unittest和pytest框架的区别
https://blog.csdn.net/qishuzdh/article/details/125686523
pytest和unittest的区别:
- 安装需求不同
- pytest为第三方单元测试库,需额外安装;
- unittest为标准库,无需额外安装。
- 用例编写规则不同
- pytest编写规则较为简单,兼容性较好
- unittest需按照固定的格式编写,较为复杂。
pytest单元测试框架
pytest是一个非常成熟python用例测试框架,可以和很多的工具或框架(selenium、requests、appium、……)实现多种自动化测试
- 通过pytest的插件可以实现多种功能:
- pytest-html 生成html报告
- pytest-xdist 多线程
- pytest-ordering 标记测试用例的执行顺序
- pytest-rerunfailures 失败用例重跑
- pytest-base-url 管理基础路径
- allure-pytest 生成allure报告
- pytest
- requests
- pyyaml
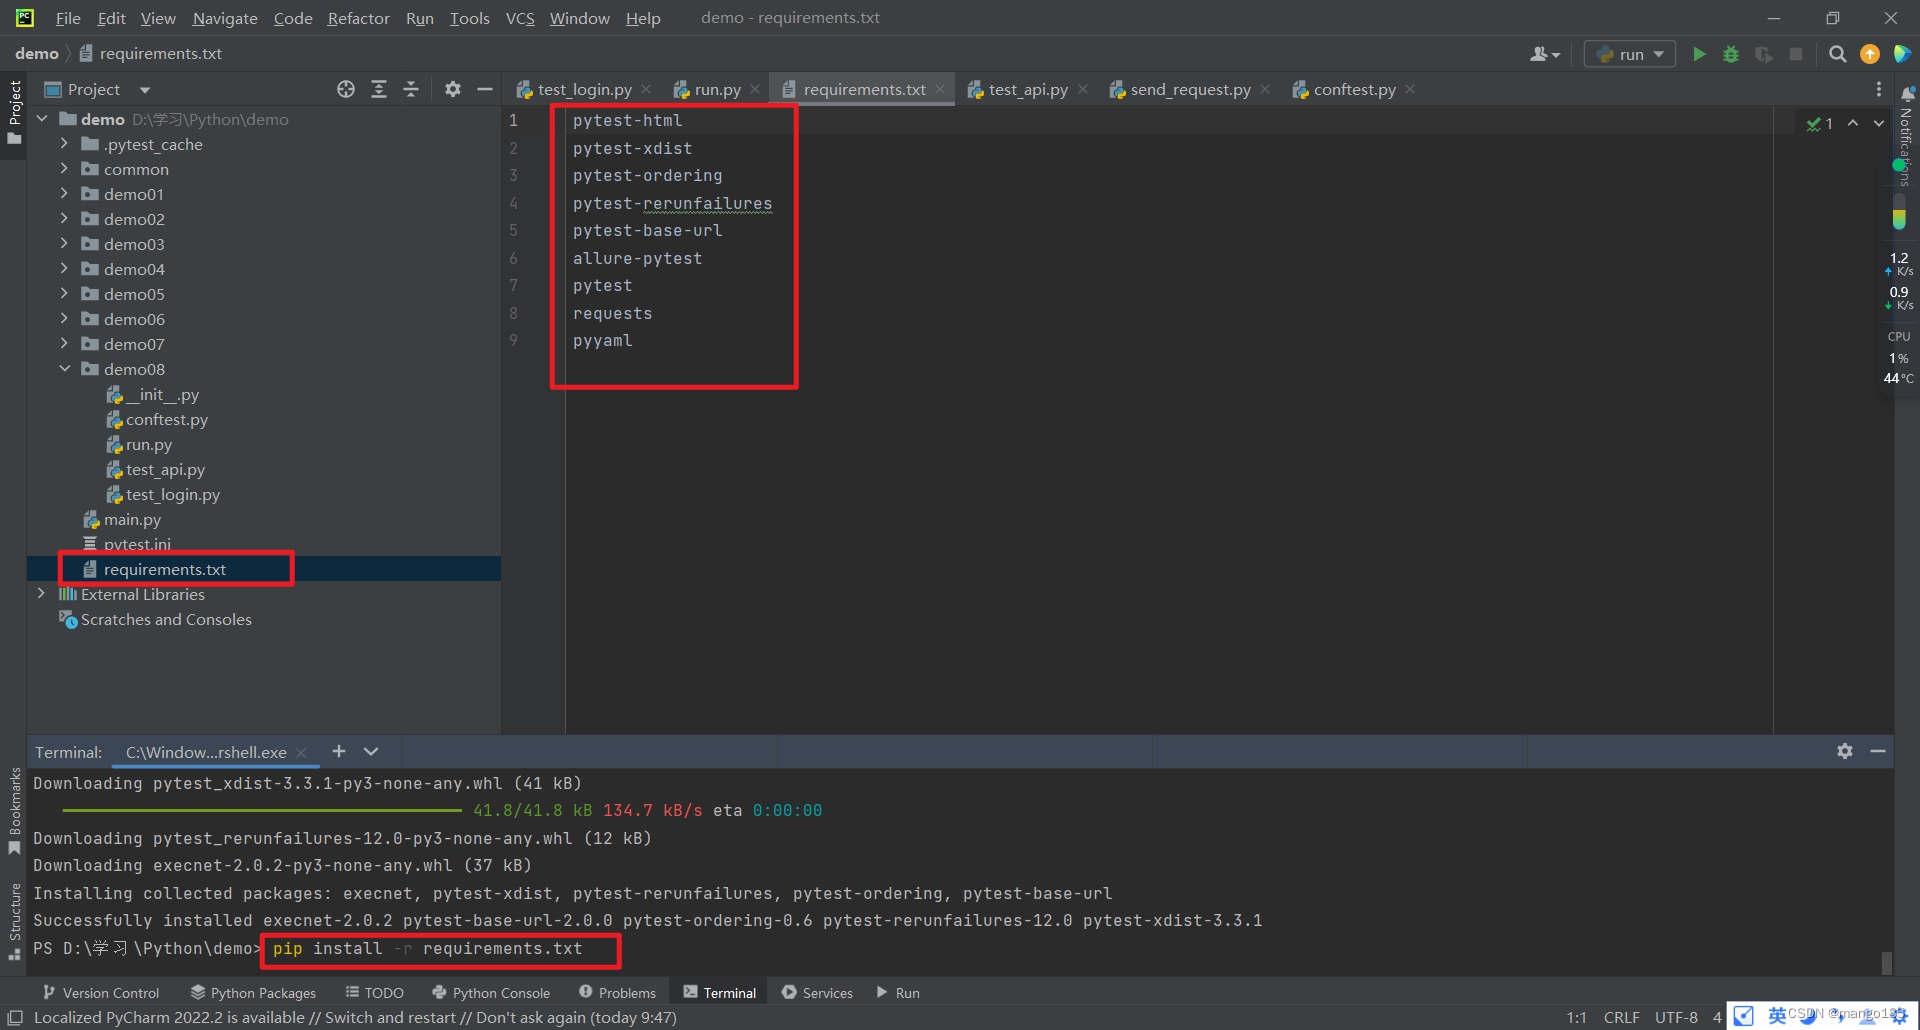
可以使用requirements.txt文件将所有的插件和模块放在一起,并通过下面的命令执行安装:
pip install -r requirements.txt
pytest-html
pytest-xdist
pytest-ordering
pytest-rerunfailures
pytest-base-url
allure-pytest
pytest
requests
pyyaml
在所有用例的最外层写一个run.py文件,一次性执行所有用例:
import pytest

if __name__ == '__main__':
    pytest.main(['-vs'])
默认测试用例的规则:
- 模块名(py文件)必须以test_开头或_test结尾
- 类名必须Test开头
- 用例名必须以test_开头
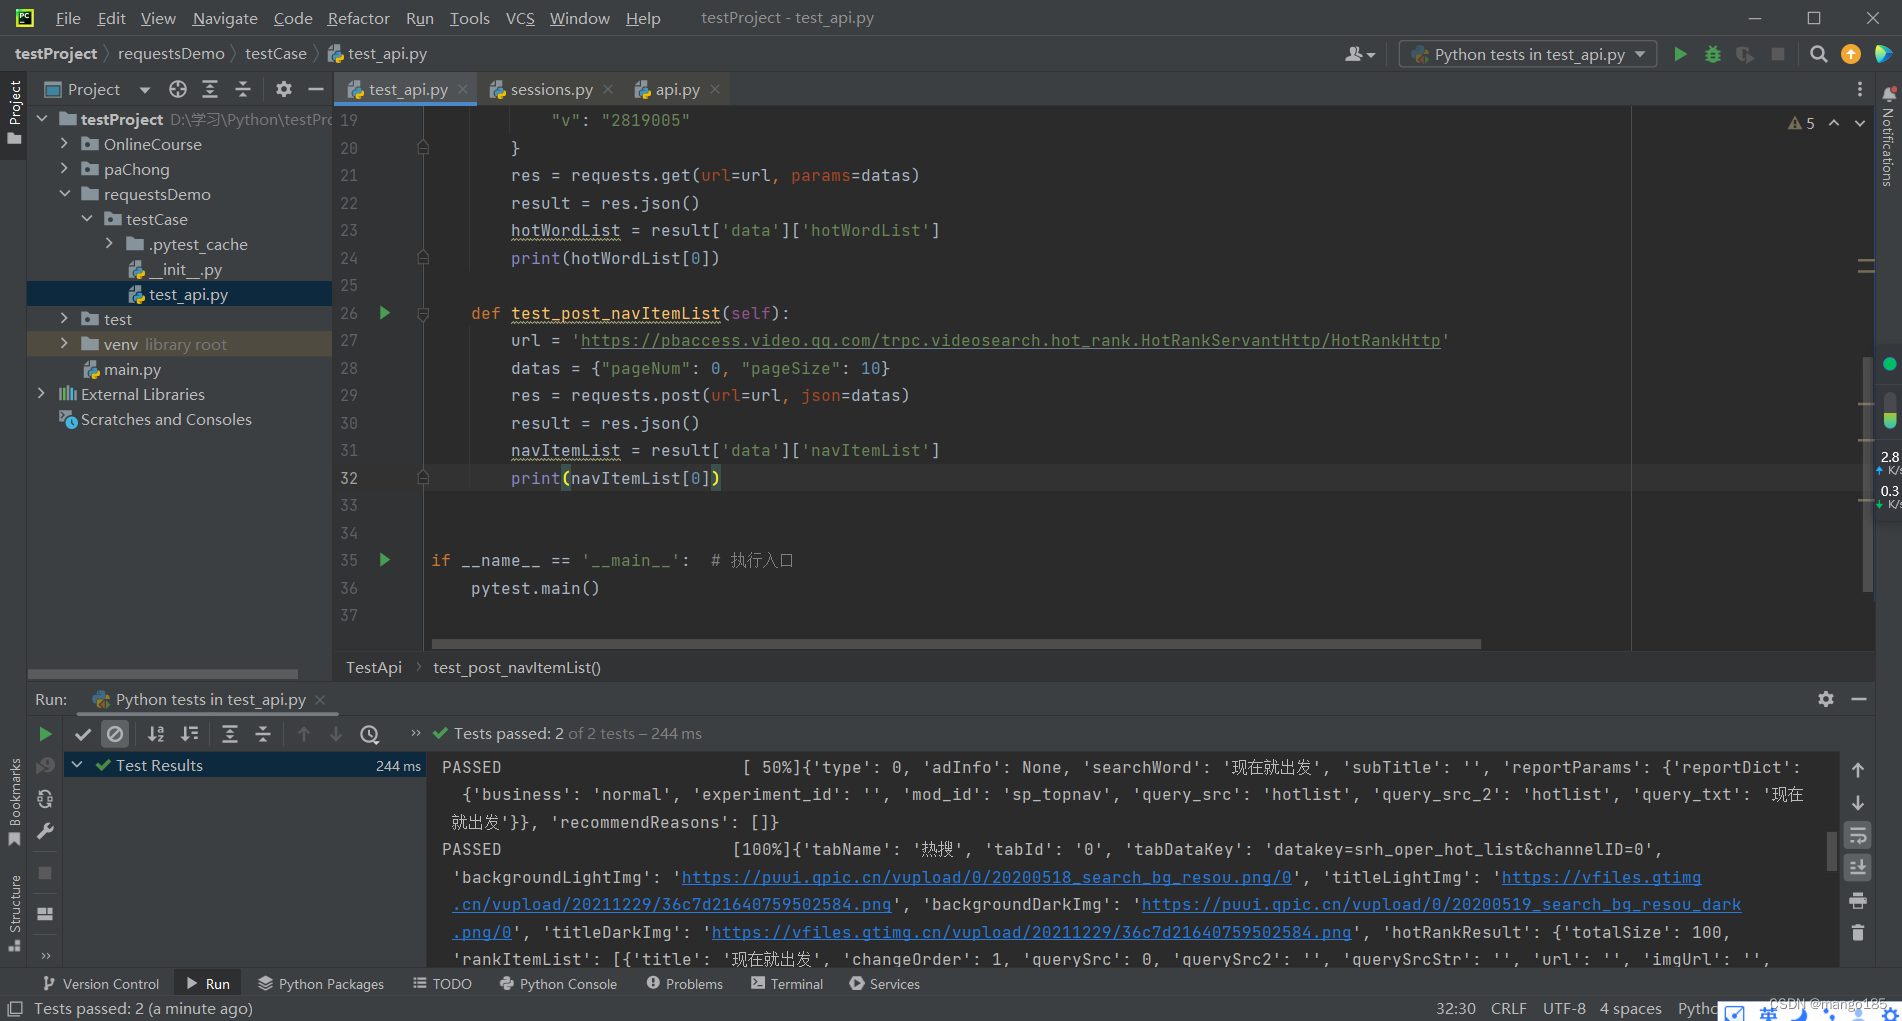
import pytest
import requests


# 模块名:test_api
# 类名:TestApi
# 用例名:test_get_token

class TestApi:

    def test_get_hotWordList(self):
        # url = 'https://pbaccess.video.qq.com/trpc.universal_backend_service.hot_word_info.HttpHotWordRecall/GetHotWords?appID=3172&appKey=lGhFIPeD3HsO9xEp&platform=2&channelID=0&v=2819005'
        url = 'https://pbaccess.video.qq.com/trpc.universal_backend_service.hot_word_info.HttpHotWordRecall/GetHotWords'
        datas = {
            "appID": "3172",
            "appKey": "lGhFIPeD3HsO9xEp",
            "platform": "2",
            "channelID": "0",
            "v": "2819005"
        }
        res = requests.get(url=url, params=datas)
        result = res.json()
        hotWordList = result['data']['hotWordList']
        print(hotWordList[0])

    def test_post_navItemList(self):
        url = 'https://pbaccess.video.qq.com/trpc.videosearch.hot_rank.HotRankServantHttp/HotRankHttp'
        datas = {"pageNum": 0, "pageSize": 10}
        res = requests.post(url=url, json=datas)
        result = res.json()
        navItemList = result['data']['navItemList']
        print(navItemList[0])


if __name__ == '__main__':  # 执行入口
    pytest.main()
三、jsonpath的定义及在关联接口中的处理
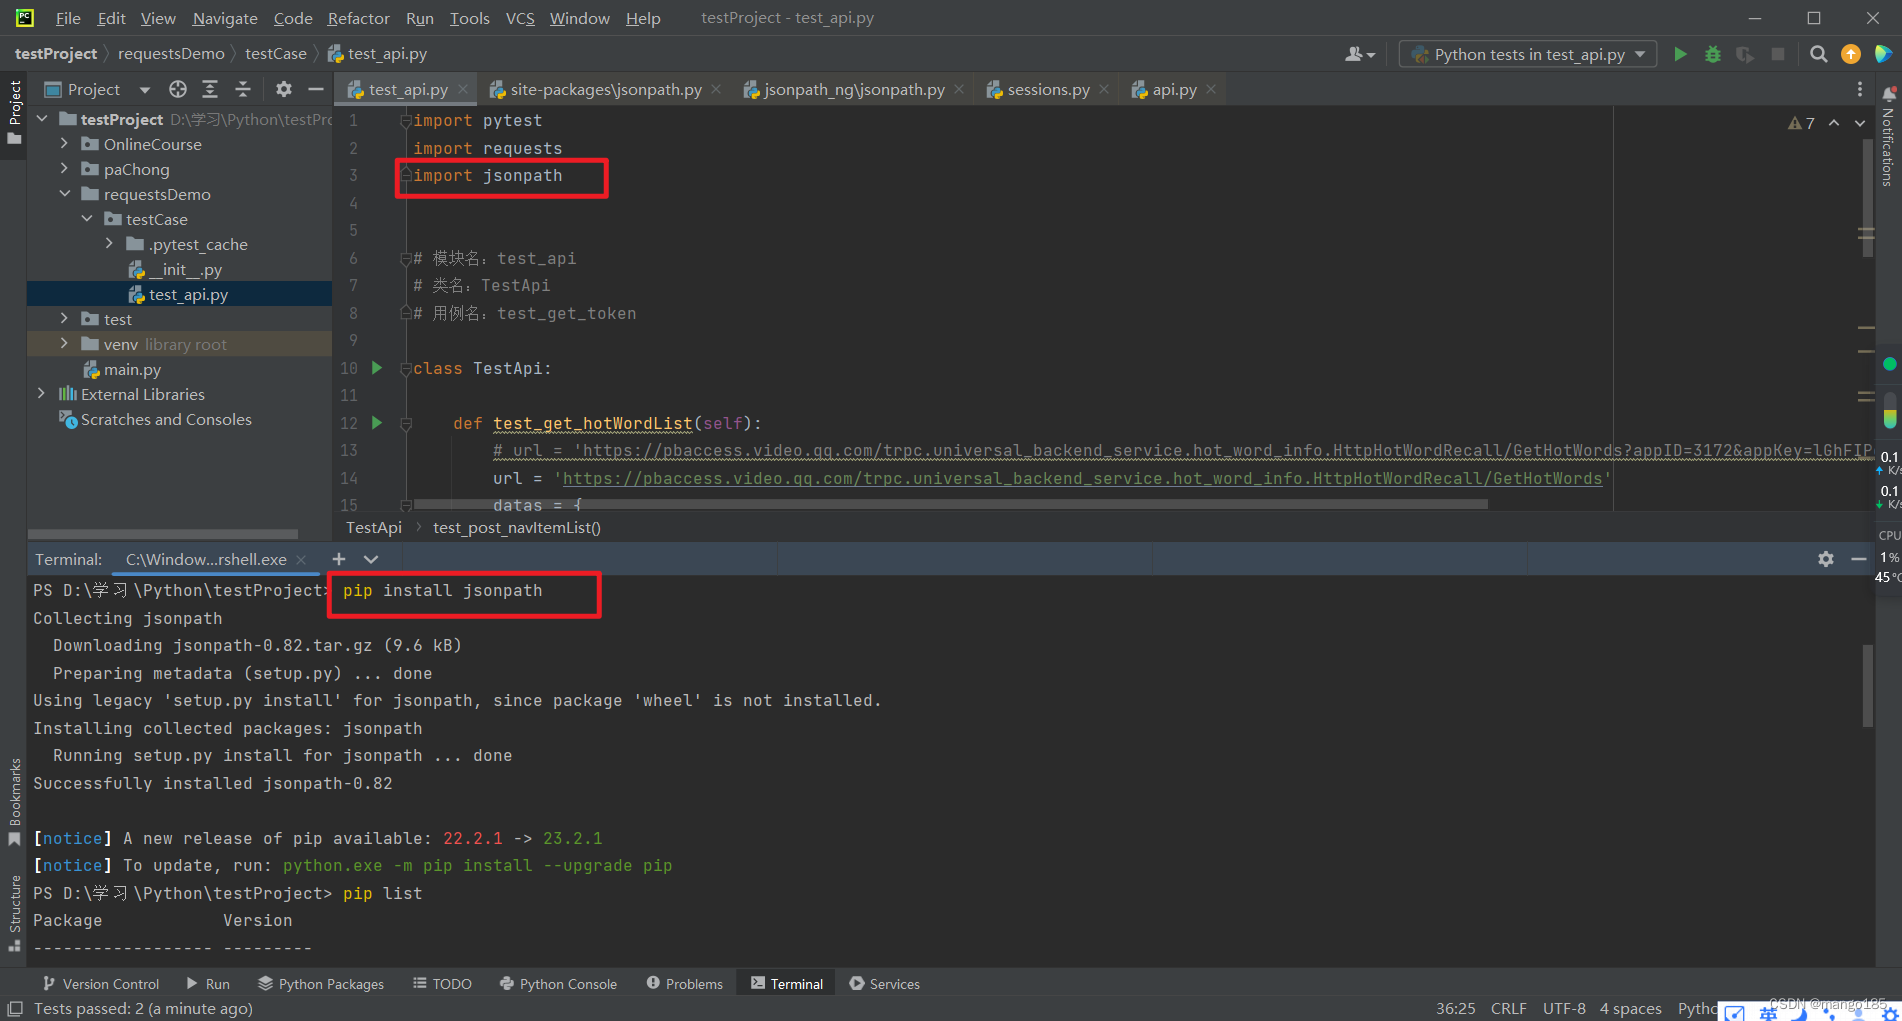
安装jsonpath
pip install jsonpath
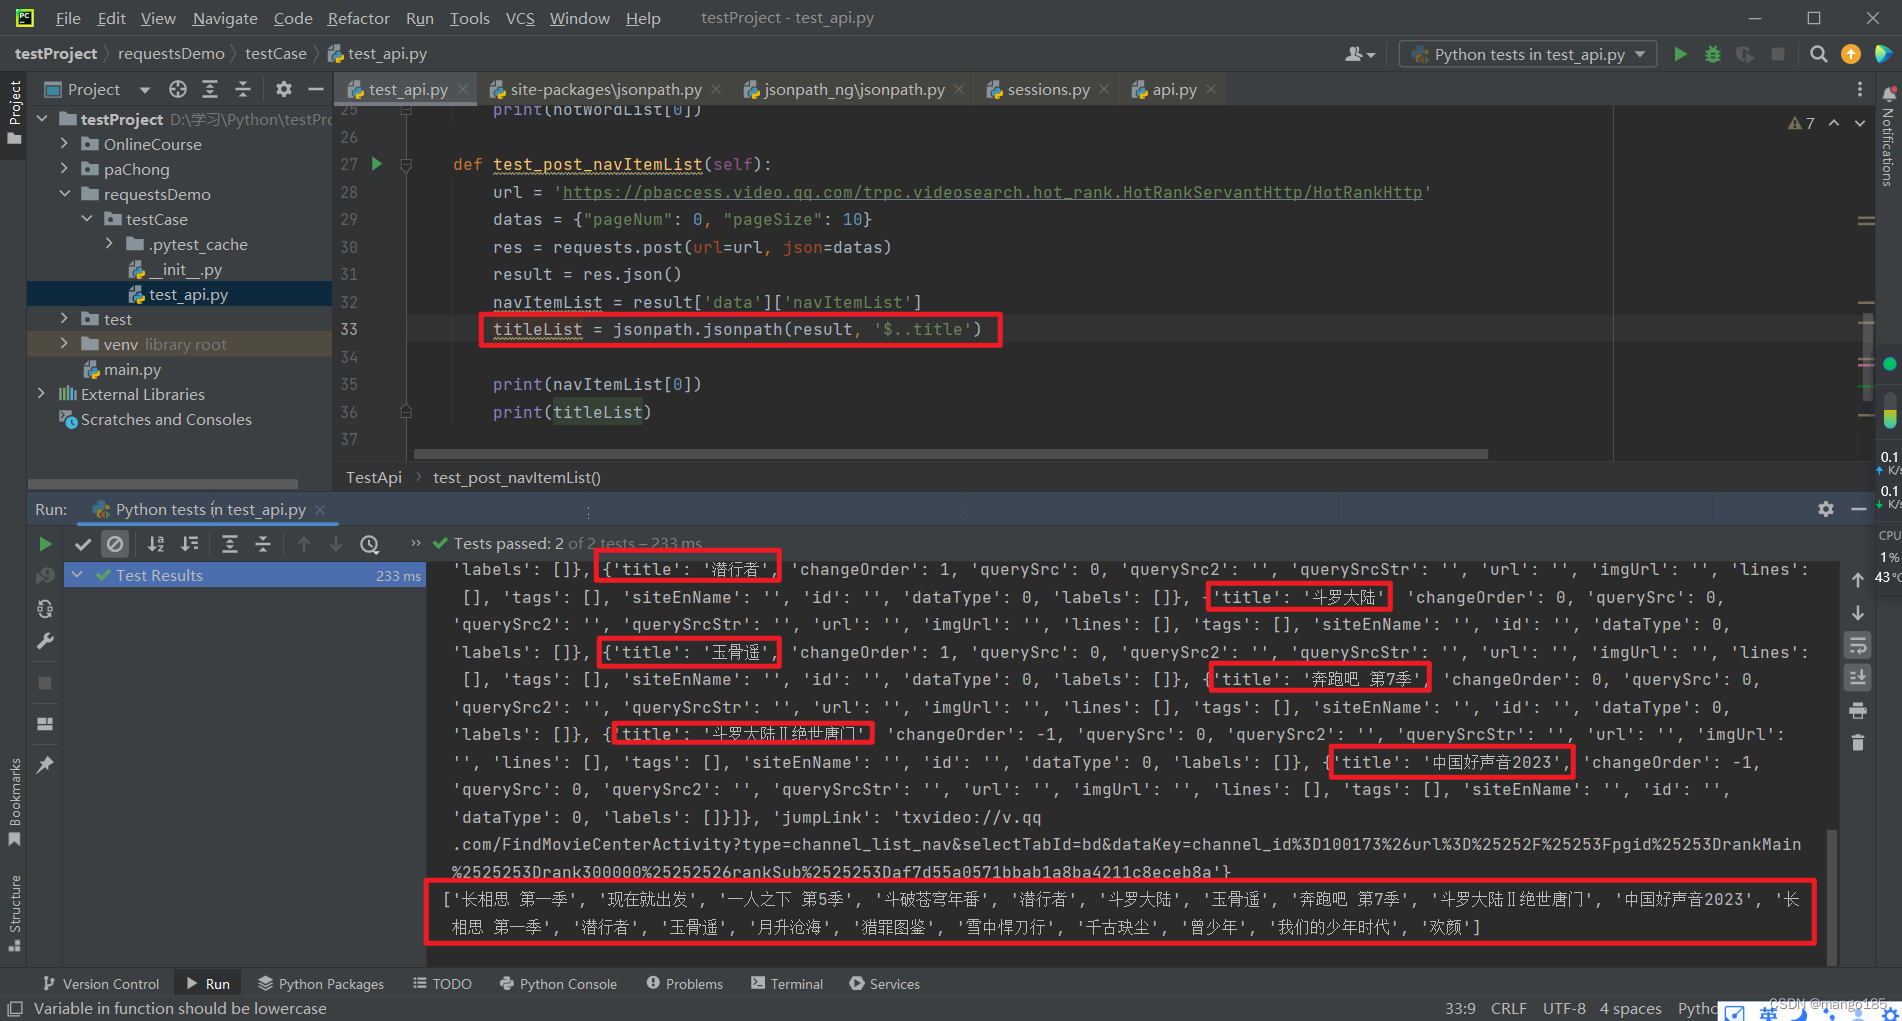
获取json中的某个字段
返回结果为list
titleList = jsonpath.jsonpath(result, '$..title') result为json数据, title为要获取的字段
四、加密接口测试
传参的时候:只能使用密文请求,不能直接使用明文
可以使用固定语法,写一个加解密的类,通过密钥进行加解密
五、pytest + Excel实现数据驱动
作用
- 统计数据
- 异常处理
- 日志监控
实现逻辑
根据requests的底层原理,所有不同的接口都通过同一个函数实现
def request(method, url, **kwargs):
rep = requests.request(
        url="URL地址",
        method="请求方式",
        params="URL中的参数部分",
        data="body中的数据"
    )
逻辑思路
- 对不同的参数,驱动同一个代码,对不同的接口进行测试
- 将参数写成列表,循环调用执行
- 把不同的参数写到Excel文件中
步骤
- 打开Excel文件
- 把Excel的数据变成列表
- 循环调用函数
- 存在问题:1)流程失败 2)中间某次循环失败
- 可以使用pytest解决,有用例错了不会停止
简单封装实现
Excel文件
代码
import pytest
import requests
from xToolkit import xfile

'''
操作Excel文件:
    安装xToolkit: pip install xToolkit
    导入xfile: from xToolkit import xfile
'''

# 1. 读取excel,并且把读出来的数据转换成列表
excel_file_sheet_1 = xfile.read("接口测试用例.xls").excel_to_dict(sheet=1)
print(excel_file_sheet_1)

# eval 这个函数,会自动按传入的数据格式,格式化掉对应的数据 () []
# assert 断言
# 通过装饰器实现参数化和自动循环(数据驱动DDT)
# parametrize规则:如果传入一个列表作为参数,则根据列表的长度循环取值进行执行

'''
parametrize:如果是不同的参数测试同一个场景,也可以直接写list,比如登录接口不同的账号密码:
@pytest.mark.parametrize("username, password", [("userA", "pwdA"), ("userB", "pwdB"), ("userC", "pwdC")])
'''

@pytest.mark.parametrize("case_info", excel_file_sheet_1)
def test_case_exec(case_info):  # 把这个列表传进来
    rep = requests.request(
        url=case_info["接口URL"],
        method=case_info["请求方式"],
        params=eval(case_info["URL参数"]),
        data=eval(case_info["JSON参数"])
    )

    assert rep.status_code == case_info["预期状态码"]
    print('excel文件数据:', case_info)
    print('接口URL:', rep.request.url)
    print('请求方式:', rep.request.method)
    print('请求数据:', rep.request.body)
    print('响应结果:', rep.json())
    print('===============用例', case_info["用例编号"], '执行结束===============')


if __name__ == '__main__':
    pytest.main(['-vs', '--capture=sys'])  # 固定语法,pytest的启动命令
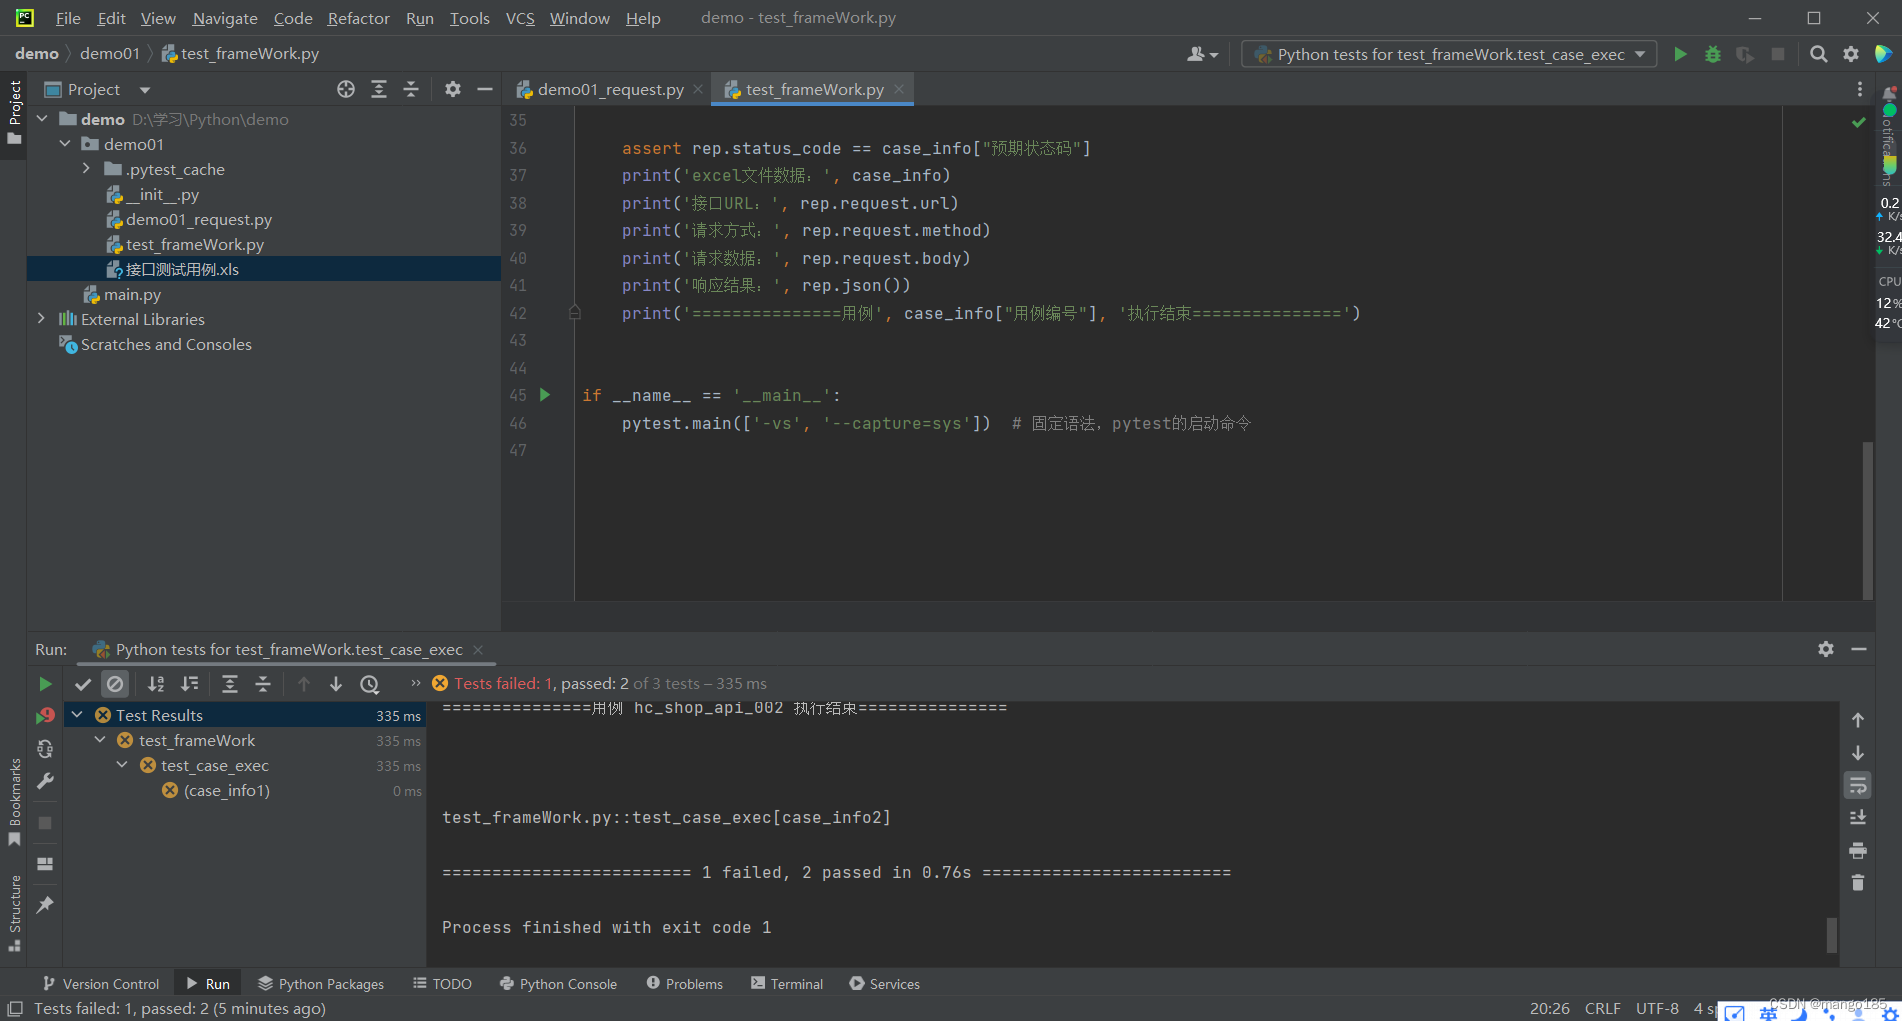
执行结果
关联接口提取参数
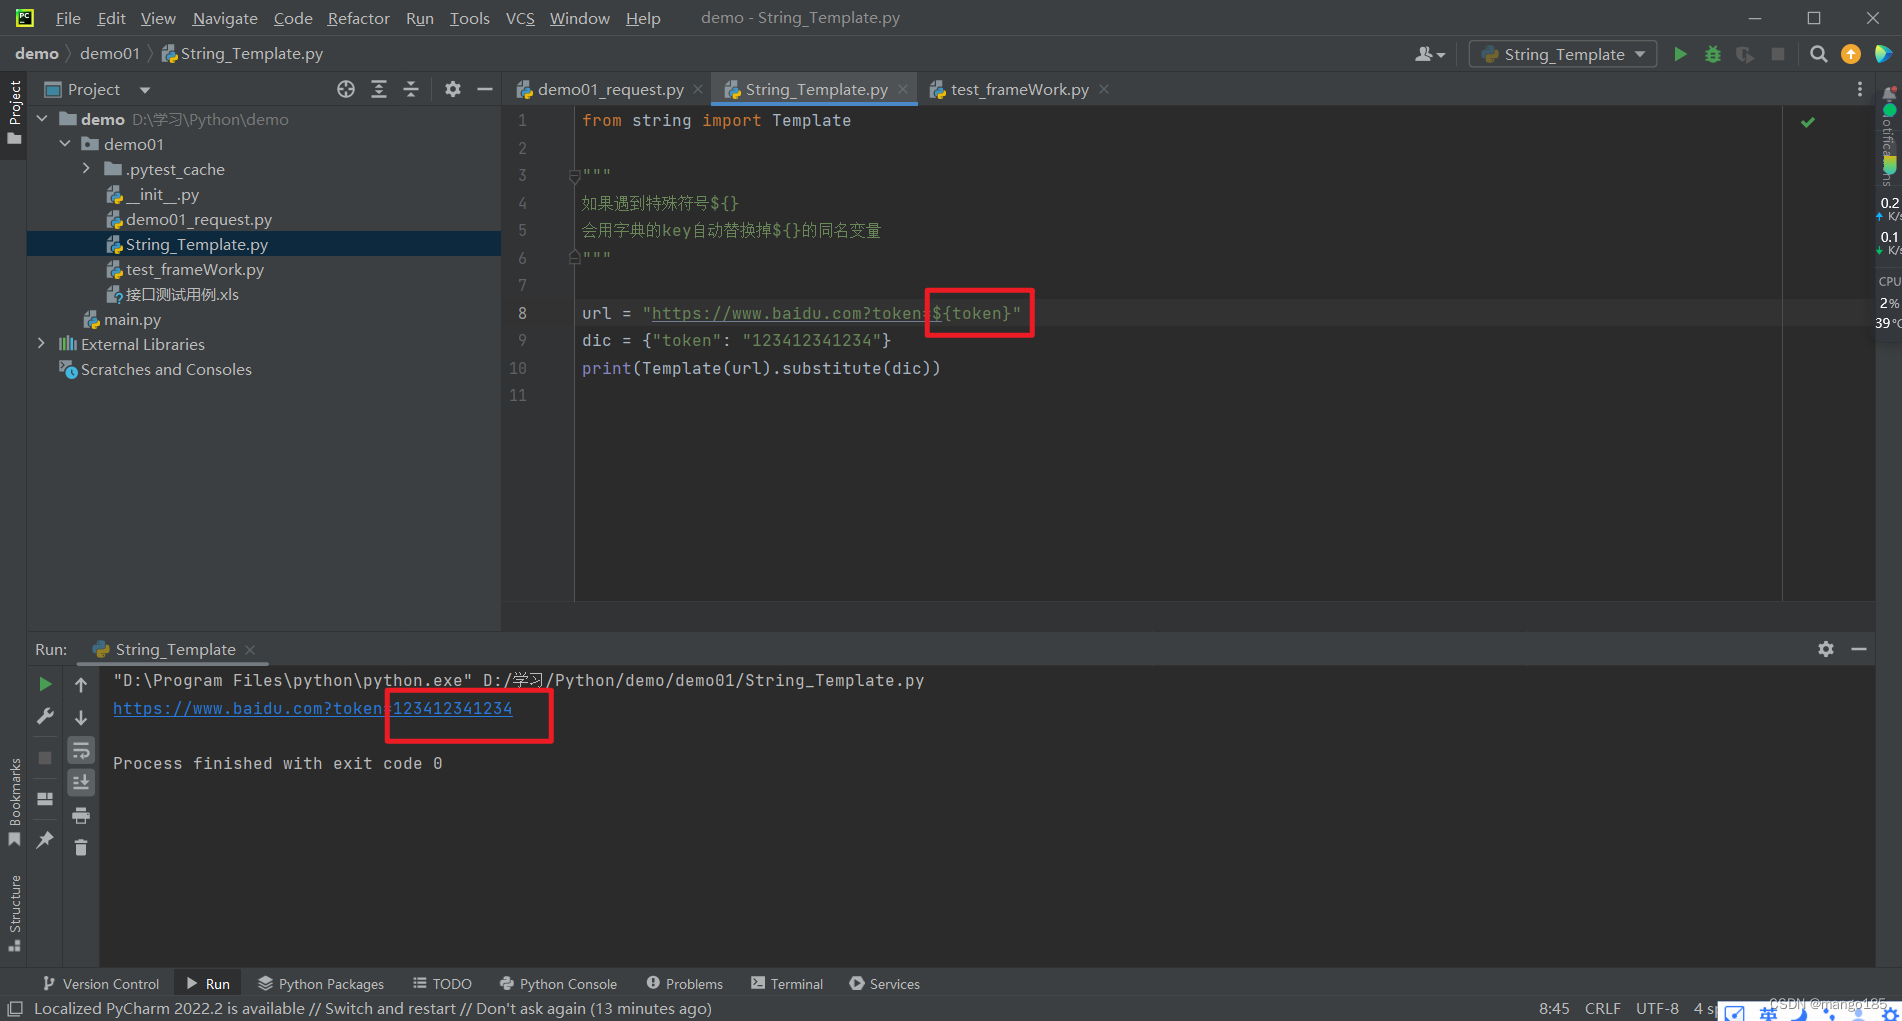
String的Template
from string import Template

"""
如果遇到特殊符号${}
会用字典的key自动替换掉${}的同名变量
"""

url = "https://www.baidu.com?token=${token}"
dic = {"token": "123412341234"}
print(Template(url).substitute(dic))
逻辑思路
-
在Excel文件中添加接口用例执行后要提取出的字段和执行时需要的字段
-
单独写一个实现字段写入和提取的对象作为全局变量,防止数据污染
class g_var(object):
    _global_dict = {}

    def set_dict(self, key, value):
        self._global_dict[key] = value

    def get_dict(self, key):
        return self._global_dict[key]

    def show_dict(self):
        return self._global_dict
- 执行每一个用例前判断是否需要变量
- 执行每一个用例后判断是否存入变量
代码
import jsonpath
import pytest
import requests
from xToolkit import xfile
from demo02.global_value import g_var
from string import Template

'''
操作Excel文件:
    安装xToolkit: pip install xToolkit
    导入xfile: from xToolkit import xfile
'''

# 1. 读取excel,并且把读出来的数据转换成列表
excel_file_sheet_1 = xfile.read("接口测试用例.xls").excel_to_dict(sheet=1)
print(excel_file_sheet_1)


# eval 这个函数,会自动按传入的数据格式,格式化掉对应的数据 () []
# assert 断言
# 通过装饰器实现参数化和自动循环DDT
@pytest.mark.parametrize("case_info", excel_file_sheet_1)
def test_case_exec(case_info):  # 把这个列表传进来

    # 判断是否需要变量
    url = case_info["接口URL"]
    dic = g_var().show_dict()
    if "$" in url:
        url = Template(url).substitute(dic)

    rep = requests.request(
        url=url,
        method=case_info["请求方式"],
        params=eval(case_info["URL参数"]),
        data=eval(case_info["JSON参数"])
    )

    # 获取的变量数据写入到对象中
    if case_info["提取参数"] != None or case_info["提取参数"] != "":
        lis = jsonpath.jsonpath(rep.json(), "$.." + case_info["提取参数"])
        g_var().set_dict(case_info["提取参数"], lis[0])

    assert rep.status_code == case_info["预期状态码"]

    print('excel文件数据:', case_info)
    print('接口URL:', rep.request.url)
    print('请求方式:', rep.request.method)
    print('请求数据:', rep.request.body)
    print('响应结果:', rep.json())
    print("提取到的参数 ", case_info["提取参数"], ":", lis[0])
    print("全局变量:", g_var().show_dict())
    print("请求头header:", rep.headers)
    print("状态码:", rep.status_code)
    print("url:", url)
    print("dic:", dic)
    print("lis:", lis)
    print('===============用例', case_info["用例编号"], '执行结束===============')


if __name__ == '__main__':
    pytest.main(['-vs', '--capture=sys'])  # 固定语法,pytest的启动命令
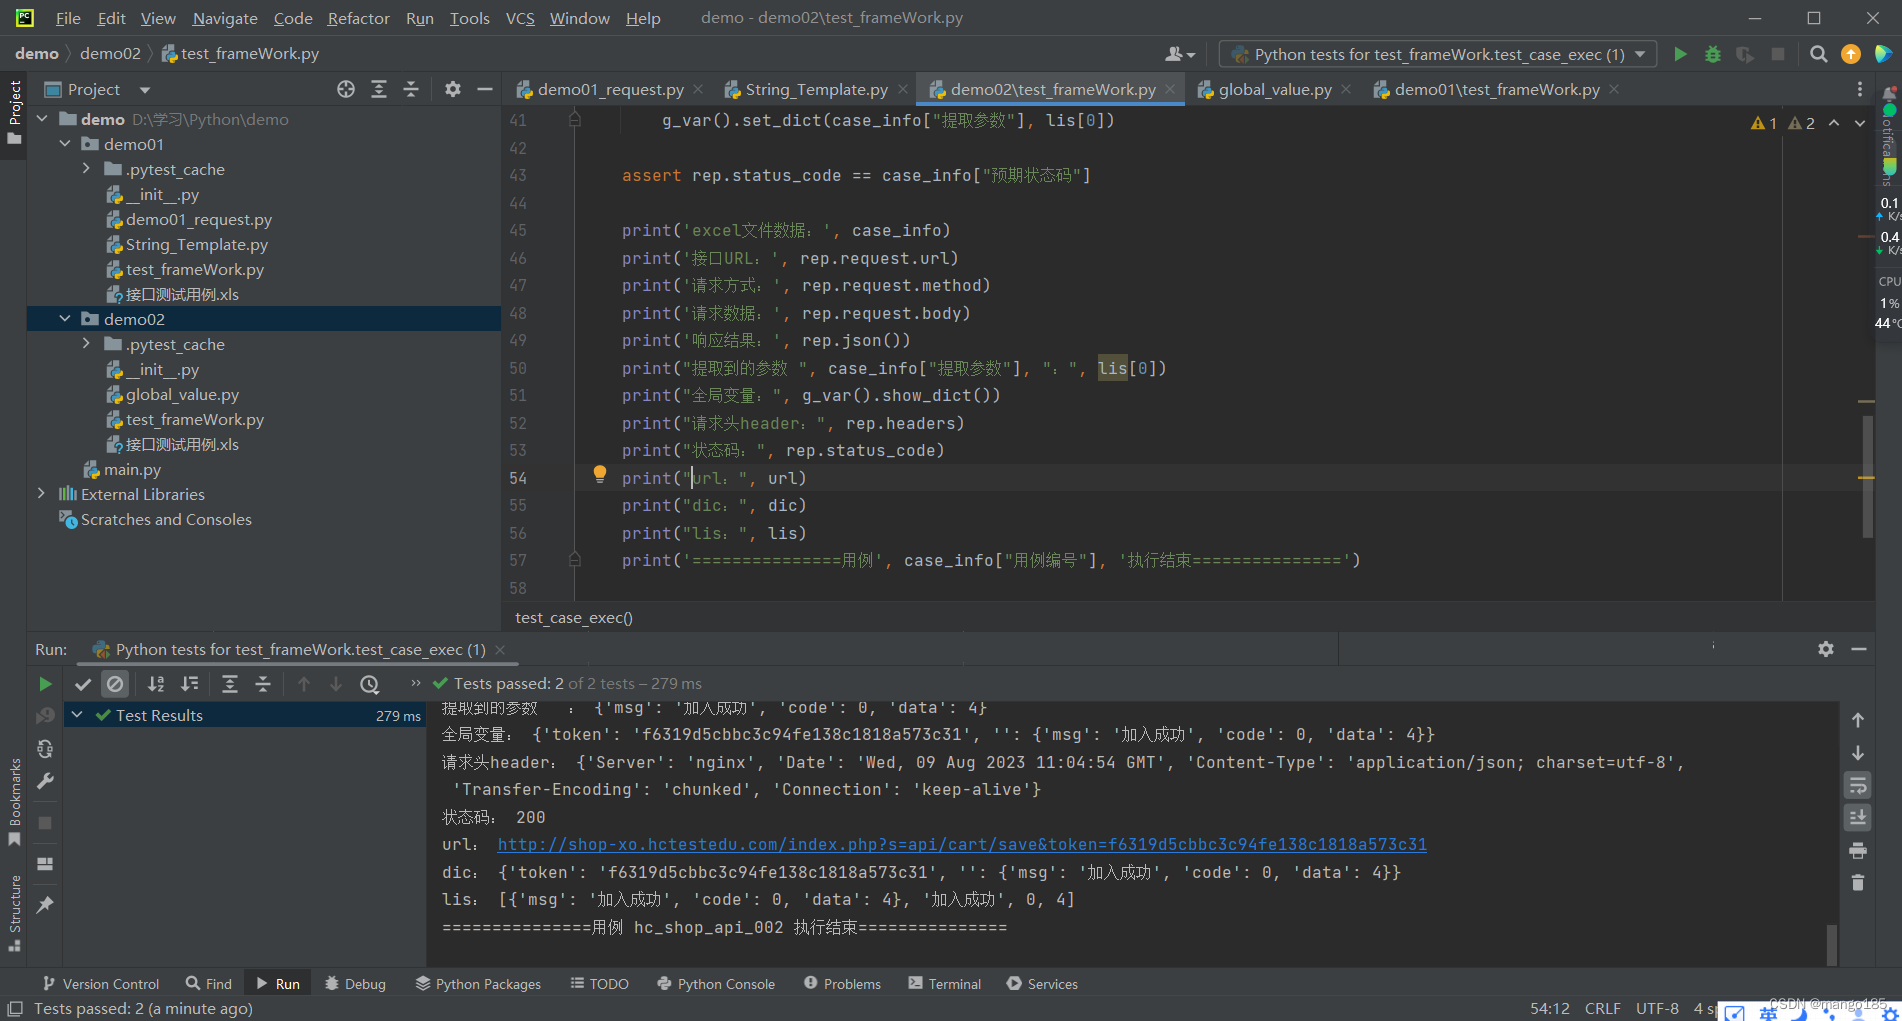
执行结果
六、框架中的断言处理assert
    assert rep.status_code == case_info["预期状态码"]
	assert rep.json()[case_info["需要断言的字段"]] == case_info["断言的预期值"]

	# 如果断言的字段在返回结果的更深层---使用jsonpath
	assert jsonpath.jsonpath(rep.json(), "$.." + case_info["需要断言的字段"]) == case_info["断言的预期值"]
七、pytest-html报告
安装pytest-html
pip install pytest-html
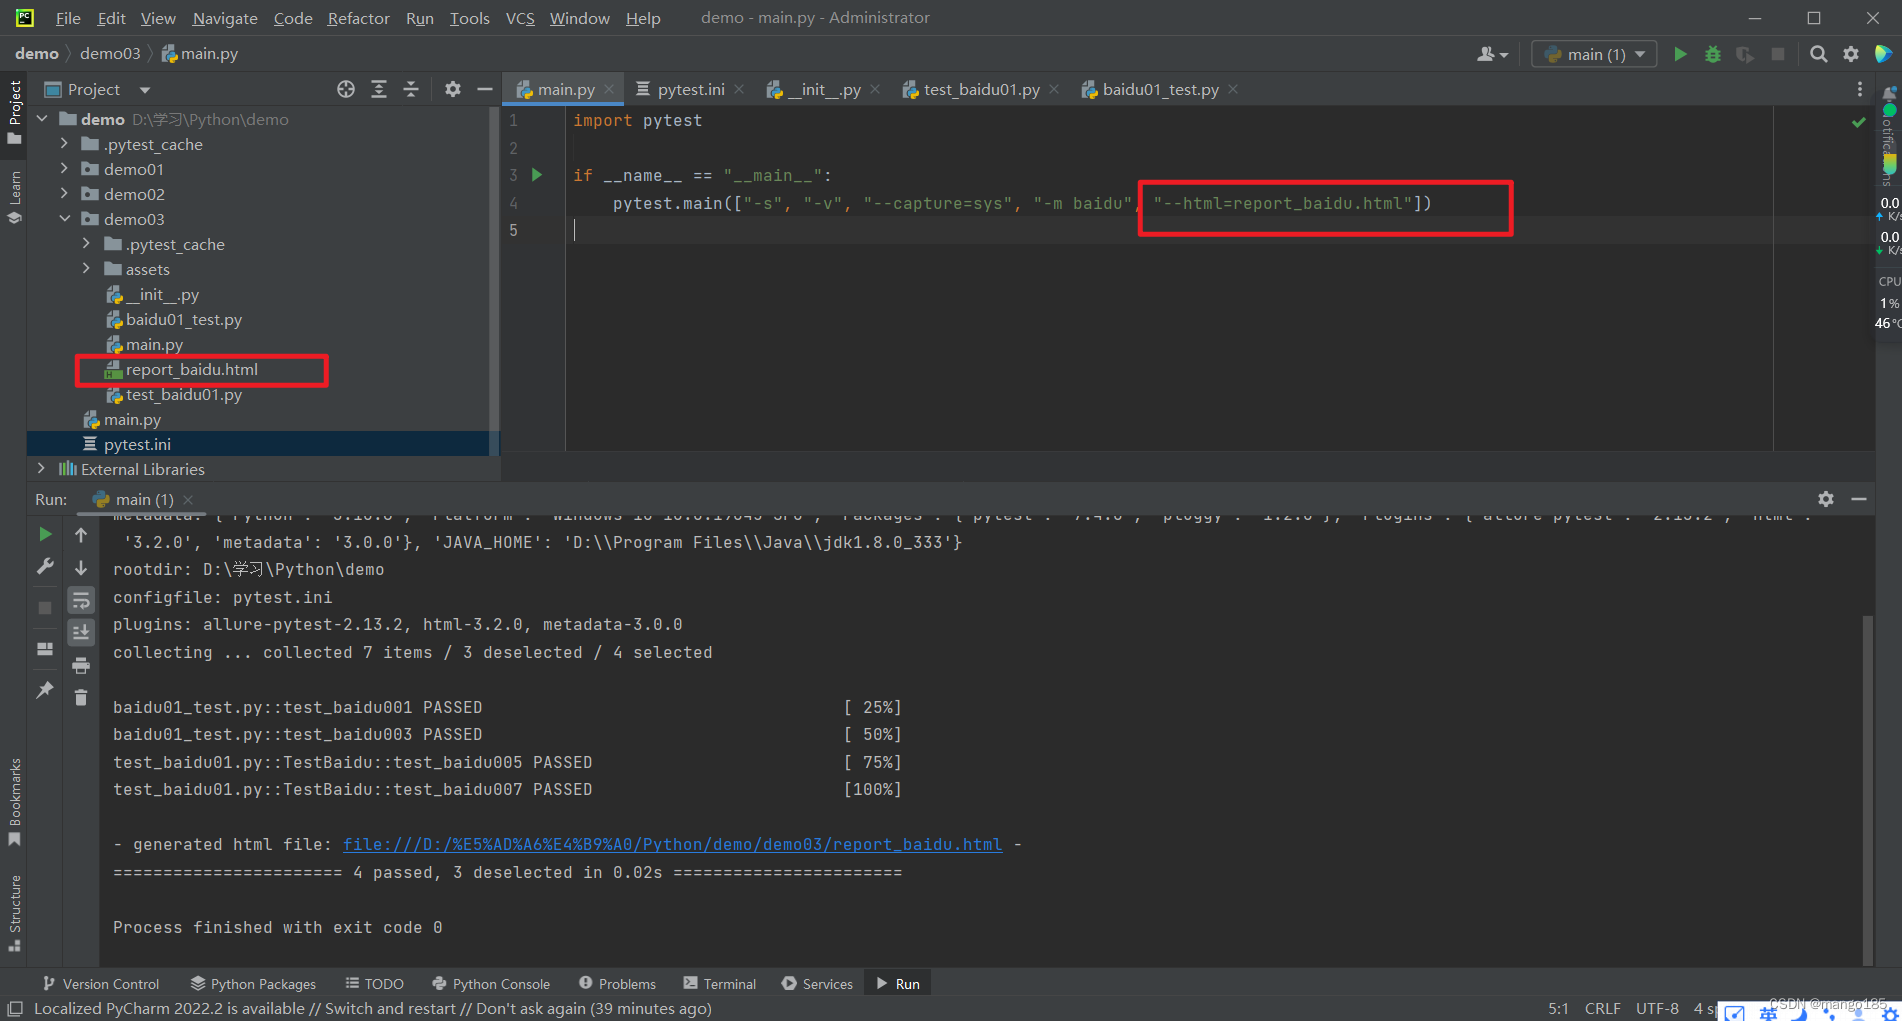
生成html报告
import pytest

if __name__ == "__main__":
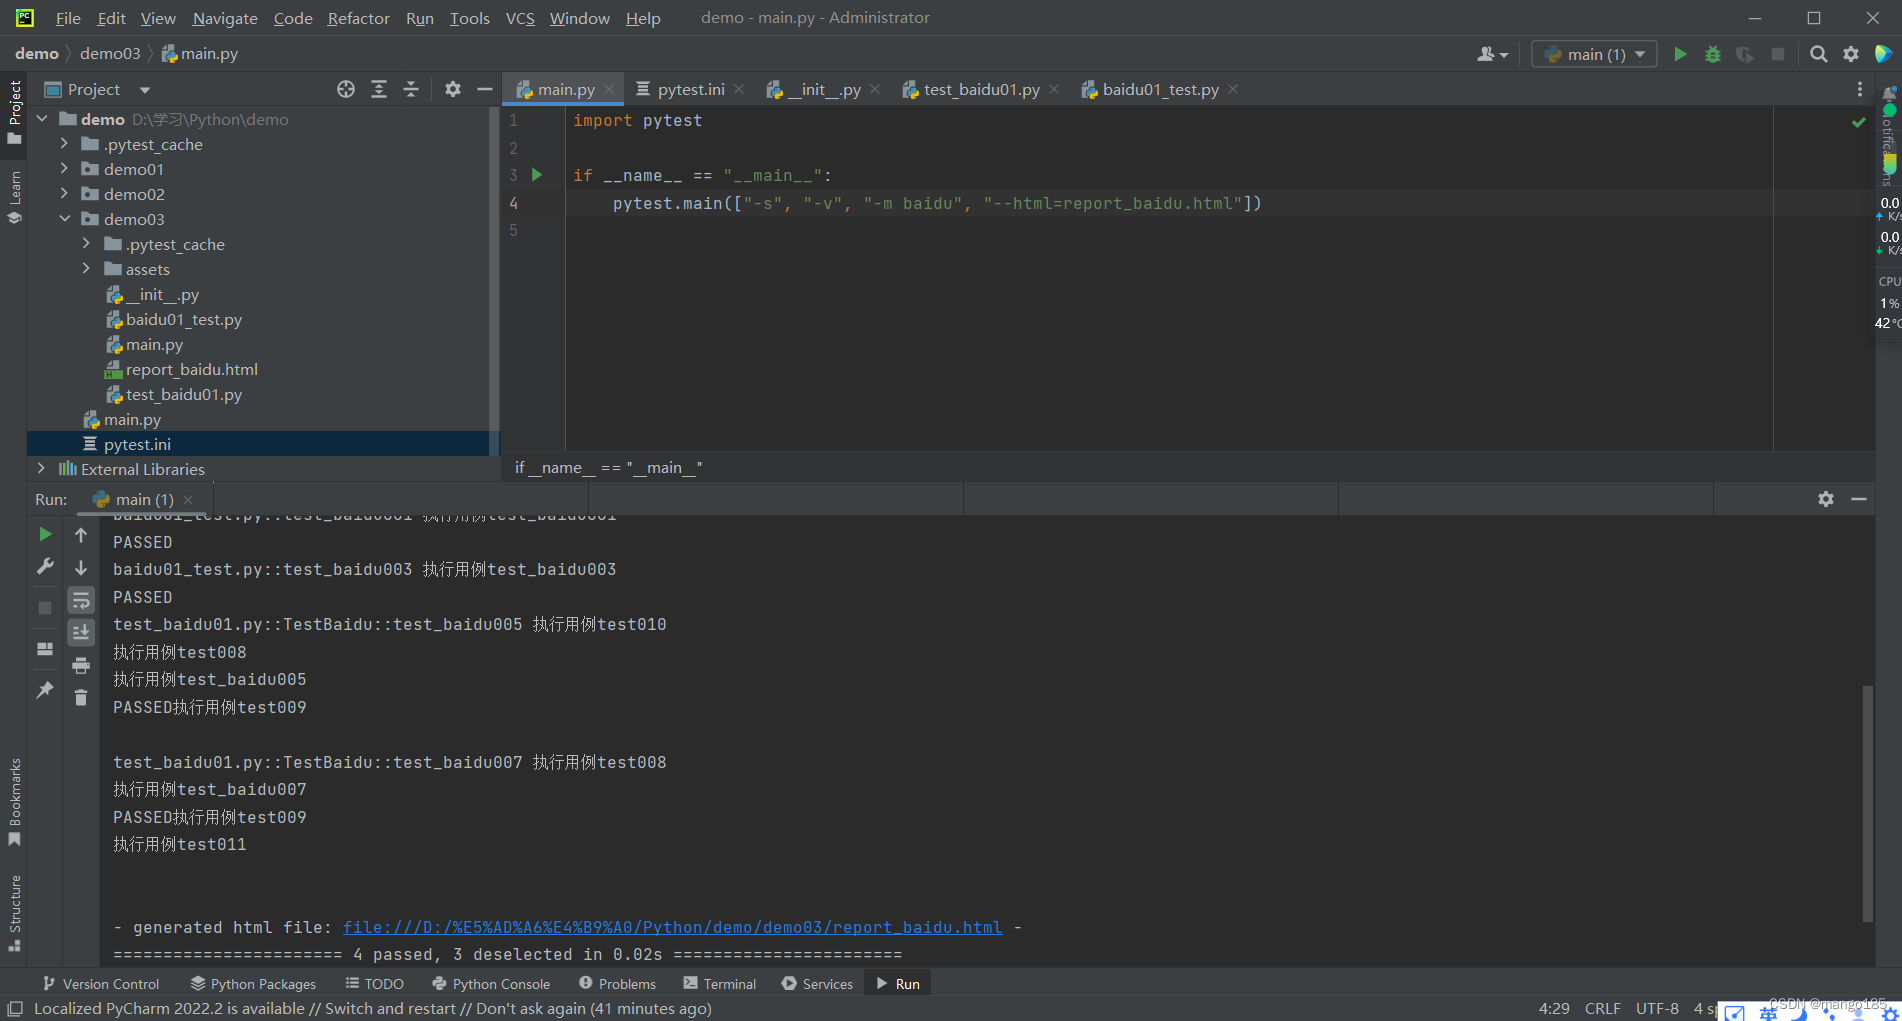
    pytest.main(["-s", "-v", "--capture=sys", "-m baidu", "--html=report_baidu.html"])
踩坑
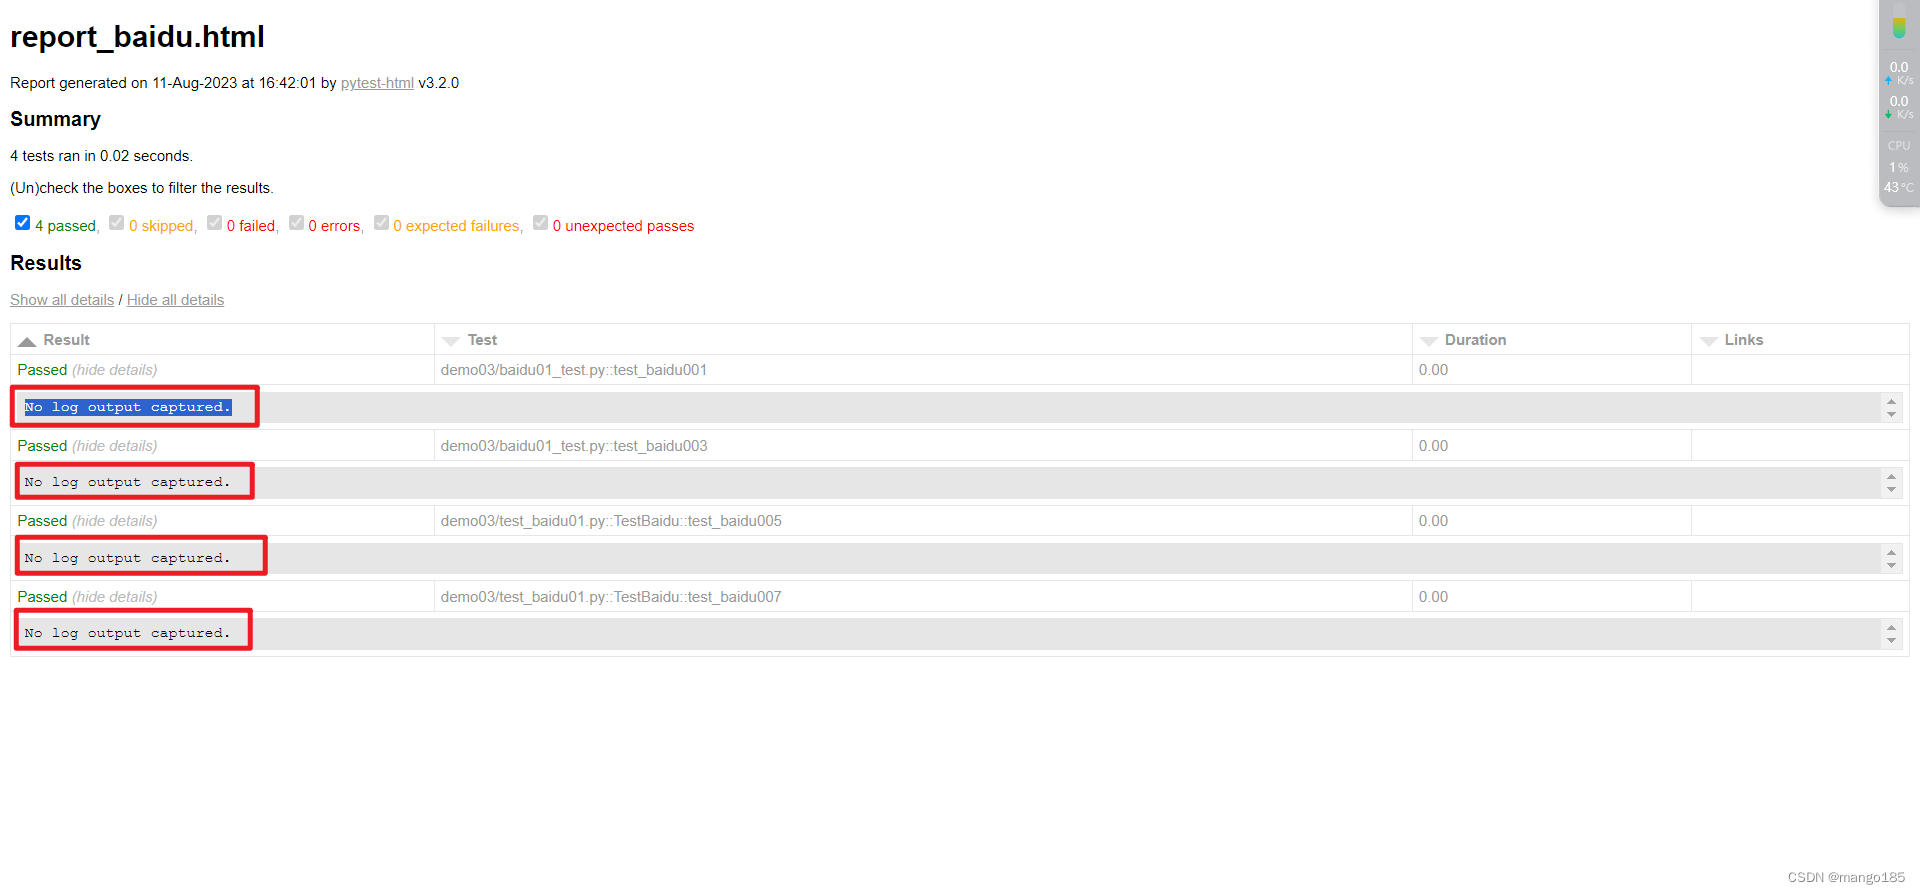
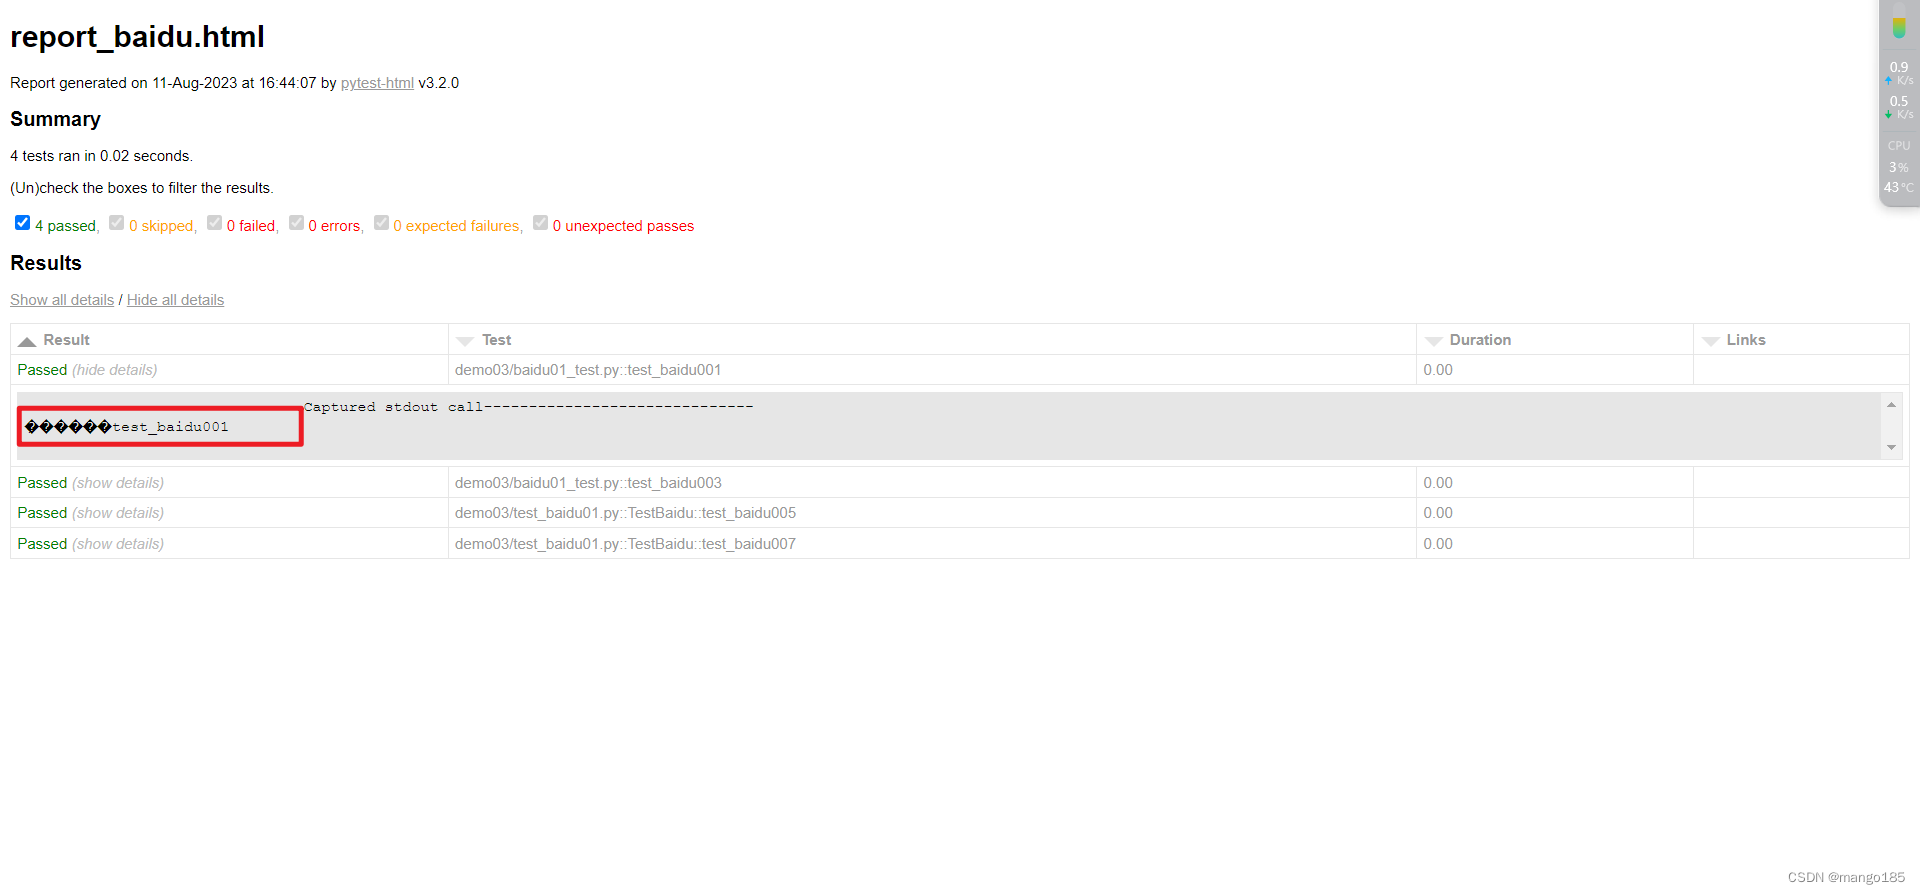
不填写"–capture=sys",html报告出现No log output captured的问题
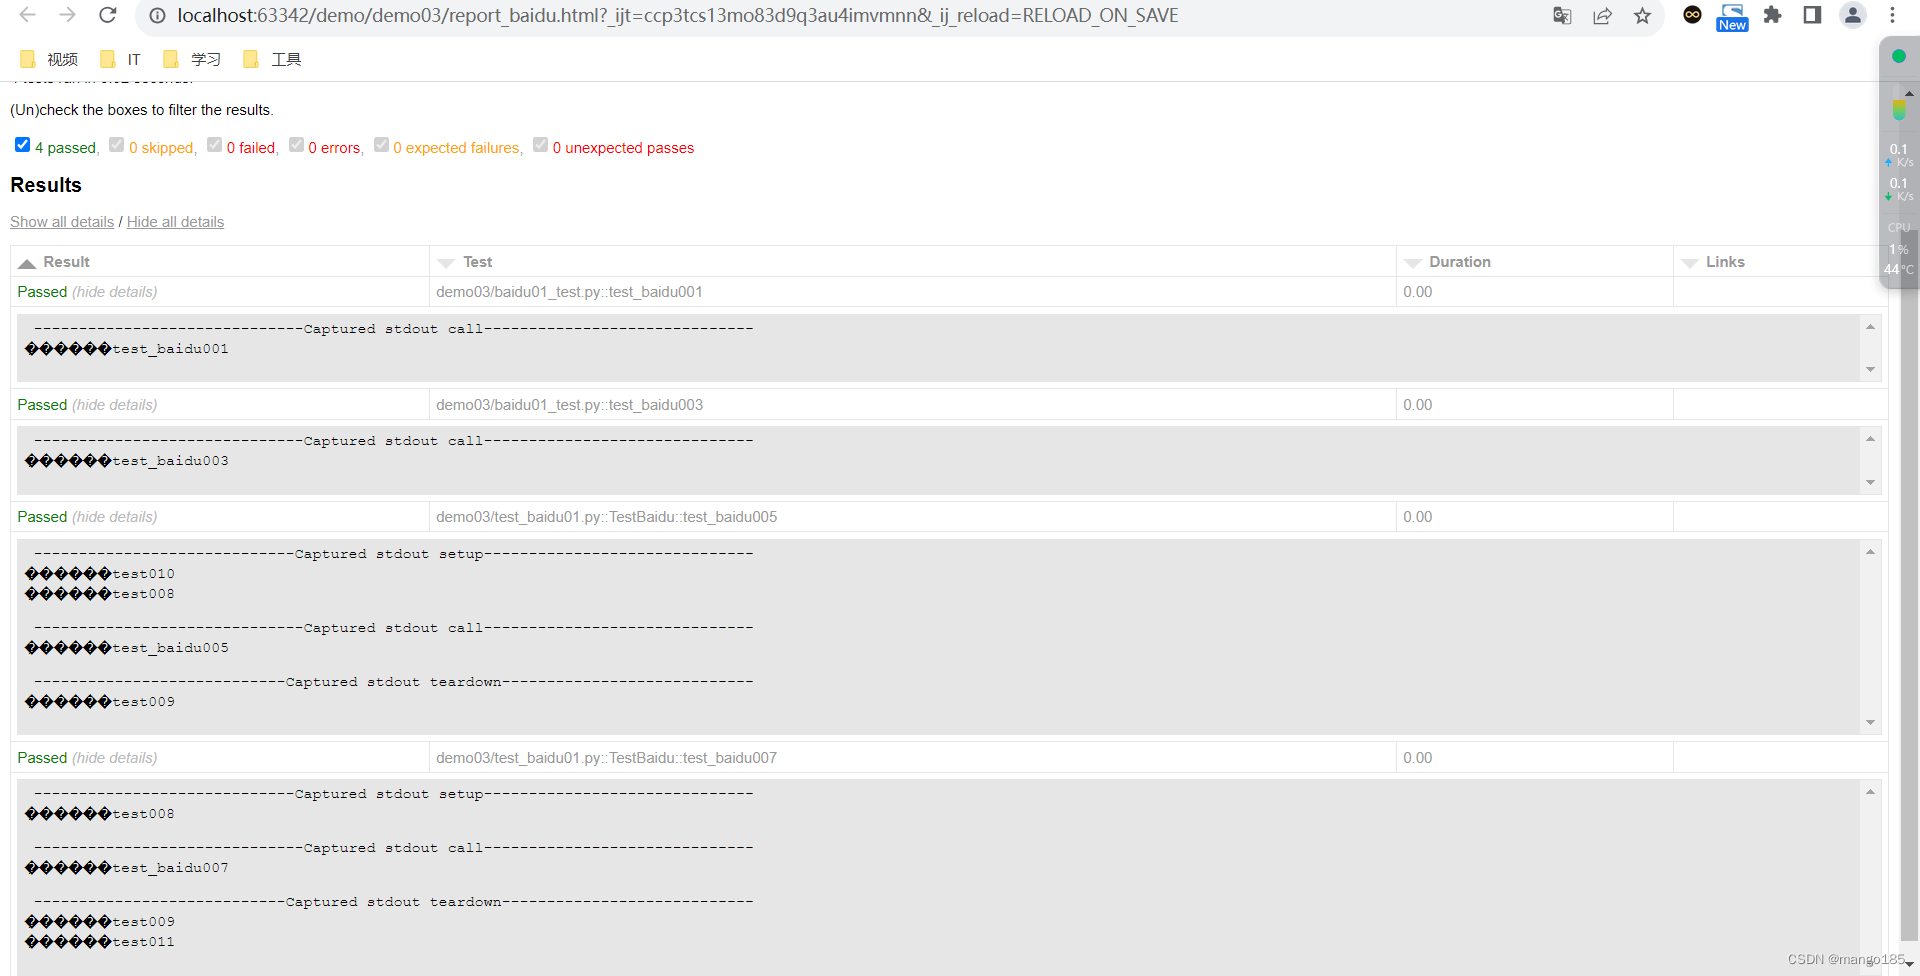
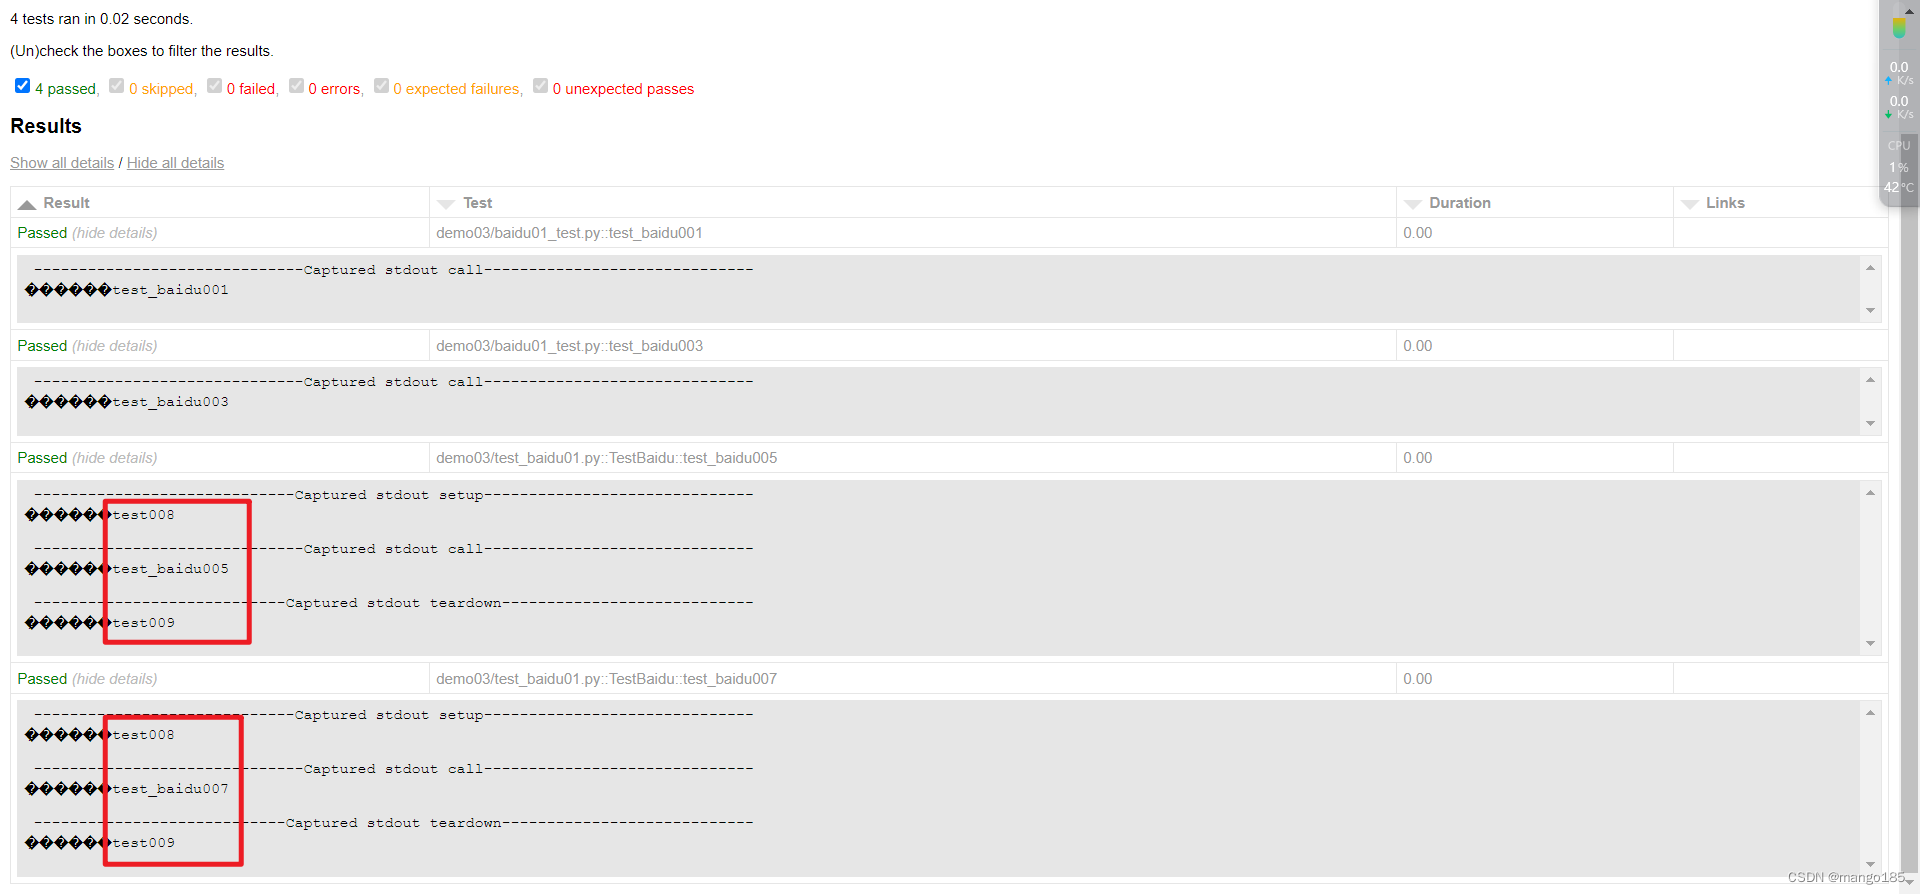
html报告中出现乱码–未解决
八、pytest用例管理
使用pytest管理测试用例:
-
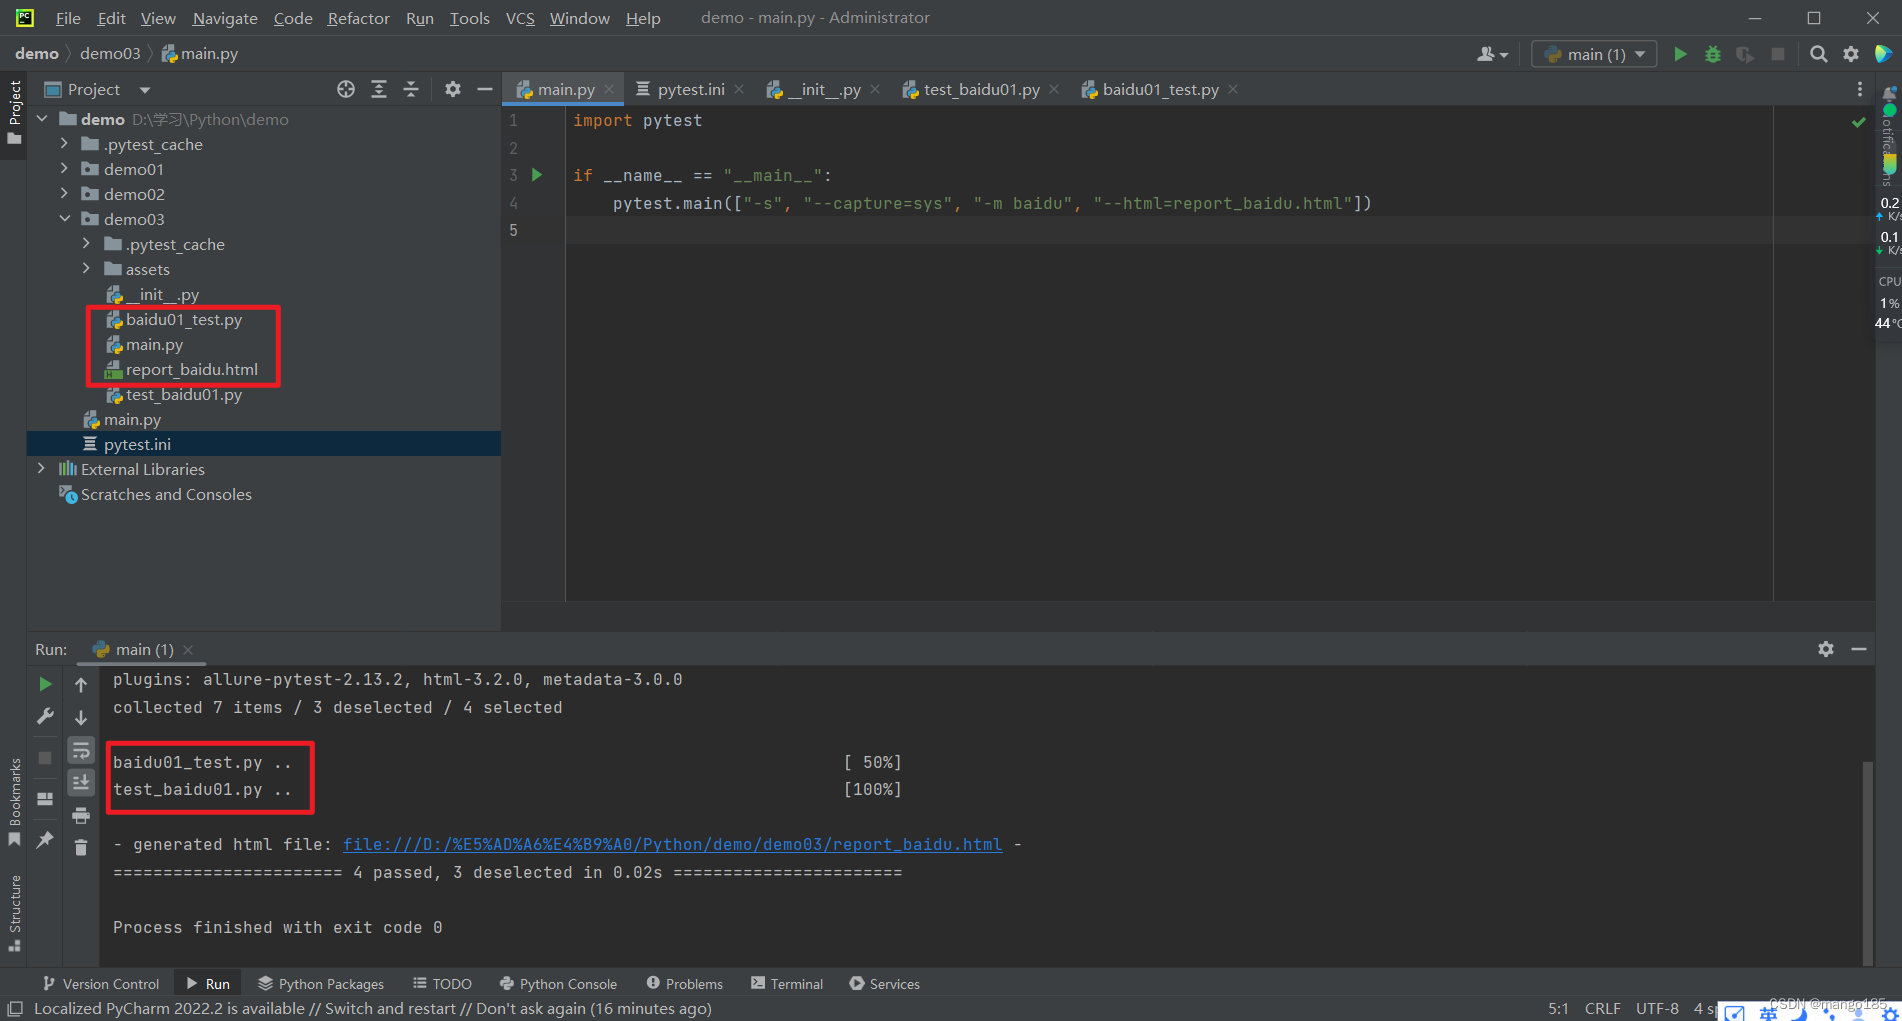
将pytest.main()写在一个单独的py文件中,执行此py文件时会执行所有和此文件同级的test_开头、_test结尾的py文件
-
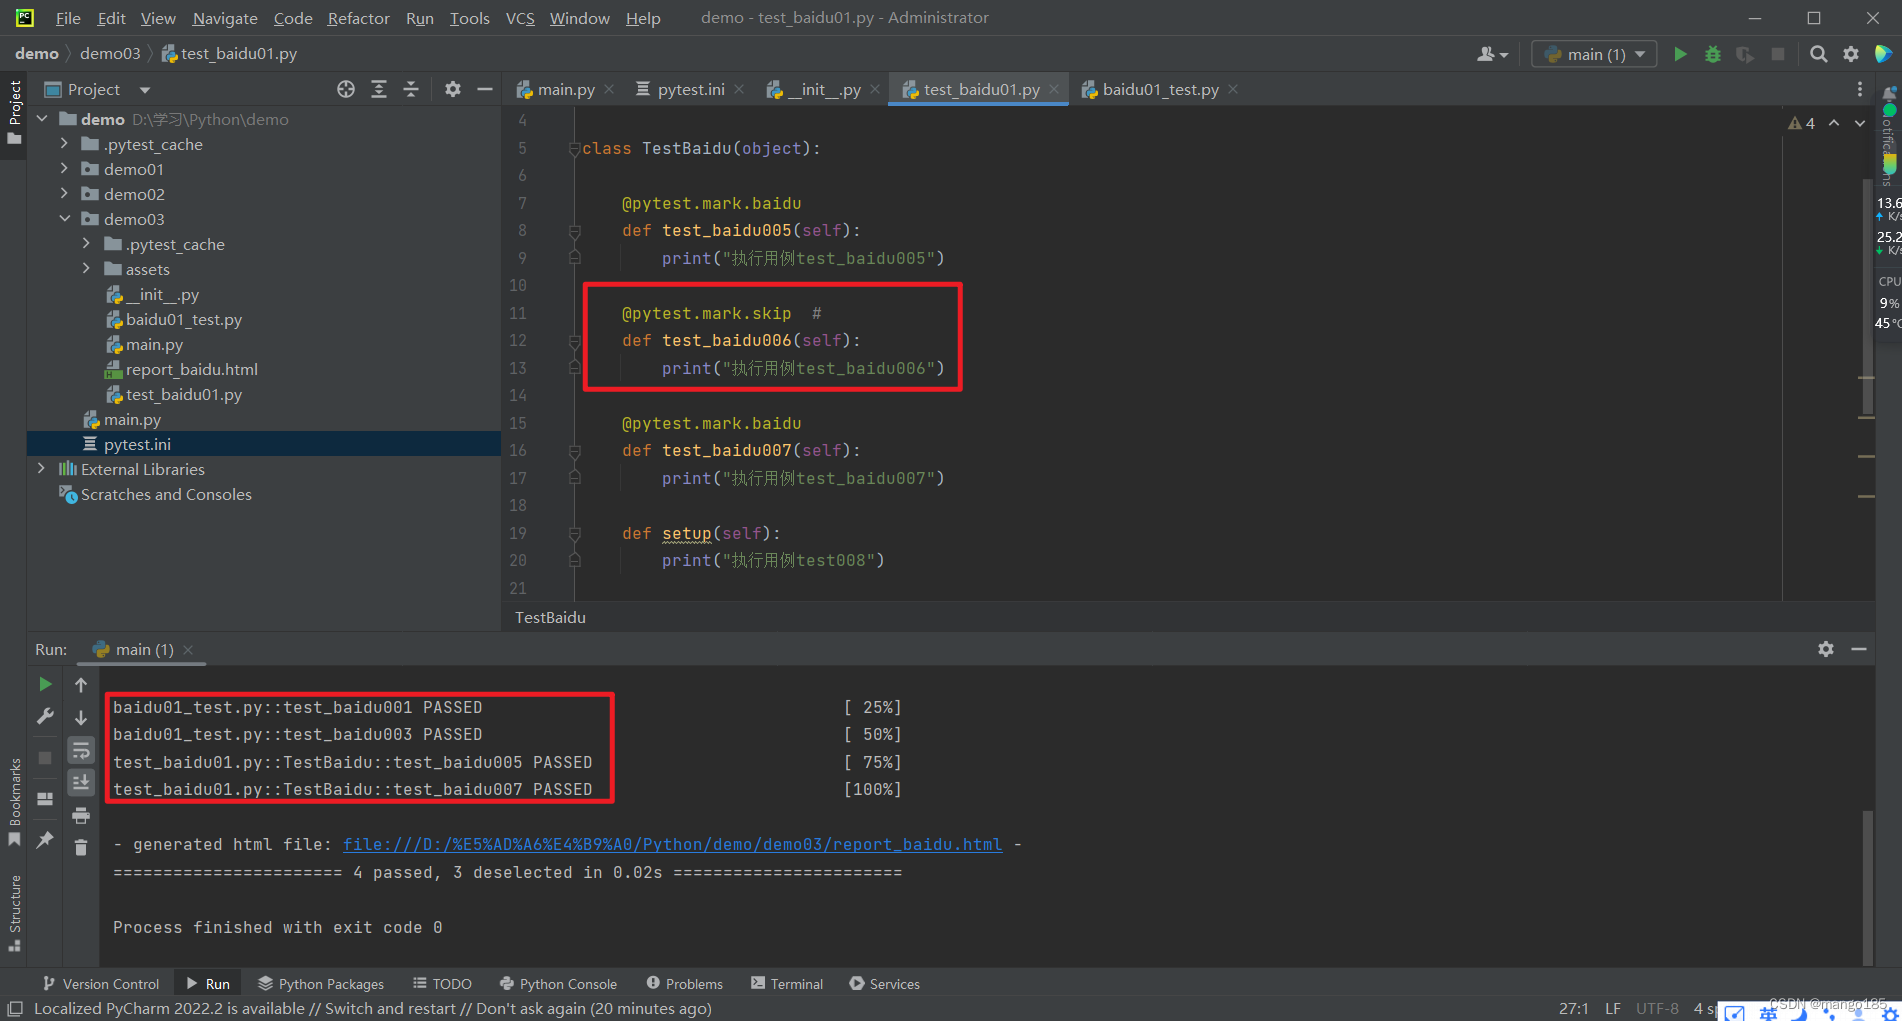
在每一个用例函数前增加装饰器@pytest.mark.skip,pytest.main([])执行时,会跳过添加了此装饰器的用例
-
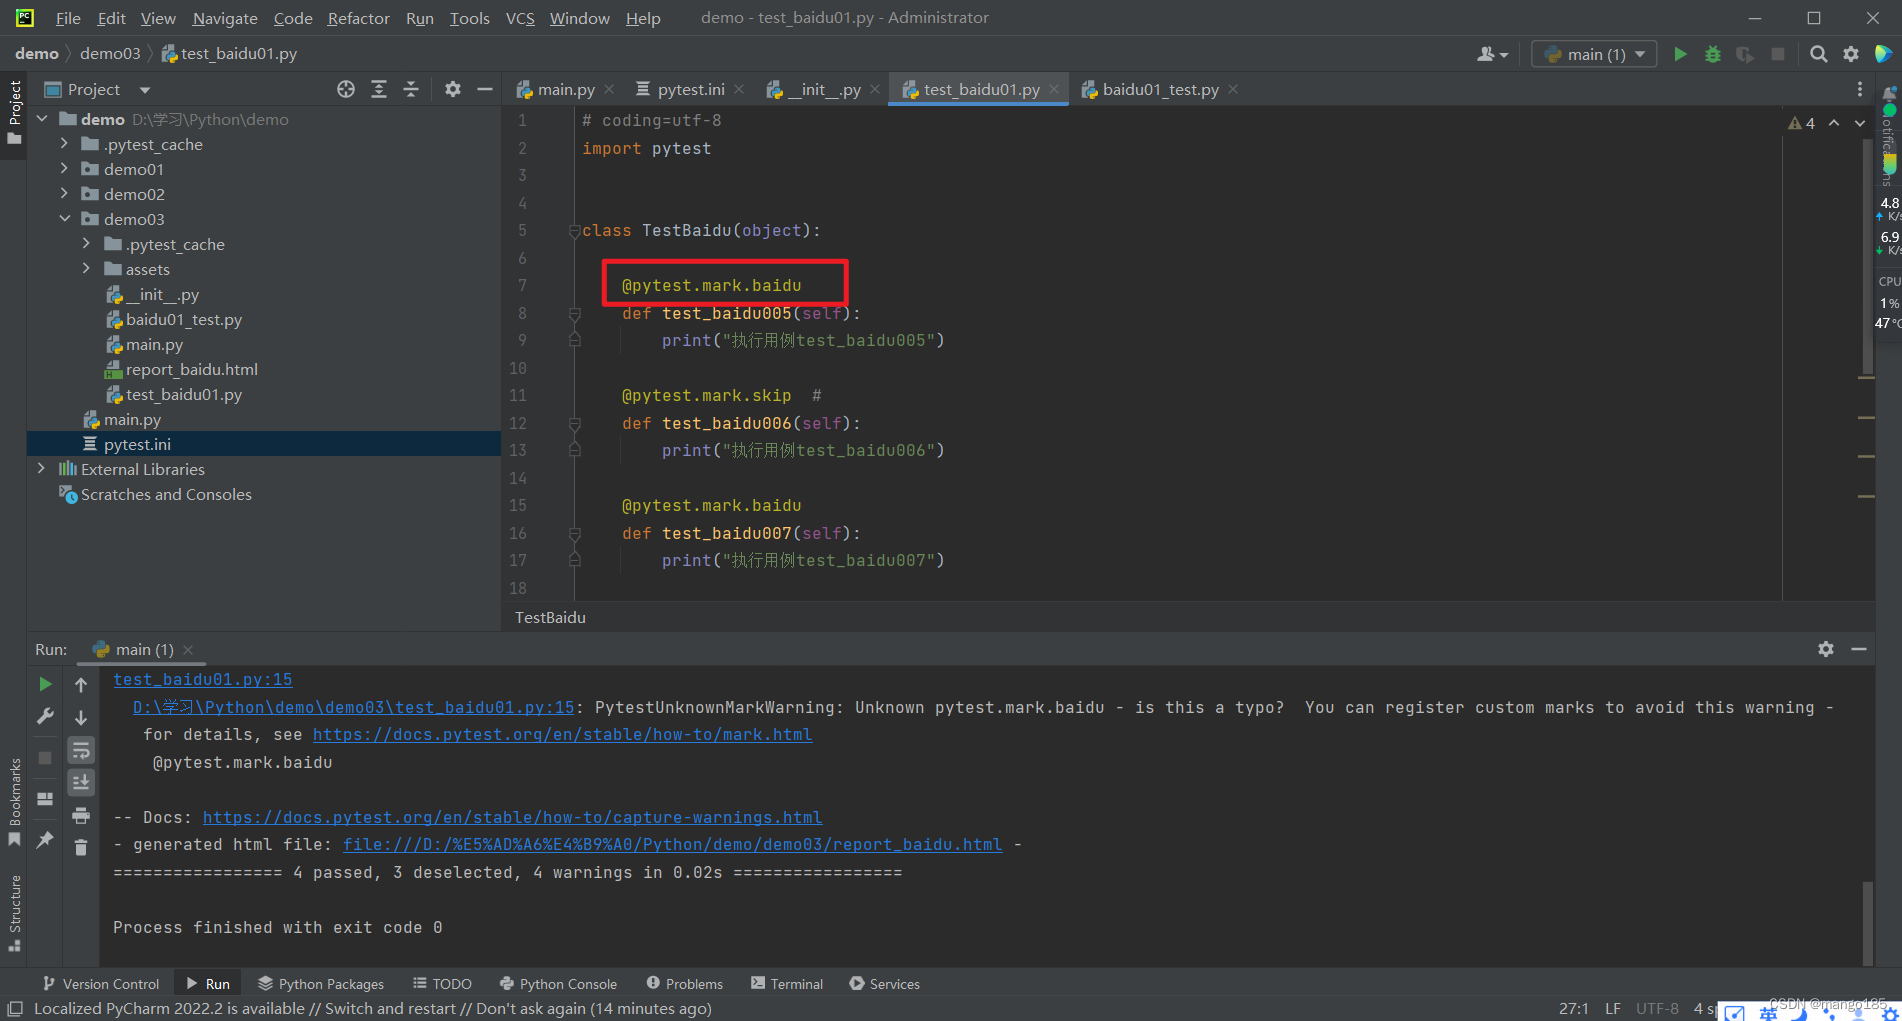
在用例函数前增加装饰器@pytest.mark.名称,pytest.main([“-m 名称”])执行时,会执行添加了此装饰器的用例
-
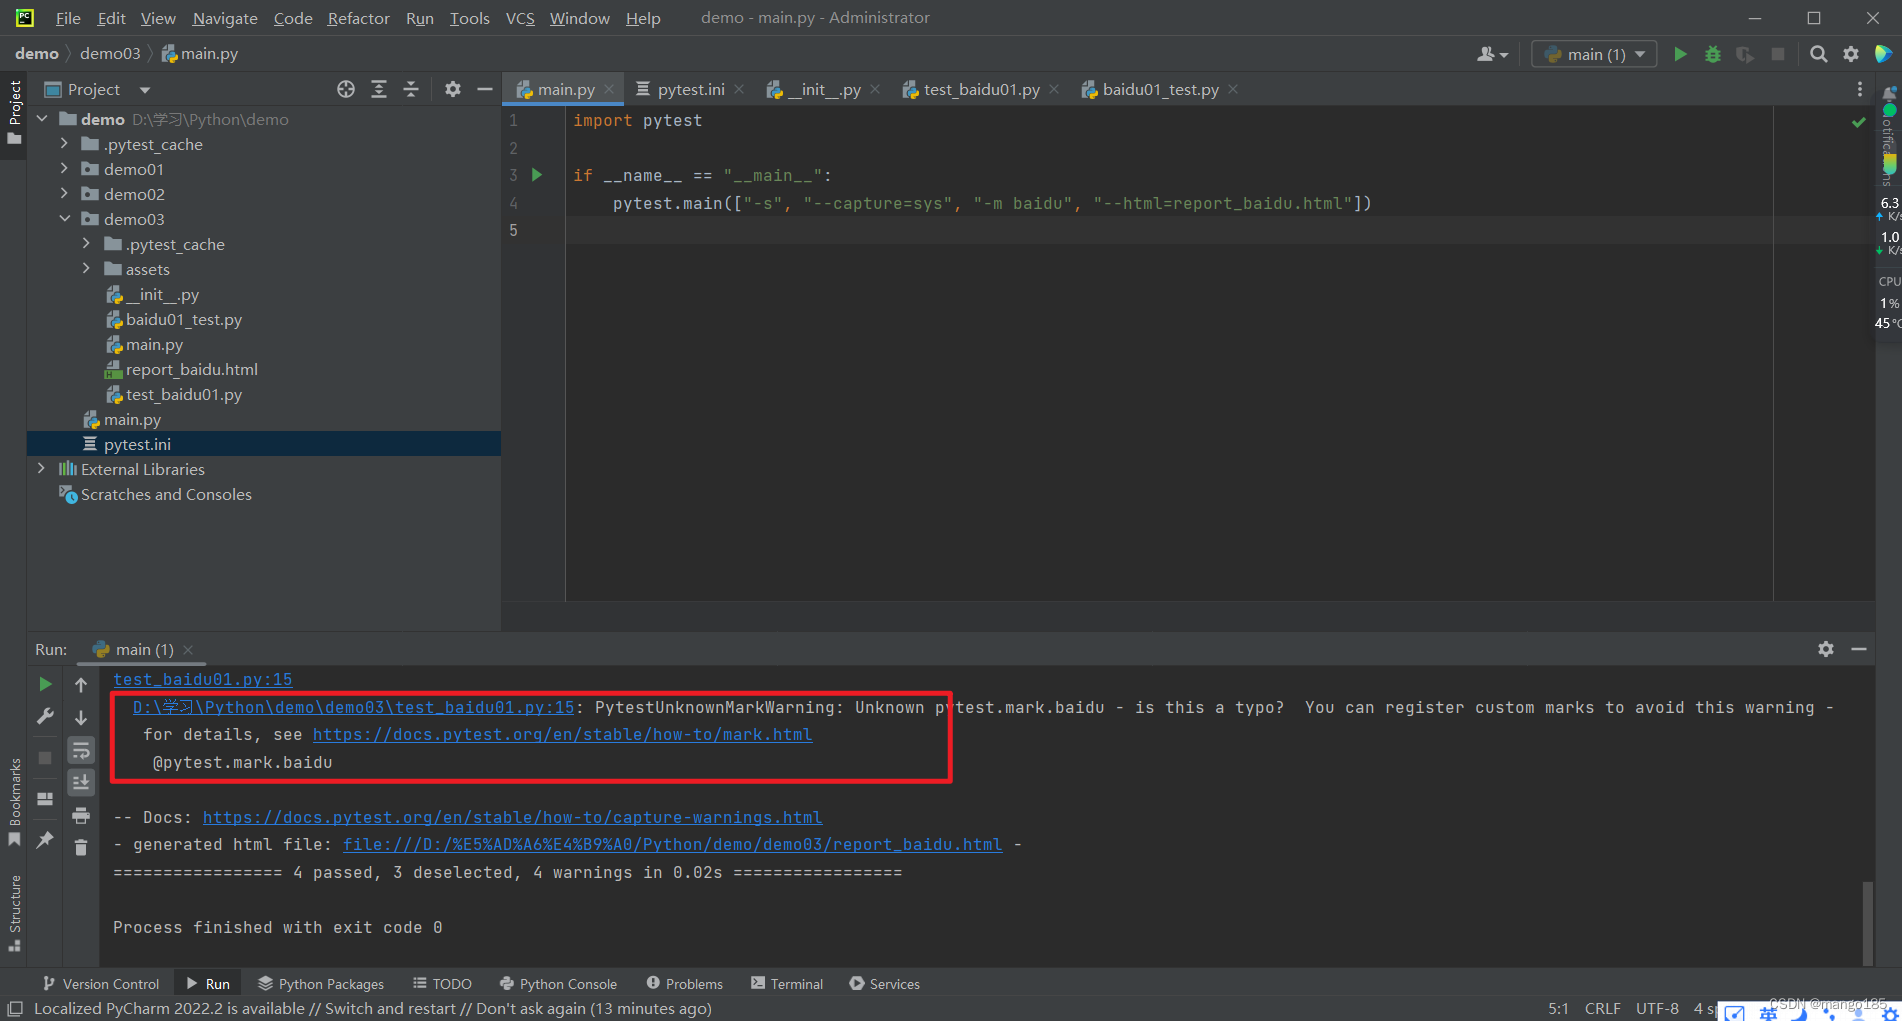
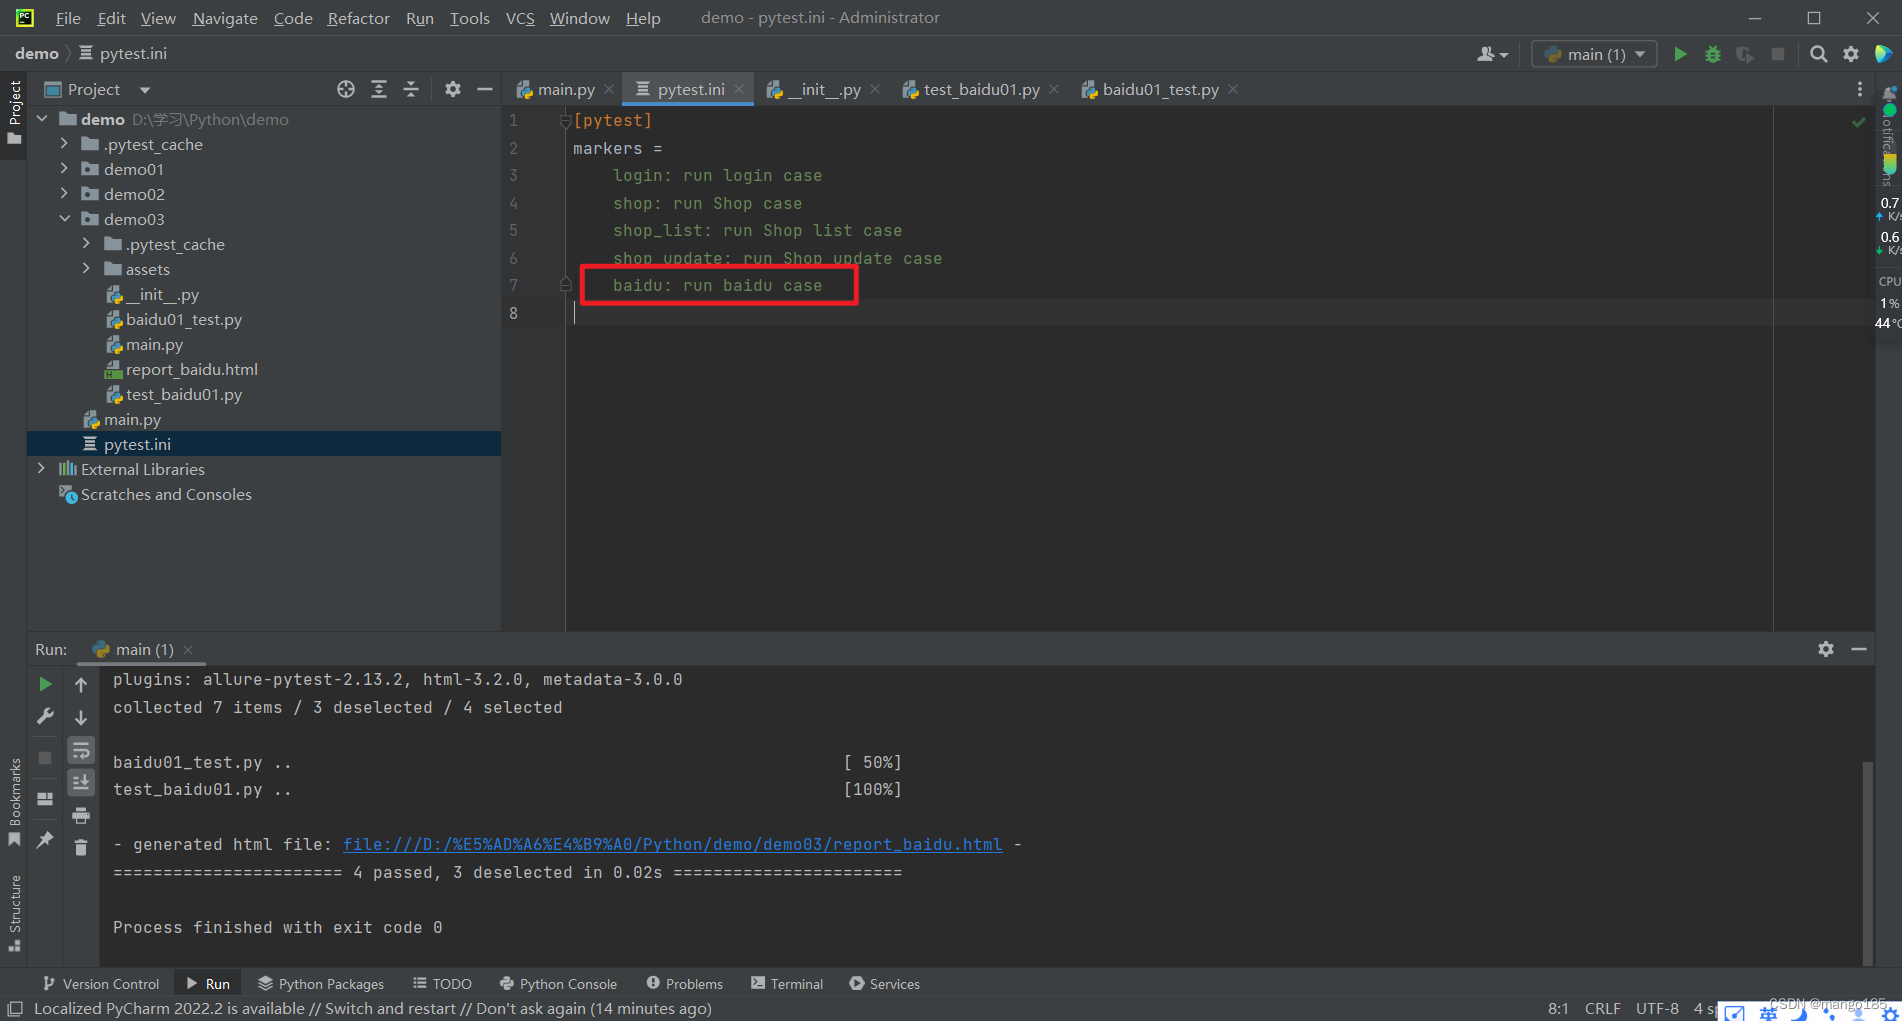
如果提示告警:可以修改pytest文件进行自定义标签
-
-
-
-
九、执行用例的前后置处理方式
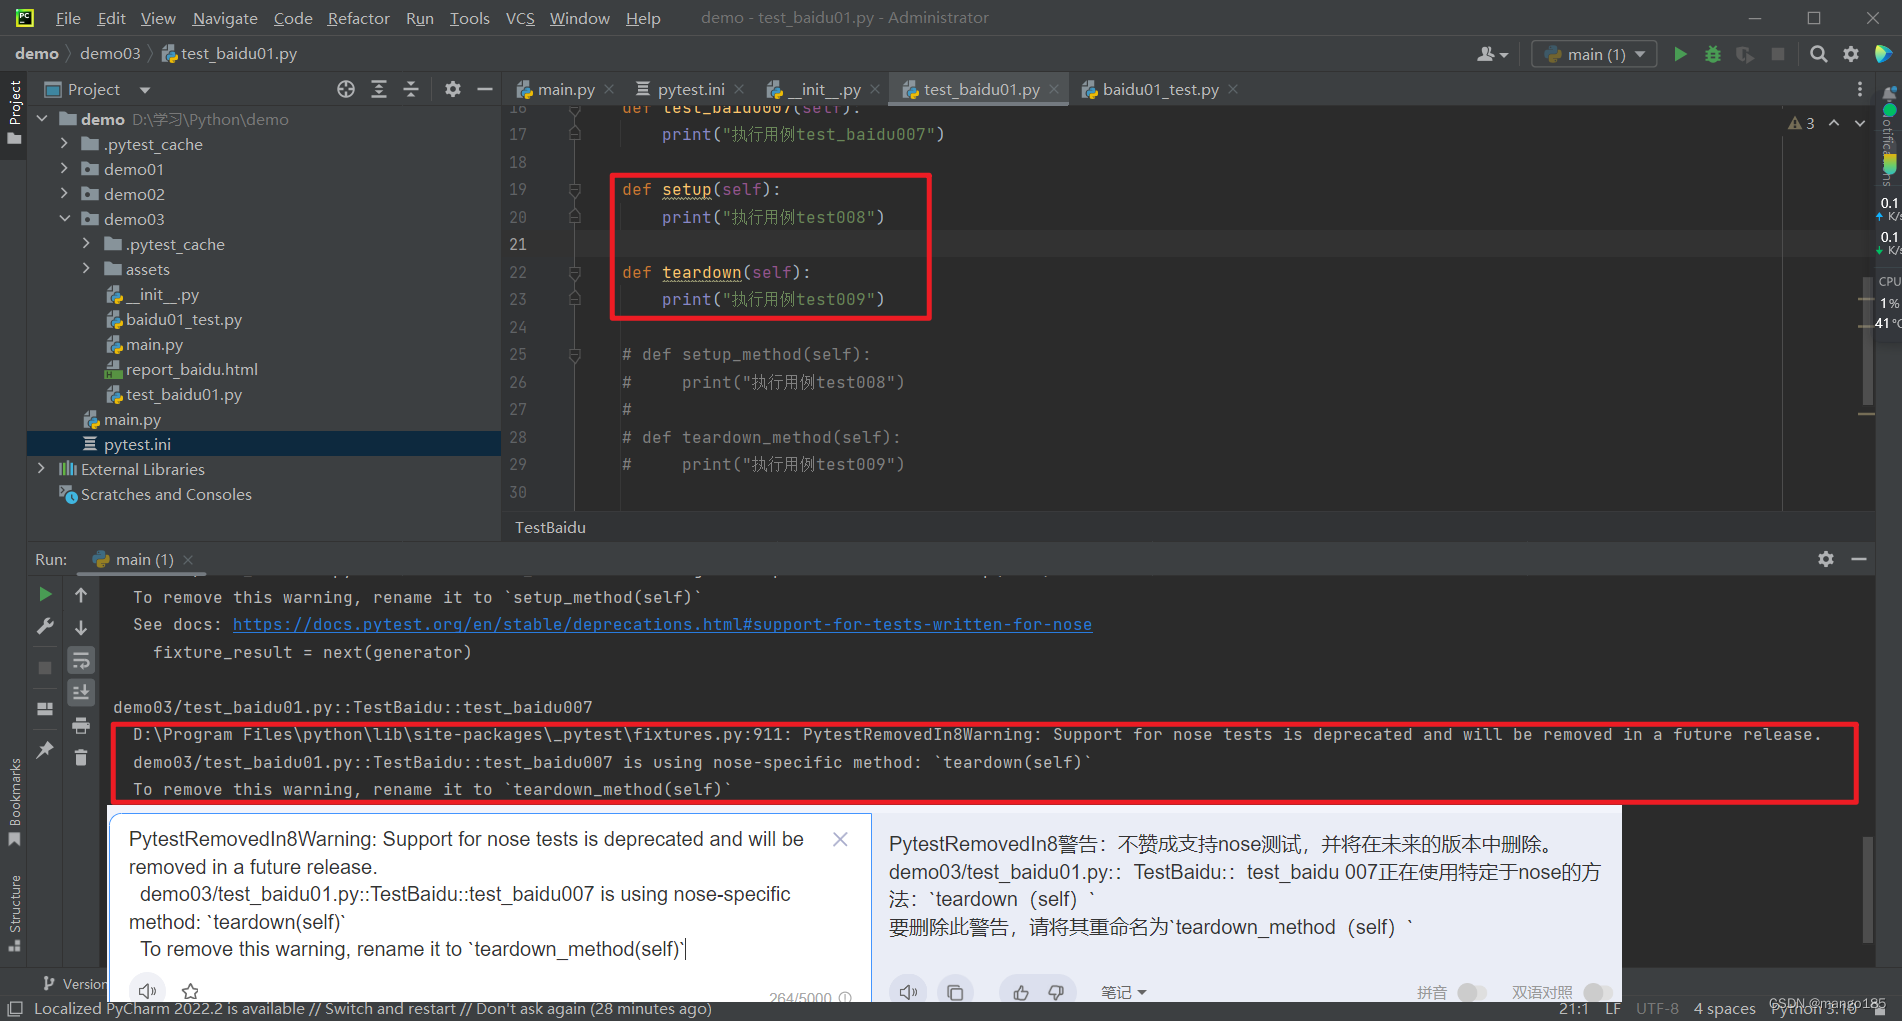
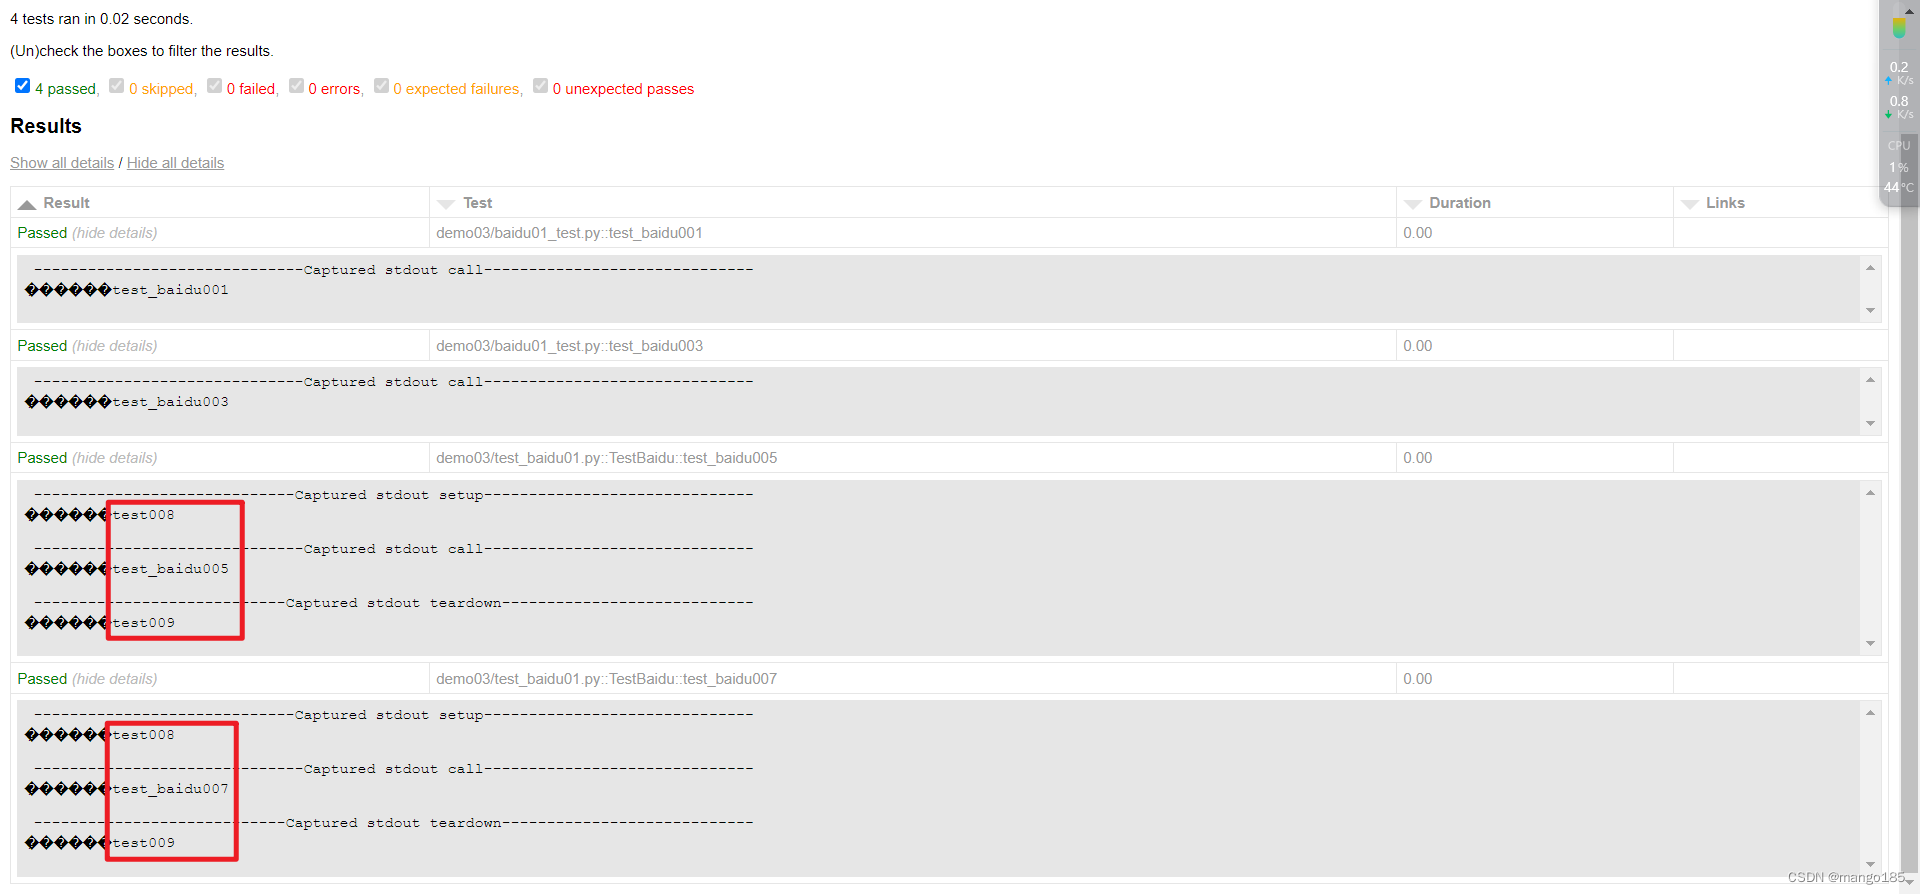
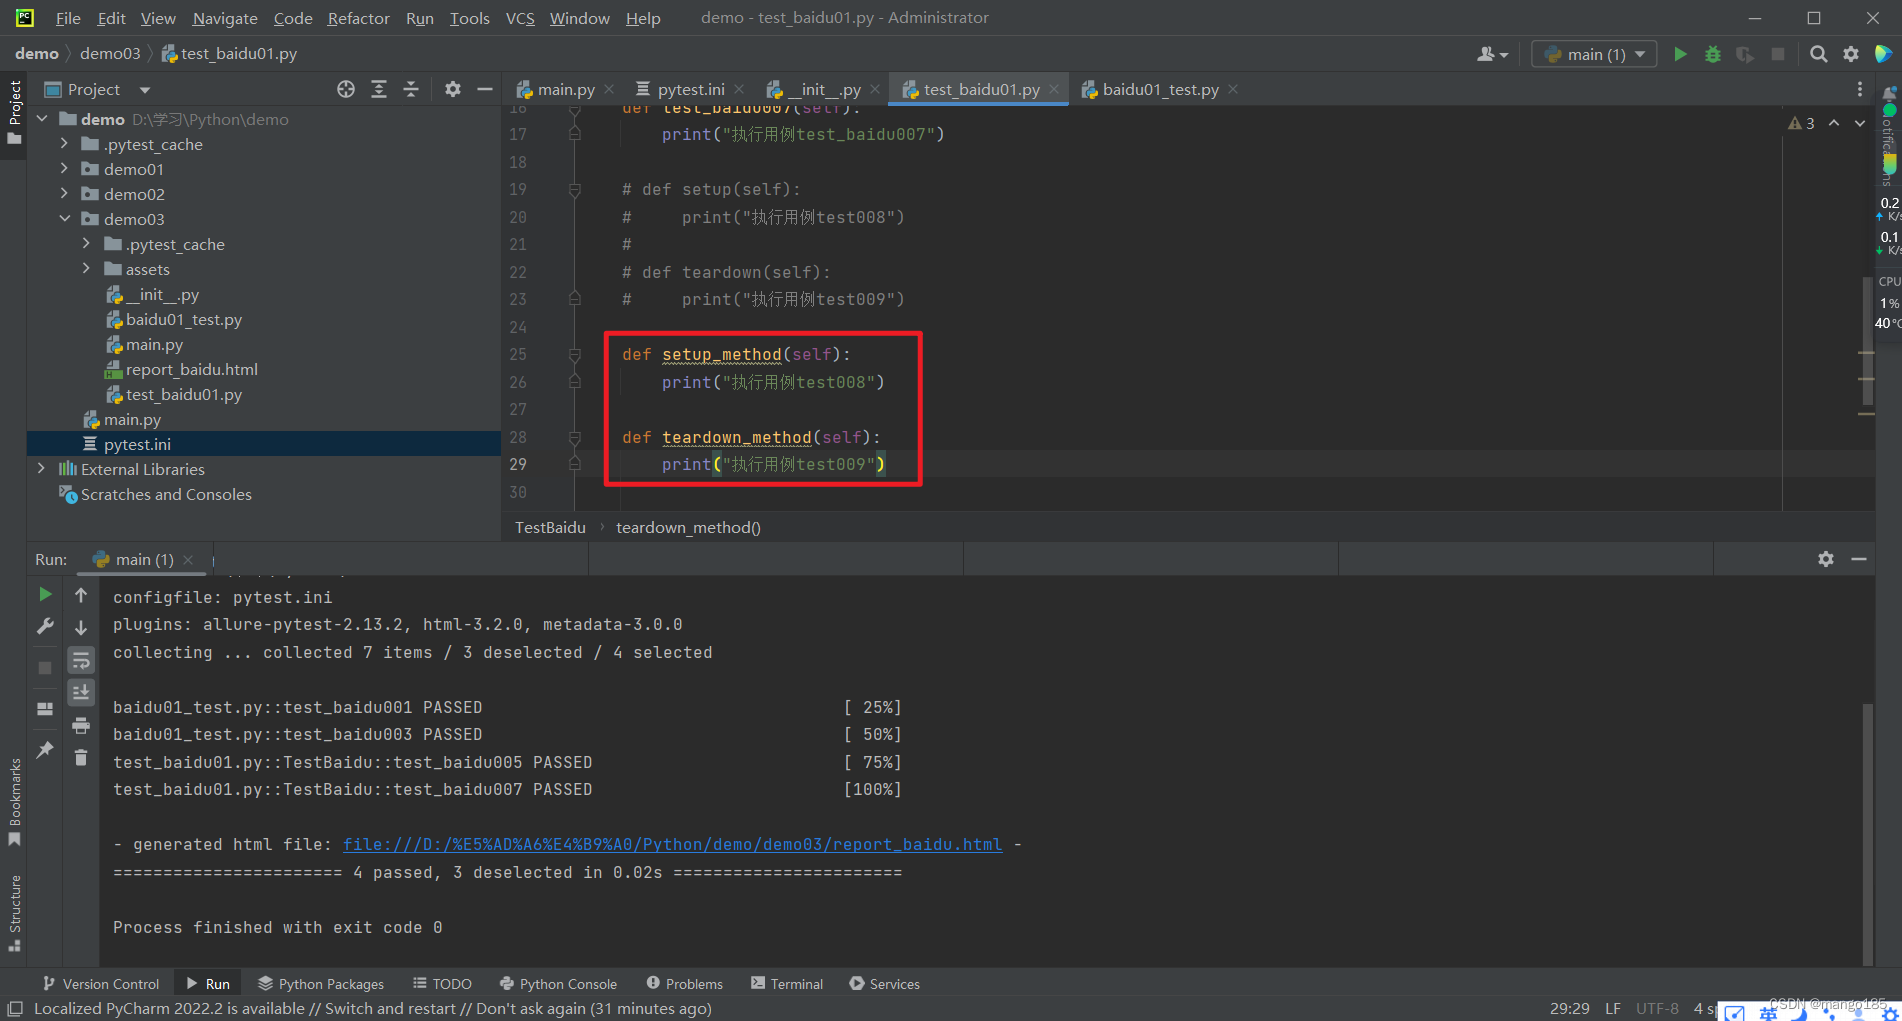
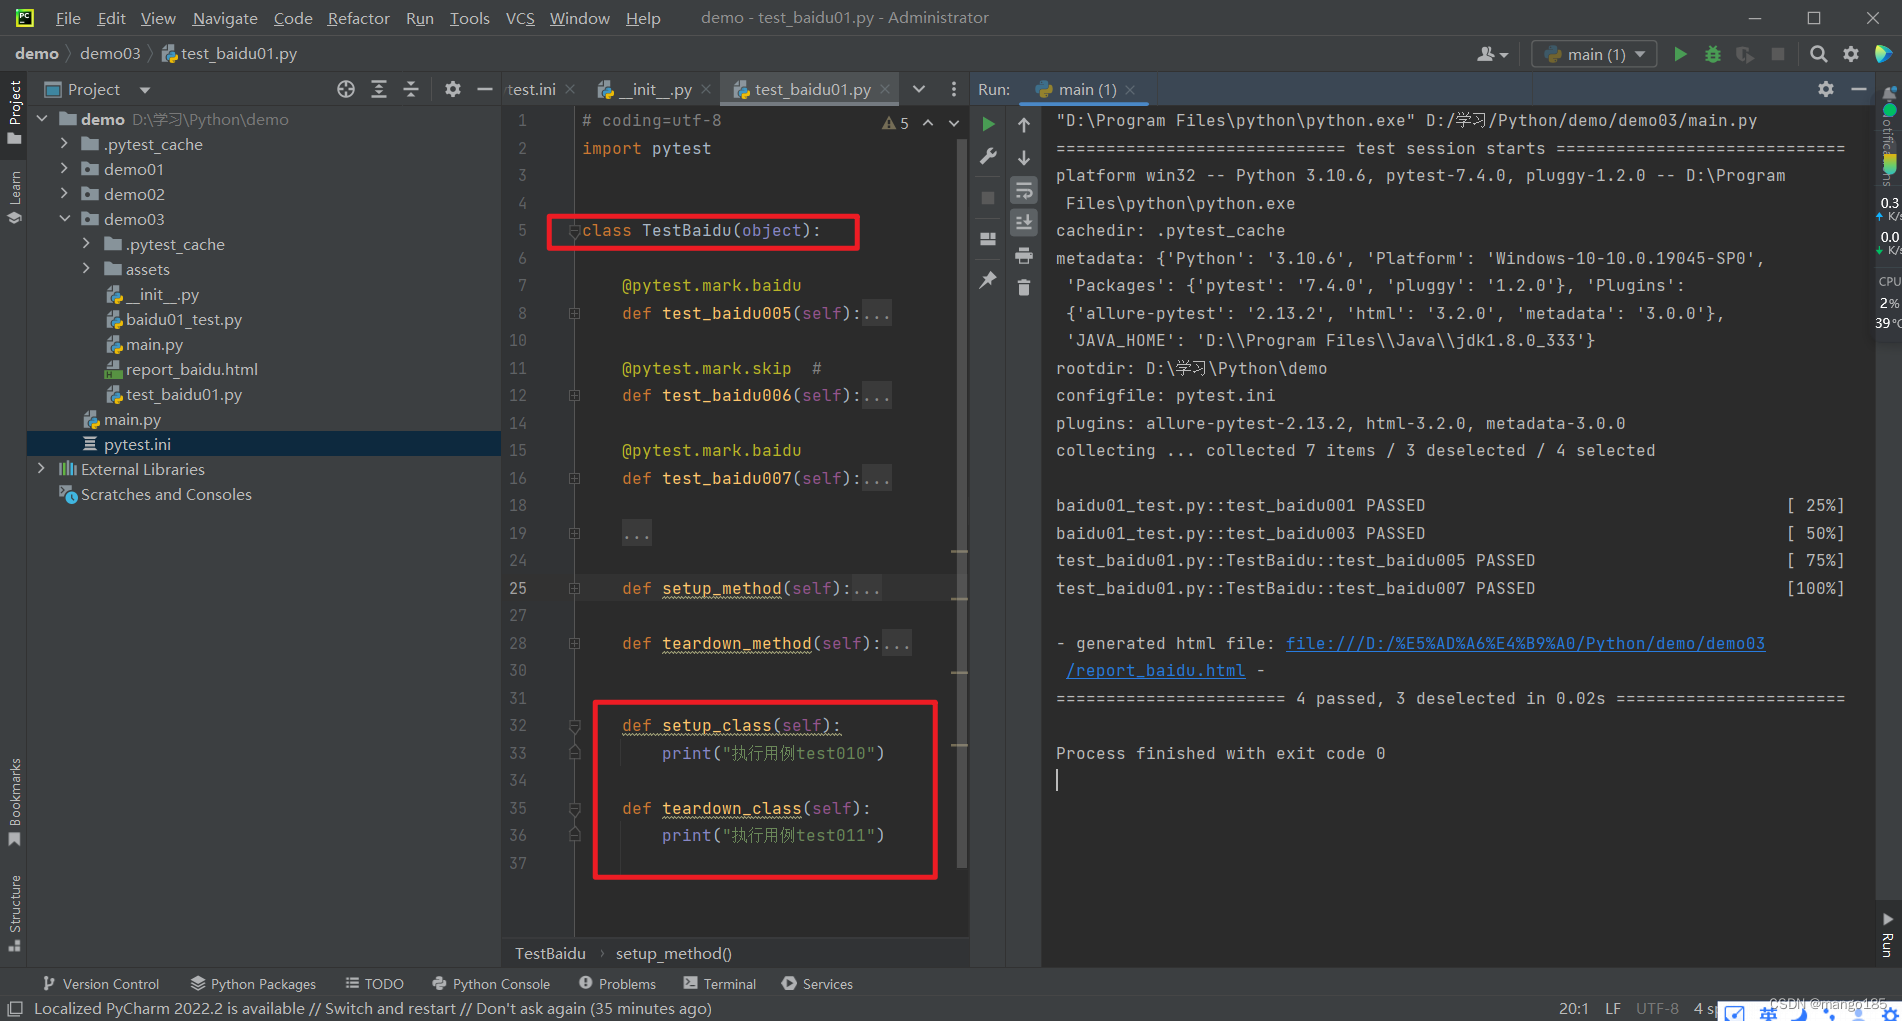
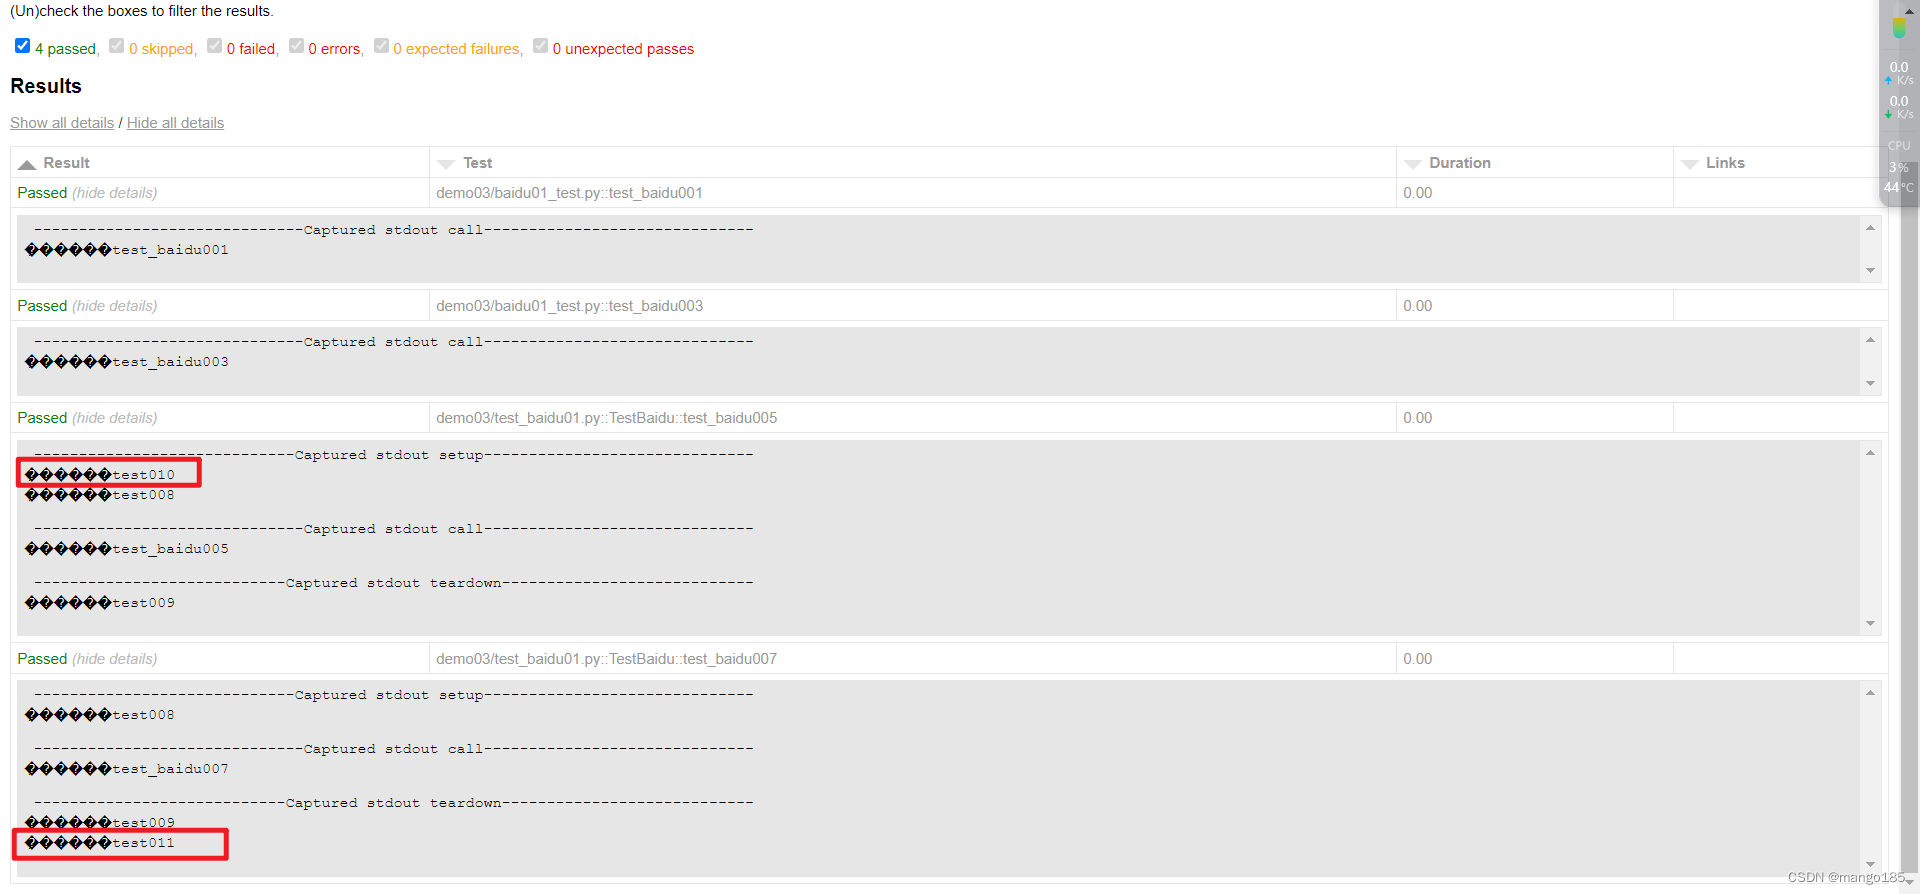
方式一:pytest(类)预置条件/(类)重置环境
-
预置条件和重置环境需要成对使用
- 表示在每一个要执行的用例前都执行一次预置条件,在每一个要执行的用例执行完成后都执行一类重置环境
-
类预置条件和类重置环境需要成对使用且需要在类中使用
- 表示在所有要执行的用例前执行一次类预置条件,在所有要执行的用例执行完成后执行一次类重置环境
方式二:使用fixture实现
import pytest

"""
@pytest.fixture(scope='', params='', autouse='', ids='', name='')
scope:作用域
    function:函数、用例,默认值
    class:类
    module:模块
    package/session:会话
params:数据驱动
autouse:自动作用还是手动作用
    True:自动调用
    False:手动调用,需要在fixture固件传入参数名称
ids:当数据驱动时更改参数名
name:fixture的别名
"""

@pytest.fixture()
def exe_assert():
    print("在用例之前执行:查询数据库用于断言")
    yield
    print("在用例之后执行:查询数据库")

class TestLogin():
    def test_login(self):
        print("登录接口")

    def test_register(self):
        print("注册接口")

    def test_test(self):
        print("测试接口")

if __name__ == '__main__':
    pytest.main(['-vs'])
返回结果:
"D:\Program Files\python\python.exe" D:/学习/Python/demo/demo07/test_fixture.py
============================= test session starts =============================
platform win32 -- Python 3.10.6, pytest-7.4.0, pluggy-1.2.0 -- D:\Program Files\python\python.exe
cachedir: .pytest_cache
metadata: {'Python': '3.10.6', 'Platform': 'Windows-10-10.0.19045-SP0', 'Packages': {'pytest': '7.4.0', 'pluggy': '1.2.0'}, 'Plugins': {'allure-pytest': '2.13.2', 'html': '3.2.0', 'metadata': '3.0.0'}, 'JAVA_HOME': 'D:\\Program Files\\Java\\jdk1.8.0_333'}
rootdir: D:\学习\Python\demo
configfile: pytest.ini
plugins: allure-pytest-2.13.2, html-3.2.0, metadata-3.0.0
collecting ... collected 3 items

test_fixture.py::TestLogin::test_login 登录接口
PASSED
test_fixture.py::TestLogin::test_register 注册接口
PASSED
test_fixture.py::TestLogin::test_test 测试接口
PASSED

============================== 3 passed in 0.01s ==============================

Process finished with exit code 0
autouse=True
import pytest

"""
@pytest.fixture(scope='', params='', autouse='', ids='', name='')
scope:作用域
    function:函数、用例,默认值
    class:类
    module:模块
    package/session:会话
params:数据驱动
autouse:自动作用还是手动作用
    True:自动调用
    False:手动调用,需要在fixture固件传入参数名称
ids:当数据驱动时更改参数名
name:fixture的别名
"""

@pytest.fixture(scope='function', autouse=True)
def exe_assert():
    print("在用例之前执行:查询数据库用于断言")
    yield
    print("在用例之后执行:查询数据库")

class TestLogin():
    def test_login(self):
        print("登录接口")

    def test_register(self):
        print("注册接口")

    def test_test(self):
        print("测试接口")

if __name__ == '__main__':
    pytest.main(['-vs'])
返回结果:
"D:\Program Files\python\python.exe" D:/学习/Python/demo/demo07/test_fixture.py
============================= test session starts =============================
platform win32 -- Python 3.10.6, pytest-7.4.0, pluggy-1.2.0 -- D:\Program Files\python\python.exe
cachedir: .pytest_cache
metadata: {'Python': '3.10.6', 'Platform': 'Windows-10-10.0.19045-SP0', 'Packages': {'pytest': '7.4.0', 'pluggy': '1.2.0'}, 'Plugins': {'allure-pytest': '2.13.2', 'html': '3.2.0', 'metadata': '3.0.0'}, 'JAVA_HOME': 'D:\\Program Files\\Java\\jdk1.8.0_333'}
rootdir: D:\学习\Python\demo
configfile: pytest.ini
plugins: allure-pytest-2.13.2, html-3.2.0, metadata-3.0.0
collecting ... collected 3 items

test_fixture.py::TestLogin::test_login 在用例之前执行:查询数据库用于断言
登录接口
PASSED在用例之后执行:查询数据库

test_fixture.py::TestLogin::test_register 在用例之前执行:查询数据库用于断言
注册接口
PASSED在用例之后执行:查询数据库

test_fixture.py::TestLogin::test_test 在用例之前执行:查询数据库用于断言
测试接口
PASSED在用例之后执行:查询数据库


============================== 3 passed in 0.01s ==============================

Process finished with exit code 0
只针对某一个用例执行
import pytest

"""
@pytest.fixture(scope='', params='', autouse='', ids='', name='')
scope:作用域
    function:函数、用例,默认值
    class:类
    module:模块
    package/session:会话
params:数据驱动
autouse:自动作用还是手动作用
    True:自动调用
    False:手动调用,需要在fixture固件传入参数名称
ids:当数据驱动时更改参数名
name:fixture的别名
"""

@pytest.fixture(scope='function')
def exe_assert():
    print("在用例之前执行:查询数据库用于断言")
    yield
    print("在用例之后执行:查询数据库")

class TestLogin():
    def test_login(self):
        print("登录接口")

    def test_register(self, exe_assert):
        print("注册接口")

    def test_test(self):
        print("测试接口")

if __name__ == '__main__':
    pytest.main(['-vs'])
返回结果:
"D:\Program Files\python\python.exe" D:/学习/Python/demo/demo07/test_fixture.py
============================= test session starts =============================
platform win32 -- Python 3.10.6, pytest-7.4.0, pluggy-1.2.0 -- D:\Program Files\python\python.exe
cachedir: .pytest_cache
metadata: {'Python': '3.10.6', 'Platform': 'Windows-10-10.0.19045-SP0', 'Packages': {'pytest': '7.4.0', 'pluggy': '1.2.0'}, 'Plugins': {'allure-pytest': '2.13.2', 'html': '3.2.0', 'metadata': '3.0.0'}, 'JAVA_HOME': 'D:\\Program Files\\Java\\jdk1.8.0_333'}
rootdir: D:\学习\Python\demo
configfile: pytest.ini
plugins: allure-pytest-2.13.2, html-3.2.0, metadata-3.0.0
collecting ... collected 3 items

test_fixture.py::TestLogin::test_login 登录接口
PASSED
test_fixture.py::TestLogin::test_register 在用例之前执行:查询数据库用于断言
注册接口
PASSED在用例之后执行:查询数据库

test_fixture.py::TestLogin::test_test 测试接口
PASSED

============================== 3 passed in 0.01s ==============================

Process finished with exit code 0
yield + 返回值
import pytest

"""
@pytest.fixture(scope='', params='', autouse='', ids='', name='')
scope:作用域
    function:函数、用例,默认值
    class:类
    module:模块
    package/session:会话
params:数据驱动
autouse:自动作用还是手动作用
    True:自动调用
    False:手动调用,需要在fixture固件传入参数名称
ids:当数据驱动时更改参数名
name:fixture的别名
"""

@pytest.fixture(scope='function')
def exe_assert():
    print("在用例之前执行:查询数据库用于断言")
    yield "哈哈哈哈"
    print("在用例之后执行:查询数据库")

class TestLogin():
    def test_login(self):
        print("登录接口")

    def test_register(self, exe_assert):
        print("注册接口: " + exe_assert)

    def test_test(self):
        print("测试接口")

if __name__ == '__main__':
    pytest.main(['-vs'])
返回结果:
"D:\Program Files\python\python.exe" D:/学习/Python/demo/demo07/test_fixture.py
============================= test session starts =============================
platform win32 -- Python 3.10.6, pytest-7.4.0, pluggy-1.2.0 -- D:\Program Files\python\python.exe
cachedir: .pytest_cache
metadata: {'Python': '3.10.6', 'Platform': 'Windows-10-10.0.19045-SP0', 'Packages': {'pytest': '7.4.0', 'pluggy': '1.2.0'}, 'Plugins': {'allure-pytest': '2.13.2', 'html': '3.2.0', 'metadata': '3.0.0'}, 'JAVA_HOME': 'D:\\Program Files\\Java\\jdk1.8.0_333'}
rootdir: D:\学习\Python\demo
configfile: pytest.ini
plugins: allure-pytest-2.13.2, html-3.2.0, metadata-3.0.0
collecting ... collected 3 items

test_fixture.py::TestLogin::test_login 登录接口
PASSED
test_fixture.py::TestLogin::test_register 在用例之前执行:查询数据库用于断言
注册接口: 哈哈哈哈
PASSED在用例之后执行:查询数据库

test_fixture.py::TestLogin::test_test 测试接口
PASSED

============================== 3 passed in 0.01s ==============================

Process finished with exit code 0
作用域为class的自动调用
import pytest

"""
@pytest.fixture(scope='', params='', autouse='', ids='', name='')
scope:作用域
    function:函数、用例,默认值
    class:类
    module:模块
    package/session:会话
params:数据驱动
autouse:自动作用还是手动作用
    True:自动调用
    False:手动调用,需要在fixture固件传入参数名称
ids:当数据驱动时更改参数名
name:fixture的别名
"""

@pytest.fixture(scope='class', autouse=True)
def exe_assert():
    print("在用例之前执行:查询数据库用于断言")
    yield "哈哈哈哈"
    print("在用例之后执行:查询数据库")

class TestLogin():
    def test_login(self):
        print("登录接口")

    def test_register(self):
        print("注册接口: ")

    def test_test(self):
        print("测试接口")

if __name__ == '__main__':
    pytest.main(['-vs'])
返回结果:
"D:\Program Files\python\python.exe" D:/学习/Python/demo/demo07/test_fixture.py
============================= test session starts =============================
platform win32 -- Python 3.10.6, pytest-7.4.0, pluggy-1.2.0 -- D:\Program Files\python\python.exe
cachedir: .pytest_cache
metadata: {'Python': '3.10.6', 'Platform': 'Windows-10-10.0.19045-SP0', 'Packages': {'pytest': '7.4.0', 'pluggy': '1.2.0'}, 'Plugins': {'allure-pytest': '2.13.2', 'html': '3.2.0', 'metadata': '3.0.0'}, 'JAVA_HOME': 'D:\\Program Files\\Java\\jdk1.8.0_333'}
rootdir: D:\学习\Python\demo
configfile: pytest.ini
plugins: allure-pytest-2.13.2, html-3.2.0, metadata-3.0.0
collecting ... collected 3 items

test_fixture.py::TestLogin::test_login 在用例之前执行:查询数据库用于断言
登录接口
PASSED
test_fixture.py::TestLogin::test_register 注册接口:
PASSED
test_fixture.py::TestLogin::test_test 测试接口
PASSED在用例之后执行:查询数据库


============================== 3 passed in 0.01s ==============================

Process finished with exit code 0
作用域为class的手动调用
import pytest

"""
@pytest.fixture(scope='', params='', autouse='', ids='', name='')
scope:作用域
    function:函数、用例,默认值
    class:类
    module:模块
    package/session:会话
params:数据驱动
autouse:自动作用还是手动作用
    True:自动调用
    False:手动调用,需要在fixture固件传入参数名称
ids:当数据驱动时更改参数名
name:fixture的别名
"""

@pytest.fixture(scope='class')
def exe_assert():
    print("在用例之前执行:查询数据库用于断言")
    yield "哈哈哈哈"
    print("在用例之后执行:查询数据库")

@pytest.mark.usefixtures("exe_assert")
class TestLogin():
    def test_login(self):
        print("登录接口")

    def test_register(self):
        print("注册接口: ")

    def test_test(self):
        print("测试接口")

if __name__ == '__main__':
    pytest.main(['-vs'])
返回结果:
"D:\Program Files\python\python.exe" D:/学习/Python/demo/demo07/test_fixture.py
============================= test session starts =============================
platform win32 -- Python 3.10.6, pytest-7.4.0, pluggy-1.2.0 -- D:\Program Files\python\python.exe
cachedir: .pytest_cache
metadata: {'Python': '3.10.6', 'Platform': 'Windows-10-10.0.19045-SP0', 'Packages': {'pytest': '7.4.0', 'pluggy': '1.2.0'}, 'Plugins': {'allure-pytest': '2.13.2', 'html': '3.2.0', 'metadata': '3.0.0'}, 'JAVA_HOME': 'D:\\Program Files\\Java\\jdk1.8.0_333'}
rootdir: D:\学习\Python\demo
configfile: pytest.ini
plugins: allure-pytest-2.13.2, html-3.2.0, metadata-3.0.0
collecting ... collected 3 items

test_fixture.py::TestLogin::test_login 在用例之前执行:查询数据库用于断言
登录接口
PASSED
test_fixture.py::TestLogin::test_register 注册接口:
PASSED
test_fixture.py::TestLogin::test_test 测试接口
PASSED在用例之后执行:查询数据库


============================== 3 passed in 0.01s ==============================

Process finished with exit code 0
scope=class时,yield后不传值
import pytest

"""
@pytest.fixture(scope='', params='', autouse='', ids='', name='')
scope:作用域
    function:函数、用例,默认值
    class:类
    module:模块
    package/session:会话
params:数据驱动
autouse:自动作用还是手动作用
    True:自动调用
    False:手动调用,需要在fixture固件传入参数名称
ids:当数据驱动时更改参数名
name:fixture的别名
"""

@pytest.fixture(scope='class')
def exe_assert():
    print("在用例之前执行:查询数据库用于断言")
    yield "哈哈哈哈"
    print("在用例之后执行:查询数据库")

@pytest.mark.usefixtures("exe_assert")
class TestLogin():
    def test_login(self):
        print("登录接口")

    def test_register(self):
        print("注册接口: " + exe_assert)

    def test_test(self):
        print("测试接口")

if __name__ == '__main__':
    pytest.main(['-vs'])
返回结果:TypeError: can only concatenate str (not “function”) to str
"D:\Program Files\python\python.exe" D:/学习/Python/demo/demo07/test_fixture.py
============================= test session starts =============================
platform win32 -- Python 3.10.6, pytest-7.4.0, pluggy-1.2.0 -- D:\Program Files\python\python.exe
cachedir: .pytest_cache
metadata: {'Python': '3.10.6', 'Platform': 'Windows-10-10.0.19045-SP0', 'Packages': {'pytest': '7.4.0', 'pluggy': '1.2.0'}, 'Plugins': {'allure-pytest': '2.13.2', 'html': '3.2.0', 'metadata': '3.0.0'}, 'JAVA_HOME': 'D:\\Program Files\\Java\\jdk1.8.0_333'}
rootdir: D:\学习\Python\demo
configfile: pytest.ini
plugins: allure-pytest-2.13.2, html-3.2.0, metadata-3.0.0
collecting ... collected 3 items

test_fixture.py::TestLogin::test_login 在用例之前执行:查询数据库用于断言
登录接口
PASSED
test_fixture.py::TestLogin::test_register FAILED
test_fixture.py::TestLogin::test_test 测试接口
PASSED在用例之后执行:查询数据库


================================== FAILURES ===================================
___________________________ TestLogin.test_register ___________________________

self = <demo07.test_fixture.TestLogin object at 0x000001F31608E7A0>

    def test_register(self):
>       print("注册接口: " + exe_assert)
E       TypeError: can only concatenate str (not "function") to str

test_fixture.py:30: TypeError
=========================== short test summary info ===========================
FAILED test_fixture.py::TestLogin::test_register - TypeError: can only concat...
========================= 1 failed, 2 passed in 0.05s =========================

Process finished with exit code 0
params实现数据驱动
import pytest

"""
@pytest.fixture(scope='', params='', autouse='', ids='', name='')
scope:作用域
    function:函数、用例,默认值
    class:类
    module:模块
    package/session:会话
params:数据驱动
autouse:自动作用还是手动作用
    True:自动调用
    False:手动调用,需要在fixture固件传入参数名称
ids:当数据驱动时更改参数名
name:fixture的别名
"""


# 读取数据
def read_yaml():
    return ["AAA", "BBB", "CCC"]

@pytest.fixture(scope='function', autouse=False, params=read_yaml())
def exe_assert(request):
    print("在用例之前执行:查询数据库用于断言")
    yield request.param
    print("在用例之后执行:查询数据库")

class TestLogin():
    def test_login(self):
        print("登录接口")

    def test_register(self, exe_assert):
        print("注册接口: " + exe_assert)

    def test_test(self):
        print("测试接口")

if __name__ == '__main__':
    pytest.main(['-vs'])
返回结果:
"D:\Program Files\python\python.exe" D:/学习/Python/demo/demo07/test_fixture.py
============================= test session starts =============================
platform win32 -- Python 3.10.6, pytest-7.4.0, pluggy-1.2.0 -- D:\Program Files\python\python.exe
cachedir: .pytest_cache
metadata: {'Python': '3.10.6', 'Platform': 'Windows-10-10.0.19045-SP0', 'Packages': {'pytest': '7.4.0', 'pluggy': '1.2.0'}, 'Plugins': {'allure-pytest': '2.13.2', 'html': '3.2.0', 'metadata': '3.0.0'}, 'JAVA_HOME': 'D:\\Program Files\\Java\\jdk1.8.0_333'}
rootdir: D:\学习\Python\demo
configfile: pytest.ini
plugins: allure-pytest-2.13.2, html-3.2.0, metadata-3.0.0
collecting ... collected 5 items

test_fixture.py::TestLogin::test_login 登录接口
PASSED
test_fixture.py::TestLogin::test_register[AAA] 在用例之前执行:查询数据库用于断言
注册接口: AAA
PASSED在用例之后执行:查询数据库

test_fixture.py::TestLogin::test_register[BBB] 在用例之前执行:查询数据库用于断言
注册接口: BBB
PASSED在用例之后执行:查询数据库

test_fixture.py::TestLogin::test_register[CCC] 在用例之前执行:查询数据库用于断言
注册接口: CCC
PASSED在用例之后执行:查询数据库

test_fixture.py::TestLogin::test_test 测试接口
PASSED

============================== 5 passed in 0.01s ==============================

Process finished with exit code 0
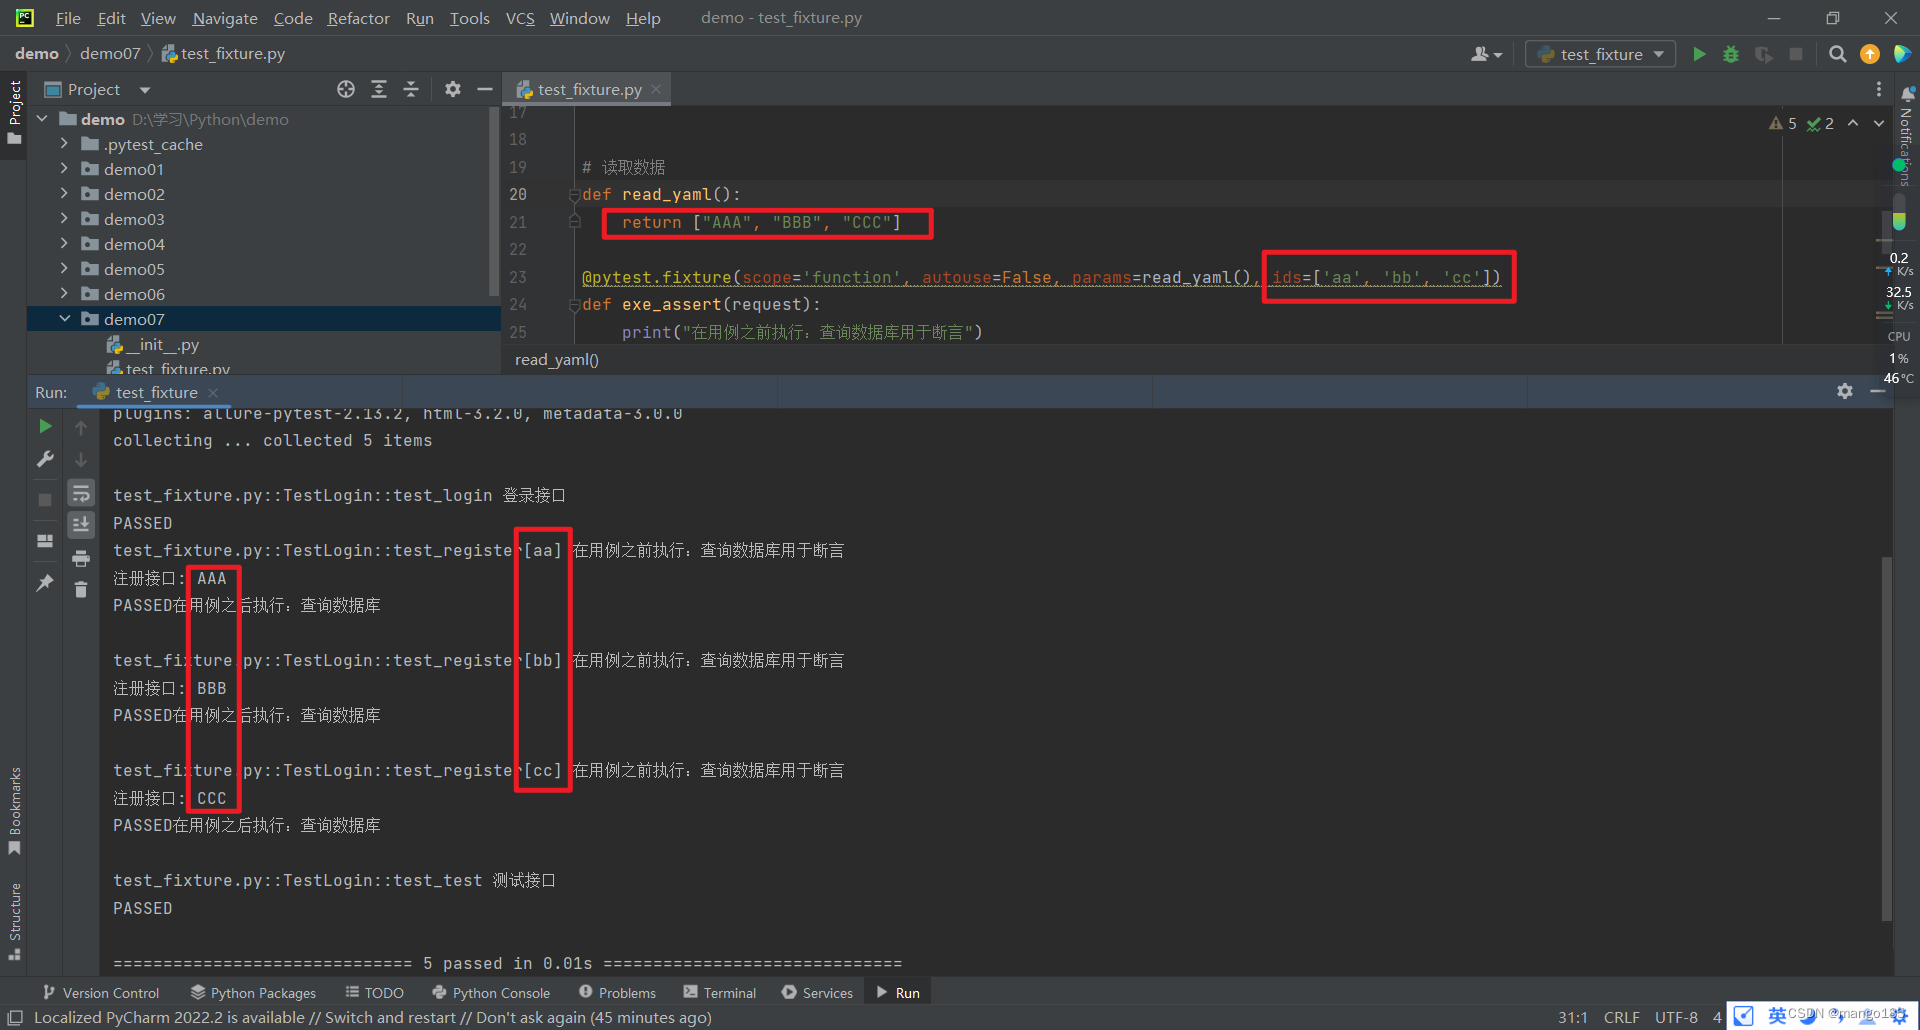
ids:可以替换params中参数的名称
import pytest

"""
@pytest.fixture(scope='', params='', autouse='', ids='', name='')
scope:作用域
    function:函数、用例,默认值
    class:类
    module:模块
    package/session:会话
params:数据驱动
autouse:自动作用还是手动作用
    True:自动调用
    False:手动调用,需要在fixture固件传入参数名称
ids:当数据驱动时更改参数名
name:fixture的别名
"""


# 读取数据
def read_yaml():
    return ["AAA", "BBB", "CCC"]

@pytest.fixture(scope='function', autouse=False, params=read_yaml(), ids=['aa', 'bb', 'cc'])
def exe_assert(request):
    print("在用例之前执行:查询数据库用于断言")
    yield request.param
    print("在用例之后执行:查询数据库")

class TestLogin():
    def test_login(self):
        print("登录接口")

    def test_register(self, exe_assert):
        print("注册接口: " + exe_assert)

    def test_test(self):
        print("测试接口")

if __name__ == '__main__':
    pytest.main(['-vs'])
返回结果:
"D:\Program Files\python\python.exe" D:/学习/Python/demo/demo07/test_fixture.py
============================= test session starts =============================
platform win32 -- Python 3.10.6, pytest-7.4.0, pluggy-1.2.0 -- D:\Program Files\python\python.exe
cachedir: .pytest_cache
metadata: {'Python': '3.10.6', 'Platform': 'Windows-10-10.0.19045-SP0', 'Packages': {'pytest': '7.4.0', 'pluggy': '1.2.0'}, 'Plugins': {'allure-pytest': '2.13.2', 'html': '3.2.0', 'metadata': '3.0.0'}, 'JAVA_HOME': 'D:\\Program Files\\Java\\jdk1.8.0_333'}
rootdir: D:\学习\Python\demo
configfile: pytest.ini
plugins: allure-pytest-2.13.2, html-3.2.0, metadata-3.0.0
collecting ... collected 5 items

test_fixture.py::TestLogin::test_login 登录接口
PASSED
test_fixture.py::TestLogin::test_register[aa] 在用例之前执行:查询数据库用于断言
注册接口: AAA
PASSED在用例之后执行:查询数据库

test_fixture.py::TestLogin::test_register[bb] 在用例之前执行:查询数据库用于断言
注册接口: BBB
PASSED在用例之后执行:查询数据库

test_fixture.py::TestLogin::test_register[cc] 在用例之前执行:查询数据库用于断言
注册接口: CCC
PASSED在用例之后执行:查询数据库

test_fixture.py::TestLogin::test_test 测试接口
PASSED

============================== 5 passed in 0.01s ==============================

Process finished with exit code 0
name:定义fixture固件别名
调用固件时需要使用name定义的别名,否则会报错
import pytest

"""
@pytest.fixture(scope='', params='', autouse='', ids='', name='')
scope:作用域
    function:函数、用例,默认值
    class:类
    module:模块
    package/session:会话
params:数据驱动
autouse:自动作用还是手动作用
    True:自动调用
    False:手动调用,需要在fixture固件传入参数名称
ids:当数据驱动时更改参数名
name:fixture的别名
"""


# 读取数据
def read_yaml():
    return ["AAA", "BBB", "CCC"]

@pytest.fixture(scope='function', autouse=False, params=read_yaml(), ids=['aa', 'bb', 'cc'], name='ea')
def exe_assert(request):
    print("在用例之前执行:查询数据库用于断言")
    yield request.param
    print("在用例之后执行:查询数据库")

class TestLogin():
    def test_login(self):
        print("登录接口")

    def test_register(self, ea):
        print("注册接口: " + ea)

    def test_test(self):
        print("测试接口")

if __name__ == '__main__':
    pytest.main(['-vs'])
返回结果:
"D:\Program Files\python\python.exe" D:/学习/Python/demo/demo07/test_fixture.py
============================= test session starts =============================
platform win32 -- Python 3.10.6, pytest-7.4.0, pluggy-1.2.0 -- D:\Program Files\python\python.exe
cachedir: .pytest_cache
metadata: {'Python': '3.10.6', 'Platform': 'Windows-10-10.0.19045-SP0', 'Packages': {'pytest': '7.4.0', 'pluggy': '1.2.0'}, 'Plugins': {'allure-pytest': '2.13.2', 'html': '3.2.0', 'metadata': '3.0.0'}, 'JAVA_HOME': 'D:\\Program Files\\Java\\jdk1.8.0_333'}
rootdir: D:\学习\Python\demo
configfile: pytest.ini
plugins: allure-pytest-2.13.2, html-3.2.0, metadata-3.0.0
collecting ... collected 5 items

test_fixture.py::TestLogin::test_login 登录接口
PASSED
test_fixture.py::TestLogin::test_register[aa] 在用例之前执行:查询数据库用于断言
注册接口: AAA
PASSED在用例之后执行:查询数据库

test_fixture.py::TestLogin::test_register[bb] 在用例之前执行:查询数据库用于断言
注册接口: BBB
PASSED在用例之后执行:查询数据库

test_fixture.py::TestLogin::test_register[cc] 在用例之前执行:查询数据库用于断言
注册接口: CCC
PASSED在用例之后执行:查询数据库

test_fixture.py::TestLogin::test_test 测试接口
PASSED

============================== 5 passed in 0.01s ==============================

Process finished with exit code 0
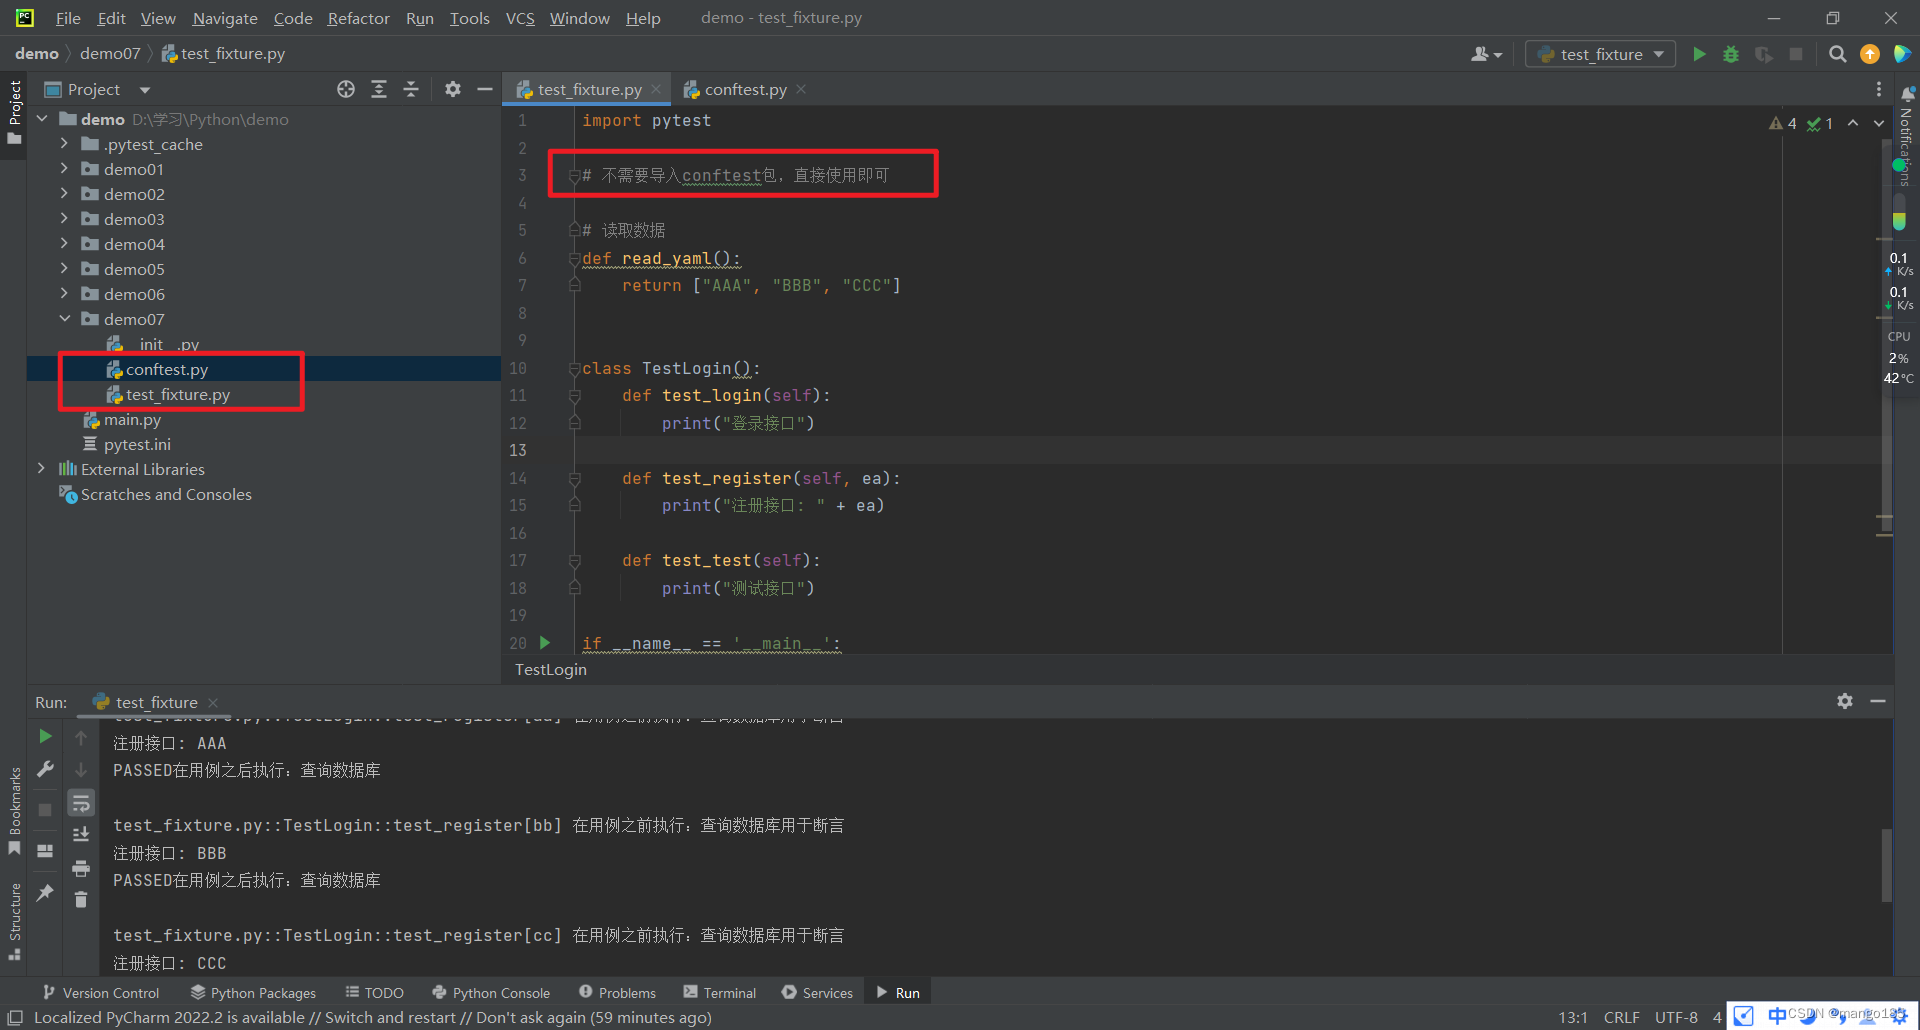
可以在conftest.py文件中保存所有的固件
test_fixture.py
import pytest

# 不需要导入conftest包,直接使用即可

# 读取数据
def read_yaml():
    return ["AAA", "BBB", "CCC"]


class TestLogin():
    def test_login(self):
        print("登录接口")

    def test_register(self, ea):
        print("注册接口: " + ea)

    def test_test(self):
        print("测试接口")

if __name__ == '__main__':
    pytest.main(['-vs'])
conftest.py
import pytest

from demo07.test_fixture import read_yaml

"""
@pytest.fixture(scope='', params='', autouse='', ids='', name='')
scope:作用域
    function:函数、用例,默认值
    class:类
    module:模块
    package/session:会话
params:数据驱动
autouse:自动作用还是手动作用
    True:自动调用
    False:手动调用,需要在fixture固件传入参数名称
ids:当数据驱动时更改参数名
name:fixture的别名
"""
@pytest.fixture(scope='function', autouse=False, params=read_yaml(), ids=['aa', 'bb', 'cc'], name='ea')
def exe_assert(request):
    print("在用例之前执行:查询数据库用于断言")
    yield request.param
    print("在用例之后执行:查询数据库")
返回结果:
"D:\Program Files\python\python.exe" D:/学习/Python/demo/demo07/test_fixture.py
============================= test session starts =============================
platform win32 -- Python 3.10.6, pytest-7.4.0, pluggy-1.2.0 -- D:\Program Files\python\python.exe
cachedir: .pytest_cache
metadata: {'Python': '3.10.6', 'Platform': 'Windows-10-10.0.19045-SP0', 'Packages': {'pytest': '7.4.0', 'pluggy': '1.2.0'}, 'Plugins': {'allure-pytest': '2.13.2', 'html': '3.2.0', 'metadata': '3.0.0'}, 'JAVA_HOME': 'D:\\Program Files\\Java\\jdk1.8.0_333'}
rootdir: D:\学习\Python\demo
configfile: pytest.ini
plugins: allure-pytest-2.13.2, html-3.2.0, metadata-3.0.0
collecting ... collected 5 items

test_fixture.py::TestLogin::test_login 登录接口
PASSED
test_fixture.py::TestLogin::test_register[aa] 在用例之前执行:查询数据库用于断言
注册接口: AAA
PASSED在用例之后执行:查询数据库

test_fixture.py::TestLogin::test_register[bb] 在用例之前执行:查询数据库用于断言
注册接口: BBB
PASSED在用例之后执行:查询数据库

test_fixture.py::TestLogin::test_register[cc] 在用例之前执行:查询数据库用于断言
注册接口: CCC
PASSED在用例之后执行:查询数据库

test_fixture.py::TestLogin::test_test 测试接口
PASSED

============================== 5 passed in 0.01s ==============================

Process finished with exit code 0
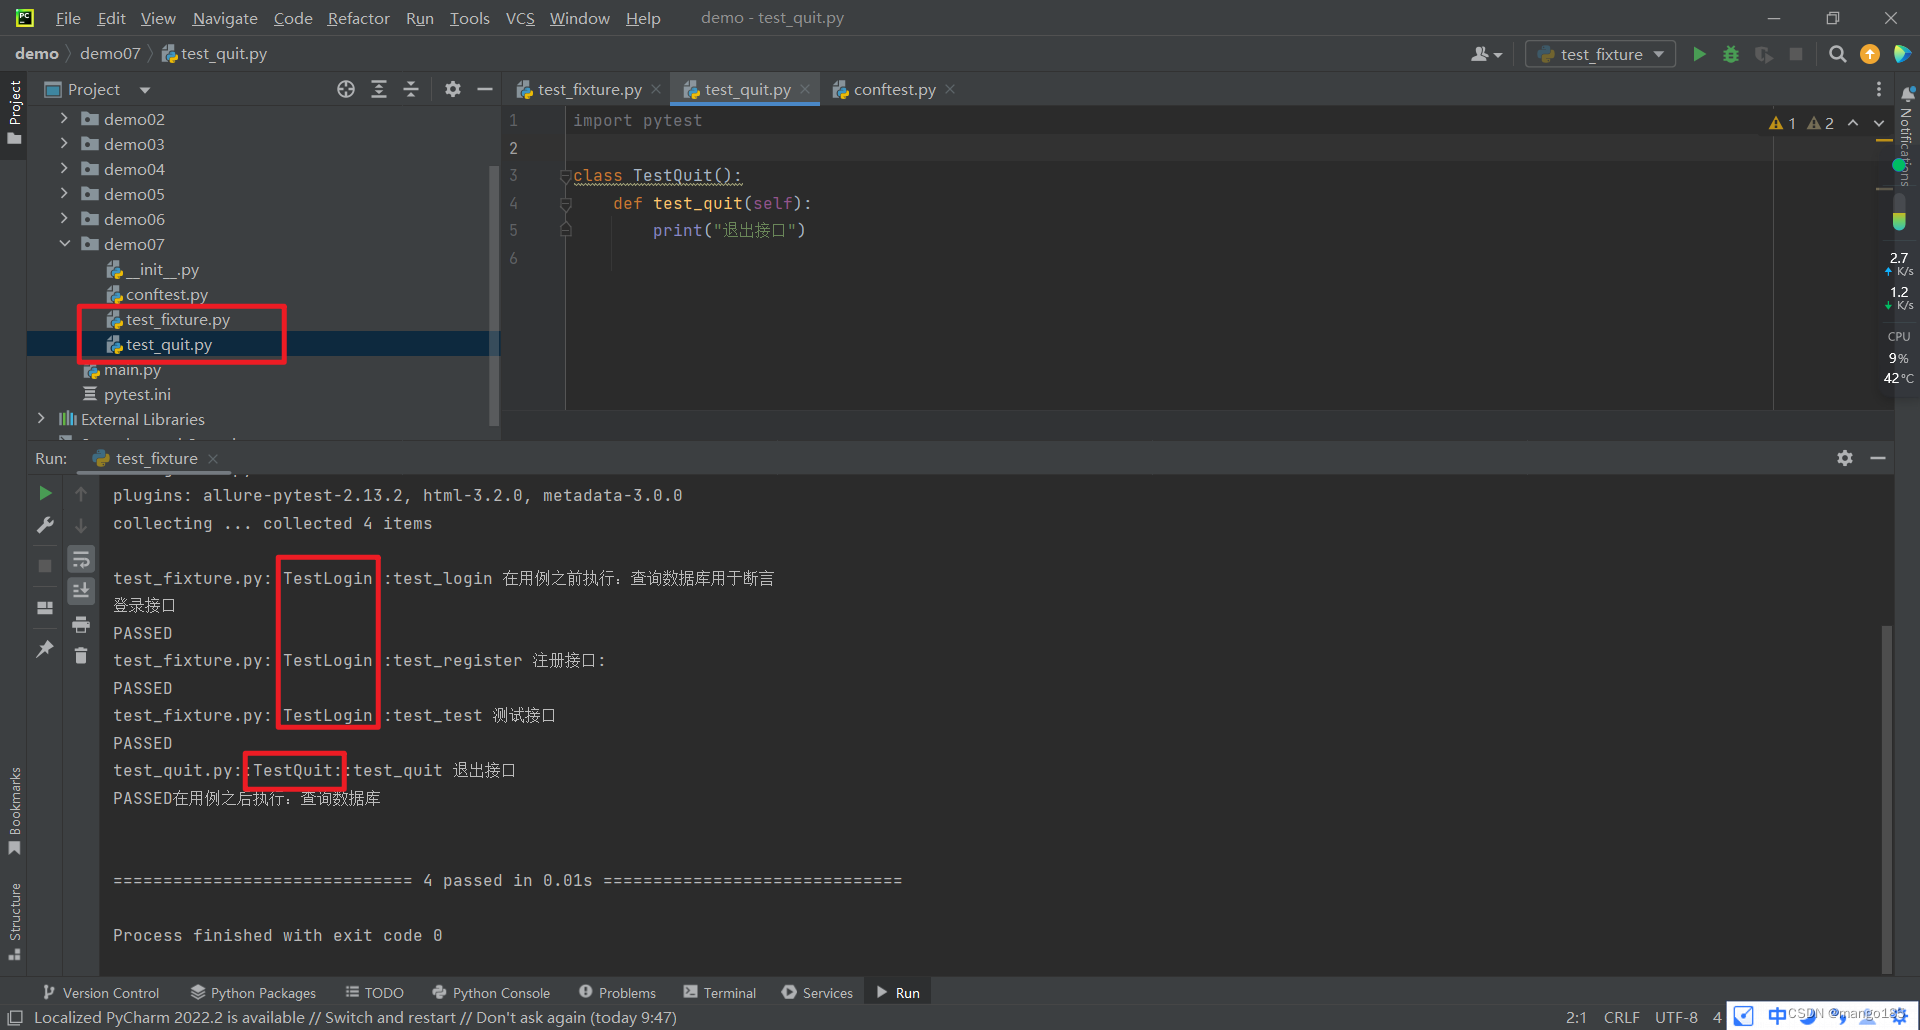
scope=session在整个会话(所有test开头的py文件中的用例)前后执行fixture固件中的用例
test_fixture.py
import pytest


class TestLogin():
    def test_login(self):
        print("登录接口")

    def test_register(self):
        print("注册接口: ")

    def test_test(self):
        print("测试接口")

if __name__ == '__main__':
    pytest.main(['-vs'])
test_quit.py
import pytest

class TestQuit():
    def test_quit(self):
        print("退出接口")
conftest.py
import pytest

"""
@pytest.fixture(scope='', params='', autouse='', ids='', name='')
scope:作用域
    function:函数、用例,默认值
    class:类
    module:模块
    package/session:会话
params:数据驱动
autouse:自动作用还是手动作用
    True:自动调用
    False:手动调用,需要在fixture固件传入参数名称
ids:当数据驱动时更改参数名
name:fixture的别名
"""
@pytest.fixture(scope='session', autouse=True)
def exe_assert():
    print("在用例之前执行:查询数据库用于断言")
    yield
    print("在用例之后执行:查询数据库")
十、allure测试报告
安装allure
pip install allure-pytest
导包
import allure
import os
固定执行命令
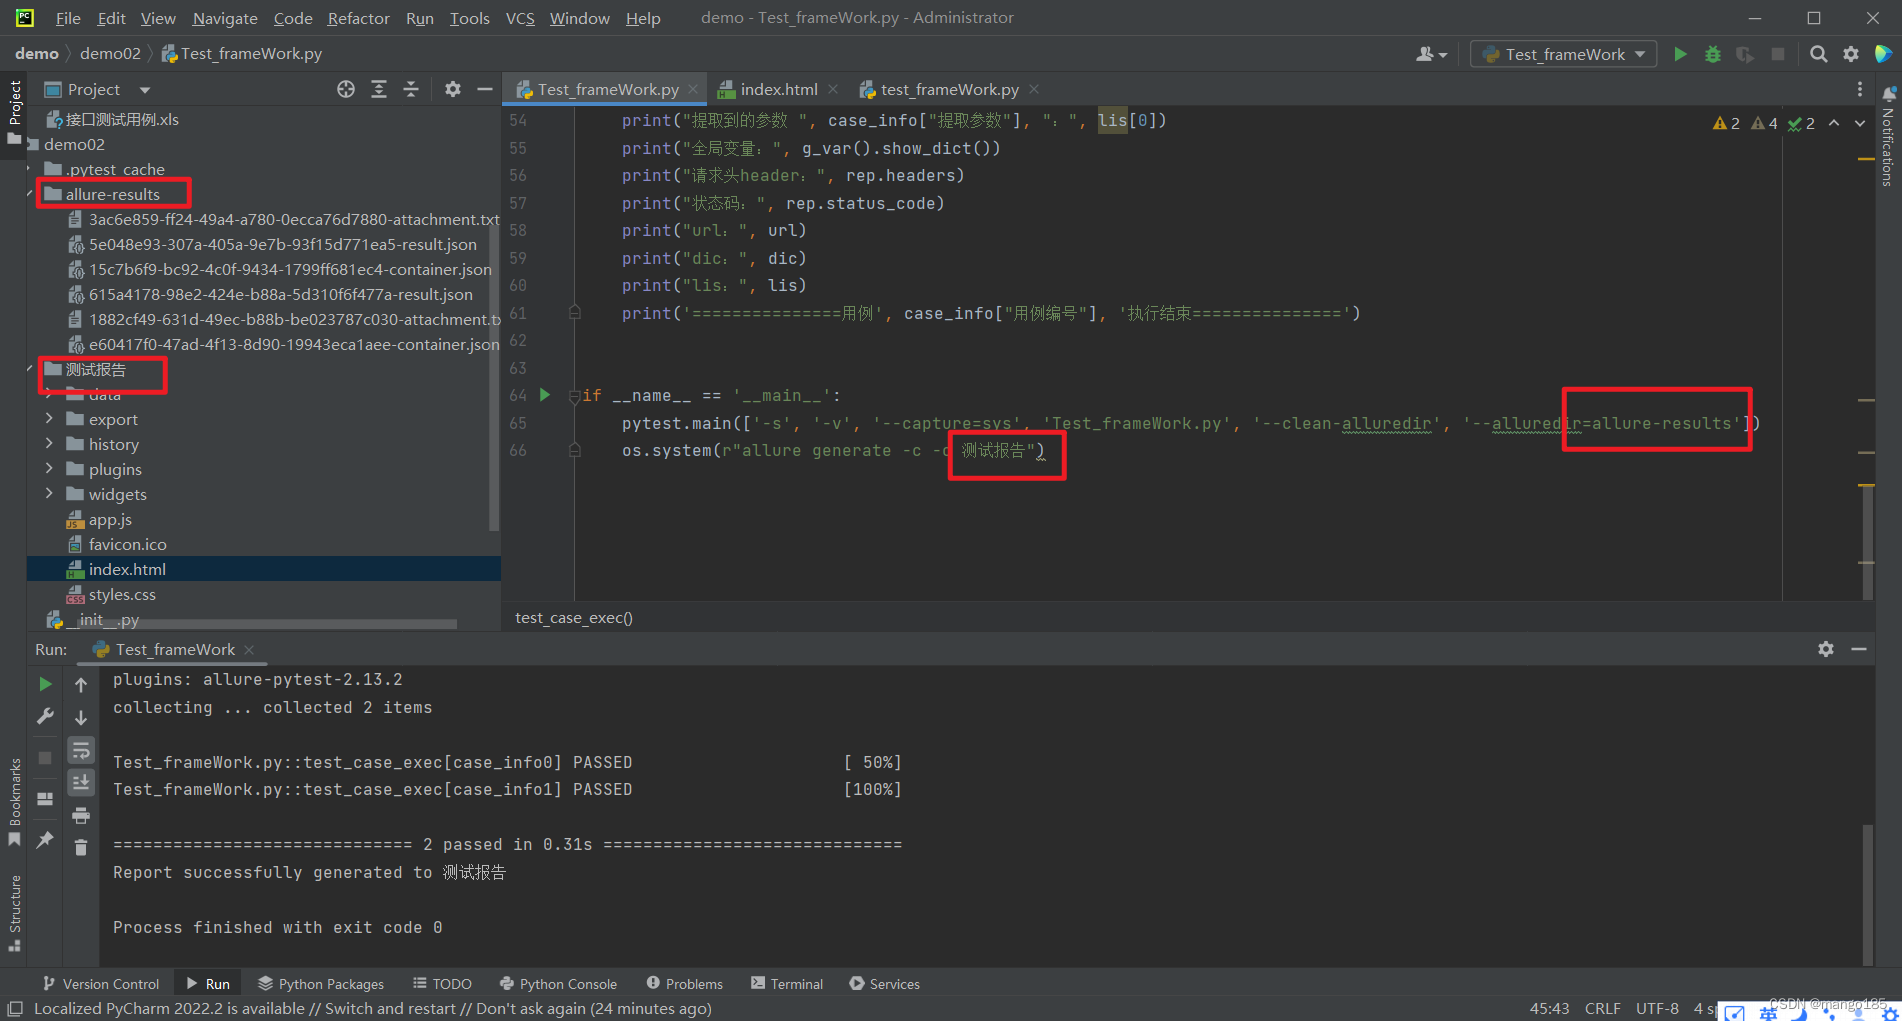
if __name__ == '__main__':
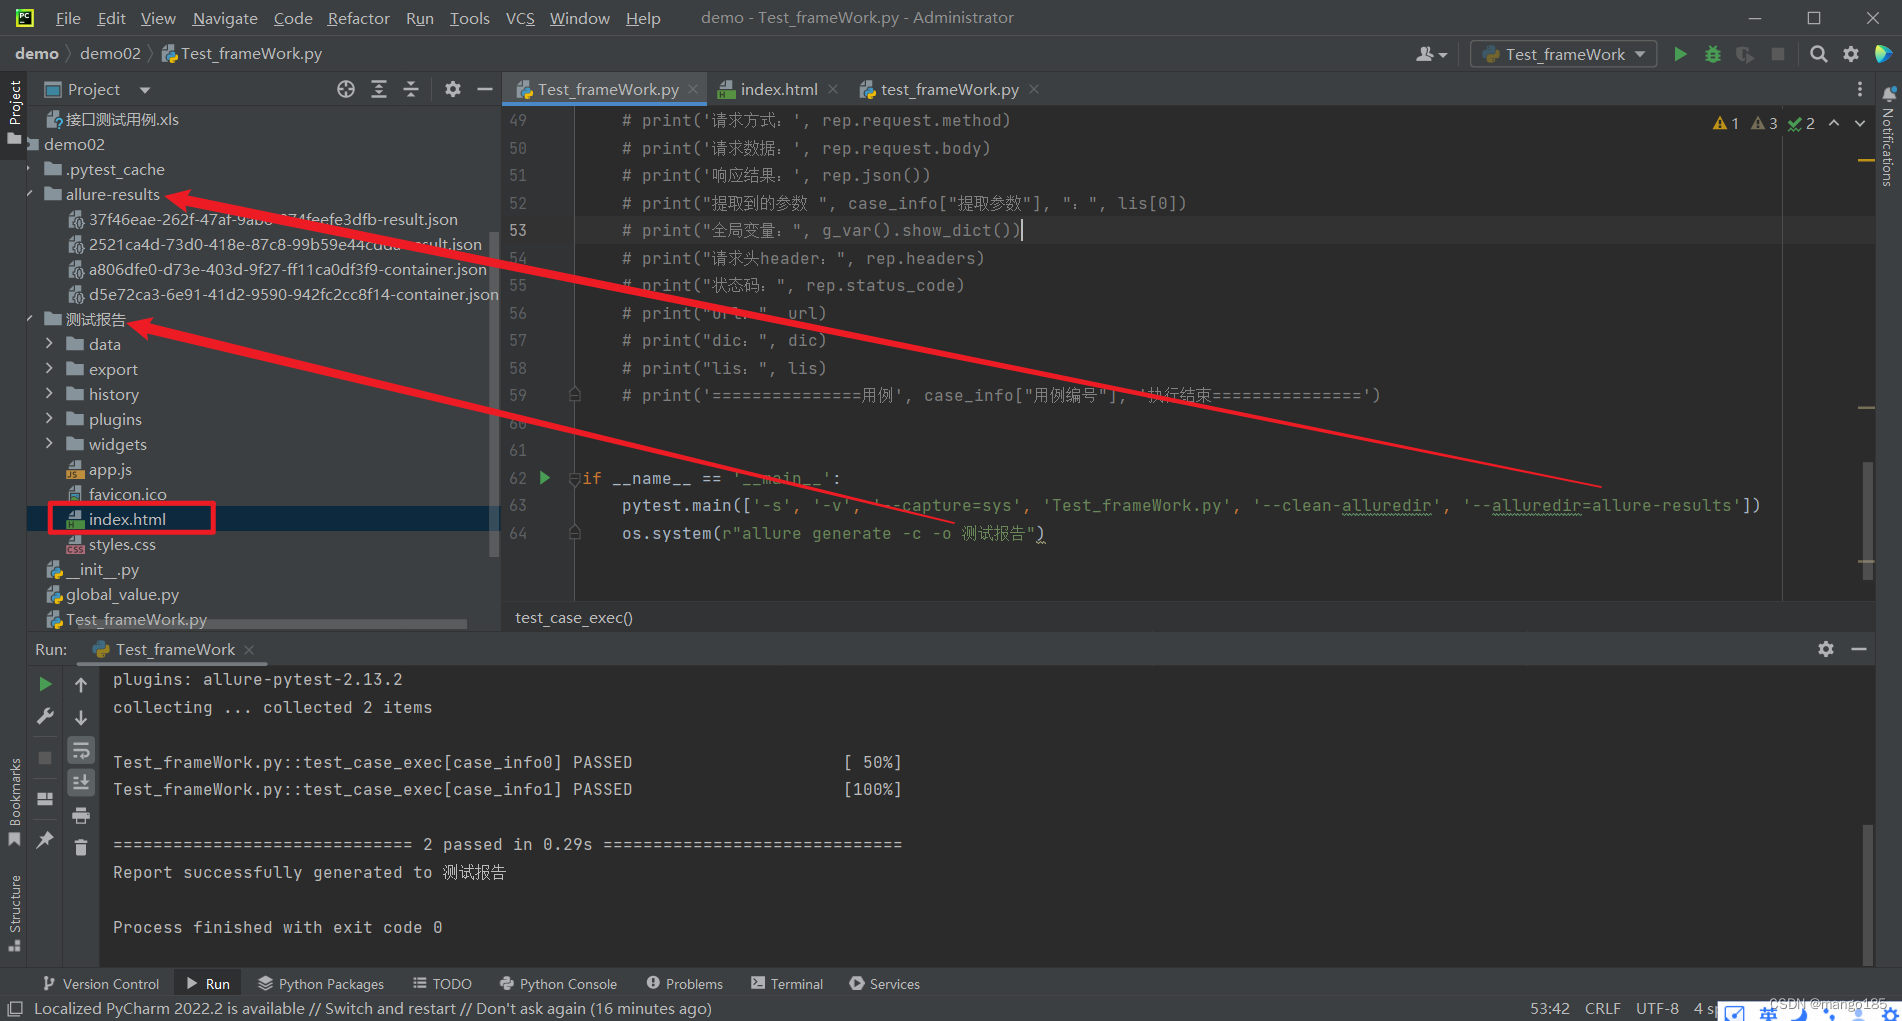
    pytest.main(['-s', '-v', '--capture=sys', 'Test_frameWork.py', '--clean-alluredir', '--alluredir=allure-results'])
    os.system(r"allure generate -c -o 测试报告")

'''
pytest.main
-q: 安静模式, 不输出环境信息
-v: 丰富信息模式, 输出更详细的用例执行信息
-s: 显示程序中的print/logging输出
Test_frameWork.py: 要执行的文件
--clean-alluredir: 每次执行--alluredir=allure-results

os.system
-c:清空历史数据
-o:指定输出测试报告路径
如果使用(r"allure serve 测试报告"),则会在系统默认目录下生成测试报告
'''
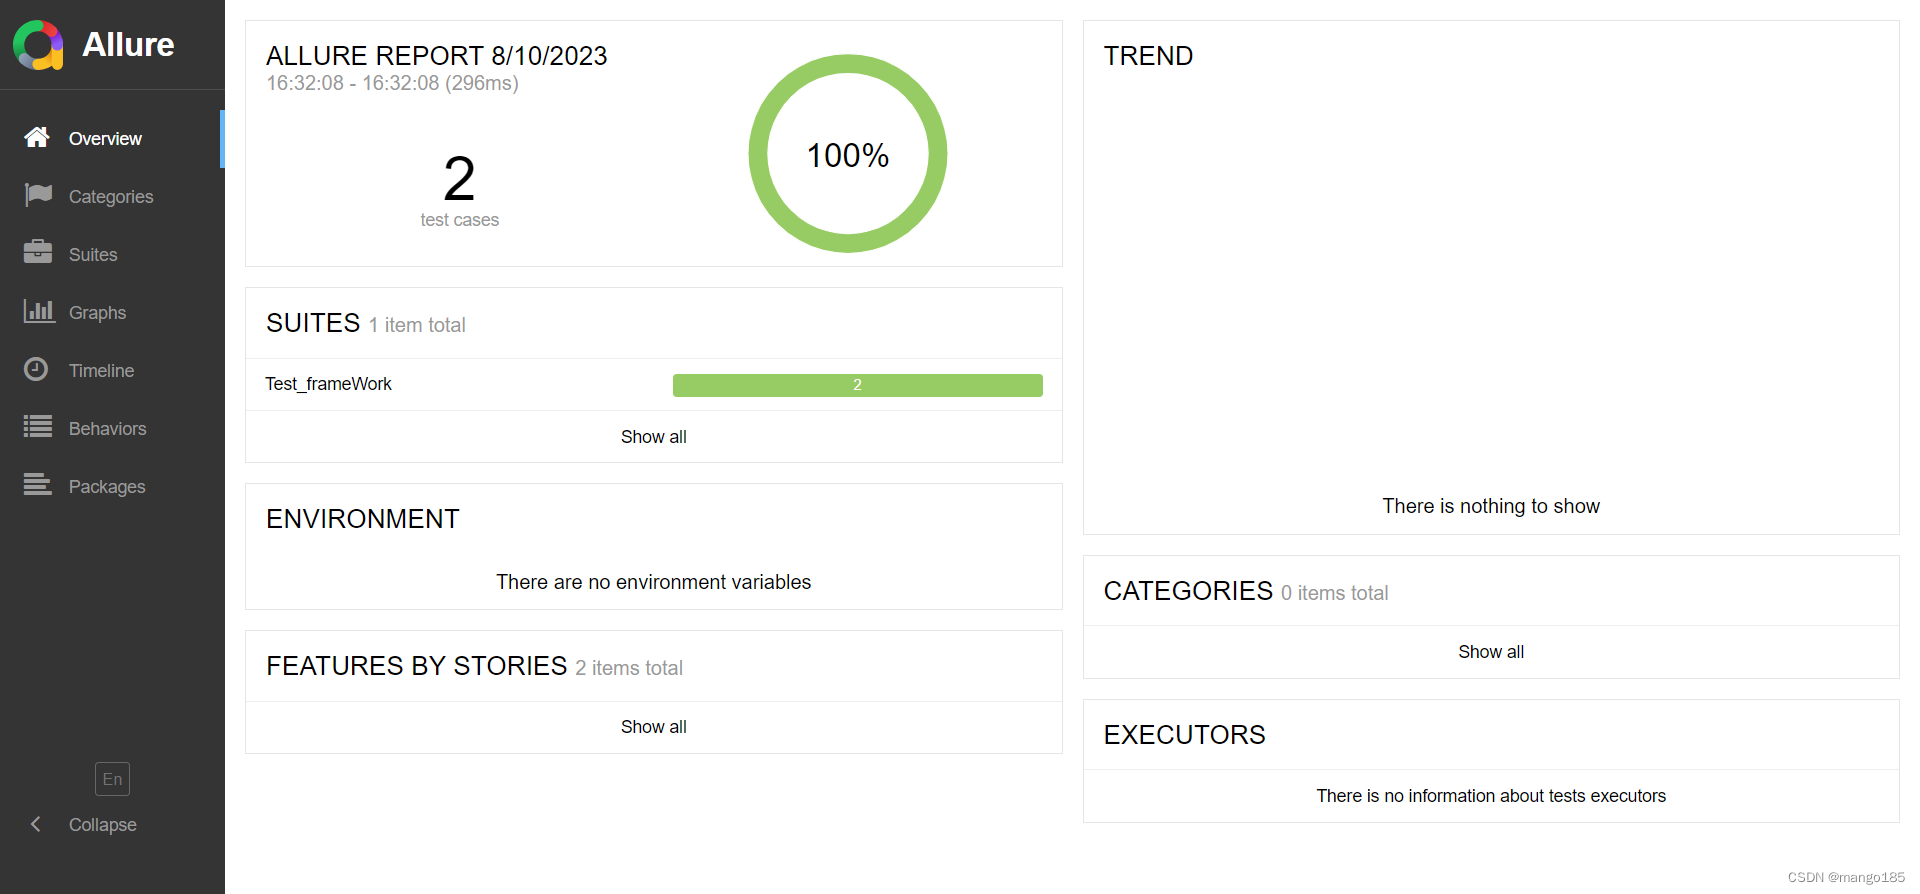
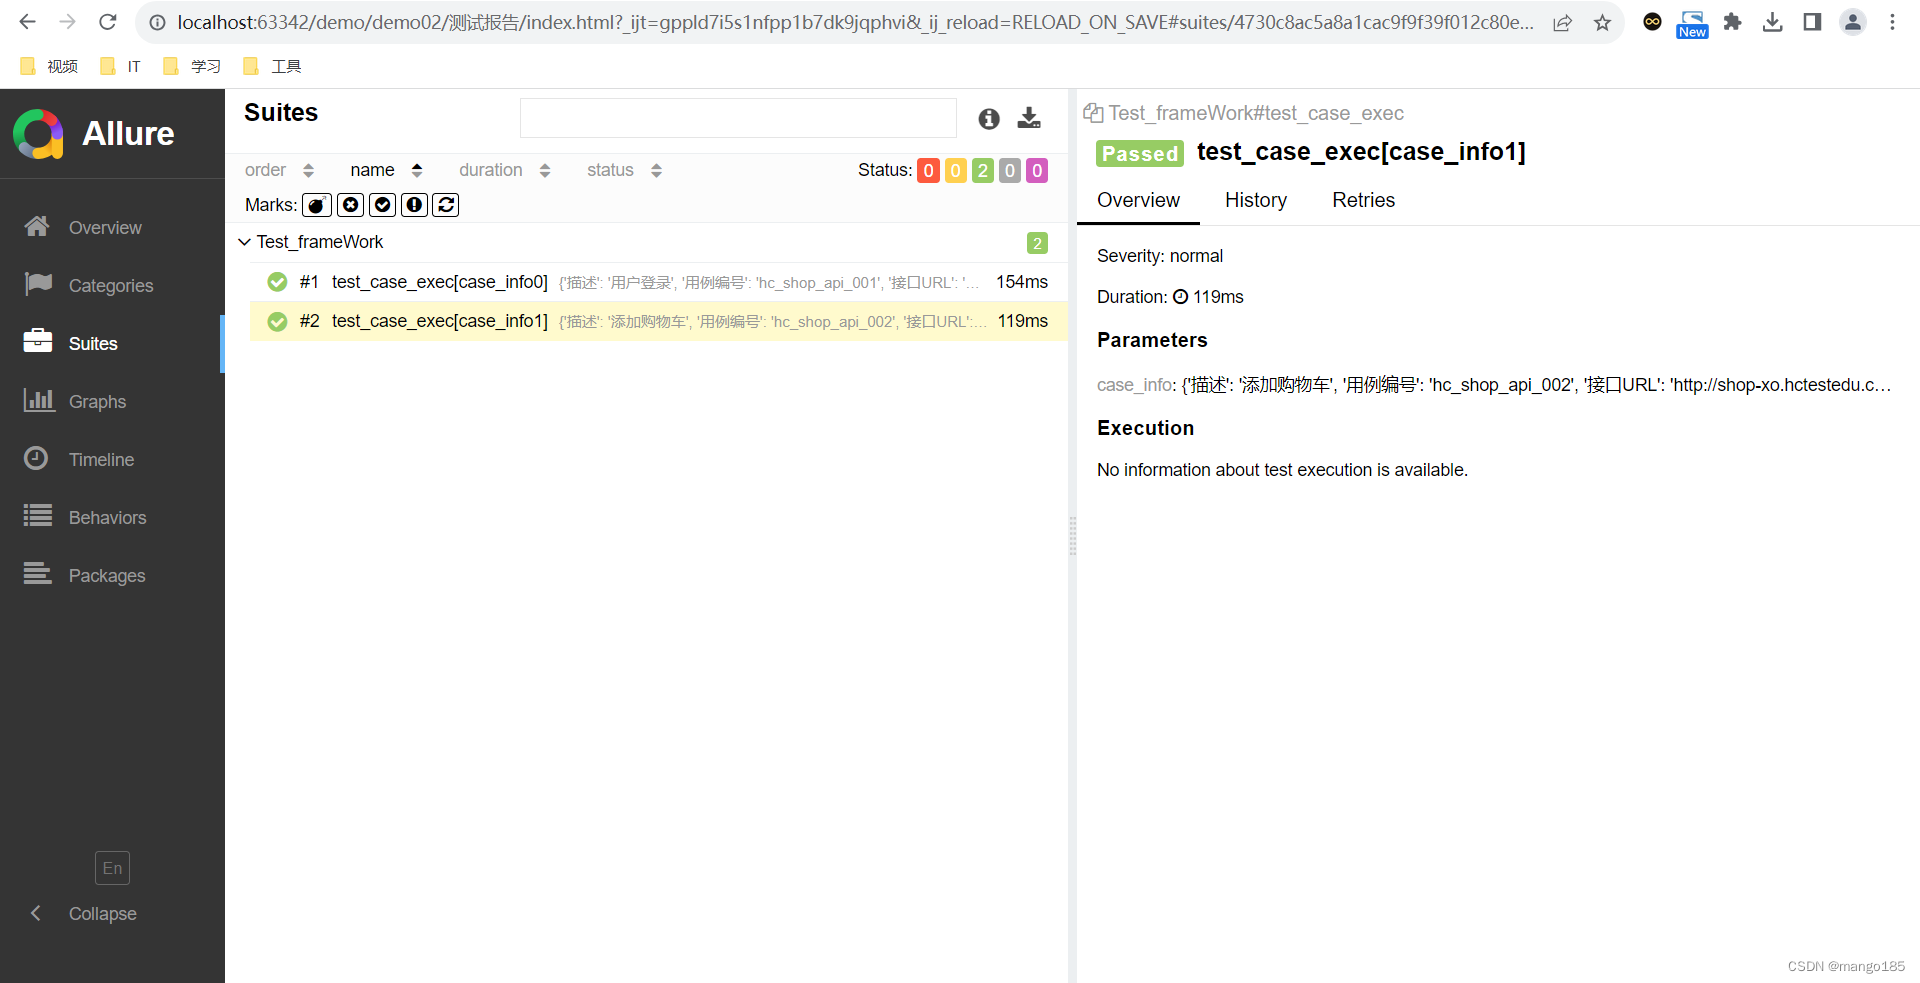
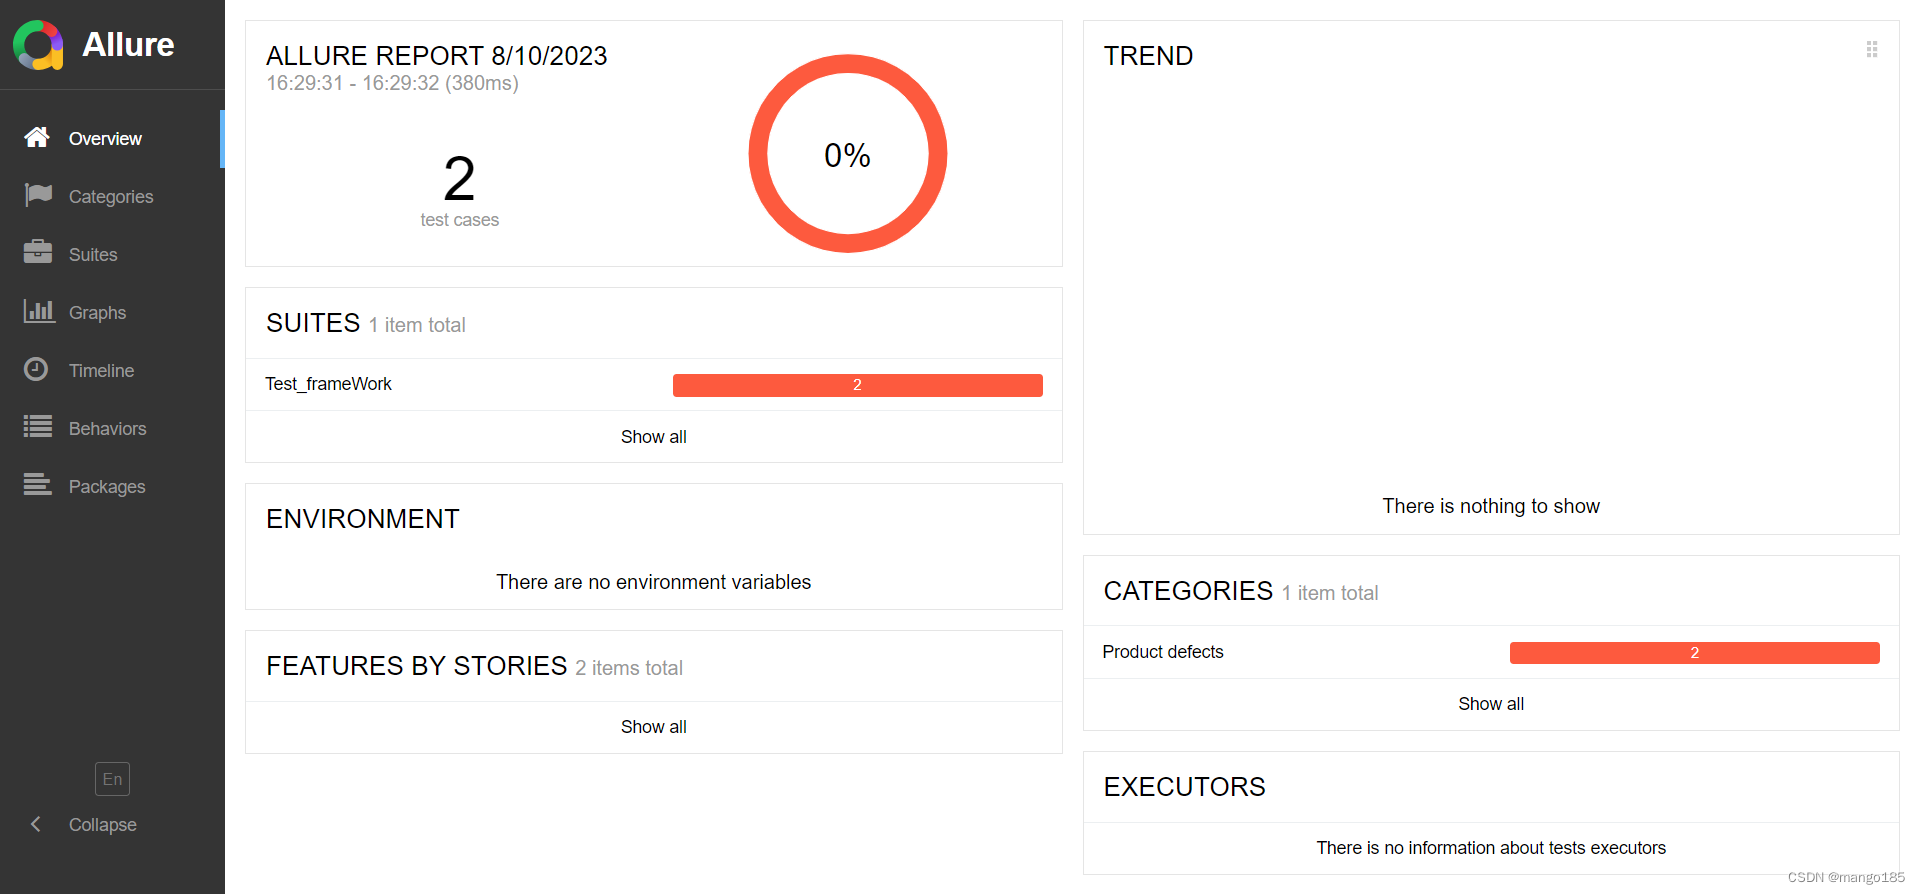
用例执行成功
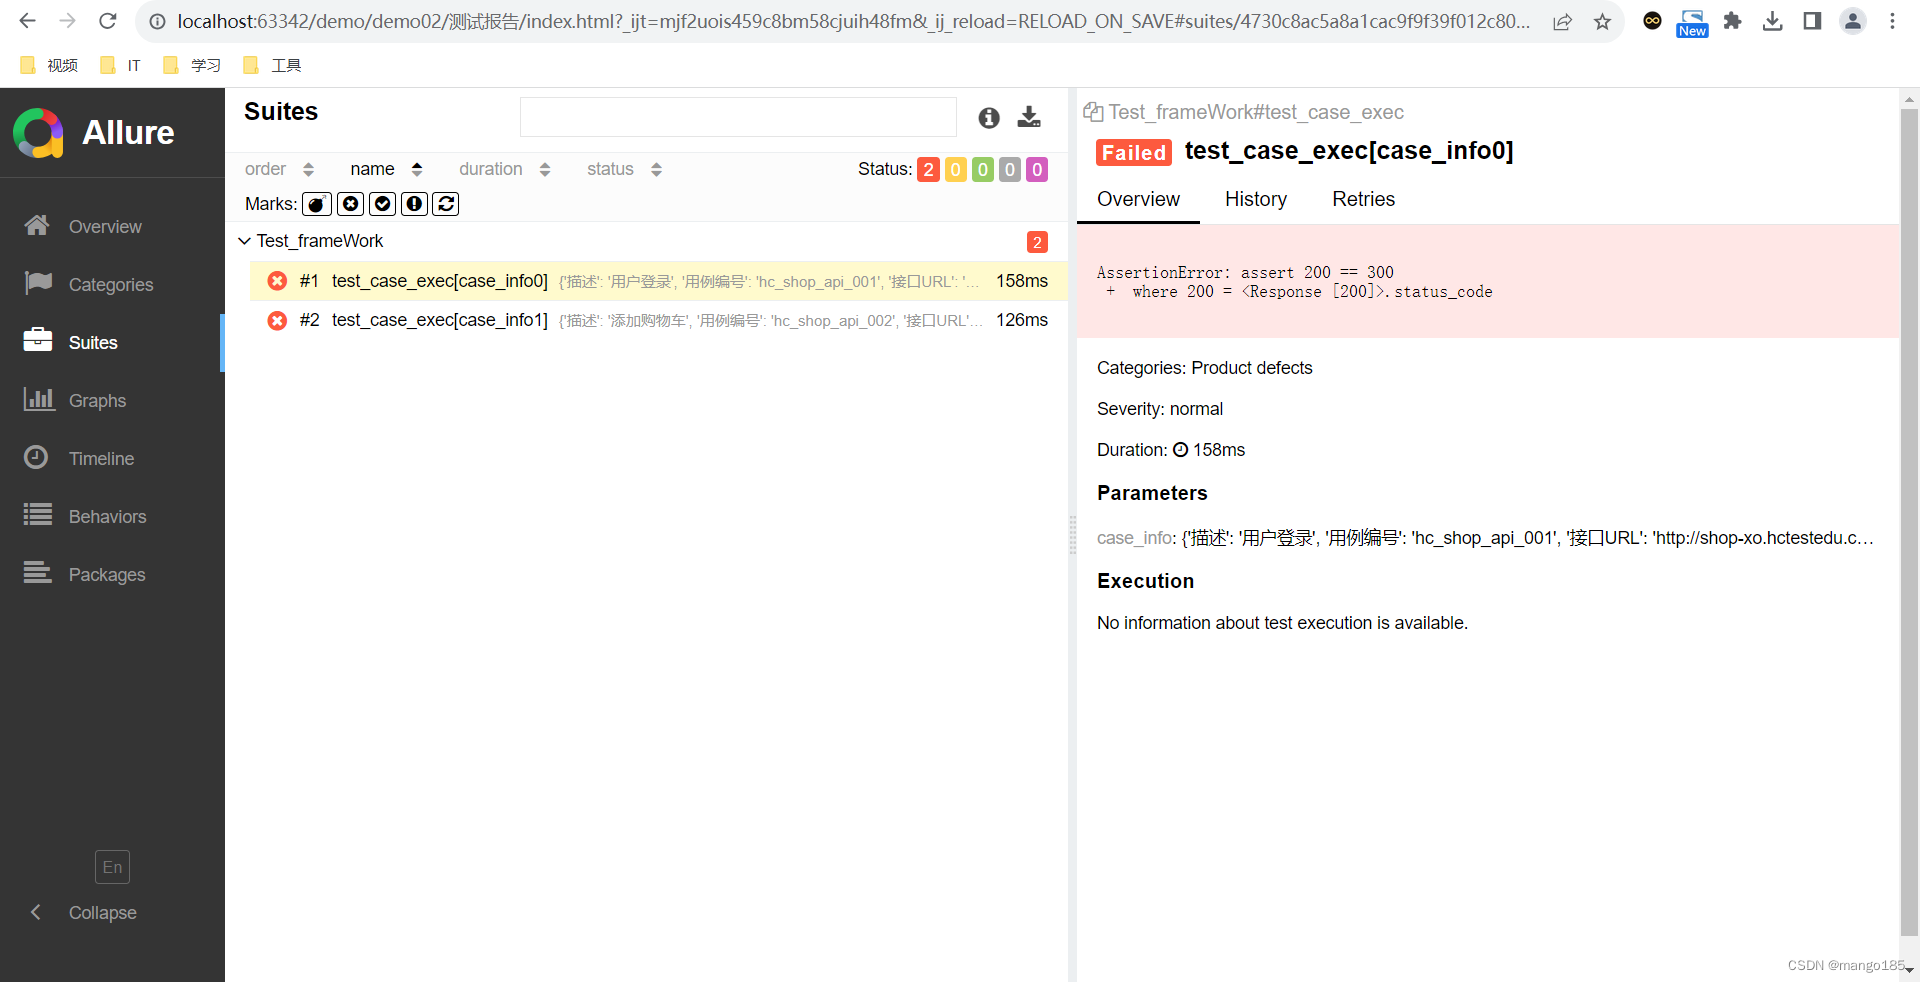
用例执行失败
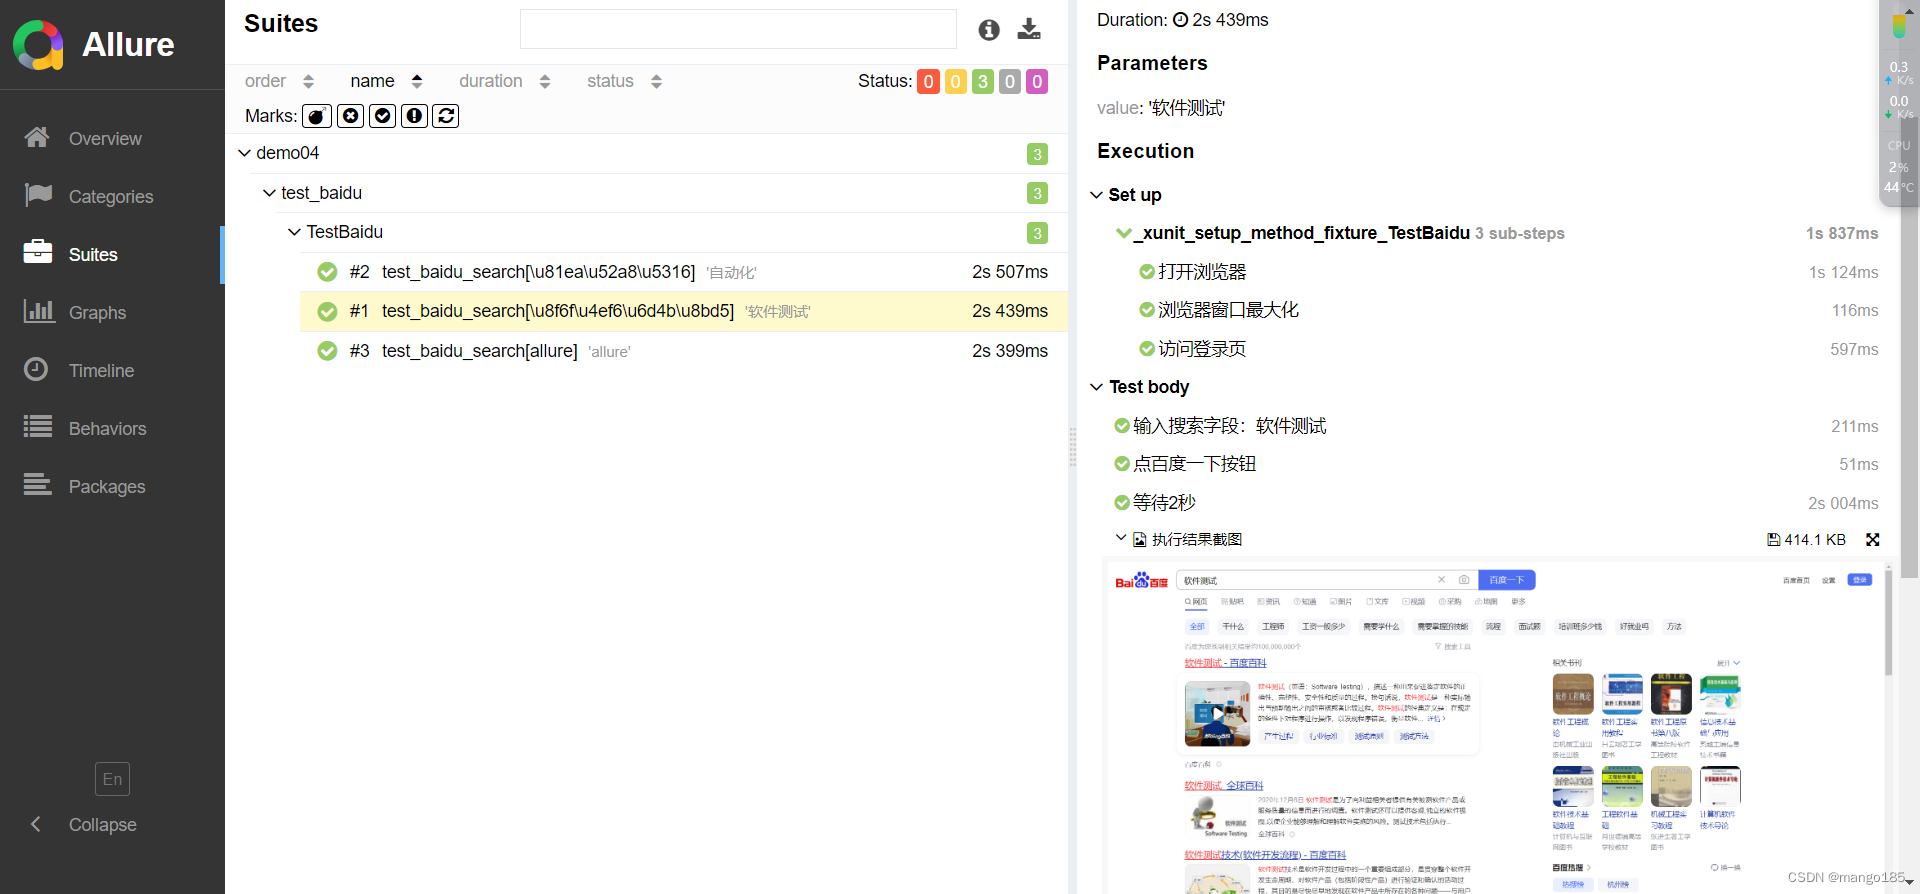
定制allure测试报告
修改前
import allure
import os
from selenium import webdriver
from selenium.webdriver.common.by import By
import time
import pytest


class TestBaidu(object):

    # 用例前置条件:打开浏览器,访问登录页
    def setup(self):
        # 打开浏览器
        self.driver = webdriver.Chrome()
        # 访问登录页
        self.driver.get("https://www.baidu.com/")

    # 用例后置条件:测试完成,等待2秒,关闭浏览器
    def teardown(self):
        # 等待2秒
        time.sleep(2)
        # 关闭浏览器
        self.driver.quit()

    # 用例场景:百度搜索字段
    @pytest.mark.parametrize("value", ["软件测试", "自动化", "allure"])
    def test_baidu_search(self, value):
        # 搜索框输入字段
        self.driver.find_element(By.ID, "kw").send_keys(value)
        # 点百度一下按钮
        self.driver.find_element(By.ID, "su").click()
        # 等待2秒
        time.sleep(2)
        # 断言:搜索完成后校验网页title
        assert self.driver.title == value + "_百度搜索", "搜索完成后校验网页title失败"


if __name__ == '__main__':
    pytest.main(['-s', '-v', '--capture=sys', 'test_baidu.py', '--clean-alluredir', '--alluredir=allure-results'])
    os.system(r"allure generate -c -o testReport")
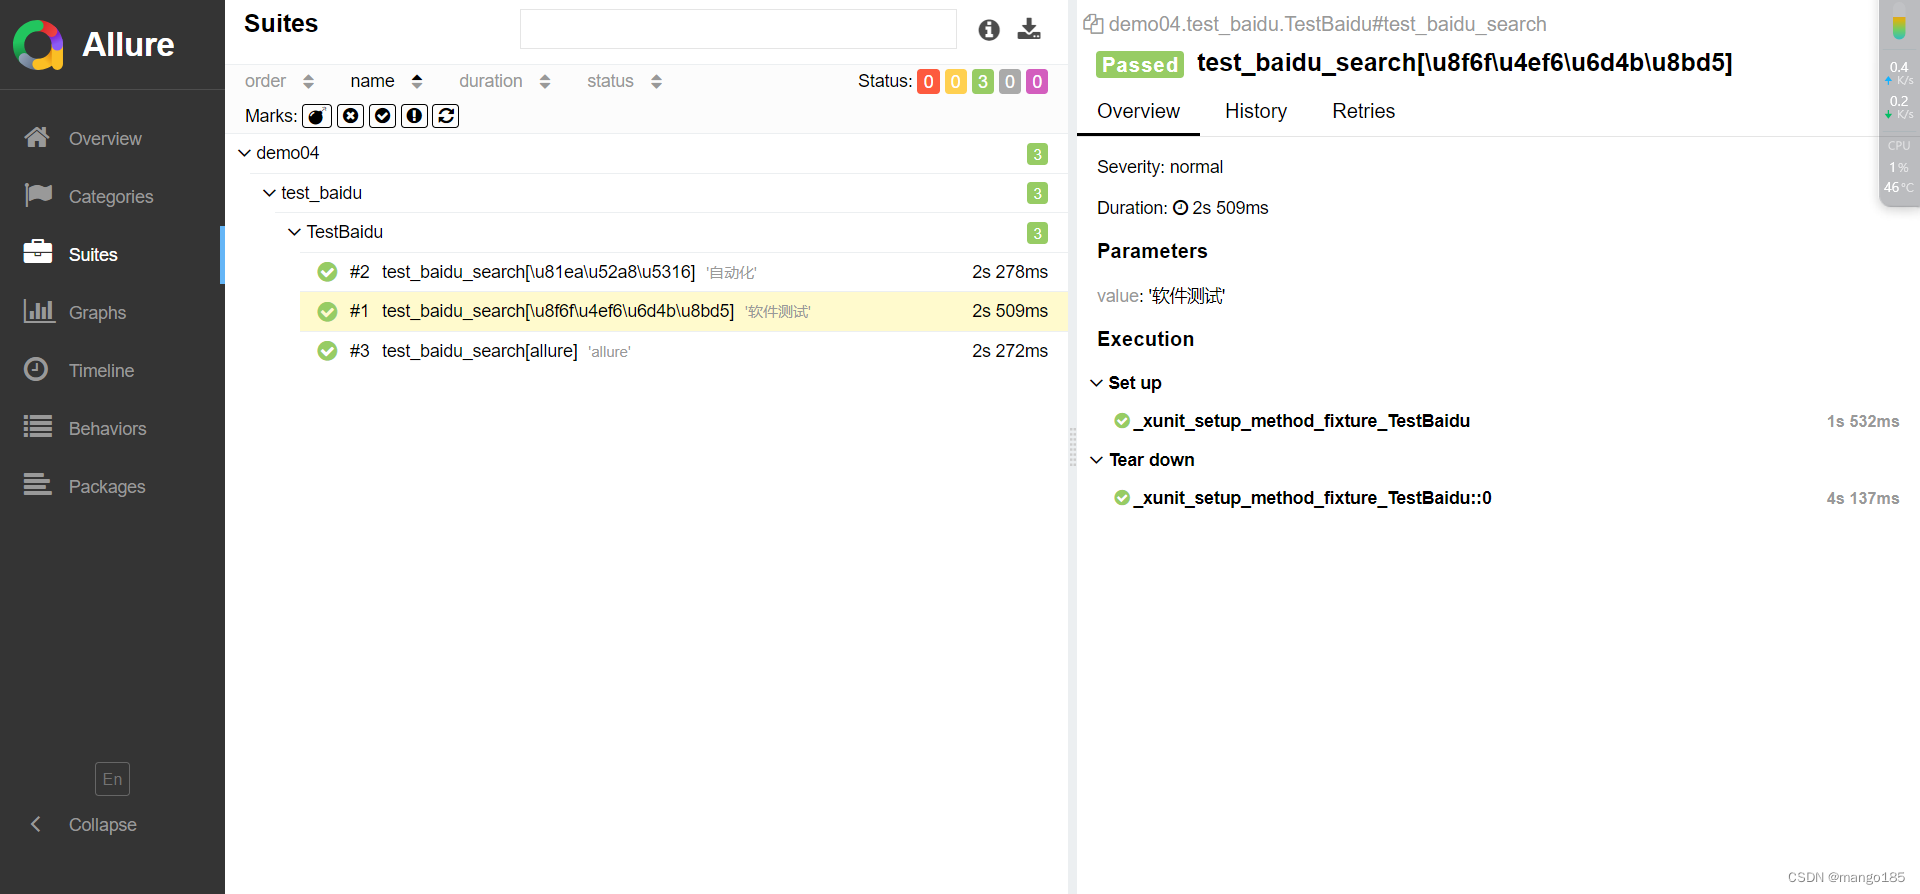
修改后:在报告中显示每一步的操作
import allure
import os
from selenium import webdriver
from selenium.webdriver.common.by import By
import time
import pytest


class TestBaidu(object):

    # 用例前置条件:打开浏览器,访问登录页
    def setup(self):
        # 打开浏览器
        with allure.step("打开浏览器"):
            self.driver = webdriver.Chrome()
        # 浏览器窗口最大化
        with allure.step("浏览器窗口最大化"):
            self.driver.maximize_window()
        # 访问登录页
        with allure.step("访问登录页"):
            self.driver.get("https://www.baidu.com/")

    # 用例后置条件:测试完成,等待2秒,关闭浏览器
    def teardown(self):
        # 等待2秒
        with allure.step("每个测试场景完成后等待2秒"):
            time.sleep(2)
        # 关闭浏览器
        with allure.step("关闭浏览器"):
            self.driver.quit()

    # 用例场景:百度搜索字段
    @pytest.mark.parametrize("value", ["软件测试", "自动化", "allure"])
    def test_baidu_search(self, value):
        # 搜索框输入字段
        with allure.step(f"输入搜索字段:{value}"):
            self.driver.find_element(By.ID, "kw").send_keys(value)
        # 点百度一下按钮
        with allure.step("点百度一下按钮"):
            self.driver.find_element(By.ID, "su").click()
        # 等待2秒
        with allure.step("等待2秒"):
            time.sleep(2)

        # 截图当前页面
        allure.attach(body=self.driver.get_screenshot_as_png(), name="执行结果截图",
                      attachment_type=allure.attachment_type.PNG)

        # 断言:搜索完成后校验网页title
        assert self.driver.title == value + "_百度搜索", "搜索完成后校验网页title失败"


if __name__ == '__main__':
    pytest.main(['-s', '-v', '--capture=sys', 'test_baidu.py', '--clean-alluredir', '--alluredir=allure-results'])
    os.system(r"allure generate -c -o testReport")
踩坑
执行后无法生成allure json文件和测试报告HTML文件
未生成allure-results和测试报告
解决方法:http://quan.51testing.com/pcQuan/chat/12141
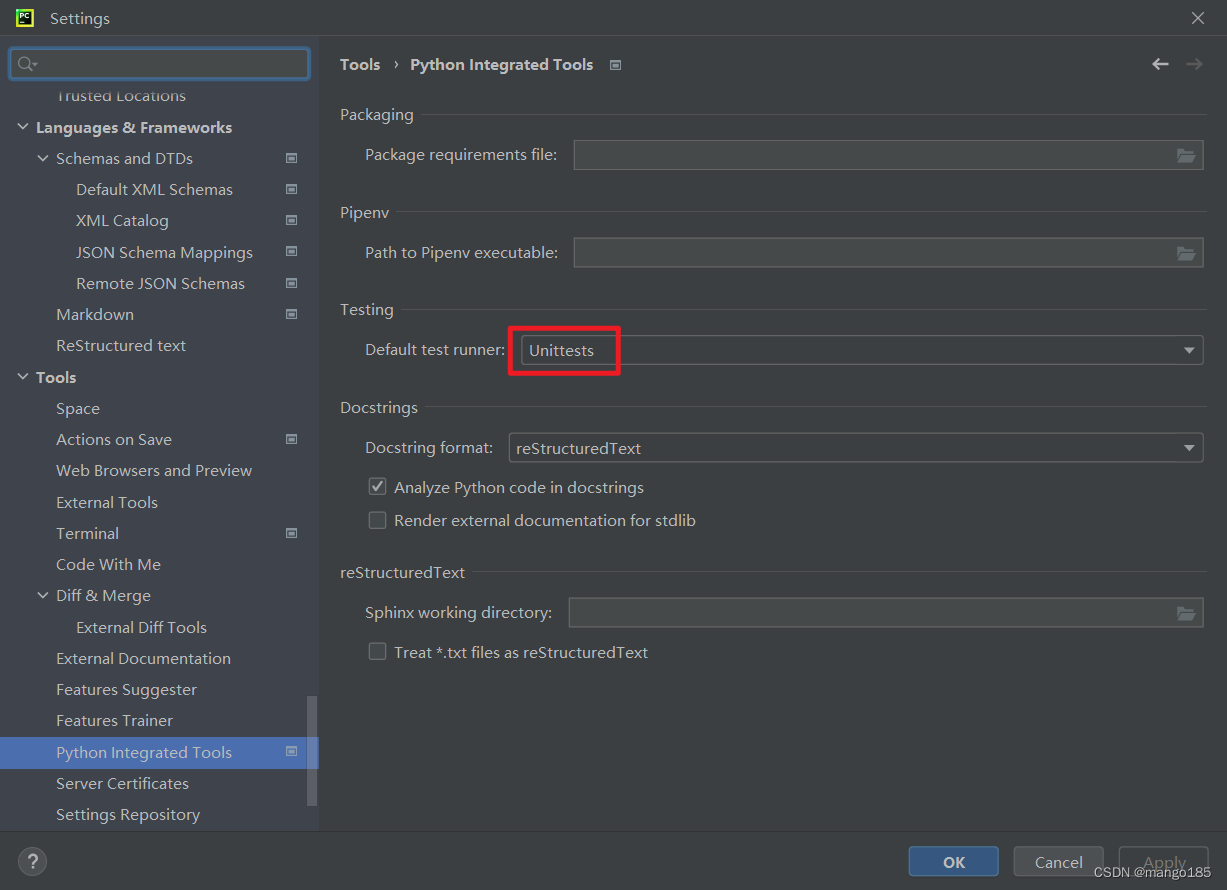
尝试在pycharm里面修改配置解决一下试试:file>setting>tools>Python integrated tools>testing>default test runner>unittests
执行后只生成allure json文件,无法生成测试报告HTML文件
只生成allure-results,未生成测试报告
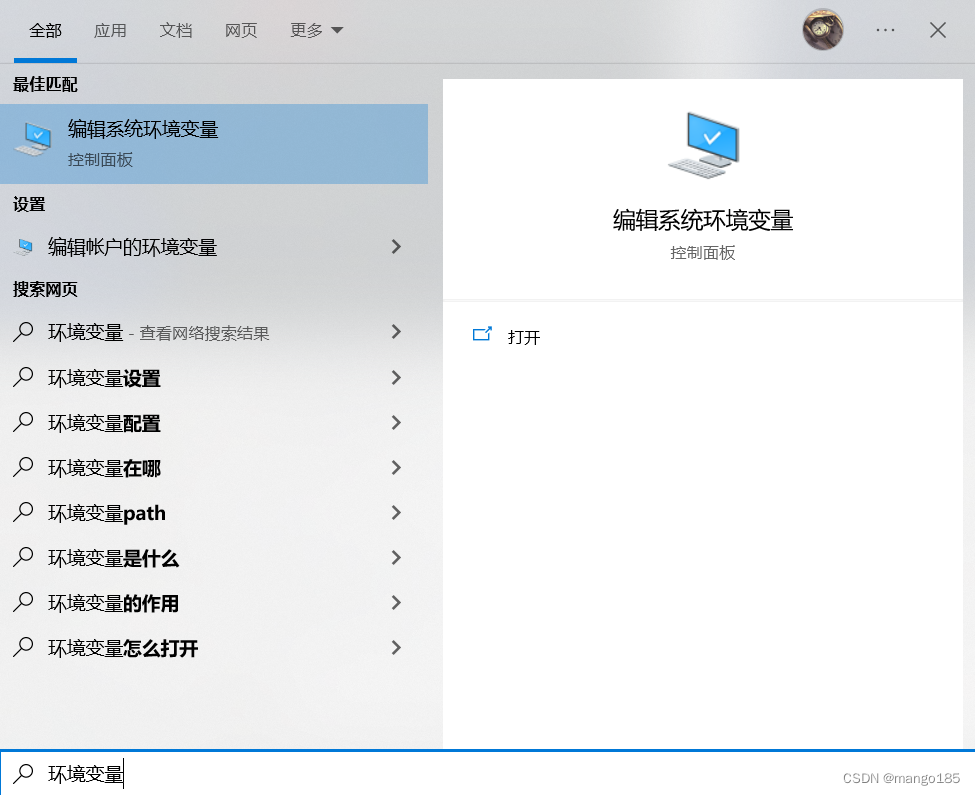
解决方法:需要配置环境变量
https://blog.csdn.net/m0_61438798/article/details/120692294
https://zhuanlan.zhihu.com/p/158795117
Allure 下载最新版本:https://github.com/allure-framework/allure2/releases
下载完成之后,解压,进入 \allure-2.13.0\bin 目录执行 allure.bat 。
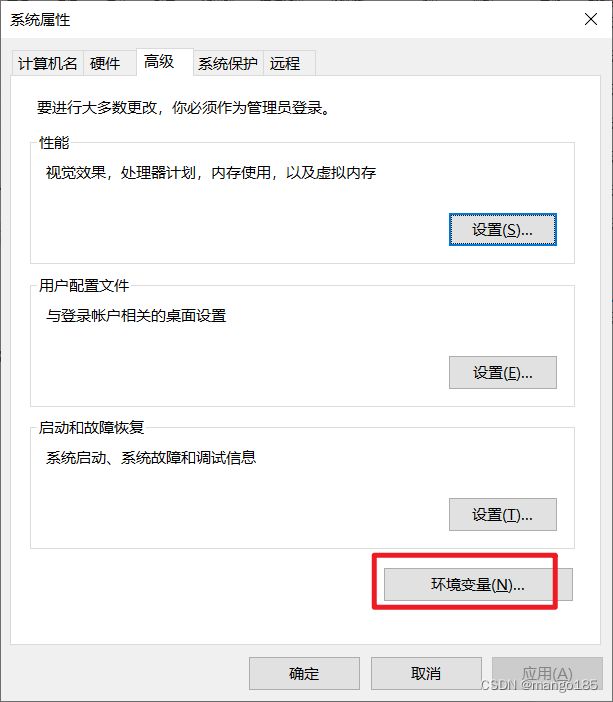
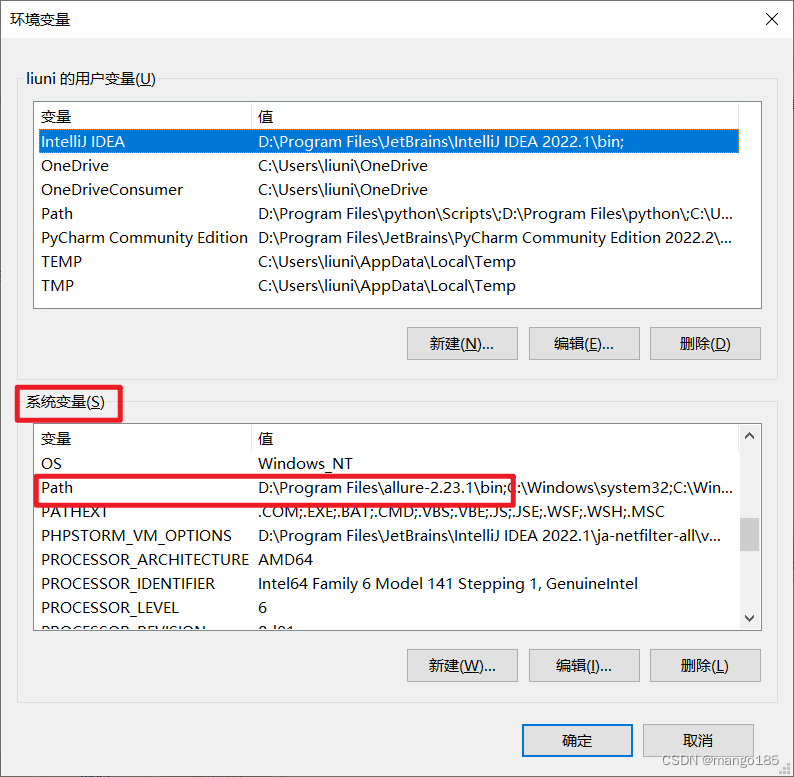
配置环境变量:
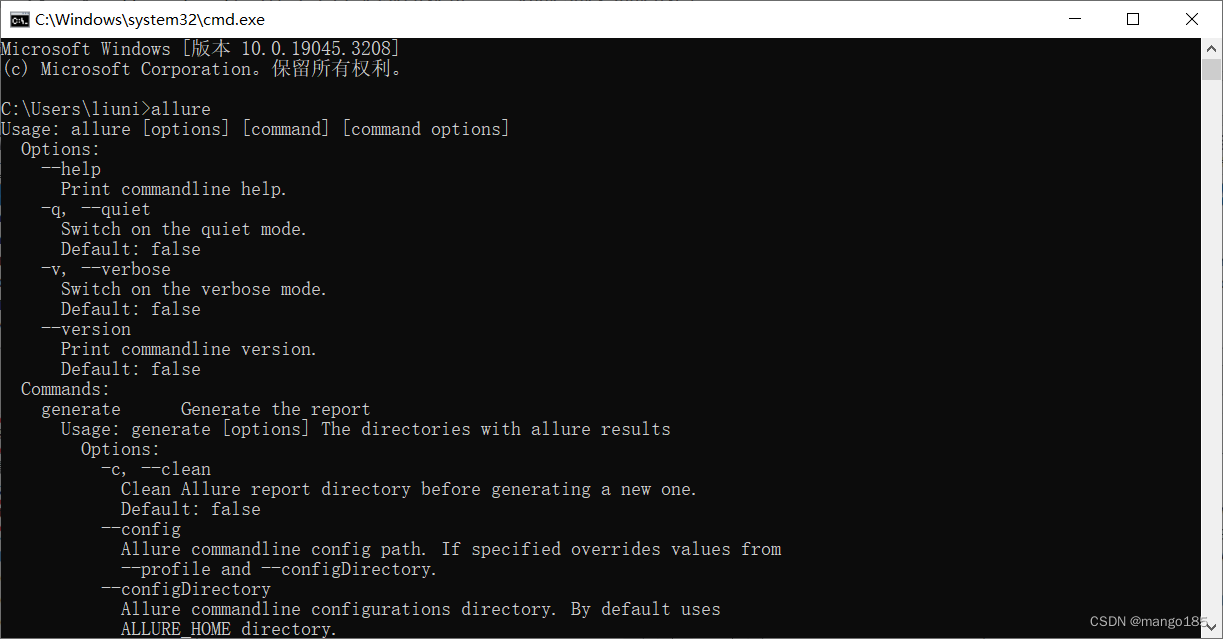
环境变量配置完成后在cmd可以执行allure命令
出现乱码
‘allure’ �����ڲ����ⲿ���Ҳ���ǿ����еij���
���������ļ���
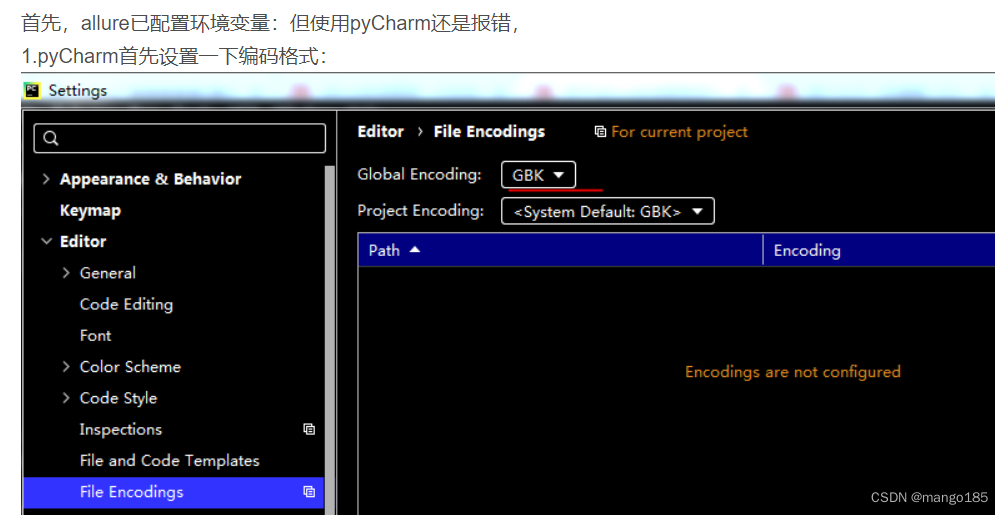
解决:修改pycharm编码格式
https://blog.csdn.net/qq_41721166/article/details/112433177
https://blog.csdn.net/WGLDXXRS/article/details/127062648
十一、yaml详解
原文:https://blog.csdn.net/venustech0919/article/details/130952029
yaml_basic.yaml
import yaml

'''
https://blog.csdn.net/venustech0919/article/details/130952029
1)规则
    大小写敏感
    使用缩进表示层级关系
    缩进时不允许使用Tab键,只允许使用空格。
    缩进的空格数目不重要,只要相同层级的元素左侧对齐即可
2)注释
    # 表示注释,从这个字符一直到行尾,都会被解析器忽略。
3)数据结构:YAML 支持的数据结构有三种。
    对象:键值对的集合,又称为映射(mapping)/ 哈希(hashes) / 字典(dictionary)
    数组:一组按次序排列的值,又称为序列(sequence) / 列表(list)
    纯量(scalars):单个的、不可再分的值
'''

'''
# 通过load()方法进行转化
safe_load(f, Loader=yaml.SafeLoader)方法
作用 :将yaml格式的数据转化为python对象 。
'''
def read_yaml(filename):
    with open(filename, encoding='utf-8') as f:
        python_obj = yaml.safe_load(f)  # 将读取到的yaml文件通过safe_load进行转化。
        # print(type(python_obj))  # 打印输出类型
    return python_obj


'''
# 通过load_all()方法进行转化
load_all(f,Loader=yaml.SafeLoader)方法
作用 :将多个yaml的文档数据转化为python生成器对象 ,每个yaml文件在同一文件是用---分割 。
'''
def read_all_yaml(filename):
    with open(filename, encoding='utf-8') as f:
        python_obj = yaml.load_all(f, Loader=yaml.SafeLoader)
        # print(type(python_obj))  # 打印输出类型
        # print(python_obj)  # 打印输出数据
        for x in python_obj:  # 循环生成器
            print(x)

'''
# 通过safe_dump()方法进行转化
safe_dump(data,stream,allow_unicode,sort_keys)方法
作用 :将Python对象序列化为YAML格式的数据并输出到指定的输出流。
参数说明 :
    data :要读取的python数据源
    stream :要指定yaml文件的文件对象 。
    allow_unicode :若数据中包含中文,此参数必须设置为true,否则写入yaml文件的是unicode编码。
    sort_keys :此值默认是True , 即按键进行排序 ,排序后的显示是不对的 ,所以,最好将其设置为False .
'''
def save_yaml(yaml_data, file_name):
    with open(file_name, mode='w', encoding='utf-8') as f:
        yaml.safe_dump(yaml_data, f, allow_unicode=True, sort_keys=False)  # 进行转化

'''
dump_all(data,stream)方法
作用 :将Python对象序列化为YAML格式的数据并输出到指定的输出流。
参数说明 :
    data :要读取的python数据源
    stream :要指定yaml文件的文件对象 。
    allow_unicode :若数据中包含中文,此参数必须设置为true,否则写入yaml文件的是unicode编码。
    sort_keys :此值默认是True , 即按键进行排序 ,排序后的显示是不对的 ,所以,最好将其设置为False .
'''
def save_all_yaml(yaml_data, file_name):
    with open(file_name, mode='w', encoding='utf-8') as f:
        yaml.dump_all(yaml_data, f, allow_unicode=True, sort_keys=False)  # 进行转化
login.yaml
cases:
- case_name: 输入正确的用户名和密码进行登录
  data:
    path: /api/admin/login
    method: post
    params:
      username: admin
      password: '123456'
    assert:
      code: 1
      message: 成功
login1.yaml
cases:  # 这是一个文档
- case_name: 输入正确的用户名和密码进行登录
  data:
    path: /api/admin/login
    method: post
    params:
      username: admin
      password: '123456'
    assert:
      code: 1
      message: 成功
---
cases1:  # 这是另外一个文档
- case_name: 输入正确的用户名和密码进行登录
  data:
    path: /api/admin/login
    method: post
    params:
      username: admin1
      password: '1234561'
    assert:
      code: 1
      message: 成功
login2.yaml
cases:
- case_name: 输入正确的用户名和密码进行登录
  data:
    path: /api/admin/login
    method: post
    params:
      username: admin
      password: '123456'
    assert:
      code: 1
      message: 成功
login3.yaml
cases:
- case_name: 输入正确的用户名和密码进行登录
  data:
    path: /api/admin/login
    method: post
    params:
      username: admin
      password: '123456'
    assert:
      code: 1
      message: 成功
---
cases1:
- case_name: 输入正确的用户名和密码进行登录
  data:
    path: /api/admin/login
    method: post
    params:
      username: admin1
      password: '1234561'
    assert:
      code: 1
      message: 成功
rw_yaml.py
from yaml_basic import read_yaml
from yaml_basic import read_all_yaml
from yaml_basic import save_yaml
from yaml_basic import save_all_yaml

# 通过load()方法进行转化
case1 = read_yaml('login.yaml')
print("=================通过load()方法进行转化=====================")
print(case1)

# 通过load_all()方法进行转化
print("=================通过load_all()方法进行转化==================")
read_all_yaml('login1.yaml')

# 数据源1
login_data = {
    "cases": [
        {
            "case_name": "输入正确的用户名和密码进行登录",
            "data": {
                "path": "/api/admin/login",
                "method": "post",
                "params": {
                    "username": "admin",
                    "password": "123456"
                },
                "assert": {
                    "code": 1,
                    "message": "成功"
                }
            }
        }
    ]
}
# 通过safe_dump()方法进行转化
save_yaml(login_data, 'login2.yaml')
case3 = read_yaml('login2.yaml')
print("=================通过safe_dump()方法进行转化=====================")
print(case3)

# 数据源2
login_data1 = {
    "cases1": [
        {
            "case_name": "输入正确的用户名和密码进行登录",
            "data": {
                "path": "/api/admin/login",
                "method": "post",
                "params": {
                    "username": "admin1",
                    "password": "1234561"
                },
                "assert": {
                    "code": 1,
                    "message": "成功"
                }
            }
        }
    ]
}
# 通过safe_dump()方法进行转化
save_all_yaml([login_data, login_data1], 'login3.yaml')
print("=================通过dump_all()方法进行转化====================")
read_all_yaml('login3.yaml')
十二、pytest + yaml实现数据驱动(yaml存放临时文件)
-
封装目的:
- 统计数据
- 异常处理
- 日志监控
-
应该用文件、数据库保存测试数据
-
其中,yaml文件保存是最简单的方式
- Excel保存的文件时字符串的类型
- yaml文件可以按照json的格式进行提取
-
web项目的接口都会存在cookie关联
- session对象能够自动关联cookie
- 如果不使用session,直接调requests.request(),则无法自动关联cookie
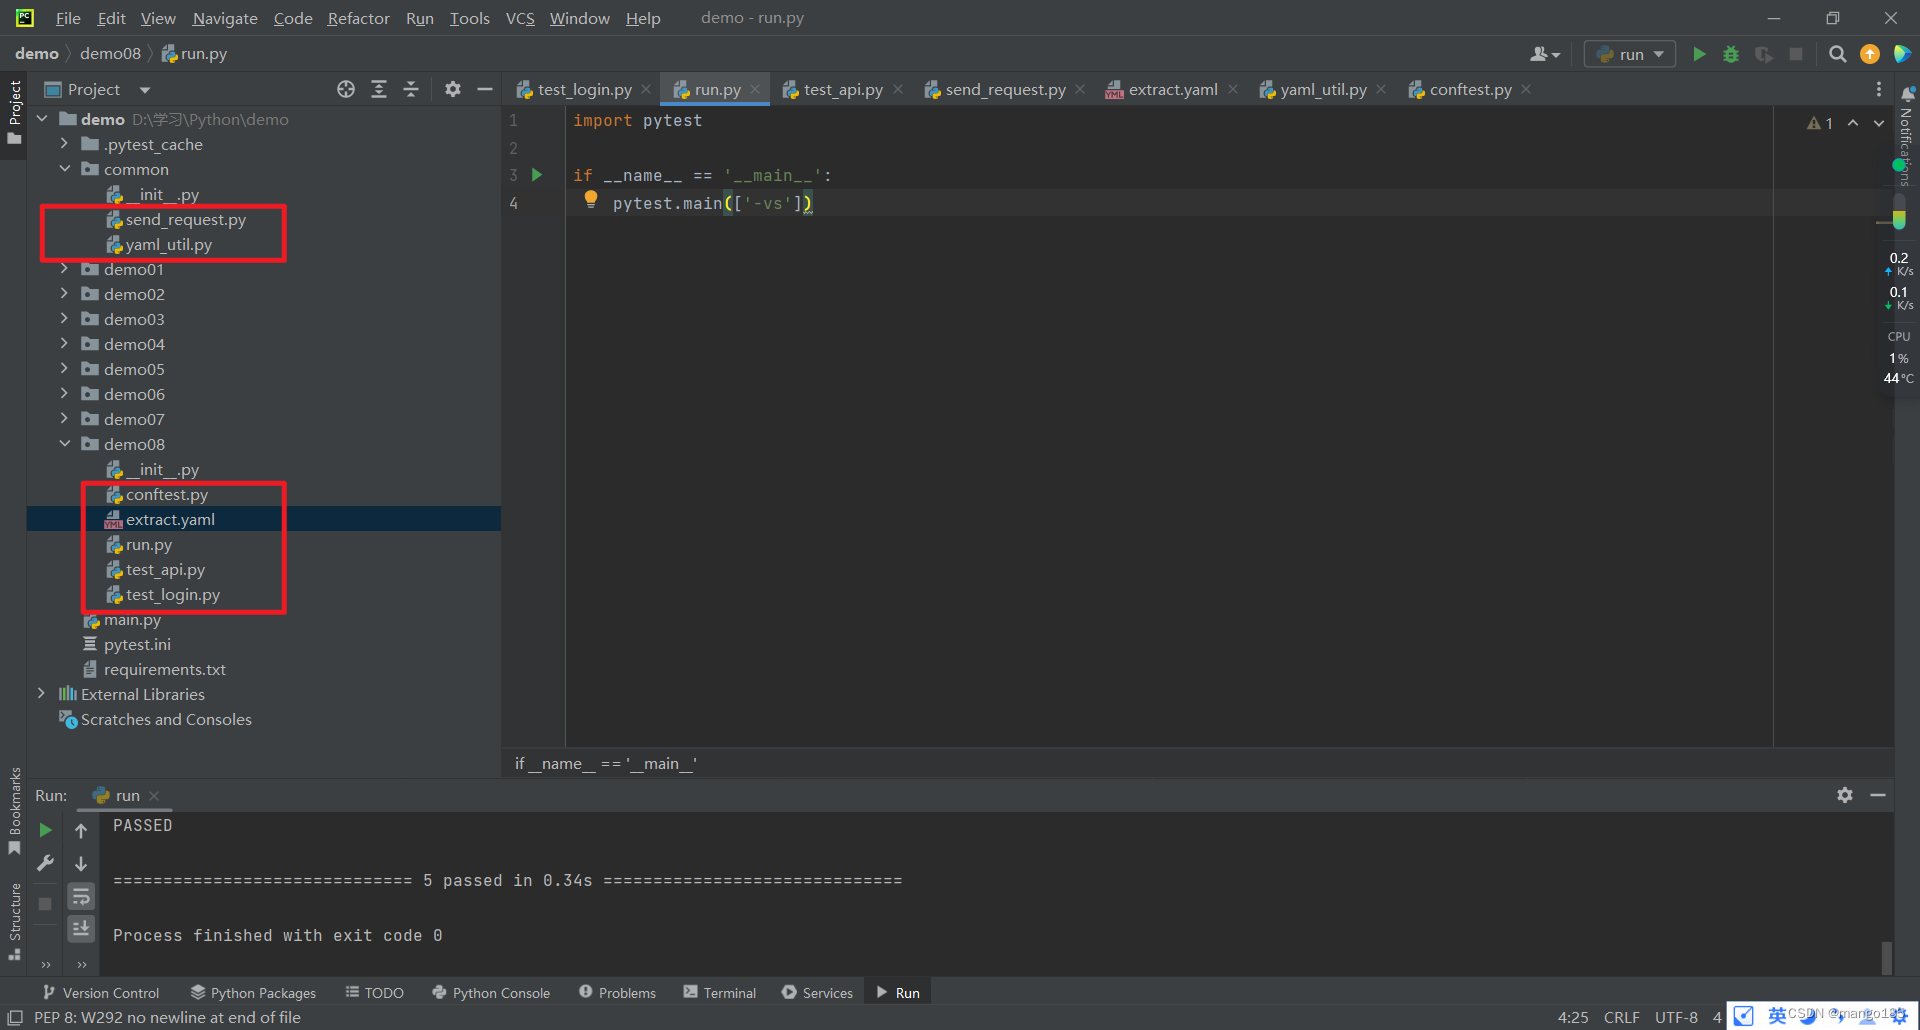
send_request.py
import requests

"""
封装一个方法,所有的request请求都通过这个方法实现
    统计数据
    日志监控
    异常处理
    ……
"""

class SendRequest:

    # 会话,会话对象能够自动管理cookie关联
    # request()方法底层调用的是session对象的request方法
    sess = requests.session()  # 类变量,通过类名访问
    num = 0
    def all_send_request(self, method, url, **kwargs):
        print("-----接口测试开始------")
        print("请求方式:%s" % method)
        print("请求地址:%s" % url)
        if "params" in kwargs.keys():
            print("请求参数params:%s" % kwargs["params"])
        if "json" in kwargs.keys():
            print("请求参数json:%s" % kwargs["json"])
        if "files" in kwargs.keys():
            print("请求参数files:%s" % kwargs["files"])
        if "data" in kwargs.keys():
            print("请求参数data:%s" % kwargs["data"])
        res = SendRequest.sess.request(method, url, **kwargs)   # 类变量,通过类名访问
        SendRequest.num = SendRequest.num + 1
        print("接口返回:%s" % res.text)
        print("可以统计接口执行次数:%s" % SendRequest.num)
        print("可以添加日志:……")
        print("可以进行异常处理:……")
        print("-----接口测试结束------")
        print("\n")
        return res
yaml_util.py
import os
import yaml

# 读取yaml文件
def read_yaml(key):
    with open(os.getcwd()+"/extract.yaml", encoding="utf-8") as f:  # os.getcwd()表示根目录,as f: 表示将打开的extract.yaml文件命名为变量f
        # value = yaml.load(stream=f, loader=yaml.FullLoader)  # stream=f 表示文件名为f, loader=yaml.FullLoader表示满加载  返回错误信息:TypeError: load() got an unexpected keyword argument 'loader'
        value = yaml.load(f, yaml.FullLoader)  # 由于使用的python3,不需要参数'loader=',直接写入参数值就可以了
        return value[key]


# 写入yaml文件
def write_yaml(data):
    with open(os.getcwd()+"/extract.yaml", encoding="utf-8", mode="a") as f:  # mode="a"表示追加内容
        yaml.dump(data, stream=f, allow_unicode=True)  # allow_unicode=True表示允许unicode编码


# 清空yaml文件
def clear_yaml():
    with open(os.getcwd()+"/extract.yaml", encoding="utf-8", mode="w") as f:  # mode="w"表示清空内容
        f.truncate()  # 清空的方法
conftest.py
import pytest
from common.yaml_util import clear_yaml

@pytest.fixture(scope='session', autouse=True)
def exe_assert():
    clear_yaml()    # 在整个会话开始前需要执行清空yaml文件
test_api.py
import pytest
import requests

from common.send_request import SendRequest
from common.yaml_util import write_yaml
from common.yaml_util import read_yaml


class TestApi:
    # access_token = ""  # 类变量   使用yaml文件保存token,则不需要此变量

    # 获取token
    def test_get_token(self):
        url = "http://shop-xo.hctestedu.com/index.php?s=api/user/login"
        datas = {
            "accounts": "huace_xm",
            "pwd": 123456,
            "type": "username"
        }
        params = {
            "application": "app",
            "application_client_type": "weixin"
        }

        # res = requests.post(url=url, params=params, data=datas)
        res = SendRequest().all_send_request(method="post", url=url, params=params, data=datas)
        result = res.json()
        # TestApi.access_token = result['data']['token']  # 使用yaml文件保存token,则不需要此变量
        # print(TestApi.access_token)
        write_yaml({"access_token": result['data']['token']})  # 获取的token保存到yaml文件中
        write_yaml({"name": "小明"})

    # 加购物车
    def test_add_item(self):
        # url = "http://shop-xo.hctestedu.com/index.php?s=api/cart/save&token=" + TestApi.access_token
        url = "http://shop-xo.hctestedu.com/index.php?s=api/cart/save&token=" + read_yaml(
            "access_token")  # 使用yaml文件保存的token
        datas = {
            "goods_id": "2",
            "spec": [
                {
                    "type": "套餐",
                    "value": "套餐二"
                },
                {
                    "type": "颜色",
                    "value": "银色"
                },
                {
                    "type": "容量",
                    "value": "64G"
                }
            ],
            "stock": 2
        }

        params = {
            "application": "app",
            "application_client_type": "weixin"
        }

        # res = requests.post(url=url, params=params, data=datas)
        res = SendRequest().all_send_request(method="post", url=url, params=params, data=datas)
        result = res.json()
        # print(result)
test_login.py
import pytest
from common.yaml_util import read_yaml

class TestLogin():
    def test_login(self):
        print("登录接口")

    def test_register(self):
        print("注册接口")

    def test_test(self):
        print("测试接口:", read_yaml("name"))
run.py
import pytest

if __name__ == '__main__':
    pytest.main(['-vs'])
extract.yaml
执行用例过程中保存的yaml文件
access_token: 0cdfd24280c269e18ead448281be568a
name: 小明
返回结果
"D:\Program Files\python\python.exe" D:/学习/Python/demo/demo08/run.py
============================= test session starts =============================
platform win32 -- Python 3.10.6, pytest-7.4.0, pluggy-1.2.0 -- D:\Program Files\python\python.exe
cachedir: .pytest_cache
metadata: {'Python': '3.10.6', 'Platform': 'Windows-10-10.0.19045-SP0', 'Packages': {'pytest': '7.4.0', 'pluggy': '1.2.0'}, 'Plugins': {'allure-pytest': '2.13.2', 'base-url': '2.0.0', 'html': '3.2.0', 'metadata': '3.0.0', 'ordering': '0.6', 'rerunfailures': '12.0', 'xdist': '3.3.1'}, 'JAVA_HOME': 'D:\\Program Files\\Java\\jdk1.8.0_333'}
rootdir: D:\学习\Python\demo
configfile: pytest.ini
plugins: allure-pytest-2.13.2, base-url-2.0.0, html-3.2.0, metadata-3.0.0, ordering-0.6, rerunfailures-12.0, xdist-3.3.1
collecting ... collected 5 items

test_api.py::TestApi::test_get_token -----接口测试开始------
请求方式:post
请求地址:http://shop-xo.hctestedu.com/index.php?s=api/user/login
请求参数params:{'application': 'app', 'application_client_type': 'weixin'}
请求参数data:{'accounts': 'huace_xm', 'pwd': 123456, 'type': 'username'}
接口返回:{"msg":"登录成功","code":0,"data":{"id":"19898","username":"huace_xm","nickname":"","mobile":"","email":"","avatar":"http:\/\/shop-xo.hctestedu.com\/static\/index\/default\/images\/default-user-avatar.jpg","alipay_openid":"","weixin_openid":"","weixin_unionid":"","weixin_web_openid":"","baidu_openid":"","toutiao_openid":"","qq_openid":"","qq_unionid":"","integral":"0","locking_integral":"0","referrer":"0","add_time":"1669790543","add_time_text":"2022-11-30 14:42:23","mobile_security":"","email_security":"","user_name_view":"huace_xm","is_mandatory_bind_mobile":0,"token":"0cdfd24280c269e18ead448281be568a"}}
可以统计接口执行次数:1
可以添加日志:……
可以进行异常处理:……
-----接口测试结束------


PASSED
test_api.py::TestApi::test_add_item -----接口测试开始------
请求方式:post
请求地址:http://shop-xo.hctestedu.com/index.php?s=api/cart/save&token=0cdfd24280c269e18ead448281be568a
请求参数params:{'application': 'app', 'application_client_type': 'weixin'}
请求参数data:{'goods_id': '2', 'spec': [{'type': '套餐', 'value': '套餐二'}, {'type': '颜色', 'value': '银色'}, {'type': '容量', 'value': '64G'}], 'stock': 2}
接口返回:{"msg":"加入成功","code":0,"data":7}
可以统计接口执行次数:2
可以添加日志:……
可以进行异常处理:……
-----接口测试结束------


PASSED
test_login.py::TestLogin::test_login 登录接口
PASSED
test_login.py::TestLogin::test_register 注册接口
PASSED
test_login.py::TestLogin::test_test 测试接口: 小明
PASSED

============================== 5 passed in 0.34s ==============================

Process finished with exit code 0
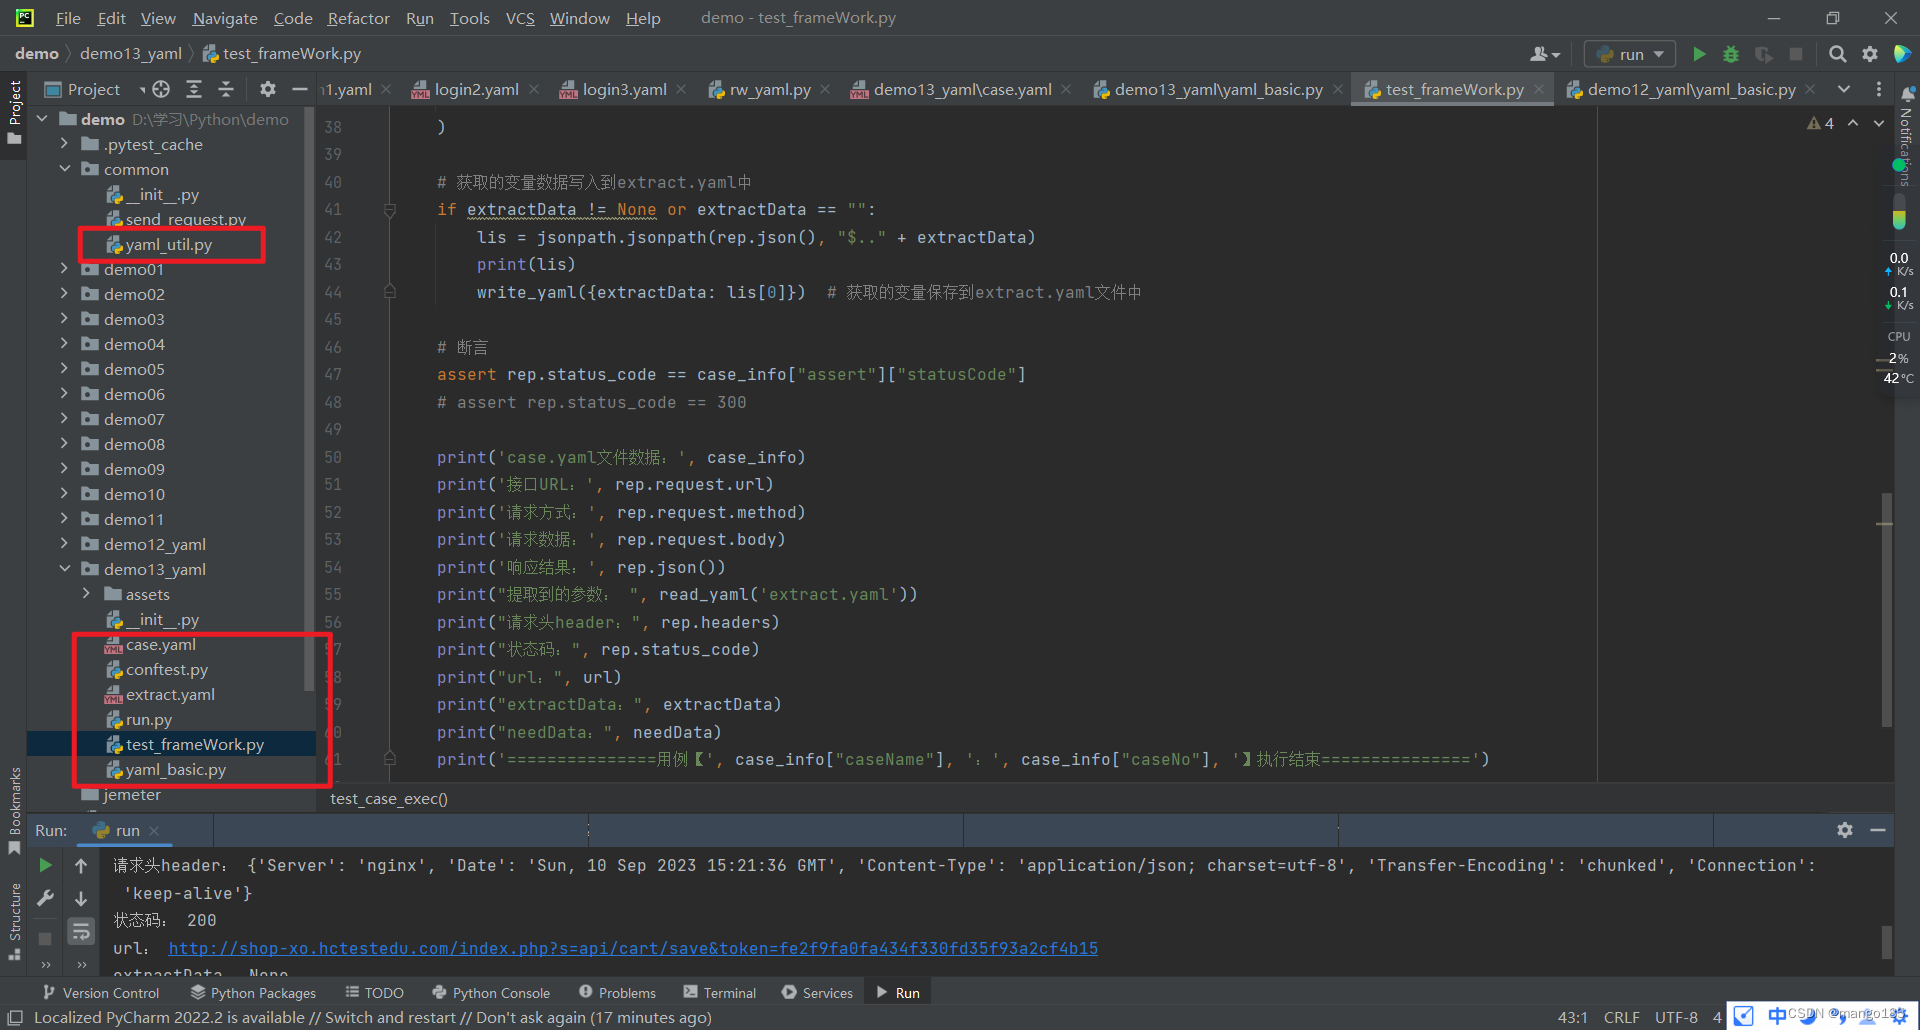
十三、pytest + yaml实现数据驱动(yaml保存测试用例)
case.yaml
case:
  - caseName: '用户登录'
    caseNo: 'hc_shop_api_001'
    url: 'http://shop-xo.hctestedu.com/index.php?s=api/user/login'
    method: 'post'
    params:
      application: 'app'
      application_client_type: 'weixin'
    datas:
      accounts: 'huace_xm'
      pwd: '123456'
      type: 'username'
    assert:
      statusCode: 200
      responseData:
    extractData: 'token'
    needData:
    notes:

  - caseName: '添加购物车'
    caseNo: 'hc_shop_api_002'
    url: 'http://shop-xo.hctestedu.com/index.php?s=api/cart/save&token=${token}'
    method: 'post'
    params:
      application: 'app'
      application_client_type: 'weixin'
    datas:
      goods_id: '2'
      spec:
        - type: '套餐'
          value: '套餐二'
        - type: '颜色'
          value: '银色'
        - type: '容量'
          value: '64G'
      stock: 2
    assert:
      statusCode: 200
      responseData:
    extractData:
    needData: 'token'
    notes:
yaml_util.py
import os
import yaml

# 读取yaml文件
def read_yaml(key):
    with open(os.getcwd()+"/extract.yaml", encoding="utf-8") as f:  # os.getcwd()表示根目录,as f: 表示将打开的extract.yaml文件命名为变量f
        # value = yaml.load(stream=f, loader=yaml.FullLoader)  # stream=f 表示文件名为f, loader=yaml.FullLoader表示满加载  返回错误信息:TypeError: load() got an unexpected keyword argument 'loader'
        value = yaml.load(f, yaml.FullLoader)  # 由于使用的python3,不需要参数'loader=',直接写入参数值就可以了
        return value[key]


# 写入yaml文件
def write_yaml(data):
    with open(os.getcwd()+"/extract.yaml", encoding="utf-8", mode="a") as f:  # mode="a"表示追加内容
        yaml.dump(data, stream=f, allow_unicode=True)  # allow_unicode=True表示允许unicode编码


# 清空yaml文件
def clear_yaml():
    with open(os.getcwd()+"/extract.yaml", encoding="utf-8", mode="w") as f:  # mode="w"表示清空内容
        f.truncate()  # 清空的方法
conftest.py
import pytest
from common.yaml_util import clear_yaml

@pytest.fixture(scope='session', autouse=True)
def exe_assert():
    clear_yaml()    # 在整个会话开始前需要执行清空yaml文件
yaml_basic.py
import yaml

'''
https://blog.csdn.net/venustech0919/article/details/130952029
1)规则
    大小写敏感
    使用缩进表示层级关系
    缩进时不允许使用Tab键,只允许使用空格。
    缩进的空格数目不重要,只要相同层级的元素左侧对齐即可
2)注释
    # 表示注释,从这个字符一直到行尾,都会被解析器忽略。
3)数据结构:YAML 支持的数据结构有三种。
    对象:键值对的集合,又称为映射(mapping)/ 哈希(hashes) / 字典(dictionary)
    数组:一组按次序排列的值,又称为序列(sequence) / 列表(list)
    纯量(scalars):单个的、不可再分的值
'''

'''
# 通过load()方法进行转化
safe_load(f, Loader=yaml.SafeLoader)方法
作用 :将yaml格式的数据转化为python对象 。
'''
def read_yaml(filename):
    with open(filename, encoding='utf-8') as f:
        python_obj = yaml.safe_load(f)  # 将读取到的yaml文件通过safe_load进行转化。
        # print(type(python_obj))  # 打印输出类型
    return python_obj


'''
# 通过load_all()方法进行转化
load_all(f,Loader=yaml.SafeLoader)方法
作用 :将多个yaml的文档数据转化为python生成器对象 ,每个yaml文件在同一文件是用---分割 。
'''
def read_all_yaml(filename):
    with open(filename, encoding='utf-8') as f:
        python_obj = yaml.load_all(f, Loader=yaml.SafeLoader)
        # print(type(python_obj))  # 打印输出类型
        # print(python_obj)  # 打印输出数据
        for x in python_obj:  # 循环生成器
            print(x)

'''
# 通过safe_dump()方法进行转化
safe_dump(data,stream,allow_unicode,sort_keys)方法
作用 :将Python对象序列化为YAML格式的数据并输出到指定的输出流。
参数说明 :
    data :要读取的python数据源
    stream :要指定yaml文件的文件对象 。
    allow_unicode :若数据中包含中文,此参数必须设置为true,否则写入yaml文件的是unicode编码。
    sort_keys :此值默认是True , 即按键进行排序 ,排序后的显示是不对的 ,所以,最好将其设置为False .
'''
def save_yaml(yaml_data, file_name):
    with open(file_name, mode='w', encoding='utf-8') as f:
        yaml.safe_dump(yaml_data, f, allow_unicode=True, sort_keys=False)  # 进行转化

'''
dump_all(data,stream)方法
作用 :将Python对象序列化为YAML格式的数据并输出到指定的输出流。
参数说明 :
    data :要读取的python数据源
    stream :要指定yaml文件的文件对象 。
    allow_unicode :若数据中包含中文,此参数必须设置为true,否则写入yaml文件的是unicode编码。
    sort_keys :此值默认是True , 即按键进行排序 ,排序后的显示是不对的 ,所以,最好将其设置为False .
'''
def save_all_yaml(yaml_data, file_name):
    with open(file_name, mode='w', encoding='utf-8') as f:
        yaml.dump_all(yaml_data, f, allow_unicode=True, sort_keys=False)  # 进行转化
test_frameWork.py
import jsonpath
import pytest
import requests

from string import Template
from common.yaml_util import write_yaml
from yaml_basic import read_yaml

# 1. 读取case.yaml
caseList = read_yaml('case.yaml')['case']


# print(caseList)


# assert 断言
# 通过装饰器实现参数化和自动循环DDT
@pytest.mark.parametrize("case_info", caseList)
def test_case_exec(case_info):  # 把这个列表传进来

    url = case_info["url"]
    params = case_info["params"]
    datas = case_info["datas"]
    needData = case_info["needData"]
    extractData = case_info["extractData"]

    # 判断是否需要变量
    if "$" in url:
        dic = {needData: read_yaml('extract.yaml')[needData]}
        print(dic)
        url = Template(url).substitute(dic)

    rep = requests.request(
        url=url,
        method=case_info["method"],
        params=params,
        data=datas
    )

    # 获取的变量数据写入到extract.yaml中
    if extractData != None or extractData == "":
        lis = jsonpath.jsonpath(rep.json(), "$.." + extractData)
        print(lis)
        write_yaml({extractData: lis[0]})  # 获取的变量保存到extract.yaml文件中

    # 断言
    assert rep.status_code == case_info["assert"]["statusCode"]
    # assert rep.status_code == 300

    print('case.yaml文件数据:', case_info)
    print('接口URL:', rep.request.url)
    print('请求方式:', rep.request.method)
    print('请求数据:', rep.request.body)
    print('响应结果:', rep.json())
    print("提取到的参数: ", read_yaml('extract.yaml'))
    print("请求头header:", rep.headers)
    print("状态码:", rep.status_code)
    print("url:", url)
    print("extractData:", extractData)
    print("needData:", needData)
    print('===============用例【', case_info["caseName"], ':', case_info["caseNo"], '】执行结束===============')
run.py
import pytest

if __name__ == '__main__':
    pytest.main(['-vs'])
extract.yaml
执行用例过程中保存的yaml文件
token: 0cdfd24280c269e18ead448281be568a
返回结果
"D:\Program Files\python\python.exe" D:/学习/Python/demo/demo13_yaml/run.py
============================= test session starts =============================
platform win32 -- Python 3.10.6, pytest-7.4.0, pluggy-1.2.0 -- D:\Program Files\python\python.exe
cachedir: .pytest_cache
metadata: {'Python': '3.10.6', 'Platform': 'Windows-10-10.0.19045-SP0', 'Packages': {'pytest': '7.4.0', 'pluggy': '1.2.0'}, 'Plugins': {'allure-pytest': '2.13.2', 'Faker': '19.3.1', 'base-url': '2.0.0', 'html': '3.2.0', 'metadata': '3.0.0', 'ordering': '0.6', 'rerunfailures': '12.0', 'xdist': '3.3.1'}, 'JAVA_HOME': 'D:\\Program Files\\Java\\jdk1.8.0_333'}
rootdir: D:\学习\Python\demo
configfile: pytest.ini
plugins: allure-pytest-2.13.2, Faker-19.3.1, base-url-2.0.0, html-3.2.0, metadata-3.0.0, ordering-0.6, rerunfailures-12.0, xdist-3.3.1
collecting ... collected 2 items

test_frameWork.py::test_case_exec[case_info0] ['fe2f9fa0fa434f330fd35f93a2cf4b15']
case.yaml文件数据: {'caseName': '用户登录', 'caseNo': 'hc_shop_api_001', 'url': 'http://shop-xo.hctestedu.com/index.php?s=api/user/login', 'method': 'post', 'params': {'application': 'app', 'application_client_type': 'weixin'}, 'datas': {'accounts': 'huace_xm', 'pwd': '123456', 'type': 'username'}, 'assert': {'statusCode': 200, 'responseData': None}, 'extractData': 'token', 'needData': None, 'notes': None}
接口URL: http://shop-xo.hctestedu.com/index.php?s=api/user/login&application=app&application_client_type=weixin
请求方式: POST
请求数据: accounts=huace_xm&pwd=123456&type=username
响应结果: {'msg': '登录成功', 'code': 0, 'data': {'id': '19898', 'username': 'huace_xm', 'nickname': '', 'mobile': '', 'email': '', 'avatar': 'http://shop-xo.hctestedu.com/static/index/default/images/default-user-avatar.jpg', 'alipay_openid': '', 'weixin_openid': '', 'weixin_unionid': '', 'weixin_web_openid': '', 'baidu_openid': '', 'toutiao_openid': '', 'qq_openid': '', 'qq_unionid': '', 'integral': '0', 'locking_integral': '0', 'referrer': '0', 'add_time': '1669790543', 'add_time_text': '2022-11-30 14:42:23', 'mobile_security': '', 'email_security': '', 'user_name_view': 'huace_xm', 'is_mandatory_bind_mobile': 0, 'token': 'fe2f9fa0fa434f330fd35f93a2cf4b15'}}
提取到的参数:  {'token': 'fe2f9fa0fa434f330fd35f93a2cf4b15'}
请求头header: {'Server': 'nginx', 'Date': 'Sun, 10 Sep 2023 15:21:36 GMT', 'Content-Type': 'application/json; charset=utf-8', 'Transfer-Encoding': 'chunked', 'Connection': 'keep-alive', 'Set-Cookie': 'PHPSESSID=j3conb6v1sjntp4t0hchthobfq; path=/; HttpOnly', 'Expires': 'Thu, 19 Nov 1981 08:52:00 GMT', 'Cache-Control': 'no-store, no-cache, must-revalidate', 'Pragma': 'no-cache'}
状态码: 200
url: http://shop-xo.hctestedu.com/index.php?s=api/user/login
extractData: token
needData: None
===============用例【 用户登录 : hc_shop_api_001 】执行结束===============
PASSED
test_frameWork.py::test_case_exec[case_info1] {'token': 'fe2f9fa0fa434f330fd35f93a2cf4b15'}
case.yaml文件数据: {'caseName': '添加购物车', 'caseNo': 'hc_shop_api_002', 'url': 'http://shop-xo.hctestedu.com/index.php?s=api/cart/save&token=${token}', 'method': 'post', 'params': {'application': 'app', 'application_client_type': 'weixin'}, 'datas': {'goods_id': '2', 'spec': [{'type': '套餐', 'value': '套餐二'}, {'type': '颜色', 'value': '银色'}, {'type': '容量', 'value': '64G'}], 'stock': 2}, 'assert': {'statusCode': 200, 'responseData': None}, 'extractData': None, 'needData': 'token', 'notes': None}
接口URL: http://shop-xo.hctestedu.com/index.php?s=api/cart/save&token=fe2f9fa0fa434f330fd35f93a2cf4b15&application=app&application_client_type=weixin
请求方式: POST
请求数据: goods_id=2&spec=type&spec=value&spec=type&spec=value&spec=type&spec=value&stock=2
响应结果: {'msg': '加入成功', 'code': 0, 'data': 1}
提取到的参数:  {'token': 'fe2f9fa0fa434f330fd35f93a2cf4b15'}
请求头header: {'Server': 'nginx', 'Date': 'Sun, 10 Sep 2023 15:21:36 GMT', 'Content-Type': 'application/json; charset=utf-8', 'Transfer-Encoding': 'chunked', 'Connection': 'keep-alive'}
状态码: 200
url: http://shop-xo.hctestedu.com/index.php?s=api/cart/save&token=fe2f9fa0fa434f330fd35f93a2cf4b15
extractData: None
needData: token
===============用例【 添加购物车 : hc_shop_api_002 】执行结束===============
PASSED

============================== 2 passed in 0.40s ==============================

Process finished with exit code 0
十四、Jenkins持续集成
https://mango185.github.io/post/8103562c.html
