文章目录
前言
如果你问我有什么方法可以让自己JS的技术活生生地提升一个等级?🙀 那就是手写Promise了!!! 😺
手写Promise 有一个难点就在于有很多地方需要和原生一样严谨,也就是说原生的Promise会考虑很多特殊情况~🧐
我们在实际运用时可能暂时不会碰到这些情况,可是当我们遇到的时候 却不知底层的原理,无法精准定位和解决问题,这就是为什么我们要知道如何手写Promise
如果你问我为什么看了这么多教程还是不懂如何手写Promise,那就是因为这里头有很多细节难点,很少人有人愿意把这些都讲出来,不过我今天就要把这里头的细节一个个给抠出来,所以请大家务必先收藏再观看 ~ 奥力给😸😸😸
手写Promise包含以下知识点 👇:
- Promise
- Class 类
- 改变this指向 (call、apply和bind)
- 事件循环 Event Loop
- 等
不必担心因为上面的知识点不熟练而无法进行"手写Promise"的学习,因为本文附带 包会套餐 👇:
-
🔍 如果你不太熟悉Promise的话,建议先看我之前写的那篇Promise文章: 通俗易懂的Promise知识点总结,检验一下你是否真的完全掌握了promise?
-
🔍 如果不知道
类 class是如何使用的,建议参考我写的这篇文章:ES6新特性 Class 类的全方面理解 -
🔍 其他知识点讲解文章,会在文中列出,不用担心,你只需要跟着这篇文中走就完了~
手写之前先简要的复习一下 Promise,现在我们就来一边回忆一边实现Promise吧 🪐~
如果很熟悉 Promsie 可以跳过下面这一节
(不建议)
◾ promise 核心要点
本章节内容其实并不多,而且通俗易懂,建议不太熟悉Promise的同学还是循序渐进的看完本章再逐步学习Promise核心手写~
Promise对象代表一个异步操作,有三种状态:pending(进行中)、fulfilled(已成功)和rejected(已失败)
一个 Promise 必然处于以下几种状态之一 👇:
- 待定
(pending): 初始状态,既没有被兑现,也没有被拒绝。 - 已成功
(fulfilled): 意味着操作成功完成。 - 已拒绝
(rejected): 意味着操作失败。
当 promise 被调用后,它会以处理中状态 (pending) 开始。 这意味着调用的函数会继续执行,而 promise 仍处于处理中直到解决为止,从而为调用的函数提供所请求的任何数据。
被创建的 promise 最终会以被解决状态 (fulfilled) 或 被拒绝状态 (rejected) 结束,并在完成时调用相应的回调函数(传给 then 和 catch)。
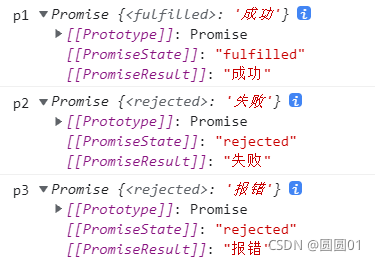
◾ 为了让读者尽快对promise有一个整体的理解,我们先来看一段promise的例子 🌰:
let p1 = new Promise((resolve, reject) => {

    resolve('成功')
    reject('失败')
})
console.log('p1', p1)

let p2 = new Promise((resolve, reject) => {

    reject('失败')
    resolve('成功')
})
console.log('p2', p2)

let p3 = new Promise((resolve, reject) => {

    throw('报错')
})
console.log('p3', p3)
输出结果为:
这里包含了四个知识点 👇:
- 1、执行了
resolve(),Promise状态会变成fulfilled,即 已完成状态 - 2、执行了
reject(),Promise状态会变成rejected,即 被拒绝状态 - 3、Promise只以
第一次为准,第一次成功就永久为fulfilled,第一次失败就永远状态为rejected - 4、Promise中有
throw的话,就相当于执行了reject()
◾ 接下来看下面一段代码,学习新的知识点:
let myPromise1 = new Promise(() => {
   });

console.log('myPromise1 :>> ', myPromise1);

let myPromise2 = new Promise((resolve, reject) => {

    let a = 1;
    for (let index = 0; index < 5; index++) {

        a++;
    }
})

console.log('myPromise2 :>> ', myPromise2)

myPromise2.then(() => {

    console.log("myPromise2执行了then");
})
输出结果为:
这里包含了三个知识点 👇:
- 1、Promise的初始状态是
pending - 2、Promise里没有执行
resolve()、reject()以及throw的话,这个promise的状态也是pending - 3、基于上一条,
pending状态下的promise不会执行回调函数then()
◾ 最后一点:
let myPromise0 = new Promise();
console.log('myPromise0 :>> ', myPromise0);
输出结果:
这个里包含了一个知识点:
- 规定必须给
Promise对象传入一个执行函数,否则将会报错。
一、定义初始结构
原生的promise我们一般都会用new来创建实例 👇 :
let promise = new Promise()
所以我们手写的时候可以用构造函数或者class来创建,为了方便代码的整体观看就用class。
🔍 如果不知道 类 class 是如何使用的,建议参考我写的这篇文章:ES6新特性 Class 类的全方面理解
把我们手写的Promise命名为myPromise,具体名字可以按自己想法,都可以
首先创建一个myPromise类
class myPromise {
   }
在new一个promise实例的时候肯定是需要传入参数的
let promise = new Promise(() => {
   })
不然这个实例用处不大;而这个参数我们知道是一个函数,并且当我们传入这个函数参数的时候,这个函数参数会自动执行。
因此,我们需要在类的构造函数constructor里面添加一个参数,这里就用func来做形参,并且执行一下这个参数
class myPromise {

+    constructor(func) {

+       func();
+   }
}
二、实现 resolve 和 reject
接下来,大家都知道需要为这个函数参数传入它自己的函数,也就是resolve()和reject()
原生的promise里面可以传入resolve和reject两个参数
let promise = new Promise((resolve, reject) => {
   })
那么我们也得允许手写这边可以传入这两个参数:
class myPromise {

    constructor(func) {

+       func(resolve, reject);
    }
}
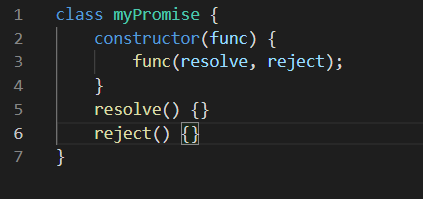
这里这样写明显有一个问题 🤨,那就是手写这边不知道哪里调用resolve()和reject()这两个参数,毕竟resolve()和reject()还没有定义
因此就需要创造出这两个对象 😀
有一点我们需要知道的是resolve()和reject()也是以函数的形式来执行的,我们在原生promise里也是在resolve和reject后面加括号()来执行的,因此我们可以用类方法的形式来创建这两个函数:
class myPromise {

    constructor(func) {

        func(resolve, reject);
    }
+   resolve() {
   }
+   reject() {
   }
}
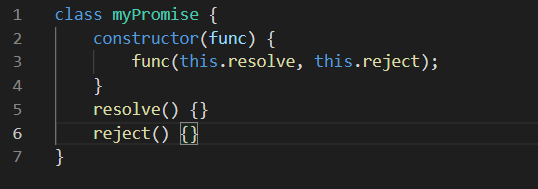
创建这两个方法以后我们发现func里面的两个参数颜色还是原来的颜色,编辑器就是在告诉我们:这两个参数还没有创建噢~😲
等下,刚刚不是已经创建了吗?🦁
是的,但是我们需要用this来调用自身class的方法,因此我们需要在构造函数里把两个参数前加上this:
class myPromise {

    constructor(func) {

+       func(this.resolve, this.reject);
    }
    resolve() {
   }
    reject() {
   }
}
那么这里的resolve()和reject()方法应该如何执行呢?里面应该写什么内容呢?😯
这就需要用到状态了 😛
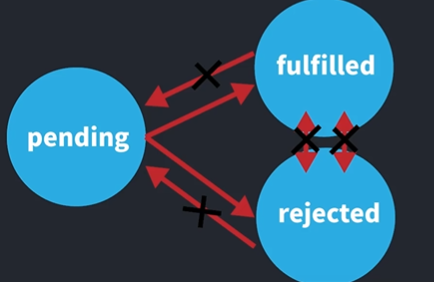
1. 管理状态和结果
promise有三种状态:分别是pending,fulfilled和rejected
- 初始的时候是
pending pending可以转为fulfilled状态,但是不能逆转pending也可以转为rejected状态,但是也不能逆转- 这里
fulfilled和rejected也不能互转
因此我们需要提前先把这些状态定义好,可以用const来创建外部的固定变量,但是这里为了统一就用static来创建静态属性:
class myPromise {

+   static PENDING = 'pending';
+   static FULFILLED = 'fulfilled';
+   static REJECTED = 'rejected';
    constructor(func) {

        func(this.resolve, this.reject);
    }
    resolve() {
   }
    reject() {
   }
}
创建了状态属性以后,还需要为每一个实例添加一个状态属性,在前面讲到得 “Promise 核心要点” 章节,我们已经知道原生Promise用PromiseState这个字段来保存实例的状态属性,这里就也用 this.PromiseState 来保存实例的状态属性,这个状态属性默认就是 待定pending 状态,这样在每一个实例被创建以后就会有自身的状态属性可以进行判断和变动了
class myPromise {

    static PENDING = 'pending';
    static FULFILLED = 'fulfilled';
    static REJECTED = 'rejected';
    constructor(func) {

+       this.PromiseState = myPromise.PENDING;
        func(this.resolve, this.reject);
    }
    resolve() {
   }
    reject() {
   }
}
那么在执行resolve()的时候就需要判断状态是否为 待定 pending,如果是 待定 pending的话就把状态改为 成功 fulfilled:
class myPromise {

    static PENDING = 'pending';
    static FULFILLED = 'fulfilled';
    static REJECTED = 'rejected';
    constructor(func) {

        this.PromiseState = myPromise.PENDING;
        func(this.resolve, this.reject);
    }
    resolve() {

+       if (this.PromiseState === myPromise.PENDING) {

+           this.PromiseState = myPromise.FULFILLED;
+       }
    }
    reject() {
   }
}
同样,为给reject添加参数,并且把参数赋值给实例的PromiseResult属性:
class myPromise {

    static PENDING = 'pending';
    static FULFILLED = 'fulfilled';
    static REJECTED = 'rejected';
    constructor(func) {

        this.PromiseState = myPromise.PENDING;
        func(this.resolve, this.reject);
    }
    resolve() {

        if (this.PromiseState === myPromise.PENDING) {

            this.PromiseState = myPromise.FULFILLED;
        }
    }
    reject() {

+       if (this.PromiseState === myPromise.PENDING) {

+           this.PromiseState = myPromise.REJECT;
+       }
    }
}
◾ 执行 resolve() 和 reject() 可以传参
现在我们再回忆一下原生Promise 🙂,在执行resolve()或者reject()的时候都是可以传入一个参数,这样我们后面就可以使用这个参数了
let promise = new Promise((resolve, reject) => {

    resolve('这次一定')
})
我们可以把这个结果参数命名为PromiseResult (和原生Promise保持一致),不管是成功还是拒绝的结果,两者选其一,我们让每个实例都有PromiseResult属性,并且给他们都赋值null,这里给空值null是因为执行resolve()或者reject()的时候会给结果赋值:
class myPromise {

    static PENDING = 'pending';
    static FULFILLED = 'fulfilled';
    static REJECTED = 'rejected';
    constructor(func) {

        this.PromiseState = myPromise.PENDING;
+       this.PromiseResult = null;
        func(this.resolve, this.reject);
    }
    resolve() {

        if (this.PromiseState === myPromise.PENDING) {

            this.PromiseState = myPromise.FULFILLED;
        }
    }
    reject() {

        if (this.PromiseState === myPromise.PENDING) {

            this.PromiseState = myPromise.REJECT;
        }
    }
}
接着我们就可以给resolve()添加参数,并且把参数赋值给实例的PromiseResult属性:
class myPromise {

    static PENDING = 'pending';
    static FULFILLED = 'fulfilled';
    static REJECTED = 'rejected';
    constructor(func) {

        this.PromiseState = myPromise.PENDING;
        this.PromiseResult = null;
        func(this.resolve, this.reject);
    }
+   resolve(result) {

        if (this.PromiseState === myPromise.PENDING) {

            this.PromiseState = myPromise.FULFILLED;
+           this.PromiseResult = result;
        }
    }
    reject() {

        if (this.PromiseState === myPromise.PENDING) {

            this.PromiseState = myPromise.REJECT;
        }
    }
}
同样,为给reject()添加参数,并且把参数赋值给实例的PromiseResult属性:
class myPromise {

    static PENDING = 'pending';
    static FULFILLED = 'fulfilled';
    static REJECTED = 'rejected';
    constructor(func) {

        this.PromiseState = myPromise.PENDING;
        this.PromiseResult = null;
        func(this.resolve, this.reject);
    }
    resolve(result) {

        if (this.PromiseState === myPromise.PENDING) {

            this.PromiseState = myPromise.FULFILLED;
            this.PromiseResult = result;
        }
    }
+   reject(reason) {

        if (this.PromiseState === myPromise.PENDING) {

            this.PromiseState = myPromise.REJECT;
+           this.PromiseResult = reason;
        }
    }
}
2. this 指向问题
现在的代码看起来风平浪静的,但很多人会在这里犯错~😥
大家觉得这里有什么错误?🧐
我们来new一个实例 🌰 执行一下代码就知道有没有问题了
class myPromise {

    static PENDING = 'pending';
    static FULFILLED = 'fulfilled';
    static REJECTED = 'rejected';
    constructor(func) {

        this.PromiseState = myPromise.PENDING;
        this.PromiseResult = null;
        func(this.resolve, this.reject);
    }
    resolve(result) {

        if (this.PromiseState === myPromise.PENDING) {

            this.PromiseState = myPromise.FULFILLED;
            this.PromiseResult = result;
        }
    }
    reject(reason) {

        if (this.PromiseState === myPromise.PENDING) {

            this.PromiseState = myPromise.REJECT;
            this.PromiseResult = reason;
        }
    }
}

// 测试代码
+  let promise1 = new myPromise((resolve, reject) => {

+      resolve('这次一定');
+  })
运行上面代码,报错 🦁:
Uncaught TypeError: Cannot read property 'PromiseState ' of undefined
可从报错的信息里面我们貌似发现不了有什么错误🤨,因为PromiseState 属性我们已经创建了,不应该是undefined~
🔍 但我们仔细看看resolve()和reject()方法里调用PromiseState ,前面是有this关键字的😲
    resolve(result) {

➡      if (this.PromiseState === myPromise.PENDING) {

➡          this.PromiseState = myPromise.FULFILLED;
            this.PromiseResult = result;
        }
    }
    reject(reason) {

➡      if (this.PromiseState === myPromise.PENDING) {

➡          this.PromiseState = myPromise.REJECT;
            this.PromiseResult = reason;
        }
    }
那么只有一种可能🧐,调用this.PromiseState 的时候并没有调用constructor里的this.PromiseState ,也就是这里的this已经跟丢了~
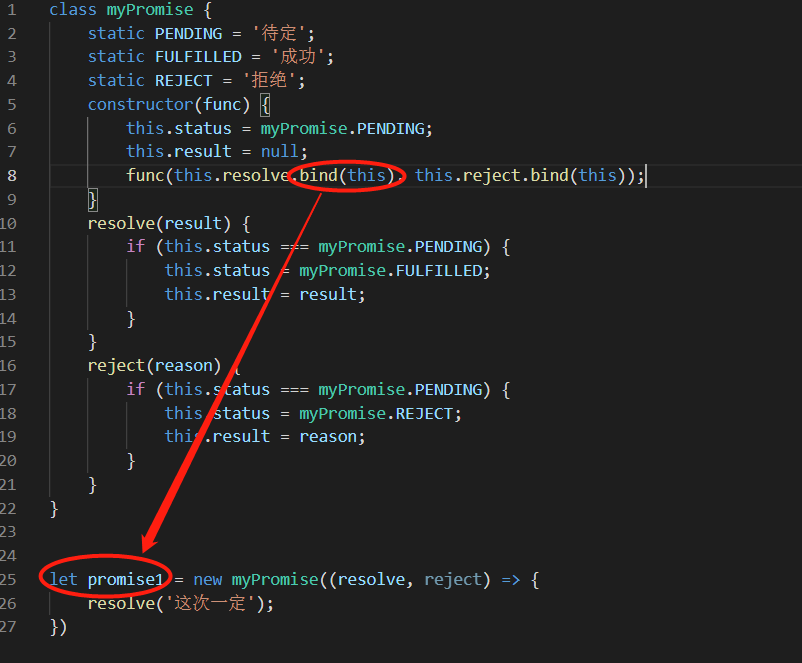
我们在new一个新实例的时候执行的是constructor里的内容,也就是constructor里的this确实是新实例的,但现在我们是在新实例被创建后再在外部环境下执行resolve()方法的,这里的resolve()看着像是和实例一起执行的,其实不然,也就相当于不在class内部使用这个this,而我们没有在外部定义任何PromiseState 变量,因此这里会报错
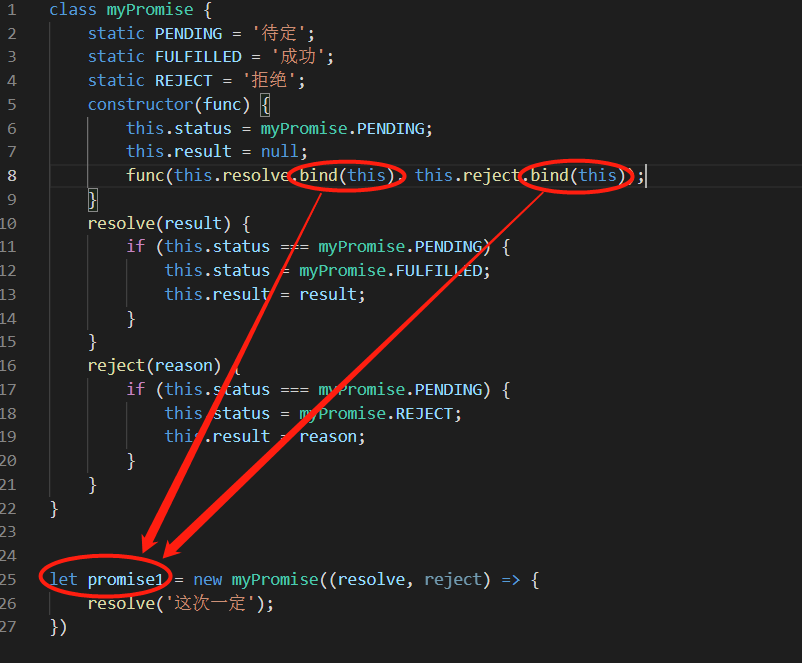
解决class的this指向问题一般会用箭头函数,bind或者proxy,在这里我们就可以使用bind来绑定this,只需要在构造函数constructor中的this.resolve和this.reject后加上,.bind(this)就可以了 😺:
class myPromise {

    static PENDING = 'pending';
    static FULFILLED = 'fulfilled';
    static REJECTED = 'rejected';
    constructor(func) {

        this.PromiseState = myPromise.PENDING;
        this.PromiseResult = null;
+       func(this.resolve.bind(this), this.reject.bind(this));
    }
    resolve(result) {

        if (this.PromiseState === myPromise.PENDING) {

            this.PromiseState = myPromise.FULFILLED;
            this.PromiseResult  = result;
        }
    }
    reject(reason) {

        if (this.PromiseState === myPromise.PENDING) {

            this.PromiseState = myPromise.REJECT;
            this.PromiseResult = reason;
        }
    }
}

// 测试代码
let promise1 = new myPromise((resolve, reject) => {

    resolve('这次一定');
})
🔍 如果这里有点蒙圈,不太懂为什么这样写,可以参考我之前写的关于this指向的文章:
▪ call、apply和bind方法的用法、区别和使用场景
▪ 手写 实现call、apply和bind方法 超详细!!!
我们接着往下写~
对于resolve来说,这里就是给实例的resolve()方法绑定这个this为当前的实例对象,并且执行this.resolve()方法:
对于reject来说,这里就是给实例的reject方法绑定这个this为当前的实例对象,并且执行this.reject方法:
咱们来测试一下代码吧:
class myPromise {

    static PENDING = 'pending';
    static FULFILLED = 'fulfilled';
    static REJECTED = 'rejected';
    constructor(func) {

        this.PromiseState = myPromise.PENDING;
        this.PromiseResult = null;
        func(this.resolve.bind(this), this.reject.bind(this));
    }
    resolve(result) {

        if (this.PromiseState === myPromise.PENDING) {

            this.PromiseState = myPromise.FULFILLED;
            this.PromiseResult = result;
        }
    }
    reject(reason) {

        if (this.PromiseState === myPromise.PENDING) {

            this.PromiseState = myPromise.REJECTED;
            this.PromiseResult = reason;
        }
    }
}


// 测试代码
let promise1 = new myPromise((resolve, reject) => {

    resolve('这次一定');
})
console.log(promise1);
// myPromise {PromiseState: 'fulfilled', PromiseResult: '这次一定'}
let promise2 = new myPromise((resolve, reject) => {

    reject('下次一定');
})
console.log(promise2);
// myPromise {PromiseState: 'rejected', PromiseResult: '下次一定'}
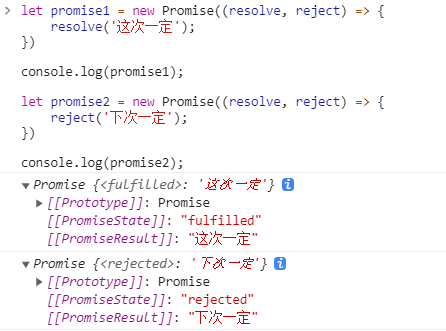
上面是我们手写的 myPromise的执行情况,看看原生Promise的执行情况:
说明执行结果符合我们的预期,是不是觉得离成功又进了一步啦~ 👏👏👏
那么大家觉得下一步我们要做什么?是不是很多同学觉得需要写then了?那么我们就先来满足想要写then的同学们~
三、实现 then 方法
因为then是在创建实例后再进行调用的,因此我们再创建一个 类方法,可千万不要创建在 constructor 里面了~😛
我想应该有些同学突然失忆😶,不记得then怎么用了,我们就来稍微写一下原生的then方法:
let promise = new Promise((resolve, reject) => {

    resolve('这次一定')
})

+  promise.then(
+      result => {

+          console.log(result);
+      },
+      reason => {

+          console.log(reason.message);
+      }
+  )
then方法可以传入两个参数,这两个参数都是函数,一个是当状态为fulfilled 成功 时执行的代码,另一个是当状态为 rejected 拒绝 时执行的代码。
虽然很多人可能一直只用一个函数参数,但不要忘记这里是两个函数参数🧐。
因此我们就可以先给手写的then里面添加 两个参数:
- 一个是
onFulfilled表示“当状态为成功时” - 另一个是
onRejected表示“当状态为拒绝时”
class myPromise {

    static PENDING = 'pending';
    static FULFILLED = 'fulfilled';
    static REJECTED = 'rejected';
    constructor(func) {

        this.PromiseState = myPromise.PENDING;
        this.PromiseResult = null;
        func(this.resolve.bind(this), this.reject.bind(this));
    }
    resolve(result) {

        if (this.PromiseState === myPromise.PENDING) {

            this.PromiseState = myPromise.FULFILLED;
            this.PromiseResult = result;
        }
    }
    reject(reason) {

        if (this.PromiseState === myPromise.PENDING) {

            this.PromiseState = myPromise.REJECTED;
            this.PromiseResult = reason;
        }
    }
+   then(onFulfilled, onRejected) {
   }
}
1. 状态不可变
这里我们先看看原生 Promise 产生的结果:
let promise = new Promise((resolve, reject) => {

    resolve('这次一定')
    reject('下次一定')
})

promise.then(
    result => {

        console.log('fulfilled', result);
    },
    reason => {

        console.log('rejected', reason.message);
    }
)
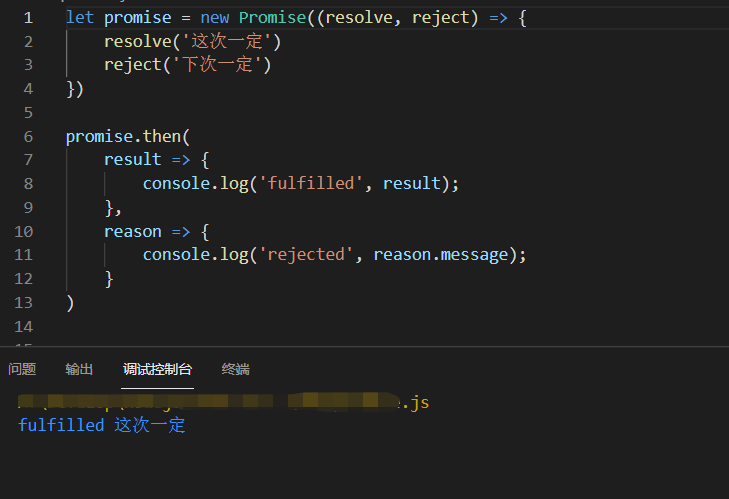
可以看到控制台只显示了一个console.log的结果,证明 Promise 只会执行成功状态 或者 拒绝状态 的其中一个
也就是我们前文讲到的,Promise 只以 第一次为准,第一次成功就永久为fulfilled,第一次失败就永远状态为rejected
因此我们在手写的时候就必须进行判断 🤖:
◾ 如果当前实例的 PromiseState 状态属性为 fulfilled 成功 的话,我们就执行传进来的 onFulfilled 函数,并且为onFulfilled函数传入前面保留的PromiseResult属性值:
class myPromise {

    static PENDING = 'pending';
    static FULFILLED = 'fulfilled';
    static REJECTED = 'rejected';
    constructor(func) {

        this.PromiseState = myPromise.PENDING;
        this.PromiseResult = null;
        func(this.resolve.bind(this), this.reject.bind(this));
    }
    resolve(result) {

        if (this.PromiseState === myPromise.PENDING) {

            this.PromiseState = myPromise.FULFILLED;
            this.PromiseResult = result;
        }
    }
    reject(reason) {

        if (this.PromiseState === myPromise.PENDING) {

            this.PromiseState = myPromise.REJECTED;
            this.PromiseResult = reason;
        }
    }
    then(onFulfilled, onRejected) {

+       if (this.PromiseState === myProise.FULFILLED) {

+           onFulfilled(this.PromiseResult);
+       }
    }
}
◾ 如果当前实例的 PromiseState 状态属性为 rejected 拒绝 的话,我们就执行传进来的 onRejected 函数,并且为onRejected函数传入前面保留的PromiseResult属性值:
class myPromise {

    static PENDING = 'pending';
    static FULFILLED = 'fulfilled';
    static REJECTED = 'rejected';
    constructor(func) {

        this.PromiseState = myPromise.PENDING;
        this.PromiseResult = null;
        func(this.resolve.bind(this), this.reject.bind(this));
    }
    resolve(result) {

        if (this.PromiseState === myPromise.PENDING) {

            this.PromiseState = myPromise.FULFILLED;
            this.PromiseResult = result;
        }
    }
    reject(reason) {

        if (this.PromiseState === myPromise.PENDING) {

            this.PromiseState = myPromise.REJECTED;
            this.PromiseResult = reason;
        }
    }
    then(onFulfilled, onRejected) {

        if (this.PromiseState === myProise.FULFILLED) {

            onFulfilled(this.PromiseResult);
        }
+       if (this.PromiseState === myPromise.REJECTED) {

+           onRejected(this.PromiseResult);
+       }
    }
}
定义好了判断条件以后,我们就来测试一下代码,也是一样,在实例 🌰 上使用then方法:
class myPromise {

    static PENDING = 'pending';
    static FULFILLED = 'fulfilled';
    static REJECTED = 'rejected';
    constructor(func) {

        this.PromiseState = myPromise.PENDING;
        this.PromiseResult = null;
        func(this.resolve.bind(this), this.reject.bind(this));
    }
    resolve(result) {

        if (this.PromiseState === myPromise.PENDING) {

            this.PromiseState = myPromise.FULFILLED;
            this.PromiseResult = result;
        }
    }
    reject(reason) {

if (this.PromiseState === myPromise.PENDING) 