首先,准备好hive安装包,下载hive安装包官方地址:hive安装包下载链接
Hive有三种安装模式:1.单用户模式(本地模式、嵌入模式);2.本地MySQL模式;3.远程MySQL模式。三者的区别是:1.单用户模式是本地模式的一种,它的元信息存储在hive自带的Derby数据库中,同一时刻只能为一个用户提供服务,功能是用于测试hive程序;2.本地MySQL模式的元信息存储在本地MySQL中,同一时刻可以为多个用户提供服务,功能是用于开发测试hive程序;3.远程MySQL模式的元信息存储在远程MySQL中,同一时刻可以为多个用户提供服务,功能是用于实际生产环境。本节首先来介绍一下Hive的本地MySQL模式的搭建过程。
这次介绍的是本地MySQL模式的安装
Hive安装
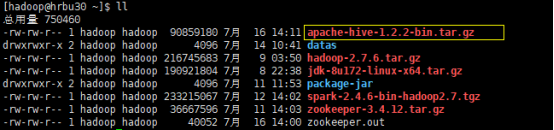
1.把下载下来的安装包 apache-hive-1.2.2-bin.tar.gz 上传到 linux 的/home/hadoop/ 目录下
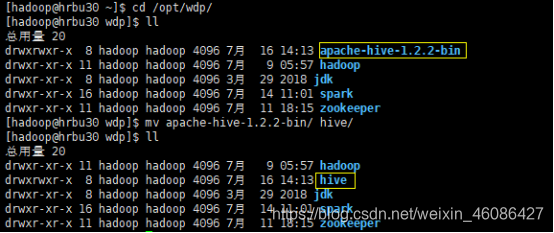
2.解压 apache-hive-1.2.2-bin.tar.gz 到/opt/wdp/目录下面
[hadoop@hrbu30 ~]$ tar -zxvf apache-hive-1.2.2-bin.tar.gz -C /opt/wdp/
3.修改 apache-hive-1.2.2-bin 的名称为 hive
[hadoop@hrbu30 wdp]$ mv apache-hive-1.2.2-bin/ hive/
4.修改/opt/wdp/hive/conf 目录下的 hive-env.sh.template 名称为 hive-env.sh
[hadoop@hrbu30 wdp]$ cd hive/conf/
[hadoop@hrbu30 conf]$ mv hive-env.sh.template hive-env.sh
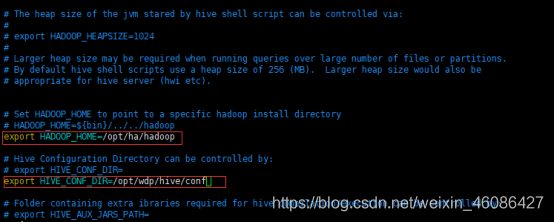
5.配置 hive-env.sh 文件
(a)配置HADOOP_HOME路径
export HADOOP_HOME=/opt/ha/hadoop
(b)配置HIVE_CONF_DIR路径
export HIVE_CONF_DIR=/opt/wdp/hive/conf
[hadoop@hrbu30 conf]$ vi hive-env.sh
6.hive的安装就搞定了
MySql安装
推荐mysql版本mysql-5.6.31-linux-glibc2.5-x86_64
下载地址:链接:https://pan.baidu.com/s/19N-pWA6Hf8NrPb2HEBNZXg 提取码:yj8w
推荐驱动jar包mysql-connector-java-5.1.46-bin.jar
下载地址:链接:https://pan.baidu.com/s/1W8WCcK94yDrMeK1qcnS9OA 提取码:owaq
1.查看 mysql 是否安装,如果安装了,卸载 mysql
[root@hrbu30 hive]# rpm -qa|grep mysql			//查看是否安装了mysql
[root@hrbu30 hive]# rpm -e --nodeps mysql-libs-5.1.71-1.el6.x86_64		//卸载mysql
2.上传mysql安装包,然后解压该安装包
[root@hrbu30 hadoop]# tar -zxvf mysql-5.6.31-linux-glibc2.5-x86_64.tar.gz
3.在/usr/local/下创建mysql文件夹(该文件夹下的文件可以被任意用户使用),移动解压后的mysql目录到系统的本地软件目录
[root@hrbu30 hadoop]# mv mysql-5.6.31-linux-glibc2.5-x86_64/* /usr/local/mysql
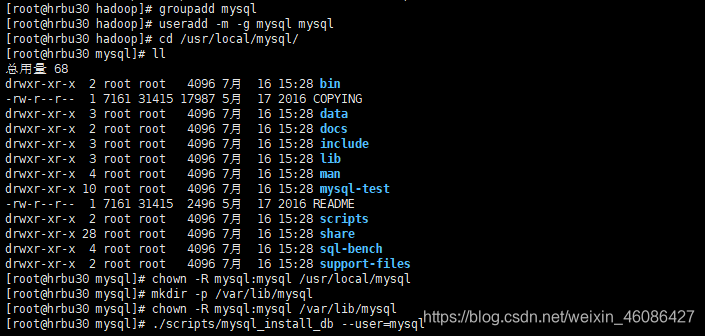
4.添加系统mysql组和mysql用户
[root@hrbu30 hadoop]# groupadd mysql
[root@hrbu30 hadoop]# useradd -m -g mysql mysql
5.进入安装mysql软件目录,修改当前目录拥有者为mysql用户
[root@hrbu30 hadoop]# cd /usr/local/mysql/
[root@hrbu30 mysql]# chown -R mysql:mysql /usr/local/mysql
[root@hrbu30 mysql]# mkdir -p /var/lib/mysql
[root@hrbu30 mysql]# chown -R mysql:mysql /var/lib/mysql
6.安装数据库
(安装时如果报 (1)-bash: ./scripts/mysql_install_db: /usr/bin/perl: bad interpreter: 没有那个文件或目录
解决: yum -y install perl perl-devel
(2)Installing MySQL system tables…/bin/mysqld: error while loading shared libraries: libaio.so.1: cannot open shared object file: No such file or directory
解决:yum -y install libaio-devel)
[root@hrbu30 mysql]# ./scripts/mysql_install_db --user=mysql
7.添加开机启动MySQL服务,启动MySQL服务
[root@hrbu30 mysql]# chkconfig --add mysql
[root@hrbu30 mysql]# cp support-files/mysql.server /etc/init.d/mysql
[root@hrbu30 mysql]# service mysql start
8.验证MySQL服务成功启动
[root@hrbu30 mysql]# ps -ef | grep mysql
9.修改MySQL的root用户密码
[root@hrbu30 mysql]# ./bin/mysqladmin -u root password '123456'
10.把MySQL客户端放到默认路径(建议使用软链过去,不要直接复制文件,便于系统安装多个版本的MySQL)
[root@hrbu30 mysql]# ln -s /usr/local/mysql/bin/mysql /usr/local/bin/mysql
11.使用MySQL的root用户登录MySQL
[root@hrbu30 mysql]# mysql -uroot -p
12.进入mysql,执行以下命令,使root与hadoop用户具有相应的权限,最后退出,本地mysql就安装完成了
mysql> show databases;
mysql> use mysql;
mysql> show tables;
mysql> select host,user,password from user;
mysql> grant all privileges on *.* to 'root'@'%' identified by '123456';
mysql> grant all privileges on *.* to 'hadoop'@'hrbu30' identified by '123456';
mysql> grant all privileges on *.* to 'root'@'hrbu30' identified by '123456';
mysql> delete from user where password="";
mysql> delete from user where host="localhost";
mysql> flush privileges;
mysql> quit;
将Hive元数据配置到MySql
1.拷贝驱动jar包到hive的lib文件夹下
[hadoop@hrbu30 ~]$ cp mysql-connector-java-5.1.46-bin.jar /opt/wdp/hive/lib/
2.配置metastore数据到mysql,在hive的conf下面创建hive-site.xml 文件,把配置参数加到该文件中
[root@hrbu30 conf]# vi hive-site.xml
<?xml version="1.0" encoding="UTF-8" standalone="no"?>
<?xml-stylesheet type="text/xsl" href="configuration.xsl"?><!--
   Licensed to the Apache Software Foundation (ASF) under one or more
   contributor license agreements.  See the NOTICE file distributed with
   this work for additional information regarding copyright ownership.
   The ASF licenses this file to You under the Apache License, Version 2.0
   (the "License"); you may not use this file except in compliance with
   the License.  You may obtain a copy of the License at

       http://www.apache.org/licenses/LICENSE-2.0

   Unless required by applicable law or agreed to in writing, software
   distributed under the License is distributed on an "AS IS" BASIS,
   WITHOUT WARRANTIES OR CONDITIONS OF ANY KIND, either express or implied.
   See the License for the specific language governing permissions and
   limitations under the License.
--><configuration>
  <!-- WARNING!!! This file is auto generated for documentation purposes ONLY! -->
  <!-- WARNING!!! Any changes you make to this file will be ignored by Hive.   -->
  <!-- WARNING!!! You must make your changes in hive-site.xml instead.         -->
  <!-- Hive Execution Parameters -->
<!-- 连接MySQL的URL地址 -->
        <property>
                <name>javax.jdo.option.ConnectionURL</name>
                <value>jdbc:mysql://hrbu30:3306/hive?createDatabaseIfNotExist=true</value>
        </property>
<!-- 连接MySQL的驱动串 -->
        <property>
                <name>javax.jdo.option.ConnectionDriverName</name>
                <value>com.mysql.jdbc.Driver</value>
        </property>
<!-- 登陆MySQL的用户名 -->
        <property>
                <name>javax.jdo.option.ConnectionUserName</name>
                <value>root</value>
        </property>
<!-- 登陆MySQL的用户密码 -->
        <property>
                <name>javax.jdo.option.ConnectionPassword</name>
                <value>123456</value>
        </property>
<!-- 显示当前数据库的名称 -->
        <property>
				<name>hive.cli.print.header</name>
				<value>true</value>
		</property>
<!-- 显示表的头信息 -->
		<property>
				<name>hive.cli.print.current.db</name>
				<value>true</value>
		</property>
</configuration>
3.配置完毕后,就搞定了