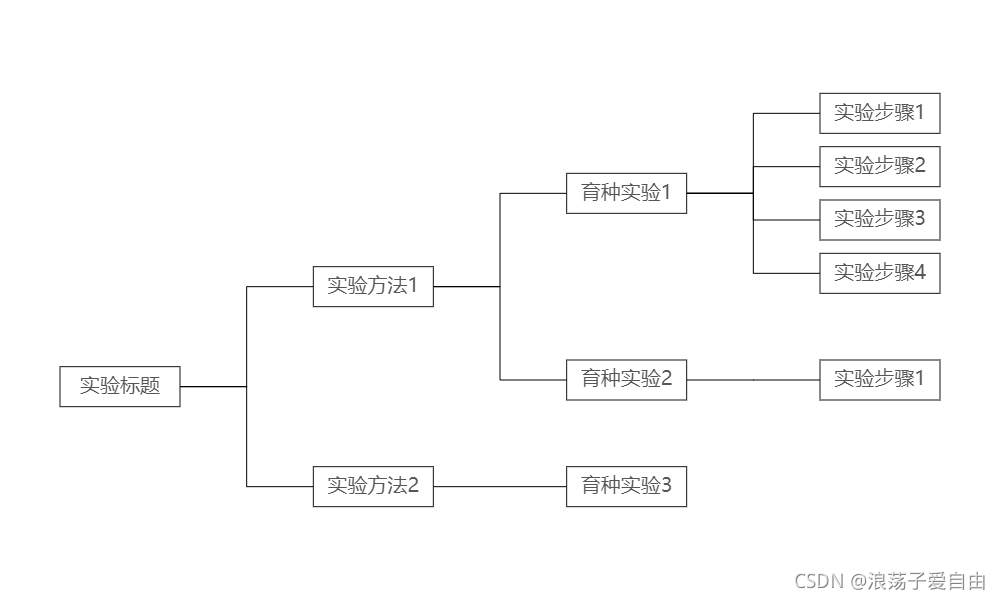
最终效果:
基于echart树图的横向组织结构图(连接线为直角线)完整代码,包括echart.js文件和网页代码。

实现步骤:
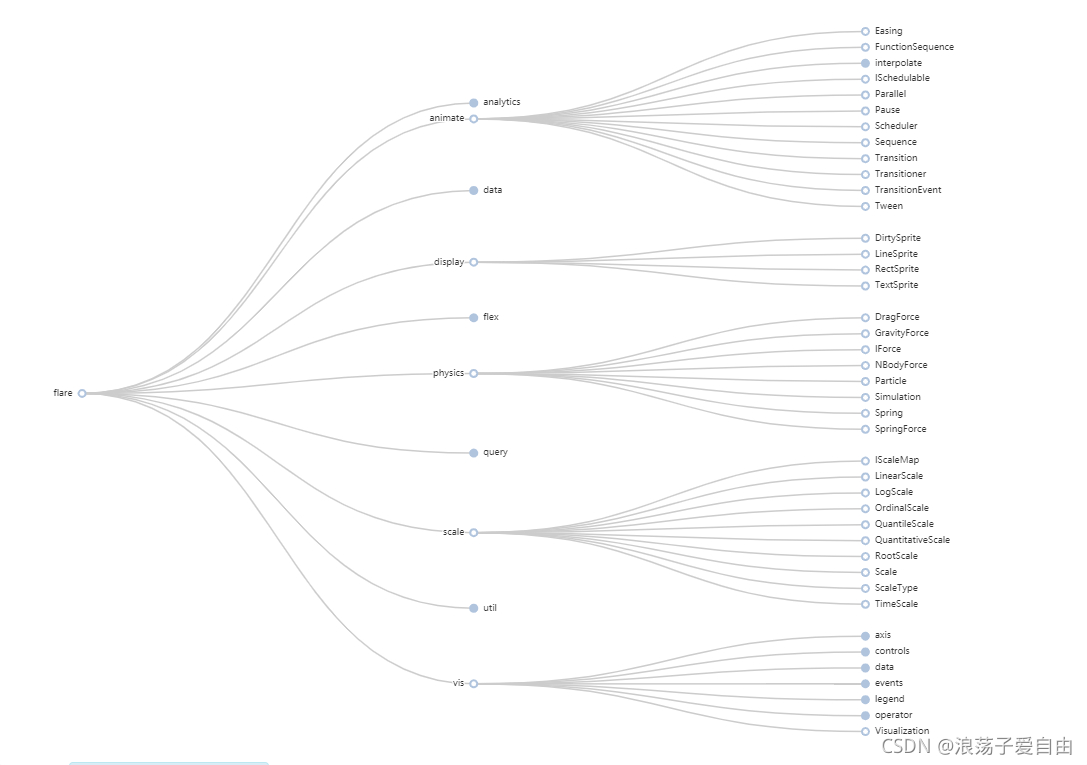
点击查看从左至右树状图官方示例,效果以及代码如下:
myChart.showLoading();    //显示Loading标志; var myChart = echarts.init(document.getElementById('页面中div的id'));
$.get('data/asset/data/flare.json', function (data) {
    myChart.hideLoading();    //得到数据后隐藏Loading标志

    echarts.util.each(data.children, function (datum, index) {
        index % 2 === 0 && (datum.collapsed = true);
    });    //间隔展开子数据,animate,display,physics,scale,vis是展开的

    myChart.setOption(option = {
        tooltip: {    //提示框组件
            trigger: 'item',    //触发类型,默认:item(数据项图形触发,主要在散点图,饼图等无类目轴的图表中使用)。可选:'axis':坐标轴触发,主要在柱状图,折线图等会使用类目轴的图表中使用。'none':什么都不触发。
            triggerOn: 'mousemove'    //提示框触发的条件,默认mousemove|click(鼠标点击和移动时触发)。可选mousemove:鼠标移动时,click:鼠标点击时,none:
        },
        series: [    //系列列表
            {
                type: 'tree',    //树形结构

                data: [data],    //上面从flare.json中得到的数据

                top: '1%',       //距离上
                left: '7%',      //左
                bottom: '1%',    //下
                right: '20%',    //右的距离

                symbolSize: 7,   //标记的大小,就是那个小圆圈,默认7

                label: {         //每个节点所对应的标签的样式
                    normal: {
                        position: 'left',       //标签的位置
                        verticalAlign: 'middle',//文字垂直对齐方式,默认自动。可选:top,middle,bottom
                        align: 'right',         //文字水平对齐方式,默认自动。可选:top,center,bottom
                        fontSize: 9             //标签文字大小
                    }
                },

                leaves: {    //叶子节点的特殊配置,如上面的树图示例中,叶子节点和非叶子节点的标签位置不同
                    label: {
                        normal: {
                            position: 'right',
                            verticalAlign: 'middle',
                            align: 'left'
                        }
                    }
                },

                expandAndCollapse: true,    //子树折叠和展开的交互,默认打开
                animationDuration: 550,     //初始动画的时长,支持回调函数,默认1000
                animationDurationUpdate: 750//数据更新动画的时长,默认300
            }
        ]
    });
});
其中不明确的是数据结构,附上自己的数据:
data = {
            "name": "实验标题",
            "children": [
                {
                    "name": "实验方法1",
                    "children": [
                        {
                            "name": "育种实验1",
                            "children": [
                                {
                                    "children": [],
                                    "name": "实验步骤1"
                                }, {
                                    "children": [],
                                    "name": "实验步骤2"
                                }, {
                                    "children": [],
                                    "name": "实验步骤3"
                                }, {
                                    "children": [],
                                    "name": "实验步骤4"
                                }
                            ]

                        }, {
                            "name": "育种实验2",
                            "children": [
                                {
                                    "children": [],
                                    "name": "实验步骤1"
                                }
                            ]

                        }
                    ]

                },
                {
                    "name": "实验方法2",
                    "children": [
                        {
                            "children": [],
                            "name": "育种实验3"
                        }
                    ],

                }
            ]


        }
可以设置树图的方向:
orient: 'horizontal', //放置组件的方式:水平('horizontal')或者竖直('vertical')更改节点的样式:
series: [
                {
                    type: 'tree', //树形结构

                    data: [data], // 数据

                    left: '12%', //距离左
                    right: '12%',//右
                    top: '10%',
                    bottom: '10%',

                    symbol: 'rectangle', // 长方形
                    // symbol: 'emptyCircle', // 图元的图形类别  emptyCircle:占位圆
                    // symbolSize:20, //标记大小,就是那个小圈圈,默认7
                    symbolSize: [120, 40],  // 长方形的宽、高
                    itemStyle: {
                        normal: {
                            color: '#fff',//节点背景色
                            borderWidth: 0.5,
                            borderColor: 'black',
                            lineStyle: {
                                color: '#000',
                                width: 1,
                                type: 'solid' // 连线的样式 'curve'|'broken'|'solid'|'dotted'|'dashed'
                            }
                        }

                    },


                    orient: 'horizontal', //放置组件的方式:水平('horizontal')或者竖直('vertical')


                    expandAndCollapse: true,//默认:true;子树折叠和展开的交互,默认打开 。

                    initialTreeDepth: 3,//默认:2,树图初始展开的层级(深度)。根节点是第 0 层,然后是第 1 层、第 2 层,... ,直到叶子节点

                    label: {    // 每个节点所对应的标签的样式
                        normal: {

                            fontSize: 20,//文字的字体大小
                        }
                    },


                    animationDurationUpdate: 750

                }
            ]
效果图如下:
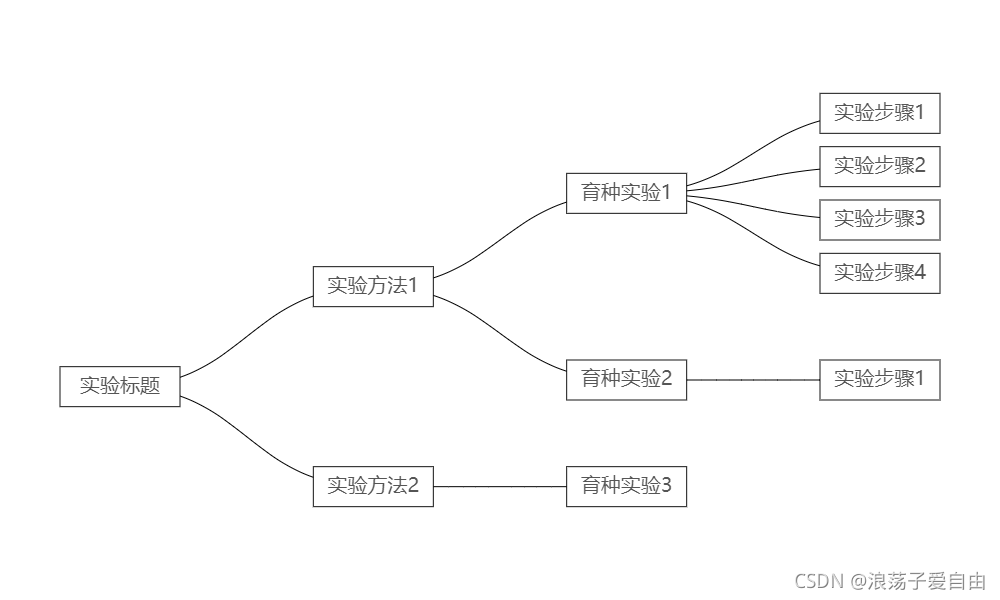
获取完整代码链接:基于echart树图的横向组织结构图(连接线为曲线)完整代码。
现将树图连接曲线修改为直角线,直接修改echarts.js的插件源码;修改updateNode和getEdgeShape两个函数即可。
function updateNode(data, dataIndex, symbolEl, group, seriesModel, seriesScope){

	if (node.parentNode && node.parentNode !== virtualRoot){

        var edge = symbolEl.__edge;
        if (!edge) {

            edge = symbolEl.__edge = new Polyline({

                shape: {

                	points: getEdgeShape(seriesScope, sourceLayout, targetLayout)
                },
                style: defaults({
     opacity: 0, strokeNoScale: true}, seriesScope.lineStyle)
            });
        }

        updateProps(edge, {

            shape: {

            	points: getEdgeShape(seriesScope, sourceLayout, targetLayout)
            },
            style: {
     opacity: 1}
        }, seriesModel);

        group.add(edge);
	}
	...
}


function getEdgeShape(seriesScope, sourceLayout, targetLayout) {

    var cpx1;
    var cpy1;
    var cpx2;
    var cpy2;
    var orient = seriesScope.orient;
    var x1;
    var x2;
    var y1;
    var y2;

    if (seriesScope.layout === 'radial') {

		...
    }
    else {

        x1 = sourceLayout.x;
        y1 = sourceLayout.y;
        x2 = targetLayout.x;
        y2 = targetLayout.y;
        if (orient === 'LR' || orient === 'RL') {
            cpx1 = x1 + (x2 - x1) * seriesScope.curvature;
            cpy1 = y1;
            cpx2 = x1 + (x2 - x1) * seriesScope.curvature;
            cpy2 = y2;
        }
        if (orient === 'TB' || orient === 'BT') {

			...
        }
    }

    return [[x1,y1],[cpx1,cpy1],[cpx2,cpy2],[x2,y2]];
}
最终效果图:
参考资料:链接