1. 需要准备:
1-1、npm i cross-env -D 是跨平台的自定义编译
1-2、构造工具:vite/webpack
==> vite: import.meta.env.VITE_NODE_ENV
==> webpack:process.env.NODE_ENV这里使用vite为例子
1-3、 package.json
2. 思路与步骤
- 首先我们知道 axios这些反向代理在测试环境/生产环境下 都是没有用的;
- 所以我们对于这种上线后的我们需要直接访问 就是完整的url的api 例如https:xxx.com/api/xxx,但是这样就会存在cors 跨域问题 对于这个问题有两种解决方法1:nginx的web服务器;2:服务端cors对我们这个域名或ip地址信任或者携带某个字段;这里我们选择第2种 第一种俺也还没有使用过;
- 然后就是前端了 ,先把第一步的cross-env下载好,然后到package.json文件中修改
"scripts": { "dev": " cross-env VITE_NODE_ENV=dev vite --mode development --host 0.0.0.0", "build": "run-p type-check \"build-only {@}\" --", "preview": "vite preview", "build-only": "vite build", "type-check": "vue-tsc --build --force", "dev:prod": "cross-env VITE_NODE_ENV=prod vite", "build:prod": "cross-env NODE_ENV=prod vite build" }, /** * --host 0.0.0.0 是为了让局域网也可访问 * --mode development 这个可以不用加 这个是没有cross-env时候内置的 * cross-env VITE_NODE_ENV=dev 这个就是设置VITE_NODE_ENV的值 * "dev:prod": "cross-env VITE_NODE_ENV=prod vite"可以不用 这里是用来测试的 */ - 然后需要注意的是 我们的目的就是当为prod时 把一个完整的url拼接出来,为了保证一致性,可以创建一个config.ts来控制
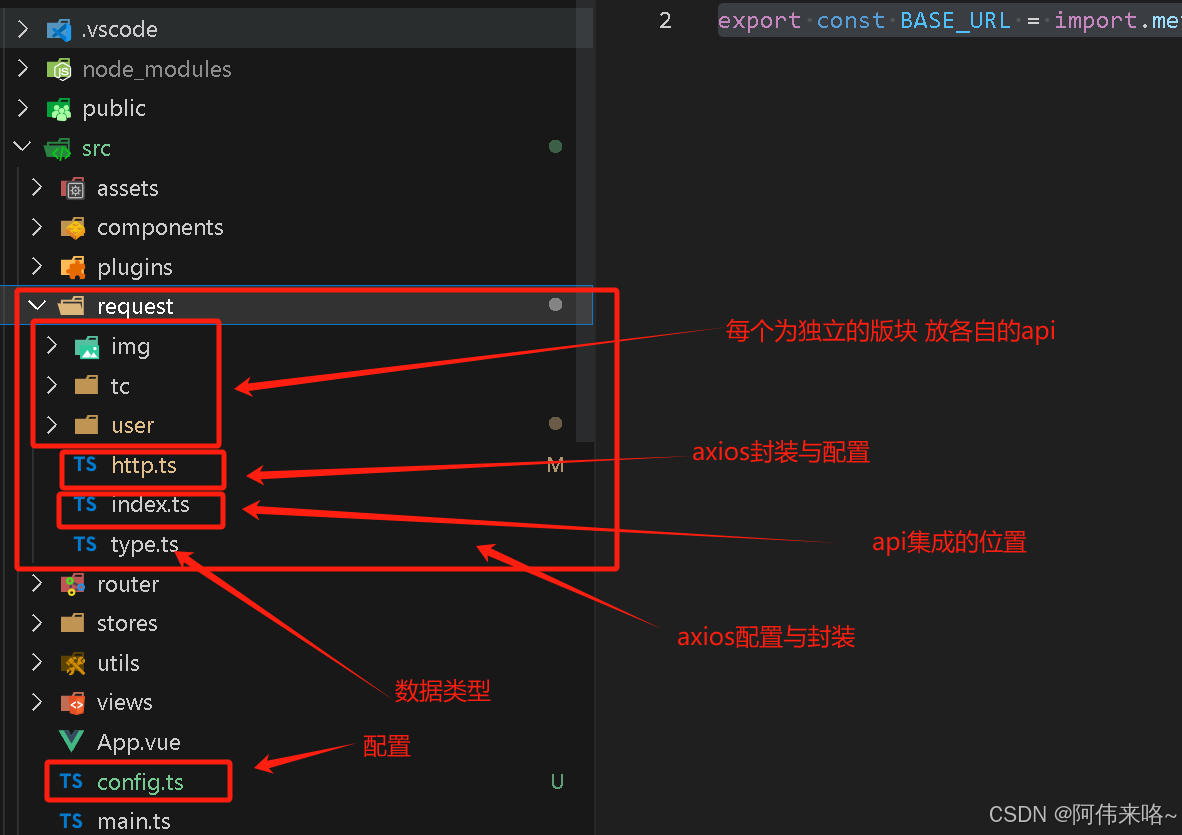
export const BASE_URL = import.meta.env.VITE_NODE_ENV === 'dev'?'/api':'http://xxx.xxyy.com/' - 然后就是如何应用在请求接口中 这个就比较简单了 我们可以从上面看出来当为dev时就是我们需要使用proxy代理的基地址 不过我不确定axios的baseURL在上线后还有用没有 所以我采取设置axios的baseURL为'/' 对每个请求api添加baseURL,再集成到api中
- 目录结构
- 接下来先看http.ts
import utils from '@/utils'; import axios from 'axios'; import { useRouter } from 'vue-router'; const router = useRouter(); // 获取 router 实例 const http = axios.create({ // baseURL: '/api' baseURL:'/' }) // 添加请求拦截器 http.interceptors.request.use(function (config) { // 在发送请求之前做些什么 config.headers.Authorization = config.headers.Authorization ? config.headers.Authorization : 'Bearer ' + localStorage.getItem('token') // console.log('请求头',config.headers) return config; }, function (error) { // 对请求错误做些什么 return Promise.reject(error); }); // 添加响应拦截器 http.interceptors.response.use(function (response) { // 2xx 范围内的状态码都会触发该函数。 // console.log(response.headers, 'response') response.headers.authorization && localStorage.setItem('token', response.headers.authorization) // 对响应数据做点什么 return response.data; }, function (error) { // 超出 2xx 范围的状态码都会触发该函数。 // 对响应错误做点什么 console.log(error.response.data.message, 'liwei') switch (error.response.status) { case 400: // utils.message.error(error.response.data.message.message) // utils.message.error(error.response.data.message.response.message[0]) // 判断类型是否不是数组 if(!Array.isArray(error.response.data.message.response.message)){ utils.message.error(error.response.data.message.response.message) }else{ utils.message.error(error.response.data.message.response.message[0]) } break; case 401: utils.message.error(error.response.data.message.message) // 重新跳转 location.href = '#/login' break; } return Promise.reject(error); }); export default http - 然后是api版块
import { useUserStore } from '@/stores/userStore' import http from "../http" import { BASE_URL } from '@/config' import type { User, Cover, AuditLog, RegisterUser, FormLibrary, FriendLink,AddCover, ChatMessage, Comment,FriendLinkCategory,Library, ChatList, NotificationType, SendPost, PromiseResult, Statistics, PromiseResult1, Post, UserInfo, Tag } from '@/request/type' import { LogType, UserTagType, CoverType,ContentType,StateType } from '@/request/type' // /awei 为不需要token的 // 登录 export const loginUser = async (data: User): Promise<UserInfo> => { return http.post(`${BASE_URL}user/awei/login`, data) } // 注册 export const registerUser = async (data: RegisterUser) => { return http.post(`${BASE_URL}user/awei/create`, data) } // 判断邮箱是否注册 export const isEmailRegister = async (email: string) => { return http.get(`${BASE_URL}user/awei/email/${email}`) } // 发送邮件验证码 export const sendEmailCode = async (data: { email: string }) => { return http.post(`${BASE_URL}mail/awei`, data) } /** * 修改友链分类的名称和描述 * @type {Object} * @property {number} id - 友链分类的唯一标识符 * @property {string} name - 友链分类的名称,例如 "学习资源" * @property {string} description - 友链分类的描述,例如 "好东西" */ export const updateFriendLinkCategory = async (data:{id:number,name:string,description:string}):Promise<PromiseResult<FriendLinkCategory>>=>{ return http.post(`${BASE_URL}linkcategories/update`,data) } /** * 删除友链分类 * @type {Object} * @property {number[]} ids - 友链分类的唯一标识符 */ export const deleteFriendLinkCategory = async (data:{ids:number[]}):Promise<PromiseResult<any>>=>{ return http.post(`${BASE_URL}linkcategories/delete`,data) } /** * @description 获取评论列表 * @type {Object} * @property {number} page - 页码 * @property {number} pageSize - 每页显示的评论数量 */ export const getCommentList = async (data:{page:number,pageSize:number}):Promise<PromiseResult1<Comment[]>>=>{ return http.post(`${BASE_URL}comment/getCommentByUserId`,data) } /** * @description 删除评论 * @type {number} * @property {number} id - 评论的唯一标识符 * @returns **删除后的评论信息** */ export const deleteComment = async (id:number):Promise<PromiseResult<Comment>>=>{ return http.post(`${BASE_URL}comment/remove/${id}`) } - 然后就是集成到index.ts中
// 集体导出 import * as user from './user' import * as img from './img' import * as tc from './tc' const api = { user, img, tc } export default api - ·最后就是根据编译的命令来对应不同的配置了
提一句 由于上线后是直接通过完整的url访问 所以我们需要让服务端cross通过我们的请求 后续会补充上去
