
1.自定义指令(directives)
1.用法
定义:除了Vue内置指令以外的其他 v-开头的指令(需要程序员自行扩展定义)
作用:自己定义的指令, 可以封装一些 dom 操作, 扩展额外功能


语法:
① 局部注册
●inserted:被绑定元素插入父节点时调用的钩子函数
●el:使用指令的那个DOM元素

② 全局注册
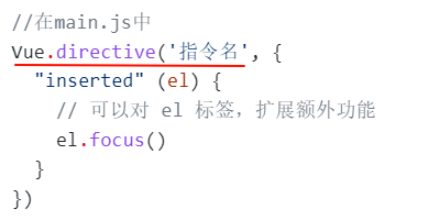
//在main.js中
// 全局注册v-focus1
Vue.directive('focus1',{
  inserted(el,binding){
    console.log(binding);
    el.focus()
  }
})
//在Vue组件的配置项中
directives: {
"指令名": {
inserted () {
// 可以对 el 标签,扩展额外功能
el.focus()
}
}
}
示例:
<script>
export default {
directives:{
// 局部注册一个focus的指令
'focus':{
// el:表示使用了这个指令的dom对象
// binding: 描述当前自定义指令的相关属性的一个对象,其中包含了给这个指令赋值的数据
inserted(el,binding){
console.log(binding)
el.focus() //让文本框自动聚焦
}
}
}
}
</script>- 在使用指令的时候,一定要先注册,再使用,否则会报错
- 注册指令时不用加v-前缀,但使用时一定要加v-前缀
2.指令的值
需求: 实现一个 color 指令 - 传入不同的颜色, 给标签设置文字颜色

步骤:
① 定义指令:通过 binding.value 可以拿到指令值,指令值修改会 触发 update 函数
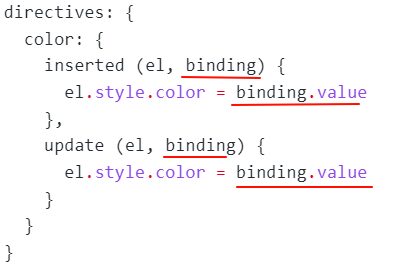
② 使用指令:通过“等号”的形式为指令 绑定 具体的参数值
<template>
<div>
<h2 v-color="color1">指令的值1测试</h2>
<h2 v-color="color2">指令的值2测试</h2>
<button @click="color1='green'">
改变第一个h1的颜色
</button>
</div>
</template>
<script>
export default {
data () {
return {
color1: 'red',
color2: 'orange'
}
},
directives: {
color: {
// 1. inserted 提供的是元素被添加到页面中时的逻辑
inserted (el, binding) {
// console.log(el, binding.value);
// binding.value 就是指令的值
el.style.color = binding.value
},
// 2. update 指令的值修改的时候触发,提供值变化后,dom更新的逻辑
update (el, binding) {
console.log('指令的值修改了');
el.style.color = binding.value
}
}
}
}
</script>
<style>
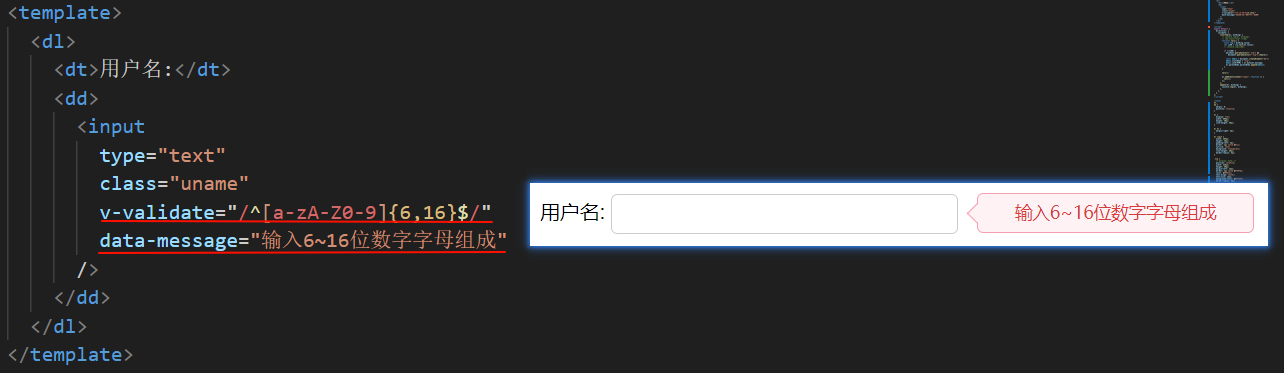
</style>3.案例

<template>
  <dl>
    <dt>用户名:</dt>
    <dd>
      <input
        type="text"
        class="uname"
        v-validate="/^[a-zA-Z0-9]{6,16}$/"
        data-message="输入6~16位数字字母组成"
      />
    </dd>
  </dl>
</template>

<script>
export default {
  directives: {
    validate: {
      inserted(el, binding) {
        // console.log(el, binding);
        // <dd class="tip" ></dd>
        function vali() {
          const reg = binding.value;
          let isOK = reg.test(el.value);
          // console.log(isOK);
          document.querySelector(".tip") &&
            document.querySelector(".tip").remove();
          if (!isOK) {
            const ddbox = document.createElement("dd");
            ddbox.className = "tip";
            ddbox.innerHTML = el.dataset.message;
            el.parentNode.parentNode.append(ddbox);
          }
        }

        vali();

        el.addEventListener("input", function () {
          vali();
        });
      },
    },
  },
};
</script>

<style>
dt,
dd {
  margin: 0;
  position: relative;
}

dl {
  display: flex;
  width: 600px;
  height: 30px;
  line-height: 30px;
}

dl dt {
  margin-right: 5px;
}

dl input {
  width: 269px;
  height: 28px;
  padding-left: 5px;
  border: 1px solid #ccc;
  outline: none;
  background: transparent;
  line-height: 30px;
  border-radius: 5px;
}

.tip {
  /* display: none; */
  position: relative;
  width: 220px;
  height: 30px;
  margin-left: 15px;
  border: 1px solid #f59fb1;
  color: #d93c3c;
  text-align: center;
  font-size: 14px;
  background-color: #fff2f5;
  border-radius: 5px;
}

.tip::before {
  content: "";
  position: absolute;
  top: 50%;
  left: -6px;
  width: 10px;
  height: 10px;
  background-color: #fff2f5;
  border-left: 1px solid #f59fb1;
  border-bottom: 1px solid #f59fb1;
  transform: translateY(-50%) rotate(45deg);
}
</style>
2.插槽(slot)
1.概念
作用:让组件内部的一些 结构 支持 自定义 -> 从外部传入
插槽使用步骤:
1.父组件传结构
2.子组件接收
(给插槽传入内容时,可以传入纯文本、html标签、组件)
- 外部使用组件时,不传东西,则slot会显示后备内容

- 外部使用组件时,传东西了,则slot整体会被换掉

2.具名插槽
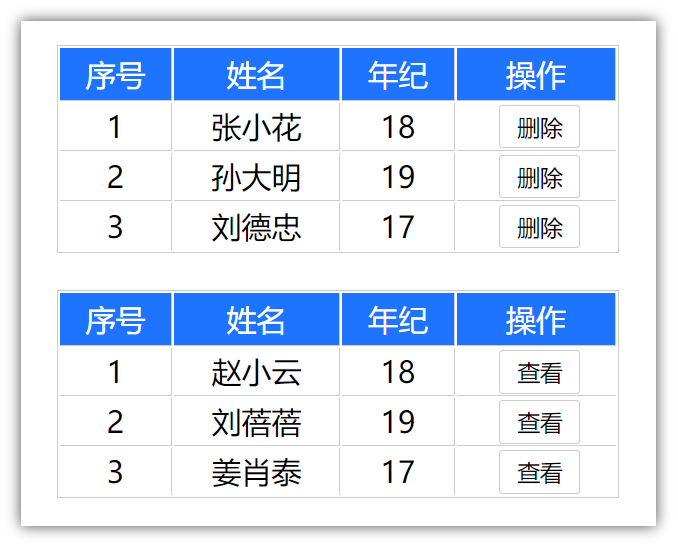
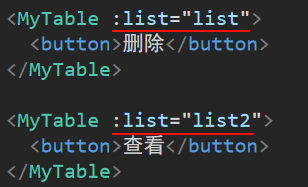
需求:一个组件内有多处结构,需要外部传入标签,进行定制
弹框中有三处不同,但是默认插槽只能定制一个位置,这时候怎么办呢?
具名插槽语法:
- 定义组件时:多个slot使用name属性区分名字
- 使用组件时:template配合v-slot:名字来分发对应标签
v-slot的简写
v-slot写起来太长,vue给我们提供一个简单写法 v-slot —> #
插槽的本质在于定制化组件,通过不同的父组件的传值来达到子组件的不同展示效果
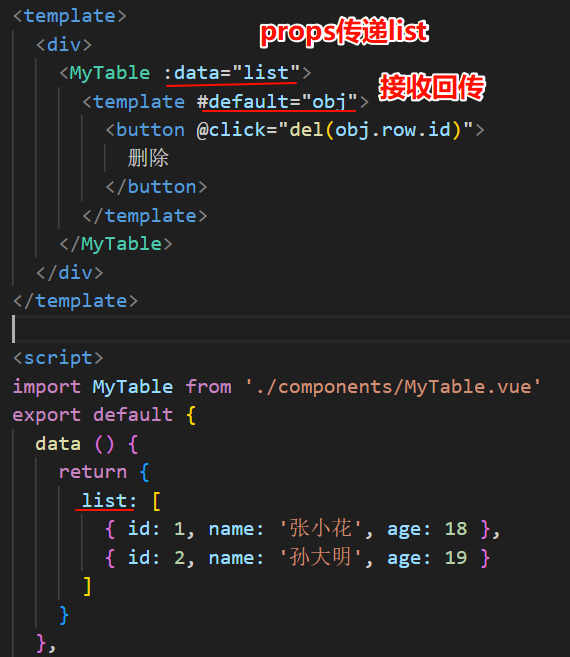
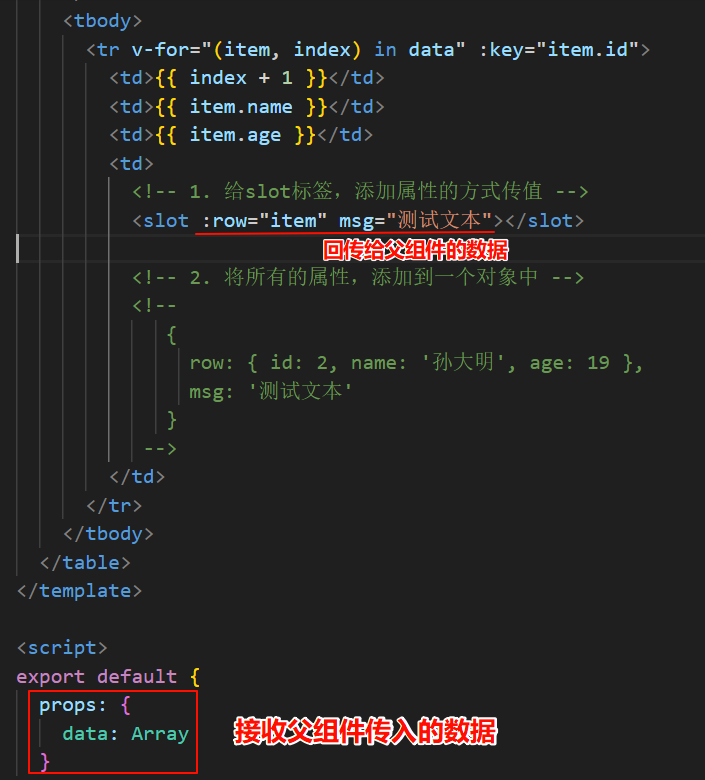
3.作用域插槽
作用域插槽: 定义slot 插槽的同时, 是可以传值的。给 插槽 上可以 绑定数据,将来 使用组件时可以用
场景:封装表格组件
使用步骤:
1定义组件:
a通过props:{}来接收外部传入的数据
b通过<slot :属性="item"></slot> -> 属性可以自定义,比如 row
2使用组件:
a通过props向组件传递数据
b通过 <template #default="obj">接收组件数据的回传
作用域插槽的本质也就是父子之间的传值的一种简化版本