一、说明与演示
cesium中虽然有水面的材质,也就是Water材质,但是那个材质吧,太简单太基础了,一点高级的效果都没有。作为水面,最重要也是最影响效果的当属反射了,连反射都没有的水面完全没有一丝一毫的真实感,至于水面的折射、水深渲染、边缘软化、动态顶点这些我认为都没有反射影响的大。b站视频教程在此
所以今天就带大家简简单单实现一波cesium反射水面。先给大家看一下最终效果,跟着教程来就能实现下面的效果。
反射水面演示
二、反射原理
在初二教材中我们就已经学习过反射了,具体看下面教材原文以及图片。
利用光的反射定律可以说明平面镜成像的原理。如图5-14所示,镜前烛焰上的点S射向平面镜的光线,经平面镜反射后进入眼睛,看起来就觉得这些光线好像是从它们在镜后延长线的交点S1射来的(图5-14甲),跟S1处真有一光源时产生的感觉一样(图5-14乙).S1就是S点在镜中的像。但是镜子后面实际上并没有这个发出光线的点,所以S1叫虚像。物体上的每个点在镜子里都有一个像点,所有的像点就组成整个物体的虚像。
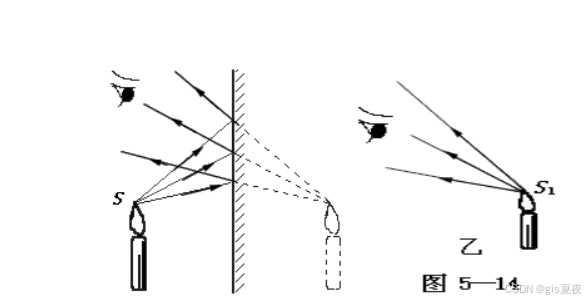
结合大家都知道的光路的可逆性,我们就能知道如果我将相机放在关于镜面对称的位置,移除镜子后看到的物体其实就是镜子中看到的物体,如下图所示。左边看到的实际上是物体关于镜子对称的虚像,右边是镜面对称后再看到的物体,实际上两则是一模一样的。

三、反射步骤实现
那原理我们知道了,具体的步骤也就非常清晰明了了。
- 第一步我们先获取镜面对称的反射相机
- 第二步就是用反射相机看物体,准确的说使用镜面对称后相机进行一次渲染
- 第三步就是将渲染结果贴到水面即可实现水面反射了
- 第四步我们就可以加强显示效果,比如结合水面材质,添加菲涅尔效应等
1、获取镜面对称的反射相机
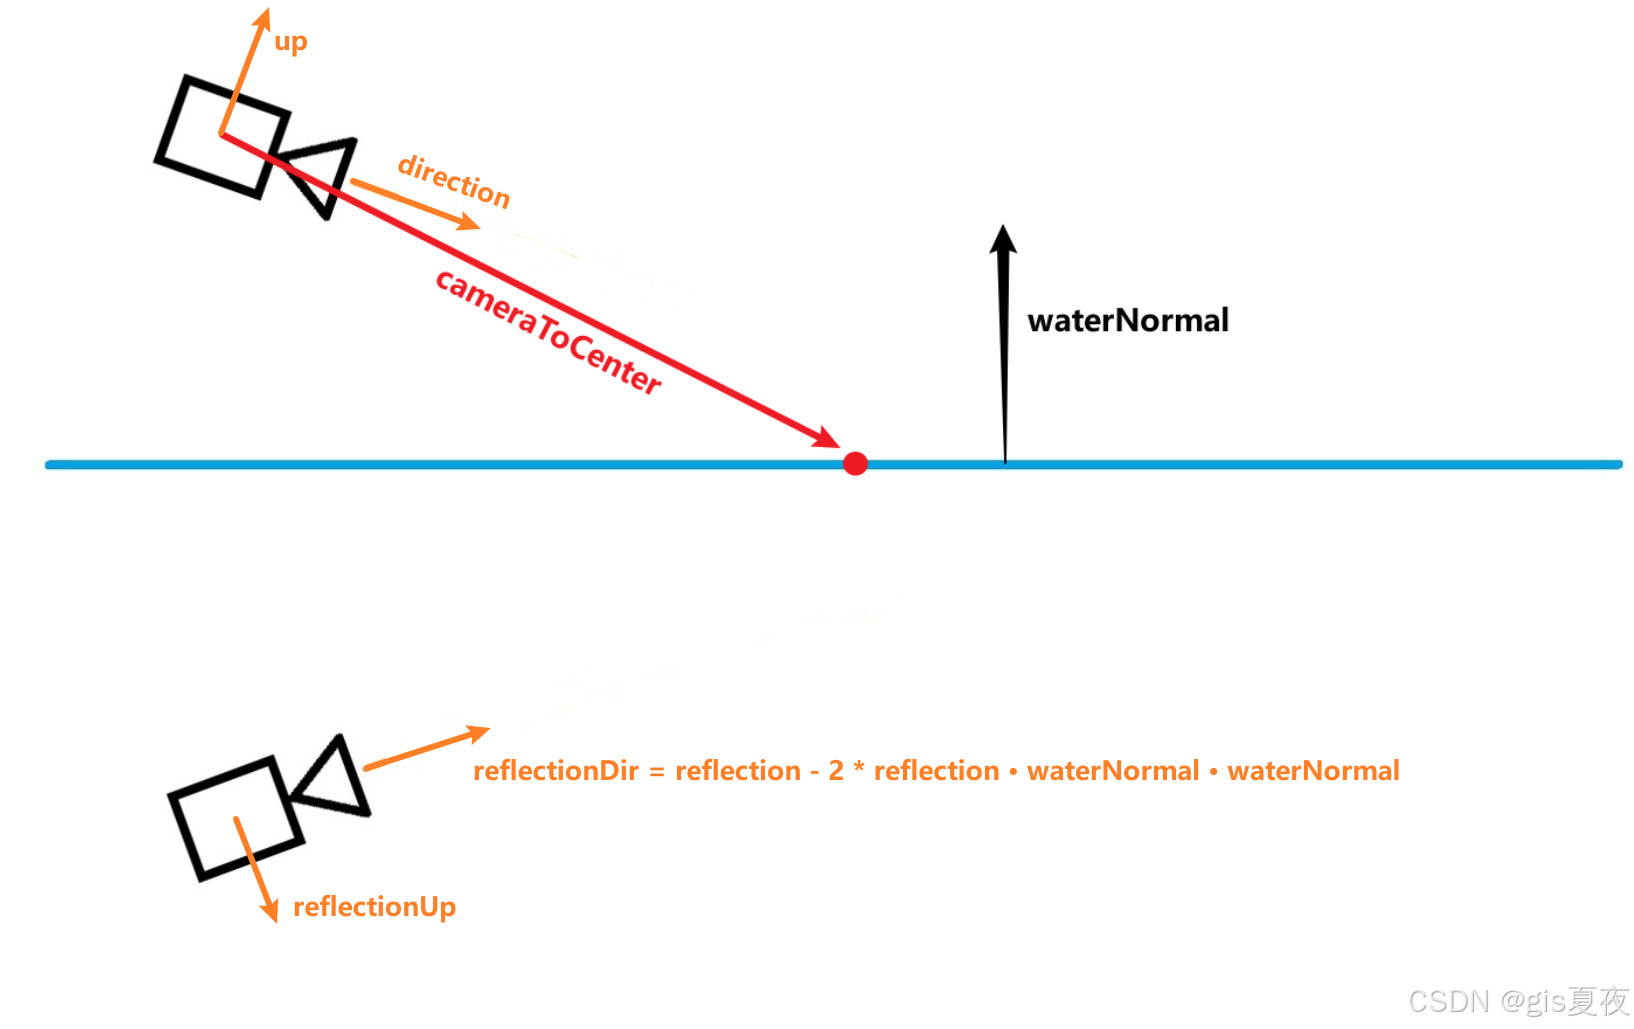
原理其实很简单,反射相机的位置就是相机朝waterNormal反方向移动cameraToCenter在waterNormal向量上的投影。而相机的方向、up等向量,就是减去2倍的方向在法向量的投影。
求取投影向量:
公式非常简单,就不再多说明了。下面列出我封装的求取对称相机的函数。这里面需要用到Camera的clone方法,如果不使用这个方法那么就需要设置很多东西,比如原相机的视锥体等等。但是这个方法cesium并不想给我们用,所以没有ts类型,所以我先将Camera断言为any。
/**
* @param camera 原始相机
* @param normal 反射面的法向量
* @param centerPosition 反射面的中心点
*/
function getMirrorCamera(camera: Camera, normal: Cartesian3, centerPosition: Cartesian3) {
	// 场景相机到反射面中心点的向量
	const cameraToCenter = Cartesian3.subtract(centerPosition, camera.position, new Cartesian3())
	const n = -Cartesian3.dot(normal, cameraToCenter)
	const t = Cartesian3.multiplyByScalar(normal, 2 * n, new Cartesian3())
	const reflectCameraPosition = Cartesian3.subtract(camera.position, t, new Cartesian3())
	// 反射向量就是 相机原本方向 - 2倍的方向在法向量的投影
	const ndir = Cartesian3.dot(normal, camera.directionWC)
	const tdir = Cartesian3.multiplyByScalar(normal, 2 * ndir, new Cartesian3())
	const reflectCameraDirection = Cartesian3.subtract(camera.directionWC, tdir, new Cartesian3())
	Cartesian3.normalize(reflectCameraDirection, reflectCameraDirection)
	// up反射后的结果同方向计算一样
	const nup = Cartesian3.dot(normal, camera.upWC)
	const tup = Cartesian3.multiplyByScalar(normal, 2 * nup, new Cartesian3())
	const reflectCameraUp = Cartesian3.subtract(camera.upWC, tup, new Cartesian3())

	// 创建反射相机,克隆可以继承原始相机的视锥体参数
	const reflectCamera = (Camera as any).clone(camera) as Camera
	reflectCamera.position = reflectCameraPosition
	reflectCamera.up = reflectCameraUp
	reflectCamera.direction = reflectCameraDirection
	reflectCamera.right = Cartesian3.cross(reflectCameraUp, reflectCameraDirection, new Cartesian3())

	return reflectCamera
}
还有计算多边形中心点的函数。
/**计算多边形的中心点,如果传递了高度,那么中心点的高程将为指定的高度 */
function calcCenterPoint(positions: Cartesian3[], heigth?: number) {
	const total = new Cartesian3()
	positions.forEach(item => {
		Cartesian3.add(total, item, total)
	})
	let centerPosition = Cartesian3.multiplyByScalar(total, 1 / positions.length, total)
	if (heigth) {
		const centerCarto = Cartographic.fromCartesian(centerPosition)
		const newCarto = new Cartographic(centerCarto.longitude, centerCarto.latitude, heigth)
		centerPosition = Cartographic.toCartesian(newCarto)
	}
	return centerPosition
}
水面法向量应该都会计算吧,一行代码搞定,我们使用水面中心点处来计算水面的法向量
const waterNormal = viewer.scene.globe.ellipsoid.geodeticSurfaceNormal(centerPosition)给大家看一下具体演示效果,使用cesium自带的DebugCameraPrimitive可视化相机。下图蓝色为原相机,红色为镜面对称相机,那个蓝色的平面就是对称面了。

2、使用反射相机渲染
有了反射相机,接下来我们就需要使用该相机进行渲染了。这里就涉及cesium中的离屏渲染,在cesium中其实最终也是绘制到纹理的,因为绘制的纹理需要传递给后处理阶段,并不会直接显示在屏幕上。我们传入自己的fbo,将结果绘制到自己fbo中,当然还有反射相机,在渲染时更换为反射相机,渲染后再换回去即可。
渲染代码再Scene.render函数的基础上进行修改,注释了一些不用的功能,并关闭了地球的渲染
/**在给定的相机视角下渲染*/
function renderToFbo(fbo: any, scene: any, camera: Camera) {
	const frameState = scene._frameState
	scene.globe.show = false
	const context = scene.context
	const us = context.uniformState

	const preCamera = scene._defaultView.camera
	scene._defaultView.camera = camera
	const view = scene._defaultView
	scene._view = view

	scene.updateFrameState()
	frameState.passes.render = true
	frameState.passes.postProcess = scene.postProcessStages.hasSelected
	const renderTilesetPassState = new (Cesium as any).Cesium3DTilePassState({
		pass: (Cesium as any).Cesium3DTilePass.RENDER,
	})
	frameState.tilesetPassState = renderTilesetPassState

	let backgroundColor = Cesium.defaultValue(scene.backgroundColor, Cesium.Color.BLACK);
	// if (scene._hdr) {
	// 	backgroundColor = Cesium.Color.clone(backgroundColor, new Color())
	// 	backgroundColor.red = Math.pow(backgroundColor.red, scene.gamma)
	// 	backgroundColor.green = Math.pow(backgroundColor.green, scene.gamma)
	// 	backgroundColor.blue = Math.pow(backgroundColor.blue, scene.gamma)
	// }
	frameState.backgroundColor = backgroundColor
	frameState.atmosphere = scene.atmosphere
	scene.fog.update(frameState)
	us.update(frameState)

	// const shadowMap = scene.shadowMap
	// if (Cesium.defined(shadowMap) && shadowMap.enabled) {
	// 	if (!Cesium.defined(scene.light) || scene.light instanceof Cesium.SunLight) {
	// 		Cesium.Cartesian3.negate(us.sunDirectionWC, scene._shadowMapCamera.direction)
	// 	} else {
	// 		Cesium.Cartesian3.clone(scene.light.direction, scene._shadowMapCamera.direction)
	// 	}
	// 	frameState.shadowMaps.push(shadowMap)
	// }

	scene._computeCommandList.length = 0
	scene._overlayCommandList.length = 0

	const viewport = view.viewport
	viewport.x = 0
	viewport.y = 0
	viewport.width = context.drawingBufferWidth
	viewport.height = context.drawingBufferHeight

	const passState = view.passState
	// 最终绘制到传入的fbo
	passState.framebuffer = fbo
	passState.blendingEnabled = undefined
	passState.scissorTest = undefined
	passState.viewport = Cesium.BoundingRectangle.clone(viewport, passState.viewport);

	// if (Cesium.defined(scene.globe)) {
	// 	scene.globe.beginFrame(frameState)
	// }

	scene.updateEnvironment();
	scene.updateAndExecuteCommands(passState, backgroundColor)
	scene.resolveFramebuffers(passState)
	passState.framebuffer = undefined

	// if (Cesium.defined(scene.globe)) {
	// 	scene.globe.endFrame(frameState)
	// 	if (!scene.globe.tilesLoaded) {
	// 		scene._renderRequested = true
	// 	}
	// }

	context.endFrame()
	scene.globe.show = true
	scene._defaultView.camera = preCamera
}
现在我们有了渲染函数,我们可以在preRender事件中创建一个fbo并进行渲染,然后将渲染结果可视化在canvas中。
viewer.scene.preRender.addEventListener(() => {
const scene = viewer.scene as any
const width = scene.context.drawingBufferWidth
const height = scene.context.drawingBufferHeight
const fbo = new (Cesium as any).Framebuffer({
context: scene.context,
colorTextures: [
new (Cesium as any).Texture({
context: scene.context,
width: width,
height: height,
pixelFormat: Cesium.PixelFormat.RGBA,
}),
],
})
const centerPosition = calcCenterPoint(positions)
const waterNormal = viewer.scene.globe.ellipsoid.geodeticSurfaceNormal(centerPosition)
const reflectCamera = getMirrorCamera(viewer.camera, waterNormal, centerPosition)
renderToFbo(fbo, scene, reflectCamera)
// 可视化渲染结果
const pixels = scene.context.readPixels({
x: 0,
y: 0,
width: width,
height: height,
framebuffer: fbo,
})
const cvs = document.querySelector('canvas') as HTMLCanvasElement
cvs.width = width
cvs.height = height
const imgData = new ImageData(new Uint8ClampedArray(pixels), width, height)
const ctx = cvs.getContext('2d')!
ctx.putImageData(imgData, 0, 0, 0, 0, width, height)
ctx.translate(0, height)
// 镜面反转
ctx.scale(1, -1)
ctx.drawImage(cvs, 0, 0)
cvs.style.height = (height * 0.35) + 'px'
cvs.style.width = (width * 0.35) + 'px'
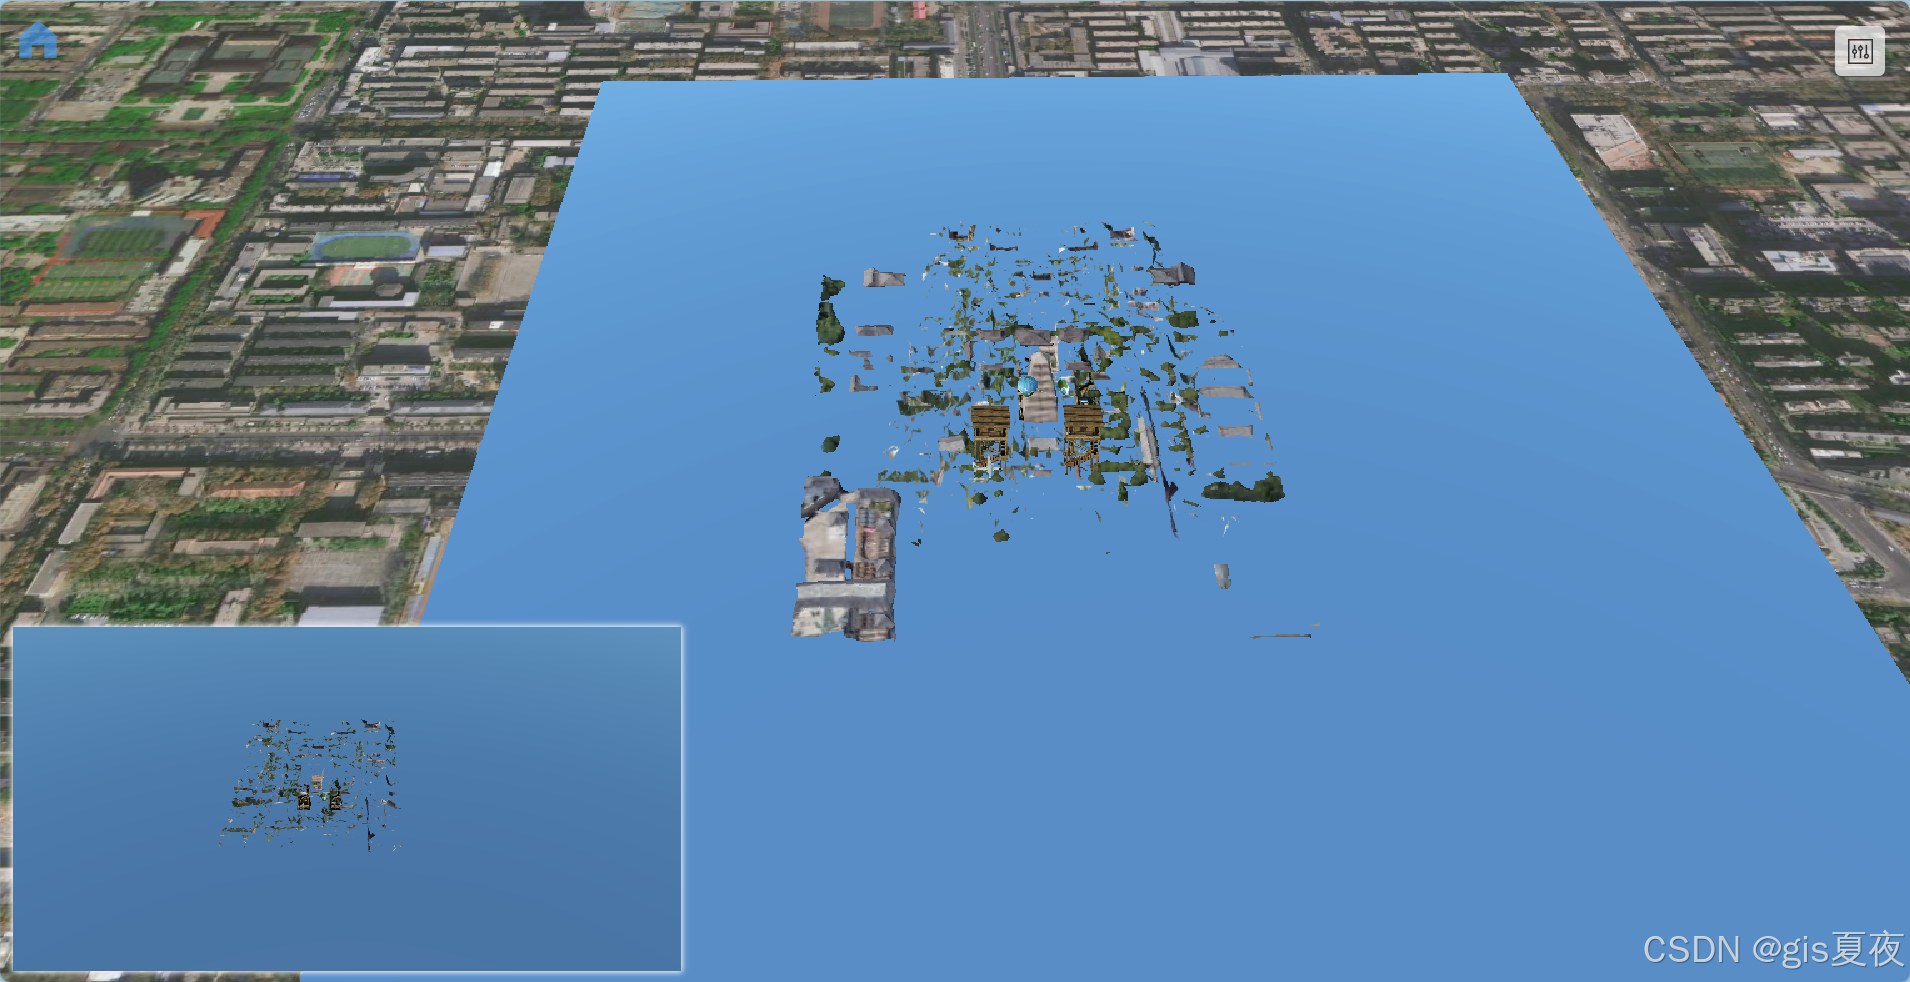
})可视化结果如下

3、 将反射结果映射到水面
接下来我们就需要将该结果在水面上进行可视化了,我们首先试试把这个结果直接用在cesium默认的Image材质上,我们在创建fbo时已经传递了colorTexture了,所以我们通过fbo.getColorTexture(0)就可以获取到纹理了。。
在下面代码我们就使用cesium默认材质创建了一个多边形,在每次绘制后修改其图像
const waterPlane = new Primitive({
	geometryInstances: new GeometryInstance({
		geometry: new PolygonGeometry({
			polygonHierarchy: new PolygonHierarchy(positions),
			perPositionHeight: true
		})
	}),
	appearance: new EllipsoidSurfaceAppearance({
		material: Material.fromType(Material.ImageType)
	})
})
viewer.scene.primitives.add(waterPlane)

viewer.scene.preRender.addEventListener(() => {
	const scene = viewer.scene as any
	const width = scene.context.drawingBufferWidth
	const height = scene.context.drawingBufferHeight
	const fbo = new (Cesium as any).Framebuffer({
		context: scene.context,
		colorTextures: [
			new (Cesium as any).Texture({
				context: scene.context,
				width: width,
				height: height,
				pixelFormat: Cesium.PixelFormat.RGBA,
			}),
		],
	})
	const centerPosition = calcCenterPoint(positions)
	const waterNormal = viewer.scene.globe.ellipsoid.geodeticSurfaceNormal(centerPosition)
	const reflectCamera = getMirrorCamera(viewer.camera, waterNormal, centerPosition)
	renderToFbo(fbo, scene, reflectCamera)
	const colorTexture = fbo.getColorTexture(0)
	waterPlane.appearance.material.uniforms.image = colorTexture
})
可以看到虽然绘制结果是贴上去了,但是这肯定不是我们想要的效果

我们需要通过自定义材质来将渲染结果正确的贴到图形上。
我们又把结果渲染到canvas中观察一下,如果只使用默认的Image材质,那么整张图片就是直接铺到多边形上。

如下图所见,实际上我们需要的是将绘制结果的里红框部分给贴到图形上,也就是说,不管最终绘制结果啥样,我需要的总是红框的那一部分。如果我们只看一个点,那么该点的在屏幕中的位置,将其转为0-1之间,再从纹理中获取颜色,那么就是最终的颜色了。
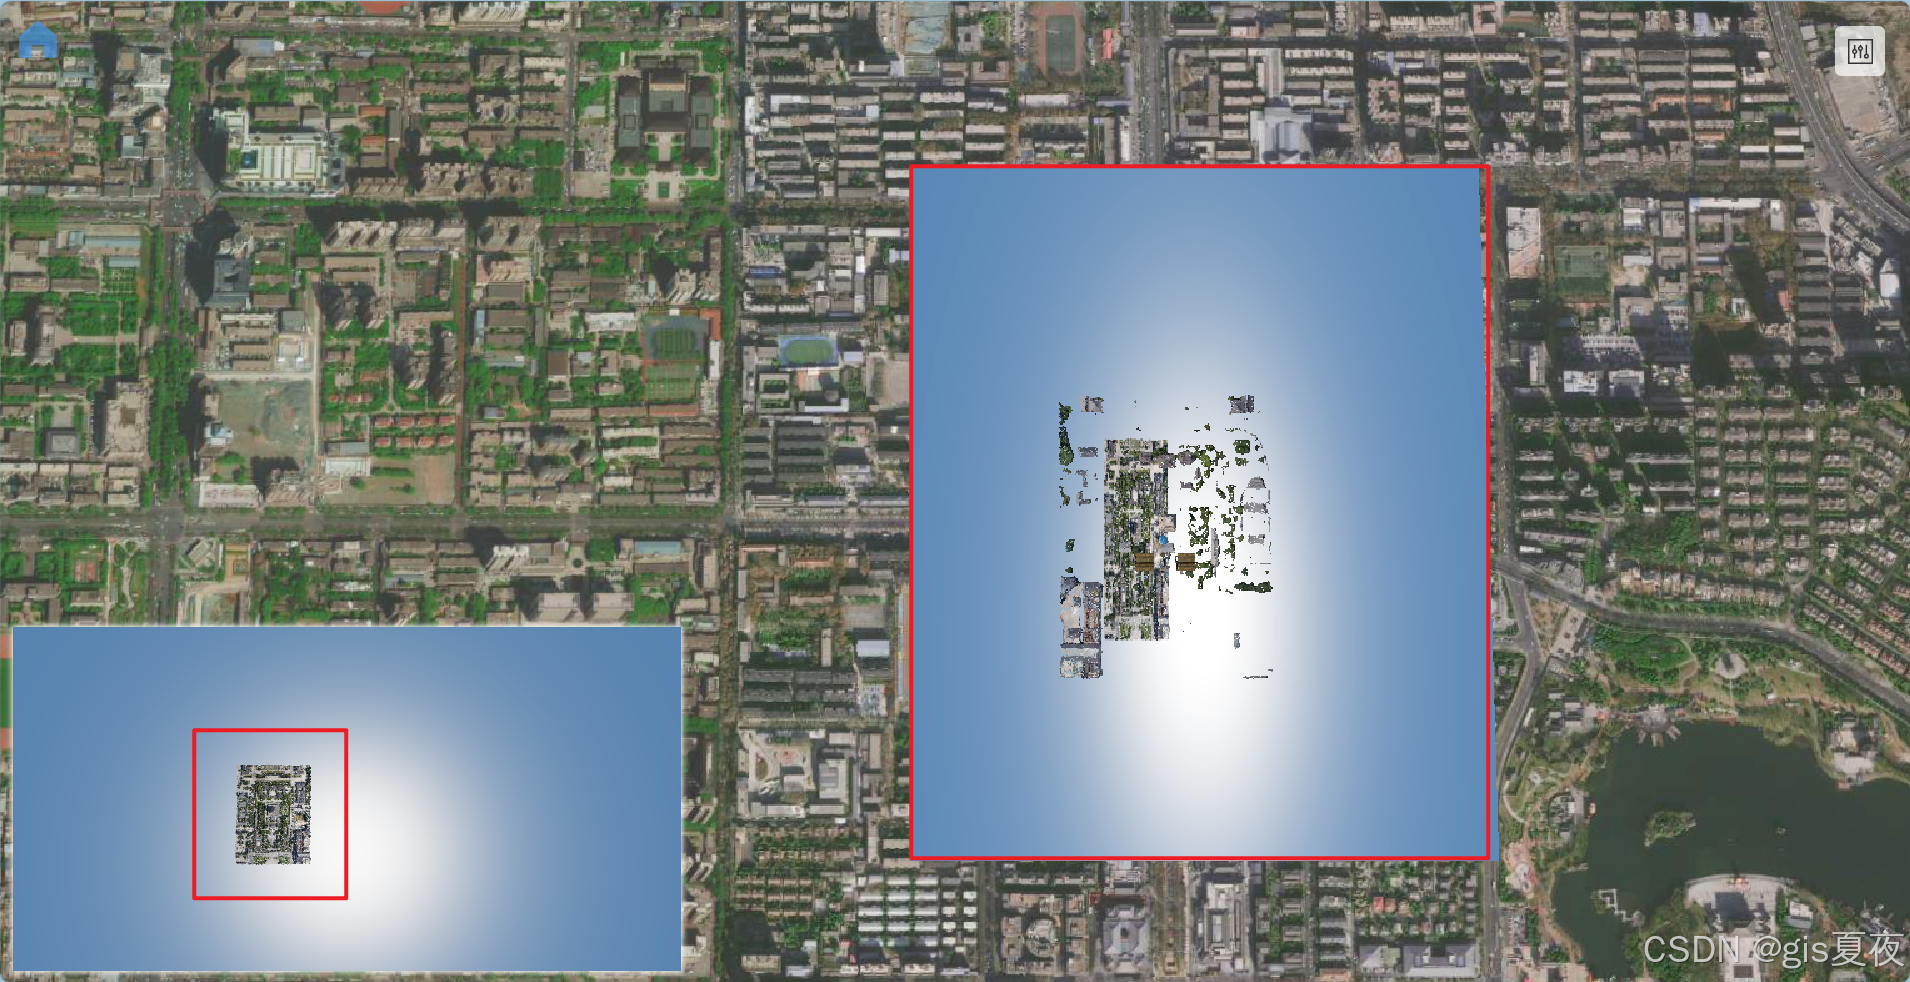

实现这个操作就需要使用到 gl_FragCoord,这个webgl提供的可变量表示该像素点在屏幕的位置。我们用它除以czm_viewport.zw,就可以得到屏幕uv,因为镜子我们都知道左右是翻转的,所以还要把uv反转一下。
uniform sampler2D image;
czm_material czm_getMaterial(czm_materialInput materialInput) {
	czm_material material = czm_getDefaultMaterial(materialInput);

	vec2 uv = gl_FragCoord.xy / czm_viewport.zw;  // 获取屏幕uv
	uv.s = (1.0 - uv.s); 			// 镜像翻转
	vec3 reflectColor = texture(image, uv).rgb;
	material.diffuse = reflectColor;
	return material;
}
这时候就实现反射效果了

4、裁剪水面以下部分的模型
我们已经正确将反射相机渲染的结果贴在水面的,但是可以看到还是有些不对劲的地方,有些不应该存在的东西被反射了出来,这些东西就是水面下的模型,所以我们需要在渲染前通过设置裁剪面将水面以下部分的模型给裁剪掉。
裁剪函数我也封装好了,如果你项目的模型本身也需要裁剪,那你就需要自己调整一下代码了,不过我想大部分人应该都没有这个需求。具体实现自己看代码了,就不再过多介绍了。
/** 根据参数裁剪3DTileset, Model, 或者Entity中的model,保留法向量方向上的部分
 * @param m Cesium3DTileset, Model, Entity
 * @param centerPosition  裁剪面的中心点
 * @param normal 裁剪面的法向量
 * @returns 生成的ClippingPlaneCollection,或者entity中没有模型则返回undefined
 */
function clipAnyModel(m: Cesium3DTileset | Model | Entity, centerPosition: Cartesian3, normal: Cartesian3) {
	let transform: Matrix4
	let model: Cesium3DTileset | Model | ModelGraphics
	// tileset有可能进行了一些变换,所以需要将transform乘上modelMatrix
	if (m instanceof Cesium3DTileset) {
		model = m
		transform = Matrix4.multiply(model.modelMatrix, model.root.transform, new Matrix4())
		Matrix4.inverse(transform, transform)
	}
	else if (m instanceof Model) {
		model = m
		transform = Matrix4.inverse(model.modelMatrix, new Matrix4())
	}
	else {
		if (!m.model) return
		transform = Transforms.eastNorthUpToFixedFrame(m.position!.getValue(new JulianDate())!)
		Matrix4.inverse(transform, transform)
		model = m.model
	}

	const clippingPlanes = new ClippingPlaneCollection()
	const plane = Plane.fromPointNormal(centerPosition, normal)
	const clipPlane = Plane.transform(plane, transform)
	clippingPlanes.add(clipPlane)
	model.clippingPlanes = clippingPlanes

	return clippingPlanes
}
我们为所有有部分在水面下的模型生成裁剪面集合,在每次渲染前循环开启,渲染后再关闭,这样就能在生成反射贴图时裁剪掉模型水下部分,正常渲染则不受影响。如果想裁剪水上部分,将normal给inverse一下就行。
我们再稍微改造一下下代码,我们并不需要每次渲染都计算centerPosition和waterNormal,并加上裁剪功能。
const waterPlane = new Primitive({
	geometryInstances: new GeometryInstance({
		geometry: new PolygonGeometry({
			polygonHierarchy: new PolygonHierarchy(positions),
			perPositionHeight: true
		})
	}),
	appearance: new EllipsoidSurfaceAppearance({
		material: new Material({
			fabric: {
				type: 'ReflectionWaterPlane',
				uniforms: {
					image: '',
				},
				source: `
						uniform sampler2D image;
						czm_material czm_getMaterial(czm_materialInput materialInput) {
							czm_material material = czm_getDefaultMaterial(materialInput);

							vec2 uv = gl_FragCoord.xy / czm_viewport.zw;  // 获取屏幕uv
							uv.s = (1.0 - uv.s); 			// 镜像翻转
							vec3 reflectColor = texture(image, uv).rgb;
							material.diffuse = reflectColor;
							return material;
						}
					`
			}
		})
	})
})
viewer.scene.primitives.add(waterPlane)

const centerPosition = calcCenterPoint(positions)
const waterNormal = viewer.scene.globe.ellipsoid.geodeticSurfaceNormal(centerPosition)
// 这里准备了3个不同类型的示例数据,第一个是3dtileset,第二个采用entity加载模型,第三个则使用Model加载
// 如果一个模型没有部分在水下,那自然就不需要裁剪了
const models = [tileset, modelEntity, model]
const clipPlaneCollections = models.map(model => clipAnyModel(model, centerPosition, waterNormal))

viewer.scene.preRender.addEventListener(() => {
	const scene = viewer.scene as any
	const width = scene.context.drawingBufferWidth
	const height = scene.context.drawingBufferHeight

	const fbo = new (Cesium as any).Framebuffer({
		context: scene.context,
		colorTextures: [
			new (Cesium as any).Texture({
				context: scene.context,
				width: width,
				height: height,
				pixelFormat: Cesium.PixelFormat.RGBA,
			}),
		],
	})
	const reflectCamera = getMirrorCamera(viewer.camera, waterNormal, centerPosition)

	// 渲染前开启裁剪面
	clipPlaneCollections.forEach(clipPlaneCollection => {
		if (clipPlaneCollection) clipPlaneCollection.enabled = true
	})
	renderToFbo(fbo, scene, reflectCamera)
	// 渲染后关闭裁剪面
	clipPlaneCollections.forEach(clipPlaneCollection => {
		if (clipPlaneCollection) clipPlaneCollection.enabled = false
	})
	const colorTexture = fbo.getColorTexture(0)
	waterPlane.appearance.material.uniforms.image = colorTexture
})
这时候水面的反射就真正的完成了,现在整个面就是一个镜子。到这里代码其实完全可以当成cesium镜面反射的代码。
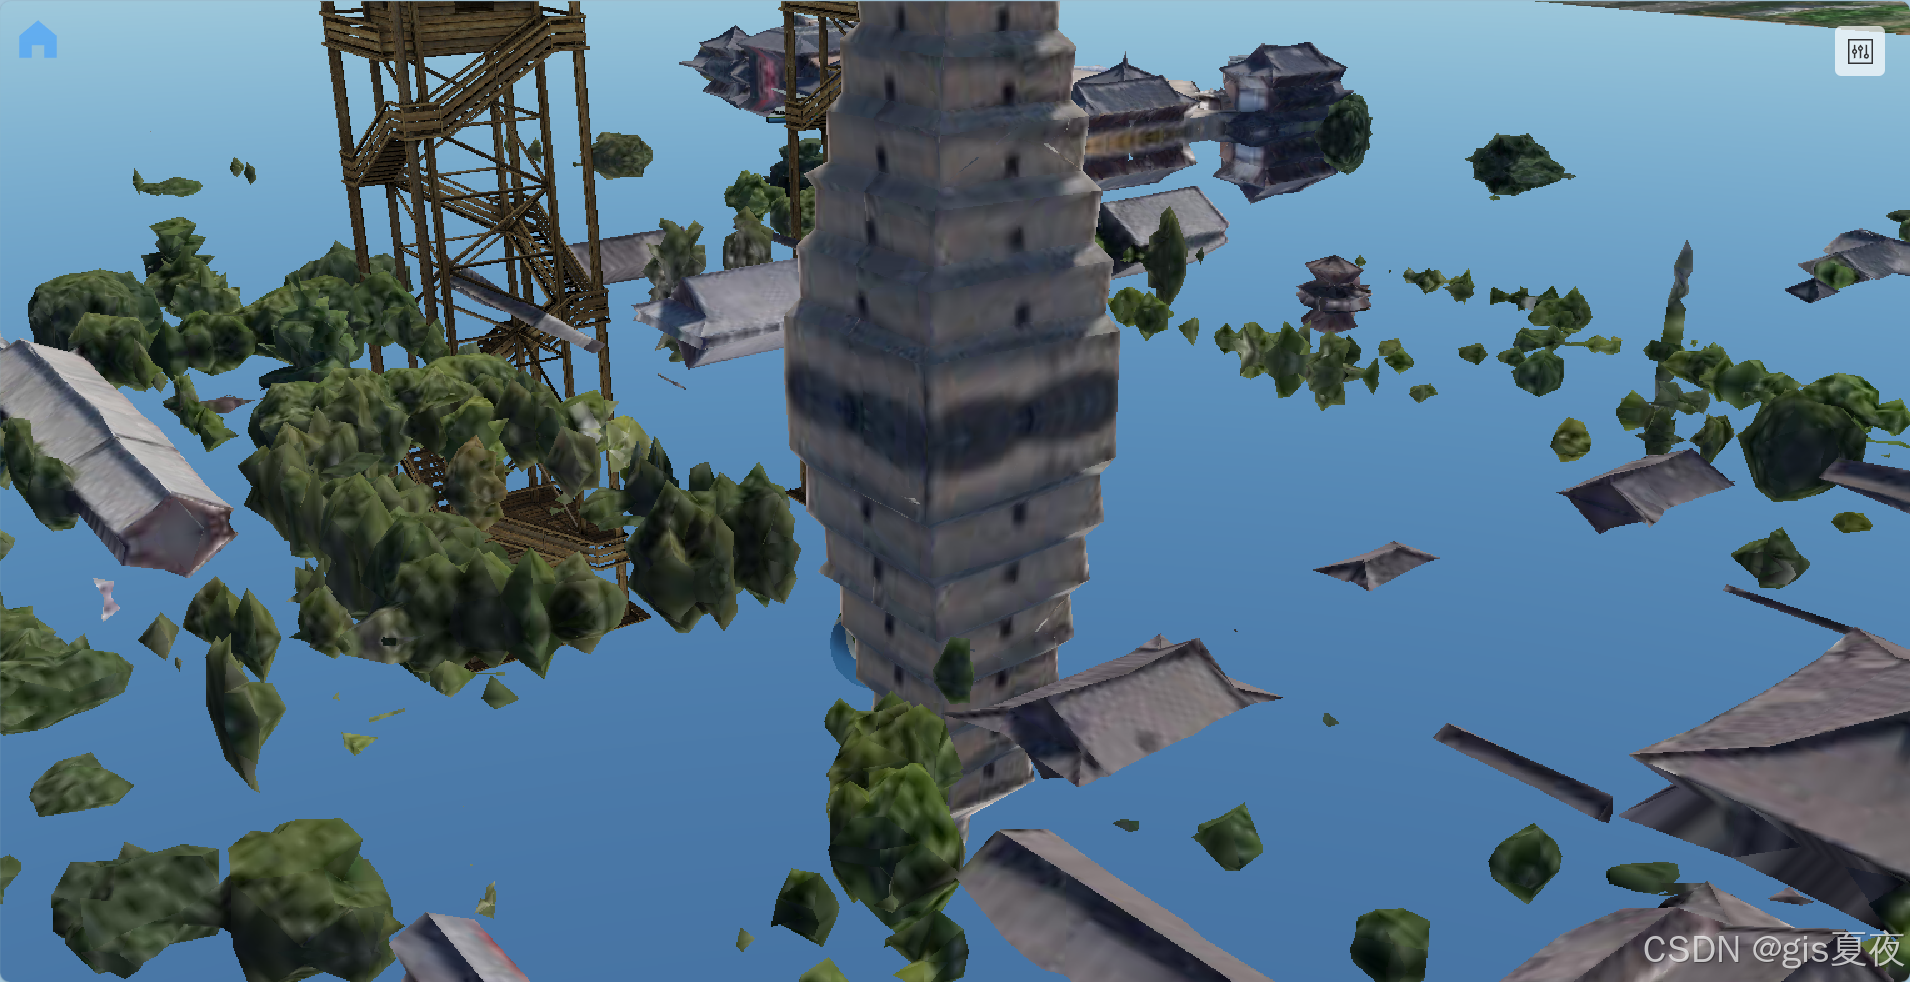
下面可以看到只是反射贴图里被裁剪了,屏幕中显示的模型水面下的部分是不会被裁剪的 。
四、加入水面效果
既然是反射水面而不是镜面,那么水面的效果我们当然也要加上,这里借鉴一波cesium自带的Water材质。
自带的Water材质代码如下。
// Thanks for the contribution Jonas
// http://29a.ch/2012/7/19/webgl-terrain-rendering-water-fog

uniform sampler2D specularMap;
uniform sampler2D normalMap;
uniform vec4 baseWaterColor;
uniform vec4 blendColor;
uniform float frequency;
uniform float animationSpeed;
uniform float amplitude;
uniform float specularIntensity;
uniform float fadeFactor;

czm_material czm_getMaterial(czm_materialInput materialInput)
{
    czm_material material = czm_getDefaultMaterial(materialInput);

    float time = czm_frameNumber * animationSpeed;

    // fade is a function of the distance from the fragment and the frequency of the waves
    float fade = max(1.0, (length(materialInput.positionToEyeEC) / 10000000000.0) * frequency * fadeFactor);

    float specularMapValue = texture(specularMap, materialInput.st).r;

    // note: not using directional motion at this time, just set the angle to 0.0;
    vec4 noise = czm_getWaterNoise(normalMap, materialInput.st * frequency, time, 0.0);
    vec3 normalTangentSpace = noise.xyz * vec3(1.0, 1.0, (1.0 / amplitude));

    // fade out the normal perturbation as we move further from the water surface
    normalTangentSpace.xy /= fade;

    // attempt to fade out the normal perturbation as we approach non water areas (low specular map value)
    normalTangentSpace = mix(vec3(0.0, 0.0, 50.0), normalTangentSpace, specularMapValue);

    normalTangentSpace = normalize(normalTangentSpace);

    // get ratios for alignment of the new normal vector with a vector perpendicular to the tangent plane
    float tsPerturbationRatio = clamp(dot(normalTangentSpace, vec3(0.0, 0.0, 1.0)), 0.0, 1.0);

    // fade out water effect as specular map value decreases
    material.alpha = mix(blendColor.a, baseWaterColor.a, specularMapValue) * specularMapValue;

    // base color is a blend of the water and non-water color based on the value from the specular map
    // may need a uniform blend factor to better control this
    material.diffuse = mix(blendColor.rgb, baseWaterColor.rgb, specularMapValue);

    // diffuse highlights are based on how perturbed the normal is
    material.diffuse += (0.1 * tsPerturbationRatio);

    material.diffuse = material.diffuse;

    material.normal = normalize(materialInput.tangentToEyeMatrix * normalTangentSpace);

    material.specular = specularIntensity;
    material.shininess = 10.0;

    return material;
}
cesium中的Water材质也不算复杂,就是通过传递的normalMap生成水面的法线,根据一些参数设置水面的起伏、法线贴图的重复数量等等。
这个specularMap是指定有水区域与无水区域的,使用一张黑白图,有水区域为白色,无水区域为黑色即可,我们反射水面一般用不到,但是还是可以保留着。其他参数自己查阅cesium文档或者自己试试就知道了。
当我们引入Water材质后就会发现一个问题,怎么将Water材质产生的水的颜色和反射颜色混合起来,总不能1:1混合吧(T_T)。这时候就需要引入一个新的概念了,那就是菲涅尔现象。
如果你站在湖边,低头看脚下的水,你会发现水是透明的,反射不是特别强烈;如果你看远处的湖面,你会发现水并不是透明的,而且反射非常强烈。这就是“菲涅尔效应”。
上面的话来自百度百科,有了菲涅尔现象,那我们就知道怎么混合颜色了,在反射强的地方我们就更多使用反射,反射弱我们就使用Water材质的颜色。菲涅尔现象在shader中也非常好计算,fresnel值如果为1则完全是反射,为0则完全是水色。因为菲涅尔值在0-1之间,所以视线因子越大菲涅尔值变小的趋势也会越快。
vec3 positionEC = -materialInput.positionToEyeEC;
vec4 positionWC = czm_inverseView * vec4(positionEC, 1.0);
vec3 cameraDir = normalize(positionWC.xyz - czm_viewerPositionWC);
vec3 n = normalize(waterNormal);
float fresnel = 1.0 - dot(-cameraDir, n);
float min_rc = fresnelParams.x; 		// 物体最小反射系数
float max_rc = fresnelParams.y;		 	// 物体最大反射系数
float f = fresnelParams.z;  				// 视线因子
// 菲涅尔值高,代表反射强(更多显示水的反射),值低则是折射强(也可以理解成更多显示水的本色)
fresnel = min_rc + (max_rc - min_rc) * pow(fresnel, f);
最终的颜色我们就通过菲涅尔值来混合。
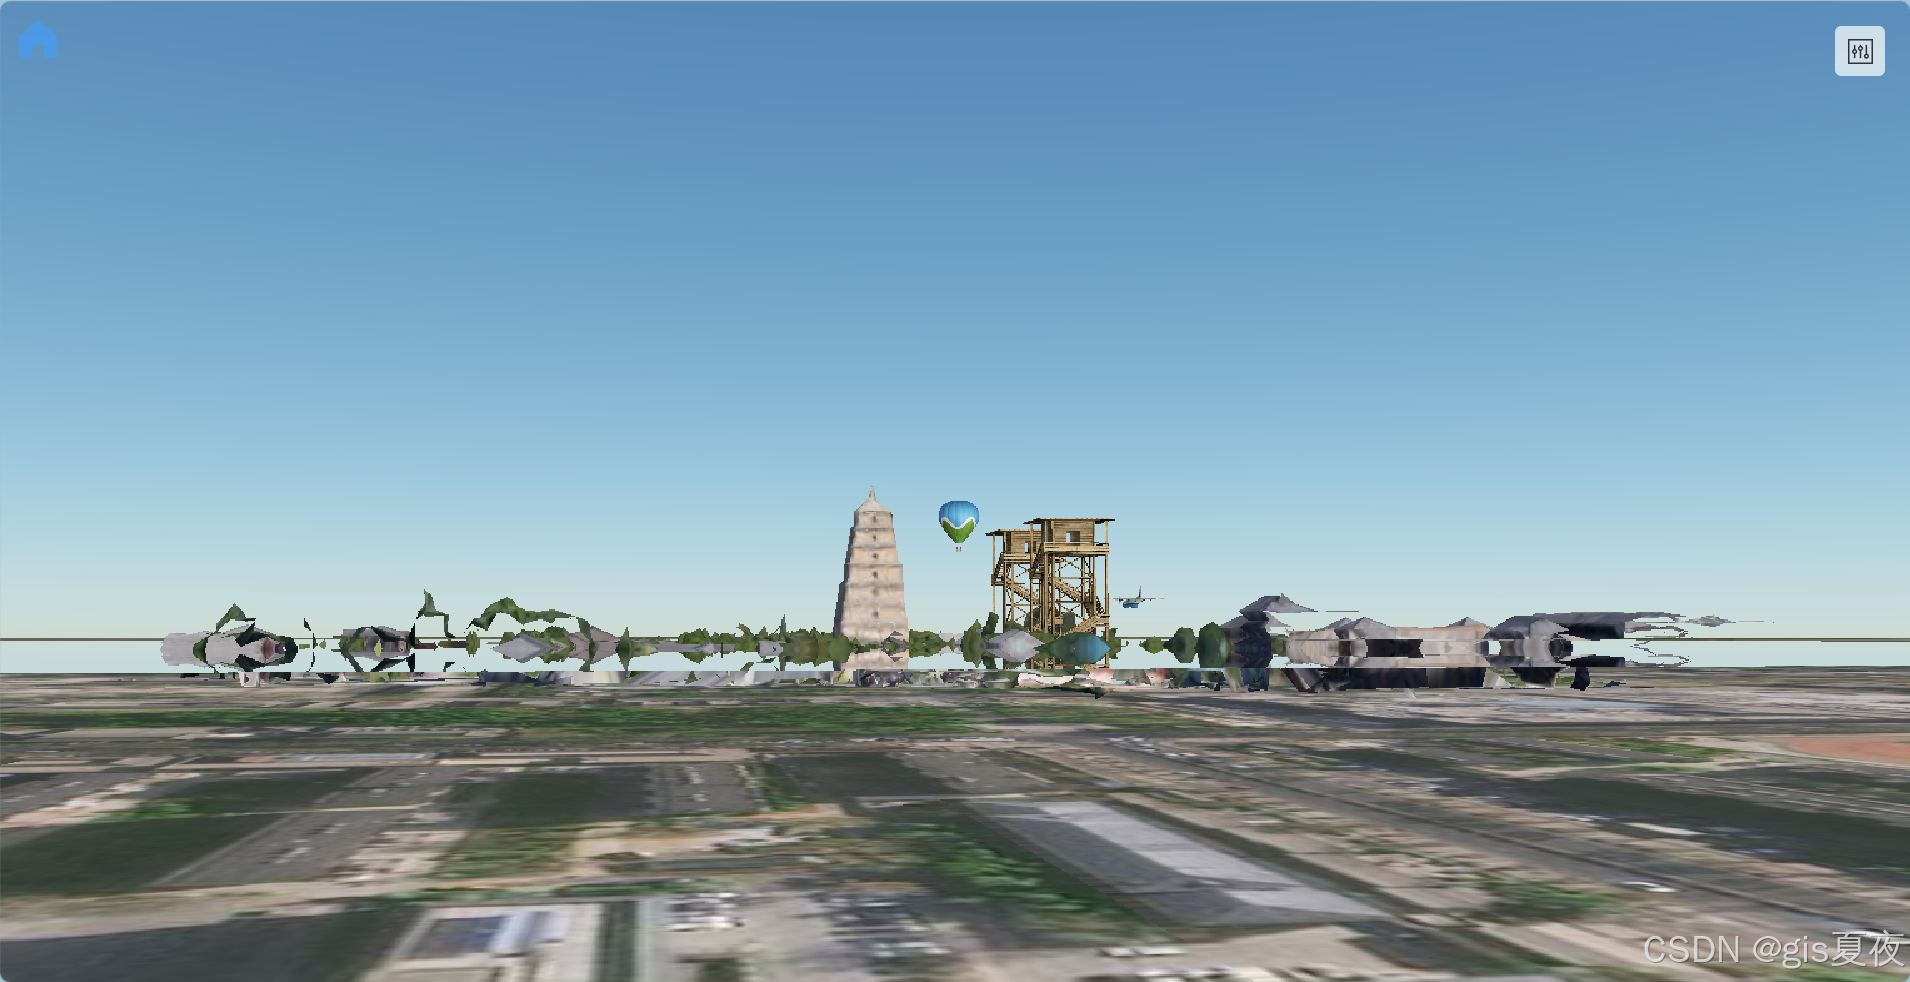
material.diffuse = mix(waterColor, reflectColor, fresnel);加入菲涅尔现象以及Water材质后效果如下,是不是有几分感觉了。

这里我们放大一点看,可以发现水在不停的动,可是反射它不动啊,太假了吧。

所以我们不光要扰动水面法线,还要扰动反射,而反射的扰动是和水面法线的扰动有关的。所以我们需要借助Water材质中扰动后的法线来扰动反射,而要扰动反射本质就是要扰动uv。
代码其实很简单,一行就可以搞定,这个100是我调的参数(我觉得效果最好),如果觉得扰动幅度不够大,可以减小这个100。
uv += normalTangentSpace.xz / 100.0;给反射扰动一下后的结果,这样就正常多了。

我这个代码如果将水面基色改为半透明,那么水面也会变成半透明的效果,但是这个透明度受限于菲涅尔效应的值,大家到时候自己可以调怎么限制。

五、整合代码
其中useDayanta是加载大雁塔数据的hooks,大家自己加载自己的3dtileset即可。initCesiumViewer是我封装的初始化viewer的函数,使用高德影像作为地图,为了方便我使用了unplugin-auto-import库来导入vue和自己的一些常用函数。法线贴图使用的是cesium的那张,网上很容易找到的。
import {
	Cartesian3,
	Cartographic,
	Primitive,
	GeometryInstance,
	PolygonGeometry,
	PolygonHierarchy,
	EllipsoidSurfaceAppearance,
	Material,
	Camera,
	ClippingPlaneCollection,
	Plane,
	Matrix4,
	Cesium3DTileset,
	Model,
	Entity,
	ModelGraphics,
	Transforms,
	JulianDate,
	Color,
} from 'cesium'
import * as Cesium from 'cesium'
import { useDayanta } from '@/utils/useAddData'
import Panel from '@/components/Panel.vue'
import PickColors from 'vue-pick-colors'

const min_rc = ref(0.8)  	// 最小反射系数
const max_rc = ref(1.0)		// 最大反射系数
const factor = ref(5)			// 视线因子
const frequency = ref(2000)
const animationSpeed = ref(0.01)
const amplitude = ref(5)
const specularIntensity = ref(0.8)
const baseWaterColor = ref('rgba(45, 95, 146, 1.0)')

onMounted(async () => {
	const viewer = initCesiumViewer({ baseLayer: useAMapLayer('img'), defaultControls: ['timeline'] })

	viewer.scene.sun.glowFactor = 10
	const tileset = await useDayanta(viewer)

	viewer.entities.add({
		position: Cartesian3.fromDegrees(108.959, 34.219, 30),
		model: {
			uri: '../models/CesiumAir/Cesium_Air.glb',
		},
	})

	viewer.entities.add({
		position: Cartesian3.fromDegrees(108.9593, 34.2195, 50),
		model: {
			uri: '../models/CesiumBalloon/CesiumBalloon.glb',
		},
	})

	const modelEntity = viewer.entities.add({
		position: Cartesian3.fromDegrees(108.959, 34.2192, 10),
		model: {
			uri: '../models/WoodTower/Wood_Tower.glb',
		},
	})

	const model = await Model.fromGltfAsync({
		url: '../models/WoodTower/Wood_Tower.glb',
		modelMatrix: Cesium.Transforms.eastNorthUpToFixedFrame(Cartesian3.fromDegrees(108.9597, 34.2192, 10))
	})
	viewer.scene.primitives.add(model)


	const positions = Cartesian3.fromDegreesArrayHeights([
		108.955, 34.215, 15,
		108.965, 34.215, 15,
		108.965, 34.225, 15,
		108.955, 34.225, 15
	])
	const waterPlane = new Primitive({
		geometryInstances: new GeometryInstance({
			geometry: new PolygonGeometry({
				polygonHierarchy: new PolygonHierarchy(positions),
				perPositionHeight: true
			})
		}),
		appearance: new EllipsoidSurfaceAppearance({
			material: new Material({
				fabric: {
					type: 'ReflectionWaterPlane',
					uniforms: {
						image: '',
						waterNormal: new Cartesian3(),
						fadeFactor: 1.0,  // 此参数不用调节
						normalMap: '../images/material/water1.jpg',
						fresnelParams: new Cartesian3(0.8, 1.0, 5),
						specularMap: 'czm_defaultImage',
						baseWaterColor: Color.fromCssColorString('rgba(45, 95, 146, 1.0)'),
						blendColor: new Color(),
						frequency: 2000,
						animationSpeed: 0.01,
						amplitude: 5,
						specularIntensity: 0.8,
					},
					source: `
						uniform sampler2D image;
						uniform vec3 waterNormal;
						uniform vec3 fresnelParams;  // x为最小反射系数,y为最大反射系数,z为视线因子
						uniform sampler2D specularMap;
						uniform sampler2D normalMap;
						uniform vec4 baseWaterColor;
						uniform vec4 blendColor;
						uniform float frequency;
						uniform float animationSpeed;
						uniform float amplitude;
						uniform float specularIntensity;
						uniform float fadeFactor;

						czm_material czm_getMaterial(czm_materialInput materialInput) {
							czm_material material = czm_getDefaultMaterial(materialInput);
							float time = czm_frameNumber * animationSpeed;
							// 衰减是与碎片的距离和波的频率的函数
							float fade = max(1.0, (length(materialInput.positionToEyeEC) / 10000000000.0) * frequency 					* fadeFactor);
							float specularMapValue = texture(specularMap, materialInput.st).r;
							// 注意:此时不使用方向运动,只需将角度设置为0.0;
							vec4 noise = czm_getWaterNoise(normalMap, materialInput.st * frequency, time, 0.0);
							vec3 normalTangentSpace = noise.xyz * vec3(1.0, 1.0, (1.0 / amplitude));
							// 当我们远离水面时,正常的扰动逐渐消失
							normalTangentSpace.xy /= fade;
	  					    // 我们接近非水区域(低镜面贴图值)时,尝试淡出正常扰动
							normalTangentSpace = mix(vec3(0.0, 0.0, 50.0), normalTangentSpace, specularMapValue);
							normalTangentSpace = normalize(normalTangentSpace);
							// 获取新法向量与垂直于切平面的向量的对齐比率
							float tsPerturbationRatio = clamp(dot(normalTangentSpace, vec3(0.0, 0.0, 1.0)), 0.0, 1.0);
							// 随着高光贴图值的减少,淡化水的效果
							float alpha = mix(blendColor.a, baseWaterColor.a, specularMapValue) * specularMapValue;
							// 基础色是水和非水颜色的混合,基于镜面贴图的值,可能需要一个均匀的混合因子来更好地控制这一点
							vec3 waterColor = mix(blendColor.rgb, baseWaterColor.rgb, specularMapValue);
							// 漫射高光是基于法线的扰动程度
							waterColor += (0.1 * tsPerturbationRatio);

							// 获取水面反射的颜色
							vec2 uv = gl_FragCoord.xy / czm_viewport.zw;  // 获取屏幕uv
							uv.s = (1.0 - uv.s); 			// 镜像翻转
							// 按照法线方向来扰动反射贴图的纹理坐标
							uv += normalTangentSpace.xz / 100.0;
							vec3 reflectColor = texture(image, uv).rgb;
							// 加入菲涅尔现象
							vec3 positionEC = -materialInput.positionToEyeEC;
							vec4 positionWC = czm_inverseView * vec4(positionEC, 1.0);
							vec3 cameraDir = normalize(positionWC.xyz - czm_viewerPositionWC);
							vec3 n = normalize(waterNormal);
							float fresnel = 1.0 - dot(-cameraDir, n);
							float min_rc = fresnelParams.x; 		// 物体最小反射系数
							float max_rc = fresnelParams.y;		 	// 物体最大反射系数
							float f = fresnelParams.z;  				// 视线因子
							fresnel = min_rc + (max_rc - min_rc) * pow(fresnel, f);
							// 菲涅尔值高,代表反射强(更多显示水的反射),值低则是折射强(也可以理解成更多显示水的本色)
							material.diffuse = mix(waterColor, reflectColor, fresnel);
							material.alpha = mix(alpha, 1.0, fresnel);
							material.normal = normalize(materialInput.tangentToEyeMatrix * normalTangentSpace);
							material.specular = specularIntensity;
							material.shininess = 10.0;

							return material;
						}
					`
				}
			})
		})
	})
	viewer.scene.primitives.add(waterPlane)

	const centerPosition = calcCenterPoint(positions)
	const waterNormal = viewer.scene.globe.ellipsoid.geodeticSurfaceNormal(centerPosition)
	// 这里准备了3个不同类型的示例数据,第一个是3dtileset,第二个采用entity加载模型,第三个则使用Model加载
	// 如果一个模型没有部分在水下,那自然就不需要裁剪了
	const models = [tileset, modelEntity, model]
	const clipPlaneCollections = models.map(model => clipAnyModel(model, centerPosition, waterNormal))

	// 设置uniforms,以及监听更改
	const uniforms = waterPlane.appearance.material.uniforms
	uniforms.waterNormal = waterNormal
	watchEffect(() => {
		uniforms.fresnelParams = new Cartesian3(min_rc.value, max_rc.value, factor.value)
		uniforms.frequency = frequency.value
		uniforms.animationSpeed = animationSpeed.value
		uniforms.amplitude = amplitude.value
		uniforms.specularIntensity = specularIntensity.value
		uniforms.baseWaterColor = Color.fromCssColorString(baseWaterColor.value)
	})
	// 渲染
	viewer.scene.preRender.addEventListener(() => {
		const scene = viewer.scene as any
		const width = scene.context.drawingBufferWidth
		const height = scene.context.drawingBufferHeight

		const fbo = new (Cesium as any).Framebuffer({
			context: scene.context,
			colorTextures: [
				new (Cesium as any).Texture({
					context: scene.context,
					width: width,
					height: height,
					pixelFormat: Cesium.PixelFormat.RGBA,
				}),
			],
		})

		const reflectCamera = getMirrorCamera(viewer.camera, waterNormal, centerPosition)
		// 渲染前开启裁剪面
		clipPlaneCollections.forEach(clipPlaneCollection => {
			if (clipPlaneCollection) clipPlaneCollection.enabled = true
		})
		renderToFbo(fbo, scene, reflectCamera)
		// 渲染后关闭裁剪面
		clipPlaneCollections.forEach(clipPlaneCollection => {
			if (clipPlaneCollection) clipPlaneCollection.enabled = false
		})
		const colorTexture = fbo.getColorTexture(0)
		waterPlane.appearance.material.uniforms.image = colorTexture
	})

})

/**计算多边形的中心点,如果传递了高度,那么中心点的高程将为指定的高度 */
function calcCenterPoint(positions: Cartesian3[], heigth?: number) {
	const total = new Cartesian3()
	positions.forEach(item => {
		Cartesian3.add(total, item, total)
	})
	let centerPosition = Cartesian3.multiplyByScalar(total, 1 / positions.length, total)
	if (heigth) {
		const centerCarto = Cartographic.fromCartesian(centerPosition)
		const newCarto = new Cartographic(centerCarto.longitude, centerCarto.latitude, heigth)
		centerPosition = Cartographic.toCartesian(newCarto)
	}
	return centerPosition
}

/**
* @param camera 原始相机
* @param normal 反射面的法向量
* @param centerPosition 反射面的中心点
*/
function getMirrorCamera(camera: Camera, normal: Cartesian3, centerPosition: Cartesian3) {
	// 场景相机到反射面中心点的向量
	const cameraToCenter = Cartesian3.subtract(centerPosition, camera.position, new Cartesian3())
	const n = -Cartesian3.dot(normal, cameraToCenter)
	const t = Cartesian3.multiplyByScalar(normal, 2 * n, new Cartesian3())
	const reflectCameraPosition = Cartesian3.subtract(camera.position, t, new Cartesian3())
	// 反射向量就是 相机原本方向 - 2倍的方向在法向量的投影
	const ndir = Cartesian3.dot(normal, camera.directionWC)
	const tdir = Cartesian3.multiplyByScalar(normal, 2 * ndir, new Cartesian3())
	const reflectCameraDirection = Cartesian3.subtract(camera.directionWC, tdir, new Cartesian3())
	Cartesian3.normalize(reflectCameraDirection, reflectCameraDirection)
	// up反射后的结果同方向计算一样
	const nup = Cartesian3.dot(normal, camera.upWC)
	const tup = Cartesian3.multiplyByScalar(normal, 2 * nup, new Cartesian3())
	const reflectCameraUp = Cartesian3.subtract(camera.upWC, tup, new Cartesian3())

	// 创建反射相机,克隆可以继承原始相机的视锥体参数
	const reflectCamera = (Camera as any).clone(camera) as Camera
	reflectCamera.position = reflectCameraPosition
	reflectCamera.up = reflectCameraUp
	reflectCamera.direction = reflectCameraDirection
	reflectCamera.right = Cartesian3.cross(reflectCameraUp, reflectCameraDirection, new Cartesian3())

	return reflectCamera
}


/**在给定的相机视角下渲染*/
function renderToFbo(fbo: any, scene: any, camera: Camera) {
	const frameState = scene._frameState
	scene.globe.show = false
	const context = scene.context
	const us = context.uniformState

	const preCamera = scene._defaultView.camera
	scene._defaultView.camera = camera
	const view = scene._defaultView
	scene._view = view

	scene.updateFrameState()
	frameState.passes.render = true
	frameState.passes.postProcess = scene.postProcessStages.hasSelected
	const renderTilesetPassState = new (Cesium as any).Cesium3DTilePassState({
		pass: (Cesium as any).Cesium3DTilePass.RENDER,
	})
	frameState.tilesetPassState = renderTilesetPassState

	let backgroundColor = Cesium.defaultValue(scene.backgroundColor, Cesium.Color.BLACK);
	// if (scene._hdr) {
	// 	backgroundColor = Cesium.Color.clone(backgroundColor, new Color())
	// 	backgroundColor.red = Math.pow(backgroundColor.red, scene.gamma)
	// 	backgroundColor.green = Math.pow(backgroundColor.green, scene.gamma)
	// 	backgroundColor.blue = Math.pow(backgroundColor.blue, scene.gamma)
	// }
	frameState.backgroundColor = backgroundColor
	frameState.atmosphere = scene.atmosphere
	scene.fog.update(frameState)
	us.update(frameState)

	// const shadowMap = scene.shadowMap
	// if (Cesium.defined(shadowMap) && shadowMap.enabled) {
	// 	if (!Cesium.defined(scene.light) || scene.light instanceof Cesium.SunLight) {
	// 		Cesium.Cartesian3.negate(us.sunDirectionWC, scene._shadowMapCamera.direction)
	// 	} else {
	// 		Cesium.Cartesian3.clone(scene.light.direction, scene._shadowMapCamera.direction)
	// 	}
	// 	frameState.shadowMaps.push(shadowMap)
	// }

	scene._computeCommandList.length = 0
	scene._overlayCommandList.length = 0

	const viewport = view.viewport
	viewport.x = 0
	viewport.y = 0
	viewport.width = context.drawingBufferWidth
	viewport.height = context.drawingBufferHeight

	const passState = view.passState
	// 最终绘制到传入的fbo
	passState.framebuffer = fbo
	passState.blendingEnabled = undefined
	passState.scissorTest = undefined
	passState.viewport = Cesium.BoundingRectangle.clone(viewport, passState.viewport);

	// if (Cesium.defined(scene.globe)) {
	// 	scene.globe.beginFrame(frameState)
	// }

	scene.updateEnvironment();
	scene.updateAndExecuteCommands(passState, backgroundColor)
	scene.resolveFramebuffers(passState)
	passState.framebuffer = undefined

	// if (Cesium.defined(scene.globe)) {
	// 	scene.globe.endFrame(frameState)
	// 	if (!scene.globe.tilesLoaded) {
	// 		scene._renderRequested = true
	// 	}
	// }

	context.endFrame()
	scene.globe.show = true
	scene._defaultView.camera = preCamera
}


/** 根据参数裁剪3DTileset, Model, 或者Entity中的model,保留法向量方向上的部分
 * @param m Cesium3DTileset, Model, Entity
 * @param centerPosition  裁剪面的中心点
 * @param normal 裁剪面的法向量
 * @returns 生成的ClippingPlaneCollection,或者entity中没有模型则返回undefined
 */
function clipAnyModel(m: Cesium3DTileset | Model | Entity, centerPosition: Cartesian3, normal: Cartesian3) {
	let transform: Matrix4
	let model: Cesium3DTileset | Model | ModelGraphics
	// tileset有可能进行了一些变换,所以需要将transform乘上modelMatrix
	if (m instanceof Cesium3DTileset) {
		model = m
		transform = Matrix4.multiply(model.modelMatrix, model.root.transform, new Matrix4())
		Matrix4.inverse(transform, transform)
	}
	else if (m instanceof Model) {
		model = m
		transform = Matrix4.inverse(model.modelMatrix, new Matrix4())
	}
	else {
		if (!m.model) return
		transform = Transforms.eastNorthUpToFixedFrame(m.position!.getValue(new JulianDate())!)
		Matrix4.inverse(transform, transform)
		model = m.model
	}

	const clippingPlanes = new ClippingPlaneCollection()
	const plane = Plane.fromPointNormal(centerPosition, normal)
	const clipPlane = Plane.transform(plane, transform)
	clippingPlanes.add(clipPlane)
	model.clippingPlanes = clippingPlanes

	return clippingPlanes
}
六、总结与完善思路
到这里以及实现反射水面了,在本篇文章中知识点还是非常密集的
- 计算反射相机(计算点和向量关于平面镜像后的结果)
- cesium中的离屏渲染与可视化
- 纹理映射
- 模型裁剪面
- 菲涅尔效应shader实现
大的知识点就这些,其中2、3是非常重要的,大家多思考一下,争取掌握,不会的那就是webgl基础的问题了,反射水面还是比较简单的。
虽然代码很多,但距离比较真实的水面还是差了很多的,所以本篇文章叫反射水面而不是仿真水面,虽然思路我有,但是目前用不到这么好的效果所以就不花时间写下去了,思路还是写给大家。
仿真水面还差很多步,我想到的就有下面的。
- 本篇将水改为半透明后就可以看到水下部分,那部分实际上是水的折射,这也是需要进行扰动的,单纯的半透明观察无法对其进行扰动。思路代码和本篇文章基本一模一样。
- 水改为半透明后不管水下多深都能看到,所以我们需要通过深度图来计算水深,然后调节水面透明度。主要难在获取深度图以及计算水深。
- 水面与模型的交接部分过于生硬,同样需要深度图来实现岸边柔和效果。有了深度图后这个很简单,网上应该有相关代码。
- 这里只是扰动了法线,如果实现比较水平很容易看出来水面其实是平的,所以要换成顶点动画的水面。这个我没有实现过不知道难不难,但是能扰动法线那么转为扰动顶点应该不是特别困难,就是应该需要通过DrawCommand实现一个自定义的Primitive了。
- 水下部分没有渲染,这里只是一个平面。大部分情况用不上,计算方法应该是需要通过判断视线方向上经过的水的距离来决定片元的颜色。
最后如果本篇内容对你有帮助别忘了点赞关注哦(要是能去b站也点个关注和赞就更好了 ◕‿◕)