hosts解析
vim /etc/hosts
10.0.0.10 es1
10.0.0.11 es2
10.0.0.12 es3
部署jdk
mkdir /usr/java
tar xf jdk-8u221-linux-x64.tar.gz -C /usr/java/
ln -s /usr/java/jdk1.8.0_221 /usr/java/jdk
vim /etc/profile.d/java.sh
export JAVA_HOME=/usr/java/jdk
export PATH=$JAVA_HOME/bin:$JAVA_HOME/bin:$PATH
export CLASSPATH=$CLASSPATH:$JAVA_HOME/lib:$JAVA_HOME/lib/tools.jar
部署elasticsearch
安装
tar xf elasticsearch-6.8.3.tar.gz -C /opt/
ln -s /opt/elasticsearch-6.8.3 /opt/elasticsearch
创建用户并授权
useradd -s /bin/bash -M es
chown -R es.es /opt/elasticsearch-6.8.3/
配置文件
vim config/elasticsearch.yml
es1
# 修改
node.name: es1
network.host: 10.0.0.10
es2
node.name: es2
network.host: 10.0.0.11
附录:
# 修改以下内容
cluster.name: es.od.com
node.name: hdss7-12.host.com
path.data: /data/elasticsearch/data
path.logs: /data/elasticsearch/logs
bootstrap.memory_lock: true
network.host: 10.0.0.10
http.port: 9200
jvm内存设置
vi config/jvm.options
修改以下
-Xms512m
-Xmx512m
文件描述符
cat /etc/security/limits.d/es.conf
es hard nofile 65536
es soft fsize unlimited
es hard memlock unlimited
es soft memlock unlimited
调整内核参数
sysctl -w vm.max_map_count=262144
echo "vm.max_map_count=262144" >> /etc/sysctl.conf
sysctl -p
启动
su -c "/opt/elasticsearch/bin/elasticsearch -p /tmp/elasticsearch-pid -d" es
集群配置
es1
egrep -v “#|^$” config/elasticsearch.yml
cluster.name: elasticsearch
node.name: es1
network.host: 10.0.0.10
http.port: 9200
node.master: true
node.data: true
node.ingest: false
network.bind_host: 0.0.0.0
network.publish_host: 10.0.0.10
bootstrap.memory_lock: true
transport.tcp.port: 9300
transport.tcp.compress: true
discovery.zen.ping.unicast.hosts: ["10.0.0.10","10.0.0.11","10.0.0.12"]
discovery.zen.minimum_master_nodes: 1
es2
egrep -v “#|^$” config/elasticsearch.yml
cluster.name: elasticsearch
node.name: es2
network.host: 10.0.0.11
http.port: 9200
node.ingest: false
node.master: false
node.data: true
transport.tcp.port: 9300
network.bind_host: 0.0.0.0
network.publish_host: 10.0.0.11
bootstrap.memory_lock: true
transport.tcp.compress: true
discovery.zen.ping.unicast.hosts: ["10.0.0.10","10.0.0.11","10.0.0.12"]
discovery.zen.minimum_master_nodes: 1
es3
egrep -v “#|^$” config/elasticsearch.yml
cluster.name: elasticsearch
node.name: es3
network.host: 10.0.0.12
http.port: 9200
node.ingest: false
node.master: false
node.data: true
transport.tcp.port: 9300
network.bind_host: 0.0.0.0
network.publish_host: 10.0.0.12
bootstrap.memory_lock: true
transport.tcp.compress: true
discovery.zen.ping.unicast.hosts: ["10.0.0.10","10.0.0.11","10.0.0.12"]
discovery.zen.minimum_master_nodes: 1
检查集群状态
curl  -X GET http://localhost:9200/_cat/nodes

10.0.0.12 21 97 0 0.00 0.01 0.05 d  - es3
10.0.0.11 21 97 0 0.06 0.04 0.05 d  - es2
10.0.0.10 19 88 0 0.00 0.03 0.05 md * es1


curl  -X GET http://192.168.51.220:9200/_cat/nodes?v
ip             heap.percent ram.percent cpu load_1m load_5m load_15m node.role master name
192.168.51.223           39          97   1    0.03    0.04     0.05 dilmrt    -      es03
192.168.51.220           66          97   1    0.09    0.07     0.08 dilmrt    -      es01
192.168.51.221           40          52   0    0.00    0.01     0.05 dilmrt    *      es02


curl -u user:passwd  -X 'GET' http://127.0.0.1:9200/_cat/health?v
curl -u user:passwd  -X 'GET' http://127.0.0.1:9200/_cat/nodes?v
说明
master:带* 表明该节点是主节点,带-表明该节点是从节点
倒排索引
- 倒排索引(inverted index),也常被称为反向索引、植入档案或反向档案,是一种索引方法,被用来存储在全文搜索下某个单词在一个文档或一组文档中的存储位置的映射。它是文档检索系统中最常用的数据结构
常规的索引建立方式
文档 —> 关键词的映射过程(正向索引)
倒排反向建立索引
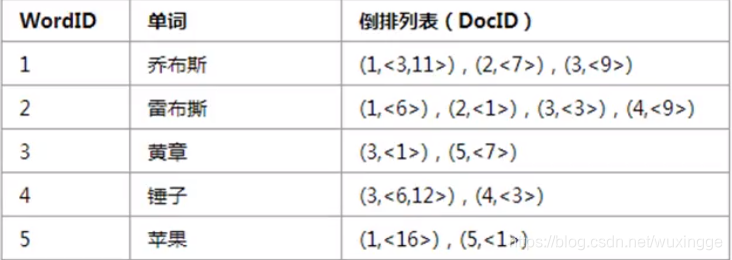
关键词 —> 文档的映射 把正向索引的结果重新构造成倒排索引
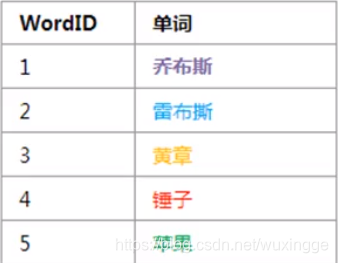
单词集合
文档集合
根据单词集合和文档集合,得到一张表
插件安装
bin/elasticsearch-plugin install analysis-icu
Elasticsearch API CURD操作
创建索引
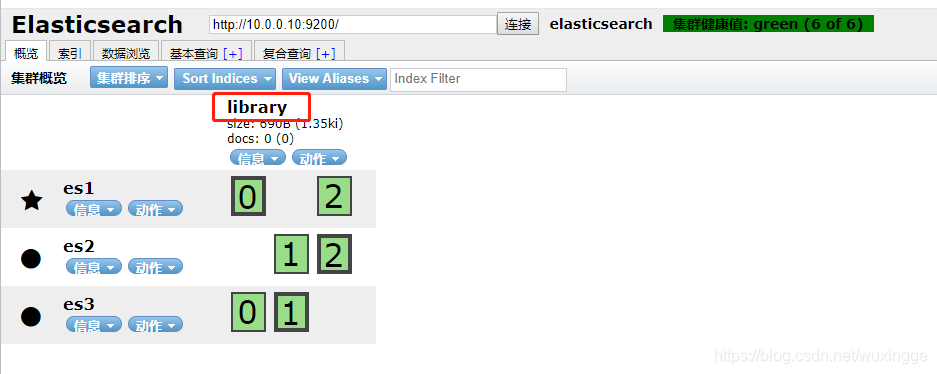
创建索引library
curl -H "Content-Type: application/json" -X PUT 'http://10.0.0.10:9200/library/' -d '{
  "settings":{
    "index":{
      "number_of_shards":3,
      "number_of_replicas":1
    }
  }
}'
查看索引
curl -X GET 'http://10.0.0.10:9200/library/_settings'

curl -X GET 'http://10.0.0.10:9200/library,library2/_settings'

curl -X GET 'http://10.0.0.10:9200/_all/_settings'

curl -k -u xxx:xxx -X GET 'http://localhost:9200/_all/_settings'

curl -k -u xxx:xxx -X GET 'http://localhost:9200/messages-2020.09.12/_settings'

curl -s -XGET http://192.168.51.45:9200/_cat/indices |awk '{print $3}'
curl -s -u username:password "http://172.21.16.3:9200/_cat/indices?v"
创建文档
/索引/Type/文档ID
curl -H "Content-Type: application/json" -X PUT 'http://10.0.0.10:9200/library/books/1' -d '{
  "title": "Elasticsearch: The Definitive Guide",
  "name":{
    "first":"Zachary",
    "last":"Tong"
  },
  "publish_date":"2020-02-06",
  "price":"49.99"
}'
curl -H "Content-Type: application/json" -X PUT 'http://10.0.0.10:9200/library/books/2' -d '{
  "title": "Elasticsearch: The Definitive Guide007",
  "name":{
    "first":"wu",
    "last":"xing"
  },
  "publish_date":"2020-02-06",
  "price":"60.99"
}'
创建文档不指定ID
curl -H "Content-Type: application/json" -X POST 'http://10.0.0.10:9200/library/books/' -d '{
  "title": "Elasticsearch: The Definitive Guide007",
  "name":{
    "first":"xia",
    "last":"zhi"
  },
  "publish_date":"2017-04-18",
  "price":"100.99"
}'
查看文档
通过ID查看文档
curl -X GET 'http://10.0.0.10:9200/library/books/1'
通过_source获取指定的字段
curl -X GET 'http://10.0.0.10:9200/library/books/1?_source=title'

curl -X GET 'http://10.0.0.10:9200/library/books/1?_source=title,price'

curl -X GET 'http://10.0.0.10:9200/library/books/1?_source'
更新文档
通过ID更新
curl -H "Content-Type: application/json" -X PUT 'http://10.0.0.10:9200/library/books/2' -d '{
  "title": "Elasticsearch: The Definitive Guide007",
  "name":{
    "first":"dong",
    "last":"zhi"
  },
  "publish_date":"2017-04-18",
  "price":"89.99"
}'
通过_update API方式单独更新对应的字段
curl -H "Content-Type: application/json" -X POST 'http://10.0.0.10:9200/library/books/1/_update' -d '{
  "doc":{
    "price":10
  }
}'


curl -H "Content-Type: application/json" -X POST 'http://10.0.0.10:9200/library/books/1/_update' -d '{
  "doc":{
    "title":"fly"
  }
}'
删除文档
curl -X DELETE http://10.0.0.10:9200/library/books/1
删除Type
curl -X DELETE http://10.0.0.10:9200/library/books
删除索引
curl -X DELETE http://10.0.0.10:9200/library

curl -k -u xxx:xxx -X DELETE http://localhost:9200/messages-2020.09.12

curl -X DELETE http://192.168.51.45:9200/192.168.51.180.181workflow-design-2022-08
elasticsearch内置字段及类型
内置字段
_uid, _id, _type, _source, _all, _analyzer, _boost, _parent, _routing, _index, _size, _timestamp, _ttl
字段类型
String, Integer/long, Float/double, Boolean, Null, Date
批量操作
创建两个索引
curl -H "Content-Type: application/json" -X PUT 'http://10.0.0.10:9200/bank/' -d '{
  "settings":{
    "index":{
      "number_of_shards":3,
      "number_of_replicas":1
    }
  }
}'


curl -H "Content-Type: application/json" -X PUT 'http://10.0.0.10:9200/shakespeare/' -d '{
  "settings":{
    "index":{
      "number_of_shards":3,
      "number_of_replicas":1
    }
  }
}'
es迁移
logstash-qianyi.conf
input {
    elasticsearch {
    hosts => ["http://x.x.x.x:9200"]
    user => "elastic"
    index => "索引1,索引2,索引3"
    password => "xxxxx"
    docinfo => true
  }
}
filter {
}
output {
  elasticsearch {
    hosts => ["http://x.x.x.x:9200"]
    user => "elastic"
    password => "xxxxx"
    index => "%{[@metadata][_index]}"
    document_type => "%{[@metadata][_type]}"
    document_id => "%{[@metadata][_id]}"
  }
}
logstash-7.2.0/bin/logstash -f logstash-7.2.0/config/logstash-qianyi.conf


