简介
react-native-swiper是基于ScrollView封装的swiper组件,用于图片滑动展示、轮播图等场景。具体示例详见react-native-swiper。
核心功能
react-native-swiper实现了三大核心功能:分页、循环滚动、自动播放。
核心原理
分页
分页功能其实是由android和ios实现的,通过pagingEnable这个props来控制是否开启分页,当值为true时开启,如果用户不手动设置为false,react-native-swiper默认传入true。
循环滚动
可以预想,在现有的ScrollView中我们无法实现从最后一页到第一页的滚动,所以react-native-swiper在最后一页后额外增加了第一页的内容;同理,为了实现从第一页到最后一页的滚动,在第一页前额外增加了最后一页的内容。
像这种跟视图展现相关的代码我们在render中可以看到。
render() {
  ...
  if (total > 1) {
    // Re-design a loop model for avoid img flickering
    pages = Object.keys(children)
    if (loop) {
      pages.unshift(total - 1 + '')
      pages.push('0')
    }

    ...
  }
  ...
}
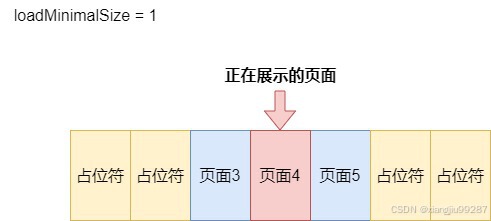
值得一提的是,为了优化性能,react-native-swiper还支持最小化加载。当我们传入loadMinimal: true时,只会加载视口页面和前后各1 loadMinimalSize大小的页面,其他页面用占位符来代替,loadMinimalSize默认为1。
如果开启了循环滚动,那么真实的第一页和最后一页将始终被渲染,后续会介绍原因。
相关代码。
if (
  (i >= index + loopVal - loadMinimalSize &&
    i <= index + loopVal + loadMinimalSize) ||
  // The real first swiper should be keep
  (loop && i === 1) ||
  // The real last swiper should be keep
  // 这里作者应该是写错了,等号右边应该是total
  (loop && i === total - 1)
) {
  return (
    <View style={pageStyle} key={i}>
      {children[page]}
    </View>
  )
}
以上的逻辑涉及到两个问题。
1. 启用了最小化加载,实际加载的页面和index有关,那么,在滚动的过程中需要维护index。
2. 首尾各新增了一页,那么用户在滚动到额外增加的页面时,我们需要手动将其挪到对应的真实页面。
先来解决第一个问题,index应该和视口可见的图片下标保持同步,而视口的切换是由于滑动这个行为导致的,所以应该在滑动结束后更新下标。
根据render函数的返回值可以找到渲染scrollView的方法renderScrollView。
return (
  <View style={[styles.container, containerStyle]} onLayout={this.onLayout}>
    {this.renderScrollView(pages)}
    {showsPagination &&
      (renderPagination
        ? renderPagination(index, total, this)
        : this.renderPagination())}
    {this.renderTitle()}
    {showsButtons && this.renderButtons()}
  </View>
)
在renderScrollView中我们可以找到动画结束后触发的回调函数this.onScrollEnd。
renderScrollView = pages => {
  return (
    <ScrollView
      ref={this.refScrollView}
      {...this.props}
      {...this.scrollViewPropOverrides()}
      contentContainerStyle={[styles.wrapperIOS, this.props.style]}
      contentOffset={this.state.offset}
      onScrollBeginDrag={this.onScrollBegin}
      onMomentumScrollEnd={this.onScrollEnd}
      onScrollEndDrag={this.onScrollEndDrag}
      style={this.props.scrollViewStyle}
    >
      {pages}
    </ScrollView>
  )
在onScrollEnd这个方法中,我们可以看到他核心就是调用了三个方法。
updateIndex:更新index(对应第一个问题)
autoplay:自动播放
loopJump: 当滚动到额外增加的页面时,手动将其挪动到对应的真实页面(对应第二个问题)
onScrollEnd = e => {
  ...
  this.updateIndex(e.nativeEvent.contentOffset, this.state.dir, () => {
    this.autoplay()
    this.loopJump()
  })
  ...
}
先来看一下updateIndex的逻辑。
通过新旧offset相减算出是左滑还是右滑,再除以元素的宽度,得到下标是+1还是-1。由于快速连续滑动可能导致计算不准确,所以这里调用了parseInt和Math.round以保证正确性。
在算出新的index后,调用setState进行更新,setState会引起重新渲染。
updateIndex = (offset, dir, cb) => {
  ...
  // offset记录的是最新的位置
  // this.internals.offset记录的是旧有位置
  const diff = offset[dir] - (this.internals.offset[dir] || 0)
  const step = dir === 'x' ? state.width : state.height
  let loopJump = false

  // Do nothing if offset no change.
  if (!diff) return

  // Note: if touch very very quickly and continuous,
  // the variation of `index` more than 1.
  // parseInt() ensures it's always an integer
  index = parseInt(index + Math.round(diff / step))

  if (this.props.loop) {
    // index记录的是真实页面的下标,不包括额外增加的页面
    // index <= -1代表从第一页滚动到了最后一页
    if (index <= -1) {
      // 所以在这里我们把下标更新为真实页面的最后一页
      index = state.total - 1
      offset[dir] = step * state.total
      loopJump = true
    } else if (index >= state.total) {
      // 同理,这里发生的是从最后一页滚动到了第一页
      index = 0
      offset[dir] = step
      loopJump = true
    }
  }

  const newState = {}
  newState.index = index
  newState.loopJump = loopJump

  this.internals.offset = offset

  // only update offset in state if loopJump is true
  if (loopJump) {
    // 以下是处理loopJump的代码,我认为作用是和下面的loopJump方法一致的
    // 以下代码的触发时间比loopJump方法早,滚动体验会更流畅,我认为loopJump方法是冗余的
    // 不知道为什么要将同样的功能实现两遍,可能是为了健壮性吧
    if (offset[dir] === this.internals.offset[dir]) {
      newState.offset = { x: 0, y: 0 }
      newState.offset[dir] = offset[dir] + 1
      this.setState(newState, () => {
        this.setState({ offset: offset }, cb)
      })
    } else {
      newState.offset = offset
      this.setState(newState, cb)
    }
  } else {
    this.setState(newState, cb)
  }
}
将上面处理loopjump的代码摘出来单独说一下。
由于在上文已经赋值this.internals.offset = offset,所以我认为在loopJump为true时,只会走到以下分支。
newState.offset = { x: 0, y: 0 }
newState.offset[dir] = offset[dir] + 1
this.setState(newState, () => {
  this.setState({ offset: offset }, cb)
})
那么为何要将offset存入state呢?
其实就是因为我们可以通过修改contentOffset实现无动画跳转,由额外增加的页面跳转到对应的真实页面。由于这个跳转的速度是非常快的,所以我们要保证滚动到的第一页或最后一页一定是已经渲染好的,这里就说明了为什么在开启了loadMinimal时,真实的第一页和最后一页始终被渲染。
renderScrollView = pages => {
  return (
    <ScrollView
      ...
      contentOffset={this.state.offset}
      ...
    >
      {pages}
    </ScrollView>
  )
}
那么为什么要将offset先+1再-1呢?因为state中offset不是实时更新的,只有在onLayout和发生了loopJump才会更新,我们第一次发生loopJump和第二次发生loopJump的offset是一致的,两次传入一样的offset不会触发滚动(这个应该是anroid和ios上的实现逻辑)。
再来看一下loopJump的逻辑。
核心逻辑就是直接调用scrollTo方法,在禁用动画的情况下将其滚动到对应位置。
loopJump = () => {
  // 未发生循环跳转,直接返回
  if (!this.state.loopJump) return
  // 其实可以不用判断this.props.loop,因为如果loop为false根本无法进行循环跳转
  const i = this.state.index + (this.props.loop ? 1 : 0)
  const scrollView = this.scrollView
  this.loopJumpTimer = setTimeout(
    () => {
      // 历史原因,曾经在anroid端是基于ViewPagerAndroid做的封装
      if (scrollView.setPageWithoutAnimation) {
        scrollView.setPageWithoutAnimation(i)
      } else {
        if (this.state.index === 0) {
          // 粗暴的滚动,禁用动画,其实会出现一下闪屏,体验不是很好
          scrollView.scrollTo(
            this.props.horizontal === false
              ? { x: 0, y: this.state.height, animated: false }
              : { x: this.state.width, y: 0, animated: false }
          )
        } else if (this.state.index === this.state.total - 1) {
          this.props.horizontal === false
            ? this.scrollView.scrollTo({
                x: 0,
                y: this.state.height * this.state.total,
                animated: false
              })
            : this.scrollView.scrollTo({
                x: this.state.width * this.state.total,
                y: 0,
                animated: false
              })
        }
      }
    },
    // Important Parameter
    // ViewPager 50ms, ScrollView 300ms
    scrollView.setPageWithoutAnimation ? 50 : 300
  )
}
自动播放
autoplay主要就是判断是否满足自动滚动的条件,满足则调用scrollBy方法。
autoplay = () => {
  if (
    // 无法自动播放的情况
    // 1. 只有一个页面
    // 2. 未开启自动播放
    // 3. 正在滚动
    // 4. 不能循环滚动 且 自动滚动方向向前且当前处于第一页 || 自动滚动方向向后且当前处于最后一页
    !Array.isArray(this.state.children) ||
    !this.props.autoplay ||
    this.internals.isScrolling ||
    this.state.autoplayEnd
  )
    return

  this.autoplayTimer && clearTimeout(this.autoplayTimer)
  this.autoplayTimer = setTimeout(() => {
    // 以上所说的第四种情况
    if (
      !this.props.loop &&
      (this.props.autoplayDirection
        ? this.state.index === this.state.total - 1
        : this.state.index === 0)
    )
      return this.setState({ autoplayEnd: true })

    // 核心方法
    this.scrollBy(this.props.autoplayDirection ? 1 : -1)
  }, this.props.autoplayTimeout * 1000)
}
scrollBy方法其实就是调用了ScrollView的scrollTo方法,在启用动画的情况下滚动到下一页/上一页。
scrollBy = (index, animated = true) => {
  if (this.internals.isScrolling || this.state.total < 2) return
  const state = this.state
  const diff = (this.props.loop ? 1 : 0) + index + this.state.index
  let x = 0
  let y = 0
  if (state.dir === 'x') x = diff * state.width
  if (state.dir === 'y') y = diff * state.height

  this.scrollView && this.scrollView.scrollTo({ x, y, animated })

  // update scroll state
  this.internals.isScrolling = true
  this.setState({
    autoplayEnd: false
  })

  ...
}
总结
react-native-swiper虽然自称是the best swiper for react native,但其实在轮播的时候会有明显的闪屏,快速滑动的时候也会存在active dot和active page不同步的问题。此外,源码在逻辑上也存在一些错误和死代码(如果我没理解错的话)。如果有swiper的更佳实践,还请大家留言呀~


