单一坐标解析
上一节我们调用getRayIntersection方法获取了射线与场景的交点,其原理是先根据离屏相机进行一次离屏渲染,将结果写入到深度图纹理中,渲染结束后从深度图纹理中获取深度,然后根据深度值计算距离,最后根据距离计算坐标值,坐标值计算关键代码如下
 const pickDepth = picking.getPickDepth(scene, i);
 const depth = pickDepth.getDepth(context, 0, 0);
 if (!defined(depth)) {
   continue;
 }
 if (depth > 0.0 && depth < 1.0) {
   const renderedFrustum = frustumCommandsList[i];
   const near =
     renderedFrustum.near *
     (i !== 0 ? scene.opaqueFrustumNearOffset : 1.0);
   const far = renderedFrustum.far;
   const distance = near + depth * (far - near);
   position = Ray.getPoint(ray, distance);
   break;
 }
其中最关键的就是getDepth方法,通过该方法获取到像素对应的深度值,然后根据深度值转为世界坐标值。因为是用于计算射线交点,所以只有一个坐标值,此时的深度纹理大小为 1x1,我们并没有直接设置这张深度图的大小,因为它会根据视口大小进行更新,默认的视口大小为1x1。
批量坐标解析
getRayIntersection方法用于拾取射线与场景的交点,所以只有一个结果值。而我们使用深度图是希望能批量获取点的高程值,所以我们需要对该方法进行一下修改,以达到我们的期望效果。
自定义离屏相机
假定研究区域范围如下
  let positions = [[110.91841340334987, 30.00563553427726, 852.0091102852589], [110.89473055638145, 30.010446441168135, 579.2311831160774], [110.87475288470749, 30.000617810741645, 678.046302939629], [110.88525405115537, 29.97371359878412, 248.6925509022207], [110.89707231953993, 29.978456909424786, 403.7668830135344], [110.9198256224335, 29.97377121630911, 712.4432989443915], [110.92939046684437, 30.003520348332533, 1062.8462515370425]]  ;
  positions = Cesium.Cartesian3.fromDegreesArrayHeights([].concat.apply([], positions));
首先需要设置离屏相机,一般将离屏相机设置在感兴趣的研究区域,从上往下看,我们将其封装为一个方法
  function createOffscreenCamera() {
    //创建相机 (正交投影)
    const offscreenCamera = new Cesium.Camera(viewer.scene);
    //设置相机的位置
    let center = new Cesium.Cartesian3();
    let n = positions.length;
    let centerPosition = new Cesium.Cartesian3();
    positions.forEach(p => {
        centerPosition = Cesium.Cartesian3.add(centerPosition, p, centerPosition);
    })
    centerPosition = Cesium.Cartesian3.multiplyByScalar(centerPosition, 1 / n, centerPosition);//中心点

    //获取中心点的法线
    let normal = Cesium.Ellipsoid.WGS84.geodeticSurfaceNormal(centerPosition);
    //中心点向上平移5000米
    centerPosition = Cesium.Cartesian3.add(centerPosition, Cesium.Cartesian3.multiplyByScalar(normal, 5000, new Cesium.Cartesian3()), centerPosition);
    offscreenCamera.position = centerPosition;
    //相机方向 从上往下看
    offscreenCamera.direction = Cesium.Cartesian3.negate(normal, normal);

    //设置相机上方向 (这里使用类似正北的方向)
    let d = Cesium.Cartographic.fromCartesian(centerPosition);
    let up = Cesium.Cartesian3.subtract(Cesium.Cartesian3.fromRadians(d.longitude, d.latitude + 0.005, d.height), centerPosition, new Cesium.Cartesian3())
    up = Cesium.Cartesian3.normalize(up, up);
    offscreenCamera.up = up;

    offscreenCamera.frustum = new Cesium.OrthographicFrustum({
        width: range,
        aspectRatio: 1,
        near: 0.1,
        far: 10000
    });

    //可视化相机
    viewer.scene.primitives.add(new Cesium.DebugCameraPrimitive({
        camera: offscreenCamera,
        color: Cesium.Color.BLUE,
        updateOnChange: false,//不更新
        show: true,
    }));

    return offscreenCamera;
}

let offscreenCamera= createOffscreenCamera();
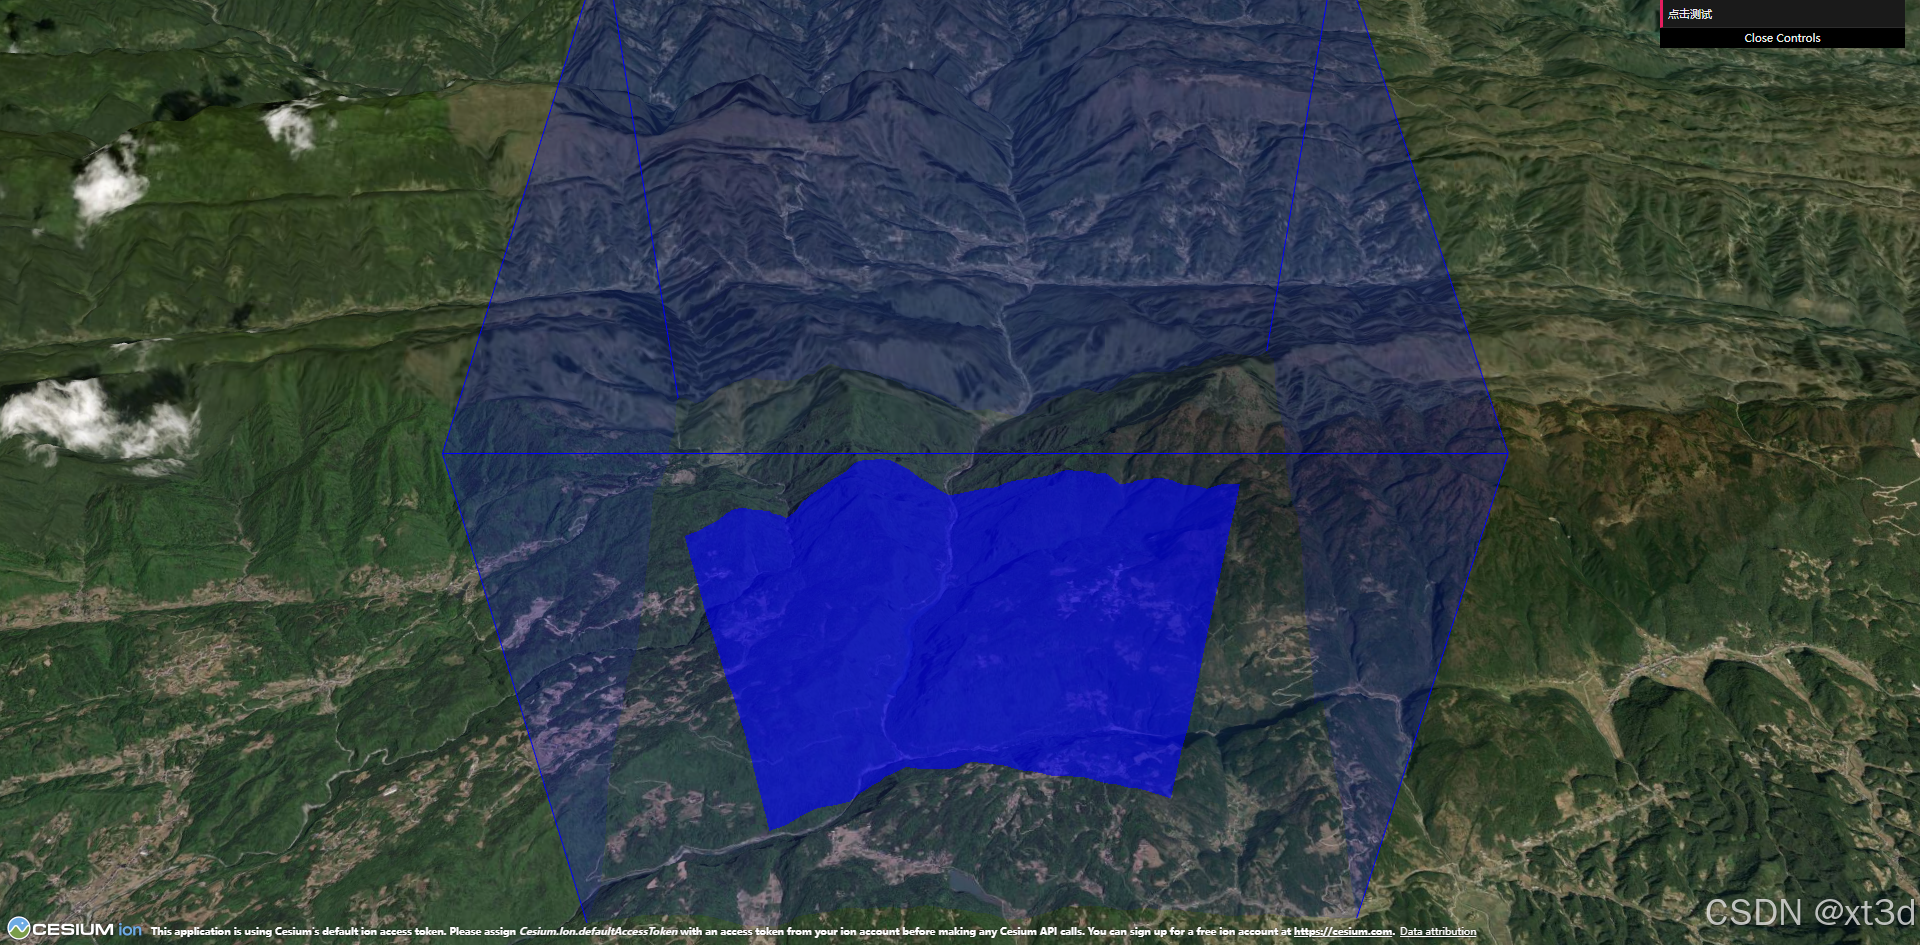
示例效果可到 xt3d 官网 运行查看
设置纹理大小
需要修改默认的纹理大小,使其能够存储多个值,在创建 Picking对象时设置其视口大小即可。
 const depthTextureSize=100;
 function creatPicking() {
     const picking = new Cesium.Picking(viewer.scene);
     const view = picking._pickOffscreenView;
     ...
     view.camera = offscreenCamera;
     return picking;
 }
 let picking = creatPicking();
离屏渲染
参考getRayIntersection方法,将离屏渲染的代码封装成一个方法,离屏渲染中使用自定义的相机。
 function offscreenRender(camera, picking) {
     const { scene } = viewer;
     const { context, frameState } = scene;
     const view = picking._pickOffscreenView;
     let sceneView = scene.view;
     scene.view = view;

     Cesium.BoundingRectangle.clone(view.viewport, scratchRectangle);
     const passState = view.pickFramebuffer.begin(scratchRectangle, view.viewport);
     scene.jobScheduler.disableThisFrame();
     scene.updateFrameState();
     frameState.invertClassification = false;
     frameState.passes.pick = true;
     frameState.passes.offscreen = true;
     frameState.tilesetPassState = pickTilesetPassState;
     context.uniformState.update(frameState);
     scene.updateEnvironment();
     scene.updateAndExecuteCommands(passState, Cesium.Color.TRANSPARENT);
     scene.resolveFramebuffers(passState);

     const ray = new Cesium.Ray(camera.position, camera.direction);

     scene.view = sceneView;
     context.endFrame();

     return positions;
 }
解析坐标值
在渲染完成后就可以对坐标进行解析了,这里也将其封装成一个方法。
  function pickPositions(ray, picking, scene, width, height, depthTextureSize) {
     const res = [];
     const { context } = scene;
     if (!context.depthTexture) { return res; }
     const view = picking._pickOffscreenView;
     const { camera } = view;
     const numFrustums = view.frustumCommandsList.length;
     const offset = new Cesium.Cartesian3();
     for (let i = 0; i < numFrustums; ++i) {
         // 获取每个视锥体的深度缓存
         const pickDepth = picking.getPickDepth(scene, i);
         const depths = getDepths(context, 0, 0, depthTextureSize, depthTextureSize, pickDepth.framebuffer);

         for (let j = 0, len = depths.length; j < len; j++) {
             const depth = depths[j];
             if (Cesium.defined(depth) && depth > 0.0 && depth < 1.0) {
                 // 根据视锥体远近截面计算出相机到物体表面的距离
                 const renderedFrustum = view.frustumCommandsList[i];
                 const near = renderedFrustum.near * (j !== 0 ? scene.opaqueFrustumNearOffset : 1.0);
                 ...
                 const point = new Cesium.Cartesian3();
                 Cesium.Cartesian3.multiplyByScalar(camera.up, rowScalar, offset);
                 Cesium.Cartesian3.add(offset, camera.position, point);
                 Cesium.Cartesian3.multiplyByScalar(camera.right, columnScalar, offset);
                 Cesium.Cartesian3.add(offset, point, point);

                 // 利用射线获取坐标高程
                 const clonedRay = Cesium.Ray.clone(ray);
                 clonedRay.origin = point;
                 const position = Cesium.Ray.getPoint(clonedRay, distance);

                 if (!res[j]) {
                     res[j] = position;
                 }
             }
         }
     }
     return res;
  }
方法中调用了一个getDepths方法,用于从深度图中获取深度数组,可以参考PickDepth.prototype.getDepth方法。
  const packedDepthScale = new Cesium.Cartesian4(1.0, 1.0 / 255.0, 1.0 / 65025.0, 1.0 / 16581375.0);  // 1, 1 / 255, 1 / (255^2), 1 / (255^3)
  function getDepths(context, x, y, width, height, framebuffer) {
      // 获取颜深度缓存中的所有像素值
      const pixels = context.readPixels({
          x,
          y,
          width,
          height,
          framebuffer
      });
      const packedDepthArray = Cesium.Cartesian4.unpackArray(pixels);
      //像素值转深度值
      return packedDepthArray.map((t) => {
          Cesium.Cartesian4.divideByScalar(t, 255.0, t);
          return Cesium.Cartesian4.dot(t, packedDepthScale);
      });
  }
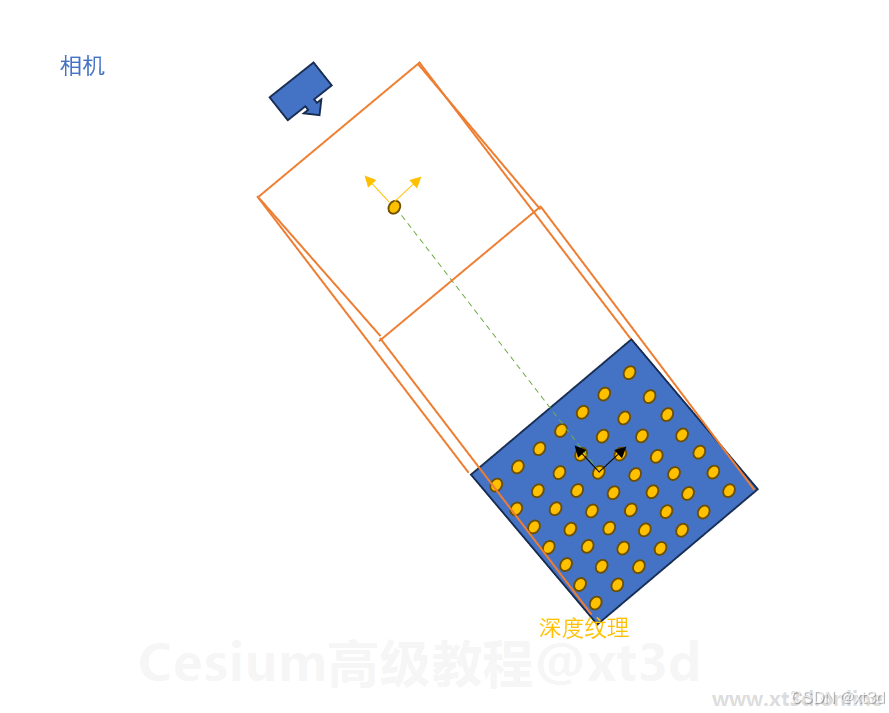
坐标解析的核心就是先将像素点映射到相机平面的世界坐标,然后根据深度值计算距离,将这个平面上的坐标进行平移即可得到正确的坐标值,原理图如下
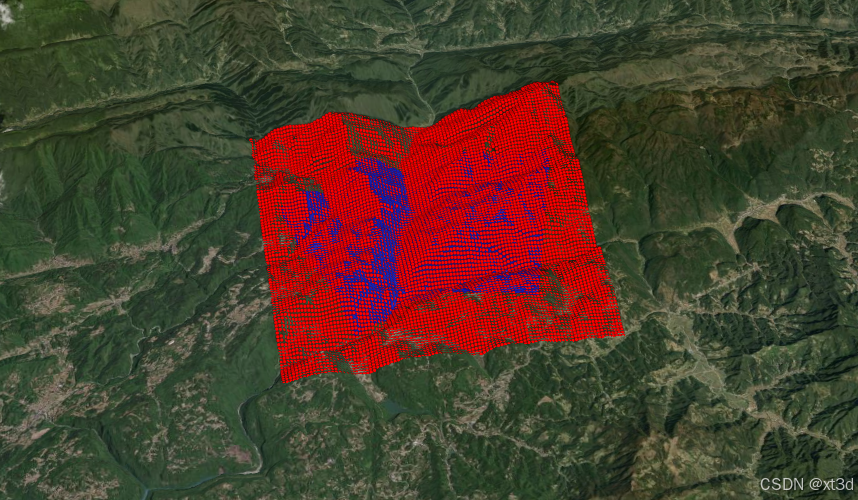
示例效果可到 xt3d 官网 运行查看
更多内容见 Cesium高级教程-教程简介