章节 1 线性回归算法
简单线性回归
线性回归是一种经典的有监督学习算法,用于研究因变量(目标变量)和一个或多个自变量(影响因素)之间的线性关系。简单线性回归关注单一自变量对目标变量的影响,而多元线性回归则处理多个自变量的情况。
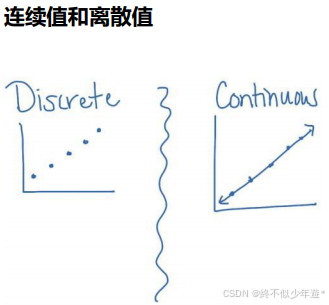
目标变量(y)是需要预测的值,可以是连续值;自变量(X)是影响目标变量的因素,可以是连续值或离散值。
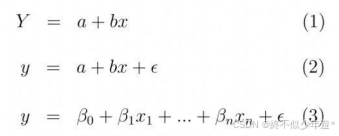
简单线性回归模型公式为 y = a + bx,其中a是截距,b是斜率。
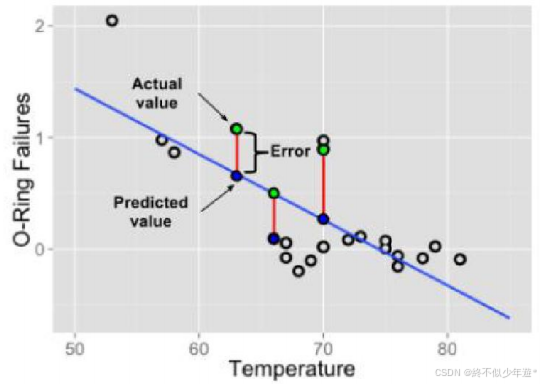
看一个美国人发火箭的例子
Actual value:真实值,即已知的 y
Predicted value:预测值,是把已知的 x 带入到公式里面和猜出来的参数 a,b 计算得到的
Error:误差,预测值和真实值的差距
最优解:尽可能的找到一个模型使得整体的误差最小,整体的误差通常叫做损失 Loss
Loss:整体的误差,loss 通过损失函数 loss function 计算得到
最优解是通过最小化整体误差(损失)来找到最佳模型。
真实值(Actual value)、预测值(Predicted value)和误差(Error)的关系用于评估模型效果。
多元线性回归
现实生活中,往往有多个因素影响结果y。这时,自变量的数量从X1变为Xn,简单线性回归的公式不再适用。
多元线性回归公式为 y = XW + ε,其中W是特征的权值向量,ε是误差向量。
举例:训练一个模型预测一个人有多漂亮,历史数据包含人的一些指标和已知得分。
在多元线性回归中 W 是一维向量,代表的是 W0 到 Wn,我们也可以用线性代数的方式去 表达公式,这时算法要求解的就是这个向量,如果维度很多我们当然需要计算机帮助我们来求解了。
章节2 从代码理解线性回归
通过anaconda环境打开jupyter notebook
正规方程处理线性回归
# 支持python2和3
from __future__ import division, print_function, unicode_literals# 导入必要的库
import numpy as np
import os# 设置随机数种子,让每一次用相同的数据进行训练时输出的结果一致
np.random.seed(42)# 设置可视化的参数
%matplotlib inline
import matplotlib as mpl
import matplotlib.pyplot as plt
mpl.rc('axes', labelsize=14)
mpl.rc('xtick', labelsize=12)
mpl.rc('ytick', labelsize=12)# 设置文件保存路径
PROJECT_ROOT_DIR = "."
CHAPTER_ID = "training_linear_models"# 无视一些不重要的警告
import warnings
warnings.filterwarnings(action="ignore", message="^internal gelsd")
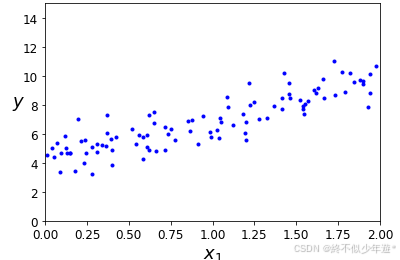
用y=4+3x+y=4+3x+高斯噪声来生成数据点(x0x0为1)
import numpy as np
X = 2 * np.random.rand(100, 1) #X中所有点的范围在0-2之间
y = 4 + 3 * X + np.random.randn(100, 1)
# 绘制定义好的方程
plt.plot(X, y, "b.")
plt.xlabel("$x_1$", fontsize=18)
plt.ylabel("$y$", rotation=0, fontsize=18)
plt.axis([0, 2, 0, 15])
# save_fig("generated_data_plot")
plt.show()
通过求解MSE的最小值^θ=(XT⋅X)−1⋅XT⋅yθ^=(XT⋅X)−1⋅XT⋅y 求解θθ值(这就是一个模型的训练过程)
X_b = np.c_[np.ones((100, 1)), X]  # add x0 = 1 to each instance
theta_best = np.linalg.inv(X_b.T.dot(X_b)).dot(X_b.T).dot(y)
theta_best
array([[4.21509616],
       [2.77011339]])
把x0=1x0=1带入可计算出y值(这里面因为有X_new是二维的,所以x0也是二维的)这里X_new是两个数据点
X_new = np.array([[0], [2]])
X_new_b = np.c_[np.ones((2, 1)), X_new]  # add x0 = 1 to each instance
y_predict = X_new_b.dot(theta_best)
y_predict
array([[4.21509616],
       [9.75532293]])
plt.plot(X_new, y_predict, "r-", linewidth=2, label="Predictions")
plt.plot(X, y, "b.")
plt.xlabel("$x_1$", fontsize=18)
plt.ylabel("$y$", rotation=0, fontsize=18)
plt.legend(loc="upper left", fontsize=14)
plt.axis([0, 2, 0, 15])
plt.show()
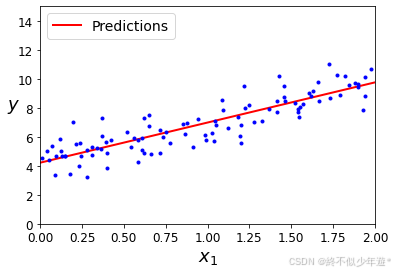
LinearRegression是基于最小二乘方法的线性模型(训练过程使用正规方程求解)
from sklearn.linear_model import LinearRegression
lin_reg = LinearRegression()
lin_reg.fit(X, y)
lin_reg.intercept_, lin_reg.coef_
(array([4.21509616]), array([[2.77011339]]))
lin_reg.predict(X_new)
array([[4.21509616],
       [9.75532293]])
梯度下降训练线性回归
eta = 0.1
n_iterations = 1000
m = 100
theta = np.random.randn(2,1)

for iteration in range(n_iterations):
    gradients = 2/m * X_b.T.dot(X_b.dot(theta) - y)
    theta = theta - eta * gradients
theta
array([[4.21509616],
       [2.77011339]])
预测
X_new_b.dot(theta)
array([[4.21509616],
       [9.75532293]])
绘制不同学习率下的学习过程
theta_path_bgd = []
# 函数 绘制不同学习率下的学习过程
def plot_gradient_descent(theta, eta, theta_path=None):
    m = len(X_b)
    plt.plot(X, y, "b.")
    n_iterations = 1000
    for iteration in range(n_iterations):
        if iteration < 10:
            y_predict = X_new_b.dot(theta)
            style = "b-" if iteration > 0 else "r--"
            plt.plot(X_new, y_predict, style)
        gradients = 2/m * X_b.T.dot(X_b.dot(theta) - y)
        theta = theta - eta * gradients
        if theta_path is not None:
            theta_path.append(theta)
    plt.xlabel("$x_1$", fontsize=18)
    plt.axis([0, 2, 0, 15])
    plt.title(r"$\eta = {}$".format(eta), fontsize=16)
np.random.seed(42)
theta = np.random.randn(2,1)  # random initialization

plt.figure(figsize=(10,4))
plt.subplot(131); plot_gradient_descent(theta, eta=0.02)
plt.ylabel("$y$", rotation=0, fontsize=18)
plt.subplot(132); plot_gradient_descent(theta, eta=0.1, theta_path=theta_path_bgd)
plt.subplot(133); plot_gradient_descent(theta, eta=0.5)

plt.show()
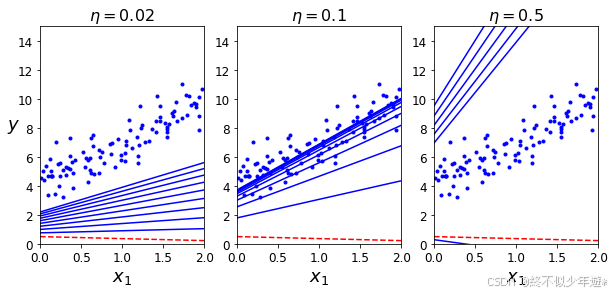
这里面绘制了前10次迭代的情况,可以看到第一幅图,由于学习率很小,梯度下降进展很慢。第二幅图,可以看到当学习率适中时,梯度下降可以快速开始寻找最优解。第三幅图,当学习率比较大时,梯度下降很可能永远找不到最优解。
随机梯度下降
每次用所有样本来梯度下降依然很慢,可以每次只用其中一个值,尽管会引入一些不规律性,算法也没法收敛到最优解,但通常最后的参数还不错,另外,也可以帮助跳出局部最优解。一个优化的方法是逐渐的减小学习率,这个过程称为模拟退火。
theta_path_sgd = []
m = len(X_b)
np.random.seed(42)

n_epochs = 50
t0, t1 = 5, 50  # learning schedule hyperparameters

def learning_schedule(t):
    return t0 / (t + t1)

theta = np.random.randn(2,1)  # random initialization

for epoch in range(n_epochs):
    for i in range(m):
        if epoch == 0 and i < 20:                    # not shown in the book
            y_predict = X_new_b.dot(theta)           # not shown
            style = "b-" if i > 0 else "r--"         # not shown
            plt.plot(X_new, y_predict, style)        # not shown
        random_index = np.random.randint(m)
        xi = X_b[random_index:random_index+1]
        yi = y[random_index:random_index+1]
        gradients = 2 * xi.T.dot(xi.dot(theta) - yi)
        eta = learning_schedule(epoch * m + i)
        theta = theta - eta * gradients
        theta_path_sgd.append(theta)                 # not shown

plt.plot(X, y, "b.")                                 # not shown
plt.xlabel("$x_1$", fontsize=18)                     # not shown
plt.ylabel("$y$", rotation=0, fontsize=18)           # not shown
plt.axis([0, 2, 0, 15])                              # not shown
plt.show()

theta
array([[4.21076011],
       [2.74856079]])
sklearn库中可以使用函数实现随机梯度下降SGDRegressor()
from sklearn.linear_model import SGDRegressor
sgd_reg = SGDRegressor(max_iter=50, tol=-np.infty, penalty=None, eta0=0.1, random_state=42)
sgd_reg.fit(X, y.ravel())
SGDRegressor(eta0=0.1, max_iter=50, penalty=None, random_state=42, tol=-inf)
sgd_reg.intercept_, sgd_reg.coef_
(array([4.16782089]), array([2.72603052]))
小批量梯度下降
在迭代的每一步,批量梯度使用整个训练集,随机梯度使用仅仅一个实例,在小批量梯度下降中,它则使用一个随机的小型实例集。它比随机梯度的主要优点在于你可以通过矩阵运算的硬件优化得到一个较好的训练表现,尤其当你使用 GPU 进行运算的时候。
theta_path_mgd = []

n_iterations = 50
minibatch_size = 20

np.random.seed(42)
theta = np.random.randn(2,1)  # random initialization

t0, t1 = 200, 1000
def learning_schedule(t):
    return t0 / (t + t1)

t = 0
for epoch in range(n_iterations):
    shuffled_indices = np.random.permutation(m)
    X_b_shuffled = X_b[shuffled_indices]
    y_shuffled = y[shuffled_indices]
    for i in range(0, m, minibatch_size):
        t += 1
        xi = X_b_shuffled[i:i+minibatch_size]
        yi = y_shuffled[i:i+minibatch_size]
        gradients = 2/minibatch_size * xi.T.dot(xi.dot(theta) - yi)
        eta = learning_schedule(t)
        theta = theta - eta * gradients
        theta_path_mgd.append(theta)
theta
array([[4.25214635],
       [2.7896408 ]])
三个方法的训练过程数据
theta_path_bgd = np.array(theta_path_bgd)
theta_path_sgd = np.array(theta_path_sgd)
theta_path_mgd = np.array(theta_path_mgd)
# 可视化 三个方法的训练过程数据
plt.figure(figsize=(7,4))
plt.plot(theta_path_sgd[:, 0], theta_path_sgd[:, 1], "r-s", linewidth=1, label="Stochastic")
plt.plot(theta_path_mgd[:, 0], theta_path_mgd[:, 1], "g-+", linewidth=2, label="Mini-batch")
plt.plot(theta_path_bgd[:, 0], theta_path_bgd[:, 1], "b-o", linewidth=3, label="Batch")
plt.legend(loc="upper left", fontsize=16)
plt.xlabel(r"$\theta_0$", fontsize=20)
plt.ylabel(r"$\theta_1$   ", fontsize=20, rotation=0)
plt.axis([2.5, 4.5, 2.3, 3.9])
plt.show()
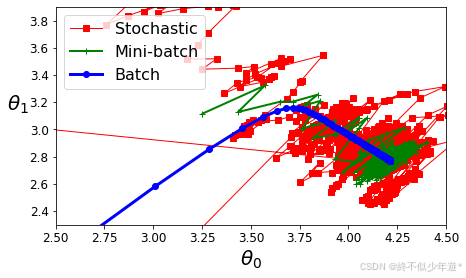
从图中可以看出随机梯度下降法的稳定性较差,波动较大;批量梯度下降法虽然整体性能最优,但是训练过程的时耗最大;小批量梯度下降法则是两者的折中,在大多数任务下的使用率最高。
