AI大模型专家之路:大道至简,调用大模型开发AI助手的最简单方法
摘要
调用大模型的最简单方法:无需安装python等各种环境,无需ollama等各种模型下载工具,无需下载各种AI app,更不需要类似chatBox的各种AI UI壳应用,甚至不需要登陆网站,本文通过一个完整的HTML单文件案例,演示如何用最简代码快速构建具有实时联网检索功能的AI助手程序,而且该助手天生自适应PC端(浏览器打开即可)和手机端(微信中点击并在手机浏览器打开即可)。通过整合现代前端技术与大模型API,实现零后端依赖的智能问答系统。文章涵盖从基础实现到优化扩展的完整技术路径,帮助开发者快速掌握大模型应用开发的核心方法。
核心知识点
- 现代前端技术栈:HTML5 + CSS3 + ES6+ 基础
- Fetch API:浏览器原生HTTP请求处理
- DOM操作:动态更新聊天界面
- 大模型API集成:通过RESTful接口调用GLM-4模型
- 响应式UI设计:自适应不同设备的聊天界面
- 异步编程:使用async/await处理异步请求
- 大模型联网检索:调用GLM的tools功能实现联网检索
代码实现详解
完整代码结构
<!DOCTYPE html>
<html lang="zh-CN">
<head>
    <meta charset="UTF-8">
    <meta name="viewport" content="width=device-width, initial-scale=1.0">
    <title>AI智能助手</title>
    <style>
        body {
            font-family: 'Segoe UI', Tahoma, Geneva, Verdana, sans-serif;
            margin: 0;
            padding: 0;
            height: 100vh;
            background: linear-gradient(135deg, #f5f7fa 0%, #c3cfe2 100%);
        }

        .chat-container {
            max-width: 800px;
            margin: 0 auto;
            padding: 20px;
            height: 100%;
            display: flex;
            flex-direction: column;
        }

        .chat-box {
            flex: 1;
            overflow-y: auto;
            padding: 20px;
            background: white;
            border-radius: 15px;
            box-shadow: 0 4px 6px rgba(0, 0, 0, 0.1);
            margin-bottom: 20px;
        }

        .message {
            margin: 10px 0;
        }

        .user-msg {
            text-align: right;
        }

        .user-msg .content {
            background: #007bff;
            color: white;
            padding: 12px 16px;
            border-radius: 20px;
            display: inline-block;
            max-width: 70%;
        }

        .ai-msg .content {
            background: #f1f1f1;
            color: #333;
            padding: 12px 16px;
            border-radius: 20px;
            display: inline-block;
            max-width: 70%;
        }

        .input-area {
            display: flex;
            gap: 10px;
        }

        #userInput {
            flex: 1;
            padding: 15px;
            border: 2px solid #007bff;
            border-radius: 25px;
            font-size: 16px;
            outline: none;
            transition: border-color 0.3s;
        }

        #userInput:focus {
            border-color: #0056b3;
        }

        button {
            padding: 12px 25px;
            background: #007bff;
            color: white;
            border: none;
            border-radius: 25px;
            cursor: pointer;
            font-size: 16px;
            transition: background 0.3s;
        }

        button:hover {
            background: #0056b3;
        }

        .loading {
            margin-top: 20px;
            text-align: center;
            color: #666;
        }
    </style>
</head>
<body>
    <div class="chat-container">
        <div class="chat-box" id="chatBox">
            <div class="message ai-msg">
                <div class="content">您好!我是AI助手,请问有什么可以帮您?</div>
            </div>
        </div>
        <div class="input-area">
            <input type="text" id="userInput" placeholder="输入您的问题..." autocomplete="off">
            <button onclick="sendMessage()">发送</button>
        </div>
        <div class="loading" id="loading">等待响应...</div>
    </div>

    <script>
        const API_TOKEN = 'your_glm_tokens'; // 替换为您的API Token
        const API_URL = 'https://open.bigmodel.cn/api/paas/v4/chat/completions';
        const MODEL_NAME = 'glm-4-plus';
        const TOOLS = [{
                     'type': 'web_search',
                      'web_search': {'enable': 'True'}
                    }];

        document.getElementById('userInput').addEventListener('keypress', function(e) {
            if (e.key === 'Enter') sendMessage();
        });

        async function sendMessage() {
            const input = document.getElementById('userInput');
            const message = input.value.trim();
            if (!message) return;

            // 添加用户消息到聊天框
            const chatBox = document.getElementById('chatBox');
            chatBox.innerHTML += `
                <div class="message user-msg">
                    <div class="content">${message}</div>
                </div>
            `;

            input.value = '';
            input.disabled = true;
            document.querySelector('button').disabled = true;
            document.getElementById('loading').style.display = 'block';

            try {
                const response = await fetch(API_URL, {
                    method: 'POST',
                    headers: {
                        'Authorization': `Bearer ${API_TOKEN}`,
                        'Content-Type': 'application/json'
                    },
                    body: JSON.stringify({
                        model: MODEL_NAME,
                        messages: [{ role: 'user', content: message }],
                        tools:TOOLS,
                    })
                });

                const data = await response.json();
                const aiResponse = data.choices[0].message.content;

                chatBox.innerHTML += `
                    <div class="message ai-msg">
                        <div class="content">${aiResponse}</div>
                    </div>
                `;
            } catch (error) {
                console.error('请求失败:', error);
                chatBox.innerHTML += `
                    <div class="message ai-msg">
                        <div class="content">请求失败,请检查网络或API配置</div>
                    </div>
                `;
            } finally {
                input.disabled = false;
                document.querySelector('button').disabled = false;
                document.getElementById('loading').style.display = 'none';
                chatBox.scrollTop = chatBox.scrollHeight;
            }
        }
    </script>
</body>
</html>
关键代码解析
1. 界面布局设计
.chat-container {
    max-width: 800px;
    margin: 0 auto;
    padding: 20px;
    height: 100%;
    display: flex;
    flex-direction: column;
}
- 使用Flex布局实现响应式结构
- 渐变背景提升视觉体验
- 阴影效果增强卡片式设计
2. 消息交互逻辑
async function sendMessage() {
    // 输入处理
    const message = input.value.trim();

    // 添加用户消息
    chatBox.innerHTML += userMessageTemplate(message);

    // 禁用输入防重复提交
    toggleInputState(true);

    try {
        // 发送API请求
        const response = await fetch(API_URL, {
            method: 'POST',
            headers: {
                'Authorization': `Bearer ${API_TOKEN}`,
                'Content-Type': 'application/json'
            },
            body: JSON.stringify({
                model: MODEL_NAME,
                messages: [{ role: 'user', content: message }]
            })
        });

        // 处理响应
        const data = await response.json();
        const aiResponse = data.choices[0].message.content;

        // 显示AI回复
        chatBox.innerHTML += aiMessageTemplate(aiResponse);
    } catch (error) {
        // 错误处理
        console.error('请求失败:', error);
        chatBox.innerHTML += aiMessageTemplate('请求失败,请检查网络或API配置');
    } finally {
        // 重置输入状态
        toggleInputState(false);
        scrollToBottom();
    }
}
3. API通信机制
fetch(API_URL, {
    method: 'POST',
    headers: {
        'Authorization': `Bearer ${API_TOKEN}`,
        'Content-Type': 'application/json'
    },
    body: JSON.stringify({
        model: MODEL_NAME,
        messages: [{ role: 'user', content: message }]
    })
})
- 使用Bearer Token认证
- 构建标准JSON请求体
- 处理异步响应流程
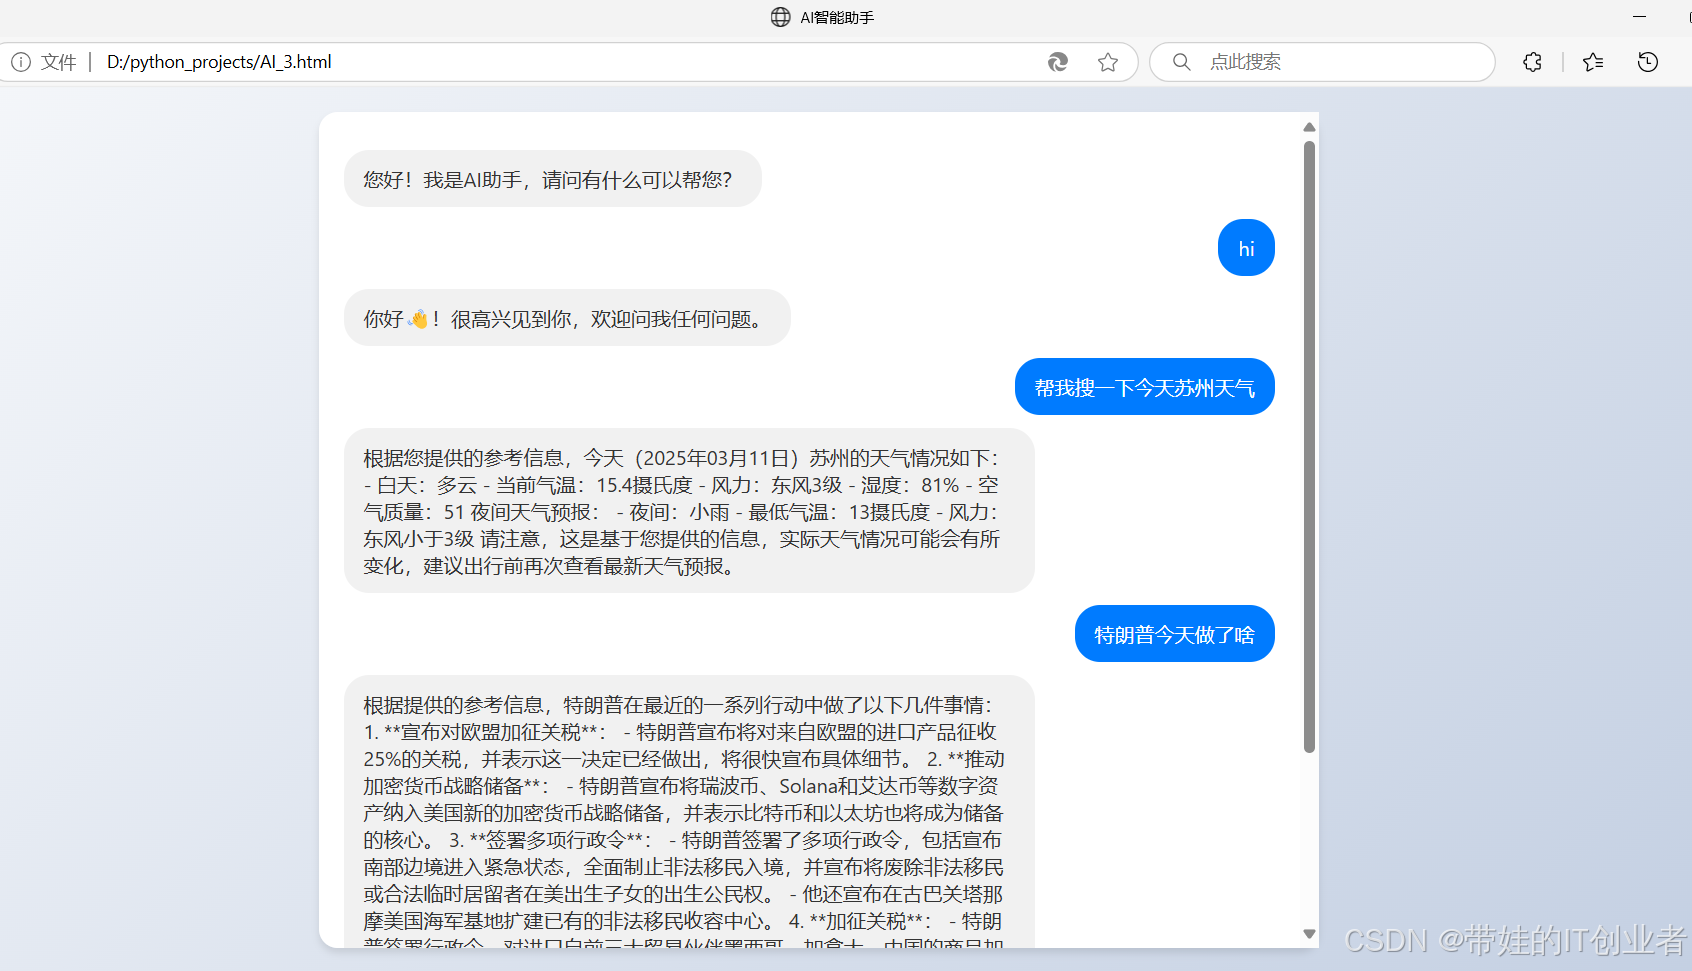
运行效果展示

- 初始界面:显示欢迎语
- 输入交互:支持Enter键和按钮提交
- 消息展示:不同颜色区分用户/系统消息
- 加载状态:显示实时请求状态
- 自动滚动:始终保持显示最新消息
优化方向展望
1. 功能增强
- 多轮对话:维护聊天历史记录
- Markdown支持:渲染富文本回复
- 语音输入:集成Web Speech API
- 主题切换:暗色/亮色模式切换
2. 性能优化
- 请求防抖:防止高频提交
- 消息缓存:本地存储聊天记录
- 流式处理:支持SSE实时输出
3. 安全增强
- Token加密:避免硬编码敏感信息
- 输入过滤:XSS攻击防护
- 速率限制:防止API滥用
总结
本文通过一个仅需HTML单文件的极简方案,展示了大模型应用开发的核心流程。开发者可在以下方面获得提升:
- 掌握API调用的基本范式
- 理解前后端交互的核心逻辑
- 积累UI设计的实战经验
- 建立性能优化的系统思维
建议开发者在此基础进行扩展实验:
- 尝试更换不同大模型(如通义千问、文心一言)
- 集成本地LLM实现离线对话
- 开发浏览器插件版本
- 添加插件扩展系统
- 增加语音对话功能
- 增加文件提交功能
- 增加拍照和图片识别功能
- 增加文生图和图生视频功能
通过持续迭代优化,可将这个基础示例发展为功能完备的智能助手系统,为后续复杂应用开发打下坚实基础。