本章节主要参考《python地理空间分析指南》第五章的内容。
一、距离测量
距离测量包括欧式距离,球面距离,以及大地线距离(椭球距离)。主要采用math库(标准库,无需下载)进行运算。
1.欧式距离
计算任意两点之间的距离可以采用距离公式:
例如:计算点A(x1, y1)和点B(x2, y2)之间的欧式距离(UTM坐标)
import math

x1 = 456456.23
y1 = 1279721.064
x2 = 576628.34
y2 = 1071740.33

ditance = math.sqrt((x1-x2)**2+(y1-y2)**2)
print(distance)

# 输出240.63
2.球面距离(半正矢公式)
利用球面距离的计算公式(Haversine公式)进行计算。
例如:计算点A(-90.212,32.316)和点B(-88.952,30.438)之间的距离(经纬度坐标)
import math

x1 = -90.212
y1 = 32.316
x2 = -88.952
y2 = 30.438

# 经纬度转换为弧度
x_dist = math.radians(x1-x2)
y_dist = math.radians(y1-y2)
y1_rad = math.radians(y1)
y2_rad = math.radians(y2)

a = math.sin(y_dist/2)**2 + math.sin(x_dist/2) * math.cos(y1_rad) * math.cos(y2_rad)
c = 2 * math.asin(math.sqrt(a))
distance = c * 6371
print(distance)

# 输出240.63
3.椭球距离(Vincenty公式)
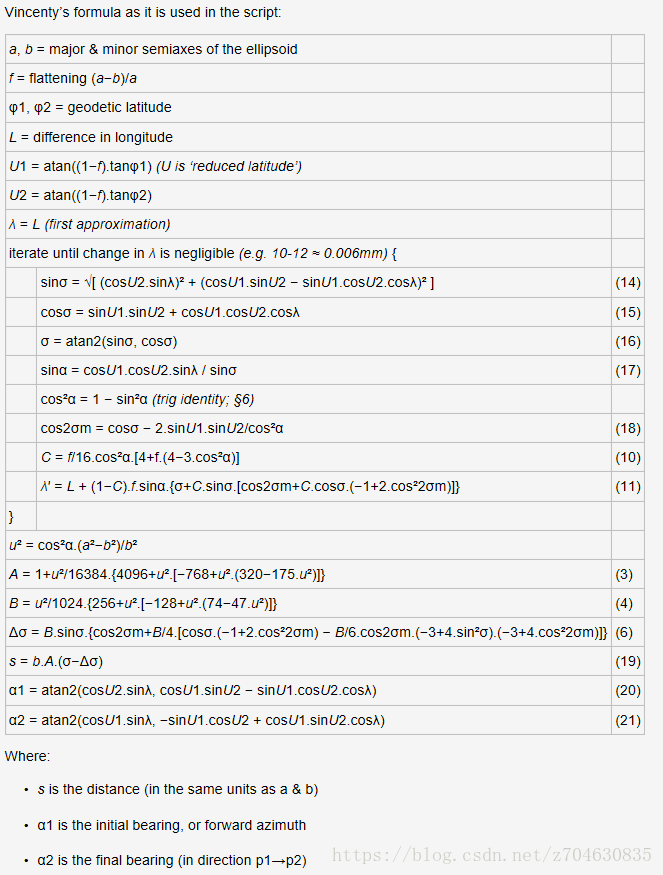
椭球距离一般采用的是Vincenty公式和NAD83(North American Datum )椭球模型。
Vincenty公式的相关准则如下:
其中,NAD83的相关参数为:
例如:计算点A(-90.212,32.316)和点B(-88.952,30.438)之间的距离(经纬度坐标)
import math

x1 = -90.212
y1 = 32.316
x2 = -88.952
y2 = 30.438

# NAD83的椭球参数
a = 6378137        # 半长轴
f = 1/298.257      # 扁平度
b = abs((f*a)-a)   # 半短轴

# 经纬度转化为弧度
L = math.radians(x2-x1)
U1 = math.atan((1-f) * math.tan(math.radians(y1)))
U2 = math.atan((1-f) * math.tan(math.radians(y2)))

sinU1 = math.sin(U1)
cosU1 = math.cos(U1)
sinU2 = math.sin(U2)
cosU2 = math.cos(U2)
lam = L

for i in range(100):
    sinLam = math.sin(lam)
    cosLam = math.cos(lam)
    sinSigma = math.sqrt((cosU2 * sinLam)**2 + (cosU1 * sinU2 - sinU1 * cosU2 * cosLam)**2)
    cosSigma = sinU1 * sinU2 + cosU1 * cosU2 * cosLam

    # 判断是否为重合点
    if sinSigma==0:
        distance = 0
        break

    sigma = math.atan2(sinSigma, cosSigma)
    sinAlpha = cosU1 * cosU2 * sinLam / sinSigma
    cosSqAlpha = 1 - sinAlpha**2
    cos2SigmaM = cosSigma - 2 * sinU1 * sinU2 / cosSqAlpha

    if math.isnan(cos2SigmaM):
        cos2SigmaM = 0

    C = f/16 * cosSqAlpha * (4 + f * (4 - 3 * cosSqAlpha))
    LP = lam
    lam = L + (1 - c) * f * sinAlpha * (sigma + C * sinSigma * (cos2SigmaM +
            C * cosSigma * (-1 + 2 * cos2SigmaM * cos2SigmaM)))

    if not abs(lam - LP) > 1e-12:
        break

uSq = cosSqAlpha * (a**2 - b**2) / b**2
A = 1 + uSq / 16384 * (4096 + uSq * (-768 + uSq * (320 - 175 * uSq)))
B = uSq / 1024 * (256 + uSq * (-128 + uSq * (74 - 47 * uSq)))
deltaSigma = B * sinSigma * (cos2SigmaM + B/4 * (cosSigma * (-1 + 2 * cos2SigmaM * cos2SigmaM) -
            B/6 * cos2SigmaM * (-3 + 4 * sinSigma * sinSigma) * (-3 + 4 * cos2SigmaM *cos2SigmaM)))
distance = b * A * (sigma - deltaSigma)
print(distance)

# 输出结果240237.67
二、方位计算
方位计算是以正北方向为0°方向,顺时针方向角度依次增大的方位角计算。
例如:计算点A(-90.212,32.316)和点B(-88.952,30.438)之间的方位角。
from math import atan2, cos, sin, degrees

x1 = -90.212
y1 = 32.316
x2 = -88.952
y2 = 30.438

angle = atan2(cos(y1)*sin(y2) - sin(y1)*cos(y2)*cos(x2-x1), sin(x2-x1)*cos(y2))
bearing = (degrees(angle) + 360) % 360
print(bearing)

#输出309.36
三、坐标转换(需要自己下载utm模块)
可以利用utm模块进行墨卡托投影和大地经纬度的相互转换。utm模块的官方下载地址为:https://pypi.org/project/utm/
例如:墨卡托投影点(5377685.825,479747.045)转大地经纬度。
import utm

y = 479747.045
x = 5377685.825

zone = 32
band = 'U'
print(utm.to_latlon(y, x, zone, band))

#输出(48.551,8.725)
例如:大地经纬度(48.551,8.725)转墨卡托投影坐标。
import utm
utm.from_latlon(48.551, 8.725)
# 输出(479747.045,5377691.373,32,'U')
四、重投影
重投影操作主要借助于osr模块进行操作。在本示例中,将使用包含Lambert等角投影的纽约市博物馆和画廊位置的点Shapefile文件。可以把它转换成WGS84坐标系统。数据的获取地址为:
http://git.io/vLbT4
下面给出重投影shapefile文件的脚本。经过转换后的几何图形被写入一个新文件,但是因为dbf文件没发生变化,所以只是简单地将其拷贝并重命名为一个新的文件。拷贝dbf文件用shutil库,代码会假定shapefile文件包含一个prj投影文件,其中是源投影格式定义信息。如果没有上述投影信息,需要自行为目标手动定义投影信息。相关代码为:
from osgeo import ogr
from osgeo import osr
import os
import shutil

srcName = "./NYC_MUSEUMS_LAMBERT/NYC_MUSEUMS_LAMBERT.shp"
tgtName = "./NYC_MUSEUMS_LAMBERT/NYC_MUSEUMS_GEO.shp"

tgt_spatRef = osr.SpatialReference()
tgt_spatRef.ImportFromEPSG(4326)

driver = ogr.GetDriverByName("ESRI Shapefile")
src = driver.Open(srcName, 0)
srcLyr = src.GetLayer()
src_spatRef = srcLyr.GetSpatialRef()
if os.path.exists(tgtName):
    driver.DeleteDateSource(tgtName)
tgt = driver.CreateDataSource(tgtName)
lyrName = os.path.splitext(tgtName)[0]

# 使用WKB格式声明几何图形
tgtLyr = tgt.CreateLayer(lyrName, geom_type=ogr.wkbPoint)
featDef = srcLyr.GetLayerDefn()
trans = osr.CoordinateTransformation(src_spatRef, tgt_spatRef)
srcFeat = srcLyr.GetNextFeature()
while srcFeat:
    geom = srcFeat.GetGeometryRef()
    geom.Transform(trans)
    feature = ogr.Feature(featDef)
    feature.SetGeometry(geom)
    tgtLyr.CreateFeature(feature)
    feature.Destroy()
    srcFeat.Destory()
    srcFeat = srcLyr.GetNextFeature()
src.Destroy()
tgt.Destroy()

# 为了导出投影文件将几何图形转换为Esri的WKT格式
tgt_spatRef.MorphToESRI()
prj = open(lyrName + ".prj", "w")
prj.write(tgt_spatRef.ExportToWkt())
prj.close()
srcDbf = os.path.splitext(srcName)[0] + ".dbf"
tgtDbf = lyrName + ".dbf"
shutil.copyfile(srcDbf, tgtDbf)
五、shapefile文件编辑
shapefile文件的操作是GIS分析的基础操作之一,关于shapefile文件的操作,重点关注两种类型即可:.shp和.dbf文件。.shp文件包含几何图形,.dbf文件包含几何图形相关的属性信息。每一条shp几何图像记录,都会有一条对应的dbf属性信息。处理shapefile文件最常用的库有两种:pyshp和ogr。
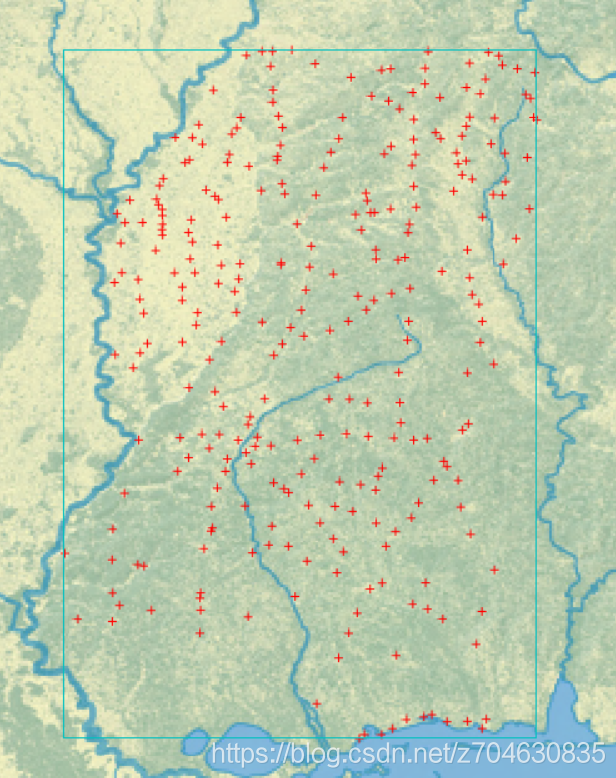
本示例所采用的文件是一个包含密西西比州的若干城市信息的点文件,下载地址为:
http://git.io/vLbU4
用ENVI叠加一张底图,打开shapefile文件,其显示结果为:
1.shapefile文件访问
利用pyshp库打开这个文件:
import shapefile
r = shapefile.Reader("MSCities_Geo_Pts")
需要注意的是,这里读取数据的时候没有写扩展名。如果数据包含多个文件,一般来说不用写扩展名。如果shapefile文件中包含.,那么最好使用扩展名。读取文件之后,还可以查看其相应的属性信息:
r                # 返回其存放地址
r.bbox           # 返回一个list对象
r.shapeType      # 返回几何形状类型,1代表点,3代表线,5代表多边形
r.numRecords     # 返回记录的数量
2.shapefile文件属性读取
方法一:
读取属性信息可以直接输入:
r.fields                                # 获取所有属性信息

[item[0] for item in r.fields[1:]]      # 获取从第2条记录开始,每条记录的第1个字段信息。
如果我们想要获得单个字段信息,可以输入:
r.record(2)        # 获取第三条记录信息
r.record(2)[4]     # 获取第三条记录的第5个字段信息
方法二:
使用r.records()方法遍历整个dbf文件:
# 打印每一条记录
for rec in enumerate(r.records()[:3]):
    print(rec[0]+1, ": ", rec[1])


# 打印记录数目
counter = 0
for rec in r.iterRecords():
    counter += 1
counter
3.shapefile文件几何图形读取
根据shapefile文件的头文件可以确定该文件是一个点shapefile文件,因此获取每一个点可以用下面的方法:
geom = r.shape(0)
geom.points
4.shapefile文件修改
(1)文件修改
使用pyshp库创建一个读取器之后,文件是只读的,它能自动处理所有头文件信息,不过pyshp库的缺点是只适用于UTM投影。下面的示例将会读取一个使用度做计量单位的点shapefile文件,然后在写入器对象保存它之前将器参照系转换文UTM投影。这里将要使用到pyshp和utm库。
下面先给出数据的下载地址:
http://git.io/vLd8Y
示例代码为:
import shapefile
import utm

r = shapefile.Reader("NYC_MUSEUMS_GEO")
w = shapefile.Writer(r.shapeType)

w.fields = list(r.fields)
w.records.extend(r.records())

for s in r.iterShapes():
    lon, lat = s.points[0]
    y, x, zone, band = utm.from_latlon(lat, lon)
    w.point(x, y)
w.save("NYC_MUSEUMS_UTM")

# 如果你想打印第一个图像的第一个点:
print(w.shapes()[0].points[0])
# 打印出信息是一个包含4个数字的list,前两个数字是x和y值,后面两个是占位符(表示高程和测量值)
下面是创建投影的过程,这里不需要像之前一样写入一个prj文件,有一种简便的方法创建,即通过EPSG方位SpatialReference.org网站来实现。从之前的示例中可以知道,UTM18区的EPSG代码是26918,相关代码实现如下:
import urllib.request

prj = urllib.request.urlopen("http://spatialreference.org/ref/epsg/26918/esriwkt/")
with open("NYC_MUSEUMS_UTM", "w") as f:
    f.write(str(prj.read()))
(2)添加特征
接下来将演示如何为一个shapefile文件添加特征。在示例中,将会在shapefile文件中添加第2个多边形用于展示热带风暴。数据的下载地址为:
http://git.io/vLdlA
现在读取这个文件,然后将其拷贝到一个写入器之中,最后添加一个多边形并保存上述操作到原shapefile文件中:
import shapefile

file_name = "ep202009.026_5day_pgn.shp"
r = shapefile.Reader(file_name)
w = shapefile.Writer(r.shapeType)

w.fields = list(r.fields)
w.records.extend(r.records())
w._shapes.extend(r.shapes())
w.poly(parts=[[[-104, 24], [-104, 25], [-103, 25], [-103, 24], [-104, 24]]])
w.record("STANLEY", "TD", "091022/1500", "27", "21", "48", "ep")
w.save(file_name)
(3)添加字段
添加字段操作需要注意的一点,当你在添加一个字段的时候,必须把所有的记录浏览以便,并在该字段列下面添加一个空的单元格或者添加一个值。接下来将用过给UTM版的纽约市博物馆shapefile文件添加经纬度来说明上述问题。
首先,打开shapefile文件并创建写入器,其次添加一个最大长度为8,小数精度为5位的浮点型字段;然后打开地理版的shapfile文件,将其中的坐标值添加到UTM版的dbf文件中的相应属性记录中;最后在源文件的基础上保存这些数据:
import shapefile

r = shapefile.Reader("NYC_MUSEUMS_UTM")
w = shapefile.Writer(r.shapeType)
w.fields = list(r.fields)
w.records.extend(r.records())

w.field("LAT", "F", 8, 5)
w.field("LON", "F", 8, 5)
geo = shapefile.Reader("NYC_MUSEUMS_GEO")
for i in range(geo.numRecords):
    lon, lat = geo.shape(i).points[0]
    w.records[i].extend([lat, lon])

w._shapes.extend(r.shapes())
w.save("NYC_MUSEUMS_UTM")
5.shapefile文件合并
(1)使用pyshp库合并
在本示例中,将会使用一组某城市分布于4个不同方位的建筑物轮廓分布图。下面是原始数据的下载地址:
http://git.io/vLbUE
合并shapefile文件的代码为:
import glob
import shapefile

files = glob.glob("footprints_*.shp")
w = shapefile.Writer()
r = None
for f in files:
    r = shapefile.Reader(f)
    w._shapes.extend(r.shapes())
    w.records.extend(r.records())
w.fields = list(r.fields)
w.save("Merged")
(2)使用dbfpy库合并
pyshp库处理特定软件生成的dbf文件时偶尔会报错。因此我们需要使用更robust的dbf库——dbfpy3。该库需要自己手动下载。
同样使用上述例子,合并shapefile文件的代码为:
from dbfpy3 import dbf
import glob
import shapefile

shp_files = glob.glob("footprints_*.shp")
w = shapefile.Writer()

# 只遍历shapefile文件并将其中的形状信息拷贝到写入器中。不打开dbf文件是为了避免产生任何文件错误解析
for f in shp_files:
    print("shp: {}".format(f))
    shpf = open(f, "rb")
    r = shapefile.Reader(shp=shpf)
    w._shapes.extend(r.shapes())
    print("Num. shapes: {}".format(len(w._shapes)))
    shpf.close()

# 只保存shp和shx索引文件到新合并的shapefile文件中
w.saveShp("merged.shp")
w.saveShx("merged.shx")
# 现在使用dbfpy库合并dbf文件
dbf_files = glob.glob("*.dbf")
# 将第一个dbf文件当作临时模板
template = dbf_files.pop(0)
merged_dbf_name = "merged.dbf"
# 拷贝实体dbf模板文件到合并后的新文件中
merged_dbf = open(merged_dbf_name, "wb")
temp = open(template, "rb")
merged_dbf.write(temp.read())
merged_dbf.close()
temp.close()
# 现在从剩下的dbf文件中读取所有记录并合并在新的,建立对应的dbf文件中
db = dbf.Dbf(merged_dbf_name)
for f in dbf_files:
    print("Dbf: {}".format(f))
    dba = dbf.Dbf(f)
    for rec in dba:
        db_rec = db.newRecord()
        for k, v in list(rec.asDict().items()):
            db_rec[k] = v
        db_rec.store()
db.close()
6.shapefile文件分割
有时候需要从一个比较大的shapefile文件分割出一个感兴趣区域。下面的示例将根据区域对建筑物分布图进行过滤并导出大约100平方米的建筑物分布图到一个新的shapefile文件中。示例将使用utm库将坐标值转换成m,正负值表示多边形点的顺序是顺时针还是逆时针排列。下面直接给出代码:
import shapefile
import utm

r = shapefile.Reader("footprints_se")
w = shapefile.Writer(r.shapeType)
w.fields = list(r.fields)
for sr in r.shapeRecords():
    utmPoints = []
    for p in sr.shape.points:
        x, y, band, zone = utm.from_lalon(p[1], p[0])
        utmPoints.append([x, y])
    area = abs(shapefile.signed_area(utmPoints))
    if area <= 100:
        w._shapes.append(sr.shape)
        w.records.append(sr.record)
w.save("footprints_185")
六、查询优化
1.点包容性查询
点包容性可以使用光影投射法进行检查,该方法会从测试点创建一条直线并穿过多边形,之后会计算其和多边形每条边相交后产生点的个数。如果该数目是偶像,那么点在多边形外部,如果该数目是奇数,那么点在多边形内部。
下面的代码将给出该方法的实现,并用该方法查询某个位置点是否在理智境内:
def point_in_poly(x, y, poly):
    # 判断该点是否为顶点
    if (x, y) in poly: return True
    # 判断一个点是否在多边形线框上
    for i in range(len(poly)):
        p1 = None
        p2 = None
        if i == 0:
            p1 = poly[0]
            p2 = poly[1]
        else:
            p1 = poly[i-1]
            p2 = poly[i]
        if p1[1] == p2[1] and p1[1] == y and x > min(p1[0], p2[0]) and x< max(p1[0], p2[0]):
            return True

    n = len(poly)
    inside = False

    p1x, p1y = poly[0]
    for i in range(n+1):
        p2x, p2y = poly[i % n]
        if y > min(p1y, p2y):
            if y <= max(p1y, p2y):
                if x <= max(p1x, p2x):
                    if p1y != p2y:
                        xints = (y-p1y)*(p2x-p1x)/(p2y-p1y)+p1x
                    if p1x ==p2x or x <= xints:
                        inside = not inside
        p1x, p1y = p2x, p2y

    if inside: return True
    else: return False

myPolygon = [(-70.593016, -33.416032), (-70.589604, -33.415370),
             (-70.589046, -33.417340), (-70.592351, -33.417949),
             (-70.593016, -33.416032)]

# 测试位置点
lon = -70.592000
lat = -33.416000

print(point_in_poly(lon, lat, myPolygon))
2.边框查询
使用一个简单的边框将一个复杂的特征集子集化,之后将器保存为一个新的shapefile文件。在本示例中,将从美国大陆主干道路shapefile文件中子集化波多黎各的道路。数据的下载地址为:
http://github.com/GeospatialPython/Learn/raw/master/roads.zip
下面直接给出代码:
import shapefile

r = shapefile.Reader("roadtr1020")
w = shapefile.Writer(r.shapeType)
w.fields = list(r.fields)
xmin = -67.5
xmax = -65.0
ymin = 17.8
ymax = 18.6
for road in r.iterShapeRecords():
    geom = road.shape
    rec = road.record
    sxmin, symin, sxmax, symax = geom.bbox
    if sxmin < xmin: continue
    elif sxmax > xmax: continue
    elif symin > ymin: continue
    elif symax > ymax: continue
    w._shapes.append(geom)
    w.records.append(rec)
w.save("Puerto_Rico_Road")
3.属性查询
接下来的示例将演示一个使用属性表获取矢量数据子集的方法,数据为一个表示密西西比州人口密度多边形shapefile文件,下载地址为:
http://git.io/vLbU9
下面的脚本首先创建读写器并拷贝dbf文件,然后遍历数据查找匹配的记录,并将查询结果添加到对象中。查询城区内人口小于5000的区域 的代码如下:
import shapefile

# 创建一个读取器
r = shapefile.Reader("MS_UrbanAnC10")
# 创建一个写入器
w = shapefile.Writer(r.shapeType)
# 将字段考入到写入器中
w.fields = list(r.fields)

# 获取几何图形和所有特征图层对应的人口数
selection = []
for rec in enumerate(r.records()):
    if rec[1][14] < 5000:
        selection.append(rec)
# 添加几何图像和记录到写入器中
for rec in selection:
    w._shapes.append(r.shape(rec[0]))
    w.records.append(rec[1])
# 保存新的shapefile文件
w.save("MS_Urban_Subset")
当然,上面的过程也可以用fiona模块实现。具体代码如下:
import fiona

with fiona.open("MS_UrbanAnC10.shp") as sf:
    filtered = filter(lambda f: f['properties']['POP'] < 5000, sf)
    # shapefile文件驱动
    drv = sf.driver
    # 参考坐标系
    crs = sf.crs
    # dbf架构
    schm = sf.schema
    subset = "MS_Urban_Fiona_Subset.shp"
    with fiona.open(subset, "w", driver=drv, crs=crs, schema=schm) as w:
        for rec in filtered:
            w.write(rec)
七、空间信息可视化
1.点密度计算
点密度地图表达了给定区域内点状符号的密度。常用来表示人口密度地图。该功能主要使用了PNGCanvas模块。本示例将使用美国人口调查局提供的包含墨西哥湾沿岸人口统计数据的shapefile文件,并使用点包容性算法确保随机分布的点都在合适的人口普查区域内。下面直接给出代码:
import shapefile
import random
import pngcanvas


def point_in_poly(x, y, poly):
    """判断一个点是否在多边形内部"""
    # 判断该点是否为顶点
    if (x, y) in poly: return True
    # 判断一个点是否在多边形线框上
    for i in range(len(poly)):
        p1 = None
        p2 = None
        if i == 0:
            p1 = poly[0]
            p2 = poly[1]
        else:
            p1 = poly[i-1]
            p2 = poly[i]
        if p1[1] == p2[1] and p1[1] == y and x > min(p1[0], p2[0]) and x< max(p1[0], p2[0]):
            return True
    n = len(poly)
    inside = False
    p1x, p1y = poly[0]
    for i in range(n+1):
        p2x, p2y = poly[i % n]
        if y > min(p1y, p2y):
            if y <= max(p1y, p2y):
                if x <= max(p1x, p2x):
                    if p1y != p2y:
                        xints = (y-p1y)*(p2x-p1x)/(p2y-p1y)+p1x
                    if p1x ==p2x or x <= xints:
                        inside = not inside
        p1x, p1y = p2x, p2y
    if inside: return True
    else: return False


def world2screen(bbox, w, h, x, y):
    """转换地理空间坐标到屏幕坐标"""
    minx, miny, maxx, maxy = bbox
    xdist = maxx - minx
    ydist = maxy - miny
    xratio = w / xdist
    yratio = h / ydist
    px = int(w - ((maxx - x) * xratio))
    py = int((maxy - y) * yratio)
    return (px, py)


# 打开人口普查的shapefile文件
inshp = shapefile.Reader("GIS_CensusTract_poly")
# 设置输出图片尺寸
iwidth = 600
iheight = 400
# 获取人口记录索引
pop_index = None
dots = []
for i, f in enumerate(inshp.fields):
    if f[0] == "POPULAT11":
        # 声明删除标记
        pop_index = i - 1
# 计算点密度并绘制相关点
for sr in inshp.shapeRecords():
    population = sr.record[pop_index]
    # 密度比率 1 一个点代表100人
    density =population / 100
    found = 0
    # 随机绘制点,知道密度达到制定比率
    while found < density:
        minx, miny, maxx, maxy = sr.shape.bbox
        x = random.uniform(minx, maxy)
        y = random.uniform(miny, maxy)
        if point_in_poly(x, y, sr.shape.points):
            dots.append((x, y))
            found += 1
# 为输出PNG图片做准备
c = pngcanvas.PNGCanvas(iwidth, iheight)
# 绘制红色的点
c.color = (255, 0, 0, 0xff)
for d in dots:
    # 将使用*d标记扩展(x, y)元组
    x, y = world2screen(inshp.bbox, iwidth, iheight, *d)
    c.filled_rectangle(x-1, y-1, x+1, y+1)

# 绘制人口普查区域
c.color = (0, 0, 0, 0xff)
for s in inshp.iterShapes():
    pixels = []
    for p in s.points:
        pixel = world2screen(inshp.bbox, iwidth, iheight, *p)
        pixels.append(pixel)
    c.polyline(pixels)
# 保存图片
img = open("DotDensity.png", "wb")
img.write(c.dump())
img.close()
2.等值区域图
等值区域图是一种用于显示密度的图。示例将根据人口普查区域每平方公里的人口得出密度比率,然后根据该比率配置相应的颜色。下面直接给出代码:
import math
import shapefile
from PIL import Image, ImageDraw


def world2screen(bbox, w, h, x, y):
    """转换地理空间坐标到屏幕坐标"""
    minx, miny, maxx, maxy = bbox
    xdist = maxx - minx
    ydist = maxy - miny
    xratio = w / xdist
    yratio = h / ydist
    px = int(w - ((maxx - x) * xratio))
    py = int((maxy - y) * yratio)
    return (px, py)


# 打开shapefile文件
inshp = shapefile.Reader("GIS_CensusTract_poly")
iwidth = 600
iheight = 400
# 初始化PIL库的image对象
img = Image.new("RGB", (iwidth, iheight), (255, 255, 255))
# PIL库的Draw模块用于填充多边形
draw = ImageDraw.Draw(img)
# 获取人口和区域索引
pop_index = None
area_index = None

# 绘制人口普查区域阴影
for i, f in enumerate(inshp.fields):
    if f[0] == "POPULAT11":
        # 声明删除标记
        pop_index = i-1
    elif f[0] == "AREASQKM":
        area_index = i-1
# 绘制多边形
for sr in inshp.shapeRecords():
    density = sr.record[pop_index] / sr.record[area_index]
    # "weight"可以用来配置人口相关的颜色深度
    weight = min(math.sqrt(density/80.0), 1.0) * 50
    R = int(205 - weight)
    G = int(215 - weight)
    B = int(245 - weight)
    pixels = []
    for x, y in sr.shape.points:
        (px, py) = world2screen(inshp.bbox, iwidth, iheight, x, y)
        pixels.append((px, py))
    draw.polygon(pixels, outline=(255, 255, 255), fill=(R, G, B))
img.save("choropleth.png")
八、使用电子表格(需要自己下载xlwt模块)
这里的电子表格大部分都是CSV表格,其可以用python内置的csv模块进行处理。如果想要进行shapefile文件和csv文件的来回切换,可以考虑同时安装xlwt模块和pyShp模块。
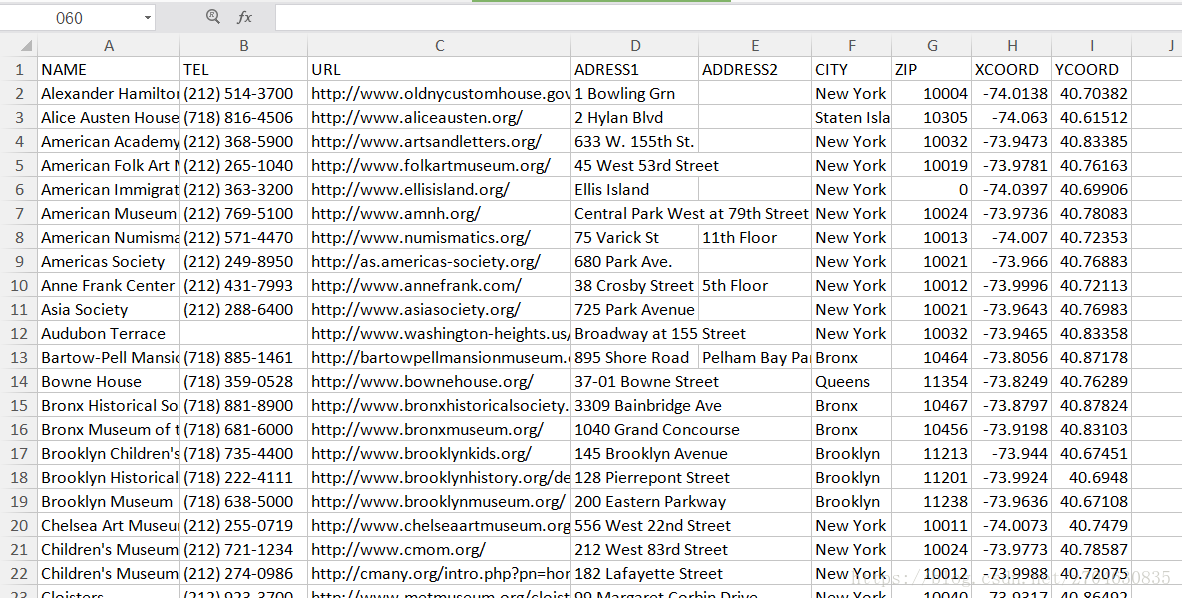
接下来将演示将一个电子表格转换为shapefile文件,本示例使用的是包含纽约城市博物馆点数据的电子表格,其获取地址为:
https://github.com/GeospatialPython/Learn/raw/master/NYC_MUSEUMS_GEO.xls
下载好并打开数据,数据里面包含了博物馆的名称,以及位置,经纬度等信息。里面的内容为:
具体的执行步骤为:获取电子表格——获取表格的表头——循环遍历表格——根据表格中的数据创建点。具体的代码为:
import xlrd
import shapefile

# 打开电子表格读取器
xls = xlrd.open_workbook("NYC_MUSEUMS_GEO.xls")
sheet = xls.sheet_by_index(0)

# 打开shapefile文件书写
w = shapefile.Writer(shapefile.POINT)

# 将数据从待女子表格移动到shapefile文件
for i in range(sheet.ncols):
    # 读取第一行表头信息
    w.field(str(sheet.cell(0, i).value), "C", 40)

for i in range(1, sheet.nrows):
    values = []
    for j in range(sheet.ncols):
        values.append(sheet.cell(i, j).value)
    w.record(*values)
    # 从最后两列获取经纬度信息
    w.point(float(values[-2]), float(values[-1]))
w.save("NYC_MUSEUMS_XLS2SHP")
九、使用GPS数据(需要自己下载pynmea)
目前最流行的GPS数据类型是Garmin GPX,它是一种XML文件,所以也遵循XML文档规范。另一种GPS数据类型是NMEA(美国国家海洋电子协会),它是由ASCII文本流构成的。使用GPS数据,需要安装punmea库。
本示例将解析NMEA文本到流对象中,NMEA文本包含一些天气信息,示例文件的下载地址如下:
http://git.io/vLbTv
打开数据,可以看到数据的内容大概为:
处理的代码如下:
from pynmea.streamer import NMEAStream

nmeaFile = open("nmea.txt")
nmea_stream = NMEAStream(stream_obj=nmeaFile)
next_data = nmea_stream.get_objects()
nmea_objects = []
while next_data:
    nmea_objects += next_data
    next_data = nmea_stream.get_objects()
# 解析NMEA流
# 通过遍历python对象输出类型
for nmea_ob in nmea_objects:
    if hasattr(nmea_ob, "lat"):
        print("Lat/Lon: (%s, %s)" % (nmea_ob.lat, nmea_ob.lon))
十、地理化编码(需要自己下载geocoder或geopy)
地理化编码是将街道的位置信息转化为经纬度的过程。该操作常见于车辆导航系统和在线位置导航网站。常用的库包括geocoder和geopy。(这两个库都需要自己进行安装)
针对geocoder,首先以geojson格式输出骨骼数据库中与该地址相关的所有信息。其次,输出WKT格式的经纬度。下面举例进行演示:
import geocoder

g = geocoder.google("1403 Washington Ave, New Orleans, LA 70130")

print(g.geojson)
print(g.wkt)
针对geopy库,下面给出演示代码:
from geopy.geocoders import Nominatim

g = Nominatim()
location = g.geocode("88360 Diamondhead Dr E, Diamondhead, MS 39525")
rev = g.reverse("{}, {}".format(location.latitude, location.longtitude))
print(rev)


