configmap介绍
Kubernetes 提供了 ConfigMap 来管理应用配置数据,将配置信息从容器镜像中解耦,使应用更灵活、可移植。
1、基于一个目录来创建ConfigMap
你可以使用 kubectl create configmap 基于同一目录中的多个文件创建 ConfigMap。 当你基于目录来创建 ConfigMap 时,kubectl 识别目录下文件名可以作为合法键名的文件, 并将这些文件打包到新的 ConfigMap 中。普通文件之外的所有目录项都会被忽略 (例如:子目录、符号链接、设备、管道等等)
- 创建本地目录:
mkdir -p configure-pod-container/configmap/
# 将示例文件下载到 `configure-pod-container/configmap/` 目录
wget https://kubernetes.io/examples/configmap/game.properties -O configure-pod-container/configmap/game.properties
wget https://kubernetes.io/examples/configmap/ui.properties -O configure-pod-container/configmap/ui.properties

# 创建 ConfigMap
kubectl create configmap game-config --from-file=configure-pod-container/configmap/
以上命令将 configure-pod-container/configmap 目录下的所有文件,也就是 game.properties 和 ui.properties 打包到 game-config ConfigMap 中。
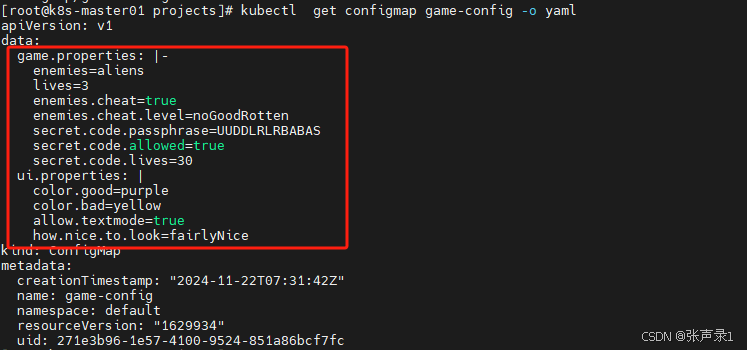
- 查看创建好的configmap
通过kubectl get configmap game-config -o yaml
上图红框中数据为对应configmap数据,发现有两个key-value对,可以key为文件名,value为对应的文件值。
-
将 ConfigMap 数据添加到一个卷中
现在来完成一项任务,将名为 game-config的configmap通过卷的方式注入到容器中
# busy-config-volumn.yaml
apiVersion: v1
kind: Pod
metadata:
  name: from-dir-pod
spec:
  containers:
    - name: test-container
      image: registry.k8s.io/busybox
      command:
      - /bin/sh
      - -c
      - |
       while true; do
          env;
          sleep 5;
       done
      volumeMounts:
      - name: game-config
        mountPath: /etc/config/
  volumes:
    - name: game-config
      configMap:
        # 提供包含要添加到容器中的文件的 ConfigMap 的名称
        name: game-config
  restartPolicy: Never
使用命令创建pod
[root@k8s-master01 projects]# kubectl apply -f busy-config-volumn.yaml
pod/from-dir-pod created
[root@k8s-master01 projects]# kubectl get pod
NAME                                  READY   STATUS    RESTARTS   AGE
from-dir-pod                         1/1     Running   0          9s
查看映射文件:
[root@k8s-master01 projects]# kubectl exec -it from-file-pod -- ls /etc/config
game.properties  ui.properties
2、基于文件来创建ConfigMap
kubectl create configmap game-config-2 --from-file=configure-pod-container/configmap/game.properties
创建利用game-config-2的文件
[root@k8s-master01 projects]# cat from-file-pod.yaml
apiVersion: v1
kind: Pod
metadata:
  name: from-file-pod
spec:
  containers:
    - name: test-container
      image: registry.k8s.io/busybox
      command:
      - /bin/sh
      - -c
      - |
       while true; do
          env;
          sleep 5;
       done
      volumeMounts:
      - name: game-config
        mountPath: /etc/config/
  volumes:
    - name: game-config
      configMap:
        # 提供包含要添加到容器中的文件的 ConfigMap 的名称
        name: game-config-2
  # 创建from-file-pod
[root@k8s-master01 projects]# kubectl apply -f from-file-pod.yaml
pod/from-file-pod created
[root@k8s-master01 projects]# kubectl get pod
NAME                                  READY   STATUS    RESTARTS   AGE
from-file-pod                         1/1     Running   0          14s
查看挂载的卷
[root@k8s-master01 projects]# kubectl exec -it from-file-pod -- ls /etc/config
game.properties
可以多次使用 --from-file 参数,从多个数据源创建 ConfigMap,如:
kubectl create configmap game-config-2 --from-file=configure-pod-container/configmap/game.properties --from-file=configure-pod-container/configmap/ui.properties
[root@k8s-master01 projects]# kubectl exec -it from-file-pod -- cat /etc/config/ui.properties
color.good=purple
color.bad=yellow
allow.textmode=true
how.nice.to.look=fairlyNice
3、使用–from-env-file基于env文件来创建configMap
[root@k8s-master01 projects]# kubectl create configmap game-config-env --from-env-file=configure-pod-container/configmap/game.properties  --from-env-file=configure-pod-container/configmap/ui.properties
configmap/game-config-env created
[root@k8s-master01 projects]# kubectl get configmap game-config-env -o yaml
apiVersion: v1
data:
  allow.textmode: "true"
  color.bad: yellow
  color.good: purple
  enemies: aliens
  enemies.cheat: "true"
  enemies.cheat.level: noGoodRotten
  how.nice.to.look: fairlyNice
  lives: "3"
  secret.code.allowed: "true"
  secret.code.lives: "30"
  secret.code.passphrase: UUDDLRLRBABAS
kind: ConfigMap
metadata:
  creationTimestamp: "2024-11-22T08:57:14Z"
  name: game-config-env
  namespace: default
  resourceVersion: "1641033"
  uid: 63e073ac-72b3-46b8-b8ef-39dcc51a6449
可以看到通过–from-env-file参数会把文件以key-value形式进行保存,而不是整体保存。
将configMap数据作为env变量注入到pod中
[root@k8s-master01 projects]# cat from-env-file-pod.yaml
apiVersion: v1
kind: Pod
metadata:
  name: from-env-file-pod
spec:
  containers:
    - name: test-container
      image: registry.k8s.io/busybox
      command:
      - /bin/sh
      - -c
      - |
       while true; do
          env;
          sleep 5;
       done
      env:
        # 定义环境变量
        - name: ALLOW_TEXTMODE_KEY
          valueFrom:
            configMapKeyRef:
              # ConfigMap 包含你要赋给 ALLOW.TEXTMODE_KEY 的值
              name: game-config-env
              # 指定与取值相关的键名
              key: allow.textmode


[root@k8s-master01 projects]# kubectl exec -it from-env-file-pod  -- env
ALLOW_TEXTMODE_KEY=true
... //省略其他环境变量
4、根据字面值创建 ConfigMap
kubectl create configmap special-config --from-literal=special.how=very --from-literal=special.type=charm

[root@k8s-master01 projects]# kubectl create configmap special-config --from-literal=special.how=very --from-literal=special.type=charm
configmap/special-config created
[root@k8s-master01 projects]# kubectl get  configmap special-config -o yaml
apiVersion: v1
data:
  special.how: very
  special.type: charm
kind: ConfigMap
metadata:
  creationTimestamp: "2024-11-22T09:06:27Z"
  name: special-config
  namespace: default
  resourceVersion: "1642217"
  uid: ba08805a-489c-40b1-9b7c-79bf39412212
--from-env-file和--from-file的区别
| 特性 | --from-env-file | --from-file |
|---|---|---|
| 文件格式要求 | 必须是 KEY=VALUE 格式的键值对 | 任意文本文件(可包含复杂内容) |
| 数据结构 | 每个键值对对应 ConfigMap 的一个条目 | 文件名是键,文件内容是值 |
| 支持目录 | 不支持 | 支持,将目录中所有文件作为键值对存储 |
| 适用场景 | 环境变量配置文件 | 配置文件(如 .properties, .yaml 等) |
| 示例 ConfigMap 数据结构 | { "KEY1": "VALUE1", "KEY2": "VALUE2" } | { "filename1": "file content", ... } |
5、基于yaml文件创建
apiVersion: v1
data:
  special.how: very
  special.type: charm
kind: ConfigMap
metadata:
  name: special-config
