文章目录
一、导入模块OS,模块中方法的使用
导入模块
import os
查看当前操作系统(Window 是 nt;Linux是posix)
os.name


实例 print(os.name  )
获取当前目录 就和 Linux中的 pwd 一样
os.getcwd()

实例 print(os.getcwd() )
获取当前目录所有文件(等于dir ls)
os.listdir()

实例 print(os.listdir())
删除一个文件
os.remove()

实例:os.remove('pip_list.txt')
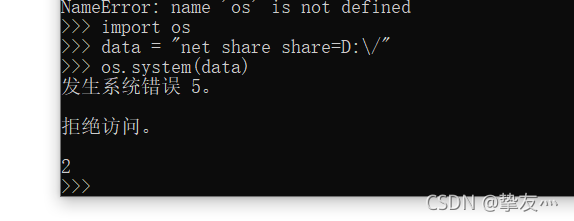
执行shell命令(这是没有权限)
os.system()

实例 : os.system("net share share=D:\/")
判断目录还是文件
os.path.isdir()  # 判断目录(不是目录或目录不存在时返回  False)

os.path.isfile() # 判断文件(不是文件或文件不存在时返回  False)
创建目录
os.mkdir()

实例 : os.mkdir('测试目录')
创建多层目录
os.makedirs()

实例 : os.makedirs('一级目录\二级目录\三级目录')
创建文件
os.mknod("test.txt")        创建空文件

open("test.txt",w)     直接打开一个文件,如果文件不存在则创建文件
循环写入文件
data = 'qwertyuiop'
with open('./ceshi.txt','w',encoding='utf-8') as pf :
    pf.write(data)
w 以写方式打开,
a 以追加模式打开 (从 EOF 开始, 必要时创建新文件)
r+ 以读写模式打开
w+ 以读写模式打开 (参见 w )
a+ 以读写模式打开 (参见 a )
rb 以二进制读模式打开
wb 以二进制写模式打开 (参见 w )
ab 以二进制追加模式打开 (参见 a )
rb+ 以二进制读写模式打开 (参见 r+ )
wb+ 以二进制读写模式打开 (参见 w+ )
ab+ 以二进制读写模式打开 (参见 a+ )
一、使用步骤
1.文件名遍历
import os

# 文件名遍历
for file in os.listdir(r'D:\Project\demo01\demo01'):
    if file == '邮件发送.py':
        print(file)
    else:
        continue
2.一个文件复制到另一个目录
import shutil
shutil.copy('文件路径','目录路径')

shutil.copy(r'D:\Project\demo01\demo01\文件操作\测试目录\ceshi.txt',r'D:\Project\demo01\demo01\文件操作\测试目录\一级目录')

#或
os.system('copy D:\Project\demo01\demo01\文件操作\ceshi.txt D:\Project\demo01\demo01\文件操作\一级目录\测试目录')
3.一个目录复制到另一个目录
os.system(r"xcopy /S  old_file  new_file")

实例 :
os.system('xcopy /S D:\Project\demo01\demo01\文件操作\测试目录  D:\Project\demo01\demo01\文件操作\一级目录')
4文件操作
1.读取文件名
import os , shutil
filelist = os.listdir(path_pdf)
        for files in filelist:
            filename1 = os.path.splitext(files)[1]  # 读取文件后缀名
            filename0 = os.path.splitext(files)[0] # 读取文件名
2.文件移动
full_path = '原文件路径'
move_path = '移动到的地址'
shutil.move(full_path, move_path)
3.文件删除
import os

file_path = '文件路径'
os.remove(file_path)
5.找不到目录就创建
if not os.path.exists(path):
    os.mkdir(path)
6.返回文件路径
这个必须在存在的py文件中,如果直接执行终端执行会报错
os.path.dirname(__file__)
二、邮件操作
发送不含附件的邮件
# smtplib 用于邮件的发信动作
import smtplib
from email.mime.text import MIMEText
# email 用于构建邮件内容
from email.header import Header

def EmailSend(from_addr ,password,smtp_server):
    # 邮箱正文内容,第一个参数为内容,第二个参数为格式(plain 为纯文本),第三个参数为编码
    msg = MIMEText('我的163邮箱', 'plain', 'utf-8')

    # 邮件头信息
    msg['From'] = Header(from_addr)
    msg['To'] = Header(to_addr)
    msg['Subject'] = Header('python test')

    # 开启发信服务,这里使用的是加密传输
    server = smtplib.SMTP_SSL('smtp.qq.com')
    server.connect(smtp_server, 465)
    # 登录发信邮箱
    server.login(from_addr, password)
    # 发送邮件
    server.sendmail(from_addr, to_addr, msg.as_string())
    # 关闭服务器
    server.quit()

if __name__ == '__main__':
    # 发信方的信息:发信邮箱,QQ 邮箱授权码
    from_addr = '26***[email protected]'
    password = '***hg'

    # 收信方邮箱
    to_addr = 'ch***[email protected]'

    # 发信服务器
    smtp_server = 'smtp.qq.com'
    EmailSend(from_addr ,password,smtp_server)
发送带附件的邮件
import base64
import os
import smtplib
import email
from email.mime.text import MIMEText
from email.mime.multipart import MIMEMultipart
from email.mime.image import MIMEImage


class EmailGainSend:
    # 邮件发送
    def EmailSend(self,host,user,pwd,file_path,gain_user):

        msg = MIMEMultipart()
        msg.attach(MIMEText('hello world!'))  # 邮件正文的内容
        msg['Subject'] = 'hello world!'  # 邮件主题
        msg['From'] = user  # 发送者账号
        msg['To'] = gain_user  # 接收者账号列表


        f = open(file_path, 'rb').read()
        att = MIMEText(f, "base64", "utf-8")
        att["Content-Type"] = 'application/octet-stream'
        # 这里是处理文件名为中文名的,必须这么写
        file_name = os.path.split(file_path)[-1]
        new_file_name = '=?utf-8?b?' + base64.b64encode(file_name.encode('utf-8')).decode('utf-8') + '?='
        att["Content-Disposition"] = 'attachment; filename="%s"' % new_file_name
        msg.attach(att)
        server = smtplib.SMTP()
        server.connect(host)
        server.login(user, pwd)
        server.sendmail(user, gain_user, msg.as_string())
        server.close()

if __name__ == '__main__':
    e_mail = EmailGainSend()
    host = 'smtp.qq.com' # 服务器地址
    user = '2623**[email protected]'  # 发送人邮箱
    pwd = '***'  # smtp 服务授权码
    file_path = r'D:\Project\ZJGL\cs.rar' # 文件路径
    gain_user = 'ch***[email protected]'
    e_mail.EmailSend(host,user,pwd,file_path,gain_user)
下载邮件附件
import base64,os,poplib,email
import smtplib
from email.mime.text import MIMEText
from email.mime.multipart import MIMEMultipart
from email.header import decode_header


"""
    需求:消息标题、附件名称(存在header中)都是以字节为单位进行传输的,中文内容需要解码
    功能:对header进行解码
"""
def decode(header: str):
    value, charset = email.header.decode_header(header)[0]
    if charset:
        return str(value, encoding=charset)
    else:
        return value


"""
    功能:下载某一个消息的所有附件
"""
def download_attachment(msg,down_load_email_file_path):
    subject = decode(msg.get('Subject'))  # 获取消息标题
    for part in msg.walk():  # 遍历整个msg的内容
        if part.get_content_disposition() == 'attachment':
            attachment_name = decode(part.get_filename())  # 获取附件名称
            attachment_content = part.get_payload(decode=True)  # 下载附件
            attachment_file = open(down_load_email_file_path+'\\'+ attachment_name, 'wb') # 在指定目录下创建文件,注意二进制文件需要用wb模式打开
            attachment_file.write(attachment_content)  # 将附件保存到本地
            attachment_file.close()
    print('Done………………', subject)


def EmailFain_login(user_email,user_pwd):
    """连接到POP3服务器"""
    server = poplib.POP3(host='pop.qq.com')  # 创建一个POP3对象,参数host是指定服务器

    """身份验证"""
    server.user(user_email)  # 参数是你的邮箱地址
    server.pass_(user_pwd)  # 参数是你的邮箱密码,如果出现poplib.error_proto: b'-ERR login fail',就用开启POP3服务时拿到的授权码

    """获取邮箱中消息(邮件)数量"""
    msg_count, _ = server.stat()

    """遍历消息并保存附件"""
    for i in range(msg_count):
        """获取消息内容:POP3.retr(which)检索index为which的整个消息,并将其设为已读"""
        _, lines, _ = server.retr(
            i+1)  # 3个结果分别是响应结果(1个包含是否请求成功和该消息大小的字符串),消息内容(一个字符串列表,每个元素是消息内容的一行),消息大小(即有多少个octets,octet特指8bit的字节)

        """将bytes格式的消息内容拼接"""
        msg_bytes_content = b'\r\n'.join(lines)

        """将字符串格式的消息内容转换为email模块支持的格式(<class 'email.message.Message'>)"""
        msg = email.message_from_bytes(msg_bytes_content)

        """下载消息中的附件"""
        download_attachment(msg,down_load_email_file_path)

if __name__ == '__main__':
    # 邮件接收
    # 附件下载邮箱与pop服务授权码
    user_email, user_pwd = '[email protected]','fin***dhjd'
    down_load_email_file_path = r'D:\Project\ZJGL\接收邮件' # 下载附件保存路径
    # EmailFain_login(user_email,user_pwd)
获取邮件时间
也看了网上的一些方法,感觉找到邮件原文并解析数据适合我,
- 下方源码的msg.walk()是邮件原文,下面的能放到上方的download_attachment函数里
- ** msg.walk 里面有邮件标题,正文 … 所以找到标题就行了,循环体的第一个里面,就是日期的存放地点,
- ** 套用上放代码时,原有循环邮件的不能变,因为这个就是找邮件标题里的日期,其他直接跳过了。
# downloadcompletes_path = r'D:\Project\ZJGL\判断重复文件\已经下载过的附件.xlsx'
# data_frame = pd.read_excel(io=downloadcompletes_path, engine='openpyxl', index_col=False)
# data_dic = data_frame.to_dict('records')
    for i in msg.walk():
        '''05 Nov 2021 14:50:40 +0800'''
        pattern = r'([\d]{2} [\w]{3} [\d]{4} [\d]{2}:[\d]{2}:[\d]{2} \+[\d]{4})'
        string = str(i)
        data = re.findall(pattern, string, flags=0)
        if len(data) == 0:
            continue
        data_frame_list = data_frame.iloc[:, 0].values.tolist()
        if subject + data[0] in data_frame_list:
            print('邮件:', subject + data[0], '已下载')
            continue
        data_dic.append({'EmailTiele+EmailDate': subject + data[0]})
三、python爬虫
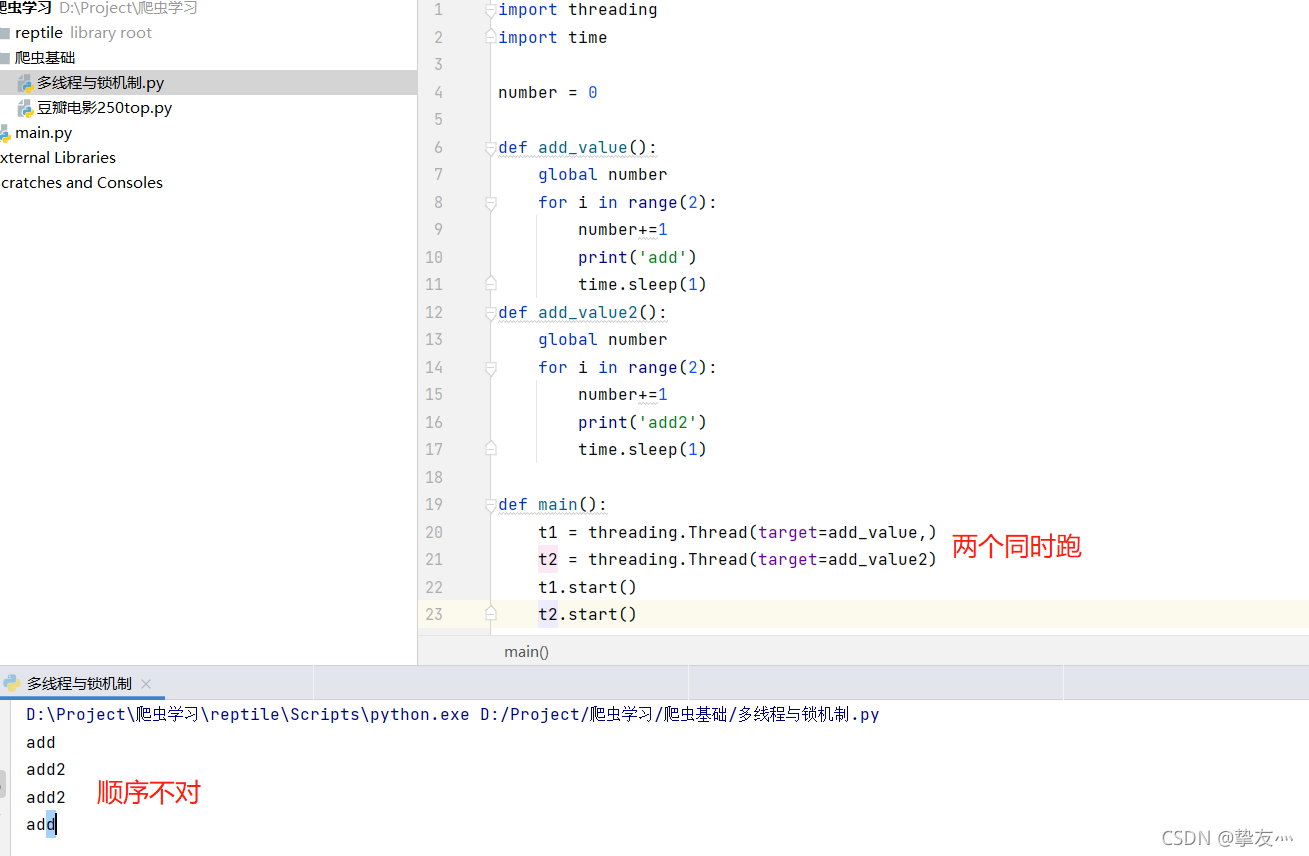
多线程
解决方法用到了再更吧,哈哈。
ps: 多线程好像就是乱出的…,如果加锁又达不到想要的效果,如果爬虫数据量大建议使用scrapy
四、selenium(获取cookies)
获取cookies
# 窗口最大化
driver.maximize_window()
# 打开指定网址
driver.get('https://www.dhl.com/cn-zh/home.html?locale=true')
# 获取cookies
cookies_data = driver.get_cookies()
cookies样式
获取到的cookies(解释)
- 它是一个列表,列表里面是一个个字典
- 需要的是字典里面的name和value 这两个key值
- 格式话cookies=字典的name+value值,中间用 “=”连接
提取数据
cookies_list = [cookie['name'] + '=' + cookie['value'] for cookie in cookies_data ]
list转str
cookies = ';'.join(cookies_list)
传入headers
headers = {
    'cookie':cookies
}
五、js字体动态加密
大众点评
开始之前,先熟悉一个第三方包
- fontTools
- 用于解析字体文件(一般是.woff后缀名)
# 导包
from fontTools.ttLib import TTFont
- 加载字体文件
tf= TTFont(r'./f07ee1ec.woff')
- 将woff文件转换成xml
font.saveXML(r'./f07ee1ec.xml')
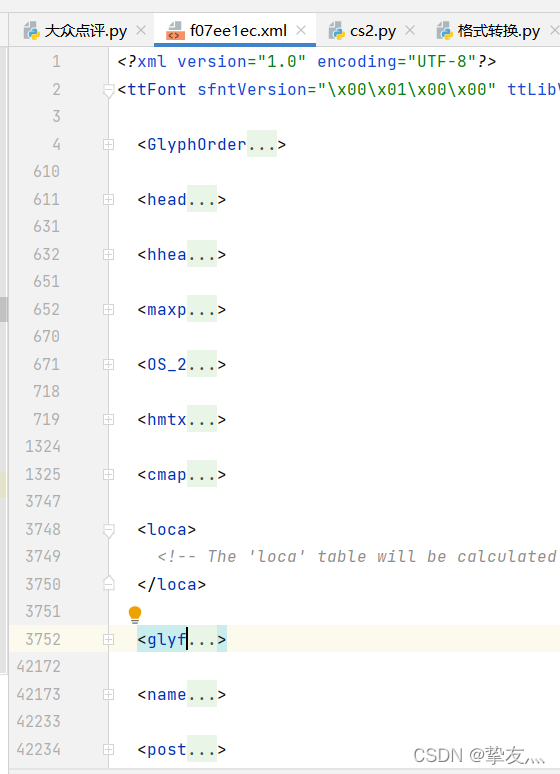
- xml文件的主题结构大概就是这样
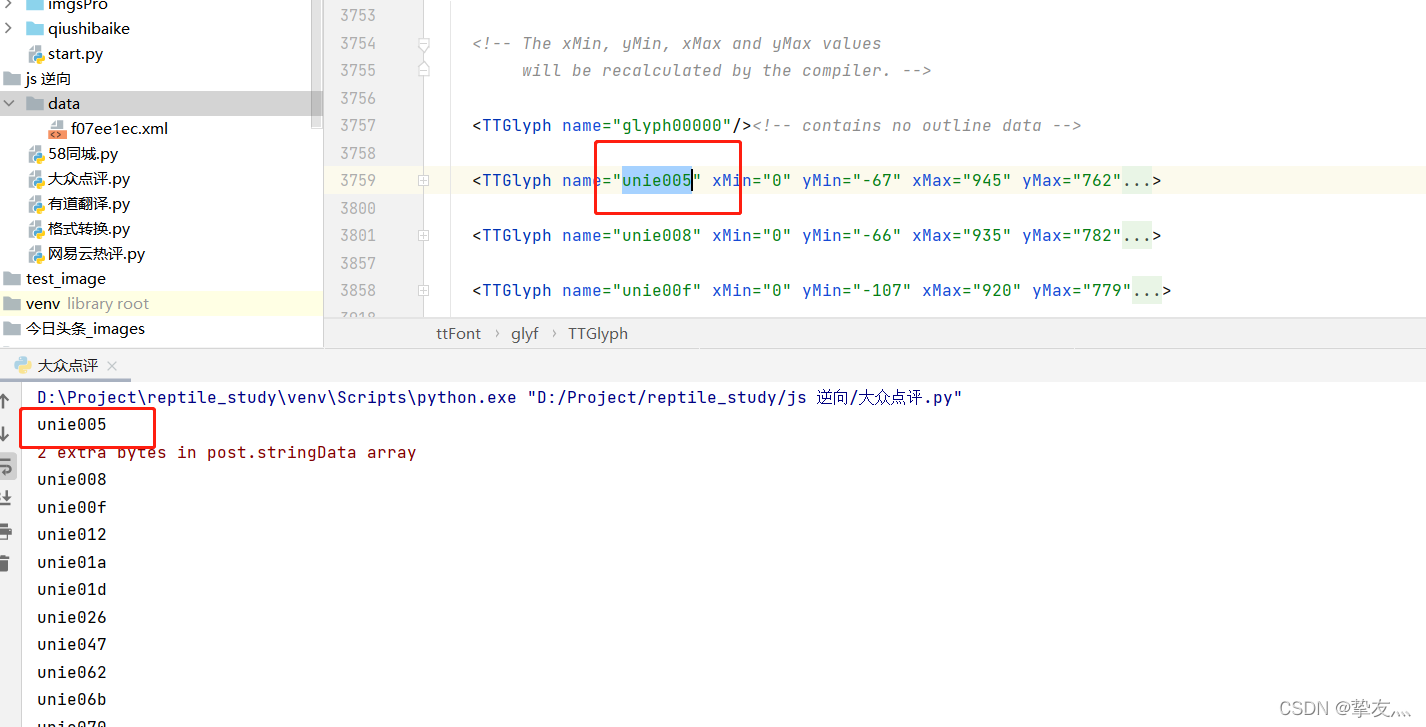
- tf.getGlyphNames()
- 这个获取到的就是glyf标签里的一个个TTGlyph name值(我这里去首尾字符了,因为这两个没用)
- 这个获取到的就是glyf标签里的一个个TTGlyph name值(我这里去首尾字符了,因为这两个没用)
- 接下来,分析这里面的x,y
- x,y就是像素坐标点,通过一个个点,显现出数字。
- 那么,分析这两个点之间有什么规则
- 懒得叨叨了,直接上图
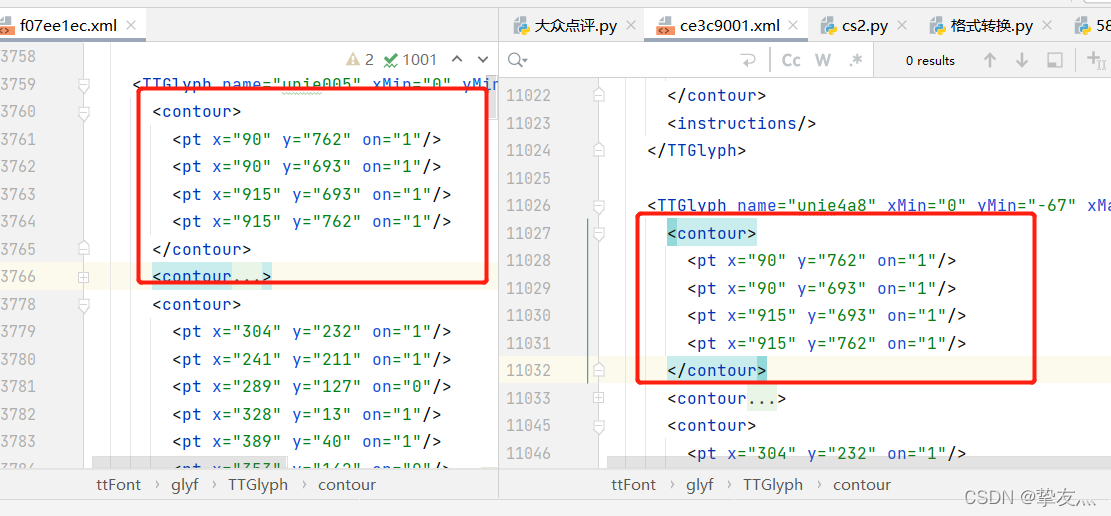
- 可以看出两个woff文件,虽然GlyphName不同,但是像素点是一样的,
- 那么,第二个像素点的X-第一个像素点的X(还有y),是不是就是固定的值了。
- 接着想,可不可以把像素点的差作为一个字典的key,真实数值当作value,这样,不就有了真实的对应表了
- 假设就是下面的对应表(真是假的)
- (-112,0):‘8’
- 就是(x2 - x1 , y2 - y1):‘8’
data_map = {
       (-112, 0):'8',(-21, -40):'9',(-12, 1):'0'
   }
- 下一步,获取每次请求得到的woff文件,获取GlyphName(网页中数字被替换掉的东西)和像素点的差
font_map = {} #定义一个空字典,用来
for i in tf.getGlyphNames()[1:-1] # 获取woff文件中的GlyphName,去除收尾无关数据
# tf.getGlyphNames() == [unie005,unie001...]
# i == unie005
# temp = tf['glyf'][i] 是一个坐标对象,coordinates将它分成一个个坐标点
temp = tf['glyf'][i].coordinates
# temp里面有很多的坐标点,我们只要前两个就行了
x1,y1 = temp[0]
x2,y2 = temp[1]
new = (x2-x1,y2-y1)# 前面不是手动填了一个真实坐标字典data_map吗,这个值就是和data_map的key对照用的
key = i.replace("uni",'&#x').lower() # 将uni替换&#x,lower是将大写字符转小写
# 这里加个判断,因为上面的data_map只是一部分解密的对照表,而new有很多
if new in data_map.keys():
font_map[key] = data_map[new] # 通过判断data_map字典的key值,拿的value(就是1,2,3这些数据)
# 这样,font_map这个字典的key就是页面的这些,value就是真实数字
请求数据
res = requests.get(url=url,headers=headers,params=params).text
# 数据清洗
for key in font_map:
    if key in res:
        res = res.replace(key, str(font_map[key]))
print(res)
就不附上源代码了,哈哈
六、调用网站js,模拟网页数据解析过程
首先,我们要认识一个包 pyexecjs
这个包是执行js用的
- 安装一下
pip install pyexecjs
ennnn,不知道怎么说的,剩下的就是在网页中找相关的变量,然后把有关的js复制下来
- 先说一下execjs怎么用的吧
# 先导包
import execjs
# 读取js文件
with open('../conf/test.js',encoding='utf-8') as f:
    js = f.read()
# 加载js
docjs = execjs.compile(js)

# 调用function
dec = docjs.call('decode',t)
# 这两个参数,第一个是js里的函数名,后面的是变量
- 这里,要注意变量的数据类型(网站上的什么样就什么样),分析js的时候一定要看仔细
- 额,后面没啥了好像,js的话,没学过应该也可以看得懂吧
最后,说一下常见报错
execjs._exceptions.ProgramError: SyntaxError: 缺少标识符、字符串或数字
我遇到了这个,安装一下node.js
execjs._exceptions.ProgramError: ReferenceError: navigator is not defined
这个问题就加一下
global.navigator={
userAgent: 'node.js',
};
最后放一下数据吧
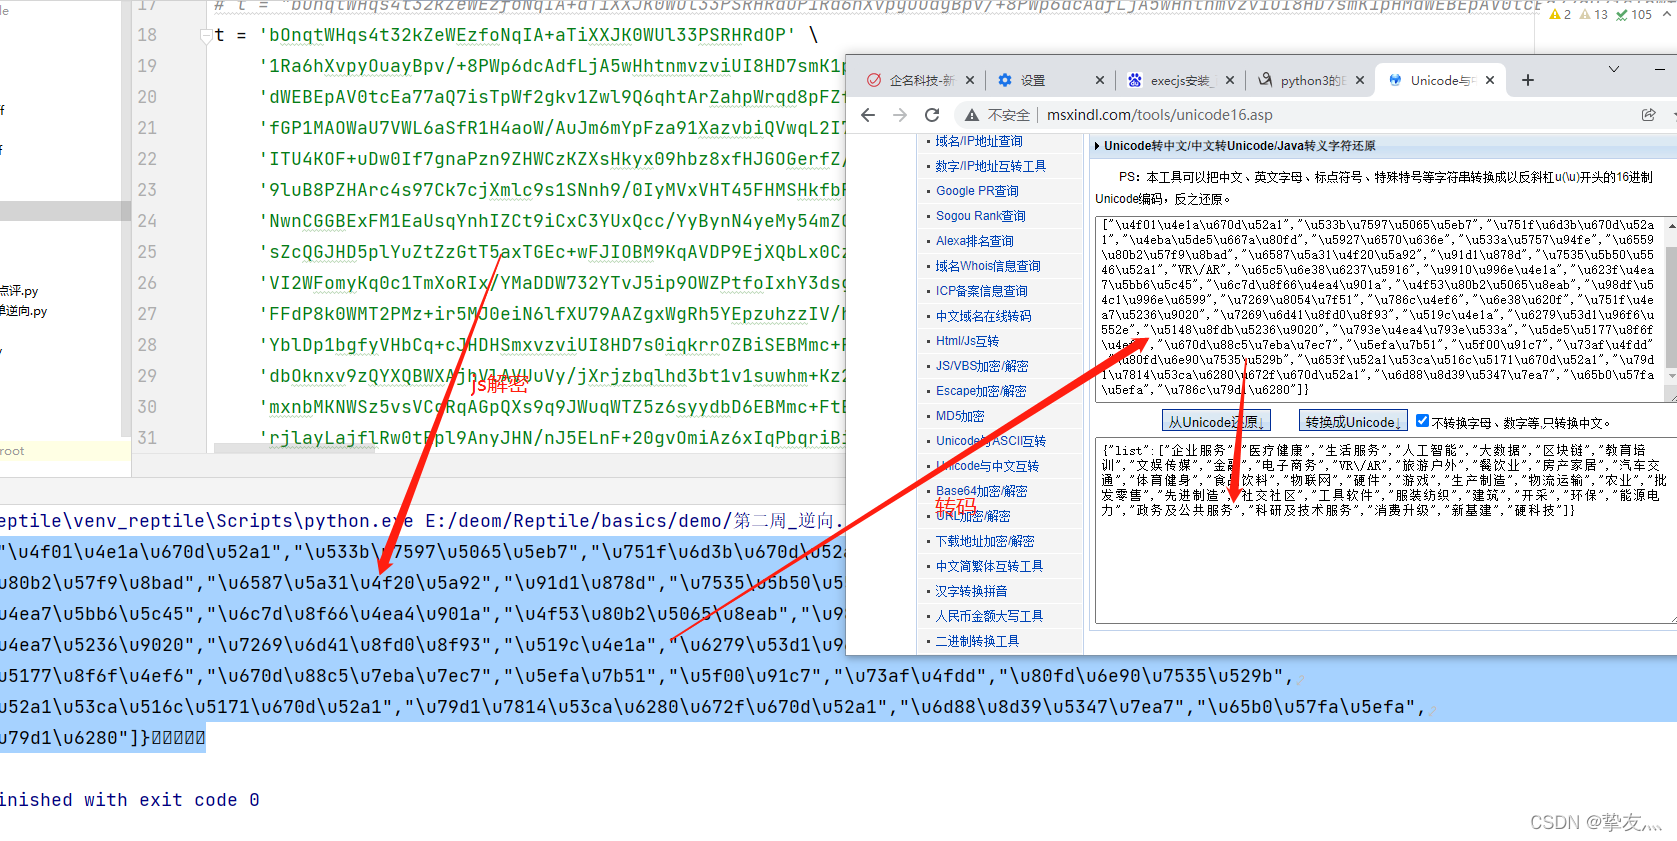
解码网站点击跳转
还有一种方法
ps:你要有node环境(直接搜安装node.js)
- python调用node.js
- 例:
- js文件:
function add(a,b) { return a+b } //node方式到导出函数 module.exports.init = function (a,b) { // 调用函数,并返回 console.log(add(a,b)); };- py文件
import os
# 获取当前路径
func_path = os.path.dirname(__file__)
func_path = func_path.replace('\\','/')

saing = os.popen('node -e "require(\\"{0}\\").init({1},{2})"'.format(func_path+'/sing.js',1,1)).read()
print(saing)
七、python中的装饰器
无参函数调用
编写装饰器(简单的获取程序运行时间)
def run_time(func):
    def time_date():
        start_time = time.time()

        # 执行函数
        func()

        end_time = time.time()
        cost_time = end_time-start_time
        print("time:",cost_time)
        return func()
    return time_date

@run_time
def fun_one():
    time.sleep(1)
    date = "时间"
    # return date
ps:这里说一下上面是什么意思
- 开头先说一下装饰器的应用场景
- 比如,获取运行时间,加日志,后端的token验证什么的,简写代码
- run_time 就是定义的一个闭包函数,通俗的讲就是,函数里面嵌套函数,外部的函数调用里面的函数
- 然后,这里说一下函数调用的时候,加不加括号()的区别
- 加括号,调用的是函数的返回值(没有return就是None,等函数执行完,括号里有没参数都一样)
- 不加 ,调用整个函数(不等函数执行完)
不定参函数调用
先要知道两个不同,函数的参数,一个星号和两个星号的不同(两个都是不定长参数)
- 一个星号:元组数据
- 两个型号:字典类型数据
import time
def deco(fun):
    def wrapper(*args,**kwargs):  # 第一步。 元组数据。
        startTime = time.time()
        endTime = time.time()
        print(args)
        msecs = (endTime - startTime) * 1000
        f = fun(*args,**kwargs)  # 第二步,执行函数
        print("装饰器",f)
        return f
    return wrapper

@deco
def fun1(a,b,c): # 第三步 : 传入数据 a = 1
                 # b = {"2":2,"3":3}
    print(c)
    print("我是 fun1 :{} {}".format(a,b['2']))
    return "01"


if __name__ == '__main__':
    a = 1
    b = {"2":2,"3":3} #传入数据
    f = fun1(a,b,c="c")
    print("f",f)
八、 token验证
jwt模块
安装模块
pip install jwt
加密算法类型
-
1.对称加密HMAC【哈希消息验证码】 HS256/HS384/HS512
这种加密方式没有公钥,私钥之分, 也就是只有一个密钥, 这种 加密方式适用于: 服务器将生成的jwt发送给接收方, 接收方将其返回给服务器, 服务器解析 jwt, 完成身份验证. -
2.非对称加密RSASSA【RSA签名算法】RS256/RS384/RS512
-
3.ECDSA【椭圆曲线数据签名算法】 ES256/ES384/ES512
对称加密使用
参数1(payload中的)
payload 中一些固定参数名称的意义, 同时可以在payload中自定义参数
- iss 【issuer】发布者的url地址
- sub 【subject】该JWT所面向的用户,用于处理特定应用,不是常用的字段
- aud 【audience】接受者的url地址
- exp 【expiration】 该jwt销毁的时间;unix时间戳
- nbf 【not before】 该jwt的使用时间不能早于该时间;unix时间戳
- iat 【issued at】 该jwt的发布时间;unix 时间戳
- jti 【JWT ID】 该jwt的唯一ID编号
参数2(headers)
- jku: 发送JWK的地址;最好用HTTPS来传输
- jwk: 就是之前说的JWK
- kid: jwk的ID编号
- x5u: 指向一组X509公共证书的URL
- x5c: X509证书链
- x5t:X509证书的SHA-1指纹
- x5t#S256: X509证书的SHA-256指纹
- typ: 在原本未加密的JWT的基础上增加了 JOSE 和 JOSE+ JSON。JOSE序列化后文会说及。适用于JOSE标头的对象与此JWT混合的情况。
- crit: 字符串数组,包含声明的名称,用作实现定义的扩展,必须由 this->JWT的解析器处理。不常见。
"""
jwt.encode(payload=dict,key=key,algorithm=""..)   加密
jjwt.decode(jwt=token,key=self.key,algorithms=['HS256']) 解密
"""
import jwt,json,time

class tokens:
    def __init__(self,data):
        self.data = data
        self.data['exp'] = time.time()+60*60*24  # token过期时间
        self.headers = {
            "alg":"HS256",
            # 声名所使用的算法
        }
        self.key = "123qwe"
    def create_token(self):
        token = jwt.encode(payload=self.data,key=self.key,algorithm="HS256",headers=self.headers).decode()
        return token

    def parse_token(self,token):
        try:
            data = jwt.decode(jwt=token,key=self.key,algorithms=['HS256'])
            return data
        except Exception as e:
            return e


if __name__ == '__main__':
    data_dic = {"username":"qwe","password":"123"}
    obj = tokens(data_dic)
    token = obj.create_token()
    data = obj.parse_token(token)
    print(token)
    print(data)
RSA加密
加密技术在数据安全存储,数据传输中发挥着重要作用,能够保护用户隐私数据安全,防止信息窃取。RSA是一种非对称加密技术,在软件、网页中已得到广泛应用。本文将介绍RSA加密解密在python中的实现。
原则:公钥加密,私钥解密
解释:具体过程的解释请见代码前的注释
如果本文对您有帮助,不妨点赞、收藏、关注哟!您的支持和关注是博主创作的动力!
一、安装模块
pip install pycryptodome
二、生成密钥对
密钥对文件生成和读取
代码:
from Crypto.PublicKey import RSA

def create_rsa_pair(is_save=False):
  '''
  创建rsa公钥私钥对
  :param is_save: default:False
  :return: public_key, private_key
  '''
  f = RSA.generate(2048)
  private_key = f.exportKey("PEM")  # 生成私钥
  public_key = f.publickey().exportKey()  # 生成公钥
  if is_save:
      with open("crypto_private_key.pem", "wb") as f:
          f.write(private_key)
      with open("crypto_public_key.pem", "wb") as f:
          f.write(public_key)
  return public_key, private_key


def read_public_key(file_path="crypto_public_key.pem") -> bytes:
  with open(file_path, "rb") as x:
      b = x.read()
      return b


def read_private_key(file_path="crypto_private_key.pem") -> bytes:
  with open(file_path, "rb") as x:
      b = x.read()
      return b
三、加密
流程:输入文本(str)→字符串编码(默认utf-8)(bytes)→rsa加密(bytes)→base64编码(bytes)→解码为字符串(str)
代码:
import base64
from Crypto.Cipher import PKCS1_v1_5
from Crypto.PublicKey import RSA

def encryption(text: str, public_key: bytes):
  # 字符串指定编码(转为bytes)
  text = text.encode('utf-8')
  # 构建公钥对象
  cipher_public = PKCS1_v1_5.new(RSA.importKey(public_key))
  # 加密(bytes)
  text_encrypted = cipher_public.encrypt(text)
  # base64编码,并转为字符串
  text_encrypted_base64 = base64.b64encode(text_encrypted ).decode()
  return text_encrypted_base64

if __name__ == '__main__':
  public_key = read_public_key()
  text = '123456'
  text_encrypted_base64 = encryption(text, public_key)
  print('密文:',text_encrypted_base64)
四、解密
说明:解密流程与加密流程相反(按照加密流程逆序解密)
流程:输入文本(str)→字符串编码(默认utf-8)(bytes)→base64解码(bytes)→rsa解密(bytes)→解码为字符串(str)
代码:
import base64
from Crypto.Cipher import PKCS1_v1_5
from Crypto import Random
from Crypto.PublicKey import RSA

def decryption(text_encrypted_base64: str, private_key: bytes):
  # 字符串指定编码(转为bytes)
  text_encrypted_base64 = text_encrypted_base64.encode('utf-8')
  # base64解码
  text_encrypted = base64.b64decode(text_encrypted_base64 )
  # 构建私钥对象
  cipher_private = PKCS1_v1_5.new(RSA.importKey(private_key))
  # 解密(bytes)
  text_decrypted = cipher_private.decrypt(text_encrypted , Random.new().read)
  # 解码为字符串
  text_decrypted = text_decrypted.decode()
  return text_decrypted

if __name__ == '__main__':
  # 生成密文
  public_key = read_public_key()
  text = '123456'
  text_encrypted_base64 = encryption(text, public_key)
  print('密文:',text_encrypted_base64)

  # 解密
  private_key = read_private_key()
  text_decrypted = decryption(text_encrypted_base64, private_key)
  print('明文:',text_decrypted)
五、完整代码
import base64
from Crypto.Cipher import PKCS1_v1_5
from Crypto import Random
from Crypto.PublicKey import RSA

#### 原文链接
https://www.jb51.net/article/244576.htm

# ------------------------生成密钥对------------------------
def create_rsa_pair(is_save=False):
  '''
  创建rsa公钥私钥对
  :param is_save: default:False
  :return: public_key, private_key
  '''
  f = RSA.generate(2048)
  private_key = f.exportKey("PEM")  # 生成私钥
  public_key = f.publickey().exportKey()  # 生成公钥
  if is_save:
      with open("crypto_private_key.pem", "wb") as f:
          f.write(private_key)
      with open("crypto_public_key.pem", "wb") as f:
          f.write(public_key)
  return public_key, private_key


def read_public_key(file_path="crypto_public_key.pem") -> bytes:
  with open(file_path, "rb") as x:
      b = x.read()
      return b


def read_private_key(file_path="crypto_private_key.pem") -> bytes:
  with open(file_path, "rb") as x:
      b = x.read()
      return b


# ------------------------加密------------------------
def encryption(text: str, public_key: bytes):
  # 字符串指定编码(转为bytes)
  text = text.encode('utf-8')
  # 构建公钥对象
  cipher_public = PKCS1_v1_5.new(RSA.importKey(public_key))
  # 加密(bytes)
  text_encrypted = cipher_public.encrypt(text)
  # base64编码,并转为字符串
  text_encrypted_base64 = base64.b64encode(text_encrypted).decode()
  return text_encrypted_base64


# ------------------------解密------------------------
def decryption(text_encrypted_base64: str, private_key: bytes):
  # 字符串指定编码(转为bytes)
  text_encrypted_base64 = text_encrypted_base64.encode('utf-8')
  # base64解码
  text_encrypted = base64.b64decode(text_encrypted_base64)
  # 构建私钥对象
  cipher_private = PKCS1_v1_5.new(RSA.importKey(private_key))
  # 解密(bytes)
  text_decrypted = cipher_private.decrypt(text_encrypted, Random.new().read)
  # 解码为字符串
  text_decrypted = text_decrypted.decode()
  return text_decrypted


if __name__ == '__main__':
  # 生成密钥对
  # create_rsa_pair(is_save=True)
  # public_key = read_public_key()
  # private_key = read_private_key()
  public_key, private_key = create_rsa_pair(is_save=False)

  # 加密
  text = '123456'
  text_encrypted_base64 = encryption(text, public_key)
  print('密文:', text_encrypted_base64)

  # 解密
  text_decrypted = decryption(text_encrypted_base64, private_key)
  print('明文:', text_decrypted)
运行:
四、rabbitmq(python)
docker安装mq镜像
详情链接 : https://blog.csdn.net/qq_37623764/article/details/105767004
docker run -d --name rabbitmq    --publish 5671:5671 --publish 5672:5672 --publish 4369:4369  --publish 25672:25672 --publish 15671:15671 --publish 15672:15672   rabbitmq

1、先开启管理功能:rabbitmq-plugins enable rabbitmq_management
2、增加用户:rabbitmqctl add_user 用户名 密码
3、让该用户变为管理员可以登后台:rabbitmqctl set_user_tags 用户名 administrator
4、删除默认管理员guest:rabbitmqctl delete_user guest
rabbitMQ 简单配置及 OSError: [Errno 9] Bad file descriptor 问题
详情链接: https://my.oschina.net/u/4295888/blog/3340312
send.py
__author__ = '生产者'

import pika


def test(hash_value):
    # 1, 连接RabbitMq服务器
    rabbit_username = 'admin'
    rabbit_password = 'admin'
    credentials = pika.PlainCredentials(rabbit_username, rabbit_password)
    connection = pika.BlockingConnection(
        pika.ConnectionParameters(host='127.0.0.1', port=5672, credentials=credentials))

    # channel是进行消息读写的通道
    channel = connection.channel()

    # 2,创建名为queue的队列
    channel.queue_declare(queue='queue')

    # 3,配置basic_pulish
    channel.basic_publish(
        '',
        'queue',
        hash_value)

    # 4,关闭连接
    connection.close()
    # return make_response({})
receive.py
import pika

rabbit_username = 'admin'
rabbit_password = 'admin'
credentials = pika.PlainCredentials(rabbit_username, rabbit_password)
connection = pika.BlockingConnection(pika.ConnectionParameters(host='127.0.0.1', port=5672, credentials=credentials))
channel = connection.channel()

# 声明队列
channel.queue_declare(queue='queue')


# 3,定义一个回调函数,当获得消息时,Pika库调用这个回调函数来处理消息
def callback(ch, method, properties, body):
    print("receive.py: receive message", body)


# 4,从队列接收消息
# channel.basic_consume(
#     queue='queue',
#     callback,
#     no_ack=True)

channel.basic_consume(
    "queue",
    callback,
    auto_ack=True
)

# 5,等待消息
channel.start_consuming()
访问被拒“NOT_ALLOWED - access to vhost ‘/’ refused for user”
原因:新建的用户并未分配权限
https://blog.csdn.net/huoliya12/article/details/104743220
