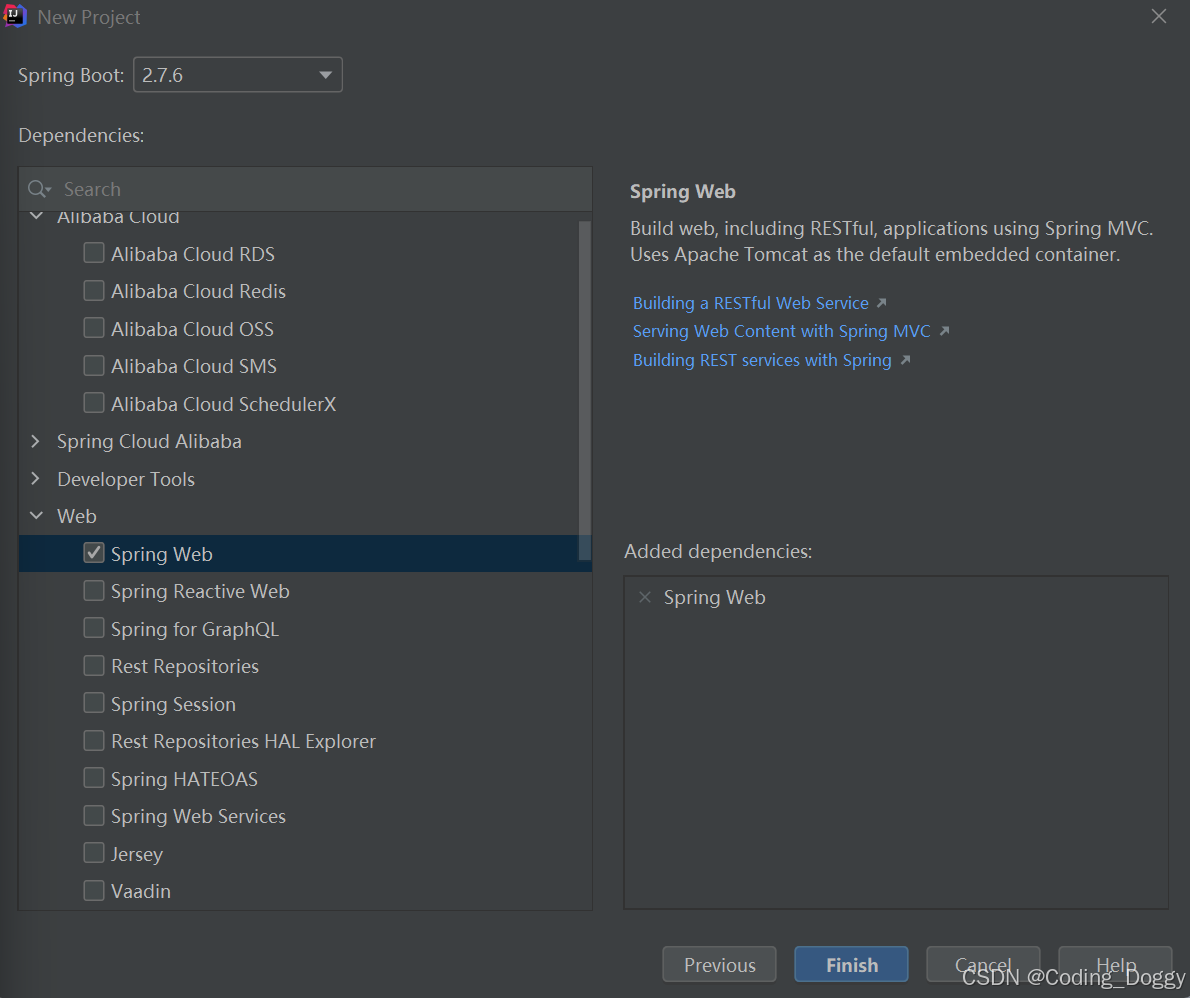
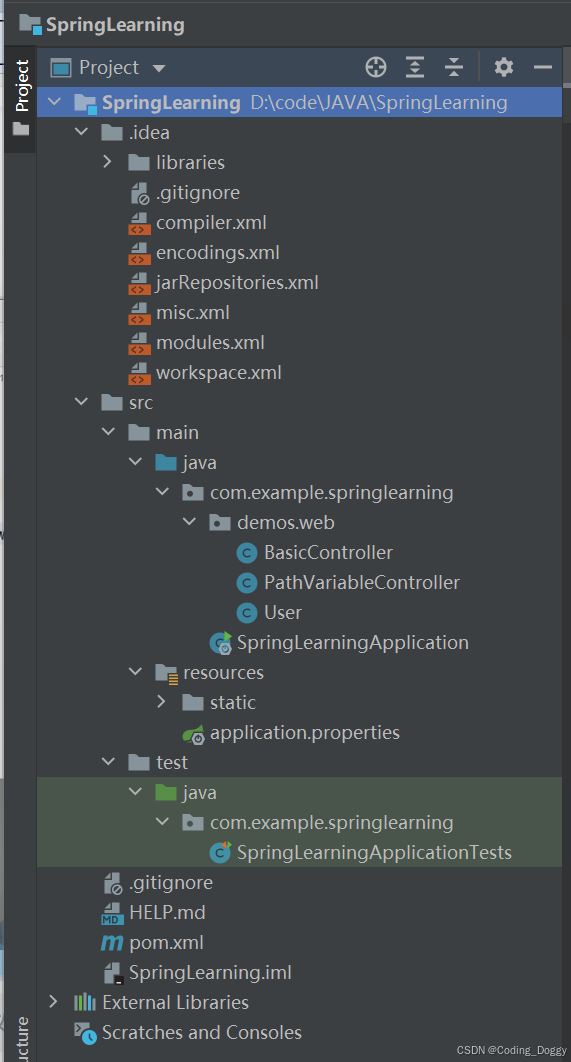
在idea里创建 SpringBoot项目
将最上面的server URL中的https://start.spring.io 改为https://start.aliyun.com。
这样就可以选择JDK8
idea创建springboot项目JDK和java版本不匹配,java版本只能选择17,21,23_idea jdk1.8,但是java是23的-CSDN博客
接着勾选Web中的SpringWeb,点击finish就创建好了
SpringBoot项目框架
pom.xml
parent
关于maven的依赖都由父级项目提供,简化开发
dependency
<dependency>
    <groupId>org.springframework.boot</groupId>
    <artifactId>spring-boot-starter-web</artifactId>
</dependency>
上面是SpringMVC的依赖,用它开发javaweb的项目
<dependency>
            <groupId>org.springframework.boot</groupId>
            <artifactId>spring-boot-starter-test</artifactId>
            <scope>test</scope>
        </dependency>
上面是测试的依赖
resources
static里放图片、CSS、JS,关于网站的静态资源
templates里面放置HTML模版等文件
但是做前后端分离的开发,是不会放在这里面的
控制器controller
在com.example.springlearning包下面新建一个package叫controller
然后新建一个Java类起名叫HelloController
package com.example.springlearning.controller;

//@RestController,做一个标记,就可以接受客户端的请求了
import org.springframework.web.bind.annotation.GetMapping;
import org.springframework.web.bind.annotation.RestController;

@RestController

public class HelloController {

    //这个标签表示等会浏览器发送get请求来访问这个方法,里面需要写一个具体的链接地址
    // http://www.baidu.com/path
    //  协议 // 域名       /path   下面传的就是path部分,因为在自己电脑运行
    // http://localhost:8080/hello  tomcat默认8080端口,其他的默认80端口
    @GetMapping("/hello")
    public String hello(){
        return "hello world";
    }
}
项目启动/tomcat启动
接着在Application里运行主类,就可以看到Tomcat成功启动了!
在浏览器输入网址,就可以看到输出的hello world了
开发环境热部署
简介
在实际的项目开发调试过程中会频繁地修改后台类文件,导致需要重新编译、重新启动,整个过程非常麻烦,影响开发效率。
Spring Boot提供了spring-boot-devtools组件,使得无须手动重启SpringBoot应用即可重新编译、启动项目,大大缩短编译启动的时间。
devtools会监听classpath下的文件变动,触发Restart类加载器重新加载该类,从而实现类文件和属性文件的热部署。
并不是所有的更改都需要重启应用(如静态资源、视图模板),可以通过设置
spring.devtools.restart.exclude属性来指定一些文件或目录的修改不用重启应用
1. dependency
<dependency>
            <groupId>org.springframework.boot</groupId>
            <artifactId>spring-boot-devtools</artifactId>
            <optional>true</optional>
</dependency>
在deppendencies里添加这段代码,并点击右上角的maven按钮安装依赖
使用optional=true表示依赖不会传递,即该项目依赖devtools;其他项目如果引入此项目生成的JAR包,则不会包含devtools
2. properties
在resources/application.properties里面修改,添加
spring.devtools.restart.enabled=true
spring.devtools.restart.additional-paths=src/main/java
3. 设置
如果使用了Eclipse,那么在修改完代码并保存之后,项目将自动编译并触发重启,而如果使用了IntelliJ IDEA,还需要配置项目自动编译。
打开Settings页面,在左边的菜单栏依次找到
- Build,Execution,Deployment→Compile,勾选Build project automatically
- 按Ctrl+Shift+Alt+/快捷键调出Maintenance页面,单击Registry,勾选compiler.automake.allow.when.app.running复选框。(或者按下快捷键
Ctrl + Shift + A搜索功能,搜索maintenance,因为我用快捷键没法调出)
做完这两步配置之后,若开发者再次在IntelliJ IDEA中修改代码,则项目会自动重启。


