一、配置网络yum源
首先删除自带的yum仓库,写入新的网络yum仓库(阿里云)
前提是虚拟机能上网
[root@cloud ~]# rm -rf /etc/yum.repos.d/*
[root@cloud ~]# wget -O /etc/yum.repos.d/CentOS-Base.repo https://mirrors.aliyun.com/repo/Centos-7.repo
--2024-07-08 23:38:14--  https://mirrors.aliyun.com/repo/Centos-7.repo
正在解析主机 mirrors.aliyun.com (mirrors.aliyun.com)... 116.162.204.107, 116.162.20.232, 116.162.20.234, ...
正在连接 mirrors.aliyun.com (mirrors.aliyun.com)|116.162.204.107|:443... 已连接。
已发出 HTTP 请求,正在等待回应... 200 OK
长度:2523 (2.5K) [application/octet-stream]
正在保存至: “/etc/yum.repos.d/CentOS-Base.repo”

100%[======================================>] 2,523       --.-K/s 用时 0s

2024-07-08 23:38:15 (11.2 MB/s) - 已保存 “/etc/yum.repos.d/CentOS-Base.repo” [2523/2523])

[root@cloud ~]# wget -O /etc/yum.repos.d/epel.repo https://mirrors.aliyun.com/repo/epel-7.repo
--2024-07-08 23:38:25--  https://mirrors.aliyun.com/repo/epel-7.repo
正在解析主机 mirrors.aliyun.com (mirrors.aliyun.com)... 183.215.52.213, 116.162.20.230, 116.162.20.235, ...
正在连接 mirrors.aliyun.com (mirrors.aliyun.com)|183.215.52.213|:443... 已连接。
已发出 HTTP 请求,正在等待回应... 200 OK
长度:664 [application/octet-stream]
正在保存至: “/etc/yum.repos.d/epel.repo”

100%[======================================>] 664         --.-K/s 用时 0s

2024-07-08 23:38:26 (177 MB/s) - 已保存 “/etc/yum.repos.d/epel.repo” [664/664])
二、安装nginx服务并启动
[root@cloud ~]# yum install -y nginx
已加载插件:fastestmirror, langpacks
Loading mirror speeds from cached hostfile
 * base: mirrors.aliyun.com
 * extras: mirrors.aliyun.com
 * updates: mirrors.aliyun.com
http://mirrors.aliyuncs.com/centos/7/os/x86_64/repodata/repomd.xml: [Errno 14] curl#7 - "Failed connect to mirrors.aliyuncs.com:80; 拒绝连接"
正在尝试其它镜像。
http://mirrors.cloud.aliyuncs.com/centos/7/os/x86_64/repodata/repomd.xml: [Errno 14] curl#6 - "Could not resolve host: mirrors.cloud.aliyuncs.com; 未知的错误"
正在尝试其它镜像。
base                                                                        | 3.6 kB  00:00:00
epel                                                                        | 4.3 kB  00:00:00
extras                                                                      | 2.9 kB  00:00:00
updates                                                                     | 2.9 kB  00:00:00
(1/4): epel/x86_64/group                                                    | 399 kB  00:00:00
(2/4): epel/x86_64/updateinfo                                               | 1.0 MB  00:00:01
(3/4): epel/x86_64/primary_db                                               | 8.7 MB  00:00:09
updates/7/x86_64/primary_db    FAILED                                          29 MB  03:12:27 ETA
http://mirrors.aliyun.com/centos/7/updates/x86_64/repodata/f19044932626155f0cd849e88972b84875fc85e3308b4d622844a911c4ef54d0-primary.sqlite.bz2: [Errno 12] Timeout on http://mirrors.aliyun.com/centos/7/updates/x86_64/repodata/f19044932626155f0cd849e88972b84875fc85e3308b4d622844a911c4ef54d0-primary.sqlite.bz2: (28, 'Operation too slow. Less than 1000 bytes/sec transferred the last 30 seconds')
正在尝试其它镜像。
updates/7/x86_64/primary_db    FAILED
http://mirrors.aliyuncs.com/centos/7/updates/x86_64/repodata/f19044932626155f0cd849e88972b84875fc85e3308b4d622844a911c4ef54d0-primary.sqlite.bz2: [Errno 14] curl#7 - "Failed connect to mirrors.aliyuncs.com:80; Connection refused"
正在尝试其它镜像。
updates/7/x86_64/primary_db    FAILED
http://mirrors.cloud.aliyuncs.com/centos/7/updates/x86_64/repodata/f19044932626155f0cd849e88972b84875fc85e3308b4d622844a911c4ef54d0-primary.sqlite.bz2: [Errno 14] curl#6 - "Could not resolve host: mirrors.cloud.aliyuncs.com; Unknown error"
正在尝试其它镜像。
(4/4): updates/7/x86_64/primary_db                                          |  27 MB  00:00:05
正在解决依赖关系
--> 正在检查事务
---> 软件包 nginx.x86_64.1.1.20.1-10.el7 将被 安装
--> 正在处理依赖关系 nginx-filesystem = 1:1.20.1-10.el7,它被软件包 1:nginx-1.20.1-10.el7.x86_64 需要
--> 正在处理依赖关系 libcrypto.so.1.1(OPENSSL_1_1_0)(64bit),它被软件包 1:nginx-1.20.1-10.el7.x86_64 需要
--> 正在处理依赖关系 libssl.so.1.1(OPENSSL_1_1_0)(64bit),它被软件包 1:nginx-1.20.1-10.el7.x86_64 需要
--> 正在处理依赖关系 libssl.so.1.1(OPENSSL_1_1_1)(64bit),它被软件包 1:nginx-1.20.1-10.el7.x86_64 需要
--> 正在处理依赖关系 nginx-filesystem,它被软件包 1:nginx-1.20.1-10.el7.x86_64 需要
--> 正在处理依赖关系 libcrypto.so.1.1()(64bit),它被软件包 1:nginx-1.20.1-10.el7.x86_64 需要
--> 正在处理依赖关系 libssl.so.1.1()(64bit),它被软件包 1:nginx-1.20.1-10.el7.x86_64 需要
--> 正在检查事务
---> 软件包 nginx-filesystem.noarch.1.1.20.1-10.el7 将被 安装
---> 软件包 openssl11-libs.x86_64.1.1.1.1k-7.el7 将被 安装
--> 解决依赖关系完成

依赖关系解决

===================================================================================================
 Package                     架构              版本                          源               大小
===================================================================================================
正在安装:
 nginx                       x86_64            1:1.20.1-10.el7               epel            588 k
为依赖而安装:
 nginx-filesystem            noarch            1:1.20.1-10.el7               epel             24 k
 openssl11-libs              x86_64            1:1.1.1k-7.el7                epel            1.5 M

事务概要
===================================================================================================
安装  1 软件包 (+2 依赖软件包)

总下载量:2.1 M
安装大小:5.3 M
Downloading packages:
(1/3): nginx-filesystem-1.20.1-10.el7.noarch.rpm                            |  24 kB  00:00:00
(2/3): nginx-1.20.1-10.el7.x86_64.rpm                                       | 588 kB  00:00:00
(3/3): openssl11-libs-1.1.1k-7.el7.x86_64.rpm                               | 1.5 MB  00:00:01
---------------------------------------------------------------------------------------------------
总计                                                               1.5 MB/s | 2.1 MB  00:00:01
Running transaction check
Running transaction test
Transaction test succeeded
Running transaction
  正在安装    : 1:openssl11-libs-1.1.1k-7.el7.x86_64                                           1/3
  正在安装    : 1:nginx-filesystem-1.20.1-10.el7.noarch                                        2/3
  正在安装    : 1:nginx-1.20.1-10.el7.x86_64                                                   3/3
  验证中      : 1:nginx-filesystem-1.20.1-10.el7.noarch                                        1/3
  验证中      : 1:nginx-1.20.1-10.el7.x86_64                                                   2/3
  验证中      : 1:openssl11-libs-1.1.1k-7.el7.x86_64                                           3/3

已安装:
  nginx.x86_64 1:1.20.1-10.el7

作为依赖被安装:
  nginx-filesystem.noarch 1:1.20.1-10.el7           openssl11-libs.x86_64 1:1.1.1k-7.el7

完毕!
防火墙开启http服务
[root@cloud ~]# firewall-cmd --permanent --zone=public --add-service=http
success
[root@cloud ~]# firewall-cmd --reload
success
[root@cloud ~]#
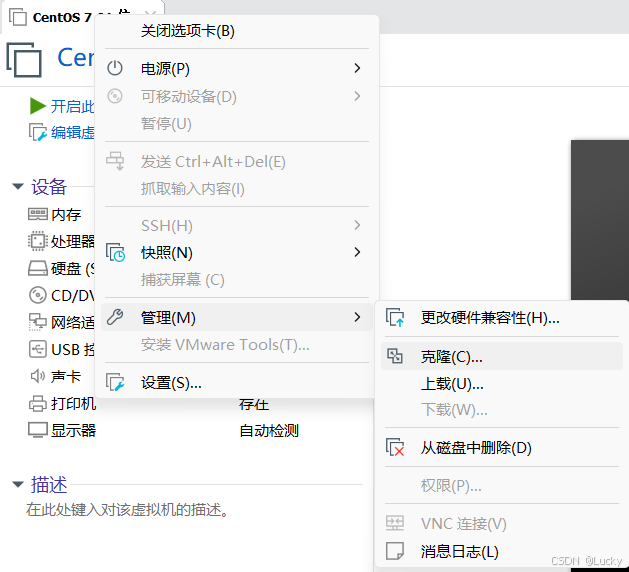
克隆两台虚拟机模拟业务机
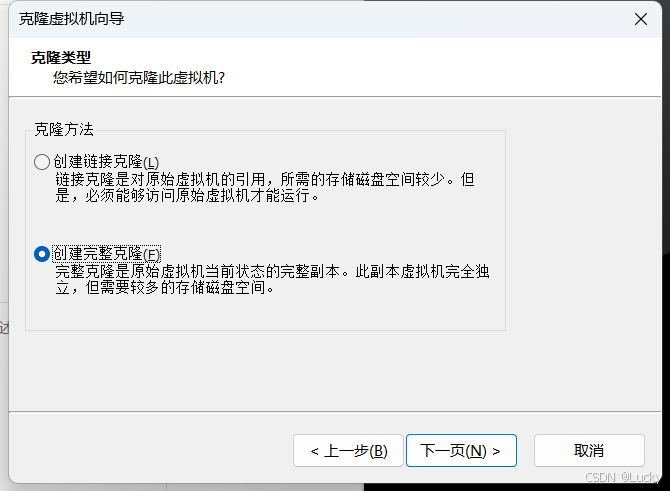
克隆需要先将虚拟机关机
必须要选择创用户创建完整克隆
随后将三台虚拟机都开起来
三、配置代理服务器
就是被克隆的那台机子
[root@cloud ~]# vim /etc/nginx/nginx.conf #nginx配置文件的位置
打开之后找到对应的位置加入以下内容
# 在http段中配置upstream
http {
    upstream backend {
        server 192.168.200.130 weight=1;        #第一台业务机的IP
        server 192.168.200.131 weight=2;        #第二台业务机的IP
    }


    # 配置server段
    server {
        listen 80;
        server_name www.testone.com;               #这里是你要设置的域名

        location / {
            proxy_pass http://backend;
            proxy_set_header Host $host;
            proxy_set_header X-Real-IP $remote_addr;
            proxy_set_header X-Forwarded-For $proxy_add_x_forwarded_for;
            proxy_connect_timeout 120;
            proxy_send_timeout 120;
            proxy_read_timeout 180;
            send_timeout 180;
        }
    }
}
完成之后保存退出并重启nginx
systemctl restart nginx四、测试
在两台业务机上创建测试文件
[root@cloud ~]# vim /usr/share/nginx/html/test.html在文件中写入一下内容
<h1>This is Test</h1>写完之后再重启nginx
两个务机都要做上面的步骤
五、物理机配置
到物理机添加本地域名解析
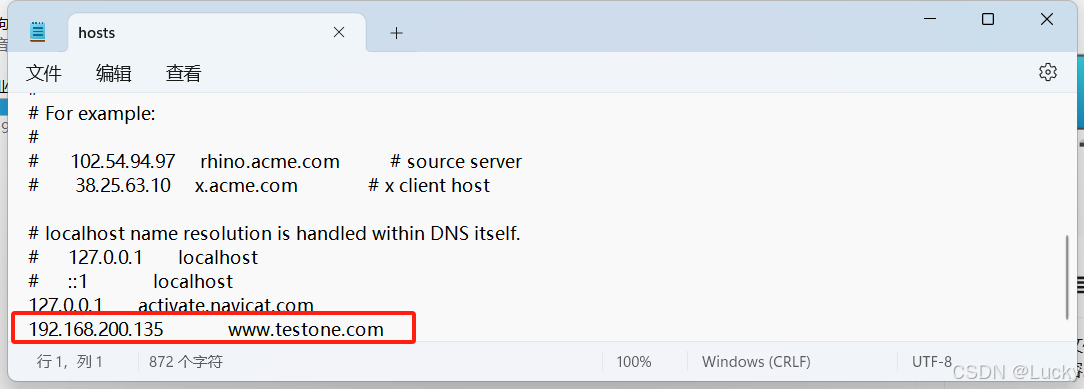
修改hosts文件
C:\Windows\System32\drivers\etc\hosts(文件位置)
右键以记事本方式打开 在末尾加入你代理服务器的IP 后面接你的域名(如图)
ctrl+s保存
去浏览器测试
地址栏输入www.testone.com
已经成功访问了
再输入之前创建的测试文件
也已经可以成功访问了
测试文件都是创建在业务机的 通过代理转发 本地域名解析 就可以在代理服务器上访问业务机的资源,实现负载均衡


