在上篇中,我们使用闭散列技术解决了哈希冲突并实现了哈希表。然而,我们发现闭散列并不理想,因此本篇将探讨如何通过开散列方法来处理哈希冲突。
🌈个人主页:是店小二呀
🌈C语言专栏:C语言
🌈C++专栏: C++
🌈初阶数据结构专栏: 初阶数据结构
🌈高阶数据结构专栏: 高阶数据结构
🌈Linux专栏: Linux
🌈喜欢的诗句:无人扶我青云志 我自踏雪至山巅
一、开散列(哈希桶)
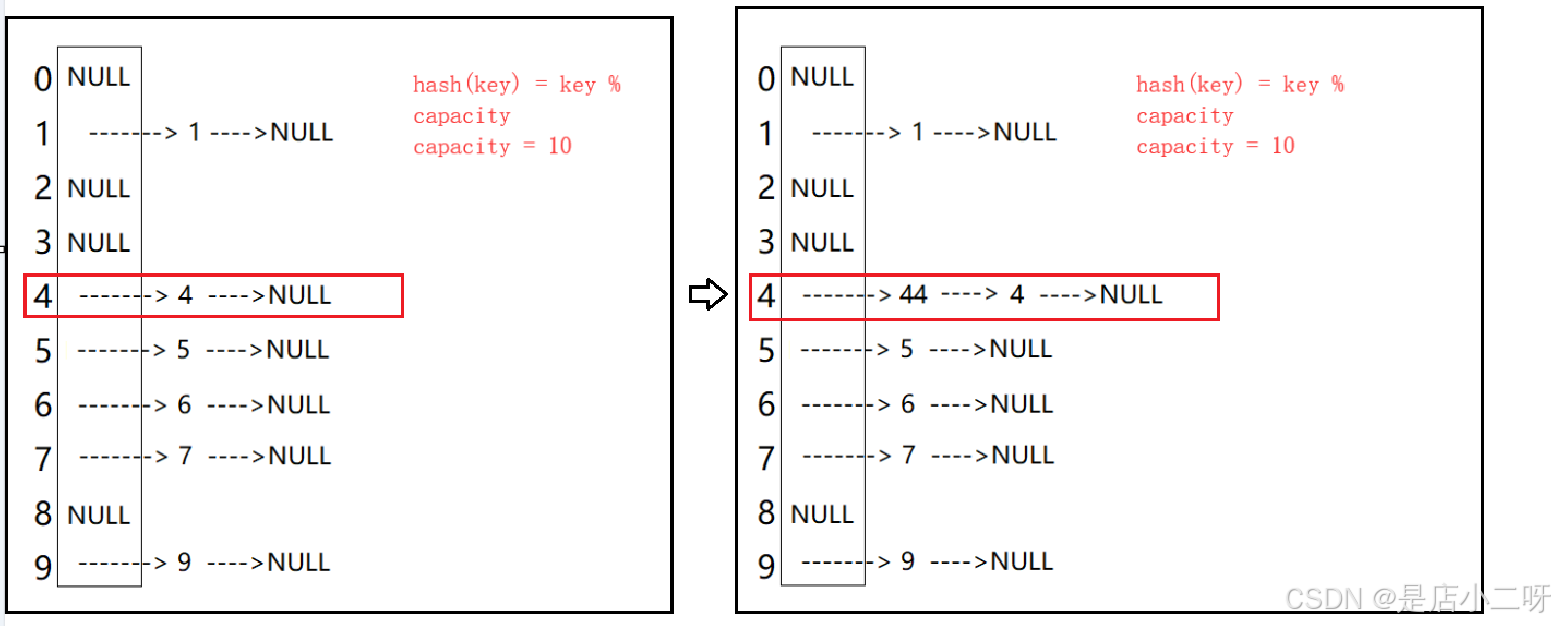
开散列法又叫链地址法(开链法),首先对关键码集合用散列函数计算散列地址,具有相同地址的关键码归于同一子集合,每一个子集合称为一个桶,各个桶中的元素通过一个单链表链接起来,各链表的头结点存储在哈希表中。
从上图可以看出,开散列中每个桶中放的都是发生哈希冲突的元素
二、实现哈希表
2.1 哈希表基本构架
template<class K>
    struct HashFunc
    {
        size_t operator()(const K& key)
        {
            return (size_t)key;
        }
    };

template<>
struct HashFunc<string>
{
    size_t operator()(const string& key)
    {
        size_t hash = 0;
        for (auto ch : key)
        {
            hash *= 131;
            hash += ch;
        }
        return hash;
    }
};
namespace hash_buck
{
    template<class K,class V>
        struct HashNode
        {
            pair<K, V> _kv;
            HashNode<K, V> _next;
        };

    template<class K, class V,class Hash = HashFunc<K>>
        class HashTable
        {
            public:
            typedef HashNode<K, V> Node;
            HashTable()
            {
                _tables.resize(10,nullptr);
            }

            private:
            vector<Node*> _tables;
            //vector<list<..>> _tables;
            size_t _n = 0;
        };
}
这里如果想实现哈希桶结构,可以使用一个个节点连接起来或者直接套上一个链表容器。这里为了更好地实现迭代器,我们选择第一种方式,第二种方式实现迭代器有一丝麻烦。
开散列中每个桶中放的都是发生哈希冲突的元素 ,并没有顺序之分。
2.2 哈希表插入数据
bool Insert(const pair<K, V>& kv)
{
    Hash hs;
    size_t hashi = hs(kv.first) % _tables.size();

    //进行头插操作
    Node* newnode = new Node(kv);
    _tables[hashi]->_next = newnode;
    _tables[hashi] = newnode;
}
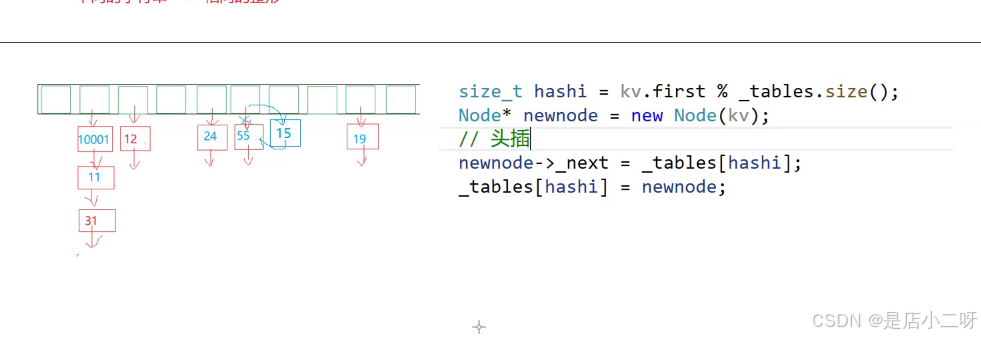
这里链表节点只需要单纯地存储数据,那么只需要设计单链表即可,没有必要设双向链表。对于单链表插入数据,一般推荐采用头插,由于尾插需要找尾比较麻烦。
2.3 哈希表析构函数
这里涉及堆上空间资源的开辟,一般需要涉及析构函数进行资源处理。
由于vector容器元素为内置类型,析构函数对内置类型不进行处理,那么就导致指向空间没有得到释放,需要显式写析构函数,完成资源释放。
~HashTable()
{
    for (size_t i = 0; i < _tables.size(); i++)
    {
        Node* cur = _tables[i];
        while (cur)
        {
            Node* next = cur->_next;
            delete cur;
            cur = next;
        }

    }
}
2.4 哈希表扩容
由于哈希桶去解决哈希冲突对于哈希表空间需要相对比较小,不同于开发定址法去解决哈希冲突占用表内空间,而是表中一个指针指向一个空间。
【负载因子满足1即可扩容】:_n == _tables.size()
【第一个方案】:复用Insert完成CV操作
//扩容逻辑
    if (_n == _tables.size())
    {
        //这里可以忽略类型
        HashTable NewTable;
        NewTable._tables.resize(n * 10);

        //CV工作
        for (size_t i = 0; i < _tables.size(); i++)
        {
            Node* cur = _tables[i];
            while (cur)
            {
                NewTable.Insert(_tables[i]._kv);
                cur = cur->_next;
            }
        }
        _tables.swap(NewTable);
    }
【缺陷】:如果存在一万个节点,意味着需要复制一万个节点又要释放一万个节点,显得很浪费
【第二个方案】:直接将节点拿下来
if (_n == _tables.size())
{
    vector<Node*> NewTable(n * 10, nullptr);

    for (size_t i = 0; i < _tables.size(); i++)
    {
        Node* cur = _tables[i];
        while (cur)
        {
            Node* next = cur->_next;

            cur->_next = _tables[i];
            _tables[i] = cur;
            cur = cur->_next;
        }
        _tables[i] = nullptr;
    }
    _tables.swap(NewTable);
}
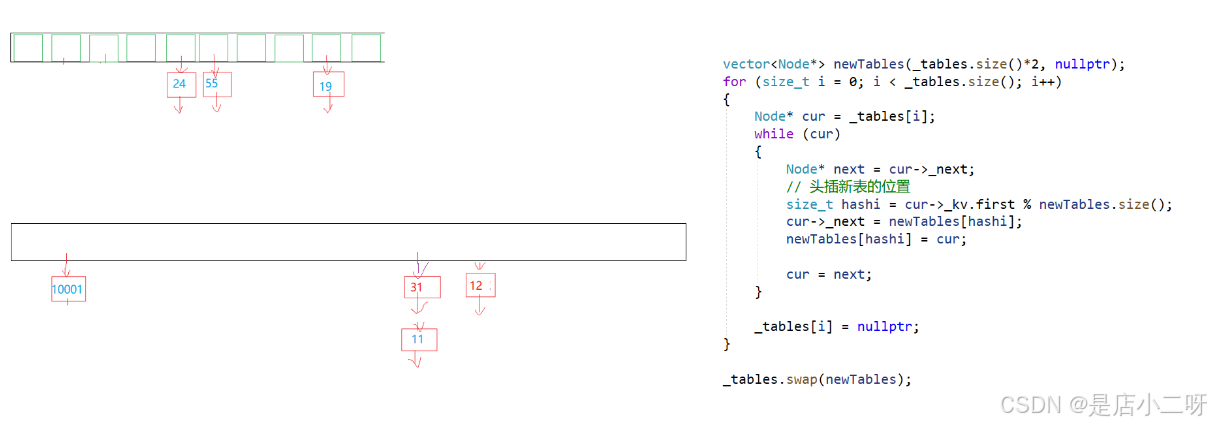
关于这段代码是比较难懂,每个指针指向一块空间,先cur->next = newTables[hashi]抓住新表的位置,newTables[hashi] = cur新表将旧表节点拿下来,可以好好理解拿下来的逻辑,得到了这个地址,这个地址指向一块节点。
这里会导致newTables[hashi]和_tables[i]共同指向一块空间,虽然不会去使用旧表去影响到新表,为了保险起见,可以将旧表这块位置指针置空。
2.5 哈希表删除数据
bool Erase(const K& key)
{
    Hash hs;
    size_t hashi = hs(kv.first) % _tables.size();

    Node* cur = _tables[hashi];
    Node* prev = nullptr;

    while (cur)
    {
        if (cur->_kv.first == key)
        {
            if (prev == nullptr)
            {
                _tables[hashi] = cur->_next;
            }
            else
            {
                prev->_next = cur->_next;
            }
            delete cur;

            return true;
        }
        else
        {
            prev = cur;
            cur = cur->_next;
        }
    }
    return false;
}
这里删除数据,无非需要考虑两种情况的删除,一种是删除第一个节点,另一种是删除其他节点prev->_next = cur->_next。在删除节点需要前后兼顾,保存下前驱指针指向节点。
2.6 哈希桶中查找
Node* Find(const K& key)
{
    Hash hs;
    size_t hashi = hs(kv.first) % _tables.size();
    Node* cur = _tables[hashi];
    while (cur)
    {
        if (cur->_kv.first == key)
        {
            return &cur->_kv.first;
        }
        else
        {
            cur = cur->_next;
        }
    }
    return nullptr;
}
三、HashTable.h
template<class K>
    struct HashFunc
    {
        size_t operator()(const K& key)
        {
            return (size_t)key;
        }
    };

template<>
struct HashFunc<string>
{
    size_t operator()(const string& key)
    {
        size_t hash = 0;
        for (auto ch : key)
        {
            hash *= 131;
            hash += ch;
        }
        return hash;
    }
};

namespace hash_bucket
{
    template<class K,class V>
        struct HashNode
        {
            pair<K, V> _kv;
            HashNode<K, V> _next;
        };

    template<class K, class V,class Hash = HashFunc<K>>
        class HashTable
        {
            public:
            typedef HashNode<K, V> Node;
            HashTable()
            {
                _tables.resize(10,nullptr);

            }

            ~HashTable()
            {
                for (size_t i = 0; i < _tables.size(); i++)
                {
                    Node* cur = _tables[i];
                    while (cur)
                    {
                        Node* next = cur->_next;
                        delete cur;
                        cur = next;
                    }

                }
            }
            bool Insert(const pair<K, V>& kv)
            {
                Hash hs;
                size_t hashi = hs(kv.first) % _tables.size();

                //扩容逻辑
                //if (_n == _tables.size())
                //{
                //	//这里可以忽略类型
                //	HashTable NewTable;
                //	NewTable._tables.resize(n * 10);
                //
                //	//CV工作
                //	for (size_t i = 0; i < _tables.size(); i++)
                //	{
                //		Node* cur = _tables[i];
                //		while (cur)
                //		{
                //			NewTable.Insert(_tables[i]._kv);
                //			cur = cur->_next;
                //		}
                //	}
                //	_tables.swap(NewTable);
                //}

                if (_n == _tables.size())
                {
                    vector<Node*> NewTable(n * 10, nullptr);

                    for (size_t i = 0; i < _tables.size(); i++)
                    {
                        Node* cur = _tables[i];
                        while (cur)
                        {
                            Node* next = cur->_next;
                            // 头插新表的位置
                            size_t hashi = hs(kot(cur->_data)) % NewTable.size();
                            cur->_next = NewTable[hashi];
                            NewTable[hashi] = cur;

                            cur = cur->_next;
                        }
                        _tables[i] = nullptr;
                    }
                    _tables.swap(NewTable);
                }

                //进行头插操作
                Node* newnode = new Node(kv);
                _tables[hashi]->_next = newnode;
                _tables[hashi] = newnode;
                ++_n;
            }

            Node* Find(const K& key)
            {
                Hash hs;
                size_t hashi = hs(kv.first) % _tables.size();
                Node* cur = _tables[hashi];
                while (cur)
                {
                    if (cur->_kv.first == key)
                    {
                        return &cur->_kv.first;
                    }
                    else
                    {
                        cur = cur->_next;
                    }
                }
                return nullptr;
            }

            bool Erase(const K& key)
            {
                Hash hs;
                size_t hashi = hs(kv.first) % _tables.size();

                Node* cur = _tables[hashi];
                Node* prev = nullptr;

                while (cur)
                {
                    if (cur->_kv.first == key)
                    {
                        if (prev == nullptr)
                        {
                            _tables[hashi] = cur->_next;
                        }
                        else
                        {
                            prev->_next = cur->_next;
                        }
                        delete cur;

                        return true;
                    }
                    else
                    {
                        prev = cur;
                        cur = cur->_next;
                    }
                }
                return false;
            }
            private:
            vector<Node*> _tables;
            size_t _n = 0;
        };
}
以上就是本篇文章的所有内容,在此感谢大家的观看!这里是店小二呀C++笔记,希望对你在学习C++语言旅途中有所帮助!


