花瓣轮廓:
分类与聚类
使用各种模型进行鸢尾花分类和聚类
1. | 介绍 👋

🤔 数据集问题
鸢尾花分类项目是使用简单数据集实现机器学习模型的实际演示。数据集本身包含有关花瓣和萼片大小的信息,包括鸢尾属物种。通过分析鸢尾花的属性,例如花瓣和萼片测量值,旨在利用基本的机器学习技术来准确地对不同品种的鸢尾进行分类。本笔记本展示了对机器学习(监督和无监督)如何应用于现实场景(即使数据集不复杂)的基本理解。此外,该项目还展示了模型创建、训练、评估、生成预测结果以及在新数据上测试最佳模型的分步过程。
📌 笔记本目标
- 使用各种类型的数据可视化执行数据集探索。
- 构建可以预测鸢尾花物种的监督机器学习模型。
- 将测试数据的预测结果导出到文件中。
- 对给定的新示例数据进行预测并导出预测结果。
- 实施无监督模型 (K-Means) 将 Iris 数据分组为集群。
👨💻 机器学习模型
- Logistic Regression,
- Gaussian Naive Bayes,
- Support Vector Machine (SVM),
- K-Nearest Neighbour (KNN), and
- Decision Tree.
- K-Means Clustering.
🧾 数据集描述
| Variable Name | Description | Sample Data |
|---|---|---|
| Id | ID for observations (unique ID) | 1; 2; ... |
| SepalLengthCm | Length of the sepal (in cm) | 5.1; 4.9; ... |
| SepalWidthCm | Width of the sepal (in cm) | 3.5; 3.0; ... |
| PetalLengthCm | Length of the petal (in cm) | 1.4; 1.3; ... |
| PetalWidthCm | Width of the petal (in cm) | 0.2; 0.4; ... |
| Species | Species name | Iris-setosa; Iris-versicolor; ... |
2. | 安装和导入库 📚
# --- Installing Libraries ---
!pip install ydata-profiling
!pip install pywaffle
!pip install highlight-text

# --- Importing Libraries ---
import numpy as np
import pandas as pd
import ydata_profiling
import matplotlib.pyplot as plt
import matplotlib.patches as mpatches
import seaborn as sns
import warnings
import os
import yellowbrick
import joblib

from ydata_profiling import ProfileReport
from highlight_text import fig_text
from random import sample
from numpy.random import uniform
from math import isnan
from sklearn.pipeline import Pipeline
from sklearn.compose import ColumnTransformer
from sklearn.preprocessing import StandardScaler
from sklearn.decomposition import PCA
from sklearn.model_selection import train_test_split, GridSearchCV
from sklearn.linear_model import LogisticRegression
from sklearn.neighbors import KNeighborsClassifier, NearestNeighbors
from sklearn.svm import SVC
from sklearn.naive_bayes import GaussianNB
from sklearn.tree import DecisionTreeClassifier
from sklearn.cluster import KMeans
from sklearn.metrics import classification_report, accuracy_score, davies_bouldin_score, silhouette_score, calinski_harabasz_score
from yellowbrick.classifier import PrecisionRecallCurve, ROCAUC, ConfusionMatrix
from yellowbrick.model_selection import LearningCurve, FeatureImportances
from yellowbrick.cluster import KElbowVisualizer, SilhouetteVisualizer
from yellowbrick.contrib.wrapper import wrap
from yellowbrick.style import set_palette
from pywaffle import Waffle
3. | 读取数据集 👓
# --- Importing Dataset ---
df = pd.read_csv("/kaggle/input/iris/Iris.csv")

# --- Reading Train Dataset ---
print(clr.start+".: Imported Dataset :."+clr.end)
print(clr.color+"*" * 23)
df.head().style.background_gradient(cmap="Purples").hide()
4. | 初始数据集探索 🔍
# --- 数据集报告 ---
ProfileReport(df, title="Iris Dataset Report", minimal=True
              , progress_bar=False, samples=None, correlations=None, interactions=None, explorative=True, dark_mode=True
              , notebook={"iframe":{"height": "600px"}}
              , html={"style":{"primary_color": color_line}}
              , missing_diagrams={"heatmap": False, "dendrogram": False}).to_notebook_iframe()
# --- 相关图变量 ---
suptitle = dict(x=0.1, y=0.92, fontsize=13, weight="heavy", ha="left", va="bottom", fontname=font_main)
title = dict(x=0.1, y=0.89, fontsize=8, weight="normal", ha="left", va="bottom", fontname=font_alt)
xy_label = dict(size=6)
highlight_textprops = [{"weight":"bold", "color": colors[0]}]

# --- 相关图数据框 ---
df_corr = df.drop(columns=["Species"])

# --- 相关图(热图)---
mask = np.triu(np.ones_like(df_corr.corr(), dtype=bool))
fig, ax = plt.subplots(figsize=(7, 6))
sns.heatmap(df_corr.corr(), mask=mask, annot=True, cmap=color_map, linewidths=0.2, cbar=False, annot_kws={"size": 7}, rasterized=True)
yticks, ylabels = plt.yticks()
xticks, xlabels = plt.xticks()
ax.set_xticklabels(xlabels, rotation=0, **xy_label)
ax.set_yticklabels(ylabels, **xy_label)
ax.grid(False)
fig_text(s="Variables Correlation Map", **suptitle)
fig_text(s="Most features in the dataset are <strongly correlated> to each other.", highlight_textprops=highlight_textprops, **title)
plt.tight_layout(rect=[0, 0.04, 1, 1.01])
plt.gcf().text(0.84, 0.03, "kaggle.com/caesarmario", style="italic", fontsize=5)
plt.show();
- 根据每列的偏度值,可以得出结论:数据集中的所有列均近似呈正态分布(值在 -0.5 到 0.5 之间)。每列的平均值和中值也证明了这一点,其中平均值与中值相差不大。
📌 如果偏度小于 -1 或大于 1,则分布为高度偏斜。如果偏度介于 -1 和 -0.5 之间或介于 0.5 和 1 之间,则分布为中度偏斜。如果偏度在 -0.5 和 0.5 之间,则分布近似对称。- 从峰度值来看,数据集中的所有变量都是 platikurtic,因为峰度值小于 3。此外,从标准差来看,所有变量也缺乏变异 因为它具有较低的标准偏差和较低的变异系数 (CV)。
📌 用于显示列的尾部的峰度值。正态分布(中峰)的值应等于 3。如果峰度值大于 3,则称为尖峰。同时,如果峰度值小于3,则称为platikurtic。📌 低标准差意味着数据聚集在平均值周围(缺乏变化),并且高标准偏差表明数据更加分散(更多变化)。📌 变异系数 (CV) 大于或等于 1 表示该列变异较大。同时,如果CV小于1,则表明相反。- 根据对萼片和花瓣长度和宽度的观察,鸢尾花的大小始终在 1 至 10 厘米范围内。
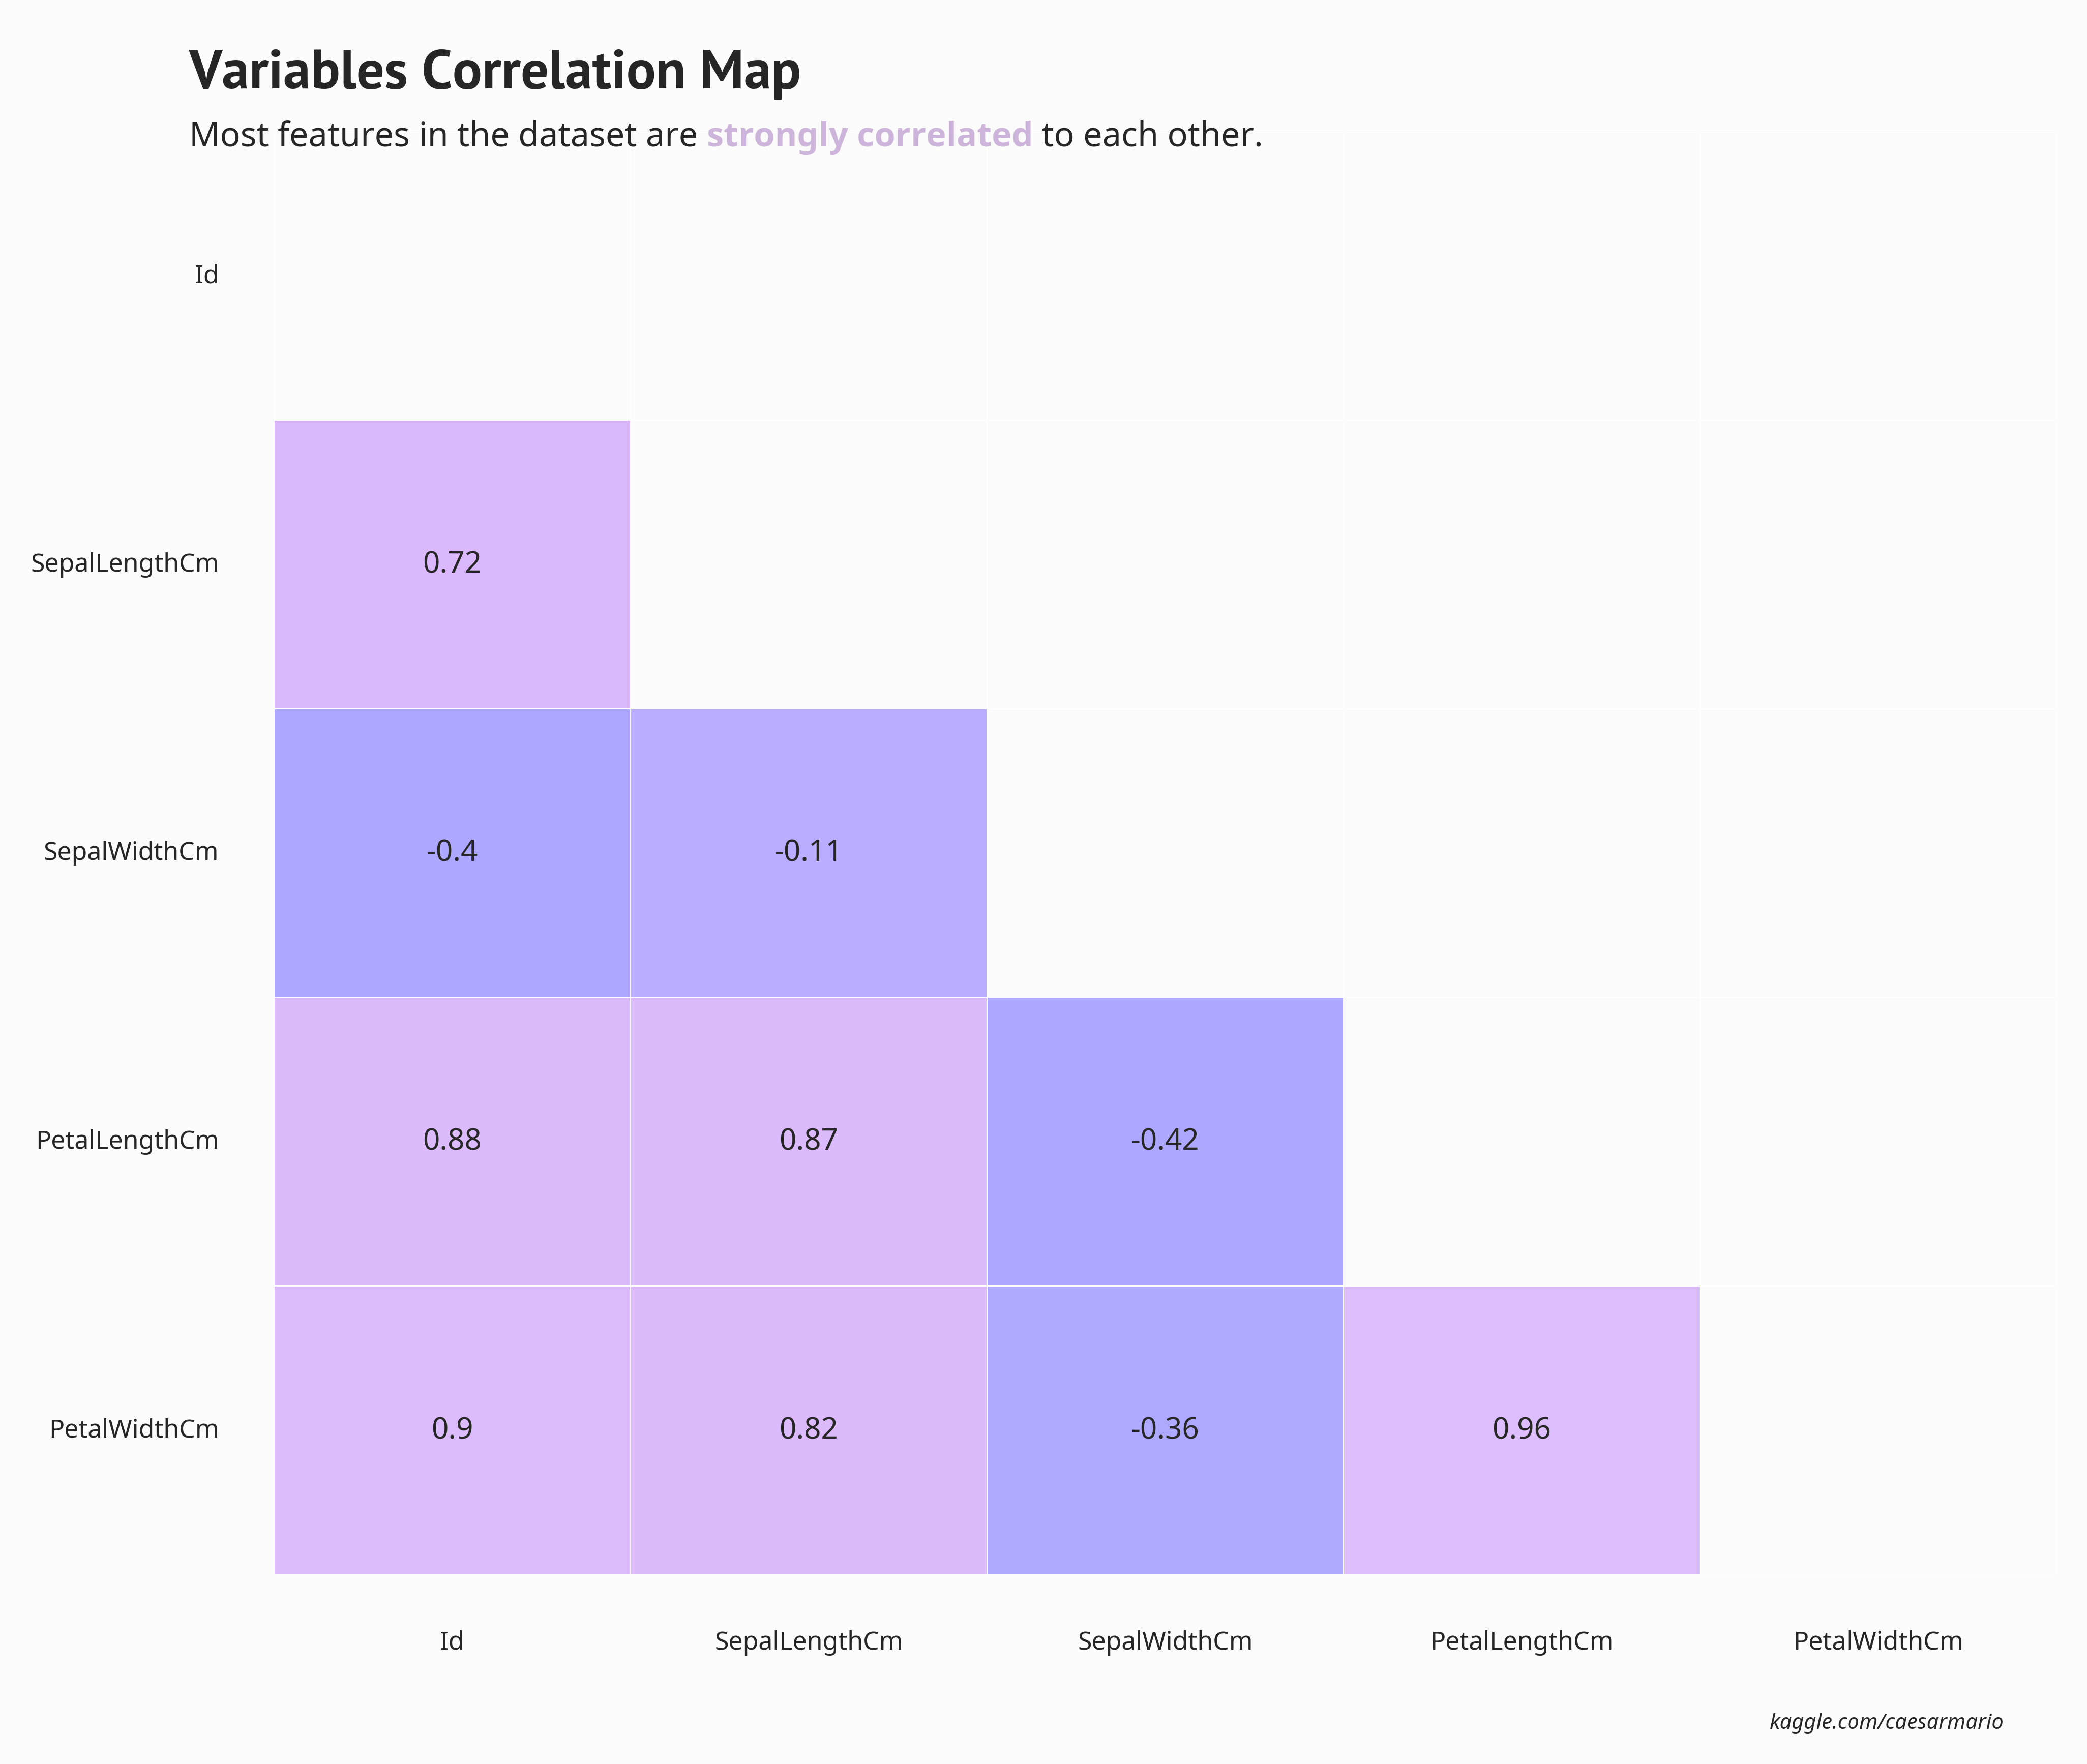
- 数据集中的大多数特征彼此强相关,除了萼片宽度(具有负相关性)。
5. | EDA 📈
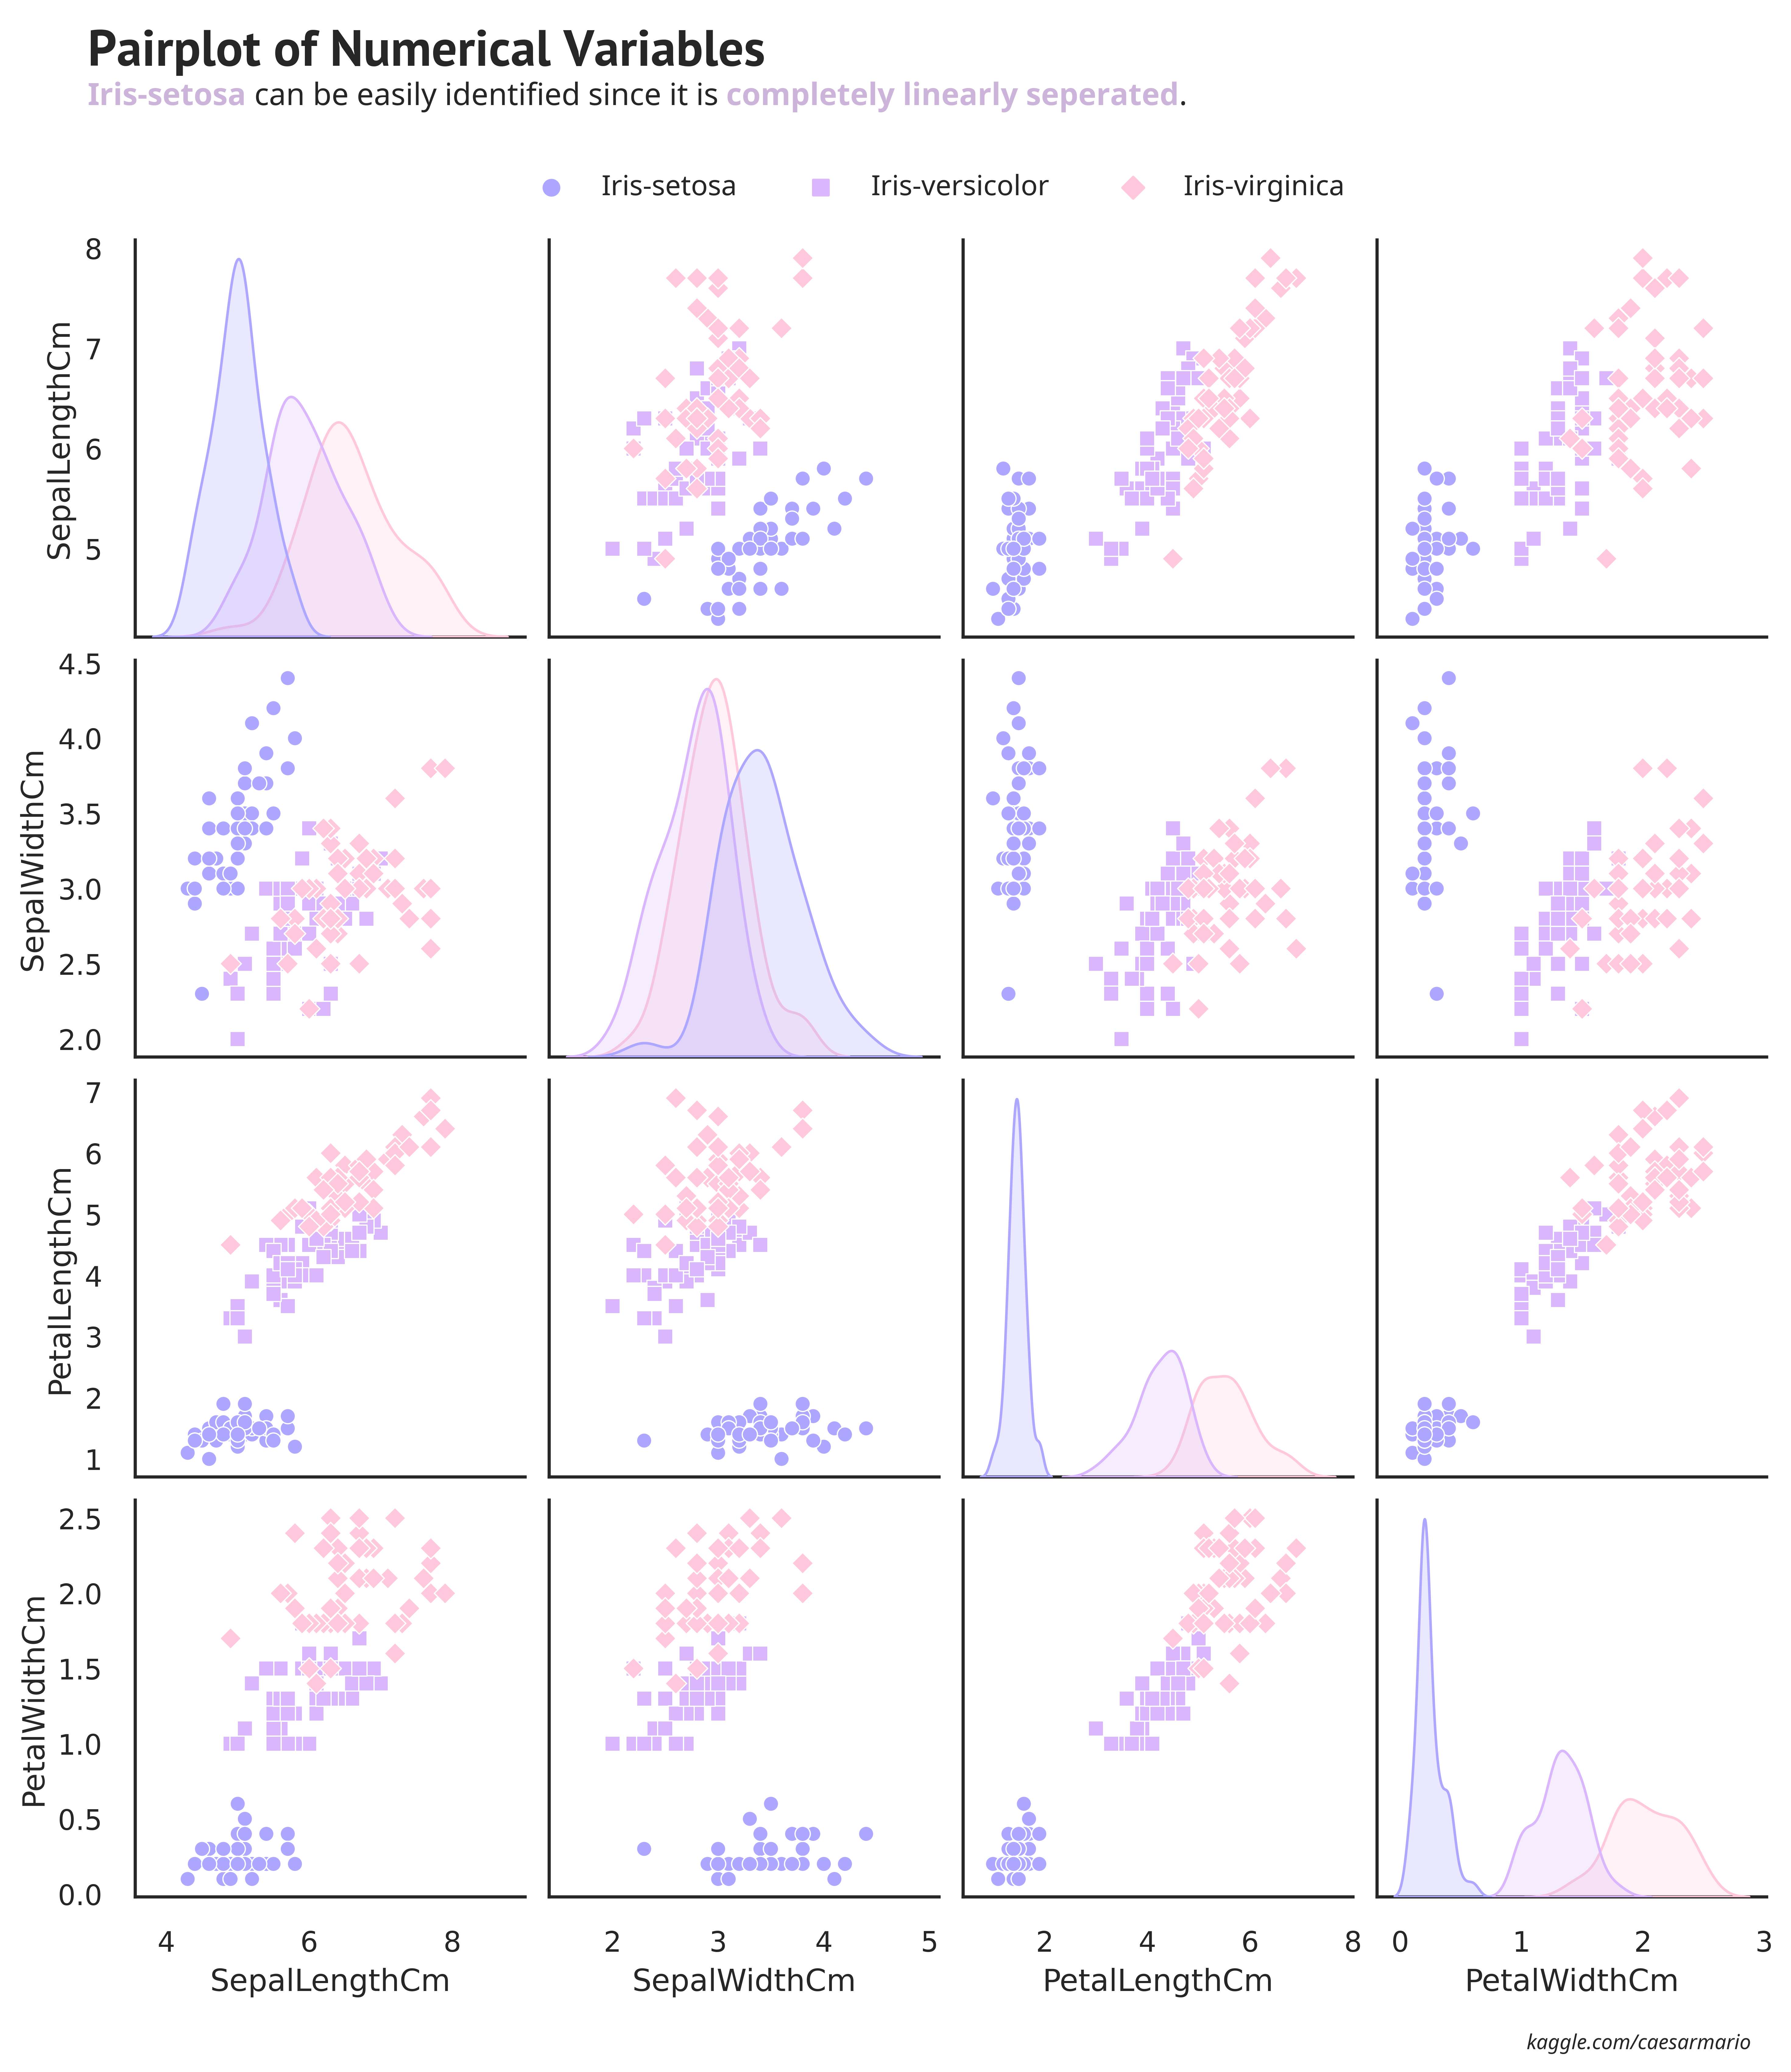
5.1 | 数值变量配对图
# --- EDA 1: Variables ---
suptitle = dict(x=0.05, y=1.07, fontsize=20, weight="heavy", ha="left", va="bottom", fontname=font_main)
title = dict(x=0.05, y=1.05, fontsize=12, weight="normal", ha="left", va="bottom", fontname=font_alt)
highlight_textprops = [{"weight":"bold", "color": colors[0]}, {"weight":"bold", "color": colors[0]}]

# --- Display EDA 1 ---
with sns.axes_style("white"):
    eda1=sns.pairplot(df, hue="Species", diag_kind="kde", palette=color_eda, markers=["o", "s", "D"], vars=column_list2)
eda1_handles, eda1_labels = eda1._legend_data.values(), eda1._legend_data.keys()
eda1._legend.remove()
eda1.fig.legend(handles=eda1_handles, labels=eda1_labels, loc="upper center", ncol=3, bbox_to_anchor=(0.45, 1.03))
fig_text(s="Pairplot of Numerical Variables", **suptitle)
fig_text(s="<Iris-setosa> can be easily identified since it is <completely linearly seperated>.", highlight_textprops=highlight_textprops, **title)
plt.gcf().text(0.73, -0.01, "kaggle.com/caesarmario", style="italic", fontsize=8)
plt.show();
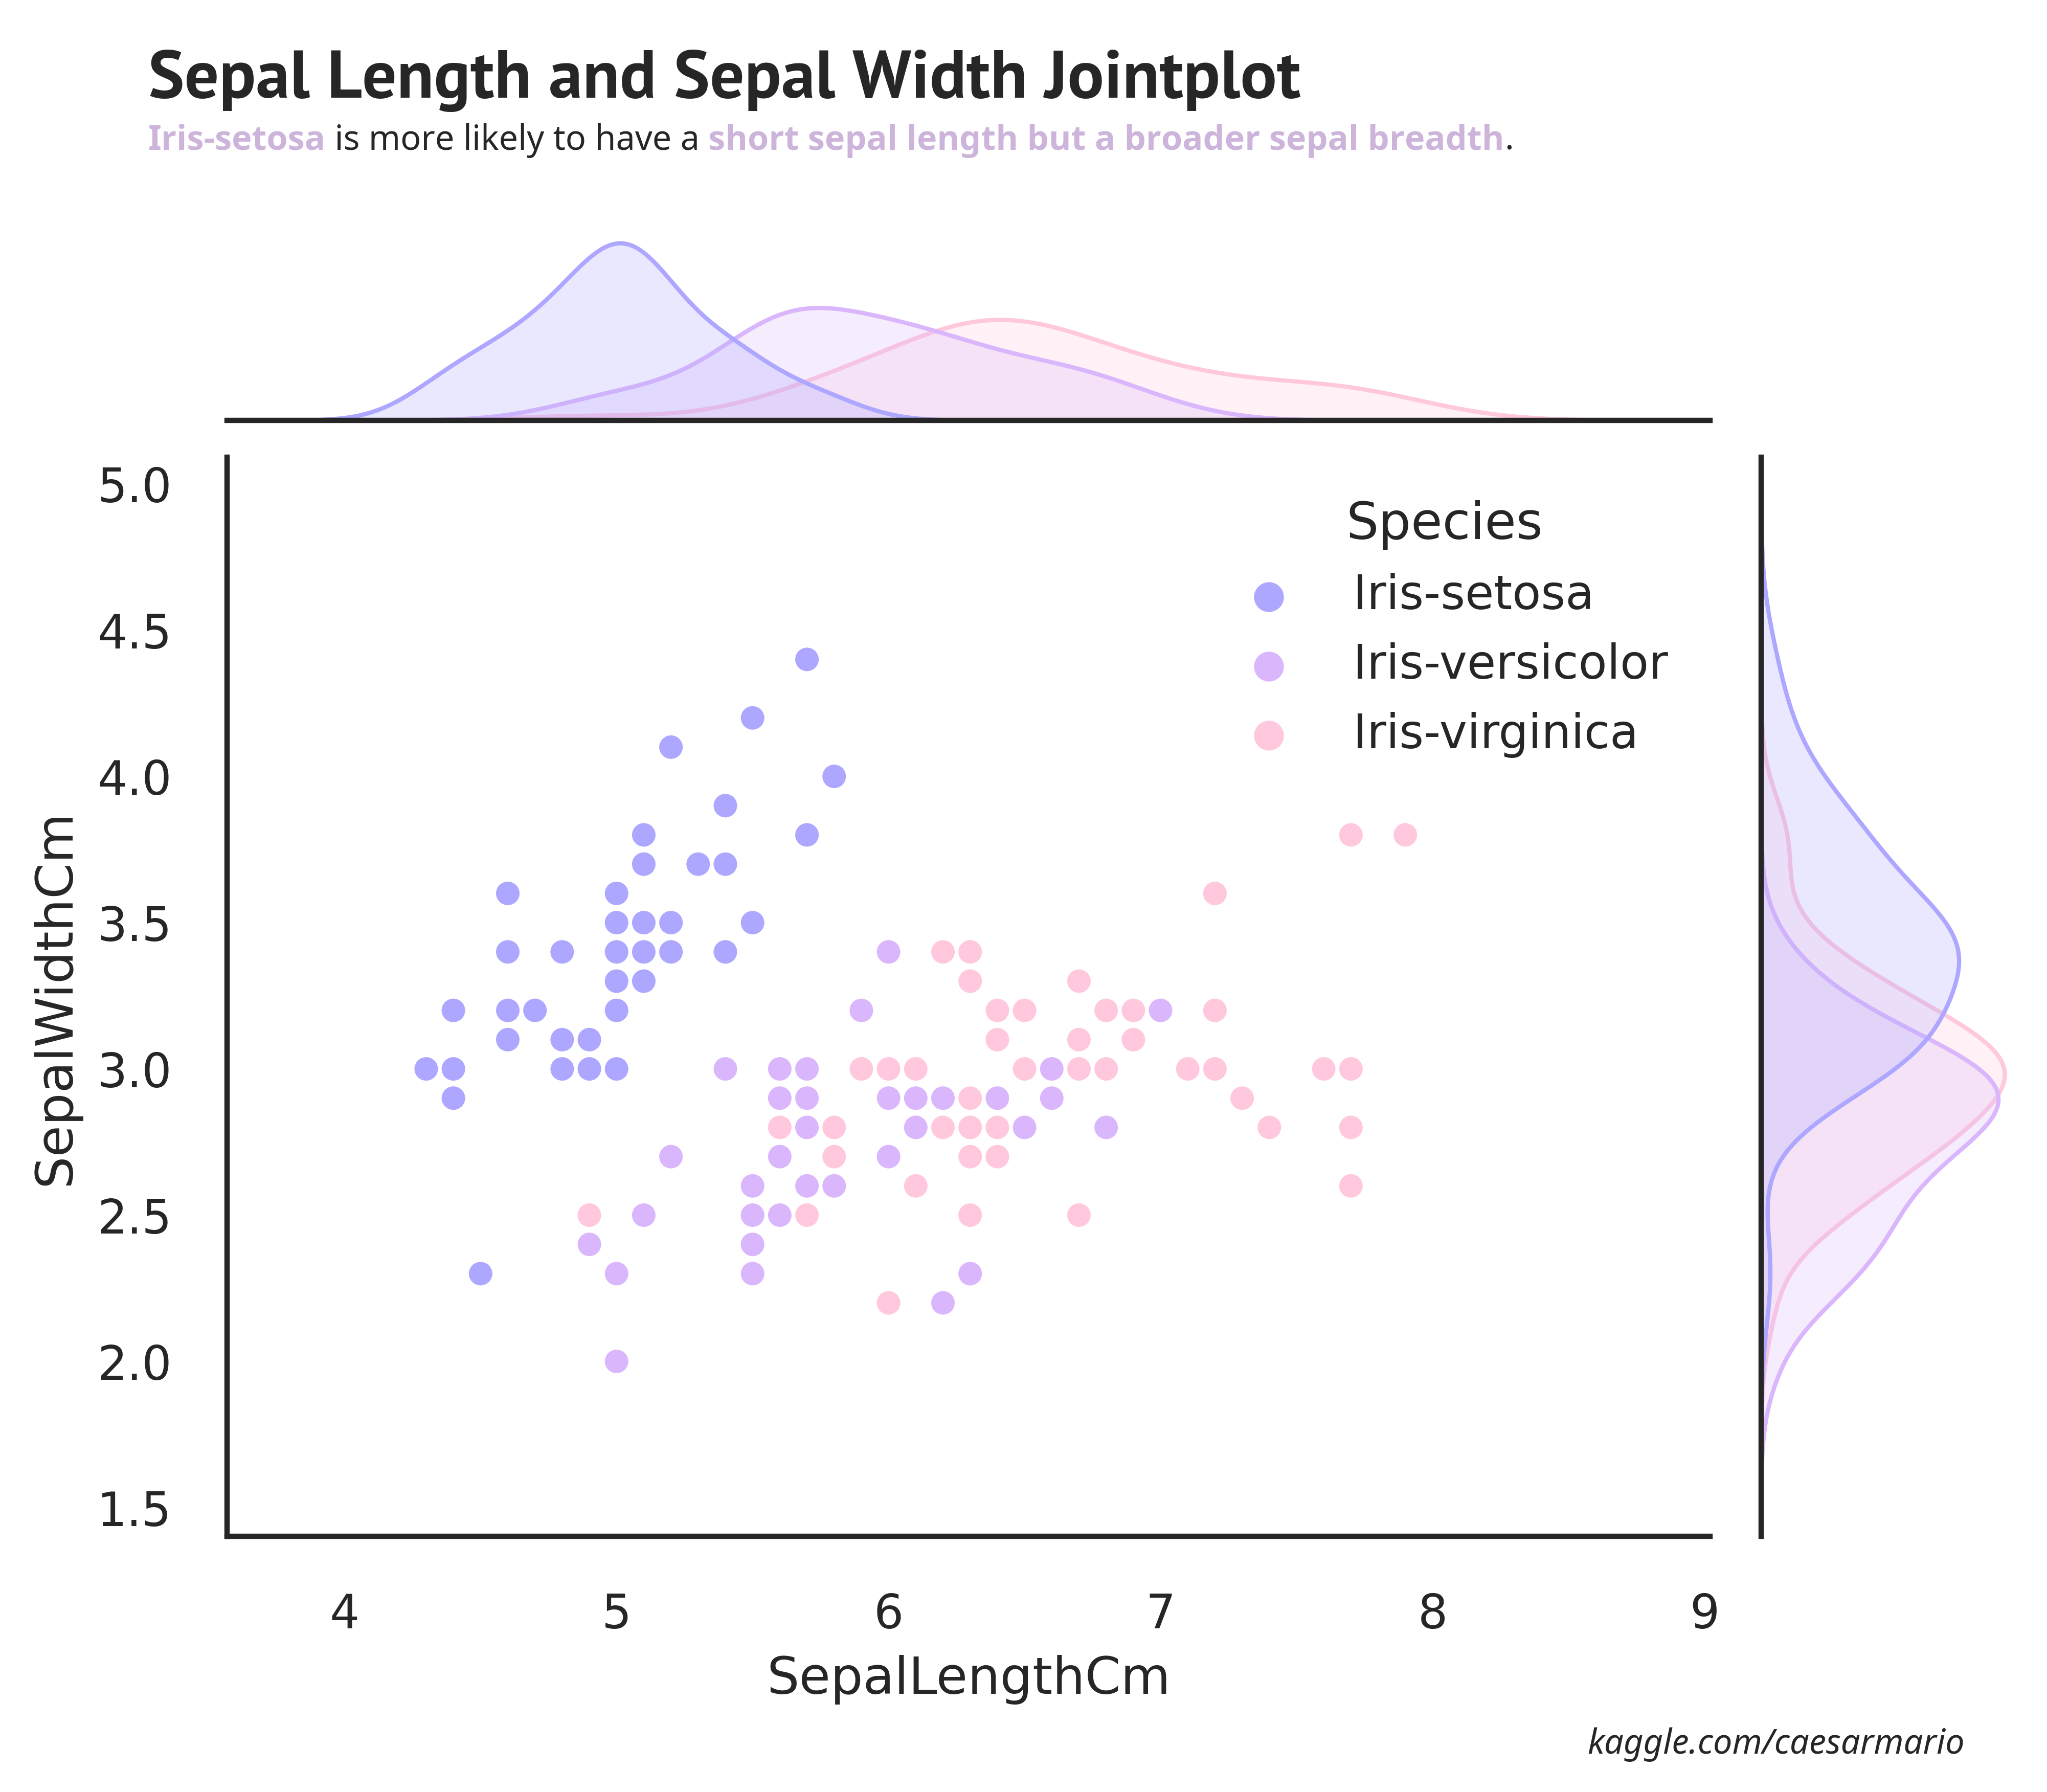
5.2 | 萼片长度和萼片宽度联合图
# --- EDA 2: Variables ---
suptitle = dict(x=0.1, y=1.05, fontsize=16, weight="heavy", ha="left", va="bottom", fontname=font_main)
title = dict(x=0.1, y=1.02, fontsize=8, weight="normal", ha="left", va="bottom", fontname=font_alt)
highlight_textprops = [{"weight":"bold", "color": colors[0]}, {"weight":"bold", "color": colors[0]}]

# --- Display EDA 2 ---
with sns.axes_style("white"):
    eda2=sns.jointplot(x="SepalLengthCm", y="SepalWidthCm", data=df, hue="Species", palette=color_eda)
eda2.fig.set_size_inches((7, 5))
fig_text(s="Sepal Length and Sepal Width Jointplot", **suptitle)
fig_text(s="<Iris-setosa> is more likely to have a <short sepal length but a broader sepal breadth>.", highlight_textprops=highlight_textprops, **title)
plt.gcf().text(0.77, -0.02, "kaggle.com/caesarmario", style="italic", fontsize=8)
plt.show();
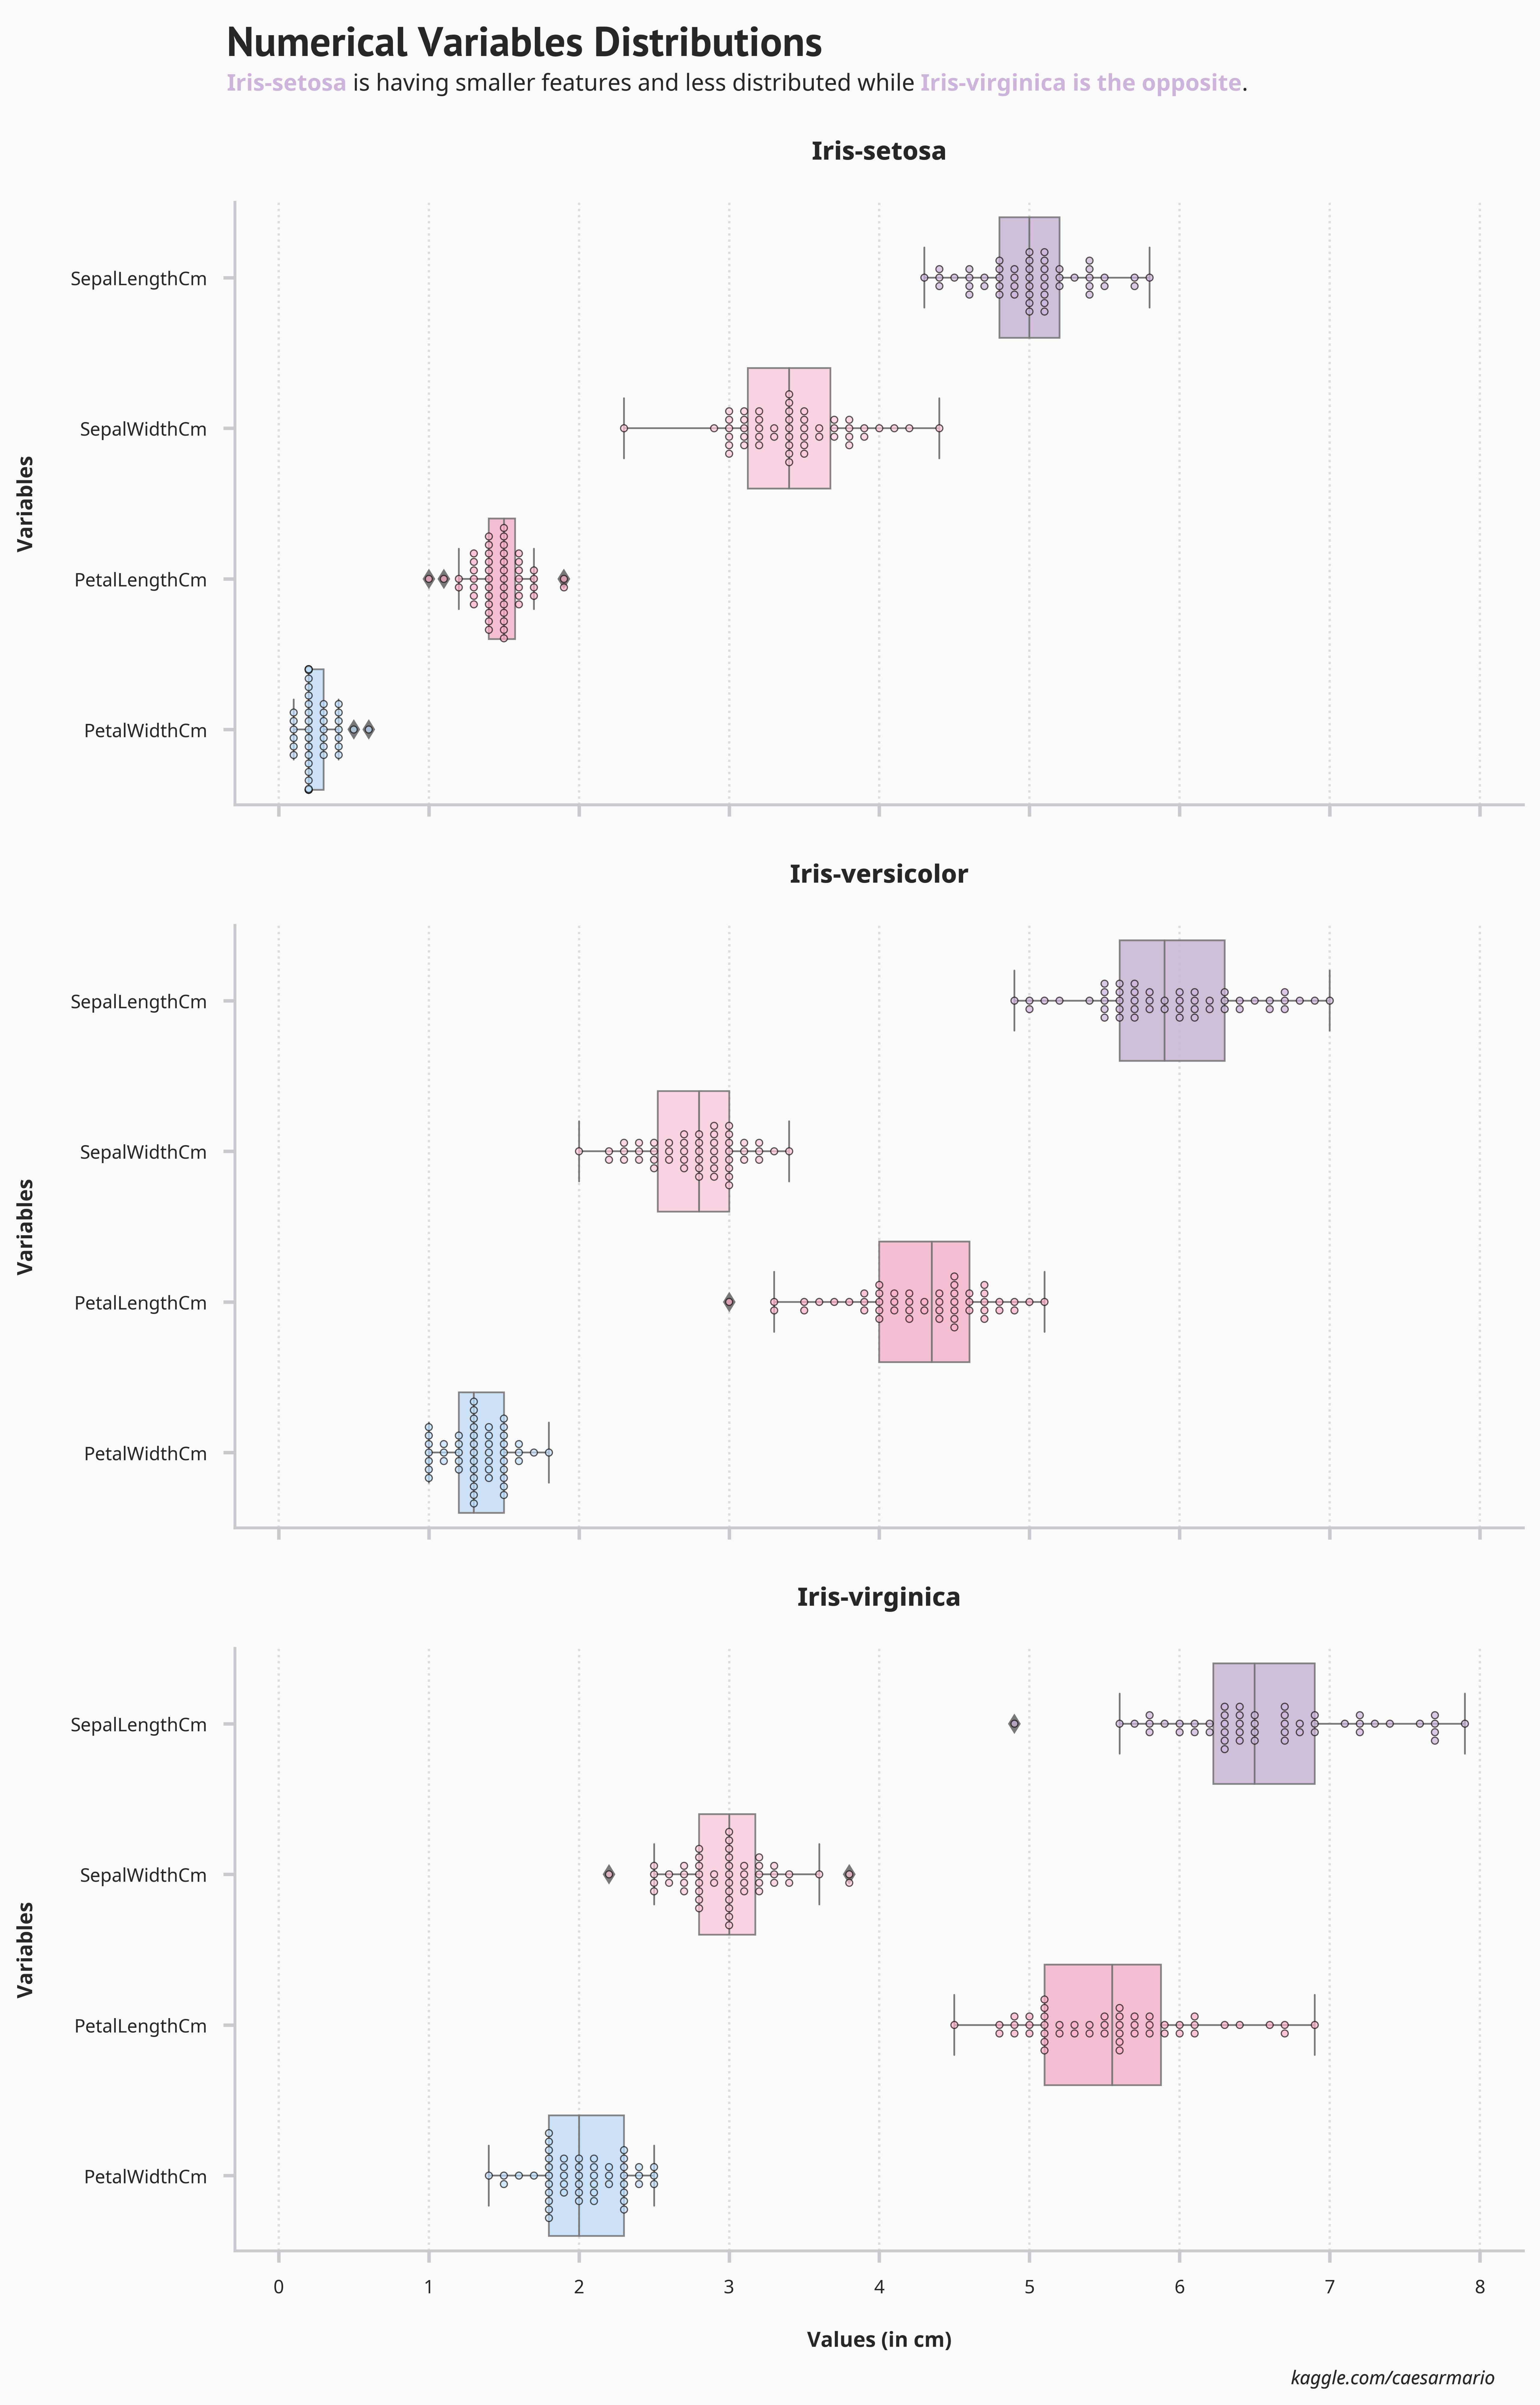
5.3 | 数值变量分布
# --- EDA 3 Variables ---
tick_params_prompt = dict(labelsize=8, length=5, width=1.5, bottom="on", color=color_line)
plot_style = dict(edgecolor=scatter_color_edge, s=3, alpha=0.7)
tick_params = dict(length=3, width=1, color=color_line)
xy_label = dict(fontsize=9, weight="bold")
highlight_textprops = [{"weight": "bold", "color": colors[0]}, {"weight": "bold", "color": colors[0]}]
suptitle = dict(x=0.12, y=0.932, fontsize=18, weight="heavy", ha="left", va="bottom", fontname=font_main)
title = dict(x=0.12, y=0.92, fontsize=10, weight="normal", ha="left", va="bottom", fontname=font_alt)

# --- EDA 3 Function ---
def boxplot_figure(iris_type):
    df_eda3 = df[column_list2][df.Species==iris_type]
    if iris_type == "Iris-setosa": ax_num = 0
    elif iris_type == "Iris-versicolor": ax_num = 1
    elif iris_type == "Iris-virginica": ax_num = 2
    fig = sns.boxplot(x="value", y="variable", data=pd.melt(df_eda3), ax=axs[ax_num], palette=colors, boxprops=dict(alpha=0.9), linewidth=0.75)
    fig = sns.swarmplot(x="value", y="variable", data=pd.melt(df_eda3), ax=axs[ax_num], palette=colors, linewidth=0.5, size=3.5, **plot_style)
    fig.set_title(f"{iris_type}\n", fontweight="heavy", fontsize="11")
    fig.set_ylabel("Variables\n", **xy_label)
    if iris_type in ["Iris-setosa", "Iris-versicolor"]:
        fig.set_xlabel("", **xy_label)
    else:
        fig.set_xlabel("\nValues (in cm)", **xy_label)
    fig.grid(axis="y", alpha=0, zorder=2)
    fig.grid(axis="x", which="major", alpha=0.3, color=color_grid, linestyle="dotted", zorder=1)
    for spine in fig.spines.values():
        spine.set_color("None")
    for spine in ["bottom", "left"]:
        fig.spines[spine].set_visible(True)
        fig.spines[spine].set_color(color_line)
    fig.tick_params(axis="both", which="major", left="on", **tick_params_prompt)
    fig.tick_params(axis="x", which="minor", **tick_params_prompt)
    plt.gcf().text(0.76, 0.06, "kaggle.com/caesarmario", style="italic", fontsize=8)

# --- Display EDA 3 ---
fig, axs = plt.subplots(3, 1, figsize=(10, 16), sharex=True, sharey=True)
for iris_type in list(df["Species"].unique()): boxplot_figure(iris_type)
fig_text(s="Numerical Variables Distributions", **suptitle)
fig_text(s="<Iris-setosa> is having smaller features and less distributed while <Iris-virginica is the opposite>.", highlight_textprops=highlight_textprops, **title)
plt.show();
6. | 数据预处理 ⚙️
6.1 | 删除变量,特征分离和分裂🪓
Id 列将被删除,因为
此列包含唯一数据。此外,
Species 列将与其他列
分离,并且数据集将
分割为
80:20 比例 ,其中 80% 是训练,20% 是测试。
# --- 从数据框中删除“Id” ---
df = df.drop("Id", axis=1)

# --- 分离“物种”列 ---
x = df.drop(["Species"], axis=1)
y = df["Species"]

# --- 分割数据集 ---
x_train, x_test, y_train, y_test = train_test_split(x, y, test_size=0.2, random_state=42)
6.2 | 处理流程 🪠
x_train和x_test数据。由于所有列(目标变量旁边)都是数字,正态分布,并且没有检测到异常值,因此将使用
标准缩放器进行缩放,这允许数字保持一致的缩放比例,同时保持比例他们之间的关系。
# --- Pipeline ---
pipeline = Pipeline([
    ("scaling", StandardScaler())
])

# --- Apply Pipeline to Dataframe ---
x_train_process = pipeline.fit_transform(x_train)
x_test_process = pipeline.fit_transform(x_test)
7. | 监督模型实施 🛠️
# --- 功能:模型拟合和性能评估 ---
def fit_ml_models(algo, algo_param, algo_name):

    # --- 算法流程 ---
    algo = Pipeline([("algo", algo)])

    # --- 应用网格搜索 ---
    model = GridSearchCV(algo, param_grid=algo_param, cv=10, n_jobs=-1, verbose=1)

    # --- 配件型号 ---
    print(clr.start+f".:. Fitting {algo_name} .:."+clr.end)
    fit_model = model.fit(x_train_process, y_train)

    # --- 模型最佳参数 ---
    best_params = model.best_params_
    print("\n>> Best Parameters: "+clr.start+f"{best_params}"+clr.end)

    # --- 最佳和最终参数 ---
    best_model = model.best_estimator_
    best_estimator = model.best_estimator_._final_estimator
    best_score = round(model.best_score_, 4)
    print(">> Best Score: "+clr.start+"{:.3f}".format(best_score)+clr.end)

    # --- 创建训练和测试预测 ---
    y_pred_train = model.predict(x_train_process)
    y_pred_test = model.predict(x_test_process)

    # --- 训练和测试准确率分数 ---
    acc_score_train = round(accuracy_score(y_pred_train, y_train)*100, 3)
    acc_score_test = round(accuracy_score(y_pred_test, y_test)*100, 3)
    print("\n"+clr.start+f".:. Train and Test Accuracy Score for {algo_name} .:."+clr.end)
    print("\t>> Train Accuracy: "+clr.start+"{:.2f}%".format(acc_score_train)+clr.end)
    print("\t>> Test Accuracy: "+clr.start+"{:.2f}%".format(acc_score_test)+clr.end)

    # --- 分类报告 ---
    print("\n"+clr.start+f".:. Classification Report for {algo_name} .:."+clr.end)
    print(classification_report(y_test, y_pred_test))

    # --- 图片设定 ---
    xy_label = dict(fontweight="bold", fontsize=12)
    grid_style = dict(color=color_grid, linestyle="dotted", zorder=1)
    title_style = dict(fontsize=14, fontweight="bold")
    tick_params = dict(length=3, width=1, color=color_line)
    bar_style = dict(zorder=3, edgecolor="black", linewidth=0.5, alpha=0.85)
    set_palette(color_yb)
    fig, ((ax1, ax2), (ax3, ax4)) = plt.subplots(2, 2, figsize=(16, 14))

    # --- 混淆矩阵 ---
    conf_matrix = ConfusionMatrix(best_estimator, ax=ax1, cmap="BuPu")
    conf_matrix.fit(x_train_process, y_train)
    conf_matrix.score(x_test_process, y_test)
    conf_matrix.finalize()
    conf_matrix.ax.set_title("Confusion Matrix\n", **title_style)
    conf_matrix.ax.tick_params(axis="both", labelsize=10, bottom="on", left="on", **tick_params)
    for spine in conf_matrix.ax.spines.values(): spine.set_color(color_line)
    conf_matrix.ax.set_xlabel("\nPredicted Class", **xy_label)
    conf_matrix.ax.set_ylabel("True Class\n", **xy_label)
    conf_matrix.ax.xaxis.set_ticklabels(iris_list, rotation=0)
    conf_matrix.ax.yaxis.set_ticklabels(iris_list[::-1])

    # --- ROC AUC ---
    logrocauc = ROCAUC(best_estimator, classes=iris_list, ax=ax2, colors=color_yb)
    logrocauc.fit(x_train_process, y_train)
    logrocauc.score(x_test_process, y_test)
    logrocauc.finalize()
    logrocauc.ax.set_title("ROC AUC Curve\n", **title_style)
    logrocauc.ax.tick_params(axis="both", labelsize=10, bottom="on", left="on", **tick_params)
    logrocauc.ax.grid(axis="both", alpha=0.4, **grid_style)
    for spine in logrocauc.ax.spines.values(): spine.set_color("None")
    for spine in ["bottom", "left"]:
        logrocauc.ax.spines[spine].set_visible(True)
        logrocauc.ax.spines[spine].set_color(color_line)
    logrocauc.ax.legend(loc="upper center", bbox_to_anchor=(0.5, -0.12), ncol=2, borderpad=2, frameon=False, fontsize=10)
    logrocauc.ax.set_xlabel("\nFalse Positive Rate", **xy_label)
    logrocauc.ax.set_ylabel("True Positive Rate\n", **xy_label)

    # --- Learning Curve ---
    lcurve = LearningCurve(best_estimator, scoring="f1_weighted", ax=ax3, colors=color_yb)
    lcurve.fit(x_train_process, y_train)
    lcurve.finalize()
    lcurve.ax.set_title("Learning Curve\n", **title_style)
    lcurve.ax.tick_params(axis="both", labelsize=10, bottom="on", left="on", **tick_params)
    lcurve.ax.grid(axis="both", alpha=0.4, **grid_style)
    for spine in lcurve.ax.spines.values(): spine.set_color("None")
    for spine in ["bottom", "left"]:
        lcurve.ax.spines[spine].set_visible(True)
        lcurve.ax.spines[spine].set_color(color_line)
    lcurve.ax.legend(loc="upper center", bbox_to_anchor=(0.5, -0.12), ncol=2, borderpad=2, frameon=False, fontsize=10)
    lcurve.ax.set_xlabel("\nTraining Instances", **xy_label)
    lcurve.ax.set_ylabel("Scores\n", **xy_label)

    # --- 特征重要性或精确召回曲线 ---
    try:
        feat_importance = FeatureImportances(best_estimator, labels=column_list2, ax=ax4, colors=color_yb_importance)
        feat_importance.fit(x_train_process, y_train)
        feat_importance.finalize()
        feat_importance.ax.set_title("Feature Importances\n", **title_style)
        feat_importance.ax.tick_params(axis="both", labelsize=10, bottom="on", left="on", **tick_params)
        feat_importance.ax.grid(axis="x", alpha=0.4, **grid_style)
        feat_importance.ax.grid(axis="y", alpha=0, **grid_style)
        for spine in feat_importance.ax.spines.values(): spine.set_color("None")
        for spine in ["bottom"]:
            feat_importance.ax.spines[spine].set_visible(True)
            feat_importance.ax.spines[spine].set_color(color_line)
        feat_importance.ax.set_xlabel("\nRelative Importance", **xy_label)
        feat_importance.ax.set_ylabel("Features\n", **xy_label)
    except:
        prec_curve = PrecisionRecallCurve(best_estimator, ax=ax4, ap_score=True, iso_f1_curves=True)
        prec_curve.fit(x_train_process, y_train)
        prec_curve.score(x_test_process, y_test)
        prec_curve.finalize()
        prec_curve.ax.set_title("Precision-Recall Curve\n", **title_style)
        prec_curve.ax.tick_params(axis="both", labelsize=10, bottom="on", left="on", **tick_params)
        for spine in prec_curve.ax.spines.values(): spine.set_color("None")
        for spine in ["bottom", "left"]:
            prec_curve.ax.spines[spine].set_visible(True)
            prec_curve.ax.spines[spine].set_color(color_line)
        prec_curve.ax.legend(loc="upper center", bbox_to_anchor=(0.5, -0.12), ncol=2, borderpad=2, frameon=False, fontsize=10)
        prec_curve.ax.set_xlabel("\nRecall", **xy_label)
        prec_curve.ax.set_ylabel("Precision\n", **xy_label)

    plt.suptitle(f"\n{algo_name} Performance Evaluation Report\n", fontsize=18, fontweight="bold")
    plt.gcf().text(0.88, 0.02, "kaggle.com/caesarmario", style="italic", fontsize=10)
    plt.tight_layout();

    return acc_score_train, acc_score_test, best_score
7.1 | Logistic Regression 逻辑回归
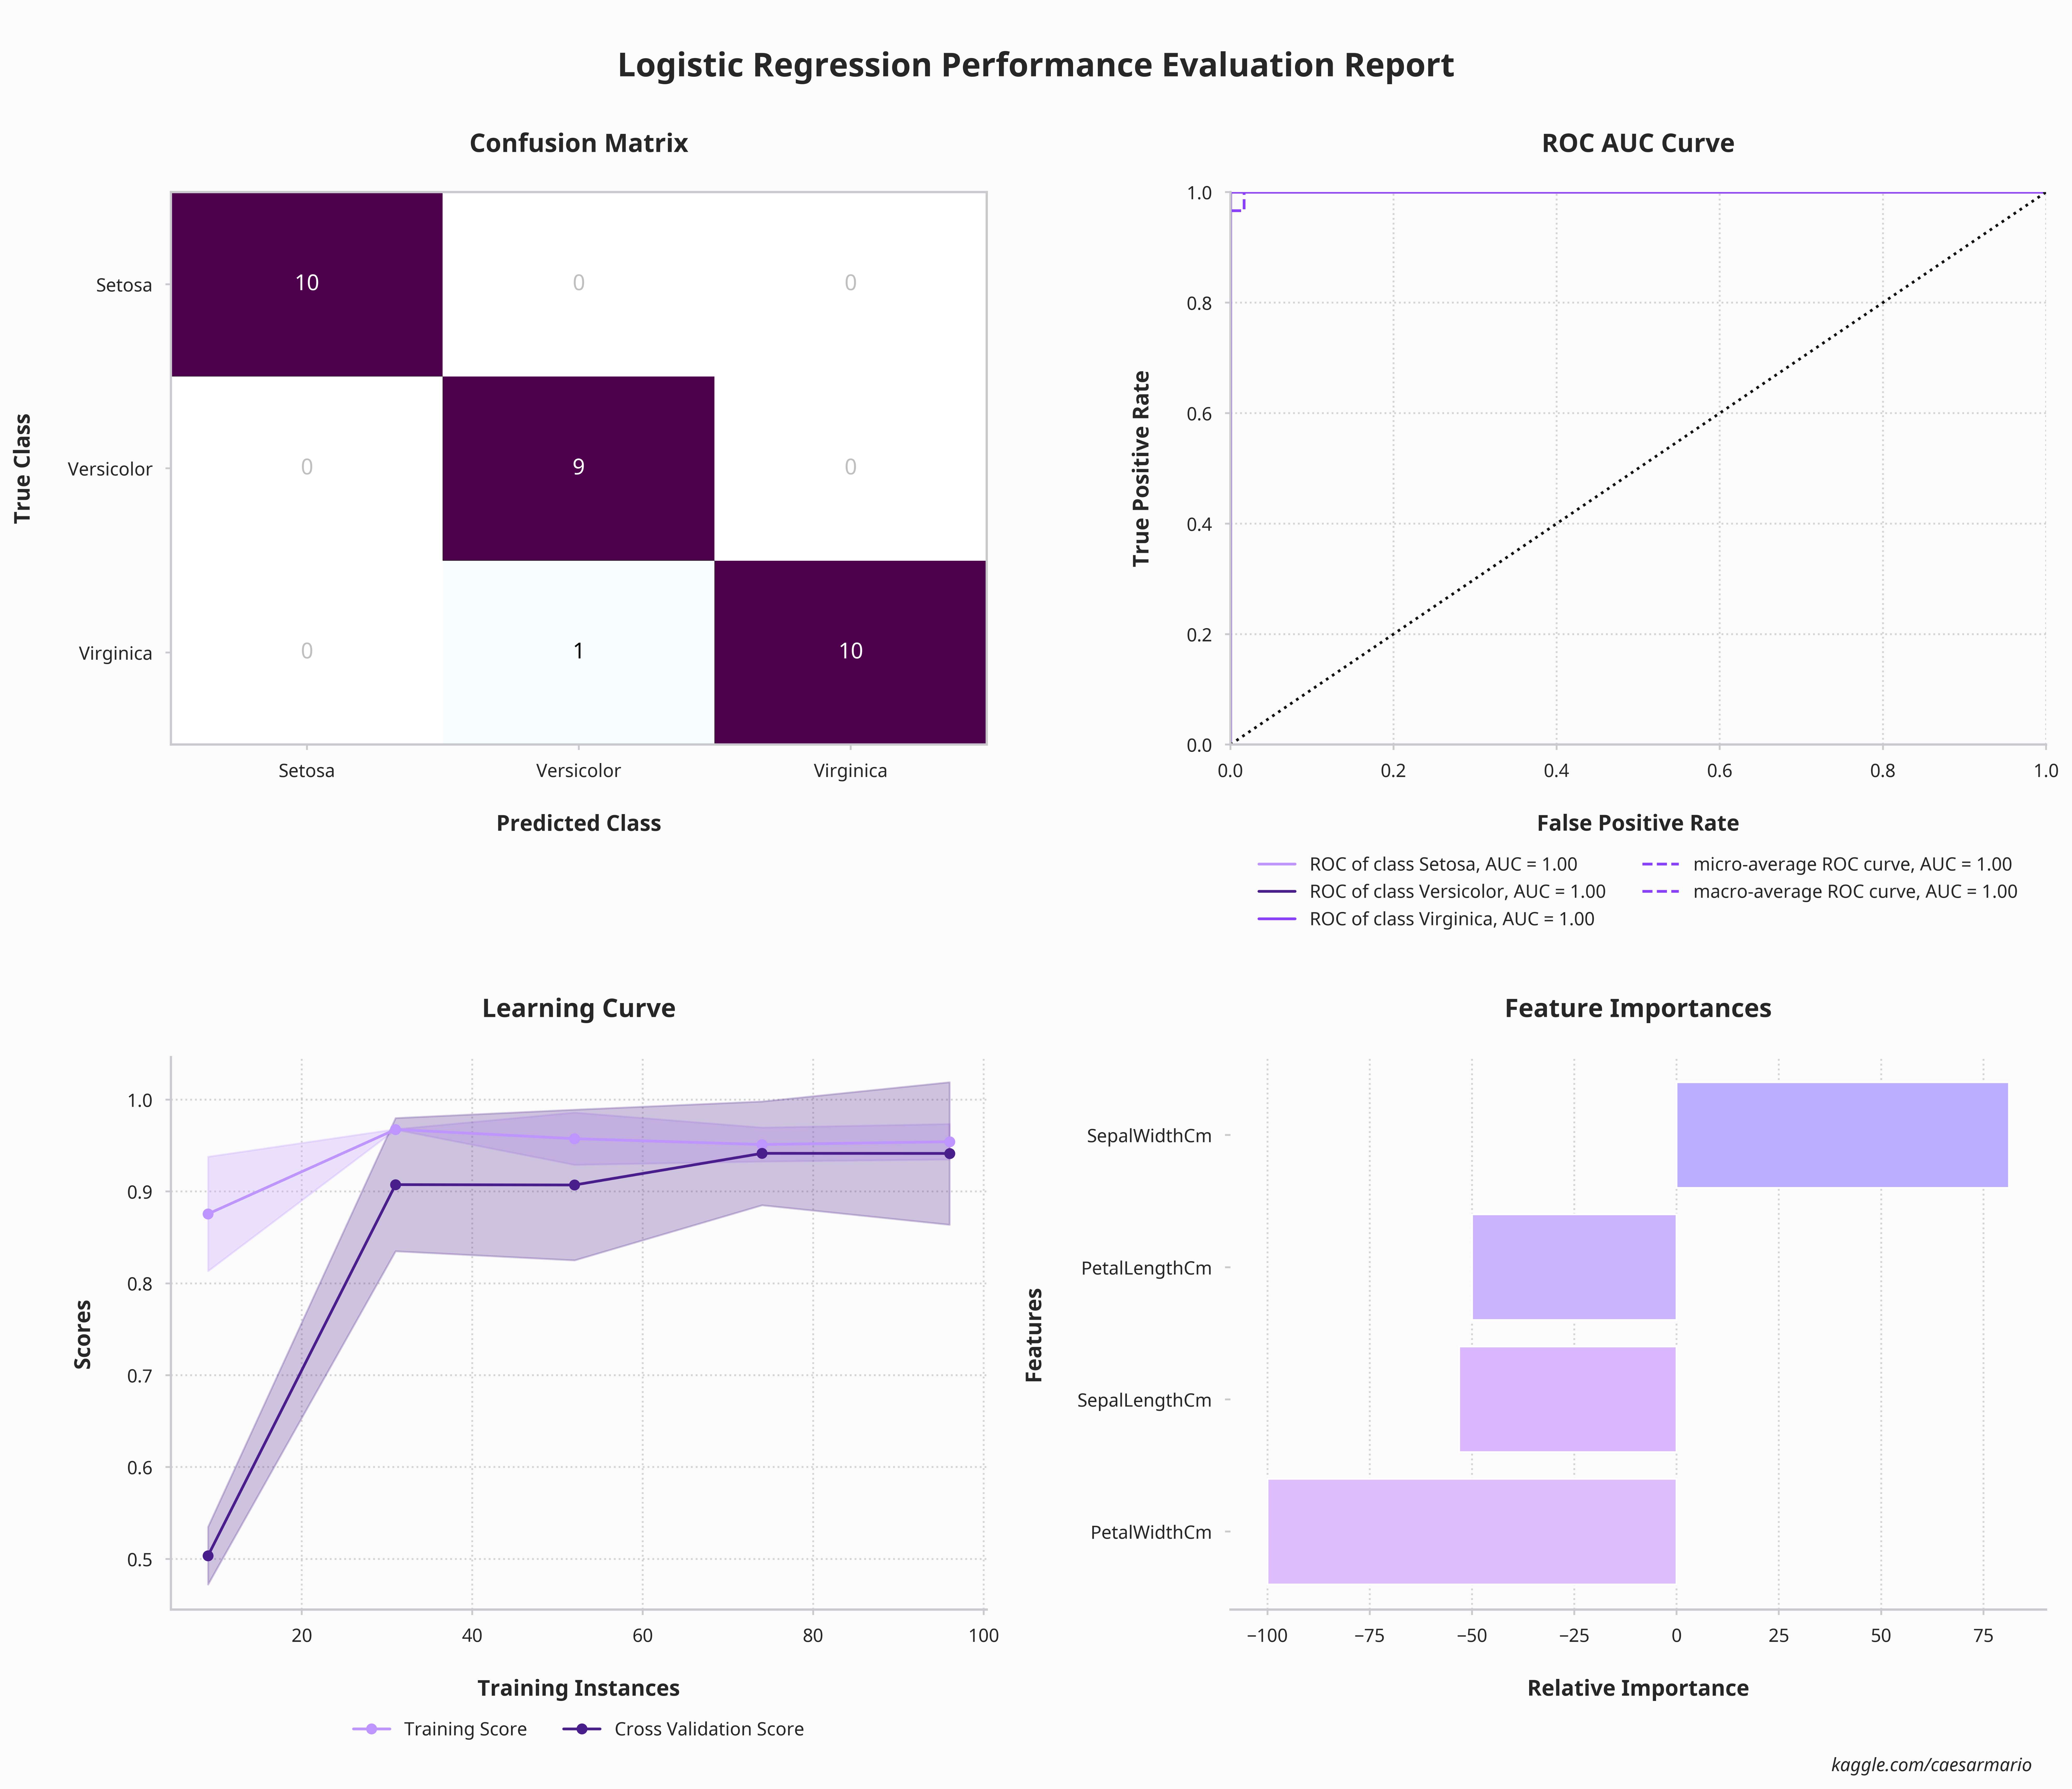
逻辑回归是一种统计方法,用于构建机器学习模型,其中 因变量是二分的:即二元。逻辑回归用于描述数据以及 一个因变量与一个或多个自变量之间的关系。自变量可以是名义型、有序型或区间型。
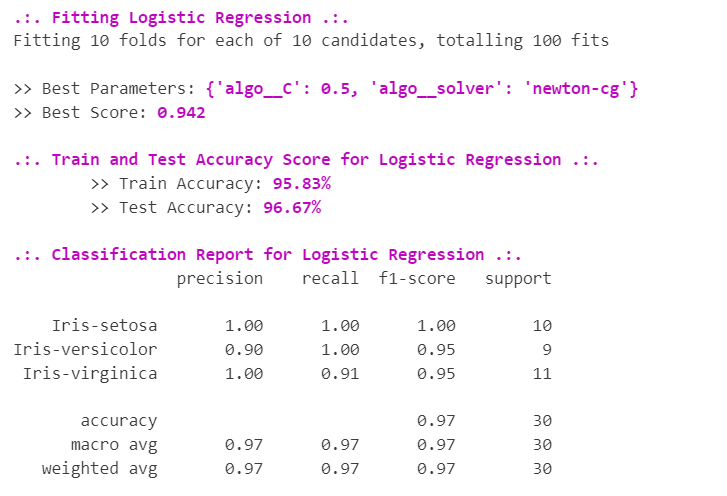
“逻辑回归”这个名称源自它使用的逻辑函数的概念。 逻辑函数也称为 sigmoid 函数。此逻辑函数的值介于 0 和 1 之间。
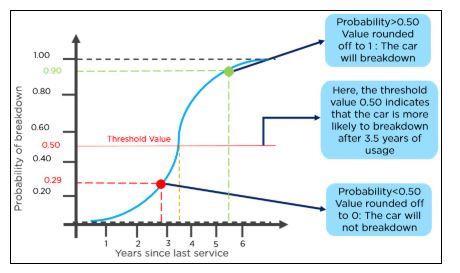
算法code如下
# --- 逻辑回归参数 ---
parameter_lr = {
    "algo__solver": ["liblinear", "newton-cg"]
    , "algo__C": [0.001, 0.01, 0.1, 0.5, 1]
}

# --- 逻辑回归算法 ---
algo_lr = LogisticRegression(penalty="l2", random_state=42)

# --- 应用逻辑回归 ---
acc_score_train_lr, acc_score_test_lr, best_score_lr = fit_ml_models(algo_lr, parameter_lr, "Logistic Regression")
7.2 | Gaussian Naive Bayes 高斯朴素贝叶斯
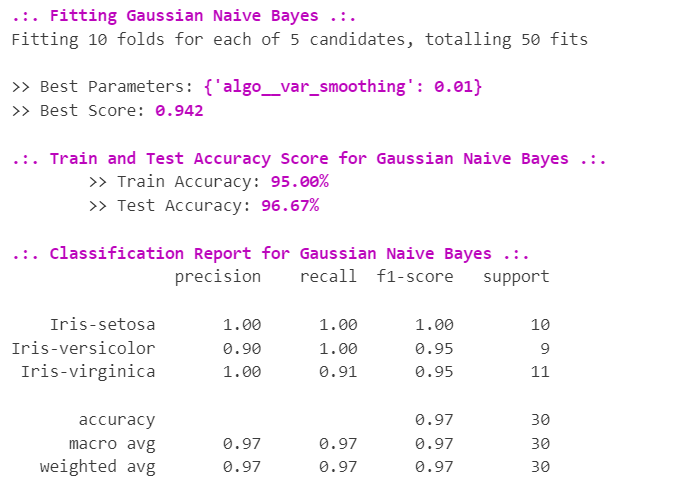
朴素贝叶斯分类器基于贝叶斯定理,该定理 采用的一个假设是特征之间的强独立性假设。这些分类器假设特定特征的值独立于任何其他特征的值。在监督学习情况下,朴素贝叶斯分类器的训练非常有效。朴素贝叶斯分类器 需要少量训练数据来估计分类所需的参数。朴素贝叶斯分类器设计和实现简单,可以应用于许多现实生活中的情况。
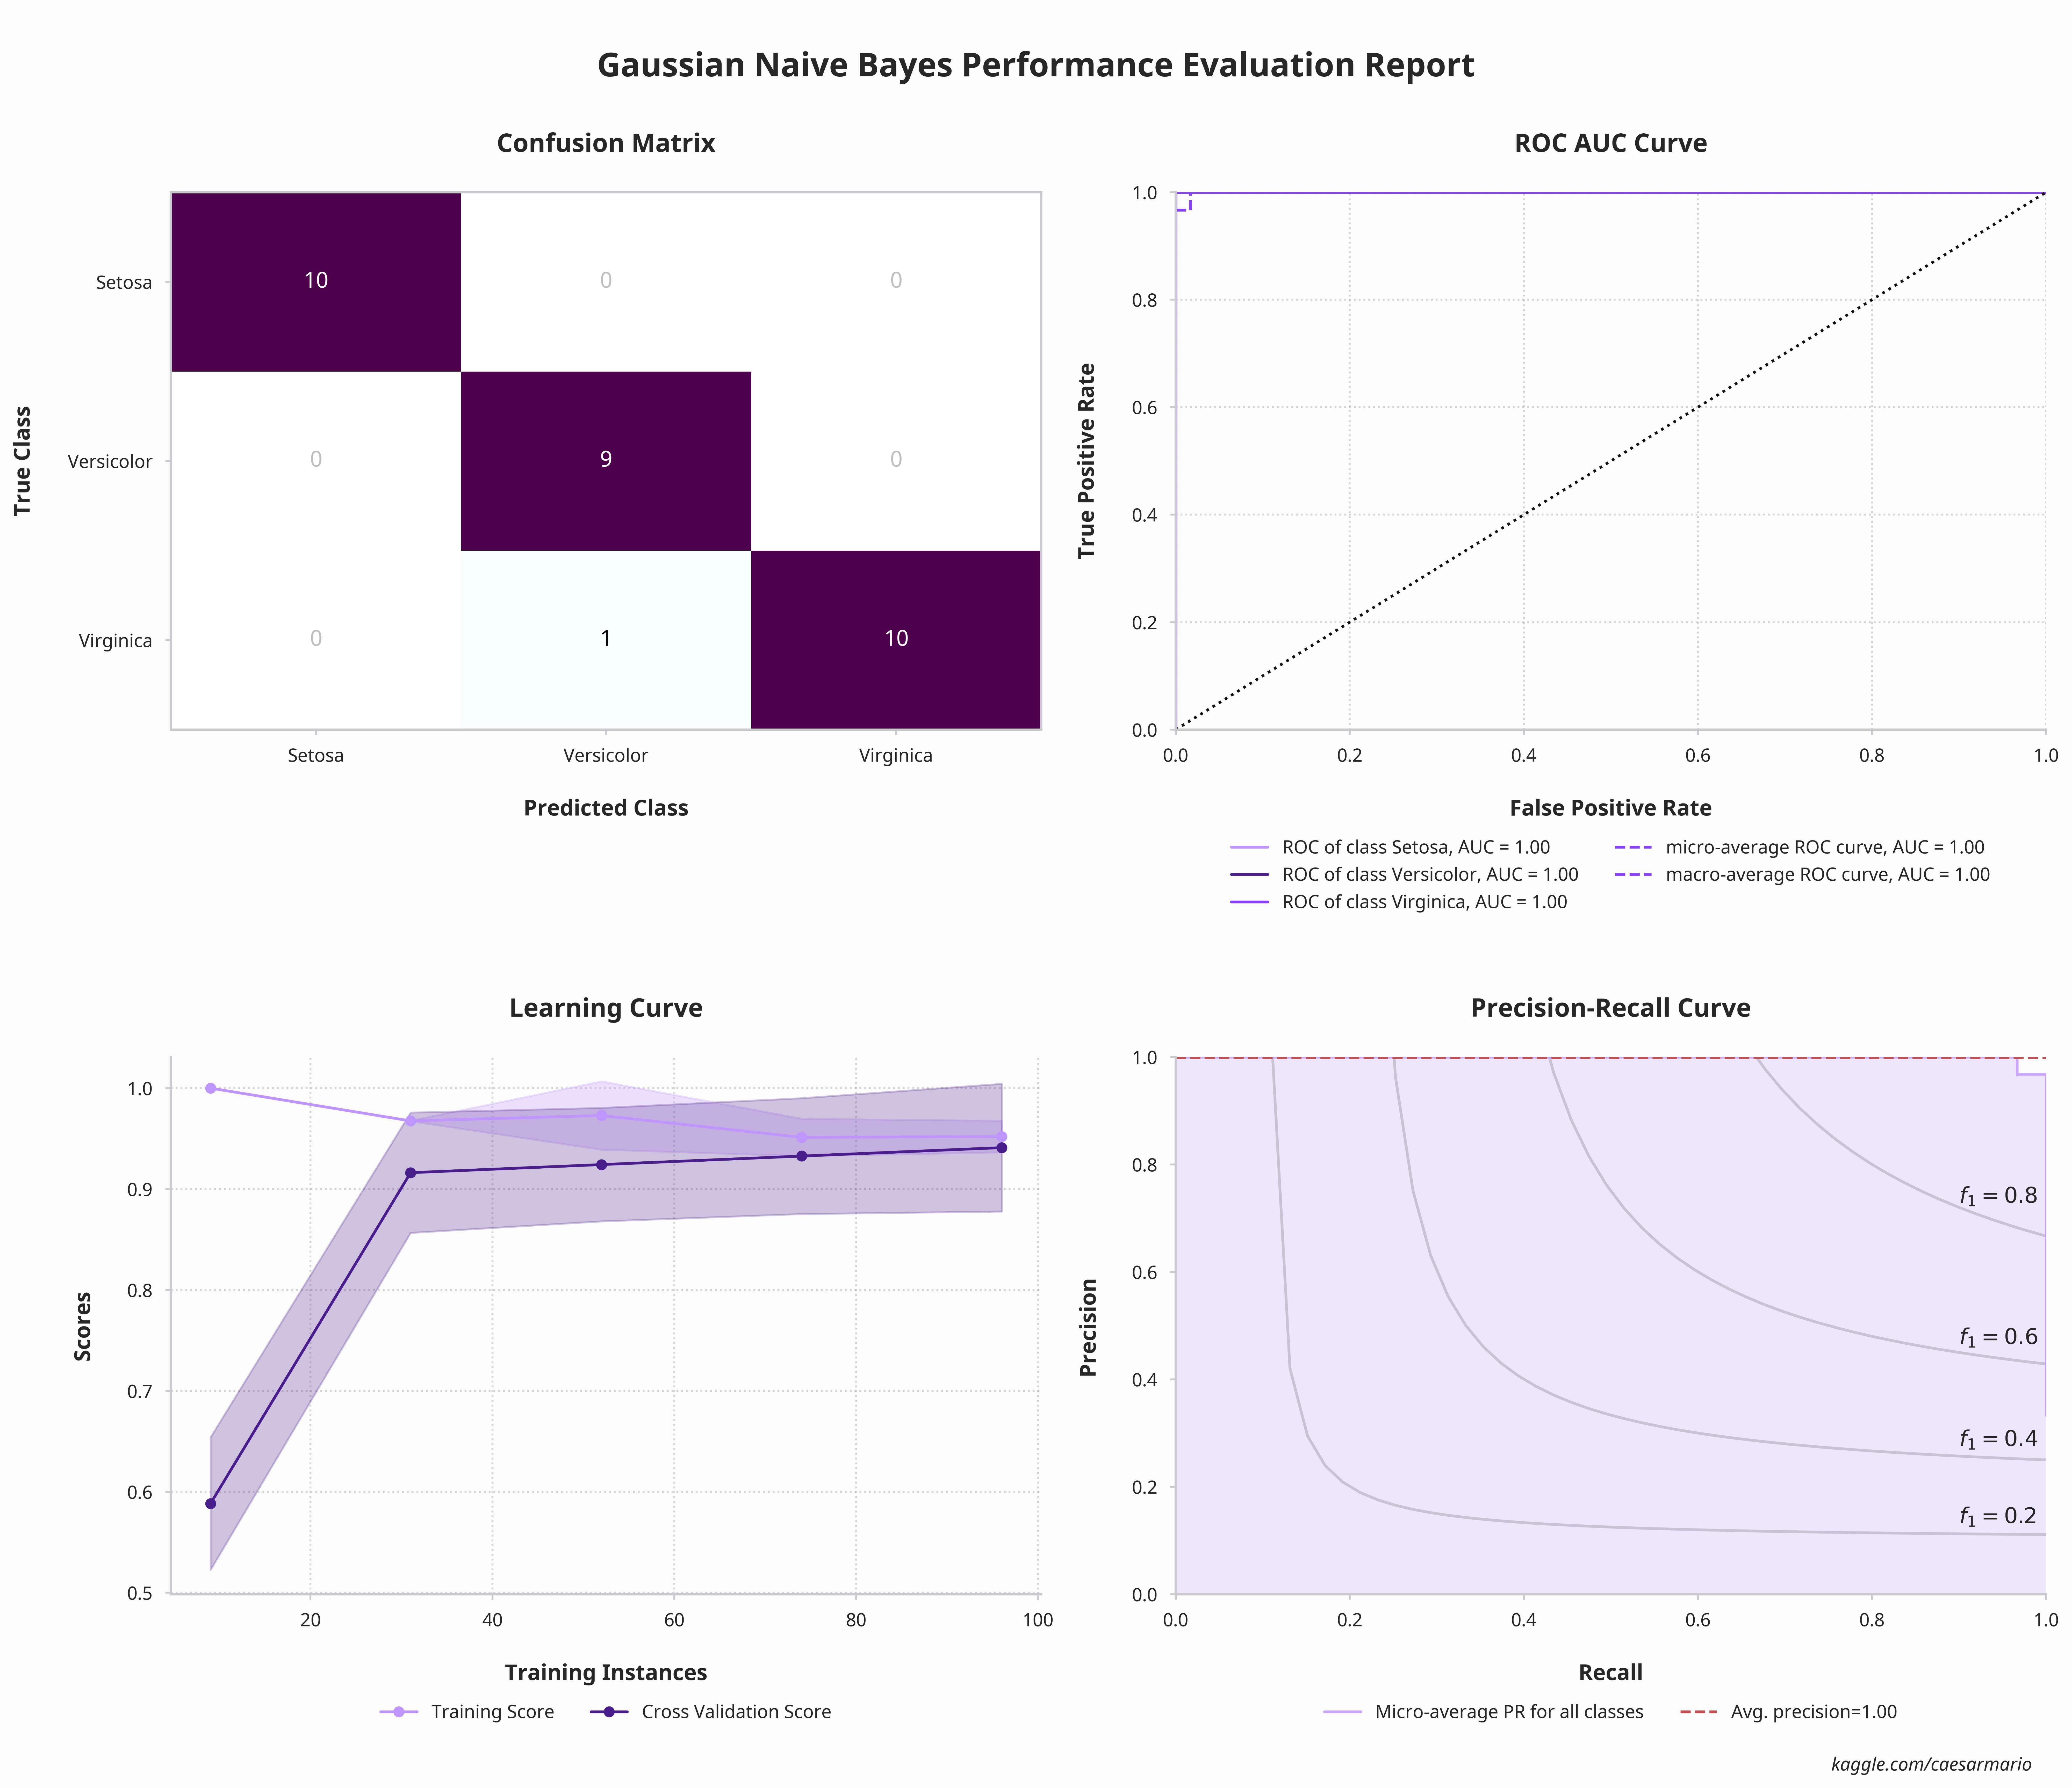
高斯朴素贝叶斯是 朴素贝叶斯的变体,遵循高斯正态分布并支持连续数据。在处理连续数据时,经常采取的假设是与每个类别相关的连续值根据正态(或高斯)分布进行分布。
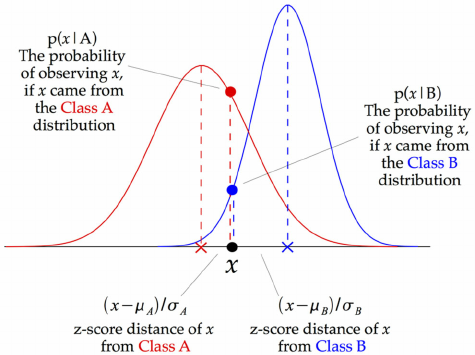
算法code如下
# --- Gaussian NB Parameters ---
parameter_gnb = {"algo__var_smoothing": [1e-2, 1e-3, 1e-4, 1e-5, 1e-6]}

# --- Gaussian NB Algorithm ---
algo_gnb = GaussianNB()

# --- Applying Gaussian NB ---
acc_score_train_gnb, acc_score_test_gnb, best_score_gnb = fit_ml_models(algo_gnb, parameter_gnb, "Gaussian Naive Bayes")
7.3 | Support Vector Machine (SVM) 支持向量机
支持向量机(SVM)是最流行的监督学习算法之一,用于分类和回归问题。 SVM算法的目标是 创建可以将n维空间分成类别的最佳线或决策边界,以便我们将来可以轻松地将新数据点放入正确的类别中。这个最佳决策边界称为超平面。
SVM 选择有助于创建超平面的 极值点/向量。这些极端情况称为支持向量,因此算法被称为支持向量机。
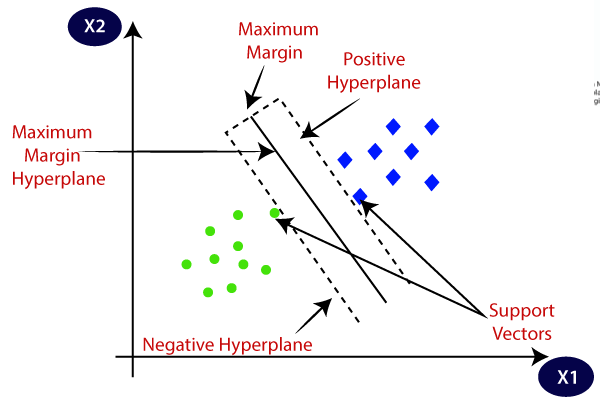
算法code如下
# --- SVM Parameters ---
parameter_svc = [
    {"algo__kernel": ["rbf"], "algo__gamma": np.arange(0.1, 1, 0.1), "algo__C": np.arange(0.1, 1, 0.1)}
    , {"algo__kernel": ["linear"], "algo__C": np.arange(0.1, 1, 0.1)}
    , {"algo__kernel": ["poly"], "algo__degree" : np.arange(1, 10, 1), "algo__C": np.arange(0.1, 1, 0.1)}
]

# --- SVM Algorithm ---
algo_svc = SVC(random_state=1, probability=True)

# --- Applying SVM ---
acc_score_train_svc, acc_score_test_svc, best_score_svc = fit_ml_models(algo_svc, parameter_svc, "Support Vector Machine (SVM)")
7.4 | K-Nearest Neighbour (KNN) K最近邻
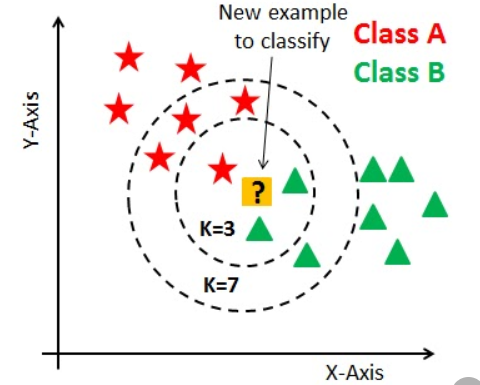
k 最近邻 (KNN) 算法是一种数据分类方法 用于根据哪个组来估计数据点成为一个组或另一个组的成员的可能性最接近它的数据点属于。 k-近邻算法是一种监督机器学习算法,用于解决分类和回归问题.
它被称为 惰性学习算法或惰性学习器,因为当您提供训练数据时它不会执行任何训练。相反,它只是在训练期间存储数据,并不执行任何计算。在对数据集执行查询之前,它不会构建模型。这使得 KNN 成为数据挖掘的理想选择。
# --- KNN Parameters ---
parameter_knn = {
    "algo__n_neighbors": np.arange(2, 15, 1)
    , "algo__leaf_size": np.arange(1, 11, 1)
}

# --- KNN Algorithm ---
algo_knn = KNeighborsClassifier()

# --- Applying KNN ---
acc_score_train_knn, acc_score_test_knn, best_score_knn = fit_ml_models(algo_knn, parameter_knn, "K-Nearest Neighbour (KNN)")
7.5 | Decision Tree 决策树
决策树是一种监督学习技术,可用于分类和回归问题,但大多数情况下它更适合解决分类问题。它是一个树形结构的分类器,其中 内部节点表示数据集的特征,分支表示决策规则,每个叶节点表示结果.
在决策树中,有 两个节点,分别是 决策节点和叶节点。决策节点用于做出任何决策并具有多个分支,而叶节点是这些决策的输出并且不包含任何进一步的分支。
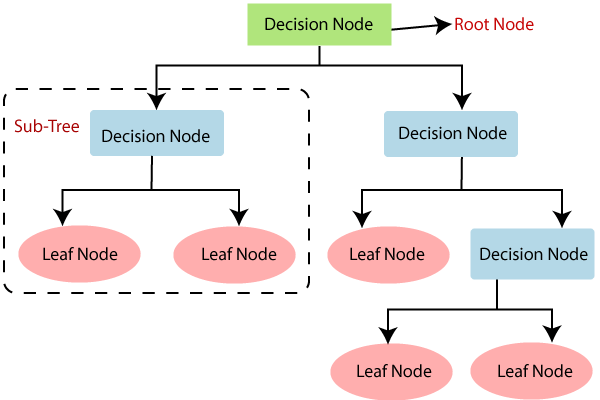
# --- Decision Tree Parameters ---
parameter_dt = {"algo__max_depth": np.arange(1, 11, 1)}

# --- Decision Tree Algorithm ---
algo_dt = DecisionTreeClassifier(random_state=42)

# --- Applying Decision Tree ---
acc_score_train_dt, acc_score_test_dt, best_score_dt = fit_ml_models(algo_dt, parameter_dt, "Decision Tree")
7.6 | 模型对比 👀
# --- 创建精度比较表 ---
df_compare = pd.DataFrame({"Model": ["Logistic Regression", "K-Nearest Neighbour", "Support Vector Machine", "Gaussian NB", "Decision Tree"]
                           , "Accuracy Train": [acc_score_train_lr, acc_score_train_knn, acc_score_train_svc, acc_score_train_gnb, acc_score_train_dt]
                           , "Accuracy Test": [acc_score_test_lr, acc_score_test_knn, acc_score_test_svc, acc_score_test_gnb, acc_score_test_dt]
                           , "Best Score": [best_score_lr, best_score_knn, best_score_svc, best_score_gnb,best_score_dt]})

# --- 创建比较表 ---
print(clr.start+f".:. Models Comparison .:."+clr.end)
print(clr.color+"*" * 26)
df_compare.sort_values(by="Best Score", ascending=False).style.apply(acc_train_vs_test, axis=1).hide()
| Model | Accuracy Train | Accuracy Test | Best Score |
|---|---|---|---|
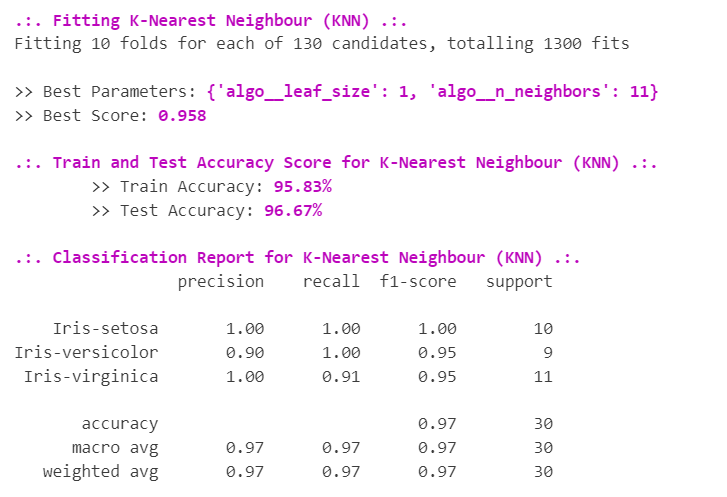
| K-Nearest Neighbour | 95.833000 | 96.667000 | 0.958300 |
| Support Vector Machine | 96.667000 | 96.667000 | 0.958300 |
| Logistic Regression | 95.833000 | 96.667000 | 0.941700 |
| Gaussian NB | 95.000000 | 96.667000 | 0.941700 |
| Decision Tree | 95.833000 | 96.667000 | 0.941700 |
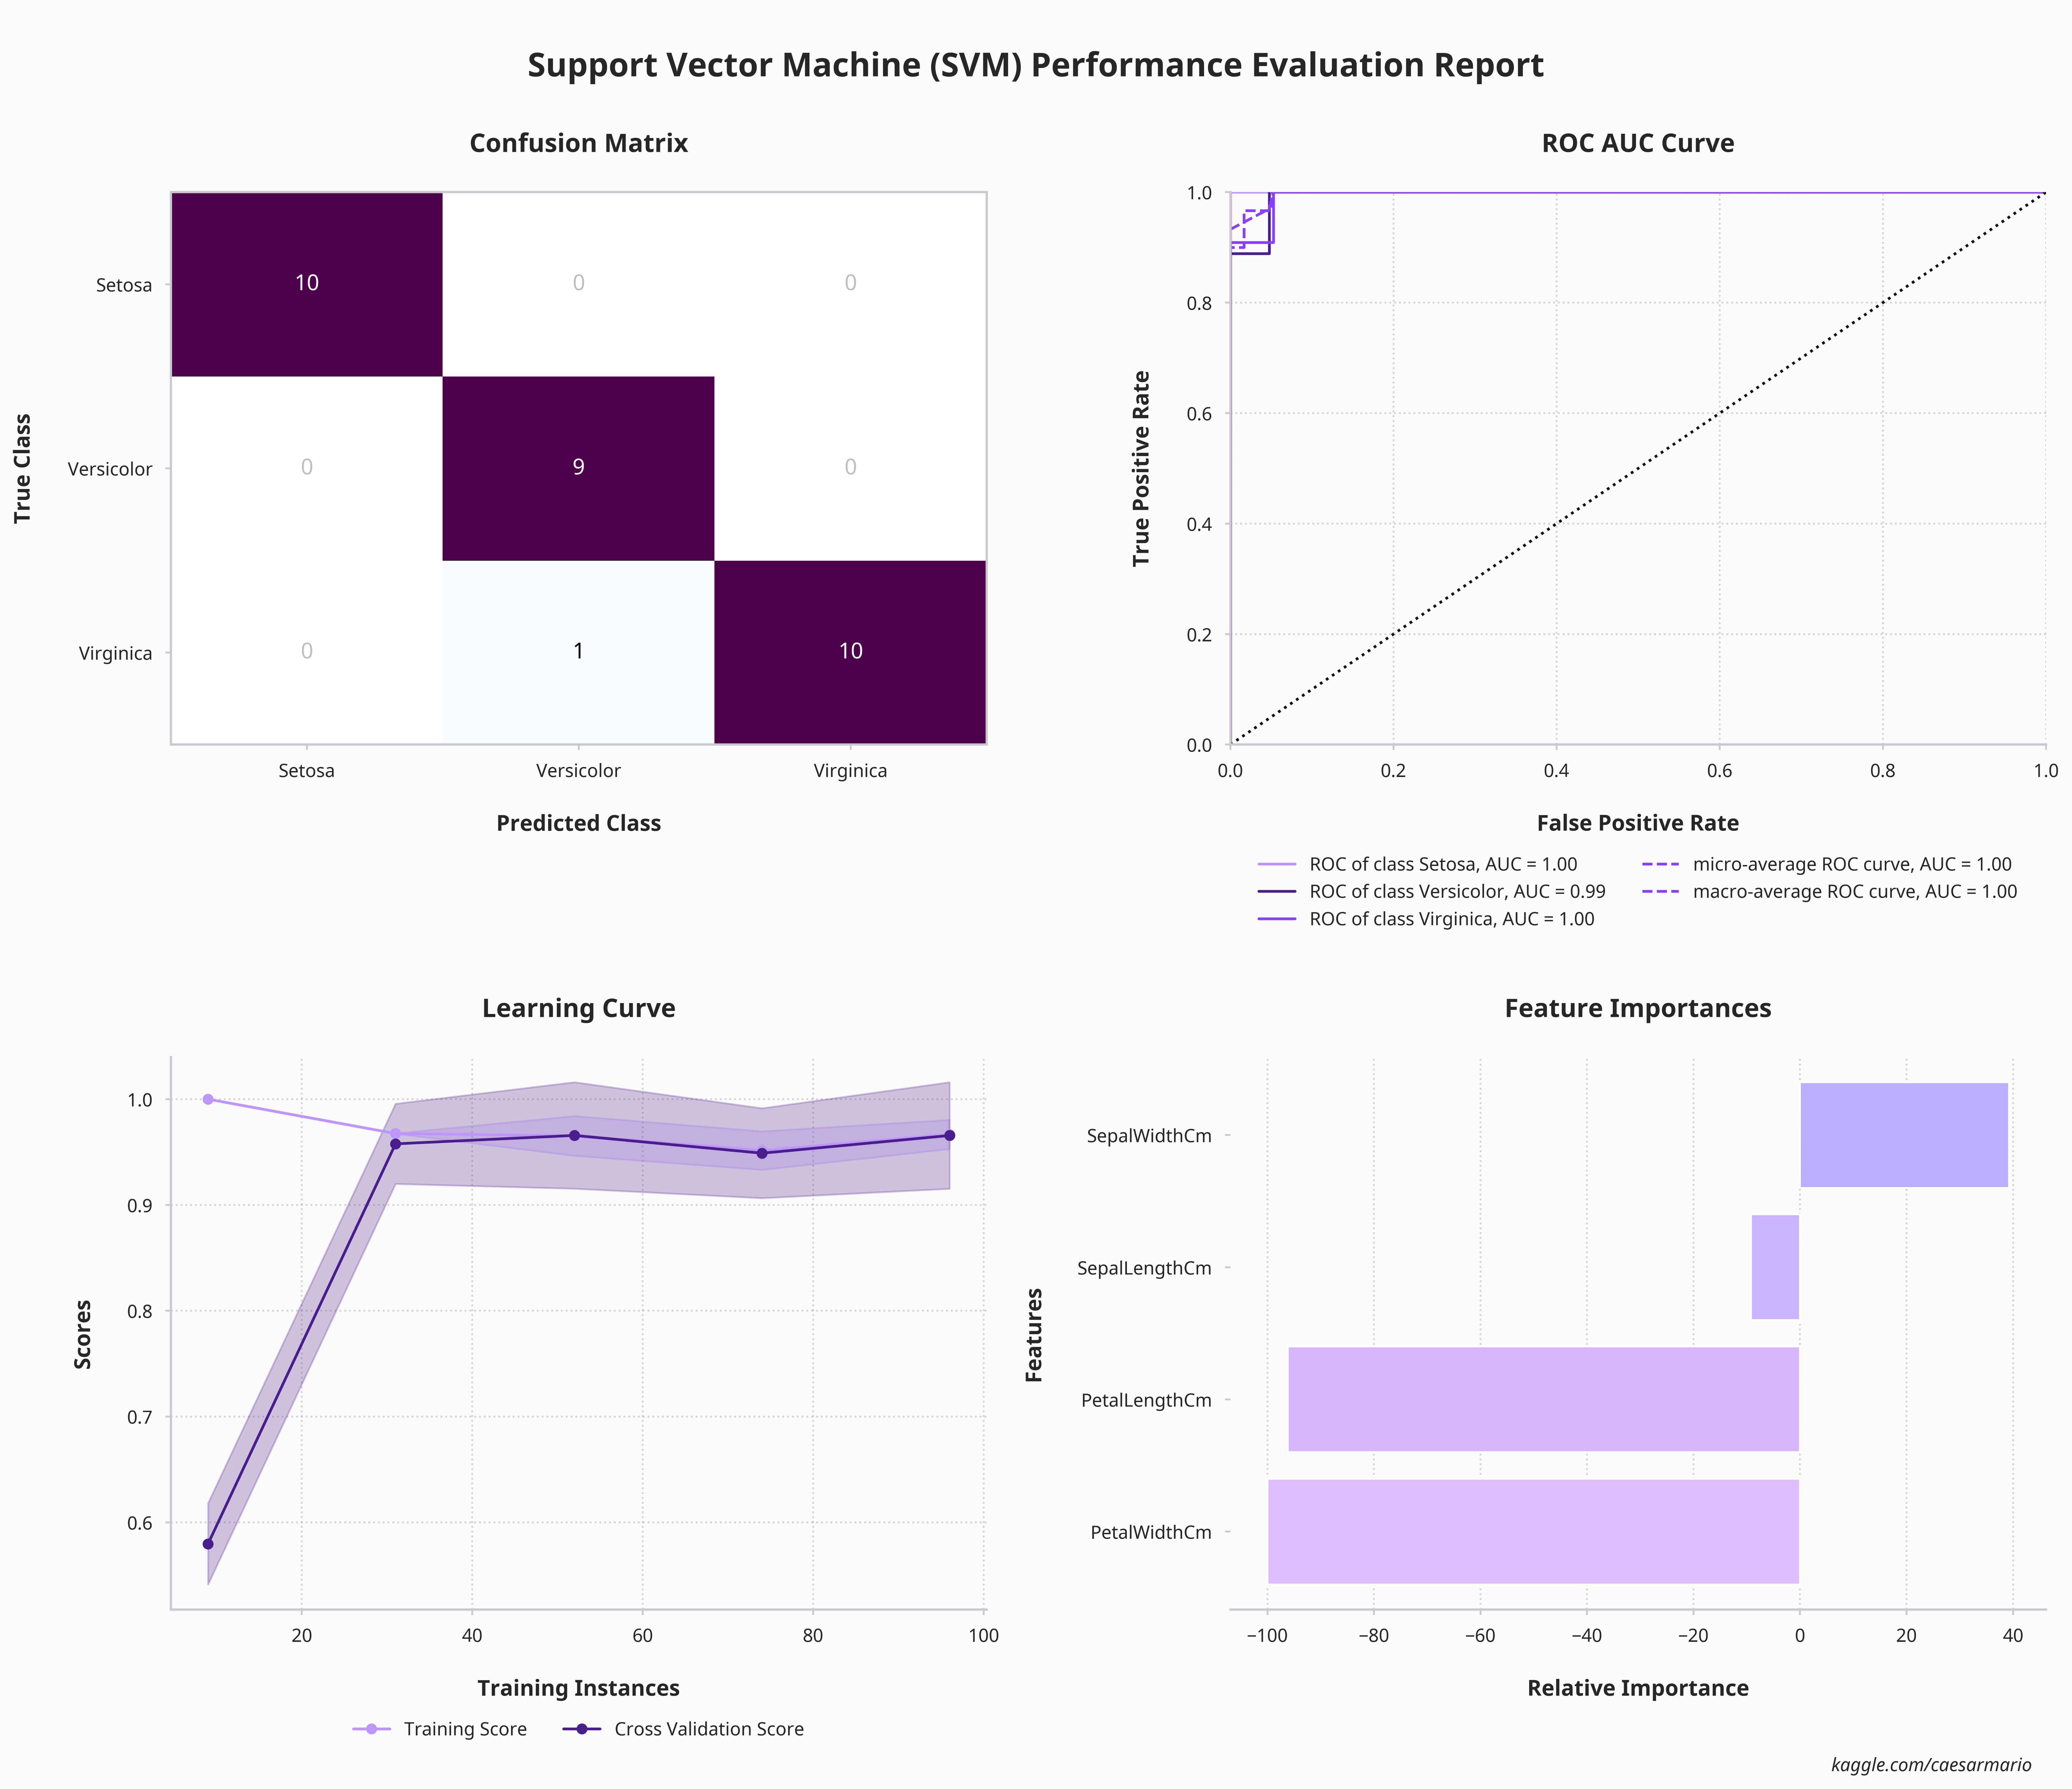
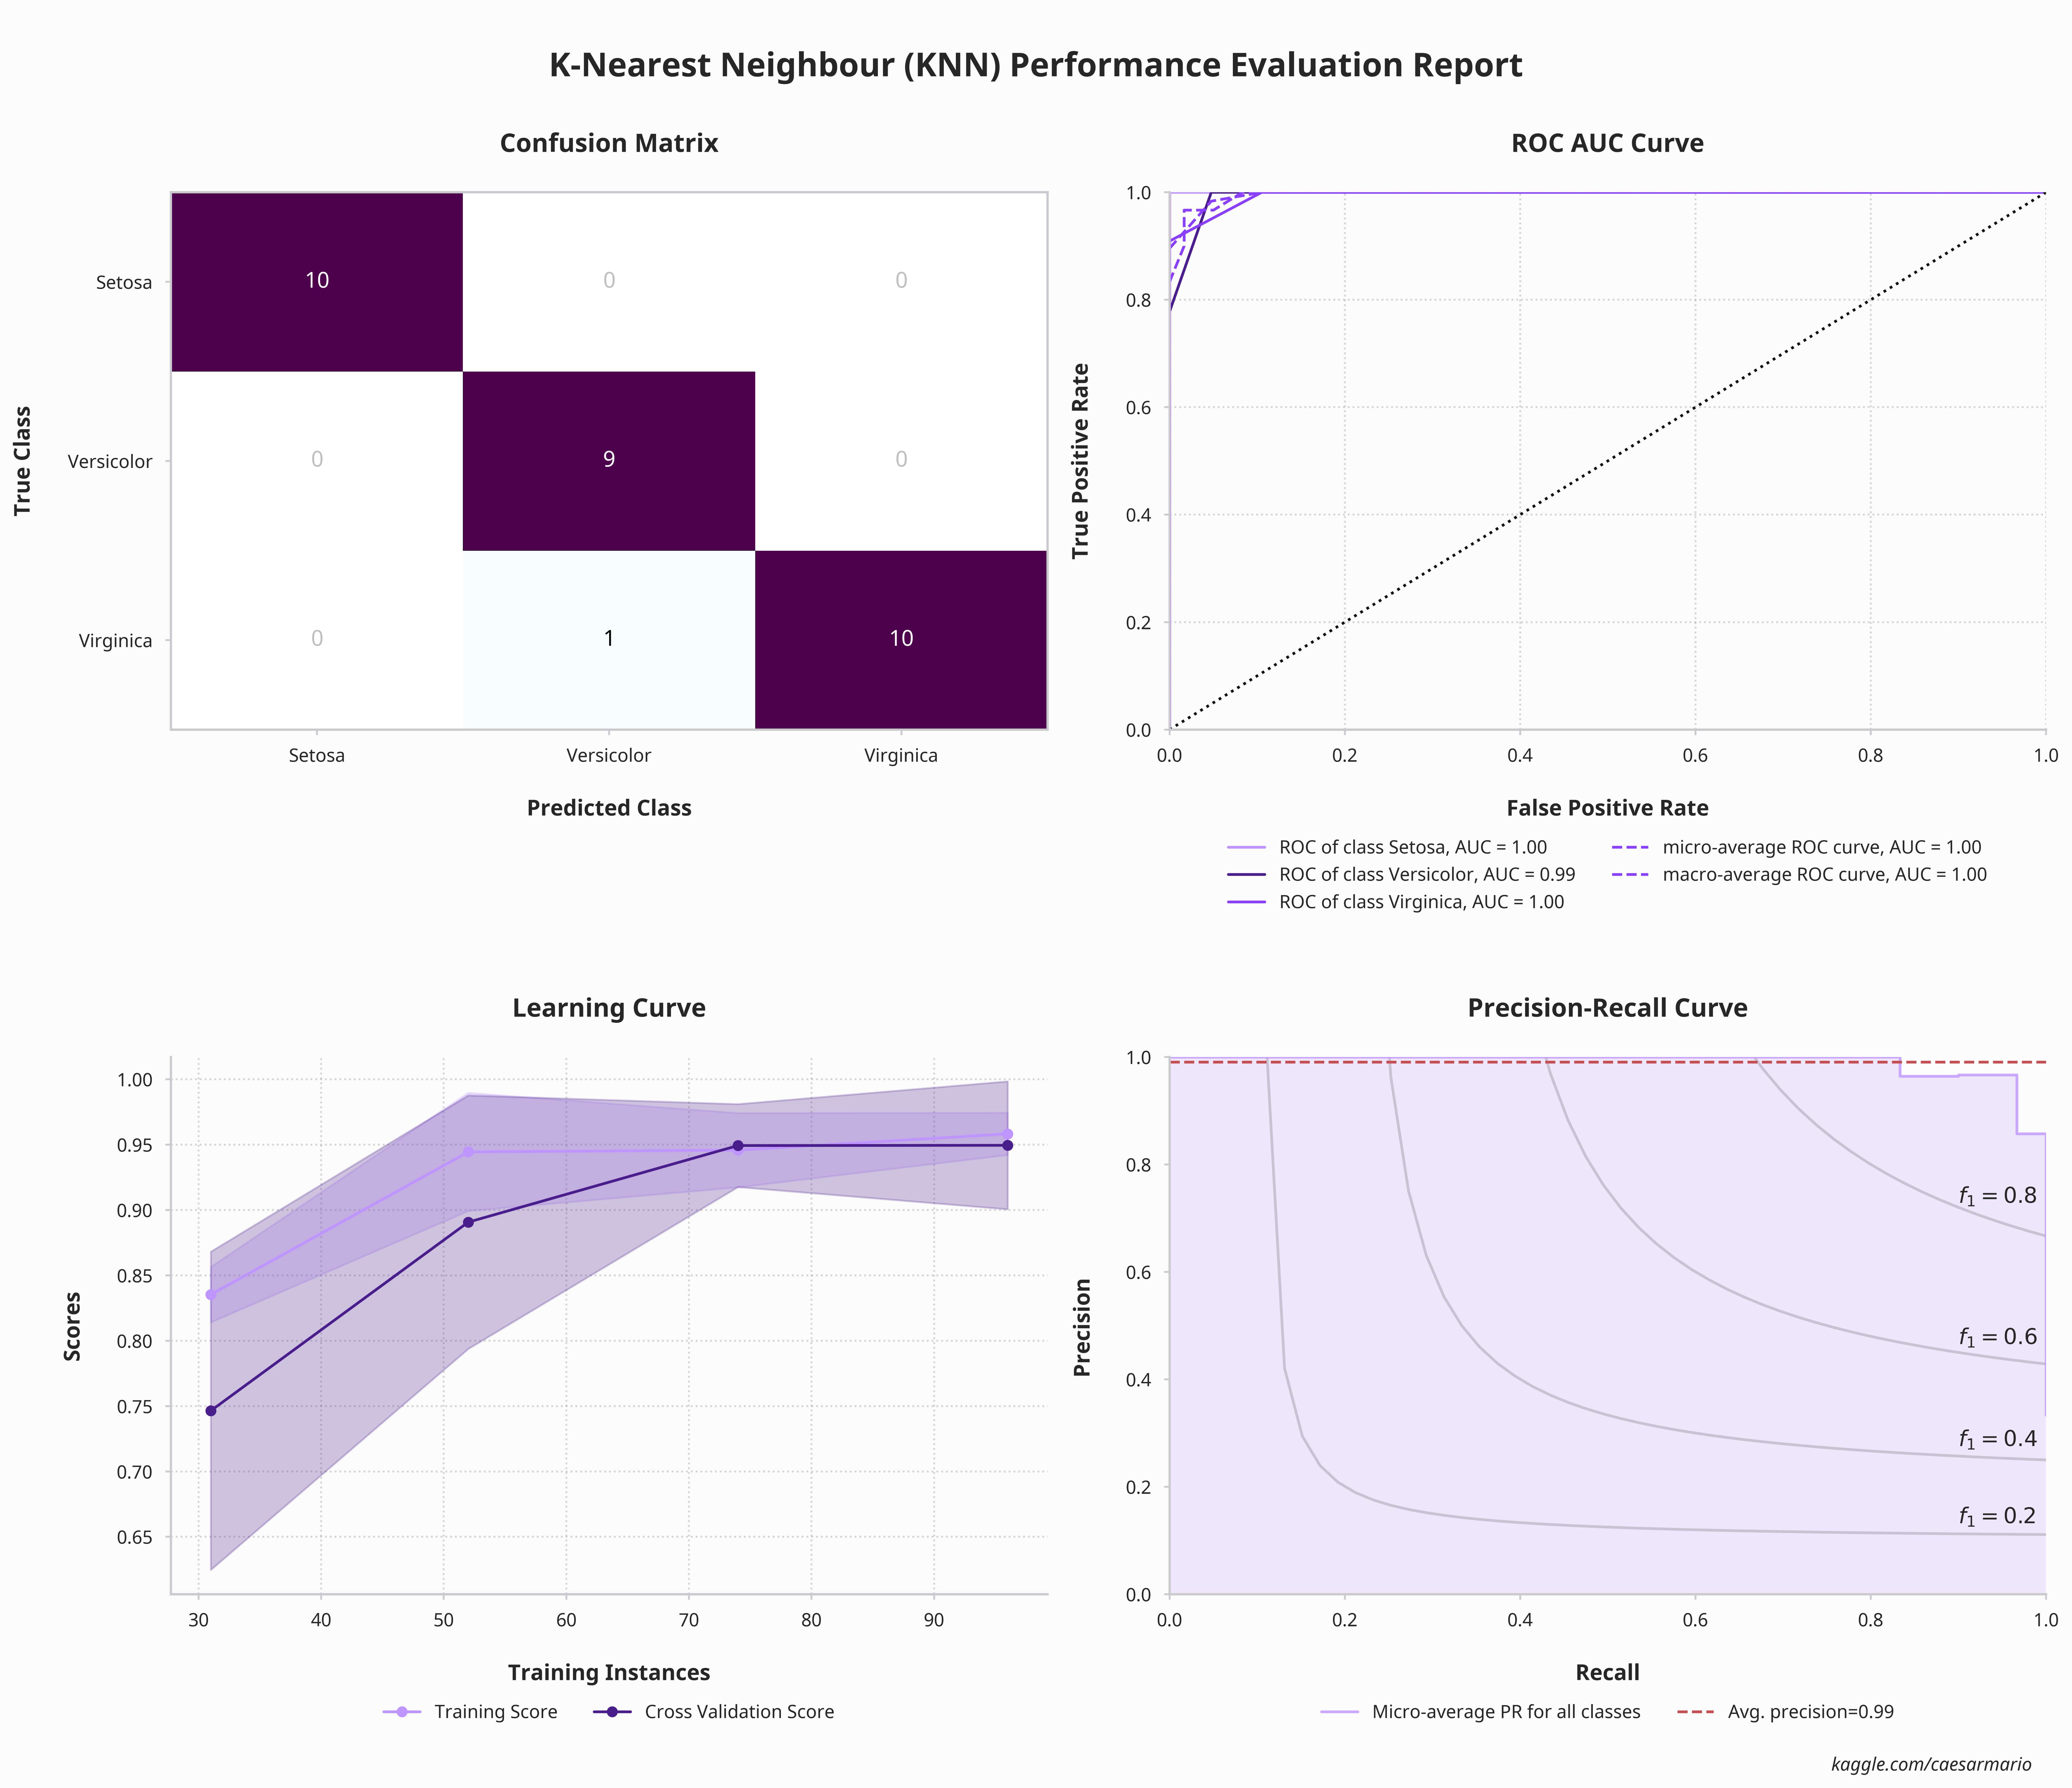
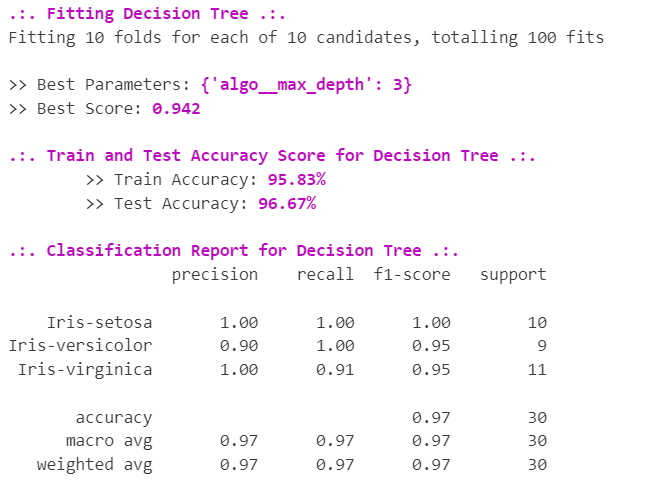
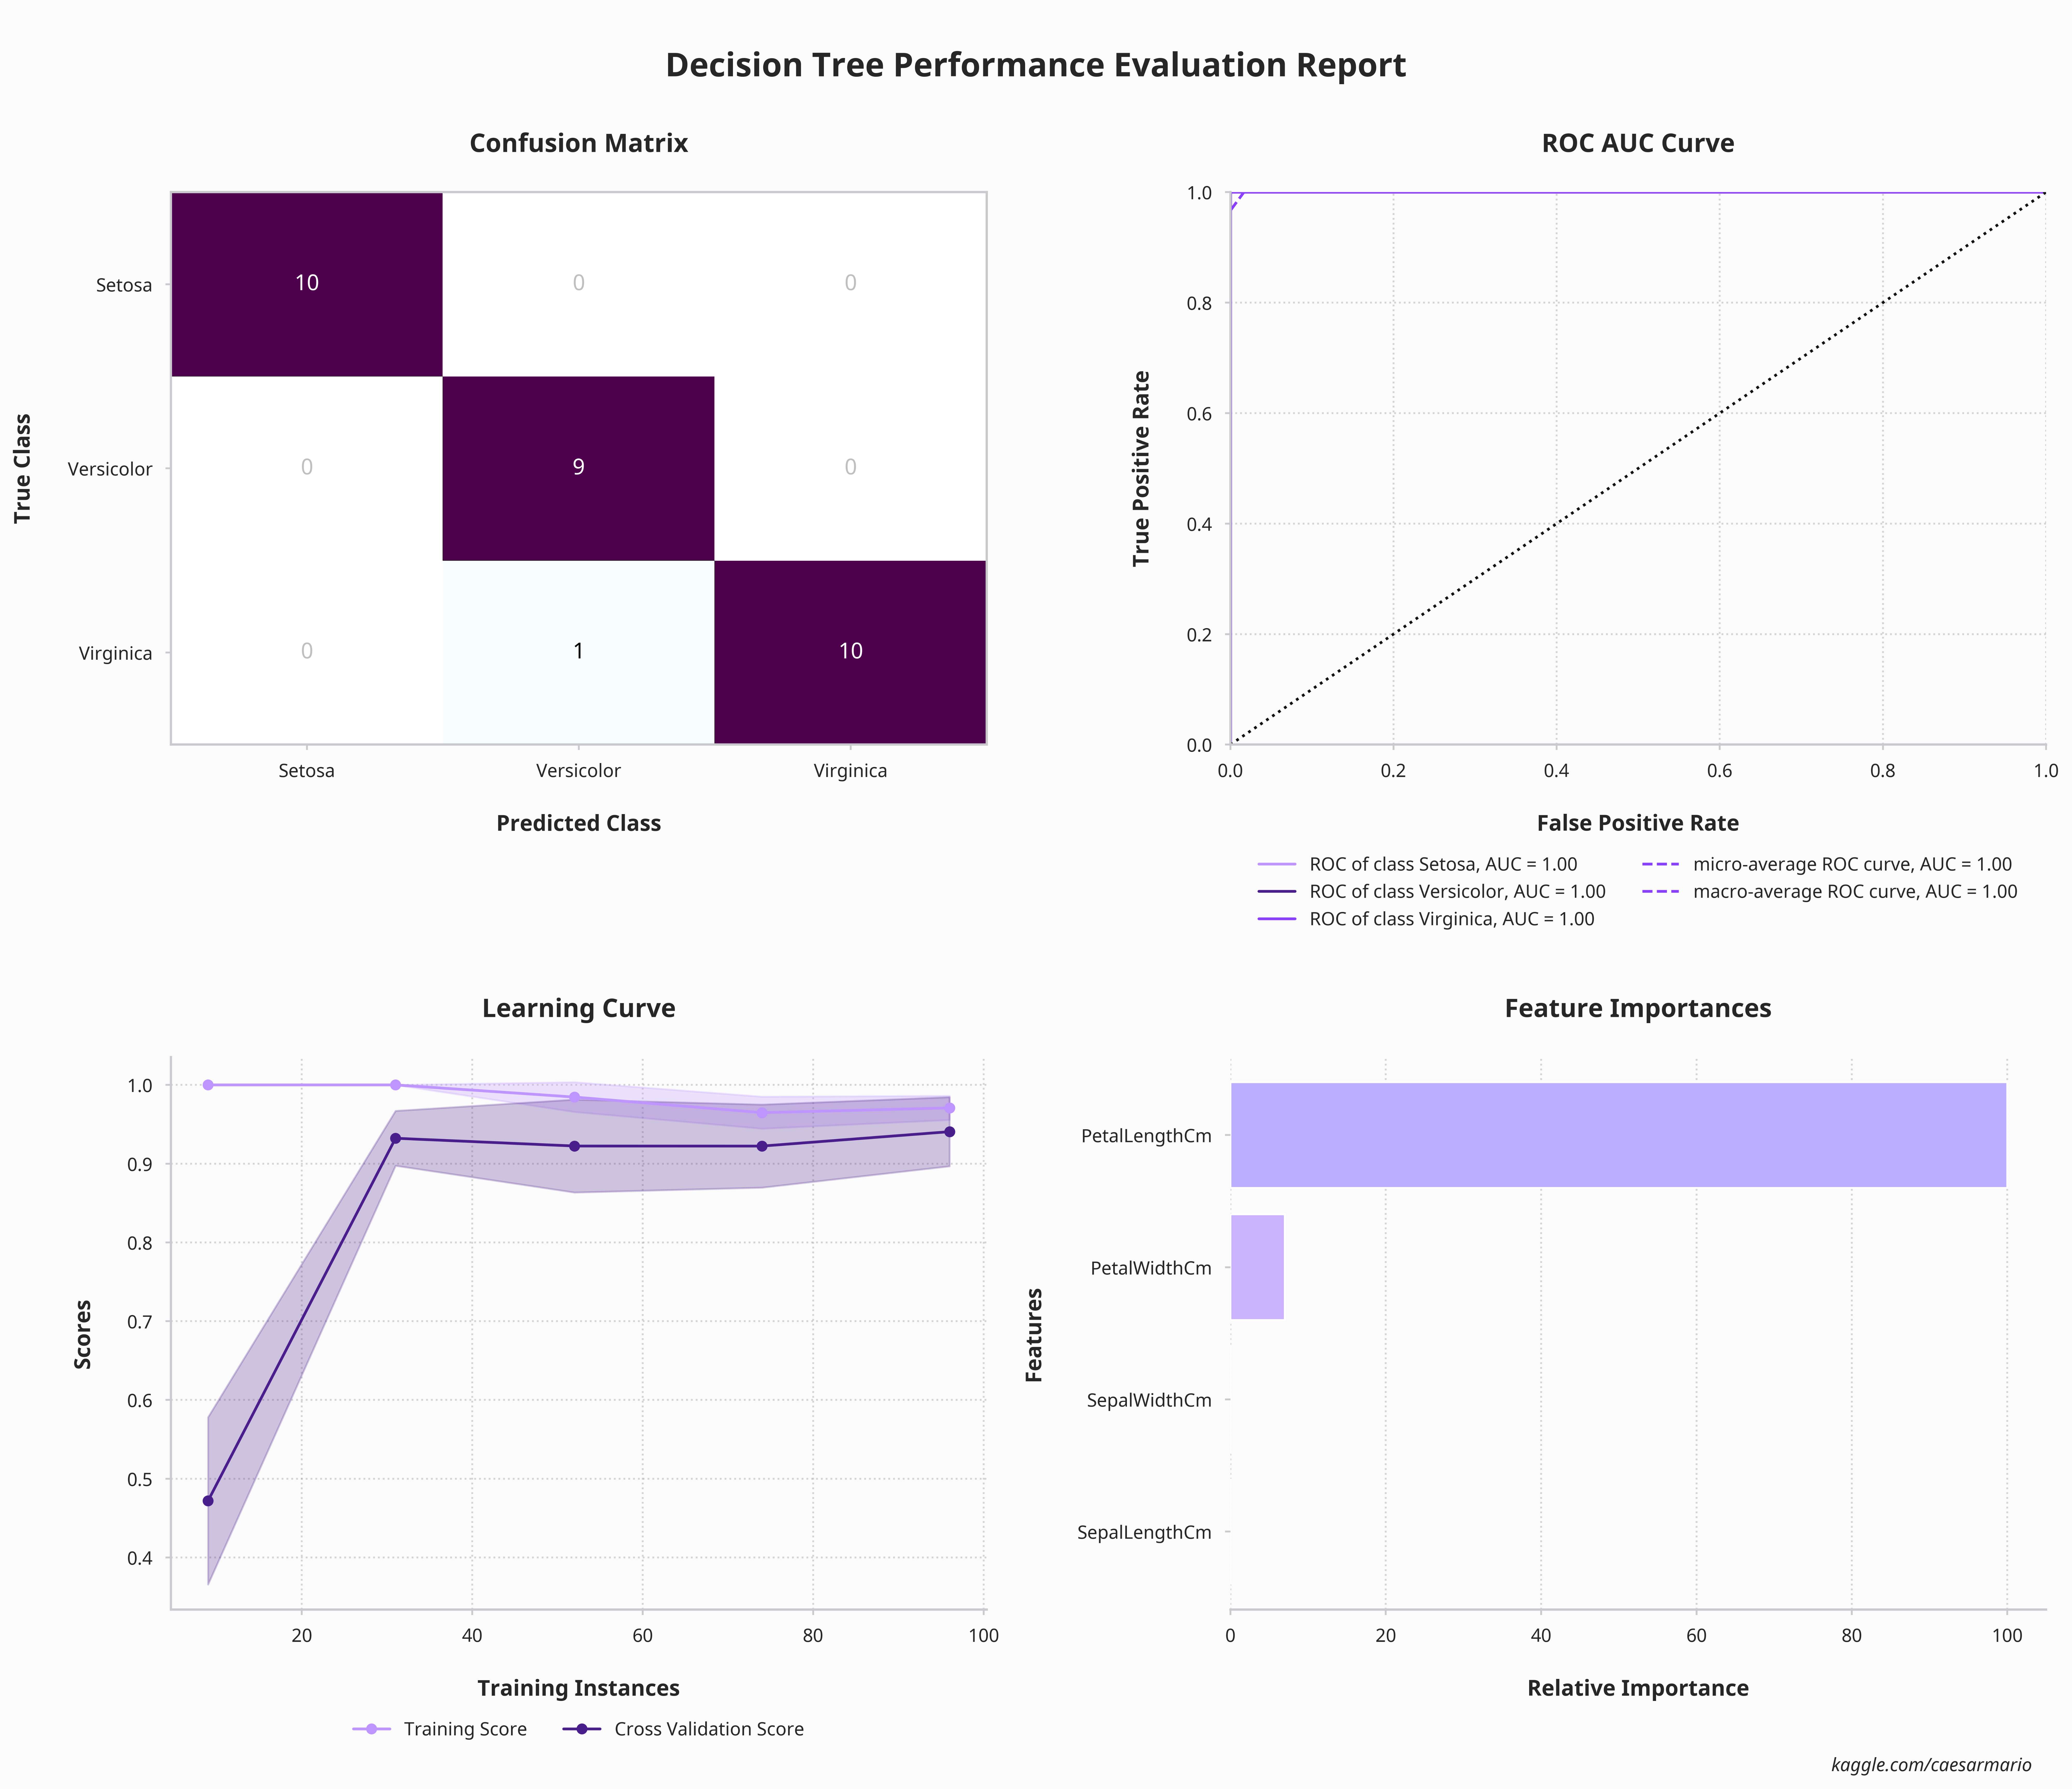
从上面训练和测试的准确率结果来看,所有模型都获得了满分,其中所有模型的得分都在0.94以上 。可以看到,得分最高的有两个模型,得分为0.95,分别是SVM和K-Nearest Neighbor。此外,所有模型的训练和测试准确率均超过 90%,这意味着所有模型都非常擅长对鸢尾花类型进行分类。然而,一些模型会出现一些欠拟合,因为测试精度高于测试,但 SVM 除外,它具有良好的拟合效果,因为训练和测试精度具有相同的值。
从ROC AUC曲线来看,所有模型的AUC值都接近1,这意味着所有模型都能很好地预测鸢尾花类型的分类。同样,混淆矩阵表明所有模型的预测结果是相同的。从所有模型的F1分数来看,所有模型都擅长区分Iris类型。所有模型的精度值也具有相同的结果,所有模型都可以100%准确地定义Setosa和Virginica,而只能90%准确度定义Versicolor。此外,所有模型中学习曲线的训练和验证分数都表明所有模型都遭受低方差和高偏差,因为线条保持靠近。换句话说,模型需要更好地概括数据。从上面的分析可以看出,SVM 是最好的模型,因为 SVM 得分很高,并且不会出现欠拟合。
令人惊讶的是,从 SVM 和其他模型特征重要性图中,萼片宽度是对鸢尾花类型进行分类的最重要特征。同时,花瓣长度、花瓣宽度和萼片长度等其他变量在鸢尾花类型分类中具有负值,这意味着某些模型假设这些变量可能对分类产生不利影响或没有影响。
8. | Miscellaneous 🧪
joblib和 pickle (.pkl) 文件。除此之外,
测试数据集预测结果也将与 CSV 和 JSON 文件中的实际结果一起导出。此外,本节还将
对虚拟数据进行预测(使用 Python 函数生成的数据)并
将其导出到 CSV 和 JSON 文件.
8.1 | 创建输出 📤
# --- 完整的流程:预处理器和 SVM ---
svm_pipeline = Pipeline([
    ("pipeline", pipeline)
    , ("algo", SVC(C=0.4, kernel="linear", random_state=1, probability=True))
])

# --- Save Complete Pipeline (joblib and pickle) ---
file_name = "pipeline_iris_svm_caesarmario"
for ext in ["joblib", "pkl"]:
    joblib.dump(svm_pipeline, f"pipeline/{file_name}.{ext}")
# --- 用于创建测试输出数据框的数据框 ---
svm_pipeline.fit(x_train, y_train)
y_pred_svm = svm_pipeline.predict(x_test)
pred_target = pd.DataFrame(y_pred_svm, columns=["pred_target"])

x_test_output = x_test.reset_index()
actual_target = y_test.to_frame(name="actual_target").reset_index()

# --- 组合并创建测试输出数据框 ---
df_test_output = pd.concat([x_test_output, actual_target, pred_target], axis=1).drop("index", axis=1)

# # --- 显示示例测试输出数据框 ---
print(clr.start+".: Sample Test Dataframe :."+clr.end)
print(clr.color+"*" * 28)
df_test_output.sample(n=6, random_state=24).style.apply(act_vs_pred, axis=1).hide()
| SepalLengthCm | SepalWidthCm | PetalLengthCm | PetalWidthCm | actual_target | pred_target |
|---|---|---|---|---|---|
| 6.50 | 3.20 | 5.10 | 2.00 | Iris-virginica | Iris-virginica |
| 5.50 | 3.50 | 1.30 | 0.20 | Iris-setosa | Iris-setosa |
| 6.70 | 2.50 | 5.80 | 1.80 | Iris-virginica | Iris-virginica |
| 6.20 | 2.20 | 4.50 | 1.50 | Iris-versicolor | Iris-virginica |
| 5.60 | 2.90 | 3.60 | 1.30 | Iris-versicolor | Iris-versicolor |
| 6.80 | 3.20 | 5.90 | 2.30 | Iris-virginica | Iris-virginica |
# --- Export to CSV and JSON Files ---
output_name = "test_data_iris_caesarmario"
df_test_output.to_csv(f"test_data/{output_name}.csv", index=False, sep=",", encoding="utf-8")
df_test_output.to_json(f"test_data/{output_name}.json", orient="index")
8.2 | 预测案例 🧐
# --- 创建预测案例数据框(100 行) ---
df_pred_case = create_prediction_case(x_train, 100)

# --- 显示数据框 ---
print(clr.start+".: Prediction Case Dataframe :."+clr.end)
print(clr.color+"*" * 32)
df_pred_case.sample(n=6, random_state=24).style.background_gradient(cmap="RdPu").hide()
| SepalLengthCm | SepalWidthCm | PetalLengthCm | PetalWidthCm |
|---|---|---|---|
| 4.800000 | 2.200000 | 1.500000 | 1.600000 |
| 4.800000 | 3.700000 | 1.800000 | 0.700000 |
| 4.400000 | 2.400000 | 2.400000 | 0.900000 |
| 5.300000 | 4.200000 | 3.500000 | 0.100000 |
| 7.400000 | 3.800000 | 5.900000 | 2.200000 |
| 7.000000 | 3.500000 | 6.200000 | 0.200000 |
# --- 使用最佳模型创建预测 ---
y_pred_case = svm_pipeline.predict(df_pred_case)

# --- 将预测案例数据框与预测相结合 ---
pred_case_target = pd.DataFrame(y_pred_case, columns=["pred_target"])
df_pred_case = pd.concat([df_pred_case, pred_case_target], axis=1)

# --- 展示最终数据集  ---
print(clr.start+".: Final Prediction Case Dataframe :."+clr.end)
print(clr.color+"*" * 38)
df_pred_case.sample(n=6, random_state=24).style.apply(coloring_target_col).hide()
| SepalLengthCm | SepalWidthCm | PetalLengthCm | PetalWidthCm | pred_target |
|---|---|---|---|---|
| 4.800000 | 2.200000 | 1.500000 | 1.600000 | Iris-versicolor |
| 4.800000 | 3.700000 | 1.800000 | 0.700000 | Iris-setosa |
| 4.400000 | 2.400000 | 2.400000 | 0.900000 | Iris-versicolor |
| 5.300000 | 4.200000 | 3.500000 | 0.100000 | Iris-setosa |
| 7.400000 | 3.800000 | 5.900000 | 2.200000 | Iris-virginica |
| 7.000000 | 3.500000 | 6.200000 | 0.200000 | Iris-versicolor |
# --- Export to CSV and JSON Files ---
pred_output_name = "pred_case_heart_disease_caesarmario"
df_pred_case.to_csv(f"pred_case/{pred_output_name}.csv", index=False, sep=",", encoding="utf-8")
df_pred_case.to_json(f"pred_case/{pred_output_name}.json", orient="index")
9. | 无监督模型实施 👥
9.1 | 霍普金斯测试🧪
以下是霍普金斯统计检验的 假设.
标准:
- H0:数据集分布不均匀(包含有意义的聚类)。
- H1:数据集均匀分布(没有有意义的集群)。
- 如果值在 {0.7, ..., 0.99} 之间,接受 H0 (它具有很高的聚类倾向)。
# --- 霍普金斯测试(代码由 Matevž Kunaver 编写) ---
def hopkins(X):
    d = X.shape[1]
    n = len(X)
    m = int(0.1 * n)
    nbrs = NearestNeighbors(n_neighbors=1).fit(X)

    rand_X = sample(range(0, n, 1), m)

    ujd = []
    wjd = []
    for j in range(0, m):
        u_dist, _ = nbrs.kneighbors(uniform(np.amin(X,axis=0),np.amax(X,axis=0),d).reshape(1, -1), 2, return_distance=True)
        ujd.append(u_dist[0][1])
        w_dist, _ = nbrs.kneighbors(X.iloc[rand_X[j]].values.reshape(1, -1), 2, return_distance=True)
        wjd.append(w_dist[0][1])

    H = sum(ujd) / (sum(ujd) + sum(wjd))
    if isnan(H):
        print (ujd, wjd)
        H = 0

    return H

# --- Perform Hopkins Test ---
hopkins_value = hopkins(x)
hopkins_result = 'Result: '+clr.start+'{:.4f}'.format(hopkins_value)+clr.end
print(clr.start+'.: Hopkins Test :.'+clr.end)
print(clr.color+'*' * 19+clr.end)
print(hopkins_result)
if  0.7 < hopkins_value < 0.99:
    print('>> From the result above,'+clr.color+' it has a high tendency to cluster (contains meaningful clusters)'+clr.end)
    print('\n'+clr.color+'*' * 31+clr.end)
    print(clr.start+'.:. Conclusions: Accept H0 .:.'+clr.end)
    print(clr.color+'*' * 31+clr.end)
else:
    print('>> From the result above,'+clr.color+' it has no meaningful clusters'+clr.end)
    print('\n'+clr.color+'*' * 31+clr.end)
    print(clr.start+'.:. Conclusions: Reject H0 .:.'+clr.end)
    print(clr.color+'*' * 31+clr.end)
.: Hopkins Test :.
*******************
Result: 0.8547
>> From the result above, it has a high tendency to cluster (contains meaningful clusters)

*******************************
.:. Conclusions: Accept H0 .:.
*******************************
9.2 | PCA 🔧
# --- 转换成数组 ---
x_pca = np.asarray(x)

# --- 应用主成分分析---
pca = PCA(n_components=2, random_state=24)
x_pca = pca.fit_transform(x_pca)
9.3 | 应用 K-Means
K-means聚类是一种简单的无监督学习算法,用于解决聚类问题。它遵循一个简单的过程,将给定的数据集分类为多个由字母“k”定义的集群,这些集群是预先固定的。然后将聚类定位为点,并将所有观测值或数据点与最近的聚类相关联,进行计算、调整,然后使用新的调整重新开始该过程,直到达到所需的结果。
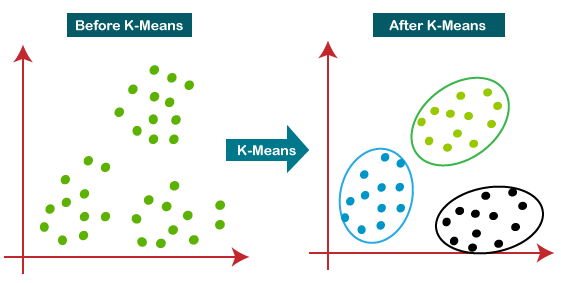
🖼 K-Means Clustering by Pranshu Sharma
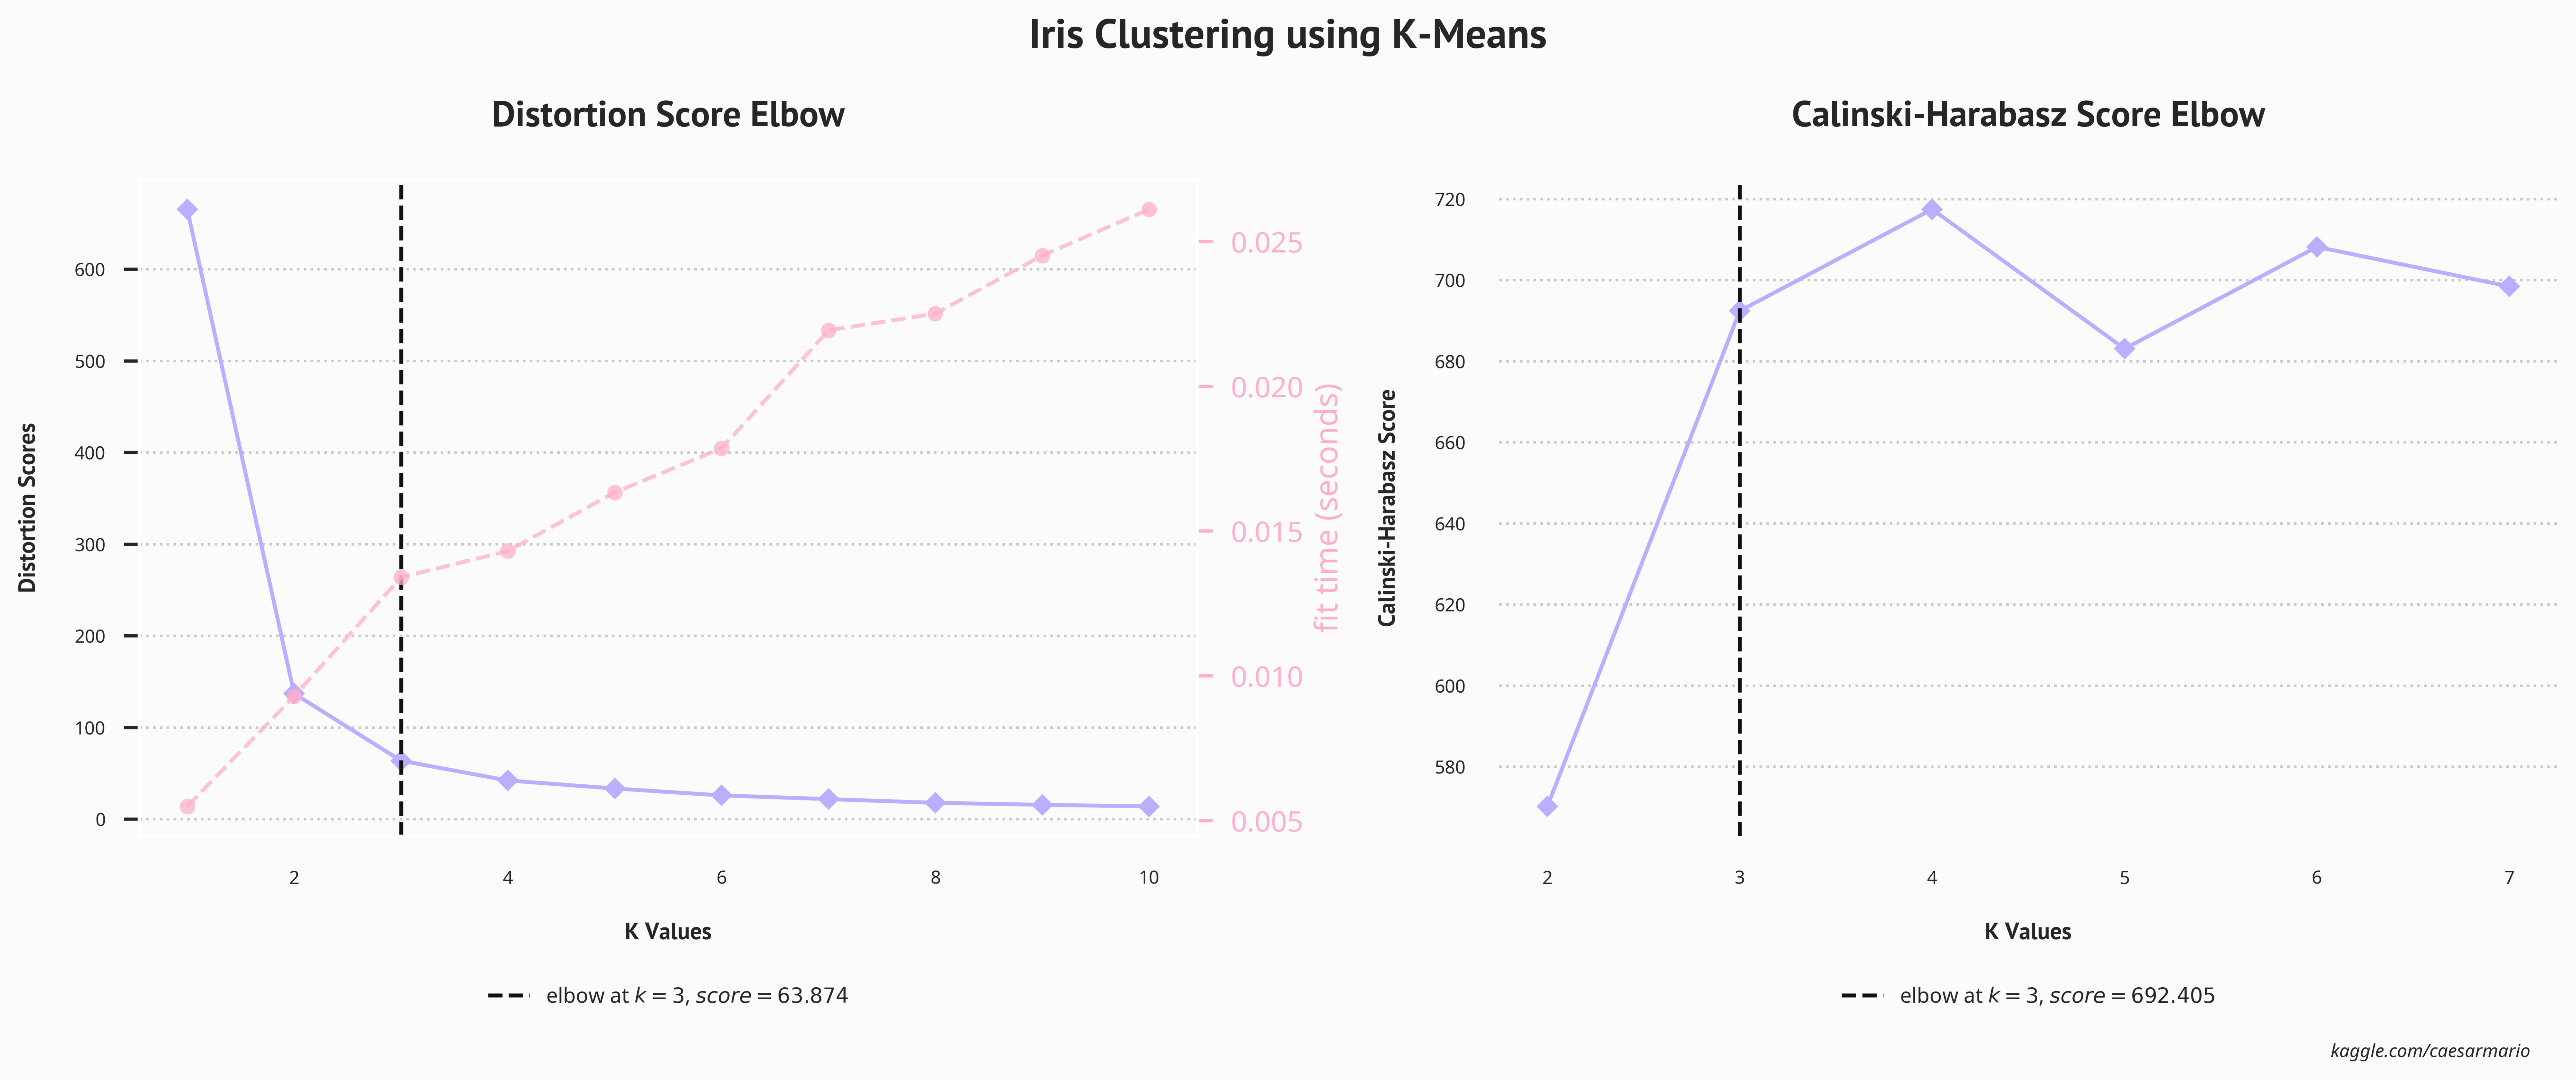
但是,在实施 K 均值之前,需要 使用肘部分数计算最佳簇数。此外, Calinski-Harabasz 索引将用于确定理想的簇数.
# --- 定义 K 均值函数 ---
def kmeans(X):

    # --- Figures Settings ---
    set_palette(color_yb_clustering)
    title = dict(fontsize=14, fontweight="bold", fontname=font_main)
    text_style=dict(fontweight="bold", fontname=font_main)
    fig, (ax1, ax2) = plt.subplots(1, 2, figsize=(14, 6))

    # --- K-Means ---
    model = KMeans(random_state=4)

    # --- 肘部评分 ---
    elbow_score = KElbowVisualizer(model, k=(1, 11), ax=ax1)
    elbow_score.fit(X)
    elbow_score.finalize()
    elbow_score.ax.set_title('Distortion Score Elbow\n', **title)
    elbow_score.ax.tick_params(labelsize=7)
    for text in elbow_score.ax.legend_.texts: text.set_fontsize(9)
    for spine in elbow_score.ax.spines.values(): spine.set_color('None')
    elbow_score.ax.legend(loc='upper center', bbox_to_anchor=(0.5, -0.15), borderpad=2, frameon=False, fontsize=8)
    elbow_score.ax.grid(axis='y', alpha=0.5, color=color_grid, linestyle='dotted')
    elbow_score.ax.grid(axis='x', alpha=0)
    elbow_score.ax.set_xlabel('\nK Values', fontsize=9, **text_style)
    elbow_score.ax.set_ylabel('Distortion Scores\n', fontsize=9, **text_style)

    # --- 肘部评分(Calinski-Harabasz 指数) ---
    elbow_score_ch = KElbowVisualizer(model, k=(2, 8), metric='calinski_harabasz', timings=False, ax=ax2)
    elbow_score_ch.fit(X)
    elbow_score_ch.finalize()
    elbow_score_ch.ax.set_title('Calinski-Harabasz Score Elbow\n', **title)
    elbow_score_ch.ax.tick_params(labelsize=7)
    for text in elbow_score_ch.ax.legend_.texts: text.set_fontsize(9)
    for spine in elbow_score_ch.ax.spines.values(): spine.set_color('None')
    elbow_score_ch.ax.legend(loc='upper center', bbox_to_anchor=(0.5, -0.15), borderpad=2, frameon=False, fontsize=8)
    elbow_score_ch.ax.grid(axis='y', alpha=0.5, color=color_grid, linestyle='dotted')
    elbow_score_ch.ax.grid(axis='x', alpha=0)
    elbow_score_ch.ax.set_xlabel('\nK Values', fontsize=9, **text_style)
    elbow_score_ch.ax.set_ylabel('Calinski-Harabasz Score\n', fontsize=9, **text_style)

    plt.suptitle('Iris Clustering using K-Means', fontsize=16, **text_style)
    plt.gcf().text(0.9, 0.05, 'kaggle.com/caesarmario', style='italic', fontsize=7, fontname=font_alt)
    plt.tight_layout()
    plt.show();

# --- Calling K-Means Functions ---
kmeans(x_pca);
# --- 应用 K-Means ---
kmeans = KMeans(n_clusters=3, random_state=4)
y_kmeans = kmeans.fit_predict(x_pca)

# --- 定义 K-Means 可视化工具和绘图 ---
def visualizer(X, kmeans, y_kmeans):

    # --- Figures Settings ---
    labels = ['Virginica', 'Versicolor', 'Setosa', 'Centroids']
    title=dict(fontsize=12, fontweight='bold', fontname=font_main)
    text_style=dict(fontweight='bold', fontname=font_main)
    scatter_style=dict(linewidth=0.65, edgecolor=scatter_color_edge, alpha=0.9)
    legend_style=dict(borderpad=2, frameon=False, fontsize=8)
    fig, ((ax1, ax2), (ax3, ax4)) = plt.subplots(2, 2, figsize=(14, 10))

    # --- 剪影图 ---
    s_viz = SilhouetteVisualizer(kmeans, ax=ax1, colors=cluster_colors)
    s_viz.fit(X)
    s_viz.finalize()
    s_viz.ax.set_title('Silhouette Plots of Clusters\n', **title)
    s_viz.ax.tick_params(labelsize=7)
    for text in s_viz.ax.legend_.texts:
        text.set_fontsize(9)
    for spine in s_viz.ax.spines.values():
        spine.set_color('None')
    s_viz.ax.legend(loc='upper center', bbox_to_anchor=(0.5, -0.15), **legend_style)
    s_viz.ax.grid(axis='x', alpha=0.5, color=color_grid, linestyle='dotted')
    s_viz.ax.grid(axis='y', alpha=0)
    s_viz.ax.set_xlabel('\nCoefficient Values', fontsize=9, **text_style)
    s_viz.ax.set_ylabel('Cluster Labels\n', fontsize=9, **text_style)

    # --- 聚类分布 ---
    y_kmeans_labels = list(set(y_kmeans.tolist()))
    for i in y_kmeans_labels:
        ax2.scatter(X[y_kmeans==i, 0], X[y_kmeans == i, 1], s=50, c=cluster_colors[i], **scatter_style)
    ax2.scatter(kmeans.cluster_centers_[:, 0], kmeans.cluster_centers_[:, 1], s=70, c='#42A2FC', label='Centroids', **scatter_style)
    for spine in ax2.spines.values():
        spine.set_color('None')
    ax2.set_title('Scatter Plot Clusters Distributions\n', **title)
    ax2.legend(labels, bbox_to_anchor=(0.85, -0.05), ncol=5, **legend_style)
    ax2.grid(axis='both', alpha=0.5, color=color_grid, linestyle='dotted')
    ax2.tick_params(left=False, right=False , labelleft=False , labelbottom=False, bottom=False)
    ax2.spines['bottom'].set_visible(True)
    ax2.spines['bottom'].set_color(color_line)

    # --- 华夫饼图 ---
    unique, counts = np.unique(y_kmeans, return_counts=True)
    df_waffle = dict(zip(unique, counts))
    df_waffle = {"Virginica" if k == 0 else "Versicolor" if k == 1 else "Setosa" if k == 2 else k:v for k,v in df_waffle.items()}
    total = sum(df_waffle.values())
    wfl_square = {key: value for key, value in df_waffle.items()}
    wfl_label = {key: round(value/total*100, 2) for key, value in df_waffle.items()}

    ax3=plt.subplot(2, 2, (3,4))
    ax3.set_title('Percentage of Each Clusters\n', **title)
    ax3.set_aspect(aspect='auto')
    Waffle.make_waffle(ax=ax3, rows=6, values=wfl_square, colors=cluster_colors
                       , labels=[f"{i} - ({k}%)" for i, k in wfl_label.items()]
                       , legend={'loc': 'upper center', 'bbox_to_anchor': (0.5, -0.05)
                                 , 'ncol': 4, 'borderpad': 2, 'frameon': False, 'fontsize':10})

    # --- Suptitle & WM ---
    plt.suptitle('Iris Clustering using K-Means Result\n', fontsize=15, **text_style)
    plt.gcf().text(0.9, 0.03, 'kaggle.com/caesarmario', style='italic', fontsize=7)
    plt.tight_layout()
    plt.show();

# --- 调用 K-Means 函数 ---
visualizer(x_pca, kmeans, y_kmeans);
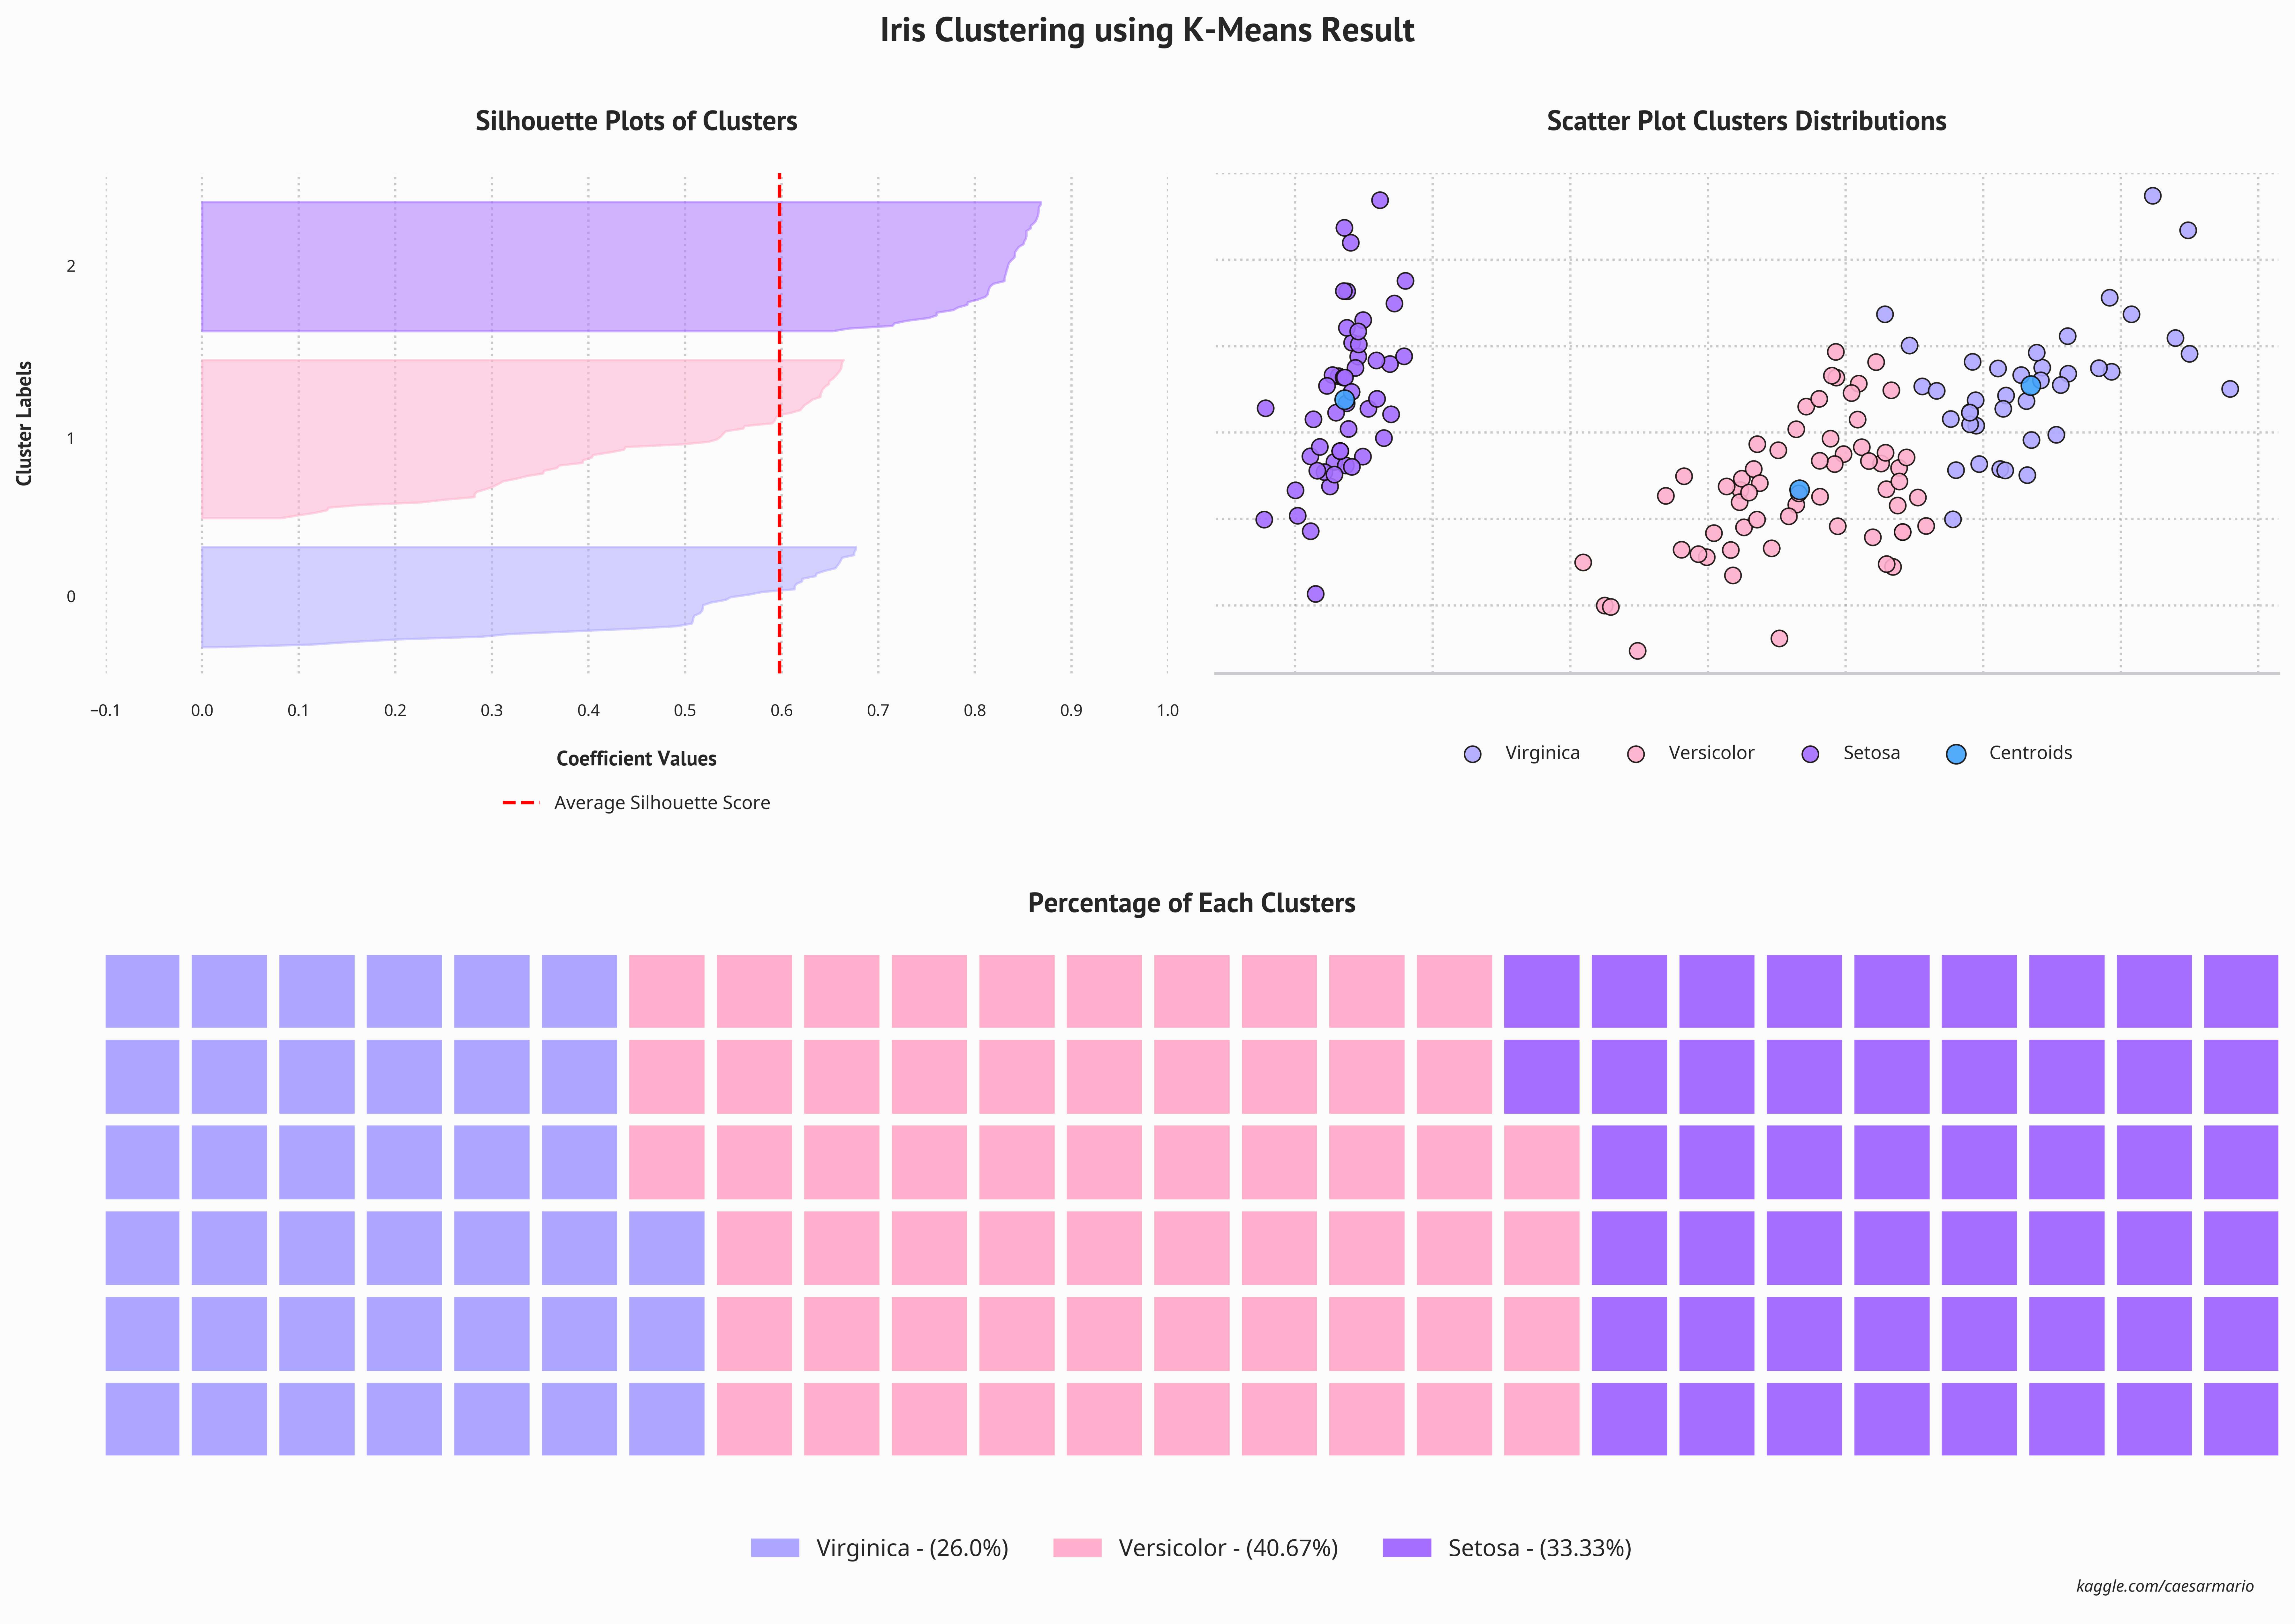
正如上一段提到的,与其他簇相比,Setosa 具有更高的粘度。这是因为 Setosa 数据点与 Virginica 和 Versicolor 完全分离。此外, K-Means 算法假设右上角的离群值是 Virginica 的一部分,因为离群值非常接近聚类。可视化底部的华夫饼图显示了每个组中客户的百分比分布。
下一步是 评估 K-Means 提供的聚类质量。质量评估将使用 Davies-Bouldin 指数、轮廓得分和 Calinski-Harabasz 指数.
📌 Davis-Bouldin 指数是评估聚类算法的指标。它被定义为 簇分散度与簇分离度之间的比率。分数范围为 0 分及以上。 0表示更好的聚类.
📌 Silhouette 系数/分数 是用于 计算聚类技术的优劣的指标。其值范围为-1到1。 分数越高越好。 1 表示聚类彼此相距较远且可清晰区分。 0 表示聚类无差异/聚类之间的距离不显着。 -1 表示簇分配方式错误。
📌 Calinski-Harabasz 指数(也称为 方差比准则),是所有簇的簇间离散度之和与簇间离散度之和的比率, 分数越高,表现越好.
# --- 评估聚类质量函数 ---
def evaluate_clustering(X, y):
    db_index = round(davies_bouldin_score(X, y), 3)
    s_score = round(silhouette_score(X, y), 3)
    ch_index = round(calinski_harabasz_score(X, y), 3)
    print(clr.start+'.: Evaluate Clustering Quality :.'+clr.end)
    print(clr.color+'*' * 34+clr.end)
    print('.: Davies-Bouldin Index: '+clr.start, db_index)
    print(clr.end+'.: Silhouette Score: '+clr.start, s_score)
    print(clr.end+'.: Calinski Harabasz Index: '+clr.start, ch_index)
    return db_index, s_score, ch_index

# ---评估 K-Means 聚类质量 ---
db_kmeans, ss_kmeans, ch_kmeans = evaluate_clustering(x_pca, y_kmeans)
9.4 | 聚类分析 🤔
# --- 将 K 均值预测添加到数据框 ----
df['cluster_result'] = y_kmeans+1
iris_type = {
    1: "Virginica"
    , 2: "Versicolor"
    , 3: "Setosa"
}
df["cluster_result"] = df["cluster_result"].replace(iris_type).astype(str)

# --- 从当前数据帧计算总体平均值 ---
df_profile_overall = pd.DataFrame()
df_profile_overall['Overall'] = df.describe().loc[['mean']].T

# --- 总结每个簇的平均值 ---
df_cluster_summary = df.groupby('cluster_result').describe().T.reset_index().rename(columns={'level_0': 'Column Name', 'level_1': 'Metrics'})
df_cluster_summary = df_cluster_summary[df_cluster_summary['Metrics'] == 'mean'].set_index('Column Name')

# --- 组合两个数据框 ---
print(clr.start+'.: Summarize of Each Clusters :.'+clr.end)
print(clr.color+'*' * 33)
df_profile = df_cluster_summary.join(df_profile_overall).reset_index()
df_profile.style.background_gradient(cmap='RdPu').hide()
| Column Name | Metrics | Setosa | Versicolor | Virginica | Overall |
|---|---|---|---|---|---|
| SepalLengthCm | mean | 5.006000 | 5.883607 | 6.853846 | 5.843333 |
| SepalWidthCm | mean | 3.418000 | 2.740984 | 3.076923 | 3.054000 |
| PetalLengthCm | mean | 1.464000 | 4.388525 | 5.715385 | 3.758667 |
| PetalWidthCm | mean | 0.244000 | 1.434426 | 2.053846 | 1.198667 |
- Setosa:与其他物种(即 Versicolor 和 Virginica)相比,Setosa 具有最小的萼片长度、花瓣长度和花瓣宽度特征。然而,该物种具有最宽的萼片宽度。因此,可以得出结论:山鸢尾是特征最小的鸢尾花。上一节中的散点图也证明了这一点,其中该类型的数据点与 Virginica 和 Versicolor 的数据点完全分离,并且位于左侧。
- 云芝:云芝具有花瓣和萼片的宽度和长度接近Virginica的特征。然而,与其他两种类型(Setosa 和 Versicolor)相比,Versicolor 具有最小的萼片宽度。所以可以得出结论,Iris Versicolor是一种鸢尾花,其特征介于Setosa和Virginica之间,尺寸不太小也不太大< /标记>。从散点图来看,Versicolor 数据点位于中间,并且与 Virginica 数据点非常接近。
- Virginica:与 Versicolor 相比,Virginica 的特点是花瓣宽度和长度最大,萼片更宽。由此可以得出,与其他两个物种相比,Virginica 具有最大的尺寸特征。从散点图中也可以明显看出这一点,其中 Virginica 数据点位于中间,就在 Versicolor 之后.
10. | 结论和未来的改进 📝
为了进一步研究,以下是对未来研究人员的 未来建议:
- 上一节使用了各种数据可视化技术来进行广泛的数据集调查,提供了有关 Iris 数据集中基本关系和模式的深刻信息。
- 该笔记本成功实现了监督和无监督机器学习模型,比较了其结果和性能,并选择了最佳模型,即 Iris 数据集最有效的分类器。此外,模型的效率得到了广泛的评估,测试数据预测的成功文件输出证明了模型在实际情况中的适用性。
- 继上一点之后,笔记本展示了模型对新示例数据生成预测的能力,展示了它们在提供的数据集之外进行泛化的能力。
- 该笔记本还成功实现了 K-Means 算法作为无监督学习方法的一部分。通过感知分析,解释了聚类结果,为数据集的基本组成部分提供了另一种观点。
- 检查如何使用集成方法(例如梯度增强或随机森林)来结合多种模型的优点以提高预测准确性。
- 考虑其他无监督学习技术,例如层次聚类或 DBSCAN,将聚类结果与 K-Means 获得的结果进行比较。
- 对每个监督学习模型进行更详尽的超参数调整过程,以最大限度地提高其性能。

