一.介绍
Vue.js是一套构建用户界面的渐进式框架。
渐进式 :可以被逐步集成。最大的特点是没有DOM操作,主张只操作数据。
- 优点:
1.轻量级的数据框架
2.双向数据绑定
3.提供了指令
4.组件化开发
5.客户端路由
6.状态管理:同cookie、session、本地存储类似
- 缺点:
1.Vue 底层基于 Object.defineProperty 实现数据响应式,而这个 api 本身不支持 IE8 及以下浏 览器,所以Vue不支持IE8及其以下浏览器;
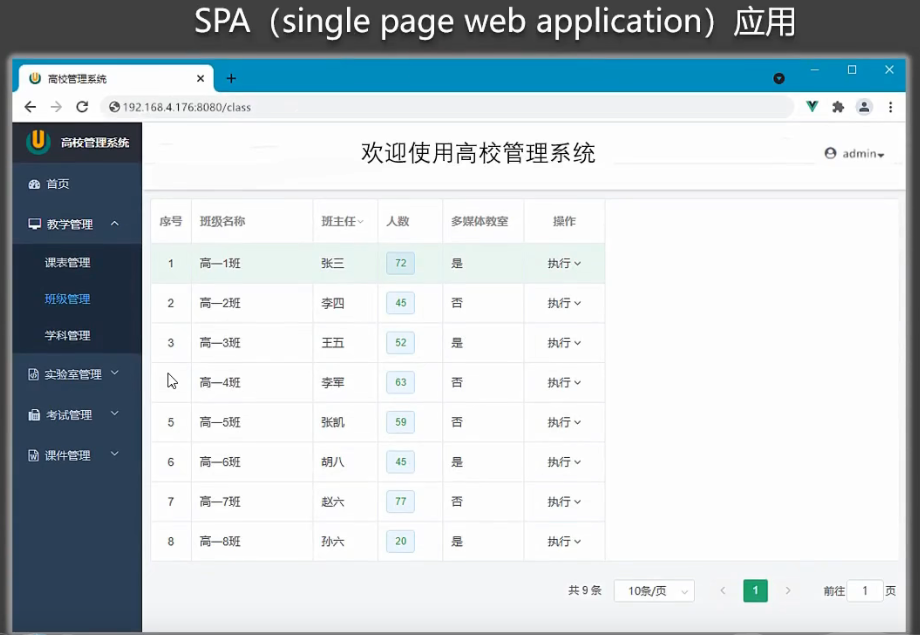
2.Vue 打造的是SPA(单页面应用),所以不利于搜索引擎优化(SEO); single page application
以前是每一个显示的页面都应该有一个html才能设置不同的title、description、keywords
app做项目时,必须使用Vue的脚手架创建项目,但脚手架就是基于webpack的一个脚手架。
3.由于 CSR的先天不足,导致首屏加载时间长,有可能会出现闪屏。client side render: 客户端渲染( 后端提供json数据,前端拼接字符串,再渲染 ) server side render: 服务端渲染( json+html拼接字符串都在后端做,返回给前端 )
-
核心:数据驱动( 数据改变驱动我们视图的改变 ) 组件系统
-
MVVM:M-model模型、V-view视图、VM-viewModel 视图模型
模型(model)通过了视图模型 决定了视图(view)
视图(view) 通过视图模型 修改模型 (model)
视图模型是模型和视图之间的桥梁。
二.Vue安装
1. cdn [不推荐]:线上的一个网址
<script src="https://cdn.jsdelivr.net/npm/[email protected]/dist/vue.js"></script>
2. npm[推荐]:在用 Vue 构建大型应用时推荐使用 NPM 安装[1]。NPM 能很好地和诸如 webpack 或 Browserify 模块打包器配合使用。同时 Vue 也提供配套工具来开发单文件组件。
# 最新稳定版
$ npm install vue
3.脚手架[做项目]
小提示:若控制台提示以下内容:
You are running Vue in development mode.
Make sure to turn on production mode when deploying for production.
See more tips at https://vuejs.org/guide/deployment.html
可在代码js部分写入这行代码:
Vue.config.productionTip = false; //阻止vue在启动时生成生产提示
三.Vue起步
每个 Vue 应用都需要通过实例化 Vue 来实现。
语法格式如下:
var vm = new Vue({
  // 选项
})
插值运算符 {{ }}
<div id="box">
    {{message}}
</div>

<script>
let vm=new Vue({
    el:"#box",  //el的第一种写法
    data:{  //data的第一种写法:对象式
        message:"哈哈",
    }
})
 //vm.$mount('#box')  //el的第二种写法(mount就是'挂载'的意思)

//data的第二种写法:函数式
data:function(){
    return{
        name:'哈哈'
    }
}
</script>
总结:
data与el的2种写法
1.el有2种写法
(1).new Vue时候配置el属性。
(2).先创建Vue实例,随后再通过vm.$mount(‘#root’)指定el的值。
2.data有2种写法
(1).对象式
(2).函数式
如何选择:目前哪种写法都可以,以后学习到组件时,data必须使用函数式,否会报错。
在简单的vue实例应用中,两种写法几乎是没有什么区别的,因为你定义的vue实例对象不会被复用。但是如果是在组件应用的环境中,就可能会存在多个地方调用同一个组件的情况,为了不让多个地方的组件共享同一个data对象,只能返回函数。这个与JavaScript的作用域特性有关,函数自己拥有私有的作用域,函数之间的作用域相互独立,也就不会出现组件对数据的绑定出现交错的情况。
3.一个重要的原则:
由Vue管理的函数,一定不要写箭头函数,一旦写了箭头函数,this就不再是Vue实例了。
四.Vue指令
vue指令 , 一般写法 v-xxx
1.v-html、v-text
两者的区别是,v-html可以渲染data里面的css内容和样式,v-text只能渲染data里的内容。
<body>
    <div id="cont">
        <h1>{{title}}</h1>
        <p>
            {{msg}}
        </p>
        <div v-html="data"></div>
        <div v-text="data"></div>
    </div>
</body>
<script>
      var vm = new Vue({
        el:"#cont",
        data:{
            title:'哈哈哈',
            msg:'你好,张三',
            data:"<h2>星期一</h2>"
        }
      })

</script>
2.v-show、v-if
v-show=“布尔”
v-if:v-if 指令用于条件性地渲染一块内容。这块内容只会在指令的表达式返回 true值的时候被渲染
v-show:v-show 的元素始终会被渲染并保留在 DOM 中。v-show 只是简单地切换元素的 CSS property display。
<body>
    <div id="app">
        <h1 v-show="flag">{{msg}}</h1>
        <h1 v-if="flag">哈哈,没想到吧</h1>
        <h1 v-else>真的没想到</h1>
    </div>
</body>

<script>
    const vm = new Vue({
        el:"#app",
        data:{
            msg:"我来了",
            flag:false
        }
    })
</script>
这里v-show 和v-if 的区别是:
主要区别:
(1)“v-show”只编译一次;而“v-if”不停地销毁和创建
(2)“v-if”更适合于带有权限的操作,渲染时判断权限数据
(3)v-show更适合于日常使用,可以减少数据的渲染,减少不必要的操作
本质区别:
(1)v-show本质就是标签display设置为none,控制隐藏
(2)v-if是动态的向DOM树内添加或者删除DOM元素
编译区别:
v-show其实就是在控制css;v-show都会编译,初始值为false,只是将display设为none,但它也编译了。
v-if切换有一个局部编译/卸载的过程,切换过程中合适地销毁和重建内部的事件监听和子组件;v-if初始值为false,就不会编译了。
3.v-on事件绑定
v-on:click=“函数名” 简写 为 @click=“函数名”
<body>
    <div id="app">
         <!-- <button v-on:click="myClick">切换</button> -->
        <button @click="myClick">切换</button> //绑定事件简写
        <div v-show="flag">
            {{msg}}
        </div>
    </div>
</body>
<script>
    new Vue({
        el:"#app",
        data:{
            msg:"你好",
            flag:true
        },
        methods: {
            myClick(){
              console.log(666);
              this.flag = !this.flag;
            }
        },
    })
</script>
4.v-bind
v-bind:src =‘imgurl’ 可以简写 :src=‘imgurl’ (可以绑定任何属性)
  <style>
        .box1{
            background-color: rebeccapurple;
        }
        .box2{
            background-color: green;
        }
    </style>

    <body>
    <div id="app">
            <img v-bind:src="img2" alt="" srcset="">
            <div v-bind:class="style" >
                哈哈哈
            </div>
    </div>
</body>

<script>
    const vm = new Vue({
        el:"#app",
        data:{
            style:"box2",                           img2:"https://dfzximg02.dftoutiao.com/news/20210914/20210914231432_8bcd33042f4815aa6fcb34f28db5a8d2_1_mwpm_03201609.jpeg",
               img:"https://dfzximg02.dftoutiao.com/news/20210914/20210914231436_d464f018dd9c7827bc0750850b380813_1_mwpm_03201609.jpeg"
        }
    })
</script>
5.v-model
v-model=“message” (双向数据绑定)
<body>
    <div class="app">
        <input type="text" v-model="msg" >
        <h1>
            {{msg}}
        </h1>
        <!-- 如下代码是错误的,因为v-model只能应用在表单类元素(输入类元素)上-->
        <h2 v-model:x="n=msg">哈哈</h2>

    </div>
</body>

<script>
    var vm = new Vue({
        el:".app",
        data:{
            msg:"哈哈"
        }
    })
</script>
底层实现原理:
核心是Object.defineProperty()方法
语法:Object.defineProperty(obj, prop, descriptor),其中:
obj:
要在其上定义属性的对象。
prop:
要定义或修改的属性的名称。
descriptor:
将被定义或修改的属性描述符。
其实,简单点来说,就是通过此方法来定义一个值。调用,使用到了get方法,赋值,使用到了set方法。
举个例子:
  var obj = {};
	   Object.defineProperty(obj,'hello',{
		   get:function(){
			   console.log('调用了get方法');
		   },
		   set:function(newVal){
			   console.log('调用了set方法,方法的值是'+newVal);
		   }
	   });
	   obj.hello;  //=>'调用了get方法'
	   obj.hello = '你好,张三';  //调用了set方法,方法的值是你好,张三
总结:
vue有两种数据绑定的方式:
(1)单向绑定(v-bind):数据只能从data流向页面。
(2)双向绑定(v-model): 数据不仅能从data流向页面,还可以从页面流向data。
6.v-once
只会渲染元素或组件一次,即使后续的数据修改了,也不会渲染到页面上;
<body>
    <div id="app">
        <input type="text" v-model="msg">
        <h1 v-once>{{msg}}</h1>
        <h1>{{msg}}</h1>
    </div>
</body>

<script>
    const vm = new Vue({
        el:"#app",
        data:{
            msg:"干的漂亮"
        }
    })
</script>
7.v-cloak
需要配合css使用 可以使用 v-cloak 指令设置样式,这些样式会在 Vue 实例编译结束时, 从绑定的 HTML 元素上被移除。 当网络缓慢,此时网页还在加载 Vue代码,页面来不及渲染,页面上就会闪现vue源代码。 我们可以使用 v-cloak 指令来解决这一问题。
<script src="https://unpkg.com/[email protected]/dist/vue.min.jss" type="text/javascript" charset="utf-8"></script>
<style type="text/css">
    [v-cloak] {
      display: none;
    }
</style>

<body>
    <!-- v-cloak用来解决屏幕闪动的问题 -->
    <div id="app">
        <div v-cloak>
            <h1>{{msg}}</h1>
            <h1>{{msg}}</h1>
            <h1>{{msg}}</h1>
            <h1>{{msg}}</h1>
            <h1>{{msg}}</h1>
        </div>
    </div>
    <script type="text/javascript">
        new Vue({
        el:"#app",
        data:{
            msg:"哈哈哈"
        }
    })
    </script>
</body>
8.v-for
循环使用 v-for 指令。
v-for 指令需要以 site in sites 形式的特殊语法, sites 是源数据数组并且 site 是数组元素迭代的别名。
也可以提供第二个的参数为键名:v-for=“(item, index) in object”
v-for 可以绑定数据到数组来渲染一个列表:
<body>
    <div id="app">
        <div v-for="(item,index) in student">
            <p v-if="item.age!=18">    <!--  不显示age=18的数据 -->
                {{index+1}}.
                姓名: {{item.name}}
                年龄: {{item.age}}
            </p>
        </div>
    </div>
</body>

<script>
    var vm = new Vue({
        el:"#app",
        data() {
            return {
                msg:"你好",
                student:[
                    {name:"张三",age:10},
                    {name:"杰克",age:11},
                    {name:"大卫",age:18},
                    {name:"李四",age:10},
                    {name:"狗蛋",age:18}
                ]
            }
        },
        methods: {

        },
    })
</script>
五.计算属性
计算属性关键词: computed。计算属性在处理一些复杂逻辑时是很有用的。
vue中计算属性和函数的区别:
通过计算属性我们能拿到处理后的数据, 但是通过函数我们也能拿到处理后的数据,下面是主要区别,
函数不会将计算的结果缓存起来, 每一次访问(调用)都会重新求值;
计算属性会将计算的结果缓存起来, 数据发生变化则会重新调用。只要数据没有发生变化, 就不会重新求值;
计算属性,比较适合用于计算不会频繁发生变化的的数据。
<body>
    <div id="app">
        <h2>总价:{{allPrice}}元</h2>
        <h2>总价:{{allPrice2()}}元</h2>
    </div>
</body>
<script src="./vue.min.js"></script>
<script>
    var vm = new Vue({
        el:"#app",
        data:{
           goods:[
           {
                name:"手机",
                num:1,
                price:2080
            },
            {
                name:"手表",
                num:2,
                price:3800
            },
            {
                name:"戒指",
                num:1,
                price:22000
            }
           ]
        },
        methods: {
            allPrice2(){
                var all = 0;
                this.goods.forEach(item => {
                    all += item.num*item.price
                });
                return all;
            }
        },
        computed:{
            allPrice(){
                var all = 0;
                this.goods.forEach(item => {
                    all += item.num*item.price
                });
                return all;
            }
        }
    })
</script>
六.模板
关键字:template
<body>
    <div id="app"></div>

    <template id="moban">
        <div>
            <h1>这是一个模板</h1>
            <p>{{msg}}</p>
        </div>
    </template>
</body>
<script src="./vue.min.js"></script>
<script>
    var vm = new Vue({
        el:"#app",
        data:{
            msg:"haha"
        },
        template:"#moban"
    })
</script>
七.组件
定义:组件是实现应用中局部功能代码和资源的集合。
组件(Component)是 Vue.js 最强大的功能之一。
组件可以扩展 HTML 元素,封装可重用的代码。
组件系统让我们可以用独立可复用的小组件来构建大型应用,几乎任意类型的应用的界面都可以抽象为一个组件树。
1. 全局组件
所有实例都能用全局组件。
注册一个全局组件语法格式如下:
Vue.component(tagName, options)
tagName 为组件名,options 为配置选项。注册后,我们可以使用以下方式来调用组件:
<tagName></tagName>
<body>
    <div id="app">
        <zujian></zujian>
    </div>

    <div id="app2">
        <zujian></zujian>
        2222
        <zujian></zujian>
        <zujian></zujian>
        <zujian></zujian>
    </div>
</body>
<script>
    Vue.component("zujian",{
        template:`<h3>这是一个全局组件</h3>`
    })

    var vm1 = new Vue({
        el:"#app",
        data:{
            msg:"haha"
        }

    })
    var vm2 = new Vue({
        el:"#app2",
    })
</script>
2. 局部组件
我们也可以在实例选项中注册局部组件,这样组件只能在这个实例中使用:
<body>
    <div id="app">
        <!-- 3.使用组件 -->
        <zujian></zujian>
        <zujian></zujian>
        <zujian></zujian>
        <zujian></zujian>
        <zujian></zujian>
    </div>

</body>
<script src="https://cdn.jsdelivr.net/npm/[email protected]/dist/vue.js"></script>
<script>
    // 1.创建组件
    var zujian = {
        template:"<div>哈哈</div>"
            }
    var vm = new Vue({
        el:"#app",
        data:{
            msg:"haha"
        },
        // 2.注册组件(局部组件)
        components:{
            "zujian":zujian
        }
    })
</script>
4.非单文件组件
<body>
		<div id="app">
			{{msg}}
			<!-- 3.使用组件 -->
            <hello></hello>
			<school></school>
			<hr>
			<student></student>
		</div>
    	<div id="app2">
			<hello></hello>
		</div>
</body>
<script src="https://cdn.jsdelivr.net/npm/[email protected]/dist/vue.js"></script>
<script>
    Vue.config.productionTip = false
    // 1.创建组件
       //school组件
    const school = Vue.extend({
        template: `
          <div>
            <h2>学校名称:{{schoolName}}</h2>
            <h2>学校地址:{{address}}</h2>
            <button @click="showName">点我提示学校名</button>
          </div>
        `,
        data(){
            return {
                schoolName:'尚硅谷',
                address:'北京'
            }
        },
        methods:{
				showName(){
					alert(this.schoolName)
				}
			}
    })
       //student组件
    const student = Vue.extend({
        template: `
          <div>
            <h2>学生姓名:{{studentName}}</h2>
            <h2>年龄:{{age}}</h2>
          </div>
        `,
        data(){
            return {
                studentName:'张三',
                age:18
            }
        }
    })
    	//hello组件
    const hello = Vue.extend({
        template:`
        <div>
            <h2>你好啊,{{name}}</h2>
        </div>
        `,
        data(){
            return {
                name:'Tom'
            }
        }
    })
   Vue.component('hello',hello)  //全局注册组件

    var vm = new Vue({
        el: "#app",
        data: {
            msg: "哈哈"
        },
        // 2.注册组件(局部注册)
        components: {
            school,student
        }
    })
    var vm2 = new Vue({
			el:"#app2"
		})
</script>
注:非单文件组件在开发的时候几乎不用,用的都是单文件组件,这里是为了过渡
5. 多个组件使用
<body>

    <div id="app">
        <myheader></myheader>
        <mycontent></mycontent>
        <myfooter></myfooter>
    </div>

</body>
<script src="https://cdn.jsdelivr.net/npm/[email protected]/dist/vue.js"></script>
<script>
    var myheader = {
        template:`<h1>这是头部</h1>`
    }
    var mycontent = {
        template:`<div>内容区域</div>`
    }
    var myfooter = {
        template:`<h1>这是底部</h1>`
    }
    const vm = new Vue({
        el: "#app",
        components:{
            "myheader":myheader,
            "mycontent":mycontent,
            "myfooter":myfooter
        }
    })
</script>
6. 动态组件
<body>
    <div id="app">
        <button @click="zujian='hello'">hello</button>
        <button @click="zujian='world'">world</button>
        <component :is="zujian"></component>
    </div>
</body>
<script>
    const vm = new Vue({
        el:"#app",
        data:{
            zujian:"world"
        },
        components:{
            "hello":{
                template:"<div>这是hello组件</div>"
            },
            "world":{
                template:"<div>这是world组件</div>"
            }
        }
    })
</script>
7.组件传值(通讯)
7.1父组件传子组件
prop 是子组件用来接受父组件传递过来的数据的一个自定义属性。
父组件的数据需要通过 props 把数据传给子组件,子组件需要显式地用 props 选项声明 “prop”,类似于用 v-bind
绑定 HTML 特性到一个表达式,也可以用 v-bind 动态绑定 props 的值到父组件的数据中。每当父组件的数据变化时,该变化也会传导给子组件。
<body>
    <div id="app">
        <hello :message="msg"></hello>
    </div>
</body>
<script src="https://cdn.jsdelivr.net/npm/[email protected]/dist/vue.js"></script>
<script>
    Vue.component("hello",{
        props:["message"],
        template:"<div>hello {{message}}</div>"
    })
    const vm = new Vue({
        el:"#app",
        data:{
            msg:"张三"
        }
    })
</script>
7.2子组件传父组件
子组件:this.$emit(‘receive’,this.reply)
<template>
    <div>
        <h1>{{name}}</h1>
        <p>{{msg}}</p>
        <button @click="btn">回复</button>
    </div>
</template>

<script>
    export default {
        props:['name','msg'],
        data() {
            return {
                reply:"收到父组件的信息,并做出回复"
            }
        },
        methods: {
            btn(){
                //  this.$emit('回调函数(自定义函数)',"传出的值")
                this.$emit('receive',this.reply)
            }
        },
    }
</script>
父组件:@receive=“receive” receive(res)
<template>
    <div>
        <h1>个人主页</h1>
        <Detail :name="name" :msg="msg" @receive="receive" />
        <p>{{receiveMsg}}</p>
    </div>
</template>

<script>
import Detail from '../components/Detail'
export default {
    components: { Detail },
    data() {
        return {
            name:'张三',
            msg:'这是张三的基本信息',
            receiveMsg:''
        }
    },
    methods: {
        receive(res){
           console.log(res);
           this.receiveMsg = res
        }
    },
}
</script>
7.3兄弟组件之间传值
事件总线(EventBus)是所有组件公用的事件中心,适用于非父子组件情况
发送事件【通过this.$bus.$emit('事件名',参数);】
接收事件【通过this.$bus.$on('事件名',回调函数(参数))】
弄一个公共的bus.js文件(实例化vue)
组件A代码:
<template>
    <div>
        AAAAAAA
        <button @click="btn">走起</button>
    </div>
</template>
<script>
import bus from './bus'
export default {
    data() {
        return {
            aStr:"A中的数据"
        }
    },
    methods:{
        btn(){
            bus.$emit("change",this.aStr)
        }
    }
}
</script>
组件B的代码:
<template>
    <div>
        BBBBBB{{bstr}}

    </div>
</template>
<script>
import bus from './bus'
export default {
    data() {
        return {
        }
    },
    computed:{
        bstr(){
            bus.$on("change",function(d){
                console.log(d);
            })
        }
    }

}
</script>
8.组件嵌套
	<body>
		<div id="app">
			<!-- 3.使用组件 -->
			<app></app>
		</div>
	</body>
	<script src="https://cdn.jsdelivr.net/npm/[email protected]/dist/vue.js"></script>
	<script>
		Vue.config.productionTip = false
	// 1.创建组件
		//定义student组件
		const student = Vue.extend({
			template: `
			  <div>
				<h2>学生姓名:{{studentName}}</h2>
				<h2>年龄:{{age}}</h2>
			  </div>
			`,
			data(){
				return {
					studentName:'张三',
					age:18
				}
			}
		})
		//定义school组件
		const school = Vue.extend({
			template: `
			  <div>
				<h2>学校名称:{{schoolName}}</h2>
				<h2>学校地址:{{address}}</h2>
				<student></student>
			  </div>
			`,
			data(){
				return {
					schoolName:'尚硅谷',
					address:'北京'
				}
			},
			components:{
				student
			}
		})
		//定义hello组件
		const hello = Vue.extend({
			template:`
			<div>
				<h2>你好啊,{{name}}</h2>
			</div>
			`,
			data(){
				return {
					name:'Tom'
				}
			}
		})
		//定义app组件
		const app = Vue.extend({
			template:`
			<div>
				<school></school>
				<hello></hello>
			</div>
			`,
			components:{
				school,
				hello
			}
		})

		var vm = new Vue({
			el: "#app",
			// 2.注册组件(局部组件)
			components: {
				app
			}
		})
	</script>
9.VueComponent
关于VueComponent:
1.school组件本质是一个名为VueComponent的构造函数,且不是程序员定义的,是Vue。extend生成的。
2.我们只需要写或者,vue解析时会帮我们创建school的实例对象,即vue帮我们执行的 new VueComponent(options).
3.特别注意:每次调用的vue.extends,返回的都是一个全新的VueComponent!!!
//定义student组件
		const student = Vue.extend({
			template: `
			  <div>
				<h2>学生姓名:{{studentName}}</h2>
				<h2>年龄:{{age}}</h2>
			  </div>
			`,
			data(){
				return {
					studentName:'张三',
					age:18
				}
			}
		})
//定义hello组件
        const hello = Vue.extend({
            template:`
            <div>
                <h2>你好啊,{{name}}</h2>
            </div>
            `,
            data(){
                return {
                    name:'Tom'
                }
            }
        })
		student.a = 99;
		console.log(student === hello);  //false
		console.log("@"+student.a);  //99
		console.log("#"+hello.a);  //undefind
4.关于this指向:
(1).组件配置中:
data函数、methods中的函数、watch中的函数、computed中的函数 ,它们的this均是【VueComponent】实例对象。
(2).new Vue()配置中:
data函数、methods中的函数、watch中的函数、computed中的函数 ,它们的this均是【vue实例对象】。
5.VueComponent的实例对象,以后简称vc(也可称之为组件实例对象),vue的实例对象,以后简称vm
10.总结
vue中使用组件的三大步骤:
一、定义组件(创建组件)
二、使用组件
三、使用组件(写组件标签)
如何定义一个组件?
使用Vue.extend(options)创建,其中options和new Vue(options)时传入的那个options几乎一样
Vue.extend(options) 可简写为 options
区别如下:
1.el不要写,为什么?——最终所有的组件都要经过一个vm的管理,由vm中的el决定服务哪个容器。
2.data必须写成函数,为什么?——避免组件被复用时,数据存在引用关系。
备注:使用template可以配置组件结构,前提是结构必须包在一个div里面
如何注册组件?
1.局部注册:靠new Vue的时候传入components选项
2.全局注册:靠Vue.component(“组件名”,组件)
编写组件标签:
<tagName></tagName>
一个重要的内置关系:
Vue.component.prototype.__proto__ === Vue.prototype
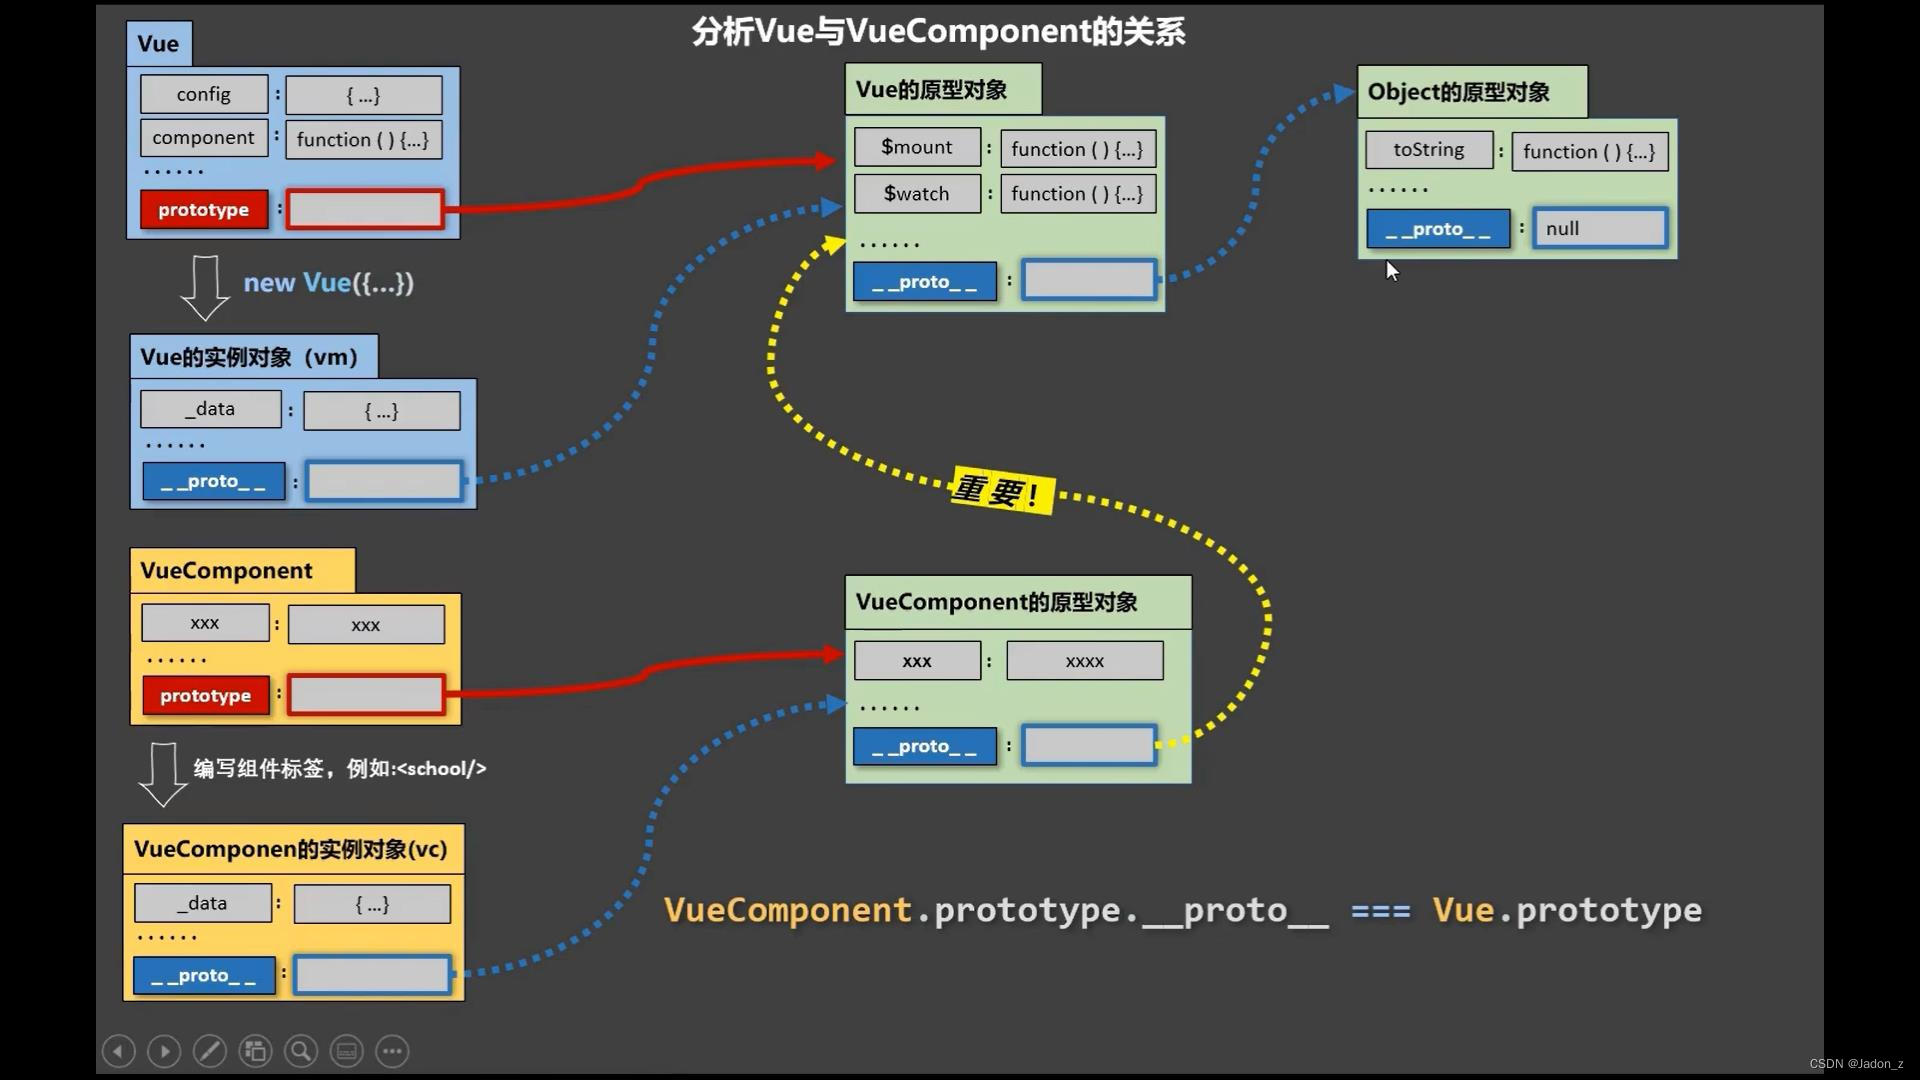
为什么要有这个关系:让组件实例对象(vc) 可以访问到Vue原型上的属性、方法。
八.自定义属性
除了默认设置的核心指令( v-model 和 v-show ), Vue 也允许注册自定义指令。
<body>
    <div id="app">
        <div v-background v-border>
            {{msg}}
        </div>
    </div>
</body>
<script>
    Vue.directive("background", {
        bind: function (el) {
            console.log(el);
            el.style.background="green";
        }
    })
    Vue.directive("border", {
        bind: function (el) {
            console.log(el);
            el.style.border="2px solid red";
        }
    })
    const vm = new Vue({
        el:"#app",
        data:{
            msg:"哈哈"
        }
    })
</script>
九. 生命周期函数(钩子函数)
1.介绍
Vue实例有一个完整的生命周期,也就是从开始创建、初始化数据、编译模板、挂载Dom、渲染→更新→渲染、卸载等一系列过程,我们称这是Vue的生命周期。
vue的生命周期通常有8个,分别是创建前后,挂载前后,更新前后,销毁前后,分别对应的钩子函数有beforeCreate创建前,created创建后,beforeMount挂载前,mounted挂载后,beforeUpdate更新前,updated更新后,beforeDestory销毁前,destoyed销毁后。
2.每个生命周期的执行机制
创建前后:new Vue()
挂载前后:$el 也是就是挂载dom
注意点:生命周期在创建之后才能够获取data数据;在挂载后才能获取dom元素
更新前后:监听的是更新试图或者说是dom元素
3.生命周期干什么事情?
销毁前后:页面的定时器到一定的时间会进行销毁,切换页面时会触发销毁创建后:ajax操作;读取缓存操作
挂载后:也可以进行ajax操作;这里可以操作dom了
销毁后:页面有定时器,页面监听…的销毁了
<body>
    <div id="app">
        <button @click="msg=888">更新</button>
        <button @click="xiaohui">销毁</button>
        <div>{{msg}}</div>
    </div>
</body>
<script>
    const vm = new Vue({
        el:"#app",
        data() {
            return {
                msg:666
            }
        },
        methods: {
            xiaohui(){
                this.$destroy()

            }
        },
        beforeCreate() {
            alert("创建前")
        },
         created() {
            alert("创建后")

         },
         beforeMount() {
            alert("挂载前")

         },
         mounted() {
            alert("挂载后")
         },
         beforeUpdate() {
            alert("跟新前")
         },
         updated() {
            alert("跟新后")
         },
         beforeDestroy() {
            alert("销毁前")
         },
         destroyed() {
            alert("销毁后")
         },
    })
</script>
4.关于$nextTick
4.1 NextTick是什么
官方对其的定义: 在下次 DOM 更新循环结束之后执行延迟回调。在修改数据之后立即使用这个方法,获取更新后的 DOM
什么意思呢? 我们可以理解成,Vue 在更新 DOM 时是异步执行的。当数据发生变化,Vue将开启一个异步更新队列,视图需要等队列中所有数据变化完成之后,再统一进行更新。
举例一下:
Html结构
<div id="app"> {{ message }} </div>
构建一个vue实例
const vm = new Vue({
  el: '#app',
  data: {
    message: '原始值'
  }
})
修改message
this.message = '修改后的值1'
this.message = '修改后的值2'
this.message = '修改后的值3'
这时候想获取页面最新的DOM节点,却发现获取到的是旧值
console.log(vm.$el.textContent) // 原始值
这是因为message数据在发现变化的时候,vue并不会立刻去更新Dom,而是将修改数据的操作放在了一个异步操作队列中,如果我们一直修改相同数据,异步操作队列还会进行去重,等待同一事件循环中的所有数据变化完成之后,会将队列中的事件拿来进行处理,进行DOM的更新。
为什么要有nexttick
举个例子
{{num}}
for(let i=0; i<100000; i++){
    num = i
}
如果没有 nextTick 更新机制,那么 num 每次更新值都会触发视图更新(上面这段代码也就是会更新10万次视图),有了nextTick机制,只需要更新一次,所以nextTick本质是一种优化策略
4.2 使用场景
如果想要在修改数据后立刻得到更新后的DOM结构,可以使用Vue.nextTick()
第一个参数为:回调函数(可以获取最近的DOM结构)
第二个参数为:执行函数上下文
// 修改数据
vm.message = '修改后的值'
// DOM 还没有更新
console.log(vm.$el.textContent) // 原始的值
Vue.nextTick(function () {
  // DOM 更新了
  console.log(vm.$el.textContent) // 修改后的值
})
组件内使用 vm.$nextTick() 实例方法只需要通过this.$nextTick(),并且回调函数中的 this 将自动绑定到当前的 Vue 实例上
this.message = '修改后的值'
console.log(this.$el.textContent) // => '原始的值'
this.$nextTick(function () {
    console.log(this.$el.textContent) // => '修改后的值'
})
$nextTick() 会返回一个 Promise 对象,可以是用async/await完成相同作用的事情
this.message = '修改后的值'
console.log(this.$el.textContent) // => '原始的值'
await this.$nextTick()
console.log(this.$el.textContent) // => '修改后的值'
4.3 实现原理
callbacks也就是异步操作队列
callbacks新增回调函数后又执行了timerFunc函数,pending是用来标识同一个时间只能执行一次
export function nextTick(cb?: Function, ctx?: Object) {
  let _resolve;

  // cb 回调函数会经统一处理压入 callbacks 数组
  callbacks.push(() => {
    if (cb) {
      // 给 cb 回调函数执行加上了 try-catch 错误处理
      try {
        cb.call(ctx);
      } catch (e) {
        handleError(e, ctx, 'nextTick');
      }
    } else if (_resolve) {
      _resolve(ctx);
    }
  });

  // 执行异步延迟函数 timerFunc
  if (!pending) {
    pending = true;
    timerFunc();
  }

  // 当 nextTick 没有传入函数参数的时候,返回一个 Promise 化的调用
  if (!cb && typeof Promise !== 'undefined') {
    return new Promise(resolve => {
      _resolve = resolve;
    });
  }
}
timerFunc函数定义,这里是根据当前环境支持什么方法则确定调用哪个,分别有:
Promise.then`、`MutationObserver`、`setImmediate`、`setTimeout
通过上面任意一种方法,进行降级操作
export let isUsingMicroTask = false
if (typeof Promise !== 'undefined' && isNative(Promise)) {
  //判断1:是否原生支持Promise
  const p = Promise.resolve()
  timerFunc = () => {
    p.then(flushCallbacks)
    if (isIOS) setTimeout(noop)
  }
  isUsingMicroTask = true
} else if (!isIE && typeof MutationObserver !== 'undefined' && (
  isNative(MutationObserver) ||
  MutationObserver.toString() === '[object MutationObserverConstructor]'
)) {
  //判断2:是否原生支持MutationObserver
  let counter = 1
  const observer = new MutationObserver(flushCallbacks)
  const textNode = document.createTextNode(String(counter))
  observer.observe(textNode, {
    characterData: true
  })
  timerFunc = () => {
    counter = (counter + 1) % 2
    textNode.data = String(counter)
  }
  isUsingMicroTask = true
} else if (typeof setImmediate !== 'undefined' && isNative(setImmediate)) {
  //判断3:是否原生支持setImmediate
  timerFunc = () => {
    setImmediate(flushCallbacks)
  }
} else {
  //判断4:上面都不行,直接用setTimeout
  timerFunc = () => {
    setTimeout(flushCallbacks, 0)
  }
}
无论是微任务还是宏任务,都会放到flushCallbacks使用
这里将callbacks里面的函数复制一份,同时callbacks置空
依次执行callbacks里面的函数
function flushCallbacks () {
  pending = false
  const copies = callbacks.slice(0)
  callbacks.length = 0
  for (let i = 0; i < copies.length; i++) {
    copies[i]()
  }
}
小结:
- 把回调函数放入callbacks等待执行
- 将执行函数放到微任务或者宏任务中
- 事件循环到了微任务或者宏任务,执行函数依次执行callbacks中的回调
5.总结
常用的生命周期钩子:
1.mounted:发送ajax请求,启动定时器、绑定自定义事件、订阅消息等(初始化操作)。
2.beforeDestroy:清除定时器、解绑自定义事件、取消订阅消息等(收尾工作)。
关于销毁vue实例
1.销毁后借助vue开发者工具看不到任何信息。
2.销毁后自定义时间会失效,但原生DOM事件依然有效。
3.一般不会在beforeDestroy操作数据,因为即使操作数据,也不会再触发更新流程了。
十. 监听
可以通过 watch 来响应数据的变化
<body>
    <div id="app">
        <button @click="student.name='张三'">改变</button>
        <p>
            {{student.name}}
        </p>
    </div>
</body>
<script src="./vue.min.js"></script>
<script>
    const vm = new Vue({
        el:"#app",
        data:{
            msg:"狗蛋",
            student:{
                name:"狗蛋"
            }
        }
    })
    //对象中的值使用深度监听
    vm.$watch("student",function(){
        alert("已经改变")
    },{
        deep:true
    })
</script>
十一. 过滤器
过滤器(filter)是输送介质管道上不可缺少的一种装置,通俗来说,就是把一些不必要的东西过滤掉,过滤器实质不改变原始数据,只是对数据进行加工处理后返回过滤后的数据再进行调用处理,我们也可以理解其为一个纯函数。
vue允许你自定义过滤器,可被用于一些常见的文本格式化。
vue中的过滤器可以用在两个地方:双花括号插值和 v-bind 表达式,过滤器应该被添加在 JavaScript表达式的尾部,由“管道”符号指示。
 <!-- 在双花括号中 -->
{{time | date}}
 <!-- 在'v-bind'中 -->
<div :id="msg | message"></div>
定义全局过滤器:
Vue.filter("date",function(v){
        console.log(v);
        let mytime = new Date(v);
        console.log(mytime.getDate());
        var str = mytime.getFullYear()+"--"+mytime.getMonth()+"--"+mytime.getDate();
        return str;

})
const vm = new Vue({
        el: "#app",
        data: {
            time: 1660638685934
        },
定义局部过滤器:
const vm = new Vue({
        el: "#app",
        data: {
            time: 1660638685934
        },
filters: {//局部过滤器
            date: (v) => {
                console.log(v);
                let mytime = new Date(v);
                var str = mytime.getFullYear() + "--" + mytime.getMonth() + "--" + mytime.getDate();
                return str;
            }
        }
十二.Vue-cli
1.安装
Vue脚手架是Vue官方提供的标准化开发工具(开发平台),它提供命令行和UI界面,方便创建vue工程、配置第三方依赖、编译vue工程。
如果下载缓慢,请配置npm淘宝镜像:
npm install -g cnpm --registry=https://registry.npmmirror.com
Vue2.0安装vue-cli(脚手架)步骤:
-
npm 命令
cnpm install -g @vue/cli -
安装完成了以后可以测试一下安装的版本:
vue --version -
切到要创建Vue项目的目录,然后用命令创建项目
vue create myapp -
进入项目
cd myapp -
启动项目
npm run serve
也可以使用ui界面操作
vue ui
2.应用
2.1 Vue中使用Swiper
-
安装 swiper
swiper版本众多,单用其中一个版本就够了,不同的版本有不同的使用方式,尽量安装低版本的最好,版本太高可能会不兼容,这里推荐swiper5
npm install [email protected] -
安装 vue-awesome-swiper
vue-awesome-swiper与swiper配套使用
npm i [email protected] -
main.js 中引入
// 如果这里报错,找不到文件,就去node_modules文件夹中查看具体位置在进行引入 import VueAwesomeSwiper from 'vue-awesome-swiper/dist/vue-awesome-swiper' // css同理 import 'swiper/css/swiper.min.css' Vue.use(VueAwesomeSwiper) -
页面中使用
<template>
	<div class="banner">
		<swiper ref="mySwiper"
				style="height:100%;"
				:options="swiperOptions">
				<swiper-slide>Slide 1</swiper-slide>
				<swiper-slide>Slide 2</swiper-slide>
				<swiper-slide>Slide 3</swiper-slide>
				<swiper-slide>Slide 4</swiper-slide>
				<swiper-slide>Slide 5</swiper-slide>
		</swiper>
	</div>
</template>
<script>
	data(){
		return {
		// 具体他的配置在官网中查看,根据需求配置
		 // https://www.swiper.com.cn/api/navigation/209.html
			swiperOptions: {
				slidesPerView: 1,
				autoplay: {
					delay: 1000,
					stopOnLastSlide: false,
					disableOnInteraction: true,
				}
			}
		}
	}
</script>
<style>
.banner {
	width:200px;
	height:100px;
}
</style>
2.2 Vue中使用Echarts
-
安装
官网地址:https://echarts.apache.org/handbook/zh/basics/download/
从 npm 获取:
npm install echarts --save -
局部使用:哪里需要哪里引入( )
<template> <div> <div id="main" :style="{width: '500px', height: '300px'}"> </div> </div> </template> <script> import * as echarts from 'echarts'; export default { mounted() { var myChart = echarts.init(document.getElementById("main")); // 绘制图表 myChart.setOption({ title: { text: "ECharts 入门示例", }, tooltip: {}, xAxis: { data: ["衬衫", "羊毛衫", "雪纺衫", "裤子", "高跟鞋", "袜子"], }, yAxis: {}, series: [ { name: "销量", type: "bar", data: [5, 20, 36, 10, 10, 20], }, ], }); }, }; </script> <style scoped> </style> -
全局使用
在main.js中引入
import * as echarts from 'echarts';
Vue.prototype.$echarts=echarts
进入到你需要写的组件中使用
src/components/Tubiao.vue<template> <div> <div id="main" :style="{width: '500px', height: '300px'}"> </div> </div> </template> <script> import * as echarts from 'echarts'; export default { mounted() { let myChart = this.$echarts.init(document.getElementById("main")) // 绘制图表 ······ }, }; </script>
3. 分析脚手架结构
3.1 ref属性
-
被用来给元素或子组件注册引用信息(id 的替代者)
-
应用在html标签上获取的是真实的DOM元素,应用在组件标签上是组件实例对象(vc)
-
使用方式:
打标识
<h1 ref="xxx">......</h1> 或<school ref="xxx"></school>获取
this.$refs.xxx
十三.Vue.js Ajax(axios)
Vue.js 2.0 版本推荐使用 axios 来完成 ajax 请求。
Axios 是一个基于 Promise 的 HTTP 库,可以用在浏览器和 node.js 中。
vue-axios|axios中文网:http://www.axios-js.com/zh-cn/docs/index.html
特性:
- 从浏览器中创建 XMLHttpRequest
- 从 node.js 创建 http 请求
- 支持 Promise API
- 拦截请求和响应
- 转换请求数据和响应数据
- 取消请求
- 自动转换 JSON 数据
- 客户端支持防御 XSRF
安装:
npm install --save axios vue-axios
将下面代码加入入口文件(main.js):(全局引入)
import Vue from 'vue'
import axios from 'axios'
import VueAxios from 'vue-axios'

Vue.use(VueAxios, axios)
单个组件引入:import axios from 'axios'
1.案例
执行get请求
  methods: {
        getBanners() {
            this.axios.get('http://120.48.109.174:8081/home/swiper').then(res => {
                console.log(res);
                let imgs = res.data.body;
                this.banners = imgs;
            })
        }
    },

  // 为给定参数ID的user创建请求
    axios.get('/user', {
    params: {
      ID: 12345
    }
  })
  .then(function (response) {
    console.log(response);
  })
  .catch(function (error) {
    console.log(error);
  });
执行post请求
axios.post('/user', {
    firstName: 'Fred',
    lastName: 'Flintstone'
  })
  .then(function (response) {
    console.log(response);
  })
  .catch(function (error) {
    console.log(error);
  });
执行多个并发请求
function getUserAccount() {
  return axios.get('/user/12345');
}

function getUserPermissions() {
  return axios.get('/user/12345/permissions');
}

axios.all([getUserAccount(), getUserPermissions()])
  .then(axios.spread(function (acct, perms) {
    // 两个请求现在都执行完成
  }));
2.跨域
在Vue中处理跨域配置:
在配置文件中找到config/index.js文件,更改**proxyTable{}**中的配置项 (更改后要重启服务器)
   proxyTable: {
      '/api': {
        target: 'https://v.api.aa1.cn',//后端接口地址
        changeOrigin: true,//是否允许跨越
        pathRewrite: {
            '^/api': '',//重写,
        }
    },
  },
vue3.x及以上版本配置,在vue.config.js文件中,添加以下配置项(更改后要重启服务器):
   /* 解决跨域 */
  devServer: {
    proxy: {
      '/api': {// 匹配所有以 '/api1'开头的请求路径
        target: 'https://api-hmugo-web.itheima.net',// 代理目标的基础路径
        changeOrigin: true,
        pathRewrite: { '^/api': '' }
      },
      '/api1': {// 匹配所有以 '/api1'开头的请求路径
        target: 'http://39.98.123.211:8510',// 代理目标的基础路径
        changeOrigin: true,
        pathRewrite: { '^/api1': '' }
      },
    }
  }
在需要调用接口的vue组件中写代码如下:
  methods: {
    getList() {
     this.axios.get("/api/api/api-wenan-gaoxiao/index.php", {
          params: {
            "aa1":"json"
          },
        })
        .then(function (response) {
          console.log(response);
        })
        .catch(function (error) {
          console.log(error);
        });
    },
  },
十四.Vue UI 组件库
Element UI,一套为开发者、设计师和产品经理准备的基于 Vue 的桌面端组件库
官网地址:https://element.eleme.cn/#/zh-CN
1.Element UI安装(vue 2.x)
npm 安装:
推荐使用 npm 的方式安装,它能更好地和 webpack 打包工具配合使用。
npm i element-ui -S
CDN:
目前可以通过 unpkg.com/element-ui 获取到最新版本的资源,在页面上引入 js 和 css 文件即可开始使用。
<!-- 引入样式 -->
<link rel="stylesheet" href="https://unpkg.com/element-ui/lib/theme-chalk/index.css">
<!-- 引入组件库 -->
<script src="https://unpkg.com/element-ui/lib/index.js"></script>
2.引入Element
完整引入:
在 main.js 中写入以下内容
import Vue from 'vue';
import ElementUI from 'element-ui';
import 'element-ui/lib/theme-chalk/index.css';
import App from './App.vue';

Vue.use(ElementUI);

new Vue({
  el: '#app',
  render: h => h(App)
});
以上代码便完成了 Element 的引入。需要注意的是,样式文件需要单独引入。
按需引入
借助 babel-plugin-component,我们可以只引入需要的组件,以达到减小项目体积的目的。
首先,安装 babel-plugin-component:
npm install babel-plugin-component -D
然后,将babel.config.js 修改为:
{
  "presets": [["@babel/preset-env", { "modules": false }]],
  "plugins": [
    [
      "component",
      {
        "libraryName": "element-ui",
        "styleLibraryName": "theme-chalk"
      }
    ]
  ]
}
接下来,如果你只希望引入部分组件,比如 Button 和 Select,那么需要在 main.js 中写入以下内容:
import Vue from 'vue';
import { Button, Select } from 'element-ui';
import App from './App.vue';

Vue.component(Button.name, Button);
Vue.component(Select.name, Select);
/* 或写为
 * Vue.use(Button)
 * Vue.use(Select)
 */

new Vue({
  el: '#app',
  render: h => h(App)
});
3.应用
-
Element UI中图片地址处理
<template> <div> <el-table :data="tableData" style="width: 100%"> <el-table-column prop="date" label="日期" width="180"> </el-table-column> <el-table-column prop="title" label="小区详情" width="380"> </el-table-column> <el-table-column prop="from" label="来源"> </el-table-column> <el-table-column prop="imgSrc" label="图片"> <template slot-scope="scope"> <el-image :src="'http://120.48.109.174:8081' + scope.row.imgSrc"> </el-image> </template> </el-table-column> </el-table> </div> </template> <script> export default { name: 'Houses', data() { return { tableData: [], } }, created() { this.getList(); }, methods: { getList() { this.axios.get("http://120.48.109.174:8081/home/news?area=AREA%7C88cff55c-aaa4-e2e0").then(res => { console.log(res); let list = res.data.body; this.tableData = list; }) }, }, } </script> -
Element UI中使用轮播图
组件Carousel 走马灯:在有限空间内,循环播放同一类型的图片、文字等内容(https://element.eleme.cn/#/zh-CN/component/carousel#carousel-zou-ma-deng)
示例:
<template>
    <div>
        <div class="block" >
            <el-carousel  type="card" height="300px">
                <el-carousel-item v-for="(item,index) in banners" :key="index">
                    <img :src="'http://120.48.109.174:8081'+item.imgSrc" alt="">
                </el-carousel-item>
            </el-carousel>
        </div>
    </div>
</template>
<script>
export default {
    data() {
        return {
            banners: []
        }
    },
    mounted() {
        this.axios.get('http://120.48.109.174:8081/home/swiper').then(res => {
            console.log(res.data.body);
            let photos = res.data.body
            this.banners = photos
        })
    },

}
</script>
<style scoped>
.el-carousel__item h3 {
    color: #475669;
    font-size: 14px;
    opacity: 0.75;
    line-height: 150px;
    margin: 0;
}

.el-carousel__item:nth-child(2n) {
    background-color: #99a9bf;
}

.el-carousel__item:nth-child(2n+1) {
    background-color: #d3dce6;
}

.block {
    width: 1200px;
    margin: 0 auto;
}

.block img {
    width: 100%;
    height: 100%;

}
</style>
4.其他组件库
移动端常用UI组件库
- Vant (https://vant-contrib.gitee.io/vant/#/zh-CN/)
- Cube UI (https://didi.github.io/cube-ui/#/zh-CN)
- Mint UI (http://mint-ui.github.io/#!/zh-cn)
PC端常用UI组件库
- Elment UI (https://element.eleme.cn/#/zh-CN)
- IView UI (https://iview.github.io/)
十五.插槽
1.作用
让父组件可以向子组件指定位置插入HTML结构,也是一种组件间通讯的方式,适用于父组件 ===> 子组件,
2. 分类
默认插槽、具名插槽、作用域插槽
3. 使用方式
3.1 默认插槽
父组件中:
    <Category>
         <div>html结构</div>
    </Category>
子组件中:
<template>
    <div>
        <!-- 定义一个插槽-->
        <slot>插槽默认内容</slot>
    </div>
</template>
3.2 具名插槽
父组件中:
    <Category>
       <template slot="footer">
            <div>html结构</div>
       </template>
    </Category>
    <Category>
       <template v-slot:footer>   <!--或者用 #footer -->
            <div>html结构</div>
       </template>
    </Category>
子组件中:
<template>
    <div>
        <!-- 定义一个插槽 -->
        <slot name="center">插槽默认内容</slot>
        <slot name="footer">插槽默认内容</slot>
    </div>
</template>
3.3 作用域插槽
-
理解:数据在组件的自身,但根据数据生成的结构需要组件的使用者来决定。(games数据在category组件中,但使用数据所遍历出来的结构由父组件来决定)
-
具体编码:
父组件中:
   <Category>
      <template scope="youxi">
        <ul>
          <li v-for="(g, i) in youxi.games" :key="i">{{ g }}</li>
        </ul>
      </template>
    </Category>

    <Category>
      <template scope="{games}">  <!-- es6解构赋值 -->
        <ol>
          <li v-for="(g, i) in games" :key="i">{{ g }}</li>
        </ol>
      </template>
    </Category>

    <Category>
      <template slot-scope="{games}">
        <h4 v-for="(g, i) in games" :key="i">{{ g }}</h4>
      </template>
    </Category>

子组件中:
<template>
    <div class="Category">
        <!-- 定义一个插槽 -->
       <slot :games="games"></slot>
    </div>
</template>
<script>
export default {
    name: 'Category',
    props: ['title'],
     //数据在子组件自身
    data() {
        return {
            games: ['王者荣耀', '穿越火线', '刺激战场', '原神']
        }
    },
}
</script>
十六.Vue Router
1. 相关理解
1.1 vue-router 的理解
vue的一个插件库,专门用来实现 SPA应用
1.2 对SPA应用的理解
(1) 单页web应用(single page web application,SPA)
(2) 整个应用只有一个完整的页面
(3) 点击页面中的导航链接不会刷新页面,只会做页面的局部更新
(4) 数据需要通过ajax请求获取
1.3 路由的理解
- 什么是路由?
a. 一个路由就是一组映射关系(key - value)
b. key为路径,value可能是function或component
- 路由分类
a. 后端路由
理解: value是function,用于处理客户端提交的请求
**工作过程:**服务器收到一个请求时,根据请求路径找到匹配的函数来处理请求,返回响应数据
b. 前端路由
理解:value是component,用于展示页面内容
**工作过程**:当浏览器的路径改变时,对应的组件就会显示
2. 基本路由
- 安装
vue-router,命令npm i vue-router - 应用插件
Vue.use(VueRouter) - 编写
router配置项
import VueRouter from 'vue-router'			// 引入VueRouter
import About from '../components/About'	// 路由组件
import Home from '../components/Home'		// 路由组件

// 创建router实例对象,去管理一组一组的路由规则
const router = new VueRouter({
	routes:[
		{
			path:'/about',
			component:About
		},
		{
			path:'/home',
			component:Home
		}
	]
})

//暴露router
export default router
-
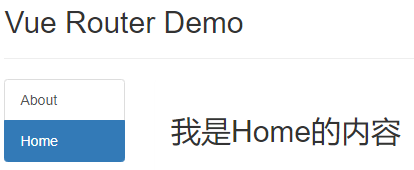
实现切换
浏览器会被替换为a标签
active-class 可配置高亮样式
<router-link active-class="active" to="/about">About</router-link> -
指示展示位
src/router/index.js 该文件专门用于创建整个应用的路由器
import VueRouter from 'vue-router'
// 引入组件
import About from '../components/About'
import Home from '../components/Home'

// 创建并暴露一个路由器
export default new VueRouter({
	routes:[
		{
			path:'/about',
			component:About
		},
		{
			path:'/home',
			component:Home
		}
	]
})
src/main.js
import Vue from 'vue'
import App from './App.vue'
import VueRouter from 'vue-router'	// 引入VueRouter
import router from './router'				// 引入路由器

Vue.config.productionTip = false

Vue.use(VueRouter)	// 应用插件

new Vue({
	el:'#app',
	render: h => h(App),
	router:router
})
src/App.vue
<template>
  <div>
    <div class="row">
      <div class="col-xs-offset-2 col-xs-8">
        <div class="page-header"><h2>Vue Router Demo</h2></div>
      </div>
    </div>
    <div class="row">
      <div class="col-xs-2 col-xs-offset-2">
        <div class="list-group">
					<!-- 原始html中我们使用a标签实现页面的跳转 -->
          <!-- <a class="list-group-item active" href="./about.html">About</a> -->
          <!-- <a class="list-group-item" href="./home.html">Home</a> -->

					<!-- Vue中借助router-link标签实现路由的切换 -->
					<router-link class="list-group-item"
                       active-class="active" to="/about">About</router-link>
          <router-link class="list-group-item"
                       active-class="active" to="/home">Home</router-link>
        </div>
      </div>
      <div class="col-xs-6">
        <div class="panel">
          <div class="panel-body">
						<!-- 指定组件的呈现位置 -->
            <router-view></router-view>
          </div>
        </div>
      </div>
    </div>
  </div>
</template>

<script>
	export default {
		name:'App'
	}
</script>
src/component/Home.vue
<template>
	<h2>我是Home的内容</h2>
</template>

<script>
	export default {
		name:'Home'
	}
</script>
src/component/About.vue
<template>
	<h2>我是About的内容</h2>
</template>

<script>
	export default {
		name:'About'
	}
</script>
3. 几个注意事项
- 路由组件通常存放在
views文件夹,一般组件通常存放在components文件夹 - 通过切换,'隐藏’了的路由组件,默认是被销毁掉的,需要的时候再去挂载
- 每个组件都有自己的**$route**属性,里面存储着自己的路由信息
- 整个应用只有一个
router,可以通过组件的$router属性获取到
4. (嵌套)多级路由
-
配置路由规则,使用
children配置项routes:[ { path:'/about', component:About, }, { path:'/home', component:Home, children:[ // 通过children配置子级路由 { path:'news', // 此处一定不要带斜杠,写成 /news component:News }, { path:'message', // 此处一定不要写成 /message component:Message } ] } ] -
跳转(要写完整路径)
<router-link to="/home/news">News</router-link>
5. 路由的query参数
5.1 传递参数
<!-- 跳转并携带query参数,to的字符串写法 -->
<router-link :to="`/home/message/detail?id=${m.id}&title=${m.title}`">跳转</router-link>

<!-- 跳转并携带query参数,to的对象写法(推荐) -->
<router-link
	:to="{
		path:'/home/message/detail',
		query:{
		   id: m.id,
       title: m.title
		}
	}"
>跳转</router-link>
5.2 接收参数
$route.query.id
$route.query.title
6. 命名路由
作用:可以简化路由的跳转
如何使用?
a. 给路由命名
{
	path:'/demo',
	component:Demo,
	children:[
		{
			path:'test',
			component:Test,
			children:[
				{
          name:'hello' // 给路由命名
					path:'welcome',
					component:Hello,
				}
			]
		}
	]
}
b. 简化跳转
<!--简化前,需要写完整的路径 -->
<router-link to="/demo/test/welcome">跳转</router-link>

<!--简化后,直接通过名字跳转 -->
<router-link :to="{name:'hello'}">跳转</router-link>

<!--简化写法配合传递参数 -->
<router-link
	:to="{
		name:'hello',
		query:{
		    id:666,
        title:'你好'
		}
	}"
>跳转</router-link>
7. 路由的params参数
- 配置路由,声明接收
params参数
{
	path:'/home',
	component:Home,
	children:[
		{
			path:'news',
			component:News
		},
		{
			component:Message,
			children:[
				{
					name:'xiangqing',
					path:'detail/:id/:title', // 🔴使用占位符声明接收params参数
					component:Detail
				}
			]
		}
	]
}
-
传递参数
特别注意:路由携带
params参数时,若使用to的对象写法,则不能使用path配置项,必须使用name配置!<!-- 跳转并携带params参数,to的字符串写法 --> <router-link :to="/home/message/detail/666/你好">跳转</router-link> <!-- 跳转并携带params参数,to的对象写法 --> <router-link :to="{ name:'xiangqing', params:{ id:666, title:'你好' } }" >跳转</router-link> -
接收参数
$route.params.id
$route.params.title
8. 路由的props配置
props作用:让路由组件更方便的收到参数
{
	name:'xiangqing',
	path:'detail/:id',
	component:Detail,

	//第一种写法:props值为对象,该对象中所有的key-value的组合最终都会通过props传给Detail组件
	// props:{a:900}

	//第二种写法:props值为布尔值,为true时,则把路由收到的所有params参数通过props传给Detail组件
	// props:true

	//第三种写法:props值为函数,该函数返回的对象中每一组key-value都会通过props传给Detail组件
	props($route){
		return {
			id: $route.query.id,
			title: $route.query.title
		}
	}
}
9.路由跳转的replace属性
的replace属性
- 作用:控制路由跳转时操作浏览器历史记录的模式
- 浏览器的历史记录有两种写入方式:分别是
push``和replace,push是追加历史记录,replace是替换当前记录,路由跳转时候默认为push - 如何开启
replace模式:<router-link replace ........>News</router-link>
10. 编程式路由导航
作用:不借助实现路由跳转,让路由跳转更灵活
-
this.$router.push({}) -
this.$router.replace({}) -
this.$router.forward({})=>前进 -
this.$router.back()=>后退 -
this.$router.go(n)=>可前进也可后退,n为正数前进n,为负数后退n,为0刷新当前路由
11. 缓存路由组件
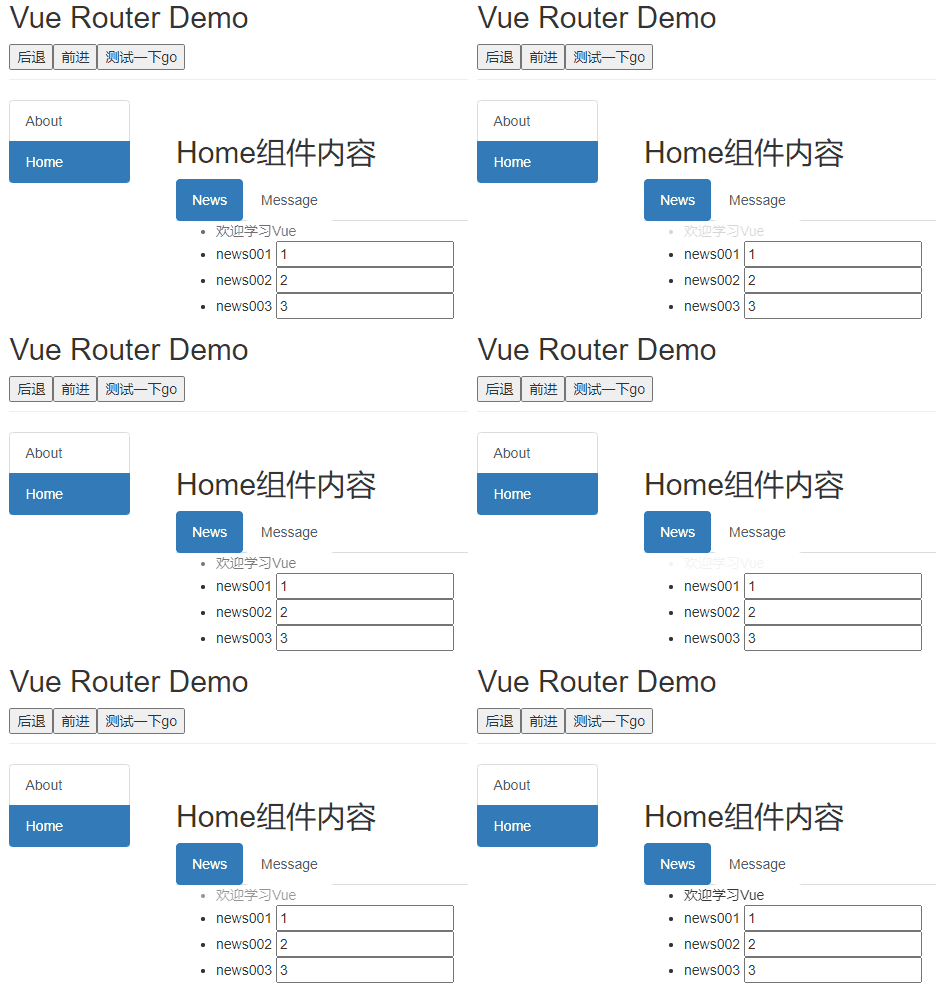
作用:让不展示的路由组件保持挂载,不被销毁
// 缓存一个路由组件
<keep-alive include="News"> // include中写想要缓存的组件名,不写表示全部缓存
    <router-view></router-view>
</keep-alive>

// 缓存多个路由组件
<keep-alive :include="['News','Message']">
    <router-view></router-view>
</keep-alive>
12.两个新的生命周期钩子
-
作用:路由组件所独有的两个钩子,用于捕获路由组件的激活状态
-
具体名字:
-
activeted路由组件被激活时触发。 -
deactiveted路由组件失活时触发。News.vue
<template> <ul> <li :style="{opacity}">欢迎学习vue</li> <li>news001 <input type="text"></li> <li>news002 <input type="text"></li> <li>news003 <input type="text"></li> </ul> </template> <script> export default { name:'News', data(){ return{ opacity:1 } }, activated(){ console.log('News组件被激活了') this.timer = setInterval(() => { this.opacity -= 0.01 if(this.opacity <= 0) this.opacity = 1 },16) }, deactivated(){ console.log('News组件失活了') clearInterval(this.timer) } } </script> -
13. 路由守卫
作用:对路由进行权限控制
分类:全局守卫、独享守卫、组件内守卫
13.全局守卫
meta路由元信息
// 全局前置守卫:初始化时、每次路由切换前执行
router.beforeEach((to,from,next) => {
	console.log('beforeEach',to,from)
	if(to.meta.isAuth){ // 判断当前路由是否需要进行权限控制
		if(localStorage.getItem('school') === 'atguigu'){ // 权限控制的具体规则
			next()	// 放行
		}else{
			alert('暂无权限查看')
		}
	}else{
		next()	// 放行
	}
})

// 全局后置守卫:初始化时、每次路由切换后执行
router.afterEach((to,from) => {
	console.log('afterEach',to,from)
	if(to.meta.title){
		document.title = to.meta.title //修改网页的title
	}else{
		document.title = 'vue_test'
	}
})
13.2 独享守卫
在单个路由的配置项后面添加
beforeEnter(to,from,next){
	console.log('beforeEnter',to,from)
    if(localStorage.getItem('school') === 'atguigu'){
        next()
    }else{
        alert('暂无权限查看')
    }
}
13.3 组件内守卫
//进入守卫:通过路由规则,进入该组件时被调用
beforeRouteEnter (to, from, next) {... next()},

//离开守卫:通过路由规则,离开该组件时被调用
beforeRouteLeave (to, from, next) {... next()},
14. 路由器的两种工作模式
-
对于一个
url来说,什么是hash值?#及其后面的内容就是hash值 -
hash值不会包含在http请求中,即:hash值不会带给服务器 -
hash模式a.地址中永远带着#号,不美观
b.若以后将地址通过第三方手机app分享,若app校验严格,则,地址会被标记为不合法
c.兼容性较好
-
history模式a. 地址干净,美观
b.兼容性和
hash模式相比略差c.应用部署上线时需要后端人员支持,解决刷新页面服务器端404的问题
const router =  new VueRouter({
	mode:'history',
	routes:[...]
})

export default router
十七.Vuex(Vue状态管理模式)
1.介绍
VueX是适用于在Vue项目开发时使用的状态管理工具。试想一下,如果在一个项目开发中频繁的使用组件传参的方式来同步data中的值,一旦项目变得很庞大,管理和维护这些值将是相当棘手的工作。为此,Vue为这些被多个组件频繁使用的值提供了一个统一管理的工具——VueX。在具有VueX的Vue项目中,我们只需要把这些值定义在VueX中,即可在整个Vue项目的组件中使用。
了解更多:https://www.jianshu.com/p/2e5973fe1223
2.安装
npm i vuex -s
3.使用
注:在Vue3中已经自动配置好Vuex,无需手动配置,如果你使用的vue2,那么以下是配置方式:
(1) 在项目的根目录下新增一个store文件夹,在该文件夹内创建index.js
此时你的项目的src文件夹应当是这样的:
│  App.vue
│  main.js
│
├─assets
│      logo.png
│
├─components
│      HelloWorld.vue
│
├─router
│      index.js
│
└─store
       index.js
(2) 初始化store下index.js中的内容
import Vue from 'vue'
import Vuex from 'vuex'

//挂载Vuex
Vue.use(Vuex)

//创建VueX对象
const store = new Vuex.Store({
    state:{
        //存放的键值对就是所要管理的状态
        name:'helloVueX'
    }
})

export default store
(3) 将store挂载到当前项目的Vue实例当中去
打开main.js
import Vue from 'vue'
import App from './App'
import router from './router'
import store from './store'

Vue.config.productionTip = false

/* eslint-disable no-new */
new Vue({
  el: '#app',
  router,
  store,  //store:store 和router一样,将我们创建的Vuex实例挂载到这个vue实例中
  render: h => h(App)
})
(4) 在组件中使用Vuex
例如在App.vue中,我们要将state中定义的name拿来在h1标签中显示
<template>
    <div id='app'>
        name:
        <h1>{{ $store.state.name }}</h1>
    </div>
</template>
或者要在组件方法中使用
...,
methods:{
    add(){
      console.log(this.$store.state.name)
    }
},
...
注意,请不要在此处更改state中的状态的值
4.Vuex和EventBus的区别
vuex 的底层实现原理其实就是 event-bus,那么它和普通的 event-bus 有什么不同呢?我们通过简单的源码一步步实现来搞懂这个问题。
- EventBus
首先一个普通的 event-bus 是这样的:
// main.js
Vue.prototype.$bus = new Vue();

// 组件中
this.$bus.$on('console', (text) => {
    console.log(text);
});

// 组件中
this.$bus.$emit('console', 'hello world');
它是通过 Vue 的$on和$emit api 来传递消息的。
- vuex 的响应式数据
而 vuex 的数据是响应式的,那么我们首先实现这种响应式数据:
class store {
    constructor(options) {
        this.vm = new Vue({
            data: {
                state: options.state
            },
        });
    }
    get state() {
        return this.vm.state;
    }
}
注意,上面的data不是一个函数,因为这里我们只会实例化一次。然后我们通过添加一个 state 的 getter 方法来暴露内部的 event-bus 的 state 属性。
那怎么实现响应式的呢?因为在实例化 vm 的时候,Vue 会自己使用 defineReactive 把 data 变为响应式数据,从而会收集有关它的依赖,然后在自己变动的时候,通知依赖更新。
- 加上 getters
vuex支持加上 getters,怎么加呢?直接初始化一个 getters 属性即可:
class store {
    constructor(options) {
        this.vm = new Vue({
            data: {
                state: options.state
            },
        });
        const getters = options.getter || {};
        this.getters = {};
        Object.keys(getters).forEach((key) => {
            Object.defineProperty(this.getters, key, () => {
                get: () => getters[key](this.state)
            })
        });
    }

    get state() {
        return this.vm.state;
    }
}
原理就是添加一个 getters 属性,然后遍历 getters 并绑定到它的各个属性的 getter 上面去即可。
- 加上 mutations
类似的,我们可以添加一个 mutations 属性来保存 mutations,然后实现一个 commit 方法,在调用 commit 方法的时候去 mutations 里面找,然后调用相应函数即可:
class store {
    constructor(options) {
        this.vm = new Vue({
            data: {
                state: options.state
            },
        });
        const getters = options.getters || {};
        this.getters = {};
        Object.keys(getters).forEach((key) => {
            Object.defineProperty(this.getters, key, () => {
                get: () => getters[key](this.state)
            })
        });
        const mutations = options.mutations || {};
        this.mutations = {};
        Object.keys(getters).forEach((key) => {
            this.mutations[key] = (args) => mutations[key](state, args);
        });
    }
    get state() {
        return this.vm.state;
    }

    commit(name, args) {
        this.mutations[name](args);
    }
}
- 加上 actions
类似的,我们可以添加一个 actions 属性来保存 actions,然后实现一个 dispatch 方法,在调用 dispatch 方法的时候去 actions 里面找,然后调用相应函数即可。不过稍有不同的是,actions 里面的方法和 mutations 里面的方法的第一个参数不同,它要传整个 store 进去,因为不仅要获得 state,还需要在里面调用 commit 方法:
class store {
    constructor(options) {
        this.vm = new Vue({
            data: {
                state: options.state
            },
        });

        const getters = options.getters || {};
        this.getters = {};
        Object.keys(getters).forEach((key) => {
            Object.defineProperty(this.getters, key, () => {
                get: () => getters[key](this.state)
            })
        });

        const mutations = options.mutations || {};
        this.mutations = {};
        Object.keys(mutations).forEach((key) => {
            this.mutations[key] = (args) => mutations[key](state, args);
        });

        const actions = options.actions || {};
        this.actions = {};
        Object.keys(actions).forEach((key) => {
            this.actions[key] = (args) => actions[key](this, args);
        });
    }

    get state() {
        return this.vm.state;
    }

    commit(name, args) {
        this.mutations[name](args);
    }

    dispatch(name, args) {
        this.actions[name](args);
    }
}
综上:可以看到,vuex 和传统的 event-bus 的不同点除了 vuex 实现了更加友好的响应式状态之外,还禁止了 vuex 里面数据的直接修改,大大增强了信任度(有点像promise的status),通过增加 mutations 和 actions 这种“中间层”,它能更好的控制中间的变化,比如实现时间旅行、状态回退和状态保存的功能。在大型应用方面,vuex确实是一个比EventBus更好的解决方案;vuex更加易于调试与管理
另外,需要说明的是,mutation 和 action 的不同点不仅在于 mutation 里面只能写同步代码,action 里面只能写异步代码,还在于 mutation 里面的方法的第一个参数是state(因为只需要修改 state 就可以了),而 action 里面的方法的第一个参数是store(因为还需要调用 commit 方法)
5.VueX中的核心内容
在VueX对象中,其实不止有state,还有用来操作state中数据的方法集,以及当我们需要对state中的数据需要加工的方法集等等成员。
成员列表:
- state 存放状态
- mutations state成员操作
- getters 加工state成员给外界
- actions 异步操作
- modules 模块化状态管理
6.VueX的工作流程
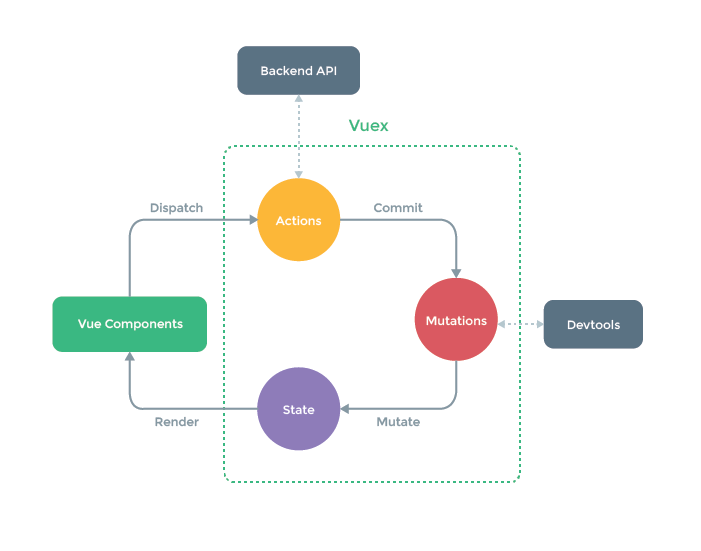
首先,Vue组件如果调用某个VueX的方法过程中需要向后端请求时或者说出现异步操作时,需要dispatch VueX中actions的方法,以保证数据的同步。可以说,action的存在就是为了让mutations中的方法能在异步操作中起作用。
如果没有异步操作,那么我们就可以直接在组件内提交状态中的Mutations中自己编写的方法来达成对state成员的操作。注意,1.3.3节中有提到,不建议在组件中直接对state中的成员进行操作,这是因为直接修改(例如:this.$store.state.name = 'hello')的话不能被VueDevtools所监控到。
最后被修改后的state成员会被渲染到组件的原位置当中去。
7.Mutations
mutations是操作state数据的方法的集合,比如对该数据的修改、增加、删除等等。
7.1 Mutations使用方法
mutations方法都有默认的形参:([state] [,payload])
state是当前VueX对象中的statepayload是该方法在被调用时传递参数使用的
例如,我们编写一个方法,当被执行时,能把下例中的name值修改为"jack",我们只需要这样做
index.js
import Vue from 'vue'
import Vuex from 'vuex'

Vue.use(Vuex)

const store = new Vuex.store({
    state:{
        name:'helloVueX'
    },
    mutations:{
        //es6语法,等同edit:funcion(){...}
        edit(state){
            state.name = 'jack'
        }
    }
})

export default store
而在组件中,我们需要这样去调用这个mutation——例如在App.vue的某个method中:
this.$store.commit('edit')
7.2 Mutation传值
在实际生产过程中,会遇到需要在提交某个mutation时需要携带一些参数给方法使用。
单个值提交时:
this.$store.commit('edit',15)
当需要多参提交时,推荐把他们放在一个对象中来提交:
this.$store.commit('edit',{age:15,sex:'男'})
接收挂载的参数:
edit(state,payload){
    state.name = 'jack'
    console.log(payload) // 15或{age:15,sex:'男'}
}
另一种提交方式
this.$store.commit({
    type:'edit',
    payload:{
        age:15,
        sex:'男'
    }
})
7.3 增删state中的成员
为了配合Vue的响应式数据,我们在Mutations的方法中,应当使用Vue提供的方法来进行操作。如果使用delete或者xx.xx = xx的形式去删或增,则Vue不能对数据进行实时响应。
-
Vue.set 为某个对象设置成员的值,若不存在则新增
例如对state对象中添加一个age成员
-
Vue.delete() 删除成员
将刚刚添加的age成员删除
Vue.delete(state,'age')
8.Getters
功能:可以对state中的成员加工后传递给外界
Getters中的方法有两个默认参数
- state 当前VueX对象中的状态对象
- getters 当前getters对象,用于将getters下的其他getter拿来用
例如
getters:{
    nameInfo(state){
        return "姓名:"+state.name
    },
    fullInfo(state,getters){
        return getters.nameInfo+'年龄:'+state.age
    }
}
组件中调用
this.$store.getters.fullInfo
9.Actions
由于直接在mutation方法中进行异步操作,将会引起数据失效。所以提供了Actions来专门进行异步操作,最终提交mutation方法。
Actions中的方法有两个默认参数
context上下文(相当于箭头函数中的this)对象payload挂载参数
例如,我们在两秒中后执行7.1节中的edit方法
由于setTimeout是异步操作,所以需要使用actions
actions:{
    aEdit(context,payload){
        setTimeout(()=>{
            context.commit('edit',payload)
        },2000)
    }
}
在组件中调用:
this.$store.dispatch('aEdit',{age:15})
改进:
由于是异步操作,所以我们可以为我们的异步操作封装为一个Promise对象
aEdit(context,payload){
    return new Promise((resolve,reject)=>{
        setTimeout(()=>{
            context.commit('edit',payload)
            resolve()
        },2000)
    })
}
10.modules
当项目庞大,状态非常多时,可以采用模块化管理模式。Vuex 允许我们将 store 分割成模块(module)。每个模块拥有自己的 state、mutation、action、getter、甚至是嵌套子模块——从上至下进行同样方式的分割。
modules:{
    a:{
        state:{},
        getters:{},
        ....
    },
    b:{
        state:{},
        getters:{},
        ....
    }
}
组件内调用模块a的状态:
this.$store.state.a
而提交或者dispatch某个方法和以前一样,会自动执行所有模块内的对应type的方法:
this.$store.commit('editKey')
this.$store.dispatch('aEditKey')
10.1 模块的细节
-
模块中
mutations和getters中的方法接受的第一个参数是自身局部模块内部的statemodules:{ a:{ state:{key:5}, mutations:{ editKey(state){ state.key = 9 } }, .... } } -
getters中方法的第三个参数是根节点状态modules:{ a:{ state:{key:5}, getters:{ getKeyCount(state,getter,rootState){ return rootState.key + state.key } }, .... } } -
actions中方法获取局部模块状态是context.state,根节点状态是context.rootStatemodules:{ a:{ state:{key:5}, actions:{ aEidtKey(context){ if(context.state.key === context.rootState.key){ context.commit('editKey') } } }, .... } }
11.vuex的辅助函数
我们在使用vuex中的公共内容时,总要用 $store.state.名字,将内容从vuex中获取到,使用vuex的辅助函数,可以将内容直接获取到想要展示的页面中,减少代码量
vuex的辅助函数一共有四个
-
mapState 获取数据
import { mapState} from 'vuex' 	// 将vuex中的数据获取到页面上
//   mapState 获取到的是vuex中的数据
// mapState和mapGetters都是使用在computed中的
 computed: {
     ...mapState(['tasks'])
 },
在页面中使用时,直接用tasks来获取,
即<li v-for="(item, index) in tasks" :key="item.id"> </li> -
mapGetters vuex中的计算属性
引入import { mapGetters } from "vuex"; computed: { // mapGetters可以将getters中的方法 放入 computed 计算属性中 便于在页面中直接使用getters数据 ...mapGetters(["countWorking"]), },同样也是使用在computed
使用方式
<span>正在进行</span><span class="count">{{ countWorking }}</span> -
mapMutations
-
mapActions
mapMutations 和mapActions都是函数方法 所以都是放在methods中的 ,这里就把他们放在一起使用
import { mapState, mapMutations } from 'vuex'
methods:{
        ...mapMutations(['delTask', 'closeExit']),
        // 删除任务的逻辑
        // del(i) {
        //     this.$store.commit('delTask', i)
        // },
        }
        // blur(i) {
        //     // console.log(1);
        //     this.$store.commit('closeExit', i)
        // }
    },
使用方式
<button @click="delTask(index)">-</button>
12. 规范目录结构
如果把整个store都放在index.js中是不合理的,所以需要拆分。比较合适的目录格式如下:
store:.
│  actions.js
│  getters.js
│  index.js
│  mutations.js
│  mutations_type.js   ##该项为存放mutaions方法常量的文件,按需要可加入
│
└─modules
        Astore.js
对应的内容存放在对应的文件中,和以前一样,在index.js中存放并导出store。state中的数据尽量放在index.js中。而modules中的Astore局部模块状态如果多的话也可以进行细分。
十八. Vue项目打包
首先,要配置 vue.config.js 文件,在打包的时候做一些配置,最新版本的vue cli项目会自动创建vue.config.js文件,低版本的vue cli 创建的项目没有vue.config.js,新建一个vue.config.js 文件
下面是配置信息:
const { defineConfig } = require('@vue/cli-service')
module.exports = defineConfig({
  transpileDependencies: true,

  /* 代码保存时进行eslint检测 */
  lintOnSave: false,
   /* 部署生产环境和开发环境下的URL:可对当前环境进行区分,baseUrl 从 Vue CLI 3.3 起已弃用,要使用publicPath */
  publicPath: './',

   /* 输出文件目录:在npm run build时,生成文件的目录名称 */
  outputDir: "dist",

    /* 放置生成的静态资源 (js、css、img、fonts) 的 (相对于 outputDir 的) 目录 */
  assetsDir: "assets",

  /* 是否在构建生产包时生成 sourceMap 文件,false将提高构建速度 */
  productionSourceMap: false,

  /* 默认情况下,生成的静态资源在它们的文件名中包含了 hash 以便更好的控制缓存,你可以通过将这个选项设为 false 来关闭文件名哈希。(false的时候就是让原来的文件名不改变) */
  filenameHashing: false,

})
