一. 场景简介
仿12306项目中,在高并发抢票时,可以利用验证码功能,削弱瞬时的请求高峰。但如果仅仅用后端验证码,又会导致瞬时对验证码验证接口产生巨大请求,因此可以再加一层前端验证码,双重验证码机制。同时也能防止机器人刷票现象
二. 通过kaptcha实现后端验证码功能
1. 引入依赖
<!-- 图形验证码 升级到JDK17后,排除掉javax.servlet-api包 -->
            <dependency>
                <groupId>com.github.penggle</groupId>
                <artifactId>kaptcha</artifactId>
                <version>2.3.2</version>
                <exclusions>
                    <exclusion>
                        <groupId>javax.servlet</groupId>
                        <artifactId>javax.servlet-api</artifactId>
                    </exclusion>
                </exclusions>
            </dependency>
2. 增加配置类
KaptchaConfig.java:
@Configuration
public class KaptchaConfig {
    @Bean
    public DefaultKaptcha getDefaultKaptcha() {
        DefaultKaptcha defaultKaptcha = new DefaultKaptcha();
        Properties properties = new Properties();
        properties.setProperty("kaptcha.border", "no");
//        properties.setProperty("kaptcha.border.color", "105,179,90");
        properties.setProperty("kaptcha.textproducer.font.color", "blue");
        properties.setProperty("kaptcha.image.width", "90");
        properties.setProperty("kaptcha.image.height", "28");
        properties.setProperty("kaptcha.textproducer.font.size", "20");
        properties.setProperty("kaptcha.session.key", "code");
        properties.setProperty("kaptcha.textproducer.char.length", "4");
        properties.setProperty("kaptcha.textproducer.font.names", "Arial");
        properties.setProperty("kaptcha.noise.color", "255,96,0");
        properties.setProperty("kaptcha.noise.impl", "com.google.code.kaptcha.impl.NoNoise");
//        properties.setProperty("kaptcha.obscurificator.impl", "com.google.code.kaptcha.impl.WaterRipple");
        properties.setProperty("kaptcha.obscurificator.impl", KaptchaWaterRipple.class.getName());
        properties.setProperty("kaptcha.background.impl", KaptchaNoBackhround.class.getName());
        Config config = new Config(properties);
        defaultKaptcha.setConfig(config);
        return defaultKaptcha;
    }

    @Bean
    public DefaultKaptcha getWebKaptcha() {
        DefaultKaptcha defaultKaptcha = new DefaultKaptcha();
        Properties properties = new Properties();
        properties.setProperty("kaptcha.border", "no");
//        properties.setProperty("kaptcha.border.color", "105,179,90");
        properties.setProperty("kaptcha.textproducer.font.color", "blue");
        properties.setProperty("kaptcha.image.width", "90");
        properties.setProperty("kaptcha.image.height", "45");
        properties.setProperty("kaptcha.textproducer.font.size", "30");
        properties.setProperty("kaptcha.session.key", "code");
        properties.setProperty("kaptcha.textproducer.char.length", "4");
        properties.setProperty("kaptcha.textproducer.font.names", "Arial");
        properties.setProperty("kaptcha.noise.impl", "com.google.code.kaptcha.impl.NoNoise");
        properties.setProperty("kaptcha.obscurificator.impl", KaptchaWaterRipple.class.getName());
        Config config = new Config(properties);
        defaultKaptcha.setConfig(config);
        return defaultKaptcha;
    }
}
KaptchaNoBackhround.java:
public class KaptchaNoBackhround extends Configurable implements BackgroundProducer {

    public KaptchaNoBackhround(){
    }
    @Override
    public BufferedImage addBackground(BufferedImage baseImage) {
        int width = baseImage.getWidth();
        int height = baseImage.getHeight();
        BufferedImage imageWithBackground = new BufferedImage(width, height, 1);
        Graphics2D graph = (Graphics2D)imageWithBackground.getGraphics();
        graph.fill(new Rectangle2D.Double(0.0D, 0.0D, (double)width, (double)height));
        graph.drawImage(baseImage, 0, 0, null);
        return imageWithBackground;
    }
}
KaptchaWaterRipple.java:
public class KaptchaWaterRipple extends Configurable implements GimpyEngine {
	public KaptchaWaterRipple(){}

	@Override
	public BufferedImage getDistortedImage(BufferedImage baseImage) {
		NoiseProducer noiseProducer = this.getConfig().getNoiseImpl();
		BufferedImage distortedImage = new BufferedImage(baseImage.getWidth(), baseImage.getHeight(), 2);
		Graphics2D graph = (Graphics2D)distortedImage.getGraphics();
		Random rand = new Random();
		RippleFilter rippleFilter = new RippleFilter();
		rippleFilter.setXAmplitude(7.6F);
		rippleFilter.setYAmplitude(rand.nextFloat() + 1.0F);
		rippleFilter.setEdgeAction(1);
		BufferedImage effectImage = rippleFilter.filter(baseImage, (BufferedImage)null);
		graph.drawImage(effectImage, 0, 0, (Color)null, (ImageObserver)null);
		graph.dispose();
		noiseProducer.makeNoise(distortedImage, 0.1F, 0.1F, 0.25F, 0.25F);
		noiseProducer.makeNoise(distortedImage, 0.1F, 0.25F, 0.5F, 0.9F);
		return distortedImage;
	}
}
3. 增加后端接口类
KaptchaController.java:
@RestController
@RequestMapping("/kaptcha")
public class KaptchaController {

    @Qualifier("getDefaultKaptcha")
    @Autowired
    DefaultKaptcha defaultKaptcha;

    @Resource
    public StringRedisTemplate stringRedisTemplate;

    @GetMapping("/image-code/{imageCodeToken}")
    public void imageCode(@PathVariable(value = "imageCodeToken") String imageCodeToken, HttpServletResponse httpServletResponse) throws Exception{
        ByteArrayOutputStream jpegOutputStream = new ByteArrayOutputStream();
        try {
            // 生成验证码字符串
            String createText = defaultKaptcha.createText();

            // 将生成的验证码放入redis缓存中,后续验证的时候用到
            stringRedisTemplate.opsForValue().set(imageCodeToken, createText, 300, TimeUnit.SECONDS);

            // 使用验证码字符串生成验证码图片
            BufferedImage challenge = defaultKaptcha.createImage(createText);
            ImageIO.write(challenge, "jpg", jpegOutputStream);
        } catch (IllegalArgumentException e) {
            httpServletResponse.sendError(HttpServletResponse.SC_NOT_FOUND);
            return;
        }

        // 定义response输出类型为image/jpeg类型,使用response输出流输出图片的byte数组
        byte[] captchaChallengeAsJpeg = jpegOutputStream.toByteArray();
        httpServletResponse.setHeader("Cache-Control", "no-store");
        httpServletResponse.setHeader("Pragma", "no-cache");
        httpServletResponse.setDateHeader("Expires", 0);
        httpServletResponse.setContentType("image/jpeg");
        ServletOutputStream responseOutputStream = httpServletResponse.getOutputStream();
        responseOutputStream.write(captchaChallengeAsJpeg);
        responseOutputStream.flush();
        responseOutputStream.close();
    }
}
这样就完成了后端验证码验证功能,接下来只需要前端传入生成的用户token即可,用来对应验证码和所属者。
三. 纯前端验证码
如果仅设计后端验证码,那可能会瞬时大量请求对验证码验证接口产生巨大压力,因此可以再多一层纯前端验证码。将纯前端验证码座位第一层验证码,将后端验证码作为第二层验证码
代码示例
第一层验证码:
 /* ------------------- 第一层验证码 --------------------- */
    const firstImageCodeSourceA = ref();
    const firstImageCodeSourceB = ref();
    const firstImageCodeTarget = ref();
    const firstImageCodeModalVisible = ref();

    /**
     * 加载第一层验证码
     */
    const loadFirstImageCode = () => {
      // 获取1~10的数:Math.floor(Math.random()*10 + 1)
      firstImageCodeSourceA.value = Math.floor(Math.random()*10 + 1) + 10;
      firstImageCodeSourceB.value = Math.floor(Math.random()*10 + 1) + 20;
    };

    /**
     * 显示第一层验证码弹出框
     */
    const showFirstImageCodeModal = () => {
      loadFirstImageCode();
      firstImageCodeModalVisible.value = true;
    };

    /**
     * 校验第一层验证码
     */
    const validFirstImageCode = () => {
      if (parseInt(firstImageCodeTarget.value) === parseInt(firstImageCodeSourceA.value + firstImageCodeSourceB.value)) {
        // 第一层验证通过
        firstImageCodeModalVisible.value = false;
        showImageCodeModal();
      } else {
        notification.error({description: '验证码错误'});
      }
    };
第二层验证码:
    /* ------------------- 第二层验证码 --------------------- */
    const imageCodeModalVisible = ref();
    const imageCodeToken = ref();
    const imageCodeSrc = ref();
    const imageCode = ref();
    /**
     * 加载图形验证码
     */
    const loadImageCode = () => {
      imageCodeToken.value = Tool.uuid(8);
      imageCodeSrc.value = process.env.VUE_APP_SERVER + '/business/kaptcha/image-code/' + imageCodeToken.value;
    };

    const showImageCodeModal = () => {
      loadImageCode();
      imageCodeModalVisible.value = true;
    };
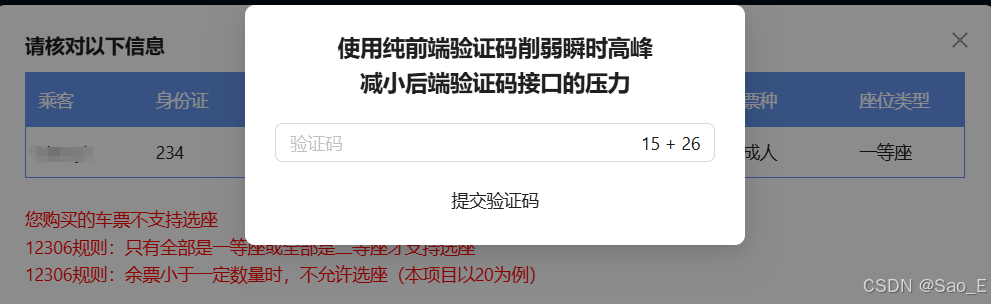
四. 效果演示
点击确认订单,先跳出第一层验证码:
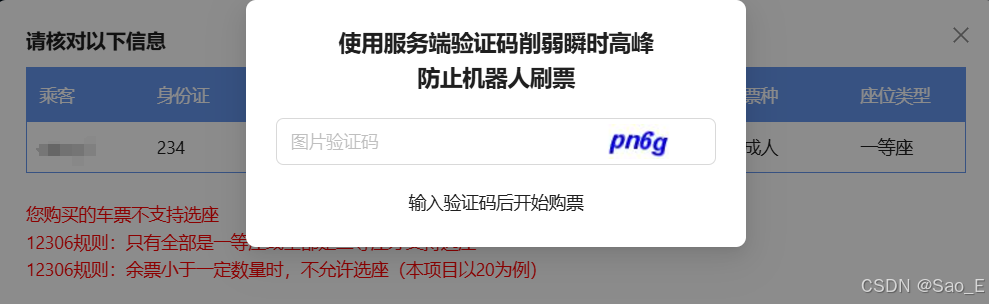
回答正确后跳出第二层图形验证码:
最后都正确了才会进入购票业务处理。