前言
Author Yoko
这篇是一份完整的学习笔记,主要是对Youtube上的一套AEM的纯英文教程的练习梳理和爬坑,原教程视频你需要科学上网观看(你可以点击每章的标题跳转原视频地址),视频教程是印度人制作的,因此口音听起来十分奇怪,在学习过程中你可以结合我的笔记进行实战操作和演练。
这篇笔记适合小白入门,主要让你知道AEM的简单操作和使用,至于一些深入的概念和功能是什么,怎么用之类的,都需要看个人能力去研究,或参考我后续的文章(当然不会面面俱到)。如果你对AEM有比较深刻的认识和理解,建议直接跳过吧。
笔记较长,建议定位目录参考,如果你发现有问题,欢迎批评。
源码:Git仓库
工具和文档:pa空格n.ba空格idu.c空格om/s/1ZF_OUdw7y0OAVziJWbEFxg 提取码:yoko
文章目录
基础(1-6)
1.安装AEM
-
文件重命名 可修改启动环境和端口
- aem-author-4502
- aem-publish-4503
-
命令行启动
java -Xmx1024m -jar aem-author-4502.jar -gui
2.创建简单的页面
3.开发者工具
-
WebConsole
- /system/console
-
CRXDE Lite
- /crx/de
-
Packages
-
Package Manger /crx/packmgr
-
Package Share
Https://www.adobeaemcloud.com/content/packageshare.html -
以上链接都可以在Lite界面中的最上方左上角打开
-
4.包操作
/crx/packmgr
5.Brackets文本编辑器
用来配合AEM开发,用于编辑页面,和IDEA类似
官网: http://brackets.io/
介绍: http://www.voidcn.com/article/p-qwozband-ho.html
-
安装完成后 file->extension manager 搜索AEM安装插件
-
将已打包出来的package项目解压,导入jcr_root到Brackets
-
选择AEM 设置好服务器地址
- 注意勾选自动同步选项
-
支持修改文件并导出到AEM Service
- 右侧小圆圈有状态提示
-
支持从AEM Service中将修改的文件导入
- 需要选择文件右键手动导入
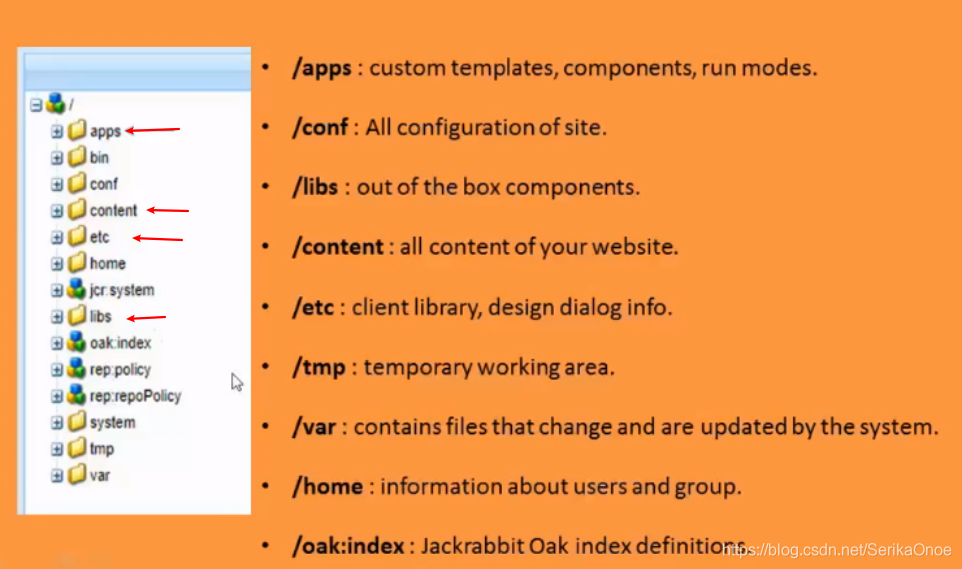
6.Repository的目录结构
开始创建Project Structure(7-15)
7.在Lite中创建ProjectStructure
创建的目录结构
- mytraining 这个可自定义
- components
- content
- structure
- templates
- components
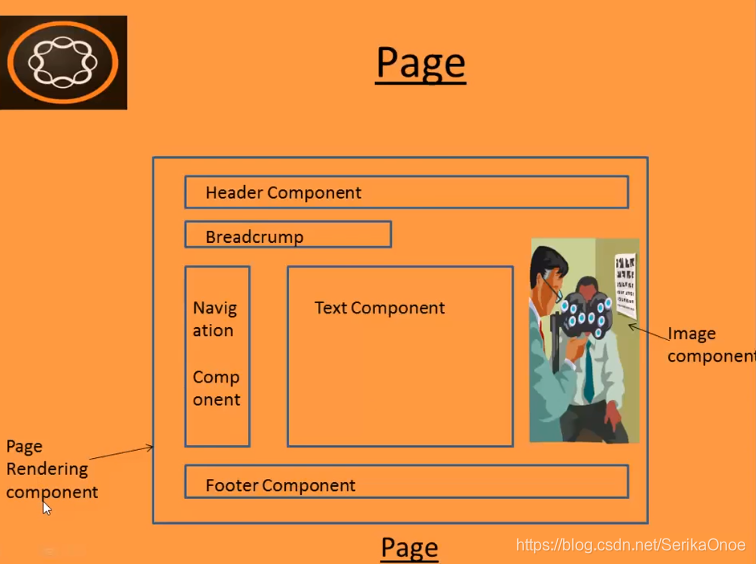
8.页面渲染组件
定义
- 一系列的scripts
- modular reusable unit 可重用的组件
创建
-
在structure中创建
- 右键create component
- 填写项如下
Label: 随便写contentpage
Title: 随便写We.Train contentpage component
Description: 随便写This is my page redering component
Super Type: 父类组件可自己找core/wcm/components/page/v2/page
-
在Component可创建html
<!doctype html>
<html>
	<head>
    </head>
    <body>
    	<h1>Hello World!!</h1>
    </body>
</html>
9.创建模板Template
定义
- Blueprint/layout.It has the same hierarchy as page but with no content.
- Used to create a page.
- Associated with a page rendering component.
Lite中创建
- template中创建 从上到下按顺序如下:
contentpage
We.Train Content page
This is contentpage template for this training
mytraining/components/structure/contentpage
1 - Resource Type: 使用前面创建的pageComponent
- Ranking: 1
- Allowed Path:
/content(/.*)?
Sites中使用template创建page
- Name和Title随便写
- we-train
- WeTrain
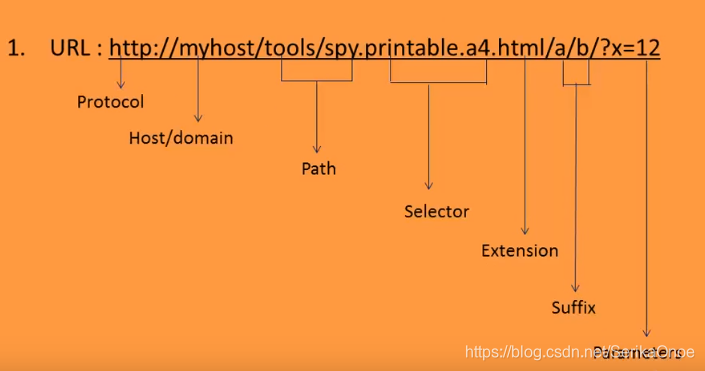
10.分解URL
在Lite中
- apps
- content
两个目录是关键
URL分解说明
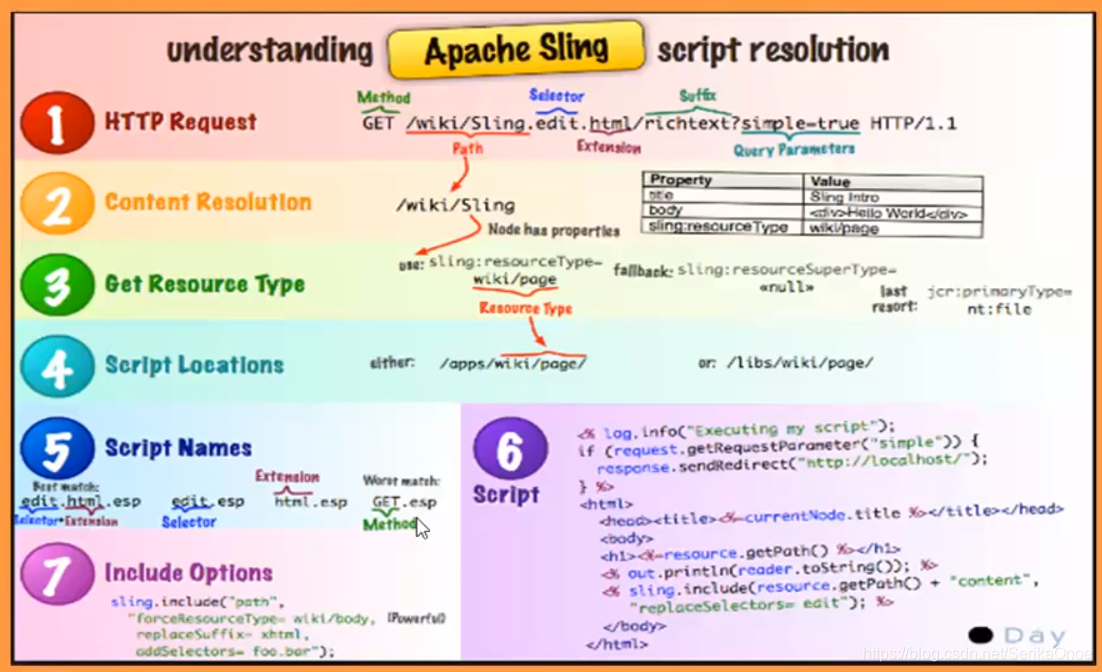
11.ApacheSling资源解析示例
- 主要讲了从page->URL 到 Lite->content & apps/项目名/components&template 等目录中的资源解析对应关系
-
- selector + extension
-
- selector
-
- extension
-
- default script
-
- method
12.ApacheSling的选择器操作
-
自己新建一个page
http://localhost:4502/editor.html/content/demo02.html
-
在这个page的原型组件里添加一个blue.html
/apps/training/components/structure/mypage添加blue.html
<h1>This is a blue page</h1> -
通过选择器访问新建的blue.html , 使用
.bluehttp://localhost:4502/editor.html/content/demo02.blue.html
13.使用allowedPaths和allowedTemplates限制AEM中的模板使用
-
allowedPaths
- 在xxx/templates中设置, 使用正则限制路径, 为template设置路径限制
allowedPaths /content(/.*)? -
cq:allowedTemplates
- 在content/你的page/jcr:content设置, 设置page的模板路径限制
- 添加行时注意点击
Multi按钮
cq:allowedTemplates /templates目录 如:/apps/training/templates/.*
14.为页面添加缩略图
- 在site中选择properties , 然后上传图片
15.创建网站结构
在site中依次创建如下的网页结构
- We.Train
- English
- About Us
- Communities
- Experiences
- Products
- Samsung
- Iphone
- Blackberry
- Nokia
- French
- English
HTL(16-21)
16.可视化/HTL语言
以前称为 Sightly
- 模板语言/类似JSP
- HTL is HTML5
- Alternate of JSP
Why?
- simplied development
- security
- separation of concern 分离关注点
17.HTL语法示例
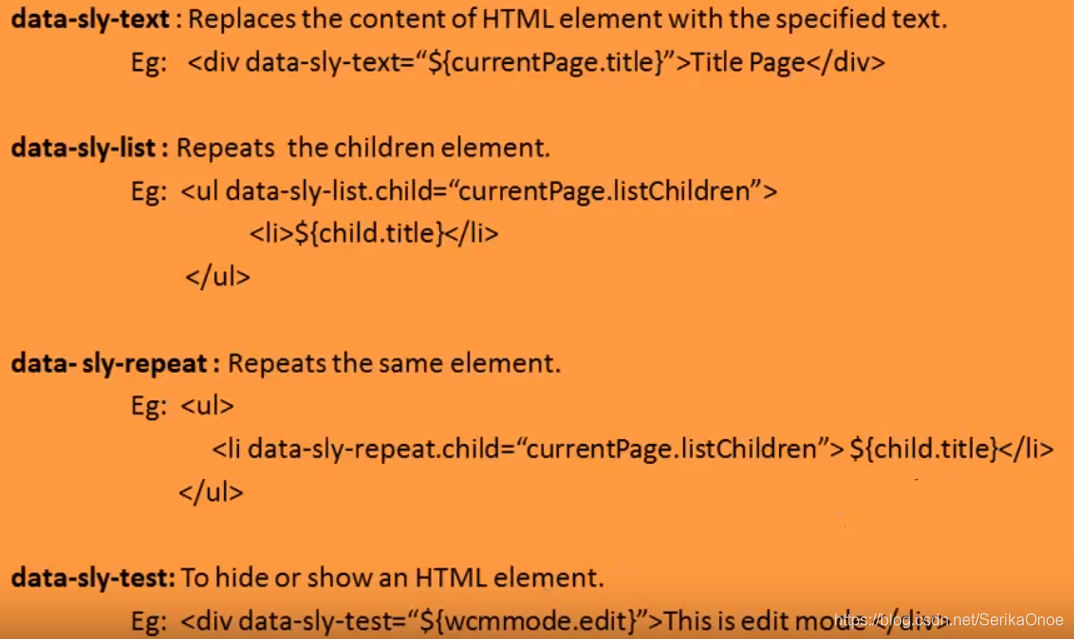
HTL
- Expression
- Sly element
- Atrributes
- Comments
注释
<!--/* sightly comment */-->
表达式
${}
Example: ${properties.jcr:title}
		 ${!currentPage.hasChild}
		 ${varOne || varTwo}
		 ${varOne == varTwo}
Sly元素
- 使用sly标签渲染时会将自身标签元素移除
Example:
=> <div data-sly-include="header.html"></div>
Output:<div>header.html</div>

=> <sly data-sly-include="header.html"></sly>
Output:header.html
Sightly Atrributes
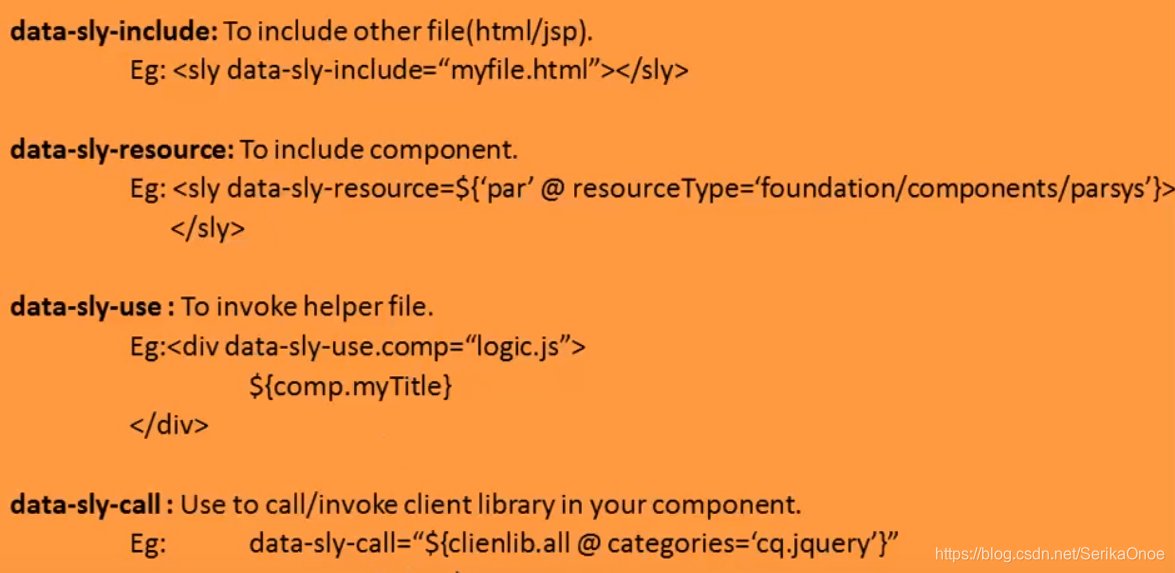
Question: data-sly-use 和 data-sly-call 的区别?
-
call直接调用js里的方法 -
use先将js对象赋到某个自指定变量 -
data-sly-use 加载模板
-
data-sly-call 调用模板
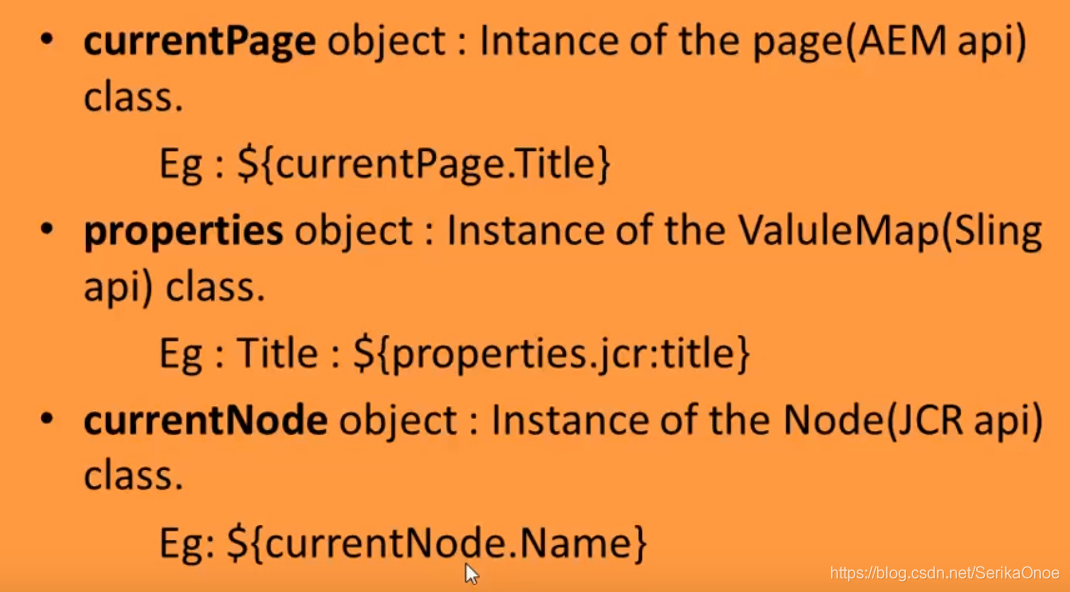
18.三个内置对象介绍:currentPage,properties,currentNode
-
currentNode : It is an instance of the page(AEM api) class, which provides some methods to access content.
-
properties: It is an instance of the ValueMap(Sling api) class an contains all properties of the current resource.
-
currentNode : It is an instance of the Node(JCR api) class.
其实可以和JSP的9个内置对象相对照
19.渲染基本的页面内容
代码见Chapter 7 Introduction to Sightly\Task - Render Basic Page Content
contentpage.html 不太长我直接粘过来了
<!doctype html>
<html>
<head>
    <meta charset="utf-8"/>
    </head>
    <body>
    <h1>Hello World!!</h1>
        <h3>Sling PropertiesObject</h3>
<p>Page Title : ${properties.jcr:title}</p>

<h3>Page Details</h3>
<p>currentPage Title: ${currentPage.Title}</p>
<p>currentPage Name: ${currentPage.Name}</p>
<p>currentPage Path: ${currentPage.Path}</p>
<p>currentPage Depth: ${currentPage.Depth}</p>

        <h3> Node Details </h3>
<p>currentNode Name: ${currentNode.Name}</p>
<p>currentNode Path: ${currentNode.Path}</p>
<p>currentNode Depth: ${currentNode.Depth}</p>
    </body>
</html>
- 在site中查看页面, 对照一下显示的内容和代码
- 注意Page Details中的深度和Node Details中的深度
20.模块化页面渲染组件(Structure目录下的)
代码见Chapter 7 Introduction to Sightly\Task - Modularize Contentpage Component
-
创建header.html
<div class="navbar navbar-inverse navbar-fixed-top hidden-xs"> <div class="container-fluid"> <nav style="color: white;" >Language Navigation</nav> <ul class="nav navbar-nav navbar-right" style="color: white;" > <sly>Toolbar</sly> </ul> </div> </div> <div >Site Navigation</div> -
创建footer.html
<footer class="we-Footer width-full"> <div class="container"> <div class="row"> <div class="row we-Footer-section we-Footer-section--sub"> <div class="we-Footer-section-item"> <div class="we-Logo we-Logo--big"> we.<strong>train</strong> </div> <div class="we-Footer-nav"> <h2>Footer Toolbar</h2> </div> </div> </div> <div class="row we-Footer-section we-Footer-section--sub"> i18n Coded Content </div> <div class="row"> <div class="col-md-12"> <div class="text-center"> <a href="#top" class="btn btn-primary">Back to the top</a> </div> </div> </div> </div> </div> </footer> -
创建body.html
<div class="container we-Container--main"> <div class="root responsivegrid"> <div class="aem-Grid aem-Grid--12 aem-Grid--default--12 "> <div class="header aem-GridColumn aem-GridColumn--default--12" data-sly-include="header.html"></div> <div class="hero-image image parbase aem-GridColumn aem-GridColumn--default--12" style="padding-top: 150px;"> <div>Hero Component</div> <div class="responsivegrid aem-GridColumn aem-GridColumn--default--12"> <div class="aem-GridColumn aem-GridColumn--default--12"> <div class="row"> <div class="aem-breadcrumb">Breadcrumb</div> <div class="we-Header">Title Component</div> <div>Responsive Content Area</div> </div> </div> <form class="page__print"> <input value="Print Friendly" type="submit" /> </form> <div class="footer aem-GridColumn aem-GridColumn--default--12" data-sly-include="footer.html"></div> </div> </div> </div> </div> </div> -
修改contentpage.html
<!DOCTYPE html!> <!--/* A simple sightly script */--> <html> <head> <title>${properties.jcr:title}</title> </head> <body> <div data-sly-include="body.html"></div> </body> </html> -
打开页面查看效果
21.AEM中的继承关系
说明
AEM中的强大功能之一是从现有组件继承。 例如,AEM附带有一个Page组件,我们可以将该页面组件中已经预先构建的所有功能继承到我们自己的页面呈现组件中。
定义属性sling:resourceSuperType可以从超类型继承。
AEM在/ libs / wcm / foundation / components中提供了基础组件,在/ libs / foundation / components中提供了jsp组件。
如果在组件中没有找到脚本,则通过sling查找: sling:resourceSuperType属性,并在父类组件中找到默认脚本。
在Component中设置以下属性
sling:resourceSuperType String core/wcm/components/page/v2/page
- 会继承Dialog
- 会继承入口html(和component名称相同的html, 若不存在则继承)
Client Library(22-26)
22.介绍ClientLibrary
- What?=>To manage client side resources(js, css, images etc).
- Why?=>To keep all the client side resources organized in project folders in the CRX repository.
如何调用ClientLibrary?
<sly data-sly-use.clientLib="/libs/granite/sightly/templates/clientlib.html" data-sly-call="${clientLib.js @ categories='we.train.all'}"/>

Css:<sly data-sly-use.clientLib="/libs/granite/sightly/templates/clientlib.html" data-sly-call="${ clientLib.css @ categories='we.train.all'}" />

ALL:<sly data-sly-use.clientLib="/libs/granite/sightly/templates/clientlib.html" data-sly-call="${ clientLib.all @ categories='perficient.yoko.gcuform'}" />
有用的设置项
- Categories:To identify the respective client library.
- Dependency:This is a list of other client library categories on which this library folder depends.
Ex:script depends on jquery - Embed:Used to embed code from other libraries.
Ex:CL1 embeds CL2=CL1+CL2
23.Design目录-clientLib-Part-1
ClientLib一共分为4块讲解, 这是第一块
- Define a design.
- Create client library.
- Calling client library.
- Assign a design to website.
如何进入
如何进入WCM系统?
- sites->tools->Operations->点击Configuration
- 或者直接访问 http://localhost:4502/miscadmin
视频里的AEM版本较低, 在AEM6.5中WCM系统中已没有Design目录, 在Lite系统中/etc下也没有Design目录了
新的目录在 /apps/settings/wcm/designs
网上一些人的建议
- For 6.4, just create the folder design and then create a node -training with cq:page as primary type.
我的操作步骤
- 在lite系统定位到目录
/apps/settings/wcm/designs - 新建node, 类型是
cq:page,名称我写training - 在
training中新建node, 类型是nt:unstructured, 名称是jcr:content
24.创建-clientLib-Part-2
代码见 Chapter 9 Design and Styles\Task - Define Design
-
导入代码中的package
-
将 clientlib (在
/apps/training/temp) 移动到/apps/settings/wcm/designs -
使用
embed属性来嵌入其他的clientlib可参考
clientlib-all和clientlib-site的属性 -
也可以自己创建clientlib目录, 类型是
cq:ClientLibraryFolder, 注意属性categories必须Example:
clientlib-my- js 普通folder
- script.js
- js 普通folder
25.调用ClientLib-Part-3
代码见 Chapter 9 Design and Styles\Task - Modify contentpage component to call the design
- 创建2个html, 在自己的pageComponent中
- 可以删除自己page组件的入口页面 ep:
mypage.html - 拷贝示例代码
- customfooterlibs.html 引入到自己的foot.html中
- customheaderlibs.html 改页面将被父组件中的
/apps/core/wcm/components/page/v2/page/head.html引用
26.为网站分配设计-Part-4
- Sites中点击自己的website->properties
- 点击 Advanced
- 选择Design -> 选择自己前面创建的目录
在AEM6.5版本中, 不做上面这个Design 分配过程, 自定义的ClientLib也能被自动加载中
导航栏组件(27-30)
27.创建简单的导航组件
代码见Chapter 10 Authoring Structure Components\Lab Activity - I\Task 1 - Create a simple navigation component
-
Your App/components/content 目录下创建component, ep:
site-topnav
Top Navigation -
拷贝代码 site-topnav.html
<!-- /* Basic mock up code */ --> <nav class="navbar navbar-inverse navbar-absolute-top"> <ul class="nav navbar-nav navbar-center"> <li class="nav navbar-nav navbar-left" data-sly-repeat="${currentPage.listChildren}"> <a href="${item.path}.html">${item.title}</a> </li> </ul> </nav> -
修改 header.html , 导入navigation, 添加以下代码
<div class="navbar navbar-inverse navbar-fixed-top hidden-xs"> <div class="container-fluid"> <nav style="color: white;" >Language Navigation</nav> <ul class="nav navbar-nav navbar-right" style="color: white;" > <sly>Toolbar</sly> </ul> </div> </div> <!--/*导入导航栏*/--> <div data-sly-resource="${'site-topnav' @ resourceType='training/components/content/site-topnav'}"></div> -
在preview模式下点击查看效果
28.响应式导航组件
代码见 Chapter 10 Authoring Structure Components\Lab Activity - I\Task 2
-
拷贝代码 site-topnav.html
<!-- /* Add the full responsive design */ --> <div class="container we-Container--top-navbar"> <nav class="navbar navbar-inverse navbar-absolute-top"> <div class="navbar-header"> <button type="button" class="navbar-toggle collapsed" data-toggle="collapse" data-target="#we-example-navbar-collapse-inverse" aria-expanded="false"> <span class="sr-only">Toggle navigation</span> <span class="icon-bar"></span> <span class="icon-bar"></span> </button> <button type="button" class="navbar-toggle navbar-toggle-close collapsed" data-toggle="collapse" data-target="#we-example-navbar-collapse-inverse" aria-expanded="false"> <span class="sr-only">Toggle navigation</span> </button> <a class="navbar-brand" href="#">we.<strong>train</strong></a> <div class="pull-right visible-xs"></div> </div> <!-- /.navbar-header --> <div class="collapse navbar-collapse width" id="we-example-navbar-collapse-inverse"> <ul class="nav navbar-nav navbar-center"> <li class="visible-xs"><a href="#">we.<strong class="text-primary">train</strong></a></li> <!-- /* Basic mock up code */ --> <li class="nav navbar-nav navbar-left" data-sly-repeat="${currentPage.listChildren}"> <a href="${item.path}.html">${item.title}</a> </li> <li class="visible-xs divider" role="separator"></li> </ul> </div> <span style="height: 0px;" class="navbar-shutter"></span> </nav> <!-- /.navbar --> </div> -
测试
29.使用Java创建复杂的导航组件
官网API文档
- https://docs.adobe.com/content/help/en/experience-manager-learn/foundation/development/understand-java-api-best-practices.html
- 6.5 API文档
- 6.3 API文档
Steps
-
在
/apps/training/components/content/site-topnav中创建TopNav.java, 复制代码, 路径如下Chapter 10 Authoring Structure Components\Lab Activity - I\Task 3
package apps.training.components.content.site_topnav; import java.util.*; import java.util.Iterator; import com.day.cq.wcm.api.Page; import com.day.cq.wcm.api.PageFilter; import com.adobe.cq.sightly.WCMUsePojo; public class TopNav extends WCMUsePojo{ private List<Page> items = new ArrayList<Page>(); private Page rootPage; // Initializes the navigation @Override public void activate() throws Exception { rootPage = getCurrentPage().getAbsoluteParent(2); if (rootPage == null) { rootPage = getCurrentPage(); } Iterator<Page> childPages = rootPage.listChildren(new PageFilter(getRequest())); while (childPages.hasNext()) { items.add(childPages.next()); } } // Returns the navigation items public List<Page> getItems() { return items; } // Returns the navigation root public Page getRoot() { return rootPage; } } -
拷贝
site-topnav.html<!-- /* Add the business logic*/ --> <div data-sly-use.topnav="TopNav" class="container we-Container--top-navbar"> <nav class="navbar navbar-inverse navbar-absolute-top"> <div class="navbar-header"> <button type="button" class="navbar-toggle collapsed" data-toggle="collapse" data-target="#we-example-navbar-collapse-inverse" aria-expanded="false"> <span class="sr-only">Toggle navigation</span> <span class="icon-bar"></span> <span class="icon-bar"></span> </button> <button type="button" class="navbar-toggle navbar-toggle-close collapsed" data-toggle="collapse" data-target="#we-example-navbar-collapse-inverse" aria-expanded="false"> <span class="sr-only">Toggle navigation</span> </button> <a class="navbar-brand" href="${topnav.root.path}.html">we.<strong>train</strong></a> <div class="pull-right visible-xs"></div> </div> <!-- /.navbar-header --> <div class="collapse navbar-collapse width" id="we-example-navbar-collapse-inverse"> <ul class="nav navbar-nav navbar-center"> <li class="visible-xs"><a href="${topnav.root.path}.html">we.<strong class="text-primary">train</strong></a></li> <!-- /* Nav with business logic */ --> <li class="nav navbar-nav navbar-left" data-sly-repeat="${topnav.items}"> <a href="${item.path}.html">${item.title}</a> </li> <li class="visible-xs divider" role="separator"></li> </ul> </div> <span style="height: 0px;" class="navbar-shutter"></span> </nav> <!-- /.navbar --> </div> -
注意API getAbsoluteParent(int level)
这里level定义了几就只能访问几级的子页面, 可以自行调试测试
/content/表示0级
30.使用JS创建复杂的导航组件
JavaScript Use-API
- 官方文档
- 其他blog
- https://varunaem.blogspot.com/2019/06/javascript-use-api.html
一些可用公共变量
In addition to this, the Use-API has some common variables available right off the bat.
· currentNode
· currentPage
· resource
· log
· sling
· pageProperties
· properties
· pageManager
· component
· designer
· currentDesign
· currentStyle
Steps
-
在
/apps/training/components/content/site-topnav中创建topnav.js, 复制代码, 路径如下Chapter 10 Authoring Structure Components\Lab Activity - I\Task 4
// Server-side JavaScript for the topnav logic use(function () { var items = []; var root = currentPage.getAbsoluteParent(2); //make sure that we always have a valid set of returned items //if navigation root is null, use the currentPage as the the navigation root if(root == null){ root = currentPage; } var it = root.listChildren(new Packages.com.day.cq.wcm.api.PageFilter()); while (it.hasNext()) { var page = it.next(); items.push(page); } return { items: items, root: root }; }); -
修改
site-topnav.html<!-- /* Add the business logic*/ --> <div data-sly-use.topnav="topnav.js" class="container we-Container--top-navbar">
Logs (31-33)
31.日志介绍
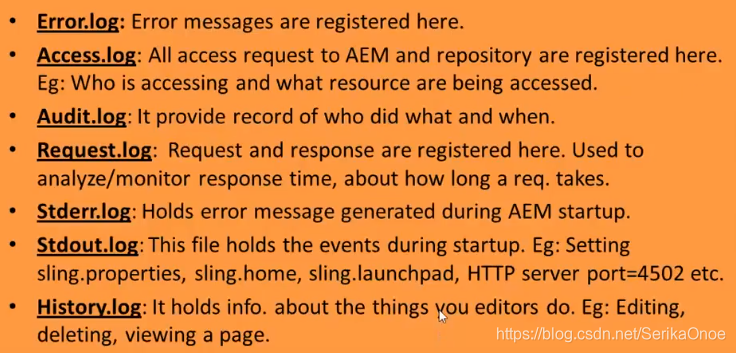
AEM Project Log路径
相对路径\crx-quickstart\logs
该路径下的log介绍
日志级别
- trace
- debug
- info
- warn
- error
使用Message记录日志信息:
Message is provided as parameter to the method call.
代码示例Eg: log.debug(“This is the log message”).
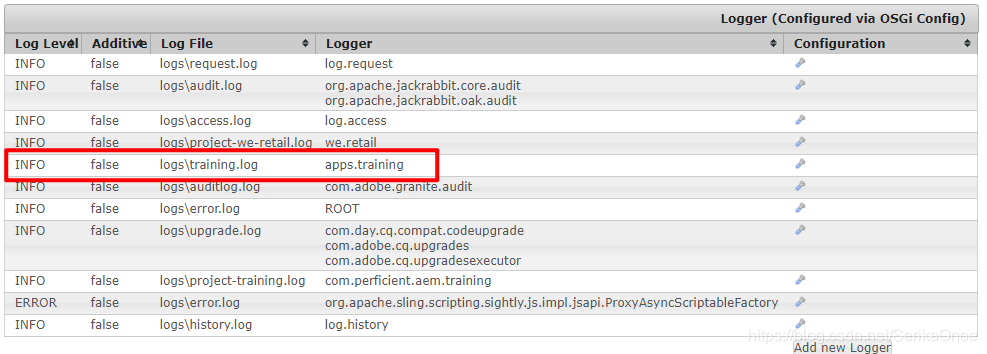
32.新建自己的日志文件
log设置控制台, 可以在控制台里自己添加log
- http://localhost:4502/system/console/slinglog
Steps
-
修改
topnav.js, 添加如下代码//logging message log.info("### Root page is : " + root.getTitle()); -
查看日志输出
33.使用Java记录日志
Steps
-
修改TopNav.java
import org.slf4j.Logger;
import org.slf4j.LoggerFactory;

Logger logger = LoggerFactory.getLogger(TopNav.class);

logger.info("Called in TopNav Java Helper, 成功使用java到处日志");
full code
package apps.training.components.content.site_topnav; import java.util.*; import java.util.Iterator; import com.day.cq.wcm.api.Page; import com.day.cq.wcm.api.PageFilter; import org.slf4j.Logger; import org.slf4j.LoggerFactory; import com.adobe.cq.sightly.WCMUsePojo; public class TopNav extends WCMUsePojo{ private List<Page> items = new ArrayList<Page>(); private Page rootPage; Logger logger = LoggerFactory.getLogger(TopNav.class); // Initializes the navigation @Override public void activate() throws Exception { rootPage = getCurrentPage().getAbsoluteParent(2); if (rootPage == null) { rootPage = getCurrentPage(); } logger.info("Called in TopNav Java Helper, 成功使用java到处日志"); Iterator<Page> childPages = rootPage.listChildren(new PageFilter(getRequest())); while (childPages.hasNext()) { items.add(childPages.next()); } } // Returns the navigation items public List<Page> getItems() { return items; } // Returns the navigation root public Page getRoot() { return rootPage; } } -
修改site-topnav.html, 修改use的内容
<!-- /* Add the business logic*/ --> <div data-sly-use.topnav="TopNav" class="container we-Container--top-navbar"> -
测试
Dialog Box(对话框34-37)
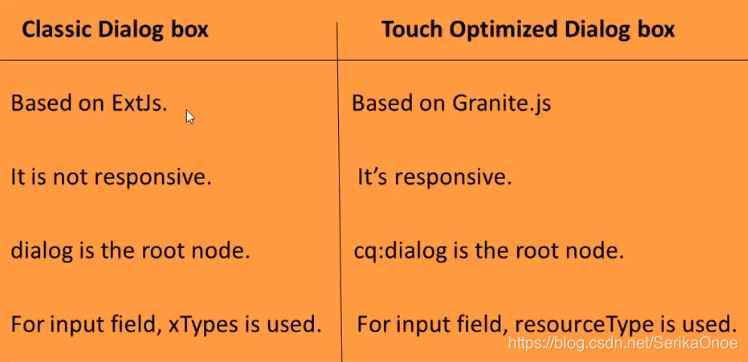
34.介绍TouchDialog和ClassicDialog
Different
可以根据 /libs/foundation/components/carousel 自己对比查看两个Dialog
查看更多信息 可搜索 aem widget api
- https://helpx.adobe.com/experience-manager/6-3/sites/developing/using/reference-materials/widgets-api/index.html
35.创建标题组件
代码见 Chapter 10 Authoring Structure Components\Lab Activity - III\Task 1 - Create Title Component
Steps
- 创建content component
title - 拷贝代码
- 修改body.html, 引入title组件
36.为标题组件创建Dialog
在 /apps/training/components/content/title 下
-
复制
cq:dialog-/apps/core/wcm/components/title/v1/title/cq:dialog- 注意v1版本, v2版本无法显示
- 注意items下title节点的name属性值
./jcr:title
-
创建
cq:editConfig- NodeType是cq:EditConfig -
打开页面测试
-
在content目录下找到保存的内容
路径参考, 根据实际变动的页面
/content/wetrain/en/aboutus/jcr:content/title
37.EditConfig
作用
- In-place editing.
- Drap and drop.
- Refresh a page after an author action.
Steps
- 创建inplaceEditing
- 在
cq:editConfig下创建cq:inplaceEditingNodeType是cq:InplaceEditingConfig - 为
cq:inplaceEditing添加两个属性- active boolean true
- editorType String title
- 再在
cq:inplaceEditing下创建configNodeType默认 - 测试
AEM Tutorial English
- 在
富文本编辑器(38-40)
https://helpx.adobe.com/experience-manager/using/touchUI_RTE_configure.html
38.在Dialog中使用富文本
Steps
-
找到
/libs/foundation/components/text/cq:dialog/content/items/text/items/column/items/text -
拷贝
sling:resourceType(如下)到/apps/training/components/content/title/cq:dialog/content/items/column/items/titlecq/gui/components/authoring/dialog/richtext -
为title 节点添加属性(视频内容没有的)
useFixedInlineToolbar Boolean true -
拷贝两个子Node
-
测试
PS
视频中用的sling:resourceType是
granite/ui/components/foundation/form/textfield
经试验无法使用
39.添加富文本的查找替换角标功能
Steps
-
修改content/title组件的
title.html, 显示富文本<h1 data-sly-use.title="title.js">${title.text @context='html'}</h1> -
在
cq:dialog/content/items/column/items/title/rtePlugins下添加Nodefindreplace类型默认添加属性
features String * -
继续添加Node
subsuperscript添加属性
features String * -
在
uiSettings/cui/inline中为toolbar添加value- findreplace#find
- findreplace#replace
- subsuperscript#subscript
- subsuperscript#superscript
-
测试
40.添加富文本的拼写检查功能
Steps
-
在
cq:dialog/content/items/column/items/title/rtePlugins下添加Nodespellcheck类型默认添加属性
features String * -
在
uiSettings/cui/inline中为toolbar添加value- spellcheck#checktext
-
测试
Design Dialog(41-45)
41.DesignDialog和Dialog
What is design dialog?
- Dialog to store content/configuration that can be accessed across pages.
- Changes will get reflected across all pages created using the same template.
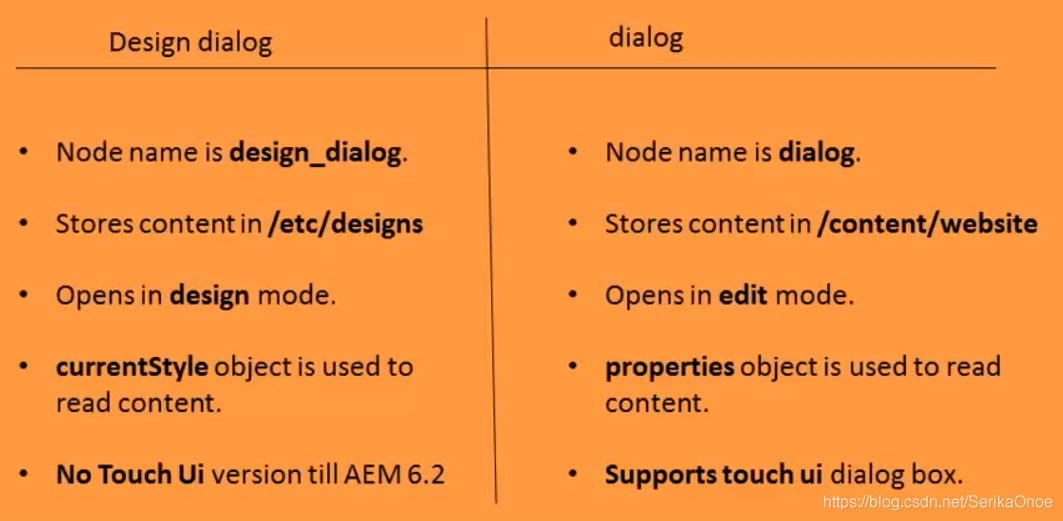
两者不同之处
补充
- 可以从参考
/libs/foundation/components/title下的dialog - 图片是6.3版本的, 6.5新的Design目录在
/apps/settings/wcm/designs
42.创建DesignDialog
Steps
-
为
components/content/title右键创建dialogdesign_dialog
Design dialog -
在
design_dialog/items/items/tab1下创建items类型cq:WidgetCollection -
在下一级里面继续创建node
type类型cq:Widget添加以下属性fieldLabel String Type
name String ./type
type String select
xtype String selection
defaultValue String h1 -
在node
type下继续创建options类型cq:WidgetCollection -
在
options里面添加四个选项node- h1 类型默认 添加属性
text String H1
value String h1 - h2 ~ h3同上
- h1 类型默认 添加属性
-
打开页面在Design模式下测试
43.从D.D.读取数据
Steps
-
数据保存在
/apps/settings/wcm/designs/training/jcr:content/mypage/title -
修改
title.js, 添加代码title.type = currentStyle.get(CONST.PROP_TAG_TYPE) || "h1"; -
修改
title.html<h1 data-sly-use.title="title.js" data-sly-element="${title.type}">${title.text @context='html'}</h1>
44.创建带文件表单的超级组件
Steps
-
创建component -
herotitle -Hero Image修改后缀, 拷贝代码
<div class="we-HeroImage width-full ratio-16by9" style="background-image:url(${properties.fileReference @context='styleString'})"> <div class="container cq-dd-image"> <div class="we-HeroImage-wrapper"> <strong class="we-HeroImage-title">${properties.jcr:title}</strong> </div> </div> </div> -
引入到pageComponent的body.html
<div data-sly-resource="${'hero' @ resourceType='training/components/content/hero'}"></div> -
拷贝image组件的cqdialog 路径
/libs/foundation/components/image/cq:dialog删除无用的内容 留
file和title -
为
hero组件创建cq:editConfig -
打开页面测试 在
edit模式下设置图片, 并查看图片路径
45.EditConfig实现拖拽
通过创建EditConfig使得该组件可直接进行拖拽操作
Steps
-
为
hero组件创建cq:editConfig -
在
cq:editConfig下继续创建nodecq:dropTargets无类型 -
继续创建子node
image类型cq:DropTargetConfig添加属性accept String image/*
groups String media
propertyName String ./fileReference -
继续创建子node
parameters无类型 -
为
hero组件添加以下属性sling:resourceType String training/components/content/hero
-
打开页面测试拖拽图片
国际化(46-48)
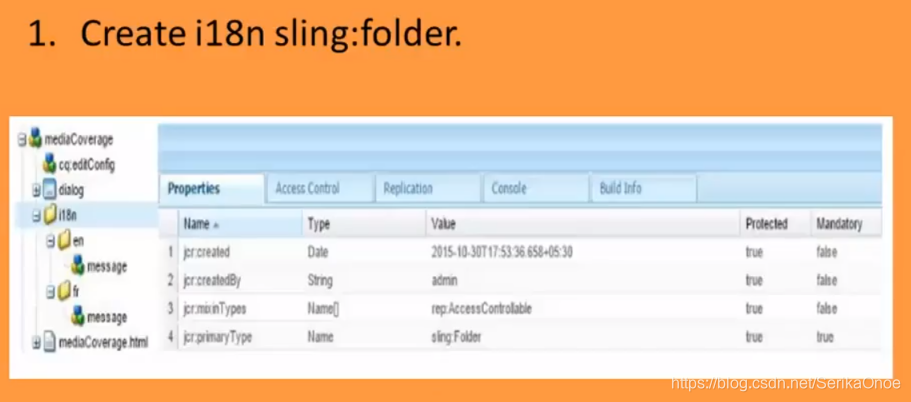
46.国际化i18n-1
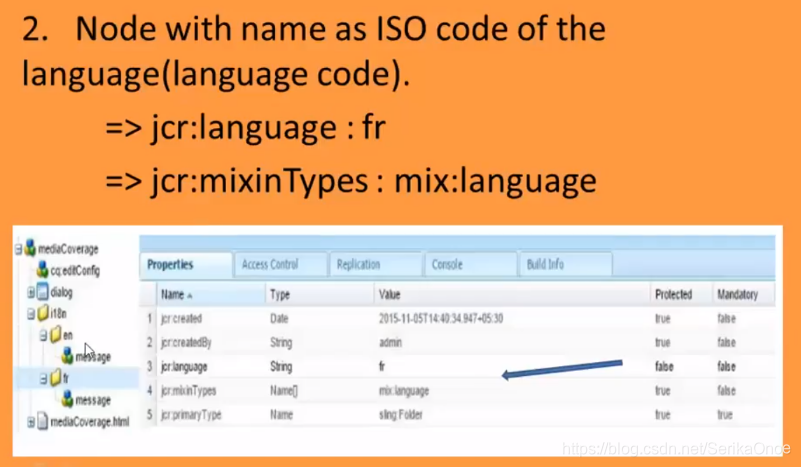
Steps(粗略版)
1.创建目录
2.创建区域语言的目录并设置属性 jcr:language
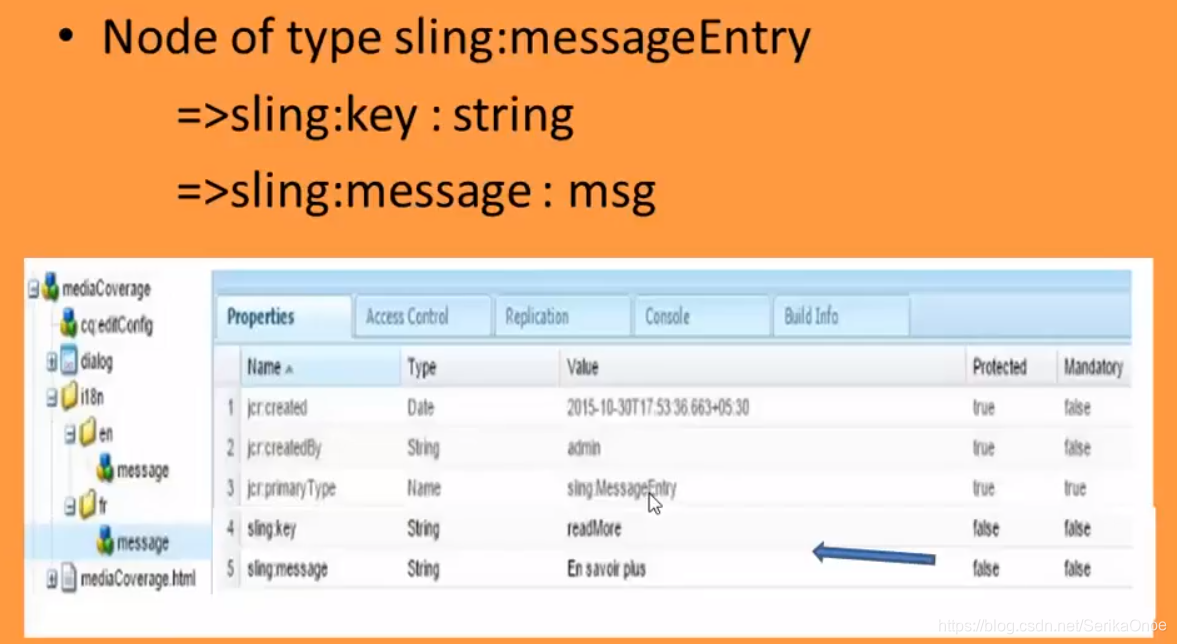
3.继续创建Node 类型 sling:MessageEntity
47.国际化i18n-2
在Sites中(详细版)
-
创建German page
-
在structure目录/自己的页面组件下创建
i18n目录 -
创建子文件夹
- en 点击页面上方bar的Mixins按钮 添加
mix:language
继续添加属性
jcr:language String en - fr …
- de …
- en 点击页面上方bar的Mixins按钮 添加
-
在en目录下继续创建子node
message类型sling:MessageEntrysling:key String copy
sling:message String This is copyright statement -
照上两步设置 fr & de , 注意在
sling:message设置不同的语言德语 Dies ist eine Urheberrechtserklärung 法语 Ceci est une déclaration de copyright -
修改
footer.html
代码见Chapter 12 Internationalization\Task 2 - Create content to be localized<footer class="we-Footer width-full"> <div class="container"> <div class="row"> <div class="row we-Footer-section we-Footer-section--sub"> <div class="we-Footer-section-item"> <div class="we-Logo we-Logo--big"> we.<strong>train</strong> </div> <div class="we-Footer-nav"> <h2 data-sly-resource="${'toolbar' @ resourceType='foundation/components/toolbar'}"></h2> </div> </div> </div> <div class="row we-Footer-section we-Footer-section--sub"> <div class="we-Footer-section-item"> <span class="text-uppercase text-muted">${"copy" @ i18n, context='html'}</span> </div> <div class="we-Footer-section-item"> <a href="#" class="text-uppercase text-muted">Terms of use & privacy policy</a> </div> </div> <div class="row"> <div class="col-md-12"> <div class="text-center"> <a href="#top" class="btn btn-primary">Back to the top</a> </div> </div> </div> </div> <sly data-sly-include="customfooterlibs.html" /> </div> </footer> -
代码关键是这句
<span class="text-uppercase text-muted">${"copy" @ i18n, context='html'}</span> -
打开不同的语言的page测试
48.在TouchDialog中使用国际化
以 hero 组件为例
-
创建
i18n目录 -
创建子文件夹
- en 点击页面上方bar的Mixins按钮 添加
mix:language
继续添加属性
jcr:language String en - de …
- en 点击页面上方bar的Mixins按钮 添加
-
在en目录下继续创建
- 子node
hero.image类型sling:MessageEntry
sling:message String Image Asset - 子node
hero.title类型sling:MessageEntry
sling:message String Title
- 子node
-
设置 fr 和 de
# de Bild-Asset Titel # fr 就不设置了 -
在hero的ca:dialog中修改节点title&file的属性
fieldLabel
- 修改
cq:dialog/content/items/column/items/file的fieldLabel属性 为hero.image - 修改
cq:dialog/content/items/column/items/title的fieldLabel属性为hero.title
-
打开en页面测试
-
设置Permission
- 打开 http://localhost:4502/useradmin 搜索admin修改语言
-
重新打开页面的dialog查看是否是德语
-
记得将语言设置回去
布局(49-54)
49.响应式网格
介绍
- 是一种 layout container (布局容器)
- 在AEM6.5
/libs/wcm/foundation/components/responsivegrid目录下 - 动态的响应式布局
- 与
parsys相似, 并且能够放置组件
Steps
-
到structure/自己的pageComponent目录
-
修改body.html
<div data-sly-resource="${'responsivegrid' @ resourceType='wcm/foundation/components/responsivegrid'}"></div> -
测试
50.开启响应式模拟器 - Problem - Solved
就是开启不同设备的模拟环境
Steps - 失败了
-
在
apps/自己的project下创建文件夹config -
打开 http://localhost:4502/system/console/configMgr , 搜索
mobileemul复制
com.day.cq.wcm.mobile.core.impl.MobileEmulatorProvider -
在 config 下创建node 类型
sling:OsgiConfig名称: 类全限定~项目名
com.day.cq.wcm.mobile.core.impl.MobileEmulatorProvider~training添加属性
mobile.resourceTypes String training/components/structure/mypage -
为pageComponent (我这里是
mypage) 添加属性
mobile.resourceTypes String training/components/structure/mypage -
找到
/content/wetrain/jcr:content添加属性
cq:deviceGroups String /etc/mobile/groups/responsive
Problem - Solved
前面过程在AEM6.5中失败了, 解决步骤:
-
在
apps/自己的project下创建文件夹config -
打开 http://localhost:4502/system/console/configMgr , 搜索
mobileemul找到
com.day.cq.wcm.mobile.core.impl.MobileEmulatorProvider~项目名 -
在里面添加组件路径
training/components/structure/mypage点击save -
PS: 这一步貌似不需要—为pageComponent (我这里是
mypage) 添加属性
mobile.resourceTypes String training/components/structure/mypage -
为需要的页面加入Emulator
找到
/content/wetrain/jcr:content添加属性
cq:deviceGroups String /etc/mobile/groups/responsive -
测试
51.激活layout模式 - to research
在此模式下, 可以动态的修改组件的大小
可参考初始项目
Steps - fail
- 视频中目录不存在, 因此找到本地已存在的目录复制一份
/content/we-retail/us/en/jcr:content/root/responsivegrid/teaser_305030210/cq:responsive - 拷贝到
/content/training/jcr:content - 测试无效 需要查阅文档
52.面包屑组件
Steps
-
修改
structure/mypage/body.html<div class="aem-breadcrumb" data-sly-resource="${'breadcrump' @ resourceType='foundation/components/breadcrumb'}">Breadcrumb</div> -
测试
53.修改Sites导航栏选项名称&Overlay和Sling
在Sites中的Navigation Bar中的按钮是可以通过Lite里设置改变的
现在我们修改以下 sites 按钮
Steps
-
定位到
/libs/cq/core/content/nav找到sites -
右键 overlay node 路径填
/apps/勾选match node type -
刷新 定位到
/apps/cq/core/content/nav/sites添加属性jcr:title String WebSite
-
就会覆盖title的值
Overlay vs Sling Resource Meger
54.创建自定义错误处理
代码见 Chapter 13 Advanced Sling Functionality\Lab - Custom Error Handlers\Task 1 - Create a custom 404 error handler
自定义错误页面
- 定位目录
/libs/sling/servlet/errorhandler - 同样的, 我们使用 overlay node 放到
apps/下 - 然后自定义页面, 拷贝代码
- 测试
AEM项目(55-59)
55.使用MavenArchetype创建AEM项目
AEM6.4创建命令
mvn org.apache.maven.plugins:maven-archetype-plugin:2.4:generate -DarchetypeGroupId=com.adobe.granite.archetypes -DarchetypeArtifactId=aem-project-archetype -DarchetypeVersion=13 -DarchetypeCatalog=https://repo.adobe.com/nexus/content/groups/public/
AEM6.5创建命令
mvn archetype:generate -DarchetypeGroupId=com.adobe.granite.archetypes -DarchetypeArtifactId=aem-project-archetype -DarchetypeVersion=18
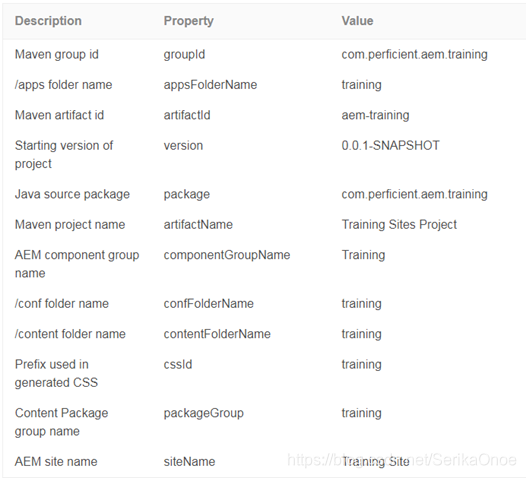
创建时的几个填写项说明
比较关键的
-
Archetype: Templating toolkit
Maven: Build tool
GroupId: Unique identifier
ArtifactId: Project name
setting.xml 设置以下adobe的配置, 防止下包失败
<profile>
  <id>adobe-public</id>
  <activation>
    <activeByDefault>true</activeByDefault>
  </activation>
  <repositories>
    <repository>
      <id>adobe</id>
      <name>Nexus Proxy Repository</name>
      <url>https://repo.adobe.com/nexus/content/groups/public/</url>
      <layout>default</layout>
    </repository>
  </repositories>
  <pluginRepositories>
    <pluginRepository>
      <id>adobe</id>
      <name>Nexus Proxy Repository</name>
      <url>https://repo.adobe.com/nexus/content/groups/public/</url>
      <layout>default</layout>
    </pluginRepository>
  </pluginRepositories>
</profile>
56.编译和部署&Developer模式演示
使用maven命令编译部署
- 在创建好的目录下打开命令行工具
- 键入以下命令
mvn clean install -PautoInstallPackage
Developer模式
- 可以在右侧的Components列表项中点击进入相关的lite目录
57.项目结构&导入项目到Eclipse
项目结构
- core 都是java代码
- …
可以通过分析每个子模块中的 pom.xml 文件来分析每个结构对应的lite中的目录
以下视频作者原文
AEM project structure and importing project in Eclipse IDE:
parent pom: It deploys maven modules and manages dependency versions.
core : It includes java code and deploy to the AEM as osgi bundle.
ui.apps: It contains the /apps part of the project.
ui.content: It contains the /content and /conf part of the project.
ui.test: IT contains Junit tests that are executed server side.
ui.launcher: It contains code that deploys the ui.test bundle to the servers and triggers the remote Junit execution.
导入Eclipse
视频作者原文
Download the eclipse IDE from the link https://www.eclipse.org/downloads/pac… Once you download it, download the AEM developers tool from the link https://eclipse.adobe.com/aem/dev-tools/ Open the Eclipse and go to help - Install new software - add. Now give it title AEM developer too and put the above link and next. Select the modules and click and next and restart the Eclipse. Import the project. go to file - import - maven - existing project and click ok.
58.在Eclipse中同步代码
在Services窗口配置AEM服务器地址和端口, 选择好项目发布, 详细配置看视频
Eclipse支持的功能
- 创建CQ节点
- 同步到AEM Server
- 从AEM Server同步属性
- …
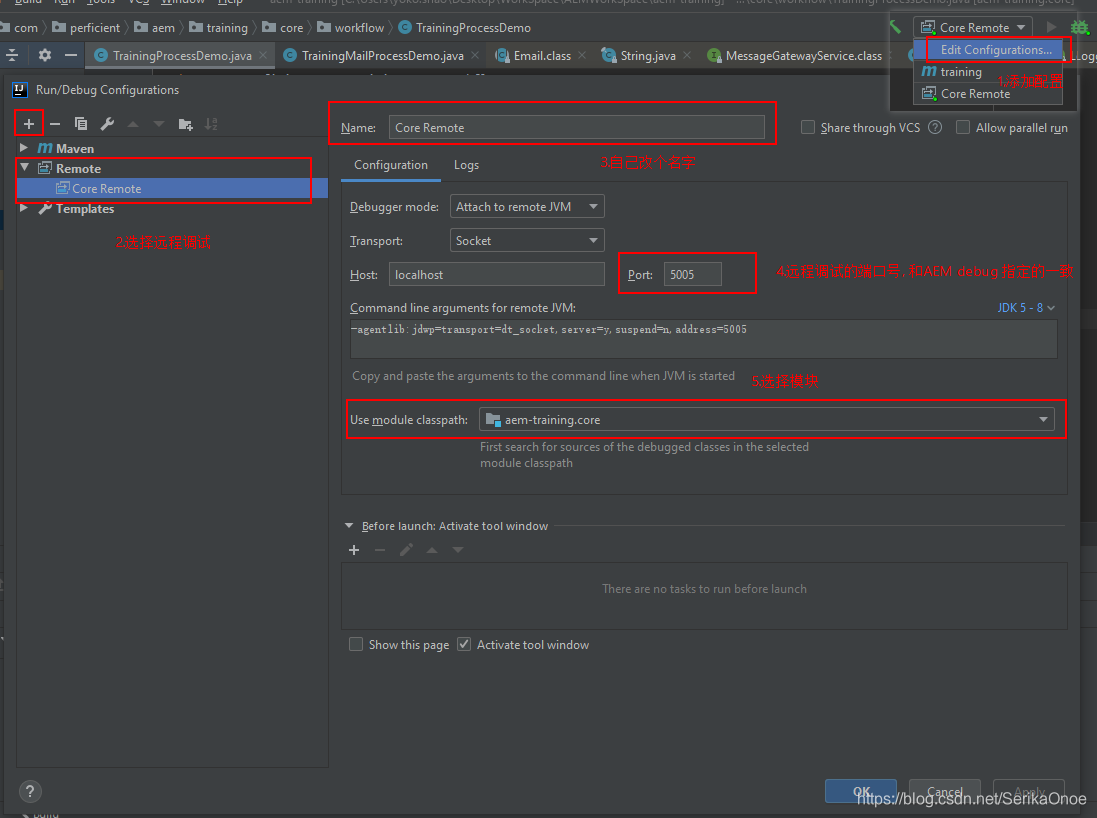
59.在Eclipse中Debug
使用了远程调试的功能
-
设置AEM启动监听Debug端口
-
方式一
找到AEMService目录
crx-quickstart\bin\start.bat找到如下行添加JVM选项::* default JVM options dt_socket,server=y,suspond=n,address=自定义端口号 -
方式二
用以下命令启动AEM
java -jar aem-author-4502.jar -gui -debug 5005 #这里端口和idea保持一致
-
-
在IDE中使用远程调试, 注意端口号需要一致
- 以IDEA为例子, Eclipse请参考视频
Content Fragment(60-64)
60.介绍CF
什么是Content Fragment(后面简称CF) ?
- Stored as Asset. 作为asset内容存储
- Content asset which contains text elements and might include other references to other assests. 包含了文本元素以及可能对其它插入项的引用
- Used in page editors by using Content Fragment component. 在editor模式下使用
- Can have variations. 多变的
Use Case
- To design content variation for specific channels. Ex:Article. 文章
- To allow content authors to create a content before it is being authored in a page.
组成
- Fragment element.
- Variations.
- Fragment paragraph.
- Fragment metadata.
- Associated content.
- Fragment Template.
- Content Fragment component.
61.创建&使用CF
使用模板创建CF
- Navigation -> Assets -> Files 选择对应项目, 选择Create
- 选择对应的CF模板
使用CF
- Navigation -> Tools -> General -> Templates 进入Editable Template
- 在Editable Template页面中, 选择Container的Policy
- 先引入
Content Fragment作为自定义CF的容器 - 再在上一步的CF容器中引入前面的CF, 然后保存, 再在页面中使用
62.为CF添加图片
在CF编辑页面中 Navigation -> Assets -> Files -> 打开自己的CF
- 可以为富文本添加图片
- 支持对图片的各种操作
图片显示不出来的问题, 参考 官方文档
63.创建CF_Model
What is CF Model ?
- Newly introduced in AEM 6.4.
- Content Fragment Models define the structure of content for your content fragments. 是创建CF的模板
- You can create your content fragment using content fragment models.
- Content Fragment models work as templates for Structured content Fragments.
Steps
- Enable content fragment model from Configuration Manager.
- 进入Navigation -> Tools -> General -> Configuration Browser
- Create 输入title, 勾选
Content Fragment Models创建
- Apply Configuartions to your Assets folder.
- 进入Navigation -> Assets -> Files
- 选择自己的
Folder-> Properties -> Cloud Configuration - 选择刚才创建的文件夹 ok
- Create Content Fragment Model.
- 进入Navigation -> Tools -> Assets -> Content Fragment Models
- 选择自己的Folder, 然后创建
- 最后在Editable Template中引用
64.使用DataSource做动态下拉菜单 - todo
创建一个Selector, 数据源动态读取
Dynamic dropdown with DataSource: In technical terms, data source is a factory to provide a collection of resource. Most of the times we use it to provide dynamic items to a container component.
Datasource within dialogs are used in place of the items node structure to represent the items of a container component.
You can mange the data source in a dialog and that’s using an acs commons list(generic list).
DOwnload the acs commons package from the link
https://adobe-consulting-services.github.io/acs-aem-commons/
After download, install the package and open the helloworld component in the demo training. Open the dialog box and create a node of dropdown (select) field. Follow the video for the rest of steps.
They are defined by a fragment template.
Editable Template(ET65-69)
65.理解EditableTemplate
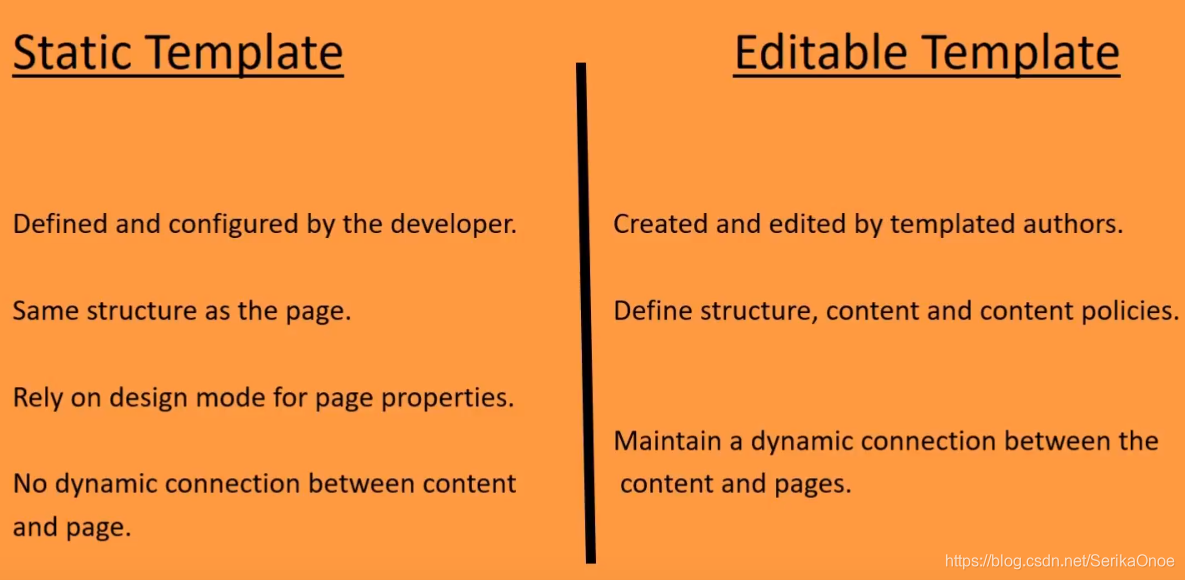
比较 Static Template 和 Editable Tenplate
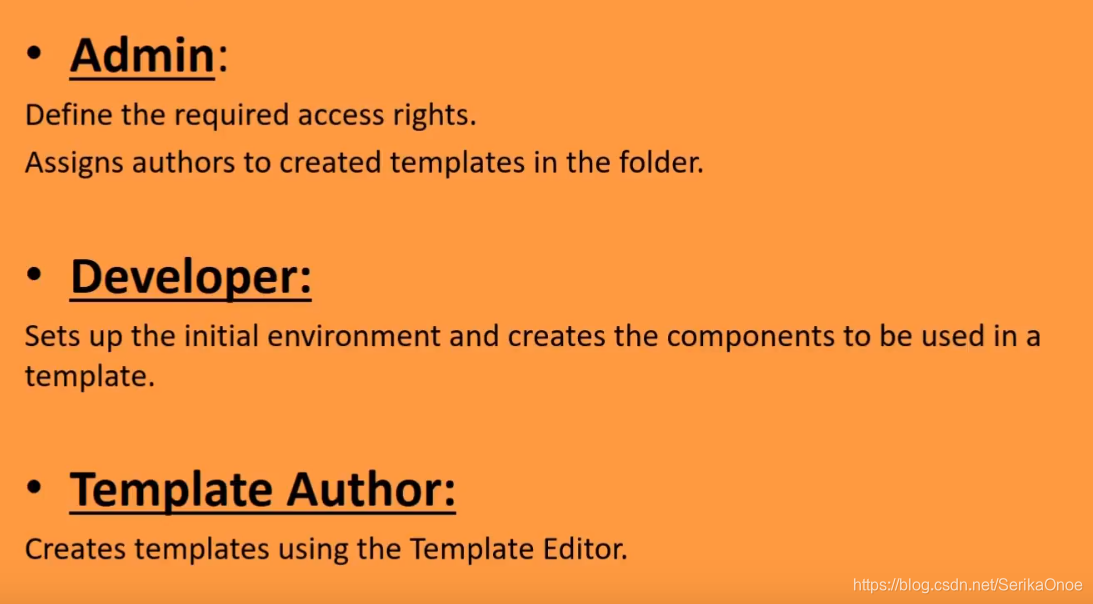
在Editable Template中不同角色需要做的事
Editable Template的几种模式
- Structure 结构编辑
- Initial Content 可修改unlock的组件
- Layout 在不同设备下的环境测试&调整大小
66.创建ET
Steps
-
进入Navigation -> Tools -> General -> Configuration Browser
-
点击Create 输入title ex.
AEM-tutorial, 勾选Editable Templates创建 -
创建好的模板目录对应在lite中的目录
/conf/上一步的文件夹名注意里面的结构层次
-
进入Navigation -> Tools -> General -> Templates
-
进入前面自己的文件夹, 点击 Create , 选择模板创建 Template
67.编辑ET
- 在Structure模式下增加/修改组件
- 组件默认是lock住的, 不可在Initial Content模式中修改
- Initial模式下, 可修改unlock的组件
- Layout模式下, 可动态修改组件的大小, 选择组件在不同设备下的显示
68.设置ContentPolicies
使用Content Policies , 来限制每个Component对其他组件的使用
Example
- 为Editable Template页面拖拽一个Layout Container
- Unlock 此组件
- 点击此Container , 选择 Policy
- 自定义Policy
- 左侧写title和描述
- 右侧选组件…
69.使用ET创建Page
Steps
-
先确保你创建的Editable Template已被启用
Navigation -> Tools -> General -> Templates -> 找到自己的ET, 选择右上角标点击
Enable -
打开 Sites http://localhost:4502/sites.html/content
-
点击自己的Sites -> 选择Properties -> 选择Advanced
-
在下方找到
Templates Settings, 写入自己刚才创建的 Editable Template 的路径(在lite里面找), 示例:/conf/AEM-tutorial/settings/wcm/templates/.*最末尾正则 -
保存, 就可以创建页面了
Touch UI Dialog(70-77)
70.介绍验证Dialog
作用
- 使用JS控制校验Dialog中的表单提交
Validation in AEM touch ui Dialog: Our dialogs are a collection of form fields and checking data before it’s submitted can save you lot of headache.
SO, input validation allows you to check the data before the dialog is submitted and Granit UI provides the easy way to add custom validation for your form fields.
Custom validation requires adding Custom JS and we can accomplish this using client library.
- Adding Javascript to dialogs throght the cq.authoring.dialog client library category.
- Adding javascript to dialogs through the includeclientlibs.
I will show above 2 methods in my next video and we will also see the difference between them.
71.通过cqAuthoringDialog添加JS
-
在
content/组件下创建 Node 类型cq:ClientLibraryFolder -
添加属性
categories String[] cq.authoring.dialog -
最后如下目录结构
-clientlib-authoring
-js
*js.js
*js.txt
-
编写js, 阅读即可
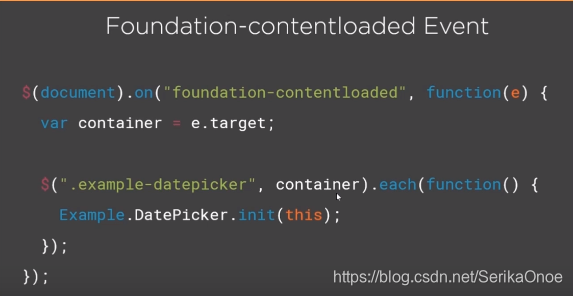
$(document).on("foundation-contentloaded",function(e){
    var container = e.target;

    console.log(container);
})
原文
Adding JS via cq authoring dialog in AEM: AEM uses client library to manage js and css. Client libraries are registered globally in aem using a category name.
You give a category for it’s identification and then we call on the category to add js and css to the browser. AEM has a category specifically for dialogs and that is called cq.authoring.dialog. SO, we can create client library with the category cq.autoring.dialog to use any custom js within our dialog.
Important point to note is that adding js this way will add it to every dialog with an AEM, even the dialogs that come out of the box.
When granite ui injects new content into the DOM, I mean when granite ui load a dialog the Foundation-contentloaded event is triggered. When listening for this event, the container is available at the event targent. IT is recommended that the listener uses the container to scope it’s operation because event could be firing many times and you want to keep the javascript scoped to its purpose…
Create the client library with the category cq.authoring.dialog, add the js within it. In js, I have used cosole.log to print some msg on cl call and below we are listening for the event and when the event occurs, we will fire this anonymous function. Container is the event target. When this event is fired we should see some msg.
72.通过IncludeClientlibs引入JS
Steps
- 在dialog中新建Node includeclientlibs 无类型
添加属性- sling:resourceType String granite/ui/components/coral/foundation/includeclientlibs
- js String
clientlibs的categories值
- 测试
原文
Adding JS via IncludeClientlibs in AEM: There are 2 ways to include JS in our dialog
- Via cq.authoring.dialog
- Via includeClientlibs Granite UI
Second method is used when you want to include clientlibs/javascript specific to a single dialog Unlike cq.authoring.dialog whuch include js to every single dialog.
Create a clientlibrary and give the catergory any name e.g. cq.include and create js and js.txt file. Use the code in the video for js file.
Once client library is ready, open the dialog box and under the items node create a node and add properties sling:resourceType as granite/ui/components/coral/foundation/includeclientlibs and js as clientlib catergory name.
Now, open the page and in the console you will see the code loaded when you open the dialog of the specific component to which inlcudeclientlibs has been added.
77.Input表单验证
说明
- Jquery Validator已经不推荐使用了
- Foundation-Validation 推荐
Validator
JS代码
$(window).adaptTo("foundation-registry").register("foundation.validation.validator", {
  selector: "[data-should-contain]",
  validate: function(el) {
    var shouldContain = el.getAttribute("data-should-contain");  //aem

    console.log('validating text contains aem');
    console.log('input should contain ' + shouldContain);

    var input = el.value;  //input added by author

    if (input.indexOf(shouldContain) === -1 ) {
      return "The field should contain " + shouldContain + ". It's current value is " + el.value + ".";
    }
  }
});
Steps
-
在需要校验的node里面添加子节点
名称
granite:data无类型 -
为granite:data 添加selector
test-selectorStringtest-need-value -
参考js代码
$(window).adaptTo("foundation-registry").register("foundation.validation.validator", {
    selector: "[data-test-selector]",
  validate: function (el) {
        let test = el.getAttribute("data-test-selector");  //test-need-value
        let test2 = el.getAttribute("data-test-website");

        let reg = /((http|https):\/\/)?(www)?.*?\.(com|cn|net|org|html)/;

        let input = el.value;

        console.log(input, test, test2);

        if (reg.test(input)) {
            return "The path must inside AEM, you can't set outer link!"
        }
        return;
        //selector: "[is=coral-textfield]",
    }

});
原文
Input field Validation using Granite UI in AEM: Now you know how to add custom js to your dialog. In this video we will write custom validation for input field using granite UI.
We can do it in aem using foundation-validation. Validation happens through a validator.
Previously, the jquery validator was used for valiadtion, but that is no longer the case as it has been deprecated but maintained for backward compatibility and new way for validation is foundation-validation approach.
To create a validator for form validation you need to register a new validator to the registry using foundation.validationvalidator name.
WHen you register a new validator you pass an object and object should contain a selector object and validate function object.
Copy the code from https://github.com/pankajchhatri/AEM and follow along for the validation.
