个人记录一下觉得有意思的功能模块
项目做完一点心得和体会:
这个项目用来缓存机制,和异步处理模式,提高了服务器的响应时间。
为了应付短时间内大量的http请求,服务端通常的做法有以下4点:
- 使用HTTP的100 Continue状态码,让客户端在发送请求头后等待服务端的确认,如果服务端认为请求头合法,就返回100 Continue,让客户端继续发送请求体,否则返回错误码,避免客户端发送无效的数据
- 使用负载均衡器,将请求分发到不同的服务器上,减轻单个服务器的压力。
- 使用缓存机制,将一些静态资源或者常用数据缓存起来,减少对服务器的访问。
- 使用异步处理模式,将一些耗时的操作放到后台线程中执行,避免阻塞主线程。
目录
5.2 重写 prehandle,posthandle等方法
12、使用redis实现点赞功能,关注功能,对登陆模块进行优化
1.发送邮件(包括html页面)
1.1 导入maven依赖
发送邮件的功能封装在spring中,可以直接调用,首先导入相应的依赖
		<dependency>
			<groupId>org.springframework.boot</groupId>
			<artifactId>spring-boot-starter-mail</artifactId>
			<version>2.1.5.RELEASE</version>
		</dependency>
1.2 修改配置文件
再修改一下application.properties配置文件,加入以下内容
# MailProperties
spring.mail.host=smtp.sina.com
spring.mail.port=465
spring.mail.username=你自己的邮箱地址
spring.mail.password=邮箱的授权码
spring.mail.protocol=smtps
spring.mail.properties.mail.smtp.ssl.enable=true
1.3 编写邮件发送工具类
好了,接下来我们开始写一下发送邮件的工具类MailClient
@Component
public class MailClient {

    private static final Logger logger = LoggerFactory.getLogger(MailClient.class);

    @Autowired
    private JavaMailSender mailSender;

    @Value("${spring.mail.username}")
    private String from;

    public void sendMail(String to, String subject, String content) {
        try {
            MimeMessage message = mailSender.createMimeMessage();
            MimeMessageHelper helper = new MimeMessageHelper(message);
            helper.setFrom(from);
            helper.setTo(to);
            helper.setSubject(subject);
            helper.setText(content, true);
            mailSender.send(helper.getMimeMessage());
        } catch (MessagingException e) {
            logger.error("发送邮件失败:" + e.getMessage());
        }
    }

}
1.4 工具类测试
接下来我们测试一下这个工具类
package com.nowcoder.community;

import com.nowcoder.community.util.MailClient;
import org.junit.Test;
import org.junit.runner.RunWith;
import org.springframework.beans.factory.annotation.Autowired;
import org.springframework.boot.test.context.SpringBootTest;
import org.springframework.test.context.ContextConfiguration;
import org.springframework.test.context.junit4.SpringRunner;
import org.thymeleaf.TemplateEngine;
import org.thymeleaf.context.Context;

@RunWith(SpringRunner.class)
@SpringBootTest
@ContextConfiguration(classes = CommunityApplication.class)
public class MailTests {

    @Autowired
    private MailClient mailClient;

    @Autowired
    private TemplateEngine templateEngine;
//发送文字消息
    @Test
    public void testTextMail() {
        mailClient.sendMail("[email protected]", "TEST", "Welcome.");
    }
//发送网页(需要事先准备好网页资源)
    @Test
    public void testHtmlMail() {
        //Context为网页正文内容
        Context context = new Context();
        //为正文内容的变量进行赋值
        context.setVariable("username", "sunday");
        //静态资源路径 template/context
        String content = templateEngine.process("/mail/demo", context);
        System.out.println(content);
        //发送邮件
        mailClient.sendMail("[email protected]", "HTML", content);
    }

}
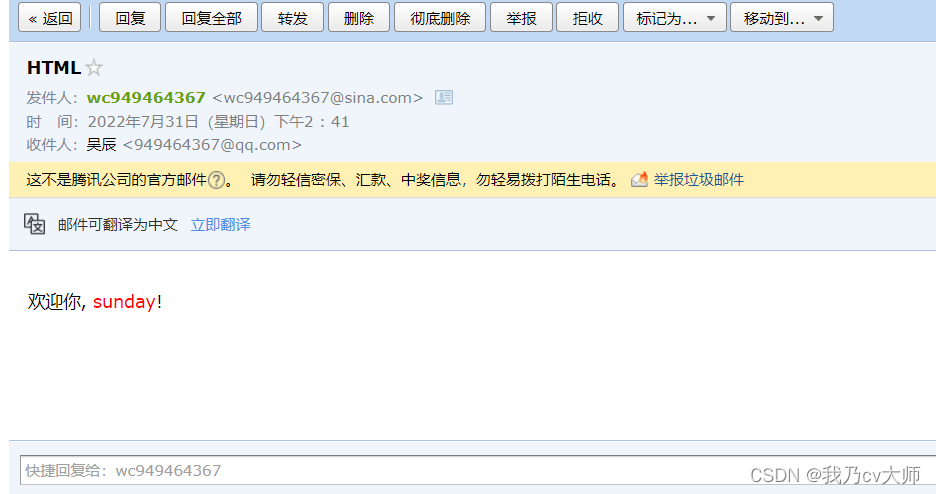
网页版测试结果
特别给力,这个方法可以用到后面的账号注册激活功能模块里面
2.登陆注册功能
通过注册页面,输入账号,密码,邮箱,点击注册后,工程会往注册邮箱发送一份html,点击html中的链接,以实现用户的激活。
2.1 对用户的信息进行加密处理
用户的账号,密码的注册,为安全性考虑,不能直接存储进数据库,下场就是学习通,需要进行加密存储。需要编写一个加密工具类,对用户信息进行加密。
采用MD5加密方法,为防止密码过于简单,导致即便是加密后也容易破解的问题,设置了加密盐,也就是在原密码后,生成n位随机字符串,再进行整体的一个加密。
工具类如下所示
package com.nowcoder.community.util;

import org.apache.commons.lang3.StringUtils;
import org.springframework.util.DigestUtils;

import java.util.UUID;

public class CommunityUtil {

    // 生成随机字符串
    public static String generateUUID() {
        return UUID.randomUUID().toString().replaceAll("-", "");
    }

    // MD5加密
    // hello -> abc123def456,这样的弊端就是简单的密码加密之后依旧是容易破解的
    //在原账号的基础上加上随机的字符串,再进行加密,这样不容易被破解
    // hello + 3e4a8 -> abc123def456abc
    public static String md5(String key) {
        //空值不处理
        if (StringUtils.isBlank(key)) {
            return null;
        }
        //spring自带的mp5加密
        return DigestUtils.md5DigestAsHex(key.getBytes());
    }

}
2.2 用户重复注册问题和用户未激活问题
注册用户的账号,邮箱不能重复注册,账号需要激活以后才能使用,账号不能重复激活。
不能重复注册实现方式,即去数据库找是否已存在,账号需要激活,不能重复激活,通过定义一组常量,通过它属性的变化,给user赋予相应的值
package com.nowcoder.community.util;

public interface CommunityConstant {

    /**
     * 激活成功
     */
    int ACTIVATION_SUCCESS = 0;

    /**
     * 重复激活
     */
    int ACTIVATION_REPEAT = 1;

    /**
     * 激活失败
     */
    int ACTIVATION_FAILURE = 2;

}
user类为如下所示
package com.nowcoder.community.entity;

import java.util.Date;

public class User {

    private int id;
//用户名
    private String username;
//密码
    private String password;
//加密盐
    private String salt;
//邮箱
    private String email;
//用户种类
    private int type;
//用户状态 0为未激活,1为激活
    private int status;
//用户的激活码
    private String activationCode;
//用户的头像地址,获取头像
    private String headerUrl;
//用户的注册时间
    private Date createTime;

    public int getId() {
        return id;
    }

    public void setId(int id) {
        this.id = id;
    }

    public String getUsername() {
        return username;
    }

    public void setUsername(String username) {
        this.username = username;
    }

    public String getPassword() {
        return password;
    }

    public void setPassword(String password) {
        this.password = password;
    }

    public String getSalt() {
        return salt;
    }

    public void setSalt(String salt) {
        this.salt = salt;
    }

    public String getEmail() {
        return email;
    }

    public void setEmail(String email) {
        this.email = email;
    }

    public int getType() {
        return type;
    }

    public void setType(int type) {
        this.type = type;
    }

    public int getStatus() {
        return status;
    }

    public void setStatus(int status) {
        this.status = status;
    }

    public String getActivationCode() {
        return activationCode;
    }

    public void setActivationCode(String activationCode) {
        this.activationCode = activationCode;
    }

    public String getHeaderUrl() {
        return headerUrl;
    }

    public void setHeaderUrl(String headerUrl) {
        this.headerUrl = headerUrl;
    }

    public Date getCreateTime() {
        return createTime;
    }

    public void setCreateTime(Date createTime) {
        this.createTime = createTime;
    }

    @Override
    public String toString() {
        return "User{" +
                "id=" + id +
                ", username='" + username + '\'' +
                ", password='" + password + '\'' +
                ", salt='" + salt + '\'' +
                ", email='" + email + '\'' +
                ", type=" + type +
                ", status=" + status +
                ", activationCode='" + activationCode + '\'' +
                ", headerUrl='" + headerUrl + '\'' +
                ", createTime=" + createTime +
                '}';
    }

}
2.3 确定邮件发送的具体网址信息
注册成功以后,工程会向用户发送激活邮件,点击里面的链接才能成功对用户进行激活。
加入配置项
# community域名
community.path.domain=http://localhost:8088
编写service层,实现注册的具体功能,以及邮件收发,UserService
package com.nowcoder.community.service;

import com.nowcoder.community.dao.UserMapper;
import com.nowcoder.community.entity.User;
import com.nowcoder.community.util.CommunityConstant;
import com.nowcoder.community.util.CommunityUtil;
import com.nowcoder.community.util.MailClient;
import org.apache.commons.lang3.StringUtils;
import org.springframework.beans.factory.annotation.Autowired;
import org.springframework.beans.factory.annotation.Value;
import org.springframework.stereotype.Service;
import org.thymeleaf.TemplateEngine;
import org.thymeleaf.context.Context;

import java.util.Date;
import java.util.HashMap;
import java.util.Map;
import java.util.Random;

@Service
public class UserService implements CommunityConstant {

    @Autowired
    private UserMapper userMapper;

    @Autowired
    private MailClient mailClient;

    @Autowired
    private TemplateEngine templateEngine;
//@Value注解,从配置文件中提取值
    @Value("${community.path.domain}")
    private String domain;
    //@Value注解,从配置文件中提取值
    @Value("${server.servlet.context-path}")
    private String contextPath;

    public User findUserById(int id) {
        return userMapper.selectById(id);
    }

    public Map<String, Object> register(User user) {
        Map<String, Object> map = new HashMap<>();

        // 空值处理
        if (user == null) {
            throw new IllegalArgumentException("参数不能为空!");
        }
        if (StringUtils.isBlank(user.getUsername())) {
            map.put("usernameMsg", "账号不能为空!");
            return map;
        }
        if (StringUtils.isBlank(user.getPassword())) {
            map.put("passwordMsg", "密码不能为空!");
            return map;
        }
        if (StringUtils.isBlank(user.getEmail())) {
            map.put("emailMsg", "邮箱不能为空!");
            return map;
        }

        // 验证账号
        User u = userMapper.selectByName(user.getUsername());
        if (u != null) {
            map.put("usernameMsg", "该账号已存在!");
            return map;
        }

        // 验证邮箱
        u = userMapper.selectByEmail(user.getEmail());
        if (u != null) {
            map.put("emailMsg", "该邮箱已被注册!");
            return map;
        }

        // 注册用户
        //加密盐
        user.setSalt(CommunityUtil.generateUUID().substring(0, 5));
        //原注册密码加上加密盐,再用md5进行加密,这样的密码难以破解
        user.setPassword(CommunityUtil.md5(user.getPassword() + user.getSalt()));
        //用户种类
        user.setType(0);
        //是否被激活
        user.setStatus(0);
        //激活码
        user.setActivationCode(CommunityUtil.generateUUID());
        //生成随机头像,参数是网址格式+(图片序号)
        user.setHeaderUrl(String.format("http://images.nowcoder.com/head/%dt.png", new Random().nextInt(1000)));
        user.setCreateTime(new Date());
        userMapper.insertUser(user);

        // 激活邮件
        Context context = new Context();
        context.setVariable("email", user.getEmail());
        // http://localhost:8080/community/activation/101/code 项目的访问路径,展示在网页上
        String url = domain + contextPath + "/activation/" + user.getId() + "/" + user.getActivationCode();
        context.setVariable("url", url);
        //将正文内容放到模板引擎中,即可跳转访问template文件夹下mail文件夹下的activation.html资源
        String content = templateEngine.process("/mail/activation", context);
        mailClient.sendMail(user.getEmail(), "激活账号", content);

        return map;
    }

    public int activation(int userId, String code) {
        User user = userMapper.selectById(userId);
        //重复激活
        if (user.getStatus() == 1) {
            return ACTIVATION_REPEAT;
        }
        //成功激活
        else if (user.getActivationCode().equals(code)) {
            userMapper.updateStatus(userId, 1);
            return ACTIVATION_SUCCESS;
        }
        //激活失败
        else {
            return ACTIVATION_FAILURE;
        }
    }

}
以及对应的Controller层 LoginController
package com.nowcoder.community.controller;

import com.nowcoder.community.entity.User;
import com.nowcoder.community.service.UserService;
import com.nowcoder.community.util.CommunityConstant;
import org.springframework.beans.factory.annotation.Autowired;
import org.springframework.stereotype.Controller;
import org.springframework.ui.Model;
import org.springframework.web.bind.annotation.PathVariable;
import org.springframework.web.bind.annotation.RequestMapping;
import org.springframework.web.bind.annotation.RequestMethod;

import java.util.Map;

@Controller
public class LoginController implements CommunityConstant {

    @Autowired
    private UserService userService;

    @RequestMapping(path = "/register", method = RequestMethod.GET)
    public String getRegisterPage() {
        return "/site/register";
    }

    @RequestMapping(path = "/login", method = RequestMethod.GET)
    public String getLoginPage() {
        return "/site/login";
    }
//注册触发的函数,成功则发送一封邮件
    @RequestMapping(path = "/register", method = RequestMethod.POST)
    public String register(Model model, User user) {
        Map<String, Object> map = userService.register(user);
        //成功
        if (map == null || map.isEmpty()) {
            model.addAttribute("msg", "注册成功,我们已经向您的邮箱发送了一封激活邮件,请尽快激活!");
            model.addAttribute("target", "/index");
            //页面跳转
            return "/site/operate-result";
         }
        //失败
        else {
            model.addAttribute("usernameMsg", map.get("usernameMsg"));
            model.addAttribute("passwordMsg", map.get("passwordMsg"));
            model.addAttribute("emailMsg", map.get("emailMsg"));
            return "/site/register";
        }
    }
//发送激活邮件,通过点击链接触发的函数,通过读取请求地址里面的参数,判定激活码是否有效,判定用户是否成功激活
    // http://localhost:8080/community/activation/101/code
    @RequestMapping(path = "/activation/{userId}/{code}", method = RequestMethod.GET)
    public String activation(Model model, @PathVariable("userId") int userId, @PathVariable("code") String code) {
        int result = userService.activation(userId, code);
        if (result == ACTIVATION_SUCCESS) {
            model.addAttribute("msg", "激活成功,您的账号已经可以正常使用了!");
            model.addAttribute("target", "/login");
        } else if (result == ACTIVATION_REPEAT) {
            model.addAttribute("msg", "无效操作,该账号已经激活过了!");
            model.addAttribute("target", "/index");
        } else {
            model.addAttribute("msg", "激活失败,您提供的激活码不正确!");
            model.addAttribute("target", "/index");
        }
        return "/site/operate-result";
    }

}
注册界面为register.html
<!doctype html>
<html lang="en" xmlns:th="http://www.thymeleaf.org">
<head>
<meta charset="utf-8">
<meta name="viewport" content="width=device-width, initial-scale=1, shrink-to-fit=no">
<link rel="icon" href="https://static.nowcoder.com/images/logo_87_87.png"/>
<link rel="stylesheet" href="https://stackpath.bootstrapcdn.com/bootstrap/4.3.1/css/bootstrap.min.css" crossorigin="anonymous">
<link rel="stylesheet" th:href="@{/css/global.css}" />
<link rel="stylesheet" th:href="@{/css/login.css}" />
<title>牛客网-注册</title>
</head>
<body>
<div class="nk-container">
<!-- 头部 -->
<header class="bg-dark sticky-top" th:replace="index::header">
<div class="container">
<!-- 导航 -->
<nav class="navbar navbar-expand-lg navbar-dark">
<!-- logo -->
<a class="navbar-brand" href="#"></a>
<button class="navbar-toggler" type="button" data-toggle="collapse" data-target="#navbarSupportedContent" aria-controls="navbarSupportedContent" aria-expanded="false" aria-label="Toggle navigation">
<span class="navbar-toggler-icon"></span>
</button>
<!-- 功能 -->
<div class="collapse navbar-collapse" id="navbarSupportedContent">
<ul class="navbar-nav mr-auto">
<li class="nav-item ml-3 btn-group-vertical">
<a class="nav-link" href="../index.html">首页</a>
</li>
<li class="nav-item ml-3 btn-group-vertical">
<a class="nav-link position-relative" href="letter.html">消息<span class="badge badge-danger">12</span></a>
</li>
<li class="nav-item ml-3 btn-group-vertical">
<a class="nav-link" href="register.html">注册</a>
</li>
<li class="nav-item ml-3 btn-group-vertical">
<a class="nav-link" href="login.html">登录</a>
</li>
<li class="nav-item ml-3 btn-group-vertical dropdown">
<a class="nav-link dropdown-toggle" href="#" id="navbarDropdown" role="button" data-toggle="dropdown" aria-haspopup="true" aria-expanded="false">
<img src="http://images.nowcoder.com/head/1t.png" class="rounded-circle" style="width:30px;"/>
</a>
<div class="dropdown-menu" aria-labelledby="navbarDropdown">
<a class="dropdown-item text-center" href="profile.html">个人主页</a>
<a class="dropdown-item text-center" href="setting.html">账号设置</a>
<a class="dropdown-item text-center" href="login.html">退出登录</a>
<div class="dropdown-divider"></div>
<span class="dropdown-item text-center text-secondary">nowcoder</span>
</div>
</li>
</ul>
<!-- 搜索 -->
<form class="form-inline my-2 my-lg-0" action="search.html">
<input class="form-control mr-sm-2" type="search" aria-label="Search" />
<button class="btn btn-outline-light my-2 my-sm-0" type="submit">搜索</button>
</form>
</div>
</nav>
</div>
</header>
<!-- 内容 -->
<div class="main">
<div class="container pl-5 pr-5 pt-3 pb-3 mt-3 mb-3">
<h3 class="text-center text-info border-bottom pb-3">注 册</h3>
<form class="mt-5" method="post" th:action="@{/register}">
<div class="form-group row">
<label for="username" class="col-sm-2 col-form-label text-right">账号:</label>
<div class="col-sm-10">
<input type="text"
th:class="|form-control ${usernameMsg!=null?'is-invalid':''}|"
th:value="${user!=null?user.username:''}"
id="username" name="username" placeholder="请输入您的账号!" required>
<div class="invalid-feedback" th:text="${usernameMsg}">
该账号已存在!
</div>
</div>
</div>
<div class="form-group row mt-4">
<label for="password" class="col-sm-2 col-form-label text-right">密码:</label>
<div class="col-sm-10">
<input type="password"
th:class="|form-control ${passwordMsg!=null?'is-invalid':''}|"
th:value="${user!=null?user.password:''}"
id="password" name="password" placeholder="请输入您的密码!" required>
<div class="invalid-feedback" th:text="${passwordMsg}">
密码长度不能小于8位!
</div>
</div>
</div>
<div class="form-group row mt-4">
<label for="confirm-password" class="col-sm-2 col-form-label text-right">确认密码:</label>
<div class="col-sm-10">
<input type="password" class="form-control"
th:value="${user!=null?user.password:''}"
id="confirm-password" placeholder="请再次输入密码!" required>
<div class="invalid-feedback">
两次输入的密码不一致!
</div>
</div>
</div>
<div class="form-group row">
<label for="email" class="col-sm-2 col-form-label text-right">邮箱:</label>
<div class="col-sm-10">
<input type="email"
th:class="|form-control ${emailMsg!=null?'is-invalid':''}|"
th:value="${user!=null?user.email:''}"
id="email" name="email" placeholder="请输入您的邮箱!" required>
<div class="invalid-feedback" th:text="${emailMsg}">
该邮箱已注册!
</div>
</div>
</div>
<div class="form-group row mt-4">
<div class="col-sm-2"></div>
<div class="col-sm-10 text-center">
<button type="submit" class="btn btn-info text-white form-control">立即注册</button>
</div>
</div>
</form>
</div>
</div>
<!-- 尾部 -->
<footer class="bg-dark">
<div class="container">
<div class="row">
<!-- 二维码 -->
<div class="col-4 qrcode">
<img src="https://uploadfiles.nowcoder.com/app/app_download.png" class="img-thumbnail" style="width:136px;" />
</div>
<!-- 公司信息 -->
<div class="col-8 detail-info">
<div class="row">
<div class="col">
<ul class="nav">
<li class="nav-item">
<a class="nav-link text-light" href="#">关于我们</a>
</li>
<li class="nav-item">
<a class="nav-link text-light" href="#">加入我们</a>
</li>
<li class="nav-item">
<a class="nav-link text-light" href="#">意见反馈</a>
</li>
<li class="nav-item">
<a class="nav-link text-light" href="#">企业服务</a>
</li>
<li class="nav-item">
<a class="nav-link text-light" href="#">联系我们</a>
</li>
<li class="nav-item">
<a class="nav-link text-light" href="#">免责声明</a>
</li>
<li class="nav-item">
<a class="nav-link text-light" href="#">友情链接</a>
</li>
</ul>
</div>
</div>
<div class="row">
<div class="col">
<ul class="nav btn-group-vertical company-info">
<li class="nav-item text-white-50">
公司地址:北京市朝阳区大屯路东金泉时代3-2708北京牛客科技有限公司
</li>
<li class="nav-item text-white-50">
联系方式:010-60728802(电话) [email protected]
</li>
<li class="nav-item text-white-50">
牛客科技©2018 All rights reserved
</li>
<li class="nav-item text-white-50">
京ICP备14055008号-4
<img src="http://static.nowcoder.com/company/images/res/ghs.png" style="width:18px;" />
京公网安备 11010502036488号
</li>
</ul>
</div>
</div>
</div>
</div>
</div>
</footer>
</div>
<script src="https://code.jquery.com/jquery-3.3.1.min.js" crossorigin="anonymous"></script>
<script src="https://cdnjs.cloudflare.com/ajax/libs/popper.js/1.14.7/umd/popper.min.js" crossorigin="anonymous"></script>
<script src="https://stackpath.bootstrapcdn.com/bootstrap/4.3.1/js/bootstrap.min.js" crossorigin="anonymous"></script>
<script th:src="@{/js/global.js}"></script>
<script th:src="@{/js/register.js}"></script>
</body>
</html>
激活界面activation.html
3.会话管理
HTTP是无状态的:在同一个连接中,两个执行成功的请求之间是没有关系的,用户无法在同一个网站中实现连续的交互。例如用户将商品加入购物车,切换一个页面后再次添加商品,这两次添加商品的请求之间没有关联,浏览器无法知道用户最终选择了哪些商品。
HTTP是有对话的:把Cookie添加到头部,创建一个会话让每次请求都能共享相同的上下文信息,达成相同的状态。
3.1 cookie
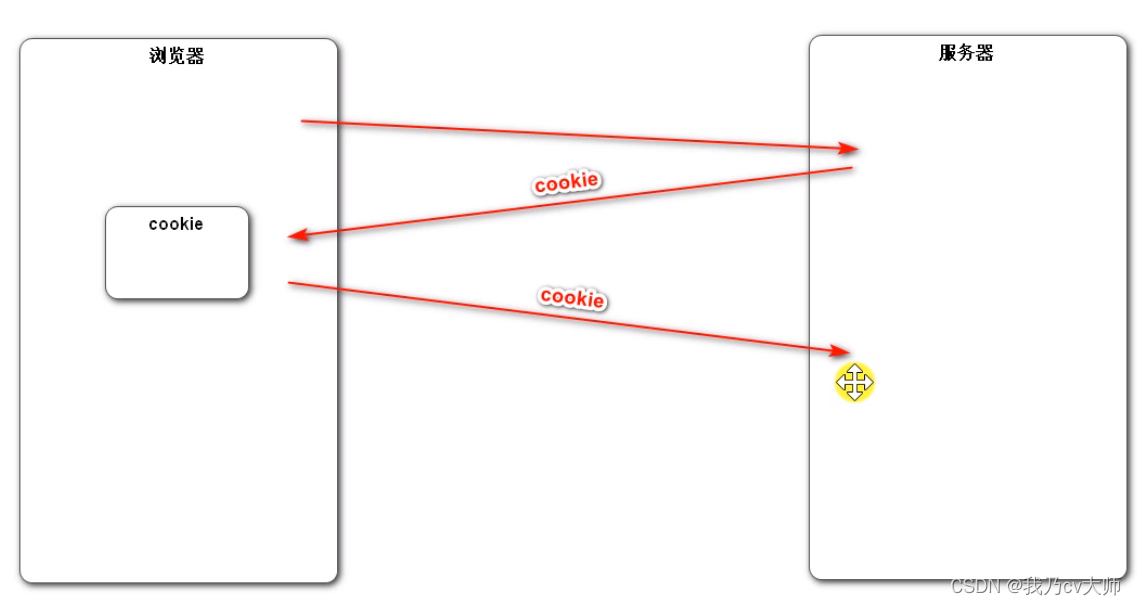
cookie的应用:
服务器将cookie存在浏览器中
存起来以后,根据每次特定的请求路径
客户端将cookie的内容也发送给服务器。
测试代码
   // cookie示例
    @RequestMapping(path = "/cookie/set", method = RequestMethod.GET)
    @ResponseBody
    public String setCookie(HttpServletResponse response) {
        // 创建cookie
        Cookie cookie = new Cookie("code", CommunityUtil.generateUUID());
        // 设置cookie生效的范围,说明在哪些路径下有效
        cookie.setPath("/community/alpha");
        // 设置cookie的生存时间,cookie一直存在硬盘里,直到生存周期过之后才失效
        cookie.setMaxAge(60 * 10);
        // 发送cookie
        response.addCookie(cookie);

        return "set cookie";
    }

    @RequestMapping(path = "/cookie/get", method = RequestMethod.GET)
    @ResponseBody
    public String getCookie(@CookieValue("code") String code) {
        System.out.println(code);
        return "get cookie";
    }
cookie的缺陷:1.存在客户端浏览器中,不安全
2.cookie会在请求中将数据发给服务器,对服务器的流量和性能造成影响,浪费流量和资源。
3.2 session
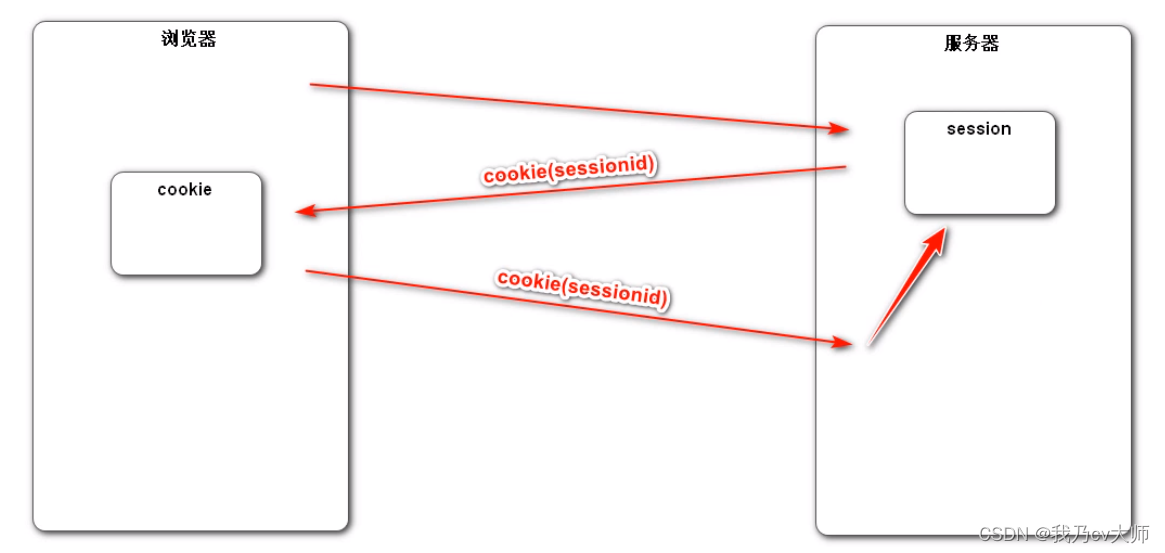
浏览器发送数据给服务器,服务器在自己内部创建一个session对象,并赋予对应浏览器相对应的sessionid,存在cookie中发还给浏览器。后面浏览器就根据这个sessionid来服务器中寻找相对应的seesion资源。这样压力就全在服务器端,数据也相对安全,数据存在内存里面,会增加服务器端的内存压力
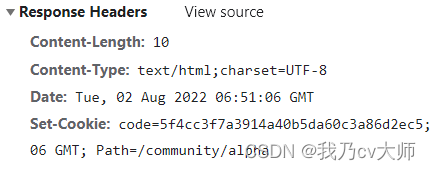
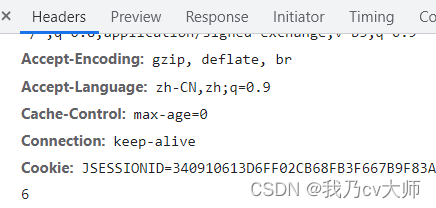
可以看到,cookie里面存的是sessionid
测试代码
  // session示例

    @RequestMapping(path = "/session/set", method = RequestMethod.GET)
    @ResponseBody
    public String setSession(HttpSession session) {
        session.setAttribute("id", 1);
        session.setAttribute("name", "Test");
        return "set session";
    }

    @RequestMapping(path = "/session/get", method = RequestMethod.GET)
    @ResponseBody
    public String getSession(HttpSession session) {
        System.out.println(session.getAttribute("id"));
        System.out.println(session.getAttribute("name"));
        return "get session";
    }
尽量不要用session
分布式部署中session会出现的问题:
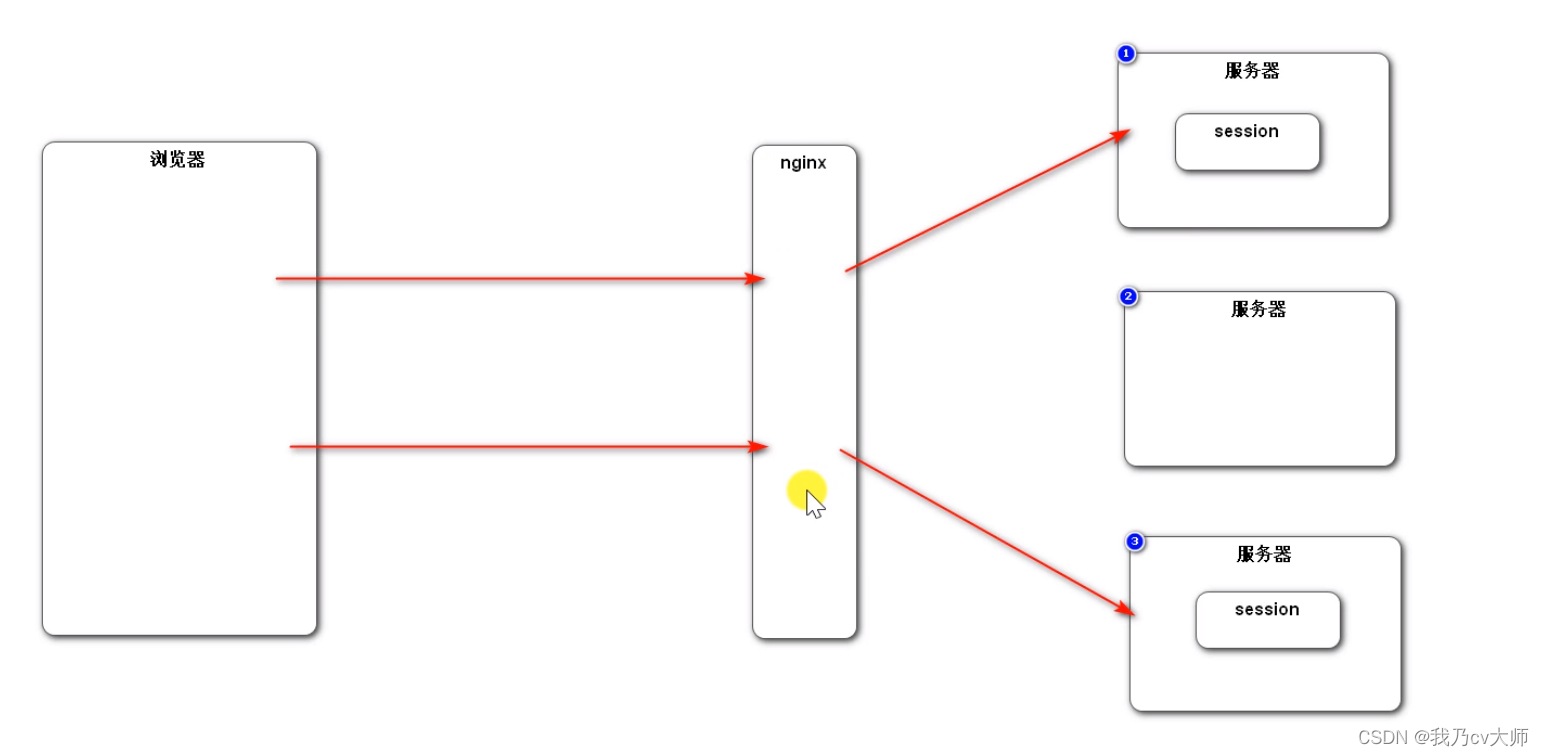
通过nginx负载均衡策略,浏览器通过nginx,寻找当前空闲的服务器进行操作。加入当前服务器1空闲,创建了session,并将sessionid放在cookie中传给浏览器。但下一次通过负载均衡策略,给客户端服务的不一定是原先的浏览器,所以便拿不到之前存放的内容,非常痛苦。
解决方法1:粘性session,根据客户端的ip指定固定的服务器,对固定的ip客户端进行服务,弊端就是严重影响了负载均衡。
解决方法2:同步session,在一台服务器创建session后,所有服务器创建同样的session。弊端就是严重影响服务器的性能,增大服务器之间的耦合性。
解决方法3:共享session,建立一个新服务器,将其他服务器的session都存进新服务器中,寻找sessionid都到里面去找,专门处理session。弊端:万一新服务器挂了,项目就gg了,危险系数很大,要是给新服务器配置集群,那就变成了同步session了。
解决方法4(主流):做关系数据库集群(MYSQL)或者NOSQL数据库,存储session内容,能很好的共享、同步数据。弊端:数据库的查询性能没有服务器那么好,存到REDIS里更快。
4.随机生成验证码
4.1导入maven依赖
	<dependency>
			<groupId>com.github.penggle</groupId>
			<artifactId>kaptcha</artifactId>
			<version>2.3.2</version>
		</dependency>
4.2 编写相应的配置类
采用@Configuration注解配置类,用@Bean装配实例化Producer对象,以便后续的操作
package com.nowcoder.community.config;

import com.google.code.kaptcha.Producer;
import com.google.code.kaptcha.impl.DefaultKaptcha;
import com.google.code.kaptcha.util.Config;
import org.springframework.context.annotation.Bean;
import org.springframework.context.annotation.Configuration;

import java.util.Properties;

@Configuration
public class KaptchaConfig {

@Bean
    public Producer kaptchaProducer() {
        Properties properties = new Properties();
//图片宽度
        properties.setProperty("kaptcha.image.width", "100");
//图片高度
        properties.setProperty("kaptcha.image.height", "40");
//字体
        properties.setProperty("kaptcha.textproducer.font.size", "32");
//颜色
        properties.setProperty("kaptcha.textproducer.font.color", "0,0,0");
//随机内容
        properties.setProperty("kaptcha.textproducer.char.string", "0123456789ABCDEFGHIJKLMNOPQRSTUVWXYAZ");
//随机字符串长度
        properties.setProperty("kaptcha.textproducer.char.length", "4");
//继承地址
        properties.setProperty("kaptcha.noise.impl", "com.google.code.kaptcha.impl.NoNoise");

        DefaultKaptcha kaptcha = new DefaultKaptcha();
        Config config = new Config(properties);
        kaptcha.setConfig(config);
        return kaptcha;
    }

}
4.3 生成验证码的方法编写
package com.nowcoder.community.controller;

import com.google.code.kaptcha.Producer;
import com.nowcoder.community.entity.User;
import com.nowcoder.community.service.UserService;
import com.nowcoder.community.util.CommunityConstant;
import org.slf4j.Logger;
import org.slf4j.LoggerFactory;
import org.springframework.beans.factory.annotation.Autowired;
import org.springframework.stereotype.Controller;
import org.springframework.ui.Model;
import org.springframework.web.bind.annotation.PathVariable;
import org.springframework.web.bind.annotation.RequestMapping;
import org.springframework.web.bind.annotation.RequestMethod;

import javax.imageio.ImageIO;
import javax.servlet.http.HttpServletResponse;
import javax.servlet.http.HttpSession;
import java.awt.image.BufferedImage;
import java.io.IOException;
import java.io.OutputStream;
import java.util.Map;

@Controller
public class LoginController implements CommunityConstant {

    private static final Logger logger = LoggerFactory.getLogger(LoginController.class);


    @Autowired
    private Producer kaptchaProducer;

    /**
     * 生成验证码的方法
     * @param response
     * @param session
     */
    @RequestMapping(path = "/kaptcha", method = RequestMethod.GET)
    public void getKaptcha(HttpServletResponse response, HttpSession session) {
        // 生成验证码
        String text = kaptchaProducer.createText();
        BufferedImage image = kaptchaProducer.createImage(text);

        // 将验证码存入session
        session.setAttribute("kaptcha", text);

        // 将突图片输出给浏览器
        response.setContentType("image/png");
        try {
            OutputStream os = response.getOutputStream();
            ImageIO.write(image, "png", os);
        } catch (IOException e) {
            logger.error("响应验证码失败:" + e.getMessage());
        }
    }

}
如此这般,可以生成随机的验证码图片,并将随机生成的验证码存入session中,以便后续的登陆验证。
5、登陆拦截器的具体应用
5.1 配置拦截路径
配置config,即WebMvcConfig,表明需要拦截的请求路径和无需拦截的请求路径
package com.nowcoder.community.config;

import com.nowcoder.community.controller.interceptor.AlphaInterceptor;
import com.nowcoder.community.controller.interceptor.LoginTicketInterceptor;
import org.springframework.beans.factory.annotation.Autowired;
import org.springframework.context.annotation.Configuration;
import org.springframework.web.servlet.config.annotation.InterceptorRegistry;
import org.springframework.web.servlet.config.annotation.WebMvcConfigurer;

@Configuration
public class WebMvcConfig implements WebMvcConfigurer {

    @Autowired
    private AlphaInterceptor alphaInterceptor;

    @Autowired
    private LoginTicketInterceptor loginTicketInterceptor;

    @Override
    public void addInterceptors(InterceptorRegistry registry) {
        registry.addInterceptor(alphaInterceptor)
                .excludePathPatterns("/**/*.css", "/**/*.js", "/**/*.png", "/**/*.jpg", "/**/*.jpeg")
                .addPathPatterns("/register", "/login");

        registry.addInterceptor(loginTicketInterceptor)
                .excludePathPatterns("/**/*.css", "/**/*.js", "/**/*.png", "/**/*.jpg", "/**/*.jpeg");
    }

}
5.2 重写 prehandle,posthandle等方法
prehandle在Controller之前执行,posthandle在Controller之后执行,afterCompetion在TemplateEngine之后执行。
package com.nowcoder.community.controller.interceptor;

import org.slf4j.Logger;
import org.slf4j.LoggerFactory;
import org.springframework.stereotype.Component;
import org.springframework.web.servlet.HandlerInterceptor;
import org.springframework.web.servlet.ModelAndView;

import javax.servlet.http.HttpServletRequest;
import javax.servlet.http.HttpServletResponse;

@Component
public class AlphaInterceptor implements HandlerInterceptor {

    private static final Logger logger = LoggerFactory.getLogger(AlphaInterceptor.class);

    // 在Controller之前执行
    @Override
    public boolean preHandle(HttpServletRequest request, HttpServletResponse response, Object handler) throws Exception {
        logger.debug("preHandle: " + handler.toString());
        return true;
    }

    // 在Controller之后执行
    @Override
    public void postHandle(HttpServletRequest request, HttpServletResponse response, Object handler, ModelAndView modelAndView) throws Exception {
        logger.debug("postHandle: " + handler.toString());
    }

    // 在TemplateEngine之后执行
    @Override
    public void afterCompletion(HttpServletRequest request, HttpServletResponse response, Object handler, Exception ex) throws Exception {
        logger.debug("afterCompletion: " + handler.toString());
    }
}
5.3 配置登陆拦截方法
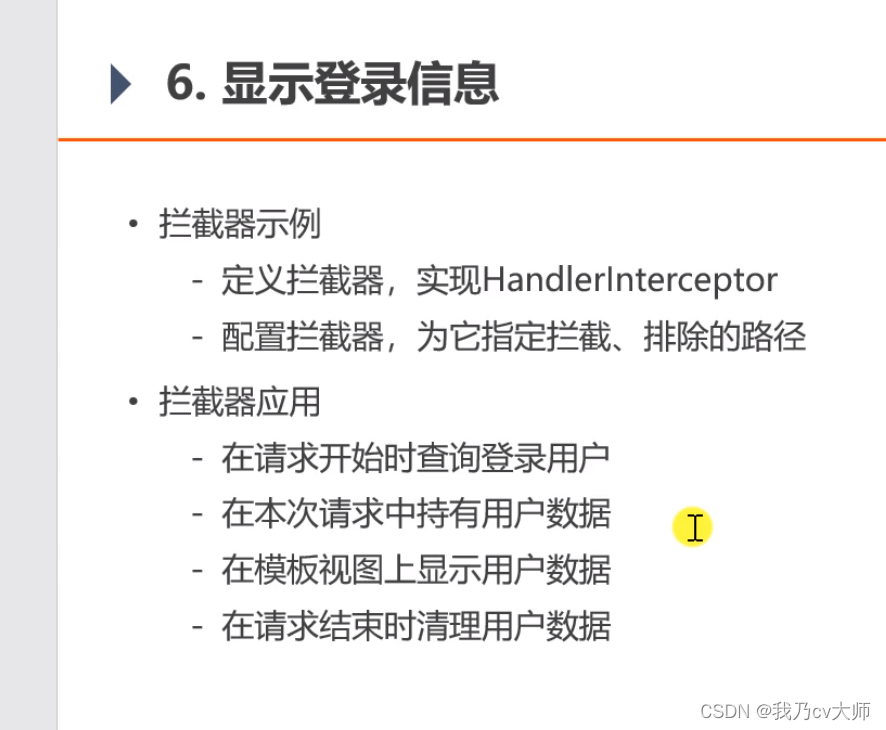
这里的主要思路便是 用户未处于登陆状态,登陆后,cookie中会存放ticket信息,数据库中也会存放ticket的相应信息,将ticket状态置为0。如果处于登陆状态,便会根据浏览器存放的cookie去数据库中寻找相对应的信息,如若找到并且ticket状态为0,并且信息没有过期,则确定其处于登陆状态。
package com.nowcoder.community.controller.interceptor;

import com.nowcoder.community.entity.LoginTicket;
import com.nowcoder.community.entity.User;
import com.nowcoder.community.service.UserService;
import com.nowcoder.community.util.CookieUtil;
import com.nowcoder.community.util.HostHolder;
import org.springframework.beans.factory.annotation.Autowired;
import org.springframework.stereotype.Component;
import org.springframework.web.servlet.HandlerInterceptor;
import org.springframework.web.servlet.ModelAndView;

import javax.servlet.http.HttpServletRequest;
import javax.servlet.http.HttpServletResponse;
import java.util.Date;

@Component
public class LoginTicketInterceptor implements HandlerInterceptor {

    @Autowired
    private UserService userService;

    @Autowired
    private HostHolder hostHolder;

    @Override
    public boolean preHandle(HttpServletRequest request, HttpServletResponse response, Object handler) throws Exception {
        // 从cookie中获取凭证
        String ticket = CookieUtil.getValue(request, "ticket");

        if (ticket != null) {
            // 查询凭证
            LoginTicket loginTicket = userService.findLoginTicket(ticket);
            // 检查凭证是否有效
            if (loginTicket != null && loginTicket.getStatus() == 0 && loginTicket.getExpired().after(new Date())) {
                // 根据凭证查询用户
                User user = userService.findUserById(loginTicket.getUserId());
                // 在本次请求中持有用户
                hostHolder.setUser(user);
            }
        }

        return true;
    }

    @Override
    public void postHandle(HttpServletRequest request, HttpServletResponse response, Object handler, ModelAndView modelAndView) throws Exception {
        User user = hostHolder.getUser();
        if (user != null && modelAndView != null) {
            modelAndView.addObject("loginUser", user);
        }
    }

    @Override
    public void afterCompletion(HttpServletRequest request, HttpServletResponse response, Object handler, Exception ex) throws Exception {
        hostHolder.clear();
    }
}
如此配置会存在一个问题,用户完全可以绕开login,拥有其他地址的访问权限。这里我们就要添加注解类,防止用户绕过login,进入其他网页。
5.4 配置注解类
package com.nowcoder.community.annotation;

import java.lang.annotation.ElementType;
import java.lang.annotation.Retention;
import java.lang.annotation.RetentionPolicy;
import java.lang.annotation.Target;

@Target(ElementType.METHOD)
@Retention(RetentionPolicy.RUNTIME)
public @interface LoginRequired {


}
这里说明一下两个注解的意思:
@Target 注解
功能:指明了修饰的这个注解的使用范围,即被描述的注解可以用在哪里。
ElementType的取值包含以下几种:
TYPE:类,接口或者枚举
FIELD:域,包含枚举常量
METHOD:方法
PARAMETER:参数
CONSTRUCTOR:构造方法
LOCAL_VARIABLE:局部变量
ANNOTATION_TYPE:注解类型
PACKAGE:包
功能:指明修饰的注解的生存周期,即会保留到哪个阶段。
RetentionPolicy的取值包含以下三种:
SOURCE:源码级别保留,编译后即丢弃。
CLASS:编译级别保留,编译后的class文件中存在,在jvm运行时丢弃,这是默认值。
RUNTIME: 运行级别保留,编译后的class文件中存在,在jvm运行时保留,可以被反射调用。
那么这里的意思是,使用在方法上面,运行级别保留
在其他网址的controller上进行相应的注解,如修改用户设置
  @LoginRequired
    @RequestMapping(path = "/setting", method = RequestMethod.GET)
    public String getSettingPage() {
        return "/site/setting";
    }
重写一遍prehandle方法 ,即在有注解的地方,进行条件判断,看user是否为空,如果为空,直接进行拦截,将其重定向到注册界面
package com.nowcoder.community.controller.interceptor;

import com.nowcoder.community.annotation.LoginRequired;
import com.nowcoder.community.util.HostHolder;
import org.springframework.beans.factory.annotation.Autowired;
import org.springframework.stereotype.Component;
import org.springframework.web.method.HandlerMethod;
import org.springframework.web.servlet.HandlerInterceptor;

import javax.servlet.http.HttpServletRequest;
import javax.servlet.http.HttpServletResponse;
import java.lang.reflect.Method;

@Component
public class LoginRequiredInterceptor implements HandlerInterceptor {

    @Autowired
    private HostHolder hostHolder;

    @Override
    public boolean preHandle(HttpServletRequest request, HttpServletResponse response, Object handler) throws Exception {
       //如果拦截器拦截到的是方法时
 if (handler instanceof HandlerMethod) {
            HandlerMethod handlerMethod = (HandlerMethod) handler;
            //取得方法
            Method method = handlerMethod.getMethod();
            //取得方法的注解
            LoginRequired loginRequired = method.getAnnotation(LoginRequired.class);
            if (loginRequired != null && hostHolder.getUser() == null) {
                response.sendRedirect(request.getContextPath() + "/login");
                return false;
            }
        }
        return true;
    }
}
对webConfig进行修改,加入修改后的重写的拦截器,这样子用户就绕不开login了。
package com.nowcoder.community.config;

import com.nowcoder.community.controller.interceptor.AlphaInterceptor;
import com.nowcoder.community.controller.interceptor.LoginRequiredInterceptor;
import com.nowcoder.community.controller.interceptor.LoginTicketInterceptor;
import org.springframework.beans.factory.annotation.Autowired;
import org.springframework.context.annotation.Configuration;
import org.springframework.web.servlet.config.annotation.InterceptorRegistry;
import org.springframework.web.servlet.config.annotation.WebMvcConfigurer;

@Configuration
public class WebMvcConfig implements WebMvcConfigurer {

    @Autowired
    private AlphaInterceptor alphaInterceptor;

    @Autowired
    private LoginTicketInterceptor loginTicketInterceptor;

    @Autowired
    private LoginRequiredInterceptor loginRequiredInterceptor;

    @Override
    public void addInterceptors(InterceptorRegistry registry) {
        registry.addInterceptor(alphaInterceptor)
                .excludePathPatterns("/**/*.css", "/**/*.js", "/**/*.png", "/**/*.jpg", "/**/*.jpeg")
                .addPathPatterns("/register", "/login");

        registry.addInterceptor(loginTicketInterceptor)
                .excludePathPatterns("/**/*.css", "/**/*.js", "/**/*.png", "/**/*.jpg", "/**/*.jpeg");

        registry.addInterceptor(loginRequiredInterceptor)
                .excludePathPatterns("/**/*.css", "/**/*.js", "/**/*.png", "/**/*.jpg", "/**/*.jpeg");
    }

}
6、敏感词过滤
6.1 设置敏感词存储txt文件
赌博
嫖娼
吸毒
开票
6.2 编写敏感词过滤的工具类
采用前缀树的方式,将敏感词用*代替,并无视特殊符号
特殊点讲解
@PostConstruct @PostConstruct注解好多人以为是Spring提供的。其实是Java自己的注解。

Java中该注解的说明:@PostConstruct该注解被用来修饰一个非静态的void()方法。被@PostConstruct修饰的方法会在服务器加载Servlet的时候运行,并且只会被服务器执行一次。PostConstruct在构造函数之后执行,init()方法之前执行。

通常我们会是在Spring框架中使用到@PostConstruct注解 该注解的方法在整个Bean初始化中的执行顺序:
package com.nowcoder.community.util;

import org.apache.commons.lang3.CharUtils;
import org.apache.commons.lang3.StringUtils;
import org.slf4j.Logger;
import org.slf4j.LoggerFactory;
import org.springframework.stereotype.Component;

import javax.annotation.PostConstruct;
import java.io.BufferedReader;
import java.io.IOException;
import java.io.InputStream;
import java.io.InputStreamReader;
import java.util.HashMap;
import java.util.Map;

@Component
public class SensitiveFilter {

    private static final Logger logger = LoggerFactory.getLogger(SensitiveFilter.class);

    // 替换符
    private static final String REPLACEMENT = "***";

    // 根节点
    private TrieNode rootNode = new TrieNode();
//在加载servlet时候运行 Constructor(构造方法) -> @Autowired(依赖注入) -> @PostConstruct(注释的方法)
    @PostConstruct
    public void init() {
        try (
                InputStream is = this.getClass().getClassLoader().getResourceAsStream("sensitive-words.txt");
                BufferedReader reader = new BufferedReader(new InputStreamReader(is));
        ) {
            String keyword;
            while ((keyword = reader.readLine()) != null) {
                // 添加到前缀树
                this.addKeyword(keyword);
            }
        } catch (IOException e) {
            logger.error("加载敏感词文件失败: " + e.getMessage());
        }
    }

    // 将一个敏感词添加到前缀树中
    private void addKeyword(String keyword) {
        TrieNode tempNode = rootNode;
        for (int i = 0; i < keyword.length(); i++) {
            char c = keyword.charAt(i);
            TrieNode subNode = tempNode.getSubNode(c);

            if (subNode == null) {
                // 初始化子节点
                subNode = new TrieNode();
                tempNode.addSubNode(c, subNode);
            }

            // 指向子节点,进入下一轮循环
            tempNode = subNode;

            // 设置结束标识
            if (i == keyword.length() - 1) {
                tempNode.setKeywordEnd(true);
            }
        }
    }

    /**
     * 过滤敏感词
     *
     * @param text 待过滤的文本
     * @return 过滤后的文本
     */
    public String filter(String text) {
        if (StringUtils.isBlank(text)) {
            return null;
        }

        // 指针1
        TrieNode tempNode = rootNode;
        // 指针2
        int begin = 0;
        // 指针3
        int position = 0;
        // 结果
        StringBuilder sb = new StringBuilder();

        while (position < text.length()) {
            char c = text.charAt(position);

            // 跳过符号
            if (isSymbol(c)) {
                // 若指针1处于根节点,将此符号计入结果,让指针2向下走一步
                if (tempNode == rootNode) {
                    sb.append(c);
                    begin++;
                }
                // 无论符号在开头或中间,指针3都向下走一步
                position++;
                continue;
            }

            // 检查下级节点
            tempNode = tempNode.getSubNode(c);
            if (tempNode == null) {
                // 以begin开头的字符串不是敏感词
                sb.append(text.charAt(begin));
                // 进入下一个位置
                position = ++begin;
                // 重新指向根节点
                tempNode = rootNode;
            } else if (tempNode.isKeywordEnd()) {
                // 发现敏感词,将begin~position字符串替换掉
                sb.append(REPLACEMENT);
                // 进入下一个位置
                begin = ++position;
                // 重新指向根节点
                tempNode = rootNode;
            } else {
                // 检查下一个字符
                position++;
            }
        }

        // 将最后一批字符计入结果
        sb.append(text.substring(begin));

        return sb.toString();
    }

    // 判断是否为符号
    private boolean isSymbol(Character c) {
        // 0x2E80~0x9FFF 是东亚文字范围
        return !CharUtils.isAsciiAlphanumeric(c) && (c < 0x2E80 || c > 0x9FFF);
    }

    // 前缀树
    private class TrieNode {

        // 关键词结束标识
        private boolean isKeywordEnd = false;

        // 子节点(key是下级字符,value是下级节点)
        private Map<Character, TrieNode> subNodes = new HashMap<>();

        public boolean isKeywordEnd() {
            return isKeywordEnd;
        }

        public void setKeywordEnd(boolean keywordEnd) {
            isKeywordEnd = keywordEnd;
        }

        // 添加子节点
        public void addSubNode(Character c, TrieNode node) {
            subNodes.put(c, node);
        }

        // 获取子节点
        public TrieNode getSubNode(Character c) {
            return subNodes.get(c);
        }

    }

}
敏感词汇会被星号替代!
7、事务管理
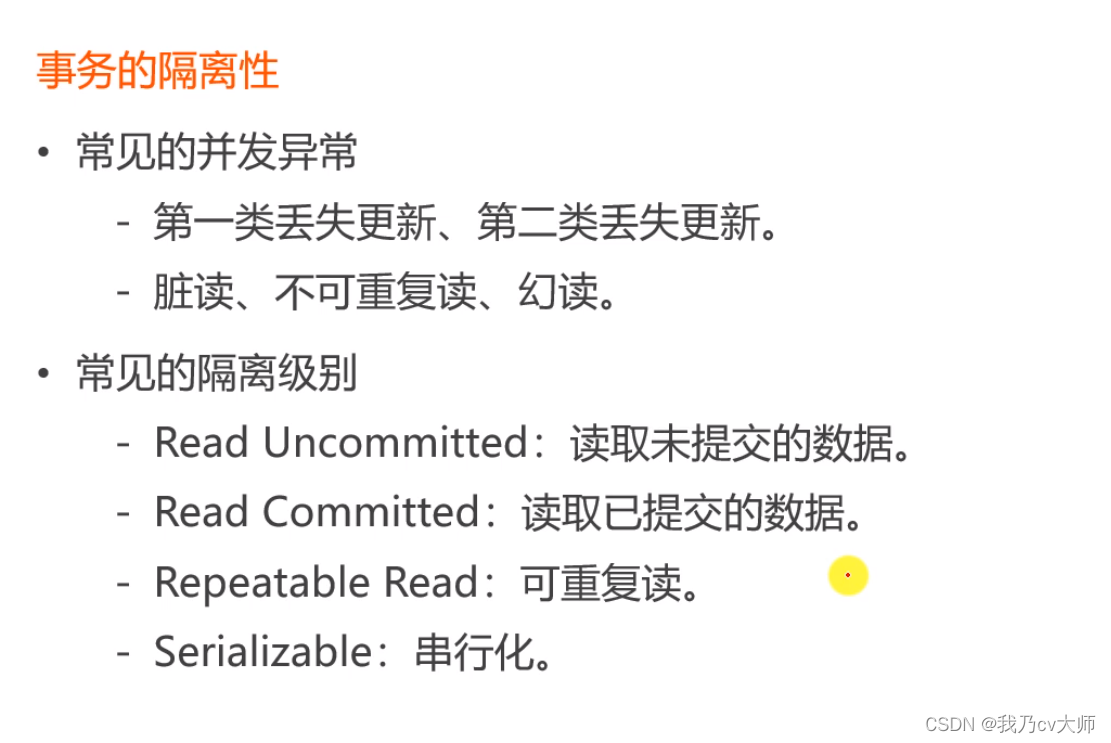
7.1 事务的隔离性
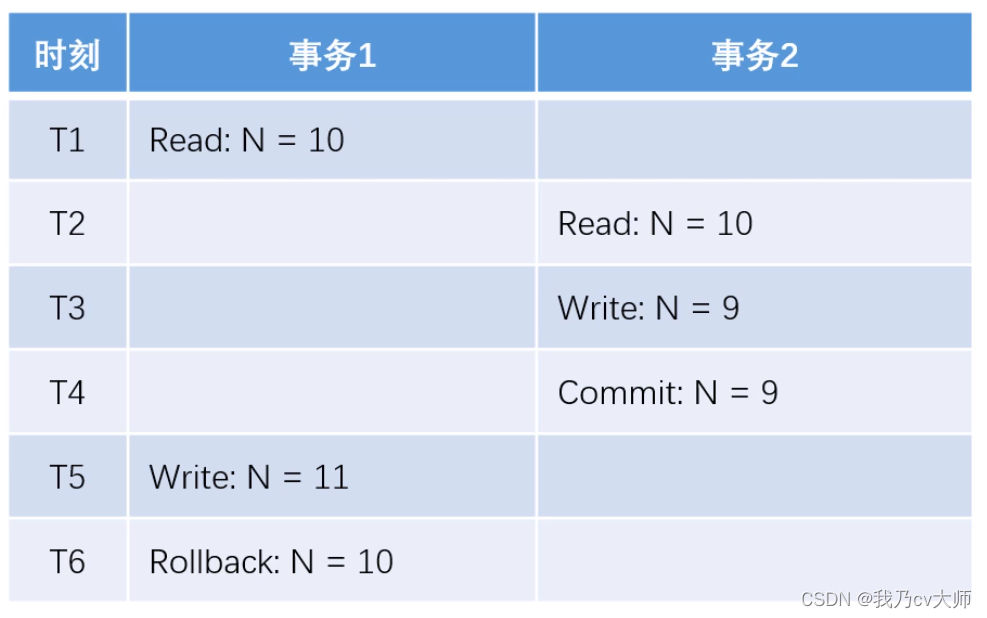
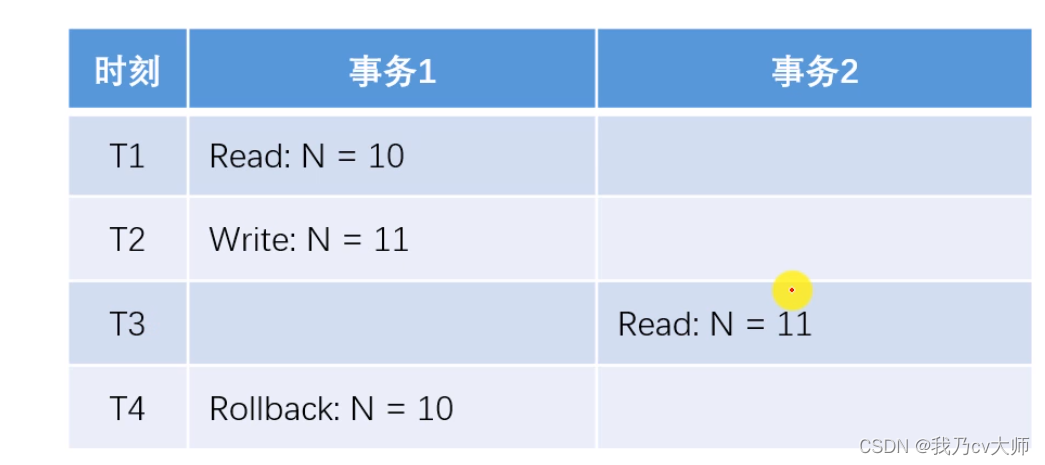
第一类丢失更新:某一个事务的更新,导致另一个事务已更新的数据丢失
经典例子:
T6下,第一类丢失更新导致,事务回滚后N=10,但实际上N应该等于9.两个事务操作间隔时间过短,某一个事务的回滚,导致另一个事务已更新的数据丢失了。
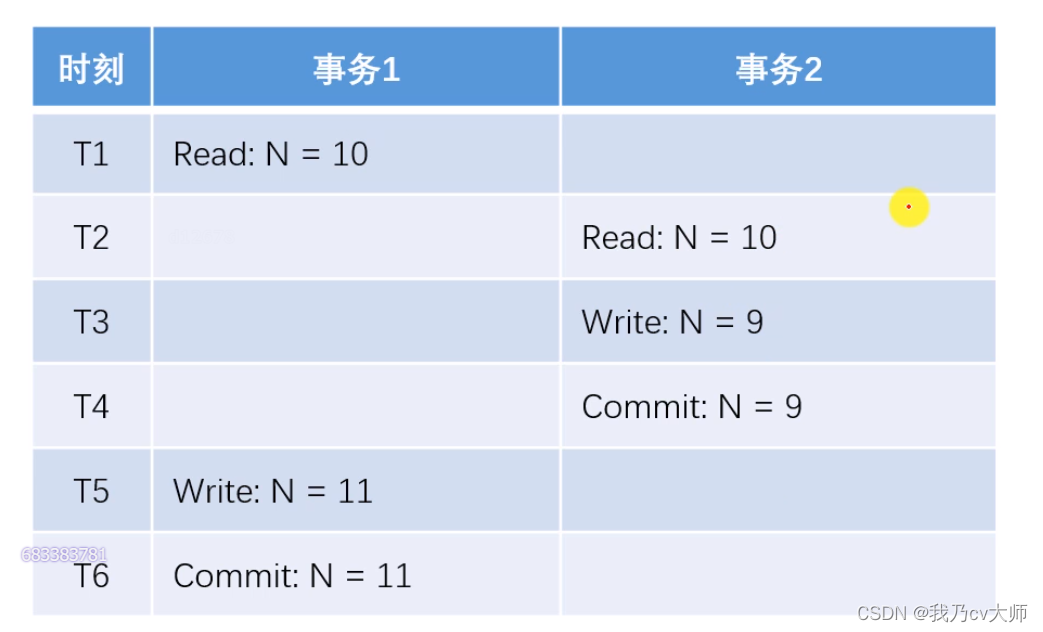
第二类丢失更新:
某一个事务的提交,导致另外一个事务已经更新的数据丢失了
可见事务2更新的数据丢失了
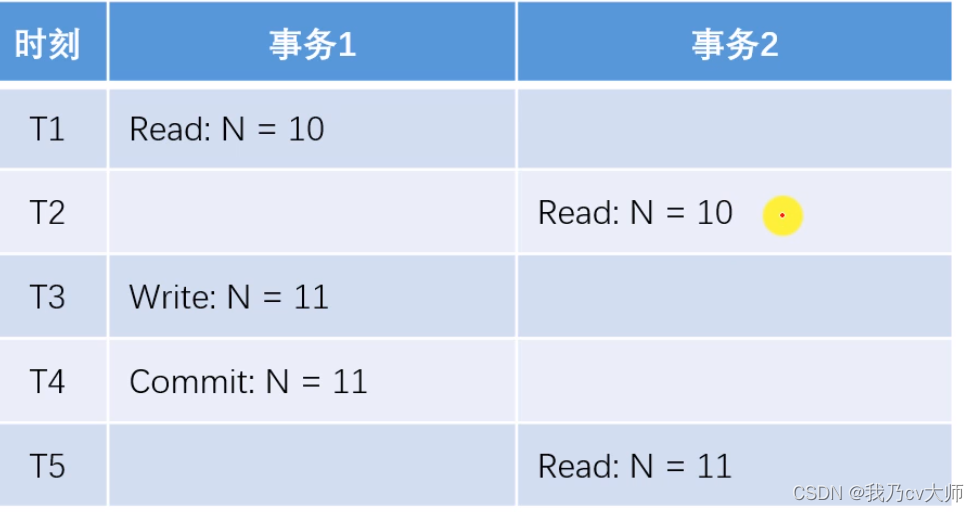
不可重复读:
某一个事务,对同一个数据前后读取的结果不一致
脏读:某一个事务,读取了另外一个事务未提交的数据
事务2在T3时刻读取了事务1的T2操作的数据
幻读:某一个事务,对同一个表前后查询到的行数不一致
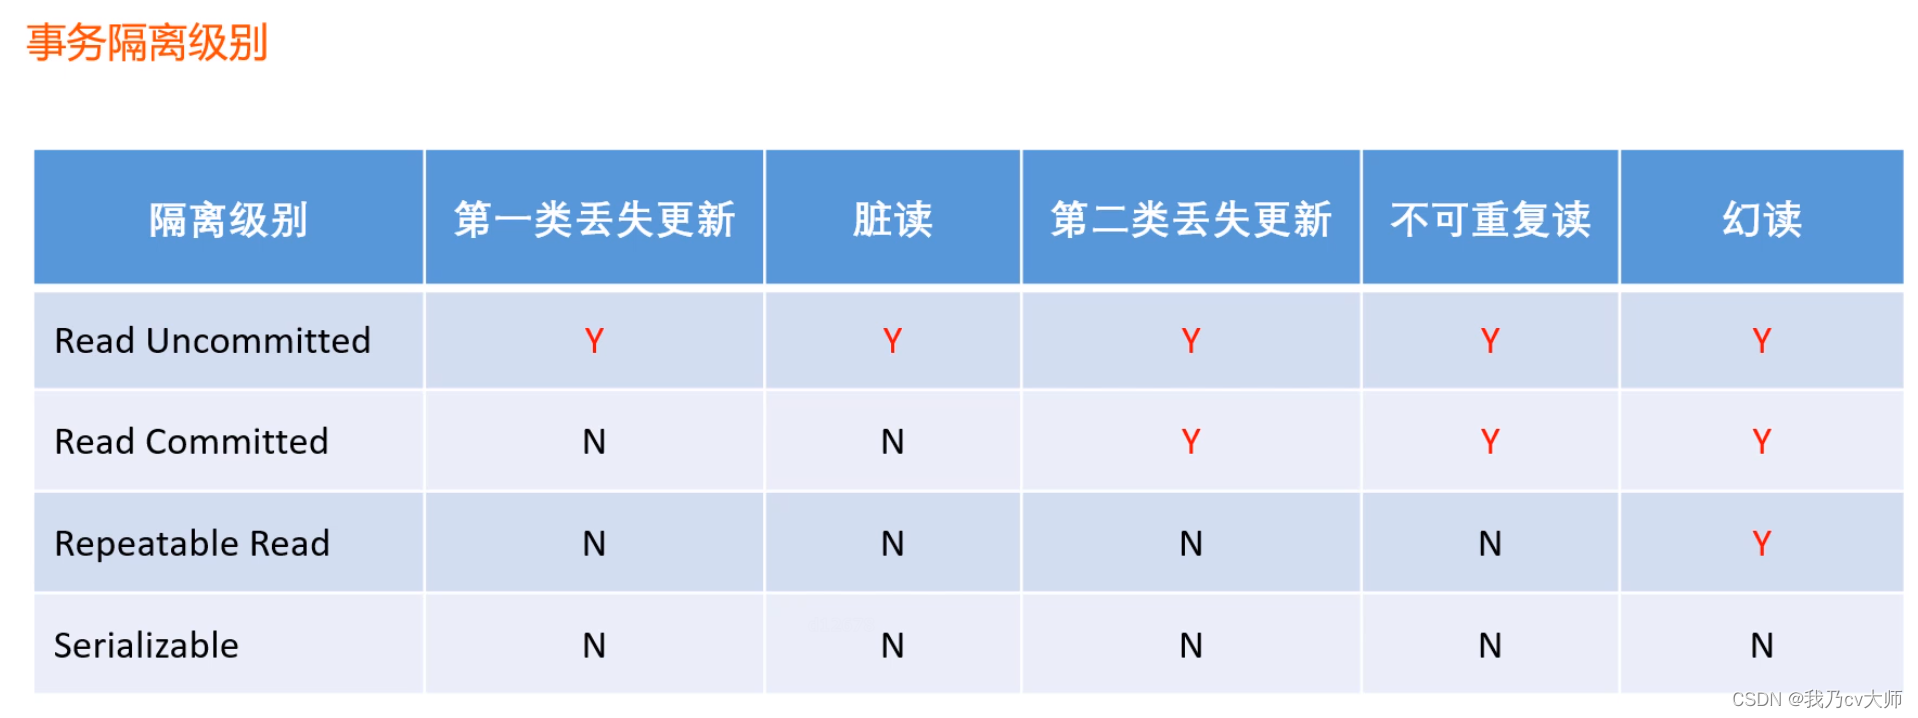
如何避免上述的bug
隔离级别越高,性能越低。
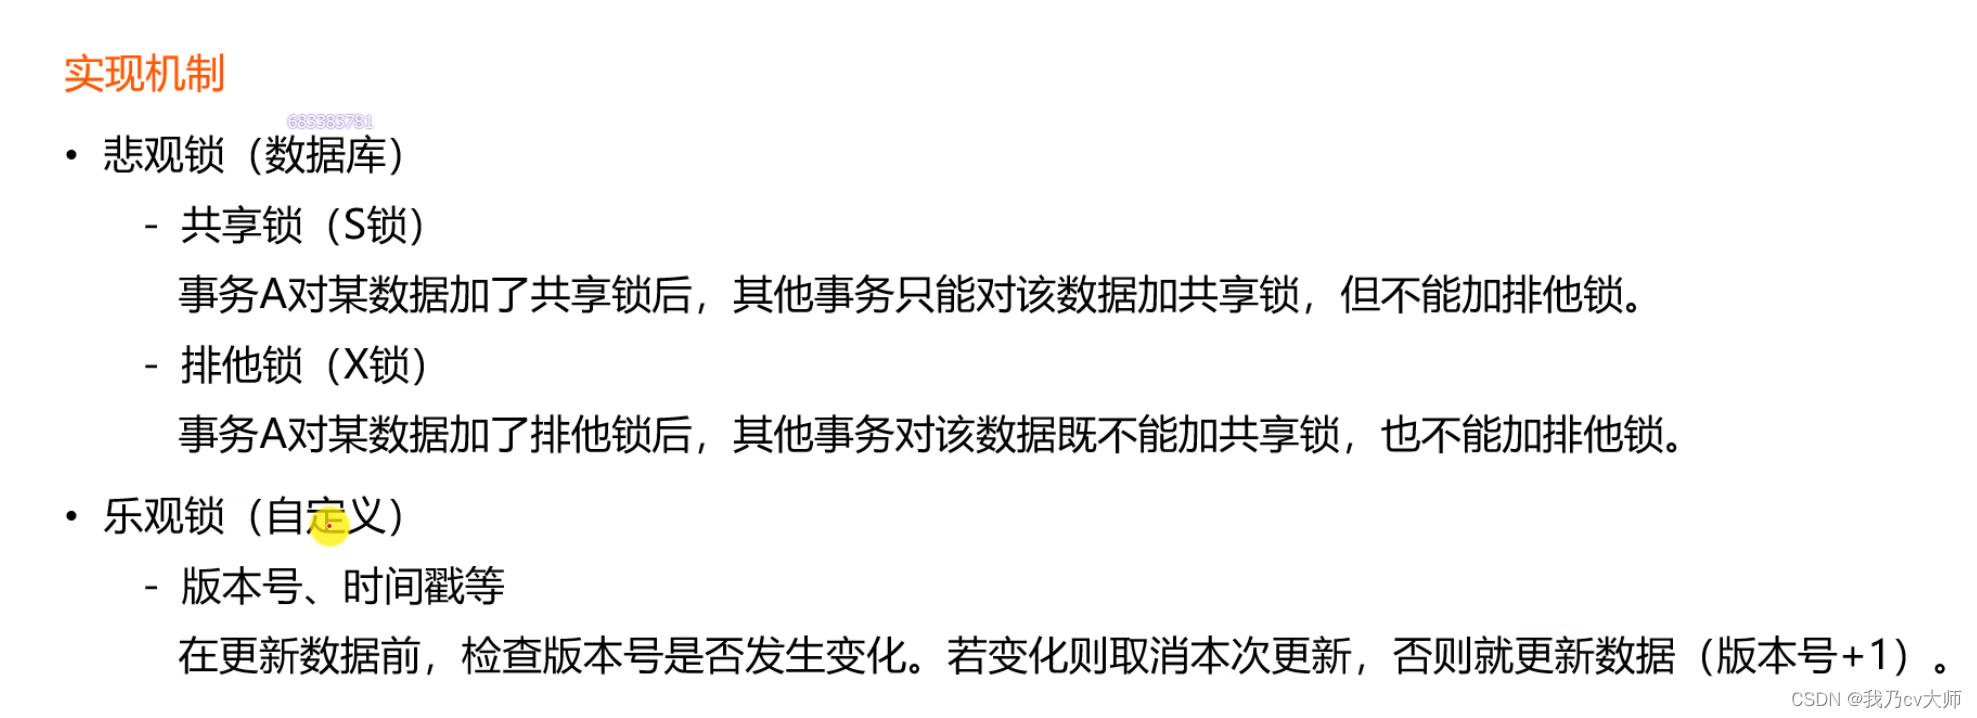
用锁实现隔离
7.2 Spring事务管理
1.声明式:通过XML配置或者注解,声明某方法的事务特征(全局的)
2.编程式事务:通过TransactionTemplate管理事务,并通过它执行数据库的操作(局部)
什么是事务属性呢? 事务属性可以理解成事务的一些基本配置,描述了事务策略如何应用到方法上。
事务属性包含了 5 个方面:
- 隔离级别
- 传播行为
- 回滚规则
- 是否只读
- 事务超时
TransactionDefinition 接口中定义了 5 个方法以及一些表示事务属性的常量比如隔离级别、传播行为等等。
这里着重讲一下传播行为有哪些以及它们的差异:
事务传播行为是为了解决业务层方法之间互相调用的事务问题。
当事务方法被另一个事务方法调用时,必须指定事务应该如何传播。例如:方法可能继续在现有事务中运行,也可能开启一个新事务,并在自己的事务中运行。
下面进行示例操作,分别通过声明式和编程式事务实现事务回滚
package com.nowcoder.community.service;

import com.nowcoder.community.dao.AlphaDao;
import com.nowcoder.community.dao.DiscussPostMapper;
import com.nowcoder.community.dao.UserMapper;
import com.nowcoder.community.entity.DiscussPost;
import com.nowcoder.community.entity.User;
import com.nowcoder.community.util.CommunityUtil;
import org.springframework.beans.factory.annotation.Autowired;
import org.springframework.context.annotation.Scope;
import org.springframework.stereotype.Service;
import org.springframework.transaction.TransactionDefinition;
import org.springframework.transaction.TransactionStatus;
import org.springframework.transaction.annotation.Isolation;
import org.springframework.transaction.annotation.Propagation;
import org.springframework.transaction.annotation.Transactional;
import org.springframework.transaction.support.TransactionCallback;
import org.springframework.transaction.support.TransactionTemplate;

import javax.annotation.PostConstruct;
import javax.annotation.PreDestroy;
import java.util.Date;

@Service
//@Scope("prototype")
public class AlphaService {

    @Autowired
    private AlphaDao alphaDao;

    @Autowired
    private UserMapper userMapper;

    @Autowired
    private DiscussPostMapper discussPostMapper;

    @Autowired
    private TransactionTemplate transactionTemplate;

    public AlphaService() {
//        System.out.println("实例化AlphaService");
    }

    @PostConstruct
    public void init() {
//        System.out.println("初始化AlphaService");
    }

    @PreDestroy
    public void destroy() {
//        System.out.println("销毁AlphaService");
    }

    public String find() {
        return alphaDao.select();
    }

    // REQUIRED: 支持当前事务(外部事务),如果不存在则创建新事务.
    // REQUIRES_NEW: 创建一个新事务,并且暂停当前事务(外部事务).
    // NESTED: 如果当前存在事务(外部事务),则嵌套在该事务中执行(独立的提交和回滚),否则就会REQUIRED一样.

    //isolation 隔离性 propagation 传播机制
    @Transactional(isolation = Isolation.READ_COMMITTED, propagation = Propagation.REQUIRED)
    public Object save1() {
        // 新增用户
        User user = new User();
        user.setUsername("alpha");
        user.setSalt(CommunityUtil.generateUUID().substring(0, 5));
        user.setPassword(CommunityUtil.md5("123" + user.getSalt()));
        user.setEmail("[email protected]");
        user.setHeaderUrl("http://image.nowcoder.com/head/99t.png");
        user.setCreateTime(new Date());
        userMapper.insertUser(user);

        // 新增帖子
        DiscussPost post = new DiscussPost();
        post.setUserId(user.getId());
        post.setTitle("Hello");
        post.setContent("新人报道!");
        post.setCreateTime(new Date());
        discussPostMapper.insertDiscussPost(post);

        Integer.valueOf("abc");

        return "ok";
    }
//通过TransactionTemplate进行局部的事务回滚
    public Object save2() {
        transactionTemplate.setIsolationLevel(TransactionDefinition.ISOLATION_READ_COMMITTED);
        transactionTemplate.setPropagationBehavior(TransactionDefinition.PROPAGATION_REQUIRED);

        return transactionTemplate.execute(new TransactionCallback<Object>() {
            @Override
            public Object doInTransaction(TransactionStatus status) {
                // 新增用户
                User user = new User();
                user.setUsername("beta");
                user.setSalt(CommunityUtil.generateUUID().substring(0, 5));
                user.setPassword(CommunityUtil.md5("123" + user.getSalt()));
                user.setEmail("[email protected]");
                user.setHeaderUrl("http://image.nowcoder.com/head/999t.png");
                user.setCreateTime(new Date());
                userMapper.insertUser(user);

                // 新增帖子
                DiscussPost post = new DiscussPost();
                post.setUserId(user.getId());
                post.setTitle("你好");
                post.setContent("我是新人!");
                post.setCreateTime(new Date());
                discussPostMapper.insertDiscussPost(post);

                Integer.valueOf("abc");

                return "ok";
            }
        });
    }

}
8、评论操作
一段文章下,会有评论,而用户可以对评论进行回复。文章列表下的评论可以增加分页操作,而回复的回复没有必要进行分页了。那么,如何去编写文章列表的回复内容呢。
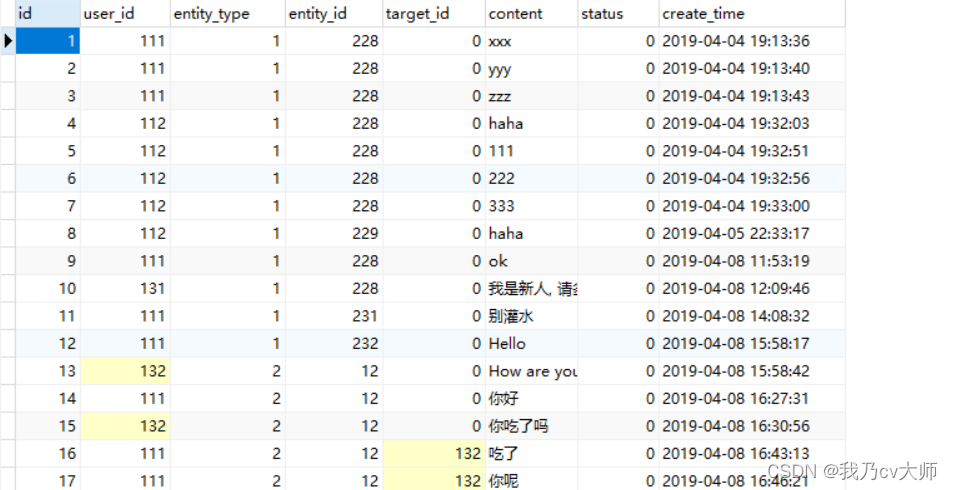
将评论分为一级评论和二级评论,即标记type为1和2,标记为1的即文章的评论回复,标记为2的即为评论的评论回复,同时评论也有评论者和被评论者,以及评论内容,这些都应该被存储。
user_id即用户id,entity_type指定该评论为文章的评论,还是评论的评论,entity_id对应文章的id,target_id根据entity_type对应文章/评论的id(回复的),content表示内容
可以逐次往下分级,首先是文章详情
文章详情下可存储List<Comment>list,其中Comment中拥有 回复者id 被回复者id 回复内容,回复等级,回复id等属性,存储到数据库中。数据回显便是,根据文章的id,查找到所有的一级评论,以及评论者的id和内容,再根据一级评论的id,查找二级评论(type为1),逻辑形成闭环。
具体流程:
1、根据文章id查询出所有在文章下面的评论List<Comment>list
2、遍历list,建立List<Map<String,Object>>listVo,存放评论的目标,评论的内容、日期、回复列表(即target为自己的id的评论列表)、点赞等
3、将listVo返回到前端
  @RequestMapping(path = "/detail/{discussPostId}", method = RequestMethod.GET)
    public String getDiscussPost(@PathVariable("discussPostId") int discussPostId, Model model, Page page) {
        // 帖子
        DiscussPost post = discussPostService.findDiscussPostById(discussPostId);
        model.addAttribute("post", post);
        // 作者
        User user = userService.findUserById(post.getUserId());
        model.addAttribute("user", user);
        // 点赞数量
        long likeCount = likeService.findEntityLikeCount(ENTITY_TYPE_POST, discussPostId);
        model.addAttribute("likeCount", likeCount);
        // 点赞状态
        int likeStatus = hostHolder.getUser() == null ? 0 :
                likeService.findEntityLikeStatus(hostHolder.getUser().getId(), ENTITY_TYPE_POST, discussPostId);
        model.addAttribute("likeStatus", likeStatus);

        // 评论分页信息
        page.setLimit(5);
        page.setPath("/discuss/detail/" + discussPostId);
        page.setRows(post.getCommentCount());

        // 评论: 给帖子的评论
        // 回复: 给评论的评论
        // 评论列表
        List<Comment> commentList = commentService.findCommentsByEntity(
                ENTITY_TYPE_POST, post.getId(), page.getOffset(), page.getLimit());
        // 评论VO列表
        List<Map<String, Object>> commentVoList = new ArrayList<>();
        if (commentList != null) {
            for (Comment comment : commentList) {
                // 评论VO
                Map<String, Object> commentVo = new HashMap<>();
                // 评论
                commentVo.put("comment", comment);
                // 作者
                commentVo.put("user", userService.findUserById(comment.getUserId()));
                // 点赞数量
                likeCount = likeService.findEntityLikeCount(ENTITY_TYPE_COMMENT, comment.getId());
                commentVo.put("likeCount", likeCount);
                // 点赞状态
                likeStatus = hostHolder.getUser() == null ? 0 :
                        likeService.findEntityLikeStatus(hostHolder.getUser().getId(), ENTITY_TYPE_COMMENT, comment.getId());
                commentVo.put("likeStatus", likeStatus);

                // 回复列表
                List<Comment> replyList = commentService.findCommentsByEntity(
                        ENTITY_TYPE_COMMENT, comment.getId(), 0, Integer.MAX_VALUE);
                // 回复VO列表
                List<Map<String, Object>> replyVoList = new ArrayList<>();
                if (replyList != null) {
                    for (Comment reply : replyList) {
                        Map<String, Object> replyVo = new HashMap<>();
                        // 回复
                        replyVo.put("reply", reply);
                        // 作者
                        replyVo.put("user", userService.findUserById(reply.getUserId()));
                        // 回复目标
                        User target = reply.getTargetId() == 0 ? null : userService.findUserById(reply.getTargetId());
                        replyVo.put("target", target);
                        // 点赞数量
                        likeCount = likeService.findEntityLikeCount(ENTITY_TYPE_COMMENT, reply.getId());
                        replyVo.put("likeCount", likeCount);
                        // 点赞状态
                        likeStatus = hostHolder.getUser() == null ? 0 :
                                likeService.findEntityLikeStatus(hostHolder.getUser().getId(), ENTITY_TYPE_COMMENT, reply.getId());
                        replyVo.put("likeStatus", likeStatus);

                        replyVoList.add(replyVo);
                    }
                }
                commentVo.put("replys", replyVoList);

                // 回复数量
                int replyCount = commentService.findCommentCount(ENTITY_TYPE_COMMENT, comment.getId());
                commentVo.put("replyCount", replyCount);

                commentVoList.add(commentVo);
            }
        }

        model.addAttribute("comments", commentVoList);

        return "/site/discuss-detail";
    }
9、私信
没什么难度,就是普通的增删改查
10、统一异常处理
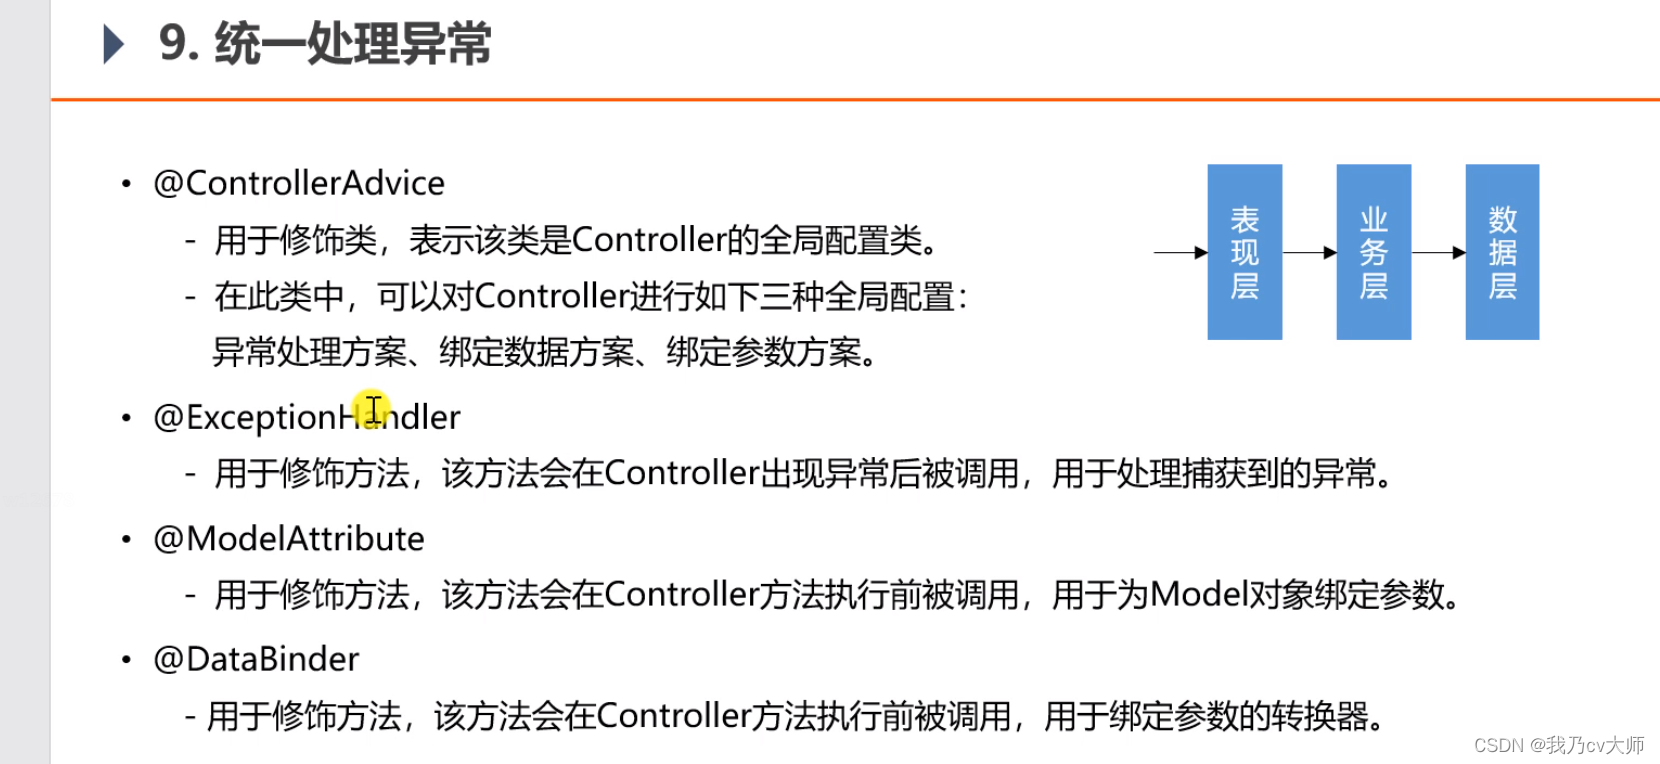
下面集中介绍一下@ControllerAdvice注解,用于controller中出现的异常
@ExceptionHandler({Exception.class}) 处理发生异常的方法
再判断该异常发生处是同步请求还是异步请求,异步报服务器异常,同步直接重定向到error界面
package com.nowcoder.community.controller.advice;

import com.nowcoder.community.util.CommunityUtil;
import org.slf4j.Logger;
import org.slf4j.LoggerFactory;
import org.springframework.stereotype.Controller;
import org.springframework.web.bind.annotation.ControllerAdvice;
import org.springframework.web.bind.annotation.ExceptionHandler;

import javax.servlet.http.HttpServletRequest;
import javax.servlet.http.HttpServletResponse;
import java.io.IOException;
import java.io.PrintWriter;
//去扫描带有controller注解的bean
@ControllerAdvice(annotations = Controller.class)
public class ExceptionAdvice {
     //日志记录
    private static final Logger logger = LoggerFactory.getLogger(ExceptionAdvice.class);
     //处理所有异常的方法
    @ExceptionHandler({Exception.class})
    public void handleException(Exception e, HttpServletRequest request, HttpServletResponse response) throws IOException {
        logger.error("服务器发生异常: " + e.getMessage());
        for (StackTraceElement element : e.getStackTrace()) {
            logger.error(element.toString());
        }
         //判断请求方式
        String xRequestedWith = request.getHeader("x-requested-with");
        //如果是异步请求(请求资源,如从前端返回json,或者向前端发送json字符串)
        if ("XMLHttpRequest".equals(xRequestedWith)) {
            response.setContentType("application/plain;charset=utf-8");
            PrintWriter writer = response.getWriter();
            writer.write(CommunityUtil.getJSONString(1, "服务器异常!"));
        }
        //如果是同步请求(比如重定向操作,向服务器请求网址)
        else {
            response.sendRedirect(request.getContextPath() + "/error");
        }
    }

}
11、利用AOP进行日志记录
关于AOP的具体介绍
细说Spring——AOP详解(AOP概览)_Jivan2233的博客-CSDN博客_aop
代码如下
package com.nowcoder.community.aspect;

import org.aspectj.lang.ProceedingJoinPoint;
import org.aspectj.lang.annotation.*;
import org.springframework.stereotype.Component;

@Component
@Aspect
public class AlphaAspect {

    @Pointcut("execution(* com.nowcoder.community.service.*.*(..))")
    public void pointcut() {

    }
//切点开始之前
    @Before("pointcut()")
    public void before() {
        System.out.println("before");
    }
//切点结束后
    @After("pointcut()")
    public void after() {
        System.out.println("after");
    }
//在返回值以后
    @AfterReturning("pointcut()")
    public void afterRetuning() {
        System.out.println("afterRetuning");
    }
//在抛异常后
    @AfterThrowing("pointcut()")
    public void afterThrowing() {
        System.out.println("afterThrowing");
    }
//前后都执行
    @Around("pointcut()")
    public Object around(ProceedingJoinPoint joinPoint) throws Throwable {
        System.out.println("around before");
        //执行切点
        Object obj = joinPoint.proceed();
        System.out.println("around after");
        return obj;
    }

}
12、使用redis实现点赞功能,关注功能,对登陆模块进行优化
redisTemplate基操作:
基本数据类型的操作:
开启事务操作(并不支持回滚,如果想要保证事务的原子性,得用watch(在事务执行前watch,一旦有改动,直接放弃整个事务的操作)或者分布式锁)
12.1 redis序列化配置类的创建
为什么要创建工具类呢,java的字符串是无法直接传输进入redis的,两者数据格式并不相同,需要通过工具类进行序列化,才能进行正常的传输。如以下代码,是要经过序列化才行!
package com.nowcoder.community.config;

import org.springframework.context.annotation.Bean;
import org.springframework.context.annotation.Configuration;
import org.springframework.data.redis.connection.RedisConnectionFactory;
import org.springframework.data.redis.core.RedisTemplate;
import org.springframework.data.redis.serializer.RedisSerializer;

@Configuration
public class RedisConfig {

    @Bean
    public RedisTemplate<String, Object> redisTemplate(RedisConnectionFactory factory) {
        RedisTemplate<String, Object> template = new RedisTemplate<>();
        template.setConnectionFactory(factory);
//将JAVA数据转换成Redis的数据格式
        // 设置key的序列化方式
        template.setKeySerializer(RedisSerializer.string());
        // 设置value的序列化方式
        template.setValueSerializer(RedisSerializer.json());
        // 设置hash的key的序列化方式
        template.setHashKeySerializer(RedisSerializer.string());
        // 设置hash的value的序列化方式
        template.setHashValueSerializer(RedisSerializer.json());
System.out.println("Bean 正运行-----------------------------");
        template.afterPropertiesSet();
        return template;
    }

}
12.2 配置文件编写
# RedisProperties
spring.redis.database=选择数据库序号
spring.redis.host=redis的ip
spring.redis.port=redis端口号
spring.redis.password=redis密码
12.3 点赞功能
不只是点赞,或者是关注功能,根据不同的功能,结合不同的主题,可以定义不同类别的key,至于key对应的value值,根据具体关注的用户/点赞的文章/评论等的id来确认
首先梳理一下点赞功能的业务逻辑。点赞,是当前登陆的用户给其他用户的帖子进行点赞,不能重复点赞,可以取消点赞。那么,往redis中存入帖子的id和用户的id即可,同时也要统计一个帖子的点赞数量的总量,那么我们可以采用redis当中的set
set可以做到一个key对应多个value的情况
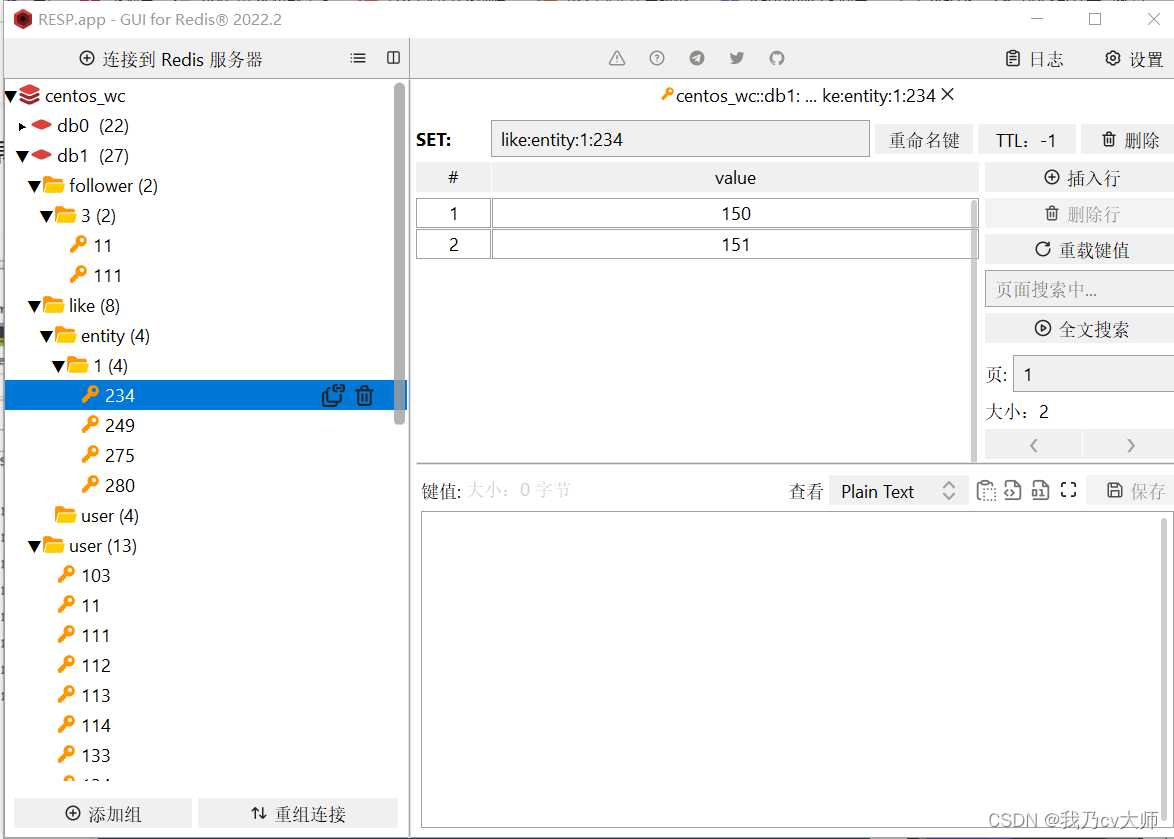
我们将键设为like:entity:type:entityid:其中type为1(默认帖子为1,种类有评论,用户等,都可以点赞,在这里我们只讨论文章点赞情况),entityid为对应的type的id。那么我们将键固定好,而值便是进行点赞用户操作的用户id。在redis中,set的键唯一,而对应的值是可以有很多个,这恰恰符合我们的需求。
整体结构如下图所示
每个键对应这一篇文章/用户/回复,可以根据value进行一个统计,查找,删除,更新。
所以,统计一篇文章的点赞数量,我们只要找到他的键,再统计这个键内值的数量即可。
所以,给一篇文章点赞,只要找到对应的键(找不到则创建),将用户的id放进去就行了
所以,给一篇文章取消点赞,只要找到对应的键,移除相对应的值(用户id)即可
对于用户关注的东西,考虑到关注的时间存在先后,可以采用Zset数据结构来存储,value为关注对象的id,score为日期。
代码实现如下 工具类
package com.nowcoder.community.util;

public class RedisKeyUtil {

    private static final String SPLIT = ":";
    //某个实体的赞
    private static final String PREFIX_ENTITY_LIKE = "like:entity";
    //某个用户的赞
    private static final String PREFIX_USER_LIKE = "like:user";
    //某个用户关注的赞
    private static final String PREFIX_FOLLOWEE = "followee";
    //某个用户拥有的粉丝
    private static final String PREFIX_FOLLOWER = "follower";
    //验证码
    private static final String PREFIX_KAPTCHA = "kaptcha";
    //登陆凭证
    private static final String PREFIX_TICKET = "ticket";
    //用户
    private static final String PREFIX_USER = "user";

    // 某个实体的赞
    // like:entity:entityType:entityId -> set(userId)
    public static String getEntityLikeKey(int entityType, int entityId) {
        return PREFIX_ENTITY_LIKE + SPLIT + entityType + SPLIT + entityId;
    }

    // 某个用户的赞
    // like:user:userId -> int
    public static String getUserLikeKey(int userId) {
        return PREFIX_USER_LIKE + SPLIT + userId;
    }

    // 某个用户关注的实体
    // followee:userId:entityType -> zset(entityId,now)
    public static String getFolloweeKey(int userId, int entityType) {
        return PREFIX_FOLLOWEE + SPLIT + userId + SPLIT + entityType;
    }

    // 某个实体拥有的粉丝
    // follower:entityType:entityId -> zset(userId,now)
    public static String getFollowerKey(int entityType, int entityId) {
        return PREFIX_FOLLOWER + SPLIT + entityType + SPLIT + entityId;
    }

    // 登录验证码
    public static String getKaptchaKey(String owner) {
        return PREFIX_KAPTCHA + SPLIT + owner;
    }

    // 登录的凭证
    public static String getTicketKey(String ticket) {
        return PREFIX_TICKET + SPLIT + ticket;
    }

    // 用户
    public static String getUserKey(int userId) {
        return PREFIX_USER + SPLIT + userId;
    }

}
service层
package com.nowcoder.community.service;

import com.nowcoder.community.util.RedisKeyUtil;
import org.springframework.beans.factory.annotation.Autowired;
import org.springframework.dao.DataAccessException;
import org.springframework.data.redis.core.RedisOperations;
import org.springframework.data.redis.core.RedisTemplate;
import org.springframework.data.redis.core.SessionCallback;
import org.springframework.stereotype.Service;

@Service
public class LikeService {

    @Autowired
    private RedisTemplate redisTemplate;

    // 点赞
    //业务逻辑:已经点过赞再点就是取消点赞,没点过的可以接着点
    public void like(int userId, int entityType, int entityId, int entityUserId) {
        //redis保证事务性,并不保证原子性。事务提供了将多个命令请求打包,然后一次性按顺序执行这些命令。在事务执行期间,服务器不会中断事务而改去执行其他客户端的命令请求,它会将事务中的所有命令都执行完毕,再去处理其他客户端的命令请求
        redisTemplate.execute(new SessionCallback() {
            @Override
            public Object execute(RedisOperations  operations) throws DataAccessException {
                String entityLikeKey = RedisKeyUtil.getEntityLikeKey(entityType, entityId);
                String userLikeKey = RedisKeyUtil.getUserLikeKey(entityUserId);

                boolean isMember = operations.opsForSet().isMember(entityLikeKey, userId);

                operations.multi();
                //如果已经点过赞,即set中已有该用户id,用户点后,则取消点赞
                if (isMember) {
                    operations.opsForSet().remove(entityLikeKey, userId);
                    operations.opsForValue().decrement(userLikeKey);
                } else {//如果没有点赞,用户点后,则点赞
                    operations.opsForSet().add(entityLikeKey, userId);
                    operations.opsForValue().increment(userLikeKey);
                }

                return operations.exec();
            }
        });
    }

    // 查询某实体点赞的数量
    public long findEntityLikeCount(int entityType, int entityId) {
        String entityLikeKey = RedisKeyUtil.getEntityLikeKey(entityType, entityId);
        return redisTemplate.opsForSet().size(entityLikeKey);
    }

    // 查询某人对某实体的点赞状态
    public int findEntityLikeStatus(int userId, int entityType, int entityId) {
        String entityLikeKey = RedisKeyUtil.getEntityLikeKey(entityType, entityId);
        return redisTemplate.opsForSet().isMember(entityLikeKey, userId) ? 1 : 0;
    }

    // 查询某个用户获得的赞
    public int findUserLikeCount(int userId) {
        String userLikeKey = RedisKeyUtil.getUserLikeKey(userId);
        Integer count = (Integer) redisTemplate.opsForValue().get(userLikeKey);
        return count == null ? 0 : count.intValue();
    }

}
controller层
package com.nowcoder.community.controller;

import com.nowcoder.community.entity.User;
import com.nowcoder.community.service.LikeService;
import com.nowcoder.community.util.CommunityUtil;
import com.nowcoder.community.util.HostHolder;
import org.springframework.beans.factory.annotation.Autowired;
import org.springframework.stereotype.Controller;
import org.springframework.web.bind.annotation.RequestMapping;
import org.springframework.web.bind.annotation.RequestMethod;
import org.springframework.web.bind.annotation.ResponseBody;

import java.util.HashMap;
import java.util.Map;

@Controller
public class LikeController {

    @Autowired
    private LikeService likeService;

    @Autowired
    private HostHolder hostHolder;

    @RequestMapping(path = "/like", method = RequestMethod.POST)
    @ResponseBody
    public String like(int entityType, int entityId, int entityUserId) {
        User user = hostHolder.getUser();

        // 点赞
        likeService.like(user.getId(), entityType, entityId, entityUserId);

        // 数量
        long likeCount = likeService.findEntityLikeCount(entityType, entityId);
        // 状态
        int likeStatus = likeService.findEntityLikeStatus(user.getId(), entityType, entityId);
        // 返回的结果
        Map<String, Object> map = new HashMap<>();
        map.put("likeCount", likeCount);
        map.put("likeStatus", likeStatus);

        return CommunityUtil.getJSONString(0, null, map);
    }

}
12.4 关注功能实现
基本和点赞实现逻辑一致,不赘述。
12.5 出现的问题
redis作为nosql数据库,数据保存在内存里面,相比MYSQL,访问速度更快!但这里有一个问题,日和保证redis的事务性,如果在高并发条件下,多用户短时间内同时和用户点赞,redis该如何进行操作,或者redis在执行事务过程中,出现bug后,如何执行事务回滚?
redis中有事务操作
Redis的事务操作_Angus_bnn的博客-CSDN博客_redis事务操作
13.KAFKA消息队列
消息队列主要为了保证在并发条件下的线程安全。这个后面再学详细的。
导入依赖
		<dependency>
			<groupId>org.springframework.kafka</groupId>
			<artifactId>spring-kafka</artifactId>
		</dependency>
定义生产者和消费者,定义主题topic
生产者:往消息队列中发送消息
package com.nowcoder.community.event;

import com.alibaba.fastjson.JSONObject;
import com.nowcoder.community.entity.Event;
import org.springframework.beans.factory.annotation.Autowired;
import org.springframework.kafka.core.KafkaTemplate;
import org.springframework.stereotype.Component;

@Component
public class EventProducer {

    @Autowired
    private KafkaTemplate kafkaTemplate;

    // 处理事件
    public void fireEvent(Event event) {
        // 将事件发布到指定的主题
        kafkaTemplate.send(event.getTopic(), JSONObject.toJSONString(event));
    }

}
消费者:有 @KafkaListener注解,自动消费队列内的消息,进行相应操作
package com.nowcoder.community.event;

import com.alibaba.fastjson.JSONObject;
import com.nowcoder.community.entity.DiscussPost;
import com.nowcoder.community.entity.Event;
import com.nowcoder.community.entity.Message;
import com.nowcoder.community.service.DiscussPostService;
import com.nowcoder.community.service.ElasticsearchService;
import com.nowcoder.community.service.MessageService;
import com.nowcoder.community.util.CommunityConstant;
import org.apache.kafka.clients.consumer.ConsumerRecord;
import org.slf4j.Logger;
import org.slf4j.LoggerFactory;
import org.springframework.beans.factory.annotation.Autowired;
import org.springframework.kafka.annotation.KafkaListener;
import org.springframework.stereotype.Component;

import java.util.Date;
import java.util.HashMap;
import java.util.Map;

@Component
public class EventConsumer implements CommunityConstant {

    private static final Logger logger = LoggerFactory.getLogger(EventConsumer.class);

    @Autowired
    private MessageService messageService;

    @Autowired
    private DiscussPostService discussPostService;

    @Autowired
    private ElasticsearchService elasticsearchService;

    @KafkaListener(topics = {TOPIC_COMMENT, TOPIC_LIKE, TOPIC_FOLLOW})
    public void handleCommentMessage(ConsumerRecord record) {
        if (record == null || record.value() == null) {
            logger.error("消息的内容为空!");
            return;
        }

        Event event = JSONObject.parseObject(record.value().toString(), Event.class);
        if (event == null) {
            logger.error("消息格式错误!");
            return;
        }

        // 发送站内通知
        Message message = new Message();
        message.setFromId(SYSTEM_USER_ID);
        message.setToId(event.getEntityUserId());
        message.setConversationId(event.getTopic());
        message.setCreateTime(new Date());

        Map<String, Object> content = new HashMap<>();
        content.put("userId", event.getUserId());
        content.put("entityType", event.getEntityType());
        content.put("entityId", event.getEntityId());

        if (!event.getData().isEmpty()) {
            for (Map.Entry<String, Object> entry : event.getData().entrySet()) {
                content.put(entry.getKey(), entry.getValue());
            }
        }

        message.setContent(JSONObject.toJSONString(content));
        messageService.addMessage(message);
    }

    // 消费发帖事件
    @KafkaListener(topics = {TOPIC_PUBLISH})
    public void handlePublishMessage(ConsumerRecord record) {
        if (record == null || record.value() == null) {
            logger.error("消息的内容为空!");
            return;
        }

        Event event = JSONObject.parseObject(record.value().toString(), Event.class);
        if (event == null) {
            logger.error("消息格式错误!");
            return;
        }

        DiscussPost post = discussPostService.findDiscussPostById(event.getEntityId());
        elasticsearchService.saveDiscussPost(post);
    }

}
测试代码:即生产者生产消息,消费者消费指定topic的消息
package com.nowcoder.community;

import org.apache.kafka.clients.consumer.ConsumerRecord;
import org.junit.Test;
import org.junit.runner.RunWith;
import org.springframework.beans.factory.annotation.Autowired;
import org.springframework.boot.test.context.SpringBootTest;
import org.springframework.kafka.annotation.KafkaListener;
import org.springframework.kafka.core.KafkaTemplate;
import org.springframework.stereotype.Component;
import org.springframework.test.context.ContextConfiguration;
import org.springframework.test.context.junit4.SpringRunner;

@RunWith(SpringRunner.class)
@SpringBootTest
@ContextConfiguration(classes = CommunityApplication.class)
public class KafkaTests {

    @Autowired
    private KafkaProducer kafkaProducer;

    @Test
    public void testKafka() {
        kafkaProducer.sendMessage("test", "你好");
        kafkaProducer.sendMessage("test", "在吗");

        try {
            Thread.sleep(1000 * 10);
        } catch (InterruptedException e) {
            e.printStackTrace();
        }
    }

}

@Component
class KafkaProducer {

    @Autowired
    private KafkaTemplate kafkaTemplate;

    public void sendMessage(String topic, String content) {
        kafkaTemplate.send(topic, content);
    }

}

@Component
class KafkaConsumer {

    @KafkaListener(topics = {"test"})
    public void handleMessage(ConsumerRecord record) {
        System.out.println(record.value());
    }


}
15、ES 这里先不说
16、SpringSecurity的应用
优势
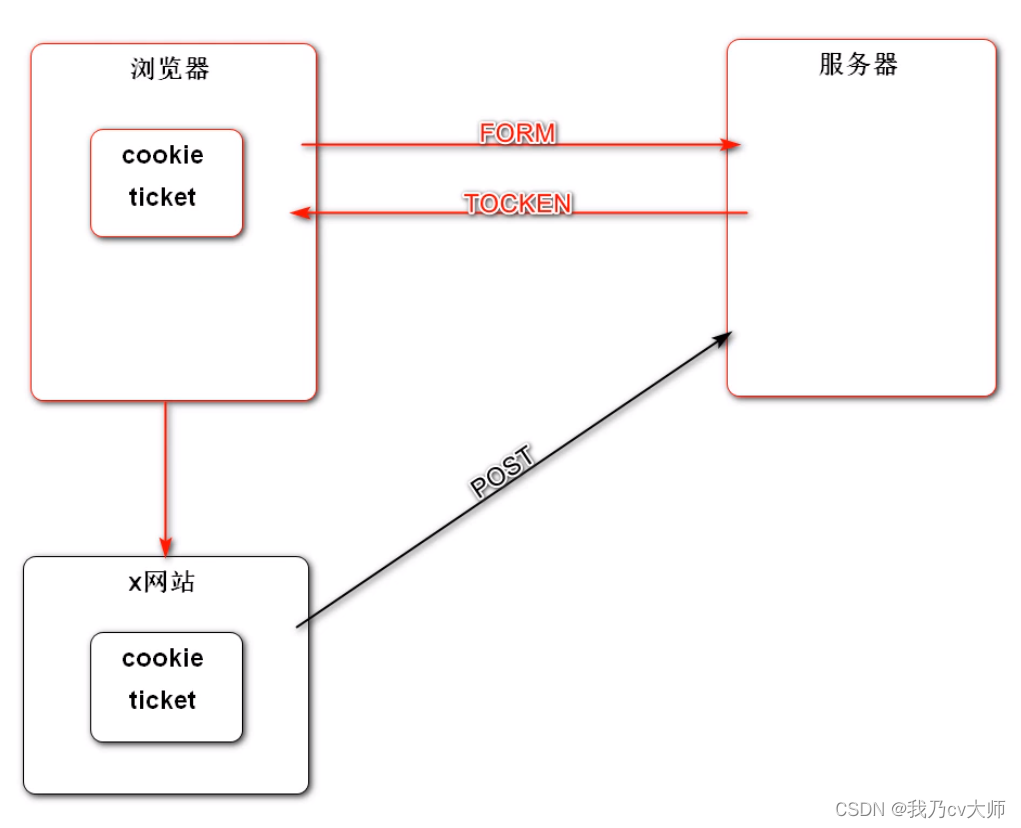
以普通方式提交表单,服务器返还ticket后,客户端将ticket放在浏览器的cookie中,非常容易被攻击,攻击者可以拦截ticket,去冒充用户向服务器发送请求。springsecruity进行改进,传回一个隐藏凭证token(同步请求,异步请求需要自己逻辑处理一下),这样就很难攻击了。
异步的话,把tocken放在请求头中,不易泄漏
    // 发送AJAX请求之前,将CSRF令牌设置到请求的消息头中.
//    var token = $("meta[name='_csrf']").attr("content");
//    var header = $("meta[name='_csrf_header']").attr("content");
//    $(document).ajaxSend(function(e, xhr, options){
//        xhr.setRequestHeader(header, token);
//    });
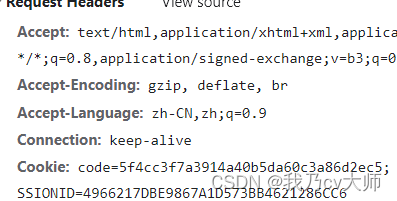
执行请求后,可以看到有请求头为:
16.1 导入相应依赖
	<dependency>
			<groupId>org.springframework.boot</groupId>
			<artifactId>spring-boot-starter-security</artifactId>
		</dependency>
16.2 编写config文件
通过antMatchers和hasAnyAuthority的组合使用,能够确定某些路径只能由特定权限的访问,否则会被拦截
package com.nowcoder.community.config;

import com.nowcoder.community.util.CommunityConstant;
import com.nowcoder.community.util.CommunityUtil;
import org.springframework.context.annotation.Configuration;
import org.springframework.security.access.AccessDeniedException;
import org.springframework.security.config.annotation.web.builders.HttpSecurity;
import org.springframework.security.config.annotation.web.builders.WebSecurity;
import org.springframework.security.config.annotation.web.configuration.WebSecurityConfigurerAdapter;
import org.springframework.security.core.AuthenticationException;
import org.springframework.security.web.AuthenticationEntryPoint;
import org.springframework.security.web.access.AccessDeniedHandler;

import javax.servlet.ServletException;
import javax.servlet.http.HttpServletRequest;
import javax.servlet.http.HttpServletResponse;
import java.io.IOException;
import java.io.PrintWriter;

@Configuration
public class SecurityConfig extends WebSecurityConfigurerAdapter implements CommunityConstant {

    @Override
    public void configure(WebSecurity web) throws Exception {
        web.ignoring().antMatchers("/resources/**");
    }

    @Override
    protected void configure(HttpSecurity http) throws Exception {
        // 授权
        http.authorizeRequests()
                .antMatchers(
                        "/user/setting",
                        "/user/upload",
                        "/discuss/add",
                        "/comment/add/**",
                        "/letter/**",
                        "/notice/**",
                        "/like",
                        "/follow",
                        "/unfollow"
                )
                .hasAnyAuthority(
                        AUTHORITY_USER,
                        AUTHORITY_ADMIN,
                        AUTHORITY_MODERATOR
                )
//增加权限操作
                .antMatchers(
                        "/discuss/top",
                        "/discuss/wonderful"
                )
                .hasAnyAuthority(
                        AUTHORITY_MODERATOR
                )
                .antMatchers(
                        "/discuss/delete"
                )
                .hasAnyAuthority(
                        AUTHORITY_ADMIN
                )
                .anyRequest().permitAll()
                .and().csrf().disable();

        // 权限不够时的处理
        http.exceptionHandling()
                .authenticationEntryPoint(new AuthenticationEntryPoint() {
                    // 没有登录
                    @Override
                    public void commence(HttpServletRequest request, HttpServletResponse response, AuthenticationException e) throws IOException, ServletException {
                        String xRequestedWith = request.getHeader("x-requested-with");
                        if ("XMLHttpRequest".equals(xRequestedWith)) {
                            response.setContentType("application/plain;charset=utf-8");
                            PrintWriter writer = response.getWriter();
                            writer.write(CommunityUtil.getJSONString(403, "你还没有登录哦!"));
                        } else {
                            response.sendRedirect(request.getContextPath() + "/login");
                        }
                    }
                })
                .accessDeniedHandler(new AccessDeniedHandler() {
                    // 权限不足
                    @Override
                    public void handle(HttpServletRequest request, HttpServletResponse response, AccessDeniedException e) throws IOException, ServletException {
                        String xRequestedWith = request.getHeader("x-requested-with");
                        if ("XMLHttpRequest".equals(xRequestedWith)) {
                            response.setContentType("application/plain;charset=utf-8");
                            PrintWriter writer = response.getWriter();
                            writer.write(CommunityUtil.getJSONString(403, "你没有访问此功能的权限!"));
                        } else {
                            response.sendRedirect(request.getContextPath() + "/denied");
                        }
                    }
                });

        // Security底层默认会拦截/logout请求,进行退出处理.
        // 覆盖它默认的逻辑,才能执行我们自己的退出代码.
        http.logout().logoutUrl("/securitylogout");
    }

}
在userservice中加入增加权限信息的方法
 public Collection<? extends GrantedAuthority> getAuthorities(int userId) {
        User user = this.findUserById(userId);

        List<GrantedAuthority> list = new ArrayList<>();
        list.add(new GrantedAuthority() {

            @Override
            public String getAuthority() {
                switch (user.getType()) {
                    case 1:
                        return AUTHORITY_ADMIN;
                    case 2:
                        return AUTHORITY_MODERATOR;
                    default:
                        return AUTHORITY_USER;
                }
            }
        });
        return list;
    }
并重构登陆拦截器的prehandle方法,调用获取授权信息方法,加入授权信息,便于进行权限认证,以权限,用户信息进行相应的权限控制,如文章作者可以编辑文章,读者无法编辑文章,管理员权限等操作。
 @Override
    public boolean preHandle(HttpServletRequest request, HttpServletResponse response, Object handler) throws Exception {
        // 从cookie中获取凭证
        String ticket = CookieUtil.getValue(request, "ticket");

        if (ticket != null) {
            // 查询凭证
            LoginTicket loginTicket = userService.findLoginTicket(ticket);
            // 检查凭证是否有效
            if (loginTicket != null && loginTicket.getStatus() == 0 && loginTicket.getExpired().after(new Date())) {
                // 根据凭证查询用户
                User user = userService.findUserById(loginTicket.getUserId());
                // 在本次请求中持有用户
                hostHolder.setUser(user);
                // 构建用户认证的结果,并存入SecurityContext,以便于Security进行授权.
                Authentication authentication = new UsernamePasswordAuthenticationToken(
                        user, user.getPassword(), userService.getAuthorities(user.getId()));
                SecurityContextHolder.setContext(new SecurityContextImpl(authentication));
            }
        }
        else {
            SecurityContextHolder.clearContext();
        }

        return true;
    }
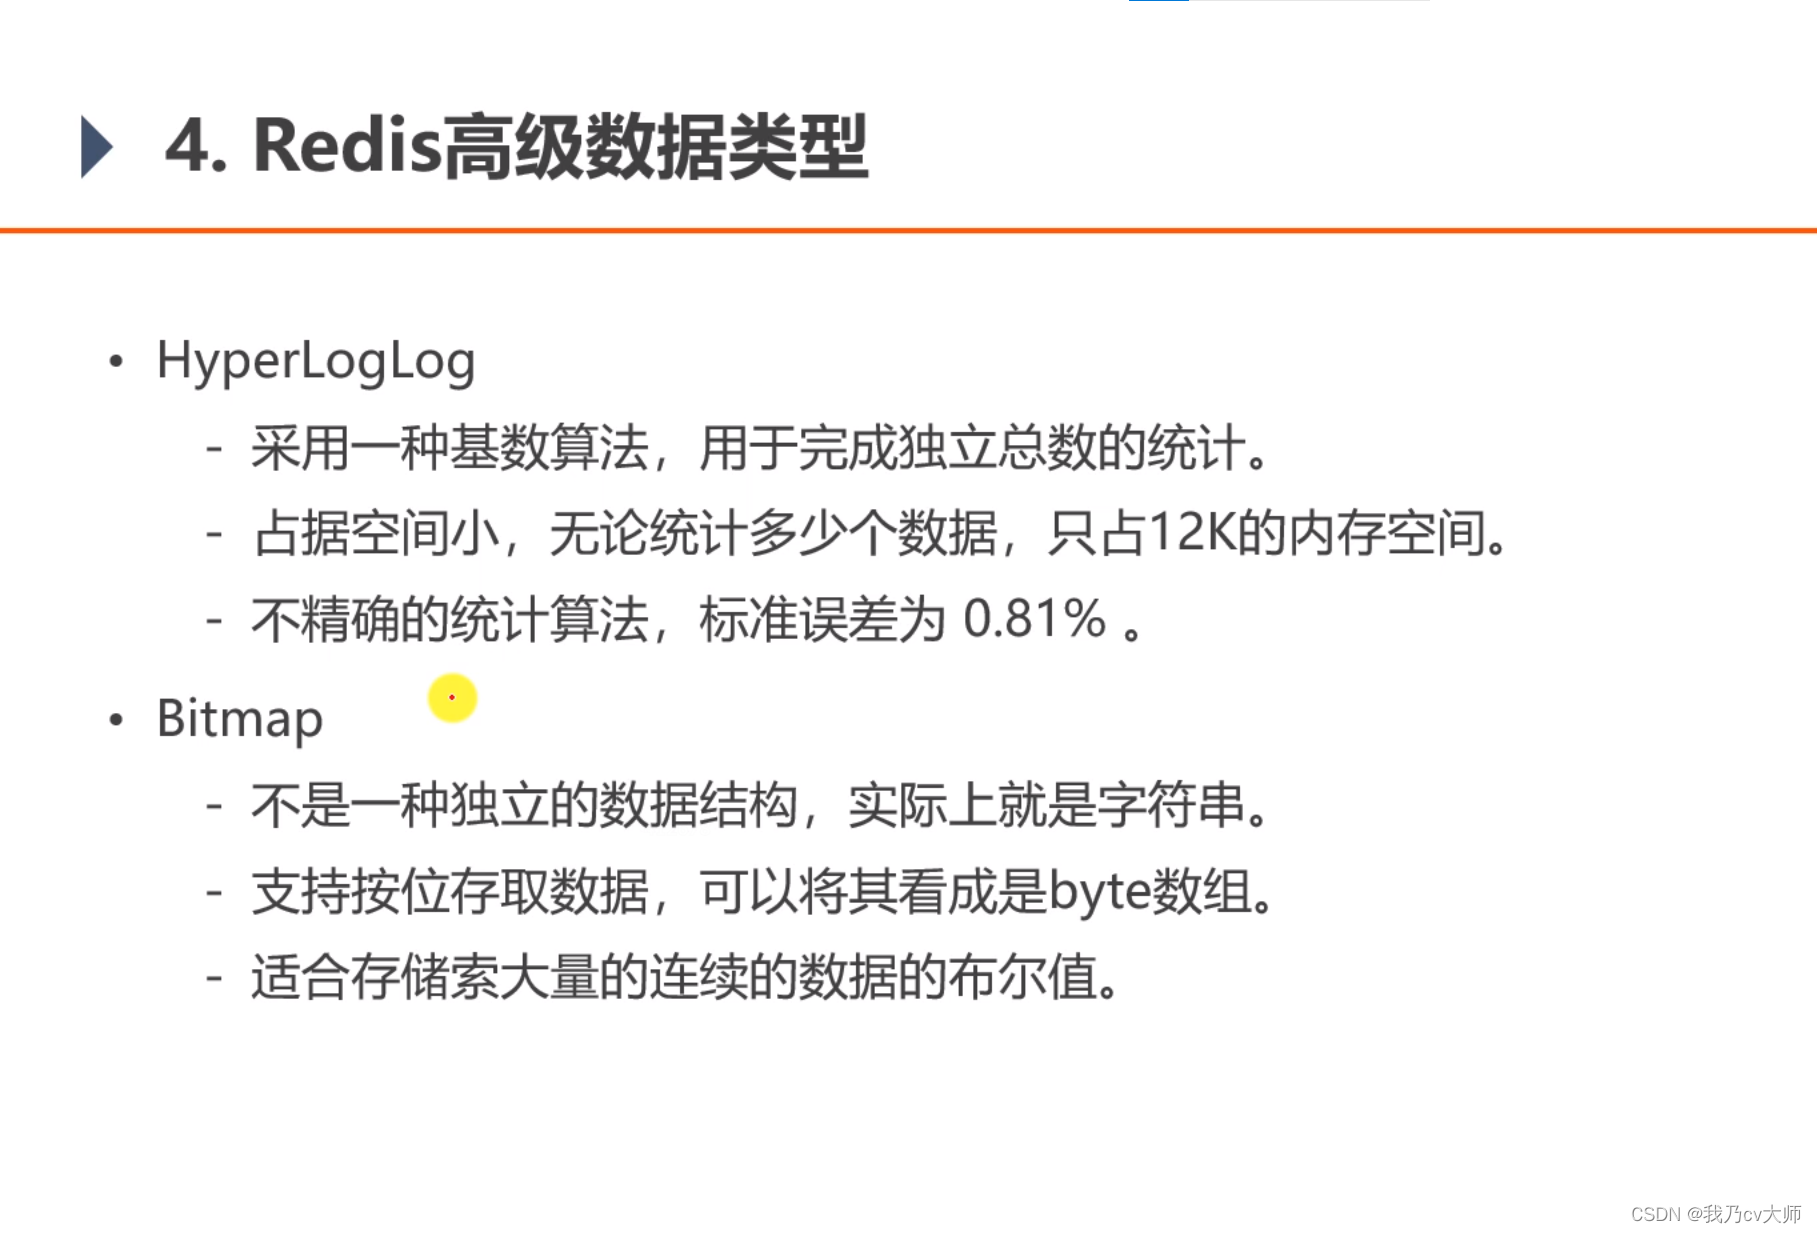
17、使用redis高级数据结构统计网站数据
