你好呀,我是小邹。
在之前的文章中,提到了个人博客的简单回复功能的实现,今天记录一下完整的评论功能的实现。
实现思路
数据库设计:评论表需要定义出当前博客id以便做关联,因为评论需要有回复功能,则需要定义当前评论有无上一级评论,需要定义出上级评论id。
代码方面:点击评论需要获取当前博客id与自己评论数据进行插入,点击回复按钮需要获取上一条评论的id以及用户姓名作为回复,回复成功后,后台在数据库中查找出所有parentCommentId为-1的值进行遍历,因为上级id为-1则证明当前评论无父节点。在通过对父节点id的遍历查询出所有对应评论的子节点。
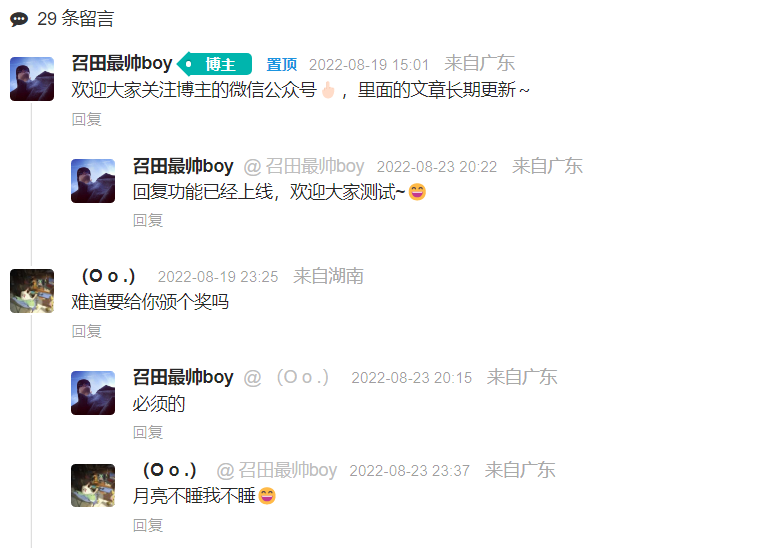
页面效果
实现的关键在于:新提交的评论排在最上面,三级评论排在二级评论的下面。
代码实现
实体类
package com.zou.blog.model.domain;

import com.baomidou.mybatisplus.annotation.TableField;
import com.baomidou.mybatisplus.annotation.TableId;
import com.baomidou.mybatisplus.annotation.TableName;
import lombok.AllArgsConstructor;
import lombok.Data;
import lombok.NoArgsConstructor;

import java.util.ArrayList;
import java.util.Date;
import java.util.List;

/**
 * @author: 邹祥发
 * @date: 2022/7/12 08:01
 */
@Data
@AllArgsConstructor
@NoArgsConstructor
@TableName("article_comments")
public class Comments {
    @TableId
    private Integer id;
    private String nickname;
    private String email;
    private String content;
    private Date createTime;
    private Integer blogId;
    private Integer isVisible;
    private String avatar;
    private String blogUrl;
    private String province;
    private String ip;
    private Date updateTime;
    private Integer sort;
    //评论的父节点id
    private Integer parentId;
    private String parentName;
    //回复评论
    @TableField(exist = false)
    private List<Comments> replyComments = new ArrayList<>();
    @TableField(exist = false)
    private Comments parentComment;
}
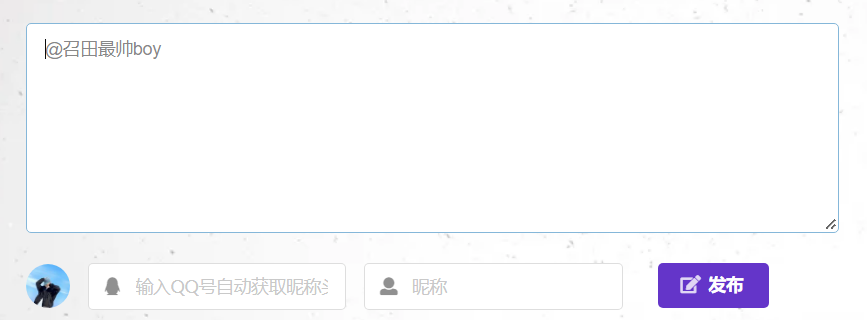
评论表单页面
<form target="myiframe" style="padding-top: 20px">
    <input type="hidden" name="blogid" value="1"/>
    <input type="hidden" name="blogUrl" value="about"/>
    <input type="hidden" name="parentCommentId" value="-1">
    <div id="comment-form" class="ui form">
        <div class="field">
            <textarea id="aaa" name="content" placeholder="欢迎高质量的留言和交流,低俗和无意义的留言不会过审" 		                       required="required">
            </textarea>
        </div>
        <div class="fields">
            <div class="field m-mobile-wide m-margin-bottom-small">
                <div class="ui left icon input">
                    <img id="avatar" src="https://q1.qlogo.cn/g?b=qq&nk=1565453341&s=100"
                         class="ui mini circular image" style="margin-top: 11px">
                </div>
            </div>
            <div class="field m-mobile-wide m-margin-bottom-small" style="padding-top: 10px">
                <div class="ui left icon input">
                    <i class="qq icon"></i>
                    <input type="text" id="QQ" name="qq" placeholder="输入QQ号自动获取昵称头像"
                           required="required"/>
                </div>
            </div>
            <div class="field m-mobile-wide m-margin-bottom-small" style="padding-top: 10px">
                <div class="ui left icon input">
                    <i class="user icon"></i>
                    <input type="text" id="nickname" name="nickname" placeholder="昵称"
                           required="required"/>
                </div>
            </div>
            <div class="field m-mobile-wide m-margin-bottom-small" style="padding-top: 10px">
                <div class="ui left icon input">
                    <input type="text" id="ccc" name="email" placeholder="邮箱"
                           hidden="hidden" required="required">
                </div>
            </div>
            <div class="field m-margin-bottom-small m-mobile-wide" style="padding-top: 10px">
                 <button id="comment-btn" type="submit" class="ui violet button m-mobile-wide "><i
                         class="edit icon"></i>发布
                 </button>
            </div>
        </div>
    </div>
</form>
点击发布
js有些多余的代码,会前端的可以自己删。
<script type="application/javascript">
    <!--根据QQ自动获取头像信息-->
    $('#QQ').blur(function () {
        var QQ = $("#QQ").val();
        $.ajax({
            url: "https://api.usuuu.com/qq/" + QQ,
            type: "GET",
            dataType: "json",
            success: function (result) {
                console.log(result["data"].name, result["data"].avatar);
                $("#nickname").val(result["data"].name);
                var obj = document.getElementById("avatar");
                obj.src = result["data"].avatar;
                $("#avatar").val(result["data"].avatar);
                $("[name='email']").val(QQ + '@qq.com');
            }
        });
    });

    $(function () {
        $('#comment-btn').click(function () {
            var blogid = $("input[name='blogid']").val().trim();
            var blogUrl = $("input[name='blogUrl']").val().trim();
            var content = $("textarea[name='content']").val().trim();
            var nickname = $("input[name='nickname']").val().trim();
            var email = $("input[name='email']").val().trim();
            var avatar = $("#avatar").val();
            var parentId = $("input[name='parentCommentId']").val();
            if (reply1 != null) {
                var parentName = reply1;
            } else {
                parentName = nickname;
            }
            var data = {
                blogid: blogid,
                blogUrl: blogUrl,
                content: content,
                nickname: nickname,
                email: email,
                avatar: avatar,
                parentId: parentId,
                parentName: parentName
            };
            if (content !== "" && content !== null && content !== undefined && nickname !== "" && nickname !== null && nickname !== undefined) {
                //验证邮箱格式
                const emailReg = /^([A-Za-z0-9_\-\.])+\@([A-Za-z0-9_\-\.])+\.([A-Za-z]{2,4})$/;
                if (!emailReg.test(email)) {
                    alert('邮箱格式错误');
                    return;
                }
                $.ajax({
                    type: "POST",
                    url: '/comments',
                    data: data,
                    dataType: 'json',
                    contentType: 'application/x-www-form-urlencoded',
                    success: function (req) {
                        console.log(req)
                    },
                    error: function (e) {
                        console.log(e)
                    }
                })
                alert('您的评论已成功投递至召田最帅boy,请耐心等待他审核吧!');
                $('#aaa').val('');
            } else {
                alert("昵称和评论内容不能为空!")
                return;
            }
        })
    })
</script>
点击回复按钮,在评论区显示回复给哪个用户
<a class="reply" data-commentid="1" data-commentnickname="zou" th:attr="data-commentid=${reply.id}, data-commentnickname=${reply.nickname}" onclick="reply(this)">回复</a>
对应函数
	//回复
    var reply1;

    function reply(obj) {
        let commentId = $(obj).data('commentid');
        let commentNickname = $(obj).data('commentnickname');
        reply1 = commentNickname;
        //添加信息到评论表单
        $("[name='content']").attr("placeholder", "@" + commentNickname).focus();
        $("[name='parentCommentId']").val(commentId);
        //滚动到评论表单
        $(window).scrollTo($('#comment-form'), 500);
    }
后端controller层代码
	/**
     * 发表评论
     */
    @ResponseBody
    @PostMapping(value = {"comments"})
    public void comments(HttpServletRequest request, @RequestBody @RequestParam("blogid") Integer blogId,
                         @RequestBody @RequestParam("blogUrl") String blogUrl,
                         @RequestBody @RequestParam("content") String content,
                         @RequestBody @RequestParam("nickname") String nickname,
                         @RequestBody @RequestParam("email") String email,
                         @RequestBody @RequestParam("avatar") String avatar,
                         @RequestBody @RequestParam("parentId") Integer parentId,
                         @RequestBody @RequestParam("parentName") String parentName) throws Exception {
        String ip = IpUtils.getIpAddr(request);
        String province = IpUtils.getIpPossession(ip);
        Comments comments = new Comments();
        comments.setId(Integer.parseInt(String.valueOf(System.currentTimeMillis() / 1000)));
        comments.setContent(content);
        comments.setEmail(email);
        comments.setCreateTime(new Date());
        comments.setBlogId(blogId);
        comments.setBlogUrl(blogUrl);
        comments.setProvince(province);
        comments.setIp(ip);
        comments.setUpdateTime(new Date());
        //数值越大则优先展示
        if (parentId == -1) {
            comments.setSort(1);
        } else {
            comments.setSort(Integer.parseInt(String.valueOf(System.currentTimeMillis() / 990)));
        }
        //未审核的评论默认不可见
        //暂时可见
        comments.setIsVisible(CommentStatus.VISIBLE.getStatus());
        //设置父节点id,-1为首节点
        comments.setParentId(parentId);
        comments.setParentName(parentName);
        comments.setNickname(nickname);
        comments.setAvatar(avatar);
        commentService.save(comments);
    }

    //根据文章id查询评论列表
    model.addAttribute("comments", commentService.listCommentByBlogId(article.getId()));
评论列表-展示层级关系
<div class="comment" th:each="comment : ${comments}">
<a class="avatar">
<img th:src="@{${comment.avatar}}">
</a>
<div class="content">
<a class="author">
<span th:text="${comment.nickname}"></span>
</a>
<div class="metadata">
<span class="date" th:text="${#dates.format(comment.createTime, 'yyyy-MM-dd HH:mm')}"> </span>
</div>
<span th:text="'来自'+${#strings.substring(comment.province,0,2)}"
style="color: darkgray"></span>
<div class="text" th:text="${comment.content}"></div>
<div class="actions">
<a class="reply" data-commentid="1" data-commentnickname="zou" th:attr="data-commentid=${comment.id}, data-commentnickname=${comment.nickname}" onclick="reply(this)">回复</a>
</div>
</div>
<div class="comments" th:if="${#arrays.length(comment.replyComments)} gt 0">
<div class="comment" th:each="reply : ${comment.replyComments}">
<a class="avatar">
<img th:src="@{${reply.avatar}}">
</a>
<div class="content">
<a class="author">
<span th:text="${reply.nickname}"></span>
</a>
<span th:text="|@ ${reply.parentName}|" class="m-grey"></span>
<div class="metadata">
<span class="date" th:text="${#dates.format(reply.createTime, 'yyyy-MM-dd HH:mm')}"> </span>
</div>
<span th:text="'来自'+${#strings.substring(reply.province,0,2)}"
style="color: darkgray"></span>
<div class="text" th:text="${reply.content}"></div>
<div class="actions">
<a class="reply" data-commentid="1" data-commentnickname="zou"
th:attr="data-commentid=${reply.id}, data-commentnickname=${reply.nickname}"
onclick="reply(this)">回复</a>
</div>
</div>
</div>
</div>
</div>
后端service层代码
先获取顶级的数据,在一层一层往下找、放入集合
	@Override
    public List<Comments> listCommentByBlogId(Integer blogId) {
        QueryWrapper<Comments> wrapper = new QueryWrapper<Comments>().eq("blog_id", blogId).eq("is_visible", CommentStatus.VISIBLE.getStatus()).orderByAsc("sort").orderByDesc("create_time");
        wrapper.select("id", "nickname", "content", "create_time", "avatar", "parent_id", "province", "blog_id", "parent_name");
        List<Comments> comments = commentsMapper.selectList(wrapper);
        return firstComment(comments);
    }

    public List<Comments> firstComment(List<Comments> comments) {
        //存储父评论为根评论-1的评论
        ArrayList<Comments> list = new ArrayList<>();
        for (Comments comment : comments) {
            //其父id等于-1则为第一级别的评论
            if (comment.getParentId() == -1) {
                //我们将该评论下的所有评论都查出来
                comment.setReplyComments(findReply(comments, comment.getId()));
                //这就是我们最终数组中的Comment
                list.add(comment);
            }
        }
        return list;
    }

    /**
     * @param comments 我们所有的该博客下的评论
     * @param targetId 我们要查到的目标父id
     * @return 返回该评论下的所有评论
     */
    public List<Comments> findReply(List<Comments> comments, int targetId) {
        //第一级别评论的子评论集合
        ArrayList<Comments> reply = new ArrayList<>();
        for (Comments comment : comments) {
            //发现该评论的父id为targetId就将这个评论加入子评论集合
            if (find(comment.getParentId(), targetId)) {
                reply.add(comment);
            }
        }
        return reply;
    }

    public boolean find(int id, int target) {
        //不将第一节评论本身加入自身的子评论集合
        if (id == -1) {
            return false;
        }
        //如果父id等于target,那么该评论就是id为target评论的子评论
        if (id == target) {
            return true;
        } else {
            //否则就再向上找
            return find(commentsMapper.selectById(id).getParentId(), target);
        }
    }
总结
本文较全面地介绍了博客评论以及回复功能的实现。实现逻辑:因为是个人博客普通用户不需要登录即可浏览,所以没有做普通用户登录功能,评论时只需输入自己的QQ号,自动拉取头像和昵称进行评论。
相关链接:评论如何获取IP地址?

