使用SpringBoot+Netty实现一个简单的RPC通信组件
远程过程调用(Remote Procedure Call,RPC)是一个计算机通信协议。该协议允许运行于一台计算机的程序调用另一个地址空间(通常为一个开放网络的一台计算机)的子程序,而程序员就像调用本地程序一样,无需额外地为这个交互作用编程(无需关注细节)。RPC是一种服务器-客户端(Client/Server)模式,经典实现是一个通过发送请求-接受回应进行信息交互的系统。要想完成调用,必须实现以下几个能力:
1.服务注册与发现,本文使用Redis模拟。
2.序列化与反序列化,本文使用protostuff-runtime。
3.网络通信,本文使用Netty。
有了以上功能,就能实现一个简单的RPC组件。
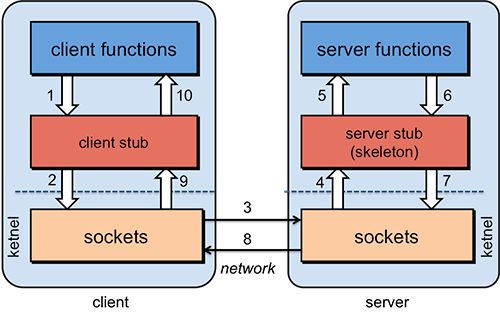
一个完整的RPC通信流程如下:
-
client以本地方式方式调用远程方法;
-
client stub收到调用后负责将方法以及参数等组装成网络可以传输的消息体;
-
client stub找到服务端地址,通过系统调用,将数据传输服务端;
-
server stub收到消息后进行反序列化;
-
server stub通过得到的参数调用本地方法;
-
执行结果返回给server stub;
-
server stub将执行结果进行序列化;
-
server stub进行系统调用将数据发送给客户端;
-
client stub收到消息并进行解码;
-
cleint stub将结果返回给调用者。
1.自定义标签
我们需要模仿Dubbo的XML方式提供自定义的标签供调用方使用,这里使用Spring提供的NamespaceHandlerSupport相关机制实现。
在项目resources/META-INF目录下提供spring.handlers和spring.schemas配置文件
spring.handlers文件就是以NamespaceUrl(就是XML文件中的命名空间xmlns:xxx后面对应的值)作为key,对应的Handler作为value的键值对,例如:
Spring在解析XML文件时会判断节点是否时defaultNamespace,不是的话就调用parseCustomElement()来解析自定义标签。
public BeanDefinition parseCustomElement(Element ele, BeanDefinition containingBd) {
        String namespaceUri = getNamespaceURI(ele);
    //根据元素的namespaceUri,找到对应的NamespaceHandler(就是自己在spring.handler文件配置好的处理类)
        NamespaceHandler handler = this.readerContext.getNamespaceHandlerResolver().resolve(namespaceUri);
        if (handler == null) {
            error("Unable to locate Spring NamespaceHandler for XML schema namespace [" + namespaceUri + "]", ele);
            return null;
        }
    //调用NamespaceHandlerSupport中的parse方法
        return handler.parse(ele, new ParserContext(this.readerContext, this, containingBd));
    }

	@Override
	@Nullable
	public BeanDefinition parse(Element element, ParserContext parserContext) {
		BeanDefinitionParser parser = findParserForElement(element, parserContext);
		return (parser != null ? parser.parse(element, parserContext) : null);
	}

public interface BeanDefinitionParser {

	/**
	 * Parse the specified {@link Element} and register the resulting
	 * {@link BeanDefinition BeanDefinition(s)} with the
	 * {@link org.springframework.beans.factory.xml.ParserContext#getRegistry() BeanDefinitionRegistry}
	 * embedded in the supplied {@link ParserContext}.
	 * <p>Implementations must return the primary {@link BeanDefinition} that results
	 * from the parse if they will ever be used in a nested fashion (for example as
	 * an inner tag in a {@code <property/>} tag). Implementations may return
	 * {@code null} if they will <strong>not</strong> be used in a nested fashion.
	 * @param element the element that is to be parsed into one or more {@link BeanDefinition BeanDefinitions}
	 * @param parserContext the object encapsulating the current state of the parsing process;
	 * provides access to a {@link org.springframework.beans.factory.support.BeanDefinitionRegistry}
	 * @return the primary {@link BeanDefinition}
	 */
	@Nullable
	BeanDefinition parse(Element element, ParserContext parserContext);

}
从上面可以看出,对于自定义的标签解析最终会调用BeanDefinitionParser的parse方法,因此我们后续也需要提供相应的实现。
此外,还需要对命名空间做一些约束,这里采用XSD方式,Spring会自动加载spring.schemas中的内容进行约束检查。
#spring.handlers内容如下
http\://rpc.nuaa.org/schema/rpc=edu.nuaa.middleware.rpc.config.spring.MyNamespaceHandler
#spring.schemas内容如下
http\://rpc.nuaa.org/schema/rpc/rpc.xsd=META-INF/rpc.xsd
#xsd文件如下
<?xml version="1.0" encoding="UTF-8"?>
<xsd:schema xmlns="http://rpc.nuaa.org/schema/rpc"
            xmlns:xsd="http://www.w3.org/2001/XMLSchema"
            xmlns:beans="http://www.springframework.org/schema/beans"
            targetNamespace="http://rpc.nuaa.org/schema/rpc"
            elementFormDefault="qualified" attributeFormDefault="unqualified">
    <xsd:import namespace="http://www.springframework.org/schema/beans"/>

    <!-- edu.nuaa.middleware.rpc.config.ServerConfig -->
    <xsd:element name="server">
        <xsd:complexType>
            <xsd:complexContent>
                <xsd:extension base="beans:identifiedType">
                    <xsd:attribute name="host" type="xsd:string">
                        <xsd:annotation>
                            <xsd:documentation><![CDATA[ 栈台地点 ]]></xsd:documentation>
                        </xsd:annotation>
                    </xsd:attribute>
                    <xsd:attribute name="port" type="xsd:string">
                        <xsd:annotation>
                            <xsd:documentation><![CDATA[ 栈台岸口  ]]></xsd:documentation>
                        </xsd:annotation>
                    </xsd:attribute>
                </xsd:extension>
            </xsd:complexContent>
        </xsd:complexType>
    </xsd:element>

    <!-- edu.nuaa.middleware.rpc.config.ConsumerConfig -->
    <xsd:element name="consumer">
        <xsd:complexType>
            <xsd:complexContent>
                <xsd:extension base="beans:identifiedType">
                    <xsd:attribute name="nozzle" type="xsd:string">
                        <xsd:annotation>
                            <xsd:documentation><![CDATA[ 接口名称 ]]></xsd:documentation>
                        </xsd:annotation>
                    </xsd:attribute>
                    <xsd:attribute name="alias" type="xsd:string">
                        <xsd:annotation>
                            <xsd:documentation><![CDATA[ 服务别名分组信息  ]]></xsd:documentation>
                        </xsd:annotation>
                    </xsd:attribute>
                </xsd:extension>
            </xsd:complexContent>
        </xsd:complexType>
    </xsd:element>

    <!-- edu.nuaa.middleware.rpc.config.ProviderConfig -->
    <xsd:element name="provider">
        <xsd:complexType>
            <xsd:complexContent>
                <xsd:extension base="beans:identifiedType">
                    <xsd:attribute name="nozzle" type="xsd:string">
                        <xsd:annotation>
                            <xsd:documentation><![CDATA[ 接口名称 ]]></xsd:documentation>
                        </xsd:annotation>
                    </xsd:attribute>
                    <xsd:attribute name="ref" type="xsd:string">
                        <xsd:annotation>
                            <xsd:documentation><![CDATA[ 接口实现类  ]]></xsd:documentation>
                        </xsd:annotation>
                    </xsd:attribute>
                    <xsd:attribute name="alias" type="xsd:string">
                        <xsd:annotation>
                            <xsd:documentation><![CDATA[ 服务别名分组信息  ]]></xsd:documentation>
                        </xsd:annotation>
                    </xsd:attribute>
                </xsd:extension>
            </xsd:complexContent>
        </xsd:complexType>
    </xsd:element>
</xsd:schema>
2.XML配置文件解析
我们需要在配置文件中声明配置中心地址server、服务提供者者标签provider、服务消费者标签consumer。
public class ServerConfig {
    protected String host;  //注册中心地址
    protected int port;     //注册中心端口
    //get set
}
public class ProviderConfig {
    protected String nozzle;//接口
    protected String ref;//映射
    protected String alias;//别名
    //get set
}
public class ConsumerConfig {
    protected String nozzle;//接口
    protected String alias;//别名
    //get set
}
对于服务提供方来说,项目启动时需要连接到注册中心,将自身暴露的服务注册到注册中心,并建立通信端口。
对于服务消费方来说,项目启动时需要连接到注册中心,从注册中心拉取需要的服务,并建立socket连接到服务提供方。
//以这个服务端XML配置为例,我们需要解析rpc:provider标签将其中的属性包装为Class(上面的ProviderConfig),并将其暴露给注册中心
<rpc:provider id="helloServiceRpc" nozzle="edu.nuaa.HelloService"
              ref="helloService" alias="providerRpc"/>
//通过ApplicationContextAware在IOC容器启动时连接到注册中心,并开启通信端口。
public class ServerBean extends ServerConfig implements ApplicationContextAware {
    private Logger logger = LoggerFactory.getLogger(ServerBean.class);

    @Override
    public void setApplicationContext(ApplicationContext applicationContext) throws BeansException {
        //启动注册中心
        logger.info("启动注册中心 ...");
        RedisRegistryCenter.init(host, port);
        logger.info("启动注册中心完成 {} {}", host, port);

        //初始化服务提供者通信管道
        logger.info("初始化生产端服务 ...");
        ServerSocket serverSocket = new ServerSocket(applicationContext);
        Thread thread = new Thread(serverSocket);
        thread.start();
        while (!serverSocket.isActiveSocketServer()) {
            try {
                Thread.sleep(500);
            } catch (InterruptedException ignore) {
            }
        }

        logger.info("初始化生产端服务完成 {} {}", LocalServerInfo.LOCAL_HOST, LocalServerInfo.LOCAL_PORT);
    }
}
/**
对于服务提供者不但需要暴露接口信息,还需要暴露出自身的通信Socket,将这些需要暴露的信息包装为RpcProviderConfig类
*/
public class ProviderBean extends ProviderConfig implements ApplicationContextAware {
    private Logger logger = LoggerFactory.getLogger(ProviderBean.class);

    @Override
    public void setApplicationContext(ApplicationContext applicationContext) throws BeansException {

        RpcProviderConfig rpcProviderConfig = new RpcProviderConfig();
        rpcProviderConfig.setNozzle(nozzle);
        rpcProviderConfig.setRef(ref);
        rpcProviderConfig.setAlias(alias);
        rpcProviderConfig.setHost(LocalServerInfo.LOCAL_HOST);
        rpcProviderConfig.setPort(LocalServerInfo.LOCAL_PORT);

        //注册生产者
        long count = RedisRegistryCenter.registryProvider(nozzle, alias, JSON.toJSONString(rpcProviderConfig));

        logger.info("注册生产者:{} {} {}", nozzle, alias, count);
    }

}
/**
服务消费方通过代理发送网络请求到服务提供方
*/
public class ConsumerBean<T> extends ConsumerConfig implements FactoryBean {
    private ChannelFuture channelFuture;

    private RpcProviderConfig rpcProviderConfig;

    @Override
    public Object getObject() throws Exception {

        //从redis获取服务提供方暴露的信息
        if (null == rpcProviderConfig) {
            String infoStr = RedisRegistryCenter.obtainProvider(nozzle, alias);
            rpcProviderConfig = JSON.parseObject(infoStr, RpcProviderConfig.class);
        }
        assert null != rpcProviderConfig;

        //与服务提供方建立通信连接
        if (null == channelFuture) {
            ClientSocket clientSocket = new ClientSocket(rpcProviderConfig.getHost(), rpcProviderConfig.getPort());
            new Thread(clientSocket).start();
            for (int i = 0; i < 100; i++) {
                if (null != channelFuture) break;
                Thread.sleep(500);
                channelFuture = clientSocket.getFuture();
            }
        }
        //设置请求信息
        Request request = new Request();
        request.setChannel(channelFuture.channel());
        request.setNozzle(nozzle);//接口
        request.setRef(rpcProviderConfig.getRef());//接口的实现类
        request.setAlias(alias);//别名
        //生成代理对象
        return (T) JDKProxy.getProxy(ClassLoaderUtils.forName(nozzle), request);
    }
	....
}
然后我们需要将这些解析类注册进IOC容器,让其能够识别相应标签。
//根据上文讲解,继承NamespaceHandlerSupport即可由spring自动识别
public class MyNamespaceHandler extends NamespaceHandlerSupport {
    @Override
    public void init() {
        registerBeanDefinitionParser("server", new MyBeanDefinitionParser(ServerBean.class));
        registerBeanDefinitionParser("provider", new MyBeanDefinitionParser(ProviderBean.class));
        registerBeanDefinitionParser("consumer", new MyBeanDefinitionParser(ConsumerBean.class));
    }

}
相应的标签解析逻辑,这里是把标签的各种信息包装为BeanDefinition注册进IOC容器。
public class MyBeanDefinitionParser implements BeanDefinitionParser {
    private final Class<?> beanClass;

    MyBeanDefinitionParser(Class<?> beanClass) {
        this.beanClass = beanClass;
    }

    @Override
    public BeanDefinition parse(Element element, ParserContext parserContext) {

        RootBeanDefinition beanDefinition = new RootBeanDefinition();
        beanDefinition.setBeanClass(beanClass);
        beanDefinition.setLazyInit(false);
        String beanName = element.getAttribute("id");
        parserContext.getRegistry().registerBeanDefinition(beanName, beanDefinition);

        for (Method method : beanClass.getMethods()) {
            if (!isProperty(method, beanClass)) continue;
            String name = method.getName();
            //截取属性名 首字母小写
            String methodName = name.substring(3, 4).toLowerCase() + name.substring(4);
            String value = element.getAttribute(methodName);
            //设置属性的名称和值
            beanDefinition.getPropertyValues().addPropertyValue(methodName, value);
        }

        return beanDefinition;
    }
  ......

}
注册中心实现
public class RedisRegistryCenter {
    private static Jedis jedis;   //非切片额客户端连接

    //初始化redis
    public static void init(String host, int port) {
        // 池基本配置
        JedisPoolConfig config = new JedisPoolConfig();
        config.setMaxIdle(5);
        config.setTestOnBorrow(false);
        JedisPool jedisPool = new JedisPool(config, host, port);
        jedis = jedisPool.getResource();
    }

    /**
     * 注册生产者
     *
     * @param nozzle 接口
     * @param alias  别名
     * @param info   信息
     * @return 注册结果
     */
    public static Long registryProvider(String nozzle, String alias, String info) {
        //使用set保存相关服务信息
        return jedis.sadd(nozzle + "_" + alias, info);
    }

    /**
     * 获取生产者
     * 模拟权重,随机获取
     * @param nozzle 接口名称
     */
    public static String obtainProvider(String nozzle, String alias) {
        return jedis.srandmember(nozzle + "_" + alias);
    }

    public static Jedis jedis() {
        return jedis;
    }

}
3.yml配置文件解析
上面XML已经可以完成相应功能了,这里提供YML解析方式,供学习参考。
以Server为例
YML文件如下:
rpc:
  server:
    host: 192.168.204.138
    port: 6379
@ConfigurationProperties("rpc.server")//rpc.server就是yml中的前缀值
public class ServerProperties {
    private String host;//注册中心地址
    private int port;//注册中心服务端口

    public String getHost() {
        return host;
    }

    public void setHost(String host) {
        this.host = host;
    }

    public int getPort() {
        return port;
    }

    public void setPort(int port) {
        this.port = port;
    }
}
public class ServerAutoConfiguration implements ApplicationContextAware {
    private Logger logger = LoggerFactory.getLogger(ServerAutoConfiguration.class);
    @Resource
    ServerProperties serverProperties;
    @Override
    public void setApplicationContext(ApplicationContext applicationContext) throws BeansException {
        logger.info("启动Redis模拟注册中心开始");
        RedisRegistryCenter.init(serverProperties.getHost(), serverProperties.getPort());
        logger.info("启动Redis模拟注册中心完成,{} {}", serverProperties.getHost(), serverProperties.getPort());

        logger.info("初始化生产端服务开始");
        ServerSocket serverSocket = new ServerSocket(applicationContext);
        Thread thread = new Thread(serverSocket);
        thread.start();
        while (!serverSocket.isActiveSocketServer()) {
            try {
                Thread.sleep(500);
            } catch (InterruptedException ignore) {
            }
        }
        logger.info("初始化生产端服务完成 {} {}", LocalServerInfo.LOCAL_HOST, LocalServerInfo.LOCAL_PORT);
    }
}
//提供注解让SpringBoot可以扫描到
@Target({ElementType.TYPE})
@Retention(RetentionPolicy.RUNTIME)
@Import({ServerAutoConfiguration.class})
@EnableConfigurationProperties(ServerProperties.class)
//@ComponentScan("edu.nuaa.middleware.*")
public @interface EnableRpc {
}
以上就是本次实现的RPC组件整体流程,网络通信和代理部分不属于本次重点,没有详细解释,完整代码可以参考:https://github.com/a982847942/spring-boot-starter-devtools
不足之处,欢迎大家批评指正。


