《K8s 的安全认证》系列,共包含以下文章:
- K8s 的安全框架和用户认证
- K8s 的鉴权管理(一):基于角色的访问控制(RBAC 鉴权)
- K8s 的鉴权管理(二):基于属性 / 节点 / Webhook 的访问控制
- 服务账号 Service Account
😊 如果您觉得这篇文章有用 ✔️ 的话,请给博主一个一键三连 🚀🚀🚀 吧 (点赞 🧡、关注 💛、收藏 💚)!!!您的支持 💖💖💖 将激励 🔥 博主输出更多优质内容!!!
服务账号 Service Account
服务账号(Service Account)是为了方便 Pod 中的进程调用 Kubernetes API 资源或访问其他外部服务而设计的。
1.服务账号与用户账号
服务账号(Service Account)和 用户账号(User Account)有着以下的不同:
- 服务账号 是为 Pod 而设计的,目的是让 Pod 中的进程能够访问 Kubernetes APl 的资源;用户账号 是为用户而设计的,目的是让用户能够访问 Kubernetes 集群。
- 服务账号 仅作用在当前的命名空间中;用户账号 是全局性的,可以跨越不同的命名空间。
- 服务账号 的创建应遵循权限最小化的原则,Kubernetes 允许为实现某个具体任务而创建服务账号;而创建 用户账号 通常需要使用外部的数据库,且可能需要组合不同的权限。
- 服务账号 属于轻量级配置,只作用在当前命名空间中,因此,在一个复杂系统中可能包含各种服务账号的定义;用户账号 的创建规则比较复杂,且可能涉及复杂的业务流程。由于服务账号和用户账号的使用对象不同,因此对二者的监控也不同。
2.【实战】创建和使用服务账号
下面来演示如何创建和使用服务账号。
2.1 创建命名空间
创建一个新的命名空间 sa-demo。
kubectl create namespace sa-demo
查看新命名空间中的 Service Account。
kubectl get sa -n sa-demo
输出的信息如下:
🚀 对于每一个命名空间会自动创建一个默认的 Service Account。
2.2 创建 Pod
编辑 pod-sa-demo1.yaml 文件在新创建的命名空间中新建一个 Pod。
kind: Pod
apiVersion: v1
metadata:
  name: pod-sa-demo1
  namespace: sa-demo
spec:
  containers:
  - name: nginx
    image: nginx
    imagePullPolicy: IfNotPresent
    ports:
     - containerPort: 80
       name: http
创建 Pod,并查看 Pod 的信息。
kubectl apply -f pod-sa-demo1.yaml
kubectl get pod pod-sa-demo1 -o yaml -n sa-demo
输出的信息如下:
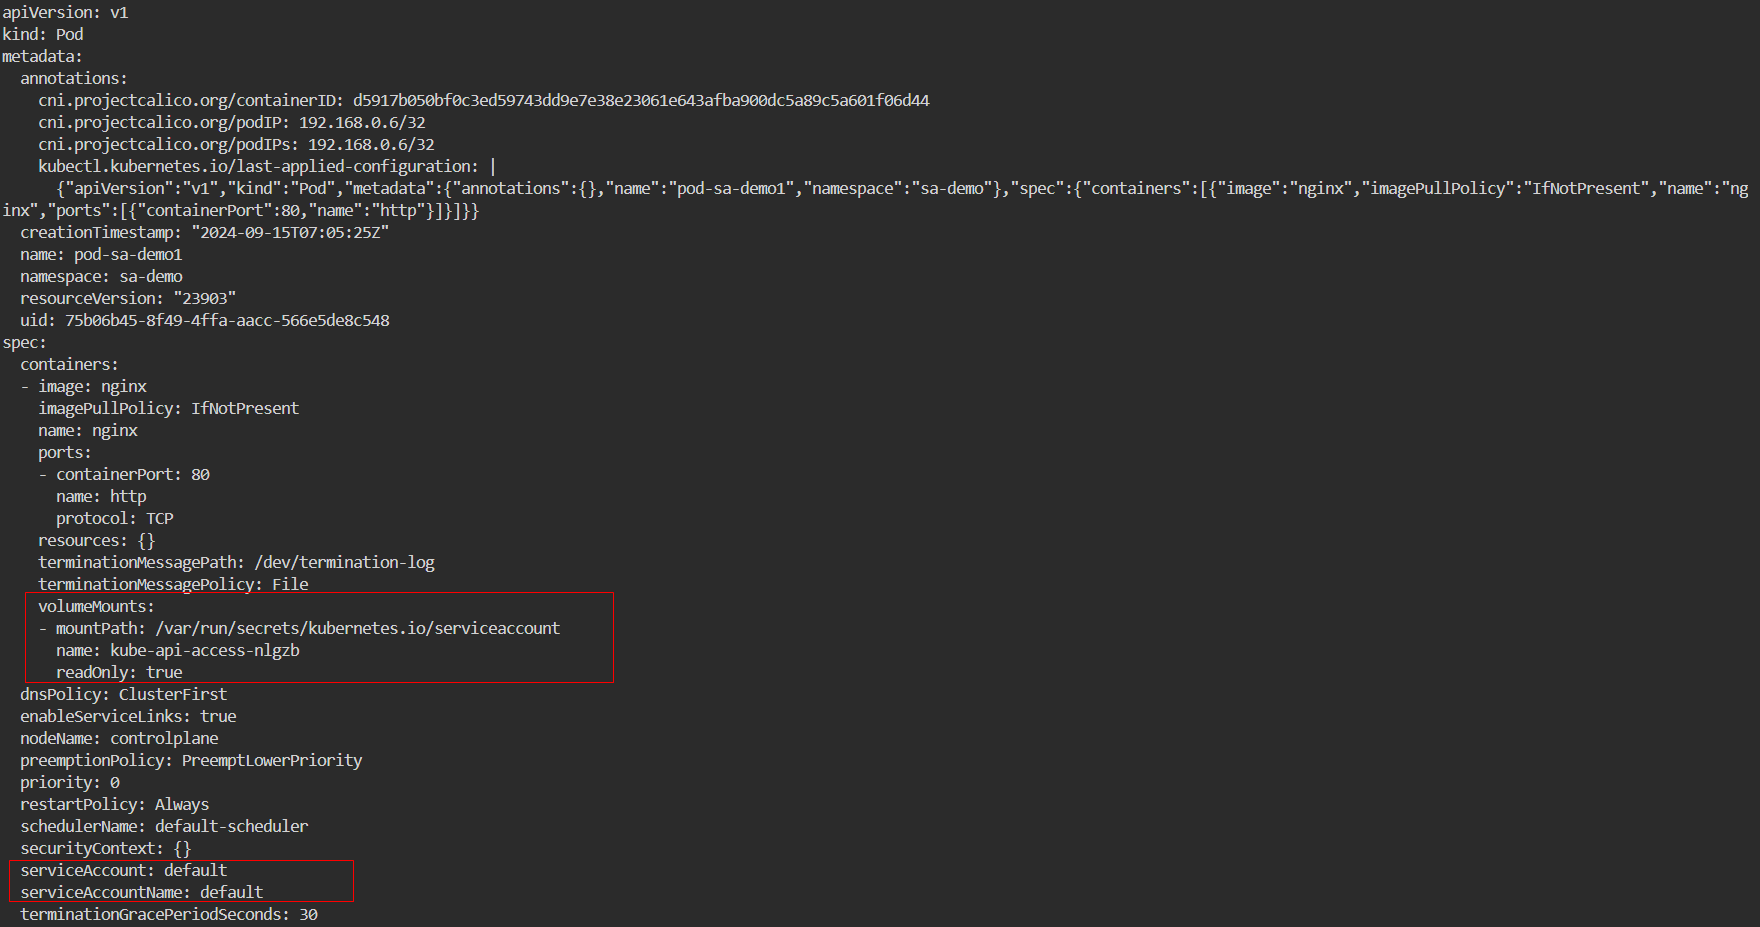
🚀 可以看出,对于每一个新创建的 Pod 来说,如果没有指定 Service Account,则它会自动挂载默认的 Service Acount,即其值为
default。
2.3 创建 Service Account
在 sa-demo 命名空间中创建一个名称为 mysa 的 Service Account,并查看当前命名空间中存在的 Service Account。
kubectl create serviceaccount mysa -n sa-demo
kubectl get sa -n sa-demo
输出的信息如下:
查看新创建的 Service Account。
kubectl get serviceaccount mysa -n sa-demo -o yaml
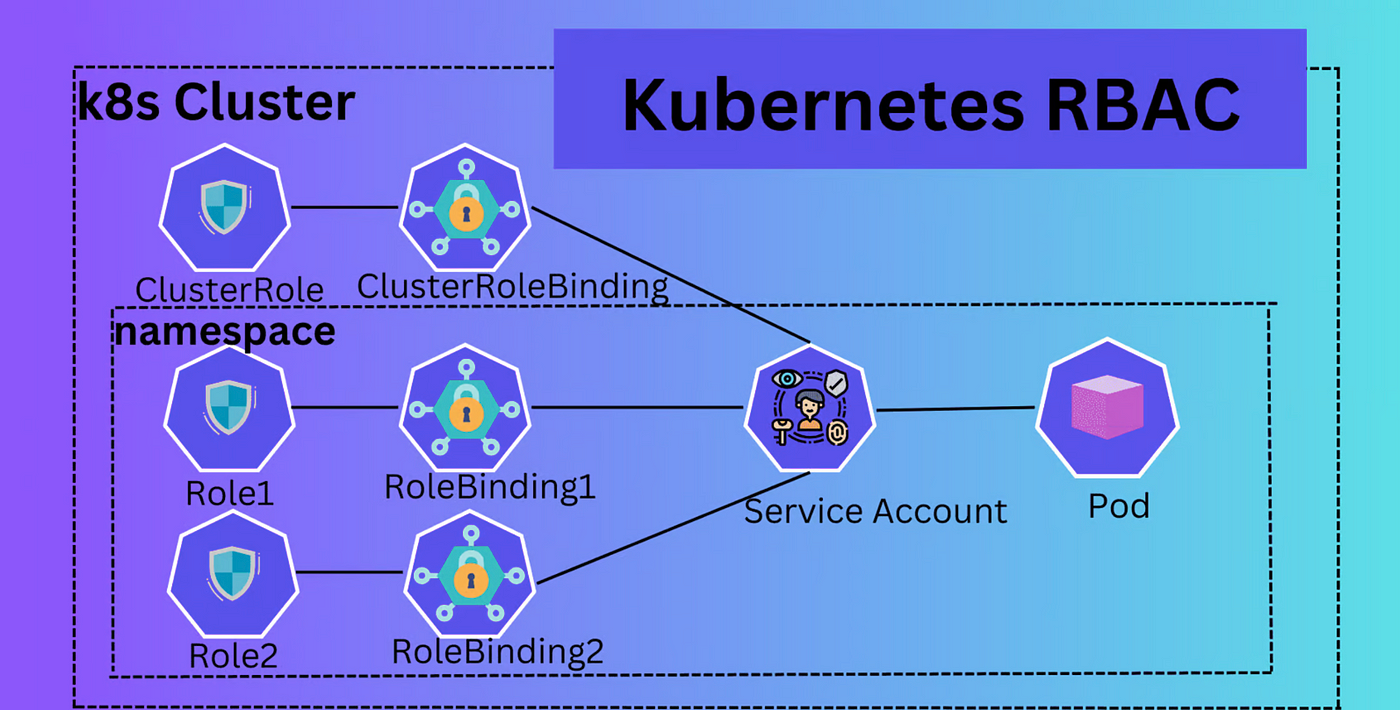
🚀 在 Service Account 创建成功后,可以使用 RoleBinding 将 Service Account 与 Role 进行绑定,使用 ClusterRoleBinding 将 ServiceAccount 与 ClusterRole 进行绑定。
2.4 使用 RoleBinding 将 Service Account 与 Role 进行绑定
编辑 sa-demo-role.yaml 文件创建 Role。
kind: Role
apiVersion: rbac.authorization.k8s.io/v1
metadata:
  #限定可访问的命名空间为sa-demo
  namespace: sa-demo
  #角色名称
  name: sa-demo-role
rules:
  #空字符串表示使用core API group
- apiGroups: [""]
  resources: ["namespaces","pods","pods/log"]
  verbs: ["get", "watch", "list", "create", "update", "patch", "delete"]
- apiGroups: [ "apps"]
  resources: ["deployments", "daemonsets"]
  verbs: ["get", "list", "watch"]
编辑 sa-demo-rolebinding.yaml 文件创建 RoleBinding。
kind: RoleBinding
apiVersion: rbac.authorization.k8s.io/v1
metadata:
  namespace: sa-demo
  name: sa-demo-rolebinding
subjects:
- kind: ServiceAccount
  namespace: sa-demo
  # Service Account的名称
  name: mysa
roleRef:
  kind: Role
  # 角色名称
  name: sa-demo-role
  apiGroup: rbac.authorization.k8s.io
🚀 这里将命名空间
sa-demo中名为mysa的 Service Account 绑定到sa-demo-role角色上了。
创建 Role 和 RoleBinding。
kubectl apply -f sa-demo-role.yaml
kubectl apply -f sa-demo-rolebinding.yaml
查看 sa-demo 命名空间中的 Role 和 RoleBinding。
kubectl get role,rolebinding -n sa-demo -o wide
输出的信息如下:
🚀 从输出信息可以看出,命名空间中的
mysa服务账号通过sa-demo-rolebinding绑定到sa-demo-role了。
2.5 使用 ClusterRoleBinding 将 ServiceAccount 与 ClusterRole 进行绑定
编辑 sa-demo-clusterrole.yaml 文件创建 ClusterRole。
kind: ClusterRole
apiVersion: rbac.authorization.k8s.io/v1
metadata:
  # 由于ClusterRole针对的是集群范围对象,因此不需要定义namespace字段
  name: sa-demo-clusterrole
rules:
  # 空字符串""表明使用core API group
- apiGroups: ["rbac.authorization.k8s.io",""]
  resources: ["pods","pods/log"]
  verbs: ["get", "watch", "list"]
- apiGroups: ["apps"]
  resources: ["namespaces"]
  verbs: ["get", "list", "watch"]
编辑 sa-demo-clusterrolebinding.yaml 文件创建 ClusterRoleBinding。
apiVersion: rbac.authorization.k8s.io/v1
kind: ClusterRoleBinding
metadata:
  name: sa-demo-clusterrolebinding
roleRef:
  apiGroup: rbac.authorization.k8s.io
  kind: ClusterRole
  name: sa-demo-clusterrole
subjects:
- apiGroup: ""
  kind: ServiceAccount
  namespace: sa-demo
  name: mysa
创建 ClusterRole 和 ClusterRoleBinding。
kubectl apply -f sa-demo-clusterrole.yaml
kubectl apply -f sa-demo-clusterrolebinding.yaml
🚀 这里将命名空间
sa-demo中名为mysa的 Servicc Account 绑定到sa-demo-clusterrole角色上了。
查看 ClusterRole 的信息。
kubectl get clusterrole
输出的信息如下:
查看 ClusterRoleBinding 的信息。
kubectl describe clusterrolebinding sa-demo-clusterrolebinding
另外一种查询方法:
kubectl get clusterrolebinding -o \
custom-columns=NAME:.metadata.name,ROLE:.roleRef.name,SERVICEACCOUNT:.subjects[0].name | grep sa-demo
3.服务账号的工作机制
Kubernetes 的 APl Service 默认开启了 Service Account 的准入控制功能。因此,在创建 Service Account 后,服务账号将按照以下方式运行。
🚀 如果 API Server 没有启用 Service Account 的准入控制功能,则可以在启动 API Server 时加入以下参数:
--admission_control-ServiceAccount
- 1️⃣ 在 Pod 创建时,通过
spec.serviceAccount字段挂载指定的 Service Account。如果没有指定该字段,则挂载命名空间中的默认 Service Account,即default的 Service Account。 - 2️⃣ API Server 验证挂载的 Service Account 是否存在。如果存在,则创建 Pod;否则拒绝创建 Pod。
- 3️⃣ 如果在 Pod 中没有指定 ImagePullSecrets,则把 Service Account 中的 ImagePullSecrets 字段加载到 Pod 中。
🚀 在拉取私有镜像仓库中的镜像时,往往需要先进行用户认证。ImagePullSecrets 字段用于指定拉取镜像时用户的 Secret 信息。
- 4️⃣ 在 Pod 创建成功并启动容器后,会将 Service Account 的 Token 挂载到
/var/run/secrets/kubernetes.io/serviceaccount/目录下。
🚀 可以通过
kubectl describe pod命令查看到挂载的信息。


