SpringBoot笔记
此笔记是博主二刷SpringBoot课程总结的笔记,其中记录的内容是自己有了实习开发经验以后觉得开发中实际能用到的高频知识
仅0-90集基础内容,原视频地址
SpringBoot的核心
1.spring-boot-dependencies定义坐标版本,通过dependencyMangement实现依赖管理避免依赖版本冲突
2.starter通过依赖传递来配置开发环境中需要的相关依赖,以减少依赖配置
3.Application引导类:初始化Spring容器
4.内嵌服务器
Rest风格开发
隐藏资源的访问行为,即无法通过访问路径得知对资源的操作类型
由@Controller,@ReponseBody,@RequestMapping转为@RestController,@RequestMapping,@GetMapping…
//@Controller
//@ResponseBody配置在类上可以简化配置,表示设置当前每个方法的返回值都作为响应体
//@ResponseBody
@RestController     //使用@RestController注解替换@Controller与@ResponseBody注解,简化书写
@RequestMapping("/books")
public class BookController {

//    @RequestMapping( method = RequestMethod.POST)
    @PostMapping        //使用@PostMapping简化Post请求方法对应的映射配置
    public String save(@RequestBody Book book){
        System.out.println("book save..." + book);
        return "{'module':'book save'}";
    }

//    @RequestMapping(value = "/{id}" ,method = RequestMethod.DELETE)
    @DeleteMapping("/{id}")     //使用@DeleteMapping简化DELETE请求方法对应的映射配置
    public String delete(@PathVariable Integer id){
        System.out.println("book delete..." + id);
        return "{'module':'book delete'}";
    }

//    @RequestMapping(method = RequestMethod.PUT)
    @PutMapping         //使用@PutMapping简化Put请求方法对应的映射配置
    public String update(@RequestBody Book book){
        System.out.println("book update..."+book);
        return "{'module':'book update'}";
    }

//    @RequestMapping(value = "/{id}" ,method = RequestMethod.GET)
    @GetMapping("/{id}")    //使用@GetMapping简化GET请求方法对应的映射配置
    public String getById(@PathVariable Integer id){
        System.out.println("book getById..."+id);
        return "{'module':'book getById'}";
    }

//    @RequestMapping(method = RequestMethod.GET)
    @GetMapping             //使用@GetMapping简化GET请求方法对应的映射配置
    public String getAll(){
        System.out.println("book getAll...");
        return "{'module':'book getAll'}";
    }
}
基础配置
三种配置文件在相同属性覆盖下的优先级:properties>yml>yaml
yml文件格式
- 只允许使用空格,不能使用Tab
- 属性名与数据之间的空格
yml数据读取
@Value读取单数据
yml文件中的变量引用:${属性名}
string类型的属性值如果加""则会使转义字符生效
自定义对象封装属性
- 创建自定义配置类,需要加@Component和@ConfigurationProperties注解
- 使用时由@Autowired注入
eg:
配置类:
server:
  port: 81
  servlet:
    context-path: /test

test:
  name: yanxin

datasource:
  driver: com.mysql.jdbc.Driver
  url: jdbc:mysql://localhost/springboot_db
  username: root
  password: root6661
配置类:
@Data
@AllArgsConstructor
@NoArgsConstructor
//受spring管控,需要定义为Bean
@Component
//指定加载的数据
@ConfigurationProperties(prefix = "datasource")
public class DataSource {
    private String driver;
    private String url;
    private String username;
    private String password;
}
实践:
@RestController
@RequestMapping("/test")
public class TestController {

    @Autowired
    private DataSource dataSource;

    @GetMapping
    public String getStr() {
        System.out.println(dataSource);
        return "hi,fengdongnan";
    }
}
注:server:servlet:context-path: /test 该属性用于配置服务器前置访问路径
SpringBoot整合JUnit
在进行 Spring Boot 应用的测试时,测试类需要依赖 Spring 的上下文环境。为了正确加载 Spring 的配置类,测试类必须满足以下条件之一:
-
与引导类处于相同层级结构:
- 测试类必须与主引导类(标注了
@SpringBootApplication的类)处于相同的包层级结构下。这是因为@SpringBootApplication注解默认会扫描当前包及其子包中的组件。 - 例如,如果主引导类位于
com.example.demo包中,测试类也应位于com.example.demo或其子包中。
- 测试类必须与主引导类(标注了
-
显式指定引导类:
-
如果测试类与主引导类不在同一包层级结构下,可以通过
@SpringBootTest注解的classes属性显式指定引导类。 -
示例:
import org.springframework.boot.test.context.SpringBootTest;

@SpringBootTest(classes = DemoApplication.class)
public class MyTests {
    // 测试方法
}
在这个例子中,
DemoApplication是主引导类,标注了@SpringBootApplication。
-
如果不满足上述条件之一,Spring Boot 测试框架可能无法正确加载 Spring 的配置类,从而导致测试失败或报错:
Test ignored.

java.lang.IllegalStateException: Unable to find a @SpringBootConfiguration, you need to use @ContextConfiguration or @SpringBootTest(classes=...) with your test
...

Process finished with exit code -1
高级配置–yml属性注入高级
@ConfigurationProperties,@EnableConfigurationProperties
@ConfigurationProperties注解的作用是用来为bean绑定属性的。开发者可以在yml配置文件中以对象的格式添加若干属性
servers:
  ip-address: 192.168.0.1
  port: 2345
  timeout: -1
然后再开发一个用来封装数据的实体类,注意要提供属性对应的setter方法
@Component
@Data
public class ServerConfig {
    private String ipAddress;
    private int port;
    private long timeout;
}
使用@ConfigurationProperties注解就可以将配置中的属性值关联到开发的模型类上
@Component
@Data
@ConfigurationProperties(prefix = "servers")
public class ServerConfig {
    private String ipAddress;
    private int port;
    private long timeout;
}
这样加载对应bean的时候就可以直接加载配置属性值了。但是目前我们学的都是给自定义的bean使用这种形式加载属性值,如果是第三方的bean呢?能不能用这种形式加载属性值呢?为什么会提出这个疑问?原因就在于当前@ConfigurationProperties注解是写在类定义的上方,而第三方开发的bean源代码不是你自己书写的,你也不可能到源代码中去添加@ConfigurationProperties注解,这种问题该怎么解决呢?下面就来说说这个问题。
使用@ConfigurationProperties注解其实可以为第三方bean加载属性,格式特殊一点而已。
步骤①:使用@Bean注解定义第三方bean
@Bean
public DruidDataSource datasource(){
    DruidDataSource ds = new DruidDataSource();
    return ds;
}
步骤②:在yml中定义要绑定的属性,注意datasource此时全小写
datasource:
  driverClassName: com.mysql.jdbc.Driver
步骤③:使用@ConfigurationProperties注解为第三方bean进行属性绑定,注意前缀是全小写的datasource
@Bean
@ConfigurationProperties(prefix = "datasource")
public DruidDataSource datasource(){
    DruidDataSource ds = new DruidDataSource();
    return ds;
}
操作方式完全一样,只不过@ConfigurationProperties注解不仅能添加到类上,还可以添加到方法上,添加到类上是为spring容器管理的当前类的对象绑定属性,添加到方法上是为spring容器管理的当前方法的返回值对象绑定属性,其实本质上都一样。
做到这其实就出现了一个新的问题,目前我们定义bean不是通过类注解定义就是通过@Bean定义,使用@ConfigurationProperties注解可以为bean进行属性绑定,那在一个业务系统中,哪些bean通过注解@ConfigurationProperties去绑定属性了呢?因为这个注解不仅可以写在类上,还可以写在方法上,所以找起来就比较麻烦了。为了解决这个问题,spring给我们提供了一个全新的注解,专门标注使用@ConfigurationProperties注解绑定属性的bean是哪些。这个注解叫做@EnableConfigurationProperties。具体如何使用呢?
步骤①:在配置类上开启@EnableConfigurationProperties注解,并标注要使用@ConfigurationProperties注解绑定属性的类
@SpringBootApplication
@EnableConfigurationProperties(ServerConfig.class)
public class Springboot13ConfigurationApplication {
}
步骤②:在对应的类上直接使用@ConfigurationProperties进行属性绑定
@Data
@ConfigurationProperties(prefix = "servers")
public class ServerConfig {
    private String ipAddress;
    private int port;
    private long timeout;
}
@EnableConfigurationProperties注解时,spring会默认将其标注的类定义为bean,无需再次声明@Component注解了。
总结
- 使用@ConfigurationProperties可以为使用@Bean声明的第三方bean绑定属性
- 当使用@EnableConfigurationProperties声明进行属性绑定的bean后,无需使用@Component注解再次进行bean声明
宽松绑定/松散绑定
…
此处各种格式的属性名转化可以作为一道算法题
计量单位绑定
校验
目前我们在进行属性绑定时可以通过松散绑定规则在书写时放飞自我了,但是在书写时由于无法感知模型类中的数据类型,就会出现类型不匹配的问题,比如代码中需要int类型,配置中给了非法的数值,例如写一个“a",这种数据肯定无法有效的绑定,还会引发错误。 SpringBoot给出了强大的数据校验功能,可以有效的避免此类问题的发生。在JAVAEE的JSR303规范中给出了具体的数据校验标准,开发者可以根据自己的需要选择对应的校验框架,此处使用Hibernate提供的校验框架来作为实现进行数据校验。书写应用格式非常固定,话不多说,直接上步骤
步骤①:开启校验框架
<!--1.导入JSR303规范-->
<dependency>
    <groupId>javax.validation</groupId>
    <artifactId>validation-api</artifactId>
</dependency>
<!--使用hibernate框架提供的校验器做实现-->
<dependency>
    <groupId>org.hibernate.validator</groupId>
    <artifactId>hibernate-validator</artifactId>
</dependency>
步骤②:在需要开启校验功能的类上使用注解@Validated开启校验功能
@Component
@Data
@ConfigurationProperties(prefix = "servers")
//开启对当前bean的属性注入校验
@Validated
public class ServerConfig {
}
步骤③:对具体的字段设置校验规则
@Component
@Data
@ConfigurationProperties(prefix = "servers")
//开启对当前bean的属性注入校验
@Validated
public class ServerConfig {
    //设置具体的规则
    @Max(value = 8888,message = "最大值不能超过8888")
    @Min(value = 202,message = "最小值不能低于202")
    private int port;
}
通过设置数据格式校验,就可以有效避免非法数据加载,其实使用起来还是挺轻松的,基本上就是一个格式。
总结
开启Bean属性校验功能一共3步:导入JSR303与Hibernate校验框架坐标、使用@Validated注解启用校验功能、使用具体校验规则规范数据校验格式
部署运维
打包
需要导入maven-Springboot打包插件,然后执行packge生成jar包(选择跳过test环节)
临时属性
除了在yml配置文件中配置属性,还可以采用其他方式来配置临时属性以实现自己的部署要求,比如命令行临时参数:
使用jar命令启动SpringBoot工程时可以使用临时属性替换配置文件中的属性
java –jar springboot.jar –-server.port=80 --logging.level.root=debug
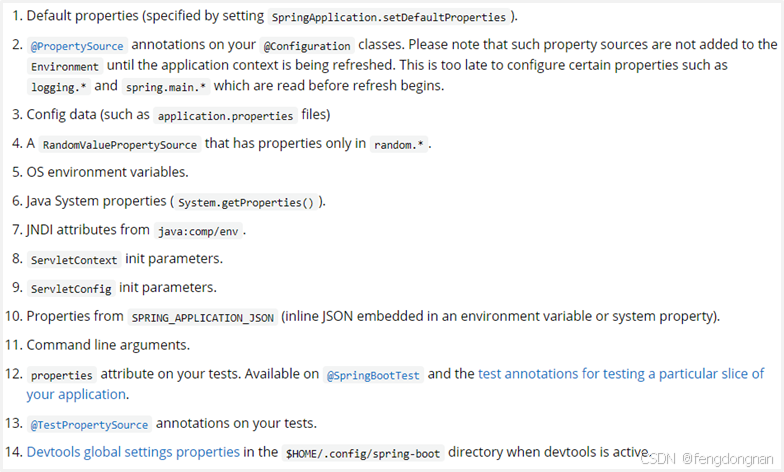
此外还有其他属性配置方式及相应优先级(序号越大优先级越高)
配置文件分类
多层级配置文件间的属性采用叠加并覆盖的形式作用于程序:
- file :config/application.yml 【最高】
- file :application.yml
- classpath:config/application.yml
- classpath:application.yml 【最低】
多环境开发
yml单文件
启动时指定选择哪一组配置
spring:
	profiles:
		active: pro		# 启动pro
---
spring:
	profiles: pro
server:
	port: 80
---
spring:
	profiles: dev
server:
	port: 81
---
spring:
	profiles: test
server:
	port: 82
yml多文件
-
主配置文件中设置公共配置(全局)
spring: profiles: active: pro # 启动pro -
环境分类配置文件中常用于设置冲突属性(局部)
server:
	port: 80
maven和SpringBoot的多环境
-
当Maven与SpringBoot同时对多环境进行控制时,以Mavn为主,SpringBoot使用@…@占位符读取Maven对应的配置属性值
-
基于SpringBoot读取Maven配置属性的前提下,如果在Idea下测试工程时pom.xml每次更新需要手动compile方可生效
日志
@Slf4j原理:根据类创建日志对象
@Slf4j		//这个注解替代创建日志对象
@RestController
@RequestMapping("/books")
public class BookController extends BaseClass{
    private static final Logger log = LoggerFactory.getLogger(BookController.class);	//这一句可以不写了
}
热部署
项目启动包括start和reload,分别加载本地代码和jar包。热部署其实就是项目restart的过程。
步骤
- 导入开发者工具的依赖
- Build Project
- Settings中勾选自动构建项目,启动允许编译器运行时make
测试
测试类中设置临时属性
@Import导入测试类的专用配置Bean
test包中的配置Bean
@Configuration
public class MyConfig {
    @Bean
    public String message(){
        return "hallo,yanxin";
    }
}
测试类@Import导入配置Bean
@SpringBootTest
@Import(MyConfig.class)//指明配置类
public class TestImport {
    @Autowired
    private String message;//注入Bean
    @Test
    void test0(){
        System.out.println(message);
    }
}
事务控制测试数据无痕
测试类同时使用@SpringBootTest和@Transactional可以利用事务控制测试数据回滚达到数据无痕测试的效果
@SpringBootTest
@Transactional
web测试
测试类中启动web环境
每一个springboot的测试类上方都会标准@SpringBootTest注解,而注解带有一个属性,叫做webEnvironment。通过该属性就可以设置在测试用例中启动web环境,具体如下:
@SpringBootTest(webEnvironment = SpringBootTest.WebEnvironment.RANDOM_PORT)
public class WebTest {
}
测试类中启动web环境时,可以指定启动的Web环境对应的端口,springboot提供了4种设置值,分别如下:
- MOCK:根据当前设置确认是否启动web环境,例如使用了Servlet的API就启动web环境,属于适配性的配置
- DEFINED_PORT:使用自定义的端口作为web服务器端口
- RANDOM_PORT:使用随机端口作为web服务器端口
- NONE:不启动web环境
测试类中发送请求
步骤①:在测试类中开启web虚拟调用功能,通过注解@AutoConfigureMockMvc实现此功能的开启
步骤②:定义发起虚拟调用的对象MockMVC,通过自动装配的形式初始化对象
步骤③:创建一个虚拟请求对象,封装请求的路径,并使用MockMVC对象发送对应请求
@SpringBootTest(webEnvironment = SpringBootTest.WebEnvironment.RANDOM_PORT)
//开启虚拟MVC调用
@AutoConfigureMockMvc
public class WebTest {
    @Test
    void testWeb(@Autowired MockMvc mvc) throws Exception {
        //http://localhost:8080/books
        //创建虚拟请求,当前访问/books
        MockHttpServletRequestBuilder builder = MockMvcRequestBuilders.get("/books");
        //执行对应的请求
        mvc.perform(builder);
    }
}
执行测试程序,现在就可以正常的发送/books对应的请求了,注意访问路径不要写http://localhost:8080/books,因为前面的服务器IP地址和端口使用的是当前虚拟的web环境,无需指定,仅指定请求的具体路径即可。
匹配json响应体
  @Test
    void testJson(@Autowired MockMvc mvc) throws Exception {
        MockHttpServletRequestBuilder builder = MockMvcRequestBuilders.get("/books");
        ResultActions action = mvc.perform(builder);
        //设定预期值 与真实值进行比较,成功测试通过,失败测试失败
        //定义本次调用的预期值
        ContentResultMatchers content = MockMvcResultMatchers.content();
        ResultMatcher result = content.json("				                  {\"id\":1,\"name\":\"springboot2\",\"type\":\"springboot\",\"description\":\"springboot\"}");
        //添加预计值到本次调用过程中进行匹配
        action.andExpect(result);
    }
MockMvc mvc) throws Exception {
MockHttpServletRequestBuilder builder = MockMvcRequestBuilders.get(“/books”);
ResultActions action = mvc.perform(builder);
//设定预期值 与真实值进行比较,成功测试通过,失败测试失败
//定义本次调用的预期值
ContentResultMatchers content = MockMvcResultMatchers.content();
ResultMatcher result = content.json(" {“id”:1,“name”:“springboot2”,“type”:“springboot”,“description”:“springboot”}");
//添加预计值到本次调用过程中进行匹配
action.andExpect(result);
}