目录
1、什么是Session跨域共享
所谓session跨域就是摒弃了系统(如tomcat)提供的session,而使用自定义的类似Session的机制来保存客户端数据的一种解决方案。如:通过设置cookie的domain来实现cookie的跨域传递。在cookie中传递一个自定义的session_id。这个session_id是客户端的唯一标记。将这个标记作为key,将客户端需要保存的数据作为value,在服务端进行保存(数据库保存或NOSQL)。这种机制是Session的跨域解决。
什么是域,在应用模型中一个完整的,有独立访问路径的功能集合称为一个域。如,百度称为一个应用或系统。百度下有若干的域,如搜索引擎(www.baidu.com)百度贴吧(tie.baidu.com),百度知道,百度地图等。域信息有时也称为多级域名。域的划分,以IP,端口,主机名,域名为标准实际划分。
什么是跨域,客户端请求的服务器,IP,端口,域名,主机名任何一个不同,都称为跨域。2、什么是SSO
单点登录(Single Sign On,SSO),就是通过用户的一次性鉴别登录。当用户在身份认证服务器上登录一次以后,即可获得访问单点登录系统中其他关联系统和应用软件的权限,同时这种实现是不需要管理员对用户的登录状态或其他信息进行修改的,这意味着在多个应用系统中,用户只需一次登录就可以访问所有相互信任的应用系统。这种方式减少了由登录产生的时间消耗,辅助了用户管理,是目前比较流行的
3、Session跨域共享简单实现
3.1 Spring Session 共享 (了解)
Spring-session技术是spring提供的用于处理集群会话共享的解决方案。spring-session技术是将用户session数据保存到三方存储容器中。如:MySQL,redis等。 Spring-session技术是解决同域名下的多服务器集群session共享问题的。不能解决跨域session共享问题。所以互联网开发中越来越少使用这门技术
3.2 Nginx Session共享
nginx中的ip_hash技术能够将某个ip的请求定向到同一台后端,这样把特定ip发送给特定主机,就不存在session这个问题了,因为1个用户对应1台主机
http {
#在http字段添加
upstream servers.mydomain.com {
server 192.168.223.129:15672;
server 192.168.223.130:15672;
server 192.168.223.131:15672;
ip_hash; #不加这句就不能保持会话
}
server{
listen 80;
location / {
proxy_pass http://servers.mydomain.com;
}
}
}问题:
1)、当某个时刻来自某个IP地址的请求特别多,那么将导致某台后端服务器的压力可能非常大,而其他后端服务器却空闲的不均衡情况,违背了负载均衡的宗旨!
2)、客户端请求的ip是动态的,对应的后端服务器出现故障。这些都使ip_hash技术变得不可用
3.3 Token + Redis + Cookie机制
Token实质上是服务端给客户端的一个字符串,上面包含着一些验证信息,相当于一个身份令牌;而通过客户端Cookie机制你每次访问的时候都会拿着这个令牌访问服务,通过与redis中存储的登录用户信息对比,从而完成身份校验。因为登录用户信息是集中保存在共享的内存服务器中的,所以所有的“域”都可以使用,从而达到跨域的目的!
以下是一个小demo:
3.3.1 pom依赖
<dependencies>
<dependency>
<groupId>org.springframework.boot</groupId>
<artifactId>spring-boot-starter</artifactId>
</dependency>
<dependency>
<groupId>org.springframework.boot</groupId>
<artifactId>spring-boot-starter-web</artifactId>
</dependency>
<dependency>
<groupId>org.springframework.boot</groupId>
<artifactId>spring-boot-starter-test</artifactId>
<scope>test</scope>
<exclusions>
<exclusion>
<groupId>org.junit.vintage</groupId>
<artifactId>junit-vintage-engine</artifactId>
</exclusion>
</exclusions>
</dependency>
<dependency>
<groupId>org.springframework.boot</groupId>
<artifactId>spring-boot-starter-data-redis</artifactId>
</dependency>
<dependency>
<groupId>com.alibaba</groupId>
<artifactId>fastjson</artifactId>
<version>1.2.31</version>
</dependency>
<!--用户设备信息工具类-->
<dependency>
<groupId>nl.bitwalker</groupId>
<artifactId>UserAgentUtils</artifactId>
<version>1.2.4</version>
</dependency>
<dependency>
<groupId>commons-codec</groupId>
<artifactId>commons-codec</artifactId>
<version>1.6</version>
</dependency>
</dependencies>3.3.2 spring配置
spring.redis.host=192.168.223.1283.3.3 用户实体类
package com.ydt.sso.pojo;
/**
* 登录用户实体类
*/
public class User {
private Integer id;
private String username;
private String password;
public User(Integer id, String username, String password) {
this.id = id;
this.username = username;
this.password = password;
}
public User() {
}
public Integer getId() {
return id;
}
public void setId(Integer id) {
this.id = id;
}
public String getUsername() {
return username;
}
public void setUsername(String username) {
this.username = username;
}
public String getPassword() {
return password;
}
public void setPassword(String password) {
this.password = password;
}
}3.3.4 token服务类
package com.ydt.sso.service.impl;
import com.alibaba.fastjson.JSONObject;
import com.ydt.sso.pojo.User;
import com.ydt.sso.service.TokenService;
import nl.bitwalker.useragentutils.UserAgent;
import org.apache.commons.codec.digest.DigestUtils;
import org.springframework.beans.factory.annotation.Autowired;
import org.springframework.data.redis.core.RedisTemplate;
import org.springframework.data.redis.core.ValueOperations;
import org.springframework.stereotype.Service;
import java.text.SimpleDateFormat;
import java.util.Date;
import java.util.Random;
/**
* token 服务类
*/
@Service
public class TokenServiceImpl implements TokenService {
@Autowired
private RedisTemplate<String, String> redisTemplate;
//生成token(格式为:设备-加密的用户名-时间-六位随机数)
public String generateToken(String userAgentStr, String username) {
StringBuilder token = new StringBuilder("token:");
//设备
UserAgent userAgent = UserAgent.parseUserAgentString(userAgentStr);
if (userAgent.getOperatingSystem().isMobileDevice()) {
token.append("MOBILE-");
} else {
token.append("PC-");
}
//加密的用户名
token.append(DigestUtils.md5Hex(username) + "-");
//时间
token.append(new SimpleDateFormat("yyyyMMddHHmmssSSS").format(new Date()) + "-");
//六位随机字符串
token.append(new Random().nextInt(999999 - 111111 + 1) + 111111 );
System.out.println("token-->" + token.toString());
return token.toString();
}
//把token存到redis中,如果是电脑登录,设置过期时间
public void save(String token, User user) {
if (token.startsWith("token:PC")) {
redisTemplate.opsForValue().set(token, JSONObject.toJSONString(user), 2*60*60);
} else {
redisTemplate.opsForValue().set(token, JSONObject.toJSONString(user));
}
}
//获取token
public String get(String token) {
return redisTemplate.opsForValue().get(token);
}
}3.3.5 登录服务类
package com.ydt.sso.service.impl;
import com.ydt.sso.pojo.User;
import com.ydt.sso.service.UserService;
import org.springframework.stereotype.Service;
/**
* 模拟用户登录服务
*/
@Service("userService")
public class UserServiceImpl implements UserService {
public User login(String username, String password) {
if ("laohu".equals(username) && "laohu".equals(password)) {
return new User(1, "laohu", "laohu");
} else {
return null;
}
}
}3.3.6 Controller接口类
package com.ydt.sso.controller;
import com.alibaba.fastjson.JSONObject;
import com.ydt.sso.pojo.User;
import com.ydt.sso.service.TokenService;
import com.ydt.sso.service.UserService;
import org.apache.commons.codec.binary.StringUtils;
import org.springframework.beans.factory.annotation.Autowired;
import org.springframework.stereotype.Controller;
import org.springframework.web.bind.annotation.RequestMapping;
import org.springframework.web.bind.annotation.ResponseBody;
import javax.servlet.http.Cookie;
import javax.servlet.http.HttpServlet;
import javax.servlet.http.HttpServletRequest;
import javax.servlet.http.HttpServletResponse;
@Controller
@RequestMapping("/user")
public class UserController {
@Autowired
private UserService userService;
@Autowired
private TokenService tokenService;
@RequestMapping("/login")
@ResponseBody
public String login(String username, String password
, HttpServletRequest request , HttpServletResponse response) {
Cookie[] cookies = request.getCookies();
if(cookies != null && cookies.length != 0){
for (Cookie cookie : cookies) {
if(cookie.getName().equals("token")){
String token = tokenService.get(cookie.getValue());
if (token != null){
return "已登录";
}
}
}
}
//先验证用户是否存在
User user = this.userService.login(username, password);
if (user != null) {
//如果存在,根据request请求生成token码
String userAgent = request.getHeader("user-agent");
String token = this.tokenService.generateToken(userAgent, username);
//将token码保存到redis中
this.tokenService.save(token, user);
Cookie cookie = new Cookie("token", token);
cookie.setMaxAge(60*60*24*30);//设置cookie有效期30天(这只会对手机有效,当然你也可以区别设置)
response.addCookie(cookie); //保存cookie.setAttribute("token",token);
} else {
return "登录失败!";
}
return "登录成功!";
}
}初次登陆
再次登录
总结:
实际生产中如果采用这种模式,其他项目这个地方需要使用MVC拦截器统一进行登录校验,登录成功后需要处理跳转回原先的访问地址
繁琐,复杂,耦合度高,不可靠(万一设备不支持cookie呢?)并且每次访问都要默认携带cookie信息(万一cookie信息被篡改了呢?),这样会增加带宽的压力
3.4 Spring Security Oauth2
OAuth是一个关于授权的开放网络标准,在全世界得到的广泛的应用,目前是2.0的版本。OAuth2在“客户端”与“服务提供商”之间,设置了一个授权层(authorization layer)。“客户端”不能直接登录“服务提供商”,只能登录授权层,以此将服务提供商与客户端分离。“客户端”登录需要获取OAuth提供的令牌,否则将提示认证失败而导致客户端无法访问服务。
3.4.1 项目介绍
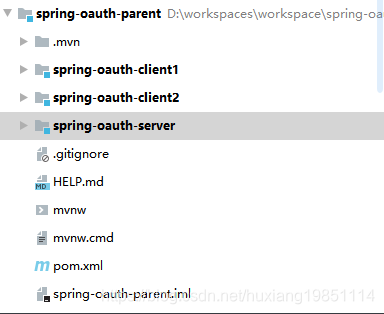
spring-oauth-parent : 父模块,管理打包
spring-oauth-server : 授权/认证服务器(端口:7777)
spring-oauth-client1 : 单点登录客户端示例(端口:8888)---资源服务器,认证客户端
spring-oauth-client2: 单点登录客户端示例(端口:9999)---资源服务器。认证客户端
涉及技术:Spring Boot ,Spring Security,Thymeleaf,Oauth
1、登录:当通过任意客户端访问资源服务器受保护的接口时,会跳转到认证服务器的统一登录界面,要求登录,登录之后,在登录有效时间内任意客户端都无需再登录
2、注销:当任意客户端注销登录后,其他的客户端都不能免登录访问受保护的接口!
3.4.2 父模块pom依赖
<?xml version="1.0" encoding="UTF-8"?>
<project xmlns="http://maven.apache.org/POM/4.0.0"
xmlns:xsi="http://www.w3.org/2001/XMLSchema-instance"
xsi:schemaLocation="http://maven.apache.org/POM/4.0.0 http://maven.apache.org/xsd/maven-4.0.0.xsd">
<modelVersion>4.0.0</modelVersion>
<!--springboot启动器基础依赖-->
<parent>
<groupId>org.springframework.boot</groupId>
<artifactId>spring-boot-starter-parent</artifactId>
<version>2.0.4.RELEASE</version>
<relativePath/> <!-- lookup parent from repository -->
</parent>
<groupId>com.ydt</groupId>
<artifactId>spring-oauth-parent</artifactId>
<version>1.0.0-SNAPSHOT</version>
<packaging>pom</packaging>
<name>spring-oauth-parent</name>
<!--版本参数-->
<properties>
<project.build.sourceEncoding>UTF-8</project.build.sourceEncoding>
<project.reporting.outputEncoding>UTF-8</project.reporting.outputEncoding>
<java.version>1.8</java.version>
<rest-assured.version>3.1.0</rest-assured.version>
<oauth.version>2.3.4.RELEASE</oauth.version>
<oauth-auto.version>2.0.1.RELEASE</oauth-auto.version>
<thymeleaf-security4.version>3.0.2.RELEASE</thymeleaf-security4.version>
</properties>
<!--模块聚合-->
<modules>
<module>spring-oauth-server</module>
<module>spring-oauth-client1</module>
<module>spring-oauth-client2</module>
</modules>
<!--版本控制-->
<dependencyManagement>
<dependencies>
<dependency>
<groupId>org.thymeleaf.extras</groupId>
<artifactId>thymeleaf-extras-springsecurity4</artifactId>
<version>${thymeleaf-security4.version}</version>
</dependency>
<dependency>
<groupId>org.springframework.security.oauth</groupId>
<artifactId>spring-security-oauth2</artifactId>
<version>${oauth.version}</version>
</dependency>
<dependency>
<groupId>org.springframework.security.oauth.boot</groupId>
<artifactId>spring-security-oauth2-autoconfigure</artifactId>
<version>${oauth-auto.version}</version>
</dependency>
</dependencies>
</dependencyManagement>
</project>3.4.3 认证服务端项目
3.4.3.1 pom依赖
<?xml version="1.0" encoding="UTF-8"?>
<project xmlns="http://maven.apache.org/POM/4.0.0" xmlns:xsi="http://www.w3.org/2001/XMLSchema-instance"
xsi:schemaLocation="http://maven.apache.org/POM/4.0.0 https://maven.apache.org/xsd/maven-4.0.0.xsd">
<modelVersion>4.0.0</modelVersion>
<artifactId>spring-oauth-server</artifactId>
<name>spring-oauth-server</name>
<parent>
<groupId>com.ydt</groupId>
<artifactId>spring-oauth-parent</artifactId>
<version>1.0.0-SNAPSHOT</version>
</parent>
<dependencies>
<dependency>
<groupId>org.springframework.boot</groupId>
<artifactId>spring-boot-starter-web</artifactId>
</dependency>
<!--安全框架和oauth2集成包-->
<dependency>
<groupId>org.springframework.security.oauth</groupId>
<artifactId>spring-security-oauth2</artifactId>
</dependency>
<!--freemarker模板引擎启动器依赖-->
<dependency>
<groupId>org.springframework.boot</groupId>
<artifactId>spring-boot-starter-freemarker</artifactId>
</dependency>
</dependencies>
</project>
3.4.3.2 Spring配置文件
server:
  port: 7777
  servlet:
    context-path: /auth
#认证服务完成后重定向地址
redirectUris: http://localhost:8888/login,http://localhost:9999/login
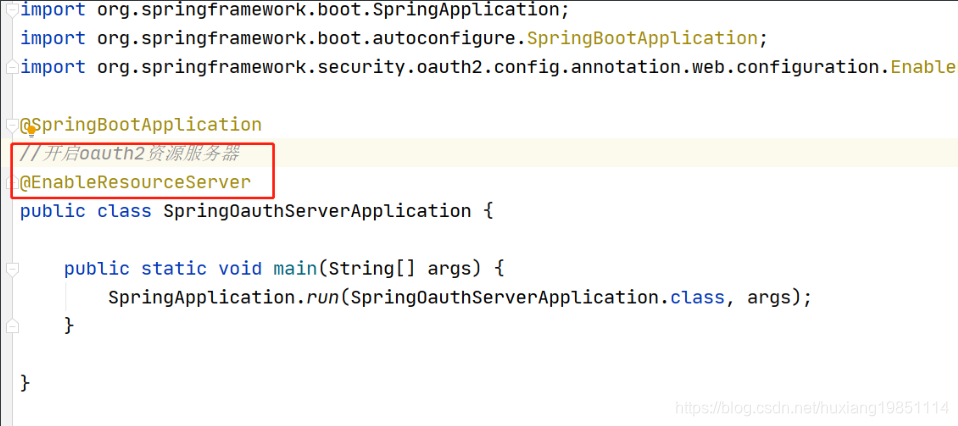
3.4.3.3 标识资源服务器
启动类添加 @EnableResourceServer 注解,表示作为资源服务器
3.4.3.4 认证服务配置
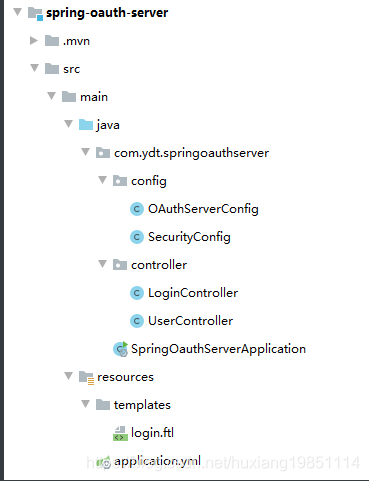
package com.ydt.springoauthserver.config;
import org.springframework.beans.factory.annotation.Autowired;
import org.springframework.beans.factory.annotation.Value;
import org.springframework.context.annotation.Configuration;
import org.springframework.security.crypto.bcrypt.BCryptPasswordEncoder;
import org.springframework.security.oauth2.config.annotation.configurers.ClientDetailsServiceConfigurer;
import org.springframework.security.oauth2.config.annotation.web.configuration.AuthorizationServerConfigurerAdapter;
import org.springframework.security.oauth2.config.annotation.web.configuration.EnableAuthorizationServer;
import org.springframework.security.oauth2.config.annotation.web.configurers.AuthorizationServerSecurityConfigurer;
/**
* 认证服务器配置
*/
@Configuration
@EnableAuthorizationServer
public class OAuthServerConfig extends AuthorizationServerConfigurerAdapter {
//认证完成后重定向地址
@Value("${redirectUris}")
private String redirectUris;
/**
* BCrypt加密,保障账号密码不以明文传输
*/
@Autowired
private BCryptPasswordEncoder passwordEncoder;
/**
* 服务器允许所有客户端通过登录认证携带token令牌访问
* @param oauthServer
* @throws Exception
*/
public void configure(final AuthorizationServerSecurityConfigurer oauthServer) throws Exception {
oauthServer.tokenKeyAccess("permitAll()").checkTokenAccess("isAuthenticated()");
}
/**
* 认证授权配置和重定向地址
* @param clients
* @throws Exception
*/
public void configure(final ClientDetailsServiceConfigurer clients) throws Exception {
String[] urls = redirectUris.split(",");
clients.inMemory()
.withClient("SampleClientId") // clientId, 可以类比为用户名,需要认证的各模块统一就好
.secret(passwordEncoder.encode("secret")) // secret, 可以类比为密码,需要认证的各模块统一就好
.authorizedGrantTypes("authorization_code") // 授权类型,这里选择授权码
.scopes("all") // 授权范围全部
.autoApprove(true) // 自动认证
.redirectUris(urls)// 认证成功重定向URL
.accessTokenValiditySeconds(10); // 超时时间,10s
}
}3.4.3.5 安全框架登录配置
package com.ydt.springoauthserver.config;
import org.springframework.context.annotation.Bean;
import org.springframework.context.annotation.Configuration;
import org.springframework.core.annotation.Order;
import org.springframework.security.config.annotation.authentication.builders.AuthenticationManagerBuilder;
import org.springframework.security.config.annotation.web.builders.HttpSecurity;
import org.springframework.security.config.annotation.web.configuration.WebSecurityConfigurerAdapter;
import org.springframework.security.crypto.bcrypt.BCryptPasswordEncoder;
@Configuration
@Order(1)//先加载Security拦截配置,访问的第一道门槛
public class SecurityConfig extends WebSecurityConfigurerAdapter {
//Security拦截配置
protected void configure(HttpSecurity http) throws Exception {
http.requestMatchers()
.antMatchers("/login")//登录接口匹配
.antMatchers("/oauth/authorize")//认证接口匹配
.and()
.authorizeRequests()//开启SPEL表达式,拦截的规则
.anyRequest().authenticated()要求执行请求时,必须已经登录了应用
.and()
.formLogin().loginPage("/login").permitAll()//自定义登录页面, 并且放行不拦截
.and().csrf().disable();//关闭csrf攻击(跨站请求伪造)
}
//认证管理器,伪认证
protected void configure(AuthenticationManagerBuilder auth) throws Exception {
// 配置用户名密码,这里采用内存方式,生产环境需要从数据库获取
auth.inMemoryAuthentication()
.withUser("admin")//账号
.password(passwordEncoder().encode("123"))//加密密码
.roles("USER");//用户角色
}
//Bcrpt加密实例
@Bean
public BCryptPasswordEncoder passwordEncoder(){
return new BCryptPasswordEncoder();
}
}3.4.3.6 登录认证页面模板
使用thymeleaf
<!DOCTYPE html>
<html>
<head>
<meta charset="UTF-8">
<title>Insert title here</title>
<link rel="stylesheet" href="https://unpkg.com/element-ui/lib/theme-chalk/index.css">
<script src="https://cdn.bootcss.com/vue/2.5.17/vue.min.js"></script>
<script src="https://unpkg.com/element-ui/lib/index.js"></script>
<script src="https://cdn.bootcss.com/jquery/3.3.1/jquery.js"></script>
</head>
<body>
<div class="login-box" id="app" >
<el-form action="/auth/login" method="post" label-position="left" label-width="0px" class="demo-ruleForm login-container">
<h2 class="title" >单点登录</h2>
<el-form-item>
<el-input type="text" name="username" v-model="username" auto-complete="off" placeholder="账号"></el-input>
</el-form-item>
<el-form-item>
<el-input type="password" name="password" v-model="password" auto-complete="off" placeholder="密码"></el-input>
</el-form-item>
<el-form-item style="width:100%; text-align:center;">
<el-button type="primary" style="width:47%;" @click.native.prevent="reset">重 置</el-button>
<el-button type="primary" style="width:47%;" native-type="submit" :loading="loading">登 录</el-button>
</el-form-item>
<el-form>
</div>
</body>
<script type="text/javascript">
new Vue({
el : '#app',
data : {
loading: false,
username: 'admin',
password: '123'
},
methods : {
reset: function() {
this.username = 'admin'
this.password = '123'
}
}
})
</script>
<style lang="scss" scoped>
.login-container {
-webkit-border-radius: 5px;
border-radius: 5px;
-moz-border-radius: 5px;
background-clip: padding-box;
margin: 100px auto;
width: 320px;
padding: 35px 35px 15px 35px;
background: #fff;
border: 1px solid #eaeaea;
box-shadow: 0 0 25px #cac6c6;
}
.title {
margin: 0px auto 20px auto;
text-align: center;
color: #505458;
}
</style>
</html>
3.4.3.7 登录页面跳转和认证成功处理器接口
package com.ydt.springoauthserver.controller;
import org.springframework.stereotype.Controller;
import org.springframework.web.bind.annotation.GetMapping;
/**
* 自定义登录接口,用于跳转到自定义的同一认证登录页面
*/
@Controller
public class LoginController {
/**
* 自定义登录页面
* @return
*/
@GetMapping("/login")
public String login() {
return "login";
}
}package com.ydt.springoauthserver.controller;
import org.springframework.web.bind.annotation.RequestMapping;
import org.springframework.web.bind.annotation.RestController;
import java.security.Principal;
/**
* 认证成功处理器接口,返回用户信息等!
*/
@RestController
public class UserController {
@RequestMapping("/user")
public Principal user(Principal principal) {
System.out.println(principal.getName());
return principal;
}
}
3.4.3.8 测试认证服务端
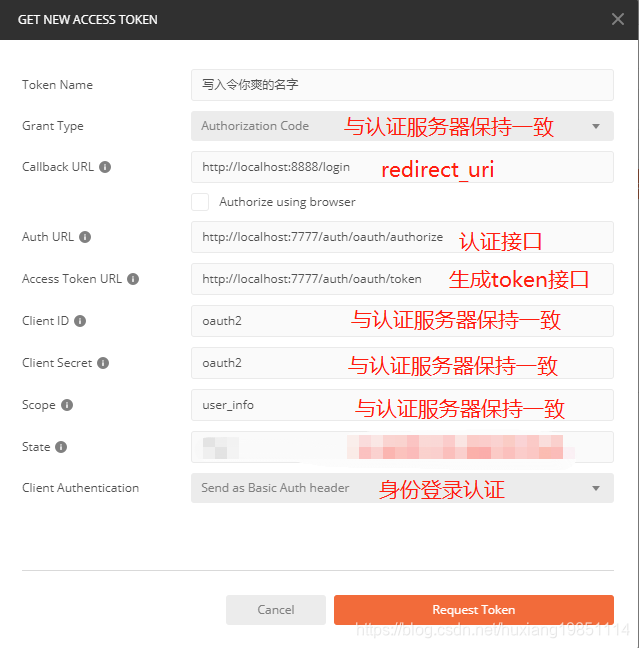
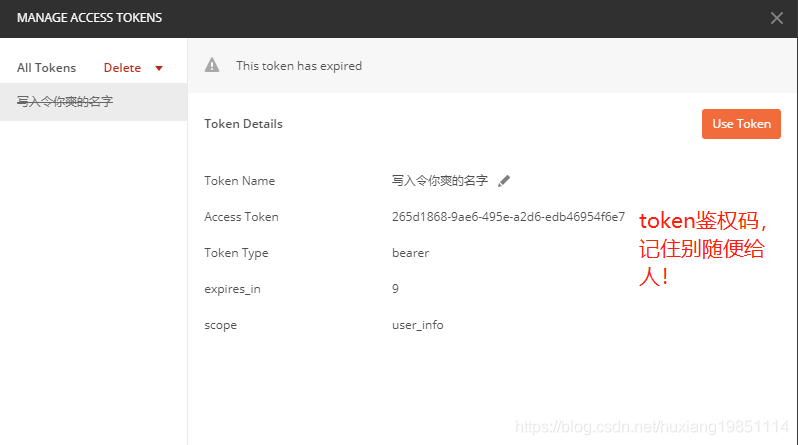
我们使用postman工具来测试是否能生成对应法的token
ok,认证服务端项目部署成功
3.4.4 客户端项目
3.4.4.1 pom依赖
<dependencies>
        <dependency>
            <groupId>org.springframework.boot</groupId>
            <artifactId>spring-boot-starter-web</artifactId>
        </dependency>
        <!--security安全框架-->
        <dependency>
            <groupId>org.springframework.boot</groupId>
            <artifactId>spring-boot-starter-security</artifactId>
        </dependency>
        <!--oauth2和安全框架自动装配包-->
        <dependency>
            <groupId>org.springframework.security.oauth.boot</groupId>
            <artifactId>spring-security-oauth2-autoconfigure</artifactId>
        </dependency>
        <!--模板引擎依赖-->
        <dependency>
            <groupId>org.springframework.boot</groupId>
            <artifactId>spring-boot-starter-thymeleaf</artifactId>
        </dependency>
        <!--模板引擎和安全框架集成装配包,仅仅只是为了绑定用户信息到html页面而已-->
        <dependency>
            <groupId>org.thymeleaf.extras</groupId>
            <artifactId>thymeleaf-extras-springsecurity4</artifactId>
        </dependency>
    </dependencies>
3.4.4.2 spring配置文件
#认证服务端地址
auth-server: http://localhost:7777/auth
server:
port: 8888 #另外一个客户端使用不同的端口9999
servlet:
context-path: /
#客户端配置认证服务器信息
security:
oauth2:
client:
clientId: oauth2 #保持跟认证服务端一直
clientSecret: oauth2 #保持跟认证服务端一直
accessTokenUri: ${auth-server}/oauth/token #oauth2 token端口
userAuthorizationUri: ${auth-server}/oauth/authorize #oauth2 认证端口
resource:
userInfoUri: ${auth-server}/user #用户身份认证接口
spring:
thymeleaf:
cache: false #是否开启模板引擎缓存(否)
3.4.4.3 开启HTTP请求监听
package com.ydt1.springoauthclient1;
import org.springframework.boot.SpringApplication;
import org.springframework.boot.autoconfigure.SpringBootApplication;
import org.springframework.context.annotation.Bean;
import org.springframework.web.context.request.RequestContextListener;
@SpringBootApplication
public class SpringOauthClient1Application {
/**
* 添加 RequestContextListener,用于监听HTTP请求事件
* @return
*/
@Bean
public RequestContextListener requestContextListener() {
return new RequestContextListener();
}
public static void main(String[] args) {
SpringApplication.run(SpringOauthClient1Application.class, args);
}
}
3.4.4.4 客户端安全认证配置类
package com.ydt1.springoauthclient1.config;
import org.springframework.boot.autoconfigure.security.oauth2.client.EnableOAuth2Sso;
import org.springframework.context.annotation.Configuration;
import org.springframework.security.config.annotation.web.builders.HttpSecurity;
import org.springframework.security.config.annotation.web.configuration.WebSecurityConfigurerAdapter;
/**
* 客户端安全配置类,添加 @EnableOAuth2Sso 注解支持单点登录
*/
@EnableOAuth2Sso
@Configuration
public class OAuthClientSecurityConfig extends WebSecurityConfigurerAdapter {
/**
* 因为本身作为需要安全认证的直接服务,需要配置安全认证的过滤
* @param http
* @throws Exception
*/
public void configure(HttpSecurity http) throws Exception {
http.csrf().disable()//禁止Security CSRF攻击(token代替了就不用这玩意了)
.antMatcher("/**")
.authorizeRequests() //匹配任何请求,并要求授权
.antMatchers("/", "/login**")
.permitAll()//login请求不要求授权,否则就进入死循环了
.anyRequest()
.authenticated();//其他任何请求必须要登录认证通过才能进行
}
}
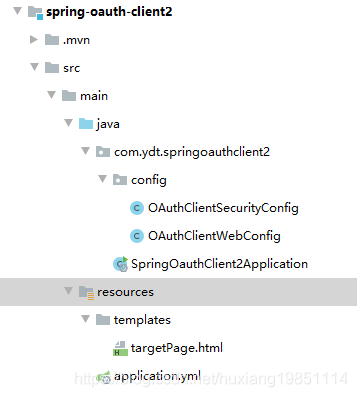
3.4.4.5 目标Controller和视图
package com.ydt.springoauthclient2.controller;
import org.springframework.stereotype.Controller;
import org.springframework.web.bind.annotation.RequestMapping;
@Controller
public class TargetController {
@RequestMapping("/targetPage")
public String targetPage(){
return "targetPage";
}
}
两个html视图仅仅打印不同的用户信息显示区分而已,使用thymeleaf绑定security用户信息
<!DOCTYPE html>
<html lang="en">
<head>
<meta http-equiv="Content-Type" content="text/html; charset=utf-8" />
<title>Spring Security SSO Client 2</title>
<link rel="stylesheet"
href="https://maxcdn.bootstrapcdn.com/bootstrap/3.3.2/css/bootstrap.min.css" />
</head>
<body>
<div class="container">
<div class="col-sm-12">
<h1>Secured Page</h1>
Welcome, <span th:text="${#authentication.name}">Name</span>
<br/>
Your authorities are <span th:text="${#authentication.authorities}">authorities</span>
</div>
</div>
</body>
</html>3.4.4.6 测试
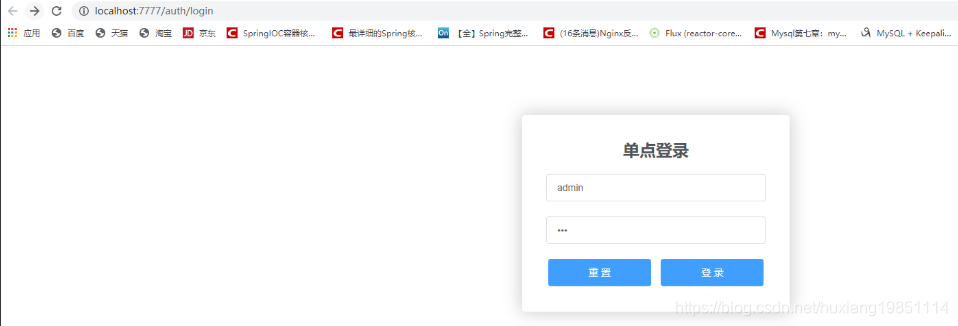
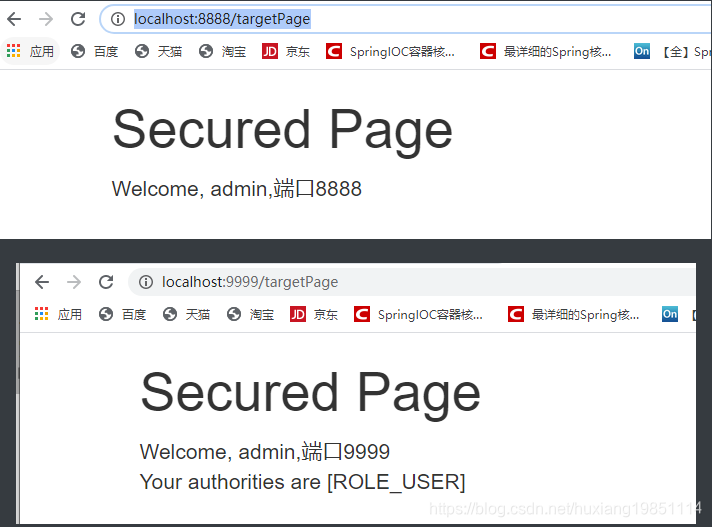
1)、不管是访问:http://localhost:8888/targetPage,还是访问http://localhost:9999/targetPage,都会被security拦截,并且定向到oauth2统一认证服务接口:http://localhost:7777/auth/login
2)、在任何一个登陆窗口登陆成功
3.4.5 补充
以上使用的都是RemoteTokenService调用授权服务器来校验token,返回校验通过的用户信息供上下文中获取
这种方式会加重授权服务器的负载,因为当用户没授权时候获取token得找授权服务器,有token了访问资源服务器还要访问授权服务器(校验token,获取token对应的用户信息),相当于说每次请求都要访问授权服务器,如果网站访问量巨大时这样对授权服务器的负载会很大
常规的方式有两种来解决这个问题:
-
使用JWT作为Token传递
-
使用Redis存储Token,资源服务器本地访问Redis校验Token
使用JWT与Redis都可以在资源服务器中进行校验Token,从而减少授权服务器的工作量
4、开源项目CAS应用
4.1 CAS简介
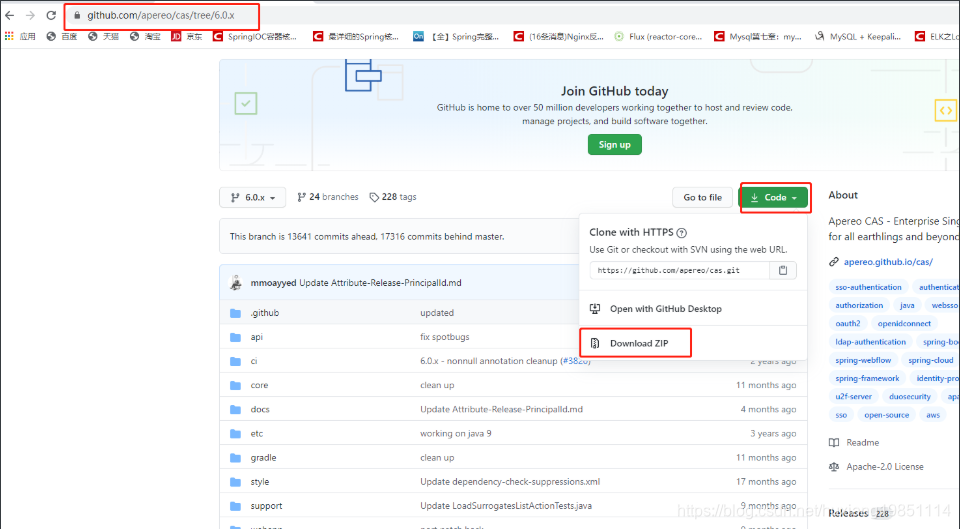
CAS(Central Authentication Service的缩写,中央认证服务)是耶鲁大学 Technology and Planning实验室的Shawn Bayern 在2002年出的一个开源系统。刚开始 名字叫Yale CAS。 Yale CAS 1.0的目标只是一个单点登录的系统,随着慢慢用开,功能就 越来越多了,2.0就提供了多种认证的方式。 2004年12月,CAS转成JASIG(Java Administration Special Interesting Group)的一 个项目,项目也随着改名为 JASIG CAS,这就是为什么现在有些CAS的链接还是有jasig的 字样。 2012年,JASIG跟Sakai基金会合并,改名为Apereo基金会,所有CAS也随着改名为 Apereo CAS。 CAS官网: CAS | Apereo 源码地址: https://github.com/apereo/cas
CAS Server下载地址:http://www.jasig.org/cas/download
CAS 具有以下特点:
【1】开源的企业级单点登录解决方案。 【2】CAS Server 为需要独立部署的 Web 应用。 【3】CAS Client 支持非常多的客户端(这里指单点登录系统中的各个 Web 应用),包 括 Java, .Net, PHP, Perl,Apache, uPortal, Ruby 等。 从结构上看,CAS 包含两个部分: CAS Server 和 CAS Client。 CAS Server 需要独立部署,主要负责对用户的认证工作;
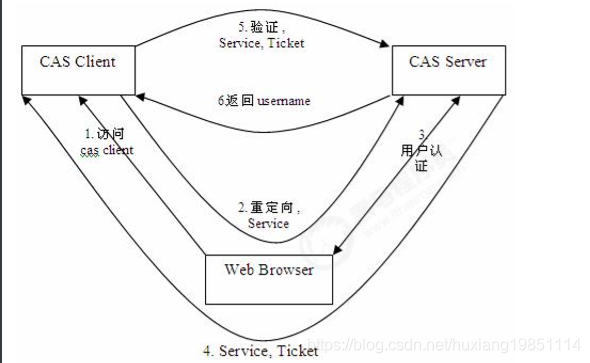
CAS Client 负责处理对客户端受保护资源的访问请求,需要登录时,重定向到 CAS Server。 下图是 CAS 最基本的协议过程:
CAS单点登录访问流程主要有以下步骤: 1.访问服务:CAS客户端发送请求访问应用系统提供的服务资源
2.定向认证:CAS客户端会重定向用户请求到SSO服务器。 3.用户认证:用户身份认证。 4.发放票据:CAS服务器会产生一个随机的ServiceTicket。 5.验证票据:CAS服务器验证票据Service Ticket的合法性,验证通过后,允许客户端访 问服务。 6.传输用户信息:CAS服务器验证票据通过后,传输用户认证结果信息给客户端。
4.2 下载CAS Server并构建
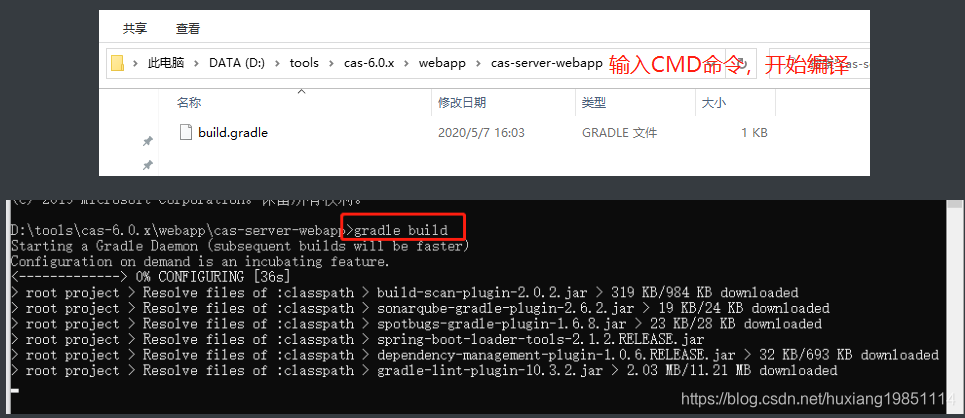
下载后进入..\cas-6.0.x\webapp\cas-server-webapp目录,cas server 由 Gradle 构建,需要提前配置好 Gradle的环境,开始使用gradle构建:
一直到编译完成,可以看到../cas-server-webapp/build/libs目录下会出现cas-server-webapp-..*.war
4.3 CAS Server部署
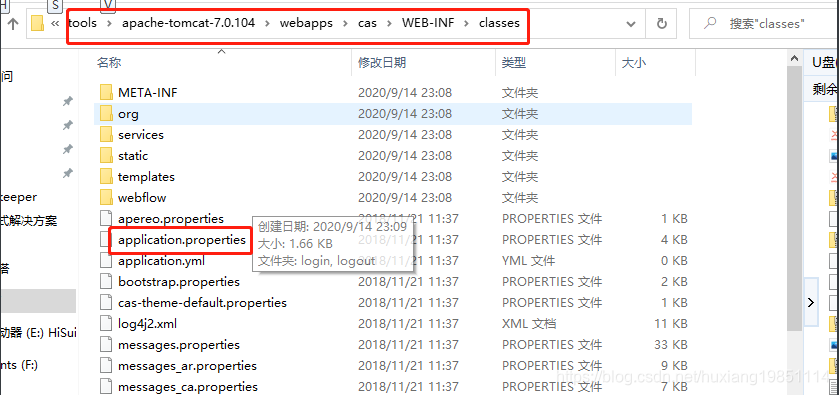
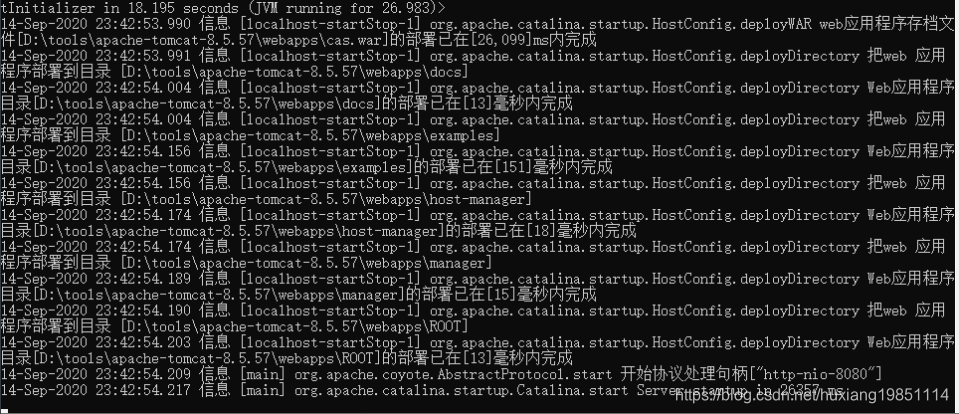
将上一步得到的war包放到tomcat,会解压成一个项目包,进入根目录下,修改application.properties文件,将CAS默认的账号和密码修改为自己的(你不改也没人打你!)
# CAS Authentication Credentials 账号密码
cas.authn.accept.users=admin::admin
# 兼容 Http 协议
cas.tgc.secure=false
# 开启识别Json文件,默认false
cas.serviceRegistry.initFromJson=true
在 cas\WEB-INF\classes\services 目录下的 HTTPSandIMAPS-10000001.json,修改内容如下,即添加http,默认是不支持http访问的:
"serviceId" : "^(https|http|imaps)://.*"再次重启tomcat(PS:注意使用tomcat8,我本地tomcat7报错了)
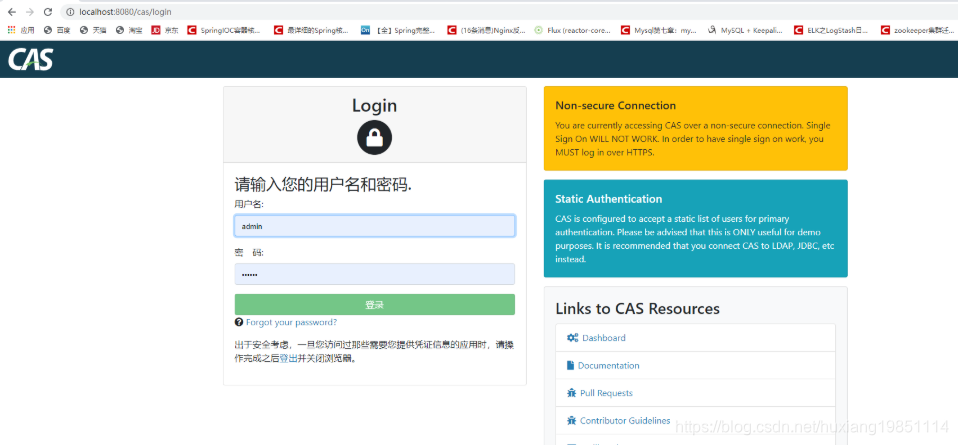
访问:http://localhost:8080/cas/login,可以看到CAS提供的统一认证登录页,当然,我们等下要替换掉他!
4.4 CAS客户端项目
我们以springboot搭建两个web客户端,通过设置cas认证登录接口来实现统一认证登录
4.4.1 pom依赖
<dependencies>
        <dependency>
            <groupId>org.springframework.boot</groupId>
            <artifactId>spring-boot-starter</artifactId>
        </dependency>
        <dependency>
            <groupId>org.springframework.boot</groupId>
            <artifactId>spring-boot-starter-web</artifactId>
        </dependency>

        <dependency>
            <groupId>net.unicon.cas</groupId>
            <artifactId>cas-client-autoconfig-support</artifactId>
            <version>2.1.0-GA</version>
        </dependency>
    </dependencies>
4.4.2 开启cas 客户端注解
package com.ydt.cas.client1;

import net.unicon.cas.client.configuration.EnableCasClient;
import org.jasig.cas.client.authentication.AuthenticationFilter;
import org.springframework.boot.SpringApplication;
import org.springframework.boot.autoconfigure.SpringBootApplication;
import org.springframework.boot.web.servlet.FilterRegistrationBean;
import org.springframework.context.annotation.Bean;

import java.util.HashMap;
import java.util.Map;

@SpringBootApplication
@EnableCasClient // 开启 Cas Client 注解
public class CasClient1Application {

    public static void main(String[] args) {
        SpringApplication.run(CasClient1Application.class, args);
    }

    private static final String CAS_SERVER_URL_LOGIN = "http://localhost:8080/cas/login";
    private static final String SERVER_NAME = "http://localhost:5555/";

    /**
     * 初始化认证过滤器,使用cas登录接口作为security的伪认证
     * @return
     */
    @Bean
    public FilterRegistrationBean filterAuthenticationRegistration() {
        FilterRegistrationBean registration = new FilterRegistrationBean();
        // AuthenticationFilter  该过滤器负责用户的认证工作
        registration.setFilter(new AuthenticationFilter());
        // 设定匹配的路径
        registration.addUrlPatterns("/*");
        Map<String,String> initParameters = new HashMap<String, String>();
        initParameters.put("casServerLoginUrl", CAS_SERVER_URL_LOGIN);
        initParameters.put("serverName", SERVER_NAME);
        // 忽略 /logoutSuccess 的路径
        initParameters.put("ignorePattern", "/logoutSuccess/*");
        registration.setInitParameters(initParameters);
        // 设定加载的顺序
        registration.setOrder(1);
        return registration;
    }
}
4.4.3 spring配置文件
server:
  port: 5555 #另一个客户端端口6666

# 配置 cas server 信息
cas:
  # cas服务端的地址
  server-url-prefix: http://localhost:8080/cas
  # cas服务端的登录地址
  server-login-url: http://localhost:8080/cas/login
  # 当前服务器的地址(客户端)
  client-host-url: http://localhost:5555
  # Ticket校验器使用Cas30ProxyReceivingTicketValidationFilter
  validation-type: cas3
4.4.4 目标接口和退出登录跳转
package com.ydt.cas.client1.controller;

import org.springframework.stereotype.Controller;
import org.springframework.web.bind.annotation.RequestMapping;
import org.springframework.web.bind.annotation.ResponseBody;

import javax.servlet.http.HttpServletRequest;
import javax.servlet.http.HttpSession;

@Controller
public class TargetController {

    @RequestMapping("/test")
    @ResponseBody
    public String test(HttpServletRequest request) {
        return "test1";
    }

    /**
     * 退出
     * @param request
     * @return
     */
    @RequestMapping("/logout")
    public String logout(HttpServletRequest request) {
        HttpSession session = request.getSession();
        session.invalidate();
        return "redirect:http://localhost:8080/cas/logout?service=http://localhost:5555/logoutSuccess";

    }

    /**
     * 退出成功页
     * @return
     */
    @RequestMapping("/logoutSuccess")
    @ResponseBody
    public String logoutSuccess() {
        return "logoutSuccess";
    }

}
4.4.5 测试
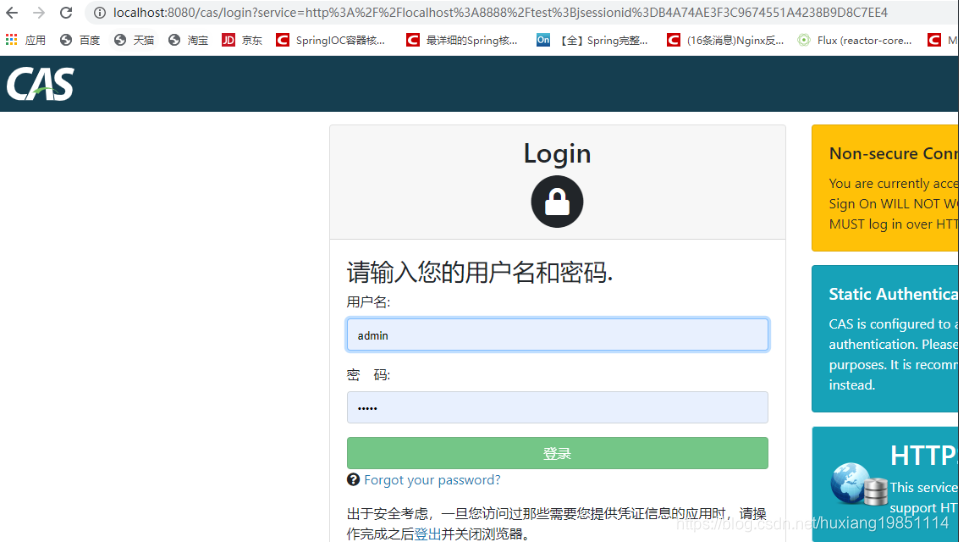
调用http://localhost:8888/test,http://localhost:9999/test都会跳转到CAS的登录页面:
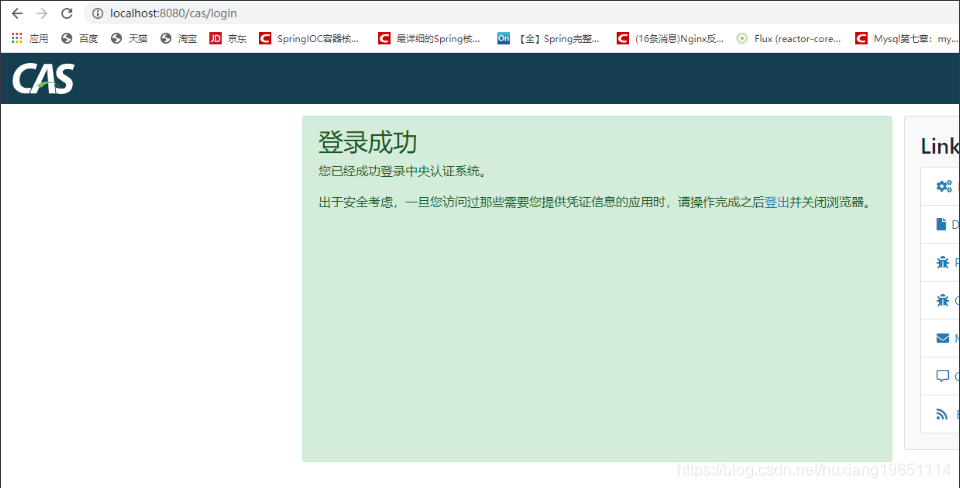
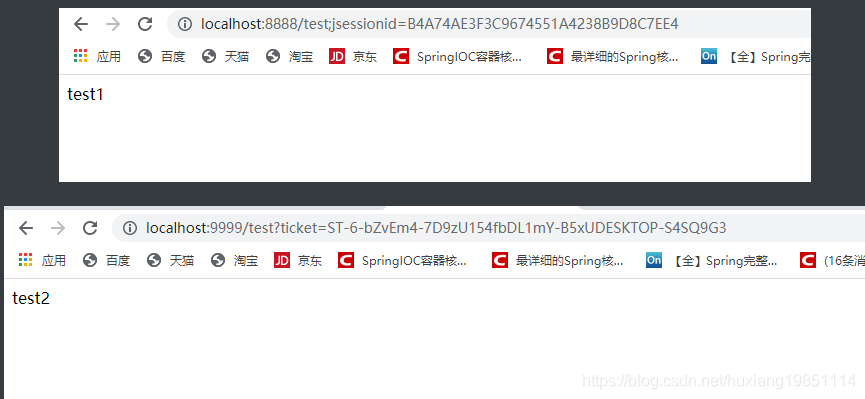
任何一个登录后,另外一个都能访问到目标接口:
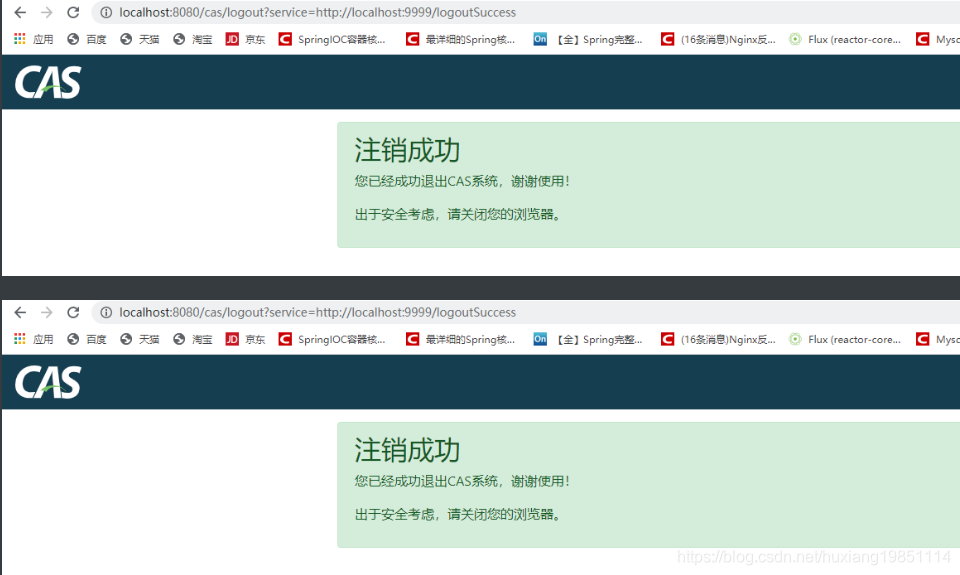
任意调用登出接口http://localhost:5555/logout,http://localhost:6666/logout,另外一个客户端的登录状态都会消失:
4.5 拓展
4.5.1 替换登录主页
提示:将cas\WEB-INF\classes\templates目录下casLoginView.html登录页面替换即可
4.5.2 集成数据库用户表
提示:
1、cas需要引入数据库相关依赖jar包,并且重新打包为war,哥已经打好了!
				<dependency>
					<groupId>org.apereo.cas</groupId>
					<artifactId>cas-server-support-jdbc</artifactId>
					<version>${cas.version}</version>
				</dependency>
				<dependency>
					<groupId>org.apereo.cas</groupId>
					<artifactId>cas-server-support-jdbc-drivers</artifactId>
					<version>${cas.version}</version>
				</dependency>
				<dependency>
					 <groupId>mysql</groupId>
					 <artifactId>mysql-connector-java</artifactId>
					 <version>8.0.16</version>
				</dependency>
2、修改CAS数据源,application.properties添加jdbc配置:
#数据库连接信息,可以配置多个数据源
cas.authn.jdbc.query[0].url=jdbc:mysql://192.168.223.128:3306/cas
cas.authn.jdbc.query[0].user=root
cas.authn.jdbc.query[0].password=root
cas.authn.jdbc.query[0].sql=select password from tb_user where username=?
cas.authn.jdbc.query[0].fieldPassword=password
cas.authn.jdbc.query[0].driverClass=com.mysql.jdbc.Driver
#生产上一般要使用BCRYPT加密,我这里难得把密码加密保存到数据库,直接用明文,别学我!
cas.authn.jdbc.query[0].passwordEncoder.type=NONE
cas.authn.jdbc.query[0].passwordEncoder.characterEncoding=UTF-8


