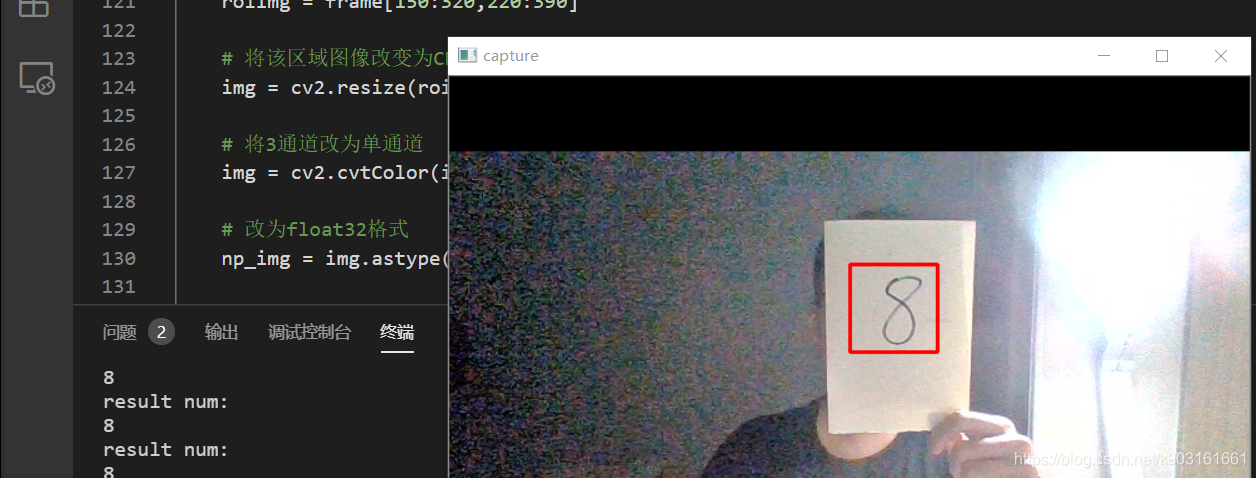
本文主要记录了通过TensorFlow对一个拥有2个卷积(池化)层和2个全连接1层的卷积神经网络对模型进行训练,再使用已训练好的模型通过OpenCV调用摄像头对手写数字进行识别的过程
本文使用的 MNIST_data 数据集如下
链接:https://pan.baidu.com/s/19QXgCJD5itp0fR6COvJO-A
提取码:acf2
准备 :
首先在有OpenCV及TensorFlow的基础上下载前文提到的数据集并将其与.py文件放置在同一文件夹下(不放的话可以像下面那样写好绝对路径),如下图 :
再创建一个文件夹用来保存模型
r"D:\anaconda\vscode-python\learn\OpenCV_and_TensorFlow\Net\Net_MNIST\
CNN训练
源码及训练结果如下 :
import tensorflow as tf
from tensorflow.examples.tutorials.mnist import input_data

# 载入数据集
mnist = input_data.read_data_sets("MNIST_data",one_hot=True)

# 每个批次的大小
batch_size = 100
# 计算一共有多少个批次
n_batch = mnist.train.num_examples // batch_size

# 权值初始化
def weight_variable(shape):
    initial = tf.truncated_normal(shape,stddev=0.1)
    # 生成一个截断的正态分布,其标准差为0.1
    return tf.Variable(initial)

# 偏置初始化
def bias_variable(shape):
    initial = tf.constant(0.1,shape=shape)
    return tf.Variable(initial)

# 卷积层
def conv2d(x,W):
    return tf.nn.conv2d(x,W,strides=[1,1,1,1],padding="SAME")
    # x为输入的tensor,其形状为[batch, in_height, in_width, in_channels],具体含义是[训练时一个batch的图片数量, 图片高度, 图片宽度, 图像通道数]
    # W为卷积核(滤波器),其形状为[filter_height, filter_width, in_channels, out_channels],具体含义是[卷积核的高度,卷积核的宽度,图像通道数,卷积核个数]
    # strides[0]和strides[3]的两个1是默认值,strides[1]代表x方向的步长,strides[2]代表y方向的步长
    # padding决定卷积方式,SAME会在外面补0

# 池化层(最大值池化)
def max_pool_2x2(x):
    return tf.nn.max_pool(x,ksize=[1,2,2,1],strides=[1,2,2,1],padding="SAME")
    # ksize[0]和ksize[3]默认为1,中间的2,2为池化窗口的大小
    # strides同conv2d,明显x,y方向的步长均为2

# 定义两个placeholder
x = tf.placeholder(tf.float32,[None,784])
y = tf.placeholder(tf.float32,[None,10])

# 改变x格式为4D的向量
x_image = tf.reshape(x,[-1,28,28,1])
# 第二个参数 : [batch, in_height, in_width, in_channels] [训练时一个batch的图片数量, 图片高度, 图片宽度, 图像通道数]
# 其中-1在程序运行后将会被赋值为100(即每批次中包含的图片的数量)

# 初始化第一个卷积层的权值和偏置
W_conv1 = weight_variable([5,5,1,32])
# 5*5的采样窗口,32个卷积核(32个平面/32个通道)从一个平面(一个通道)提取特征
b_conv1 = bias_variable([32])
# 每一个卷积核一个偏置值

# 把x_image和权值向量进行卷积,再加上偏置值,并用relu激活函数
h_conv1 = tf.nn.relu(conv2d(x_image,W_conv1) + b_conv1)
# x_image和W_conv1进行2D卷积操作再加上权值,最后输入relu激活函数

# 将第一卷积层输出进行池化
h_pool1 = max_pool_2x2(h_conv1)

# 初始化第二个卷积层的权值和偏置
W_conv2 = weight_variable([5,5,32,64]) # 5*5的采样窗口,64个卷积核从32个平面提取特征
b_conv2 = bias_variable([64]) # 每一个卷积核一个偏置值

# 把h_pool1和权值向量进行卷积,再加上偏置值,并用relu激活函数
h_conv2 = tf.nn.relu(conv2d(h_pool1,W_conv2) + b_conv2)

# 将第二卷积层输出进行池化
h_pool2 = max_pool_2x2(h_conv2)

# 说下这些卷积池化的过程(数据形状) :
#   28*28的图片第一次卷积后还是28*28(SAME padding不会改变图片的大小),第一次池化后变为14*14
#   14*14的图片第二次卷积后还是14*14,第二次池化后变为7*7
#   经上述操作后最后获得64张7*7平面

# 初始化第一个全连接层的权值
W_fc1 = weight_variable([7*7*64,1024])
# 上一层共有7*7*64个像素点,全连接层1共1024个神经元
b_fc1 = bias_variable([1024])
# 每个神经元一个偏置值

# 把池化层2的输出扁平化为1维
h_pool2_flat = tf.reshape(h_pool2,[-1,7*7*64])
# h_pool2为形状为[100(批次),7,7(高宽),64(图片或者通道数)]
# -1为任意值,计算时会处理为100
# 实际上就是将其后三个维度转化为7*7*64这一个维度

# 求第一个全连接层的输出
h_fc1 = tf.nn.relu(tf.matmul(h_pool2_flat,W_fc1) + b_fc1)

# 用keep_prob来表示神经元的输出概率(dropout)
keep_prob = tf.placeholder(tf.float32)
h_fc1_drop = tf.nn.dropout(h_fc1,keep_prob)

# 初始化第二个全连接层
W_fc2 = weight_variable([1024,10])
b_fc2 = bias_variable([10])

# 计算输出
prediction = tf.nn.softmax(tf.matmul(h_fc1_drop,W_fc2) + b_fc2)

# 交叉熵代价函数
cross_entropy = tf.reduce_mean(tf.nn.softmax_cross_entropy_with_logits(labels=y,logits=prediction))
# 使用AdamOptimizer进行优化
train_step = tf.train.AdamOptimizer(1e-4).minimize(cross_entropy)
# 结果存放在一个bool型列表中
correct_prediction = tf.equal(tf.argmax(prediction,1),tf.argmax(y,1)) # argmax返回一维张量中最大值所在的位置
# 求准确率
accuracy = tf.reduce_mean(tf.cast(correct_prediction,tf.float32))

saver = tf.train.Saver()

with tf.Session() as sess:
    sess.run(tf.global_variables_initializer())
    for epoch in range(11):
        for batch in range(n_batch):
            # 传入数据
            batch_xs,batch_ys =  mnist.train.next_batch(batch_size)
            # 用70%的神经元训练网络(dropout)
            sess.run(train_step,feed_dict={x:batch_xs,y:batch_ys,keep_prob:0.7})

        # 运行100%的神经元来检测网络准确率
        acc = sess.run(accuracy,feed_dict={x:mnist.test.images,y:mnist.test.labels,keep_prob:1.0})
        # 输出
        print ("Iter " + str(epoch) + ", Testing Accuracy= " + str(acc))

    saver.save(sess, r"D:\anaconda\vscode-python\learn\OpenCV_and_TensorFlow\Net\Net_MNIST\my_net.ckpt")


# 输出结果
'''
Iter 0, Testing Accuracy= 0.9488
Iter 1, Testing Accuracy= 0.9667
Iter 2, Testing Accuracy= 0.9757
Iter 3, Testing Accuracy= 0.9786
Iter 4, Testing Accuracy= 0.9837
Iter 5, Testing Accuracy= 0.9829
Iter 6, Testing Accuracy= 0.9851
Iter 7, Testing Accuracy= 0.9859
Iter 8, Testing Accuracy= 0.9889
Iter 9, Testing Accuracy= 0.9887
Iter 10, Testing Accuracy= 0.9896
'''
这里因为网络基本已经收敛且效果不错故而不再进行过多训练(CPU表示很赞)
关于CNN,提供下我之前的一篇博客: tensorflow学习笔记 + 程序 (五)CNN与MNIST数据集
里面还有该网络模型进行可视化的一些效果,另外关于Tensorboard可视化,我之前的一篇博客也进行了相关介绍 : tensorflow学习笔记 + 程序 (四)tensorboard可视化
收获
emmmm…确切说上一步的收获就是下面这4个文件(前文的路径下)
关于文件保存和载入提供两篇文章 :
tensorflow保存和恢复模型的两种方法介绍
Tensorflow学习笔记-模型保存与加载
OpenCV+TensorFlow联用
源码如下 :
import tensorflow as tf
from cv2 import cv2
import numpy as np

# 权值初始化
def weight_variable(shape):
    initial = tf.truncated_normal(shape,stddev=0.1)
    # 生成一个截断的正态分布,其标准差为0.1
    return tf.Variable(initial)

# 偏置初始化
def bias_variable(shape):
    initial = tf.constant(0.1,shape=shape)
    return tf.Variable(initial)

# 卷积层
def conv2d(x,W):
    return tf.nn.conv2d(x,W,strides=[1,1,1,1],padding="SAME")

# 池化层(最大值池化)
def max_pool_2x2(x):
    return tf.nn.max_pool(x,ksize=[1,2,2,1],strides=[1,2,2,1],padding="SAME")

# 网络模型
def network(x):

    # 改变x格式为4D的向量
    x_image = tf.reshape(x,[-1,28,28,1])

    # 把x_image和权值向量进行卷积,再加上偏置值,并用relu激活函数
    h_conv1 = tf.nn.relu(conv2d(x_image,W_conv1) + b_conv1)

    # 将第一卷积层输出进行池化
    h_pool1 = max_pool_2x2(h_conv1)

    # 把h_pool1和权值向量进行卷积,再加上偏置值,并用relu激活函数
    h_conv2 = tf.nn.relu(conv2d(h_pool1,W_conv2) + b_conv2)

    # 将第二卷积层输出进行池化
    h_pool2 = max_pool_2x2(h_conv2)

    # 把池化层2的输出扁平化为1维
    h_pool2_flat = tf.reshape(h_pool2,[-1,7*7*64])

    # 求第一个全连接层的输出
    h_fc1 = tf.nn.relu(tf.matmul(h_pool2_flat,W_fc1) + b_fc1)

    # 使用drop
    h_fc1_drop = tf.nn.dropout(h_fc1,keep_prob)

    # 计算输出
    prediction = tf.nn.softmax(tf.matmul(h_fc1_drop,W_fc2) + b_fc2)

    return prediction


# 定义两个placeholder
x = tf.placeholder(tf.float32,[None,784])
y = tf.placeholder(tf.float32,[None,10])

# 初始化第一个卷积层的权值和偏置
W_conv1 = weight_variable([5,5,1,32])
b_conv1 = bias_variable([32])

# 初始化第二个卷积层的权值和偏置
W_conv2 = weight_variable([5,5,32,64])
b_conv2 = bias_variable([64])

# 初始化第一个全连接层的权值
W_fc1 = weight_variable([7*7*64,1024])
b_fc1 = bias_variable([1024])

# 用keep_prob来表示神经元的输出概率(dropout)
keep_prob = tf.placeholder(tf.float32)

# 初始化第二个全连接层
W_fc2 = weight_variable([1024,10])
b_fc2 = bias_variable([10])

# 开启会话并导入模型
sess = tf.InteractiveSession()
saver = tf.train.Saver()
saver.restore(sess, r"D:\anaconda\vscode-python\learn\OpenCV_and_TensorFlow\Net\Net_MNIST\my_net.ckpt")

# 开启摄像头
cap = cv2.VideoCapture(0)

while(1):

    # 读取摄像头
    ret, frame = cap.read()

    # 在图像上绘制矩形框(红色)
    cv2.rectangle(frame,(320,150),(390,220),(0,0,255),2)
    cv2.imshow("capture", frame)

    # 确定ROI
    roiImg = frame[150:320,220:390]

    # 将该区域图像改变为CNN输入格式
    img = cv2.resize(roiImg,(28,28))

    # 将3通道改为单通道
    img = cv2.cvtColor(img, cv2.COLOR_BGR2GRAY)

    # 改为float32格式
    np_img = img.astype(np.float32)

    # 连接网络
    netoutput = network(np_img)

    # 获取网络输出
    prediction = sess.run(netoutput,feed_dict={keep_prob:1.0})

    # 转换为列表并取结果
    predicts = prediction.tolist()
    label = predicts[0]
    result = label.index(max(label))
    print('result num:')
    print(result)

    if cv2.waitKey(1) & 0xFF == ord('q'):
        break

cap.release()
cv2.destroyAllWindows()
效果
看上去还不错
参考链接 :
通过摄像头捕获图像用tensorflow做手写数字识别


