我认为比较容易制作的启动盘是从SD卡启动,但实际中很需要直接从QSPI启动。
那么本文是在制作从SD卡的基础上完成的。如果你有不清楚,那就先看看我的另篇博客 petalinux 2018.2 在ubuntu 16 下的工程制作并启动实验 链接是:https://blog.csdn.net/leon_zeng0/article/details/82766521
那篇文章介绍从SD 启动的制作过程。
与从SD启动不同的只有2点:参数设置,打包下载。
1: 参数设置通过运行 petalinux-config 来实现。设置的内容就是从QSPI启动,媒介存在QSPI。
在Linux计算机上运行以下步骤,将引导模式更改为QSPI闪存(以下操作参见ug1167 page82)。
a: 切换到PetaLinux项目的根目录:
$ cd <plnx-proj-root>
b: 启动顶级系统配置菜单:
$ petalinux-config
c: 选择子系统AUTO硬件设置(Subsystem AUTO Hardware Settings)。
d: 选择“高级可启动映像存储设置”(Advanced Bootable Images Storage Settings)。
- 选择启动映像设置(boot image settings)。
- 选择图像存储介质(Image Storage Media)。
- 选择启动设备作为主闪存(primary flash)。
e: 在“高级可启动映像存储设置”子菜单下:
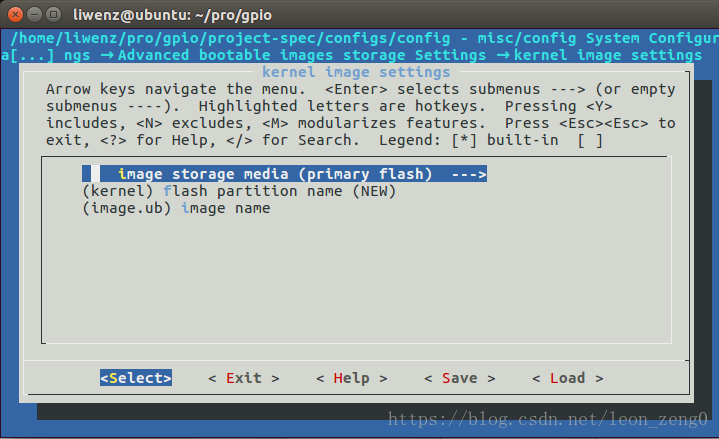
- 选择内核映像设置(kernel image settings).。
- 选择图像存储介质(Image Storage Media)。
- 选择存储设备作为主闪存(primary flash)。
f: 保存配置设置并退出配置向导。
g: 使用Petalinux-build命令重建
以下就用图来表示:
上面就是设置的一些界面。
2:设置完后按照SD卡启动盘制作过程一样编译, petalinux-build
或者分几步完成:
petalinux-config -c bootloader
petalinux-build -c bootloader
petalinux-config -c u-boot
petalinux-build -c u-boot
petalinux-build
3: 打包 petalinux-package
3.1:打包有2种方式,一种和SD卡制作打包一样
petalinux-package --boot --fsbl <FSBL image> --fpga <FPGA bitstream> --u-boot
这种方式不包括 imag.ub
操作示例如下:我这里是先cd ~/pro/gpio/images/linux,否则要加路径。
liwenz@ubuntu:~/pro/gpio/images/linux$ petalinux-package --boot --fsbl zynq_fsbl.elf --fpga system.bit --u-boot
INFO: Getting system flash information...
rlwrap: warning: your $TERM is 'xterm-256color' but rlwrap couldn't find it in the terminfo database. Expect some problems.: Inappropriate ioctl for device
INFO: File in BOOT BIN: "/home/liwenz/pro/gpio/images/linux/zynq_fsbl.elf"
INFO: File in BOOT BIN: "/home/liwenz/pro/gpio/images/linux/system.bit"
INFO: File in BOOT BIN: "/home/liwenz/pro/gpio/images/linux/u-boot.elf"
INFO: Generating zynq binary package BOOT.BIN...
****** Xilinx Bootgen v2018.2
**** Build date : Jun 14 2018-20:09:18
** Copyright 1986-2018 Xilinx, Inc. All Rights Reserved.
INFO: Binary is ready.
liwenz@ubuntu:~/pro/gpio/images/linux$
3.2:还有一种方式就是包含imag.ub, 命令如下:
petalinux-package --boot --fsbl <FSBL image> --fpga <FPGA bitstream> --u-boot --kernel
包含imag.ub 的方式不同点就是 后面多了 --kernel 这个option。
操作示例如下:我这里是先cd ~/pro/gpio/images/linux,否则要加路径。
liwenz@ubuntu:~/pro/gpio/images/linux$ petalinux-package --boot --fsbl zynq_fsbl.elf --fpga system.bit --u-boot --kernel
INFO: Getting system flash information...
rlwrap: warning: your $TERM is 'xterm-256color' but rlwrap couldn't find it in the terminfo database. Expect some problems.: Inappropriate ioctl for device
INFO: File in BOOT BIN: "/home/liwenz/pro/gpio/images/linux/zynq_fsbl.elf"
INFO: File in BOOT BIN: "/home/liwenz/pro/gpio/images/linux/system.bit"
INFO: File in BOOT BIN: "/home/liwenz/pro/gpio/images/linux/u-boot.elf"
INFO: File in BOOT BIN: "/home/liwenz/pro/gpio/images/linux/image.ub&#


